

 75 914 Laguna Blue Project |
|
|

|
Porsche, and the Porsche crest are registered trademarks of Dr. Ing. h.c. F. Porsche AG.
This site is not affiliated with Porsche in any way. Its only purpose is to provide an online forum for car enthusiasts. All other trademarks are property of their respective owners. |
|
|
  |
| Graydingo |
 Aug 6 2026, 03:43 PM
Post
#61
|
|
Member  Group: Members Posts: 105 Joined: 12-August 22 From: Las Vegas Member No.: 26,768 Region Association: Southwest Region  |
Here's the bumper fitment, It's actually touching both sides:
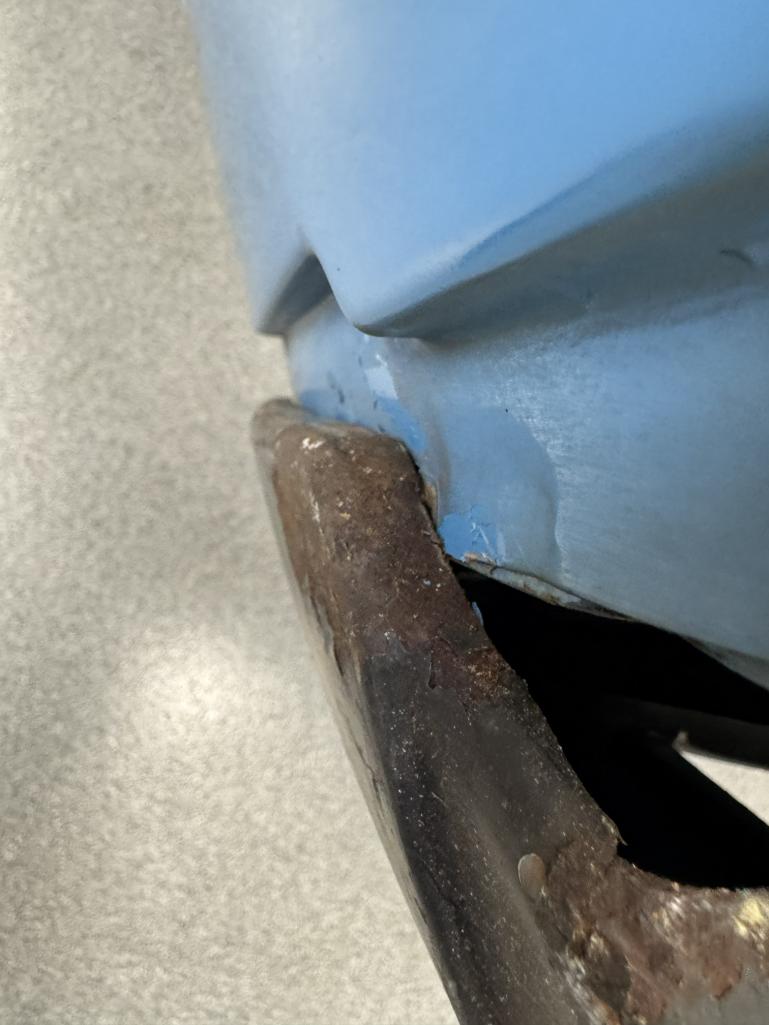 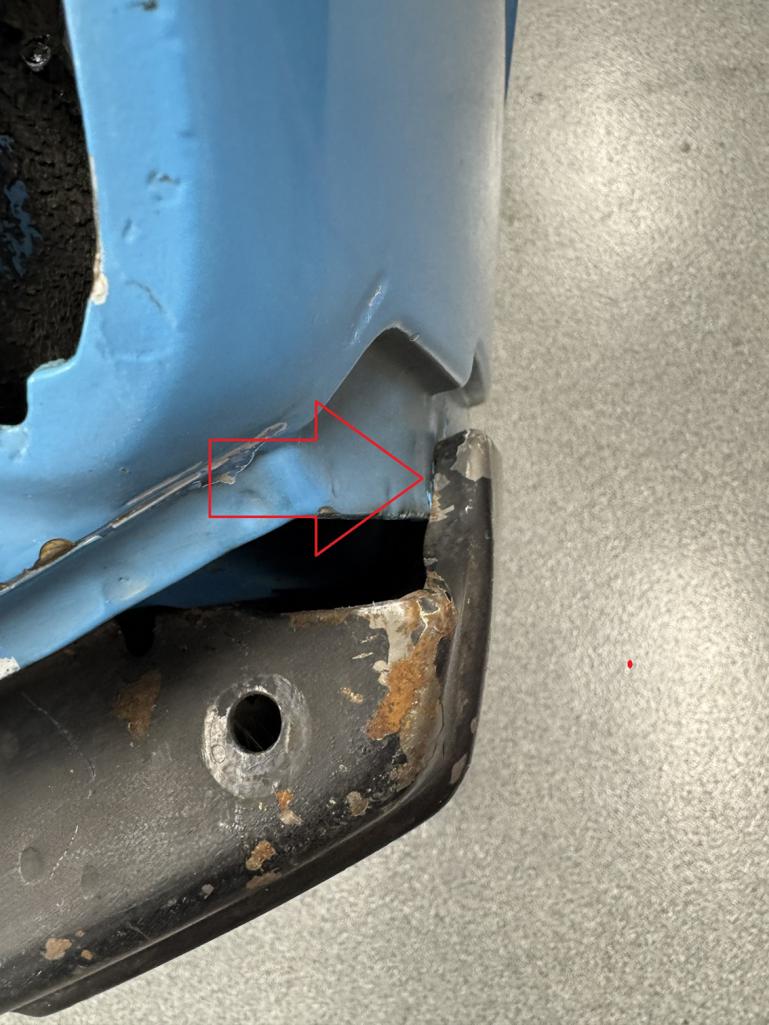 After measuring the front suspension points from the workshop manual, its off side to side by maybe 1/16" which is in tolerance. So I'm wondering how close these fenders should be to the bumper. I don't have the bumpers mounted yet, I was mainly using the valance as a reference since i have the later 75 front section with no mounting points for the steel bumper. (That will be another bonus of replacing the front to the earlier bit. |
   |

 
|
| friethmiller |
Aug 6 2026, 03:57 PM
Post
#62
|
|
Senior Member Group: Members Posts: 1,587 Joined: 10-February 19 From: Austin, TX Member No.: 22,863 Region Association: Southwest Region 
|
QUOTE(Graydingo @ Aug 6 2026, 04:43 PM)  So I'm wondering how close these fenders should be to the bumper. @Graydingo - Not sure on the measurements however I've found that the bumper ends tend to migrate inward over time. My theory is that it is caused by mailboxes, fire hydrants, and garage walls. (IMG:style_emoticons/default/biggrin.gif) I've had good luck cutting, pulling, and re-welding these ends to get the proper clearance. UPDATE: I meant Bumper not Fender ends. Corrected above. |
 |
|
| Graydingo |
Aug 6 2026, 04:34 PM
Post
#63
|
|
Member Group: Members Posts: 105 Joined: 12-August 22 From: Las Vegas Member No.: 26,768 Region Association: Southwest Region |
Good call Fred. I think the drv side migrated outward, hence the too tight fitment. Wondering what the clearance should be between the steel bumper and the fender, assuming my bumper didn't shrink when the GT mouth was added and it somehow pulled the tips in. Hmmm just thought of that possibility.
I'm looking at a set of donor cars that have extra bumpers. If I end up getting another bumper I'll have another point of reference. |
|
|
|
| Graydingo |
Sep 6 2026, 02:17 PM
Post
#64
|
|
Member Group: Members Posts: 105 Joined: 12-August 22 From: Las Vegas Member No.: 26,768 Region Association: Southwest Region |
A few highlights.
- Bought harbor freight "pinch weld" dollies. Seemed like a good alternative to building a dolly. Metal is expensive right now and the time and effort to build it would have been a week for me. For $400 I got 4 of these tripod dollies to move the car around the shop instead of it living on the quick jack. I want to build the RS 2.7 motor so I can stick it in my 911 until the 914 is ready. The 911 motor is tired with the original 170k miles on it. - removed front part of trunk entirely. About 100 spot welds. Also had a nice 6 hours in the ER. I was feeling a spot weld and the new bit went through quicker than I thought... 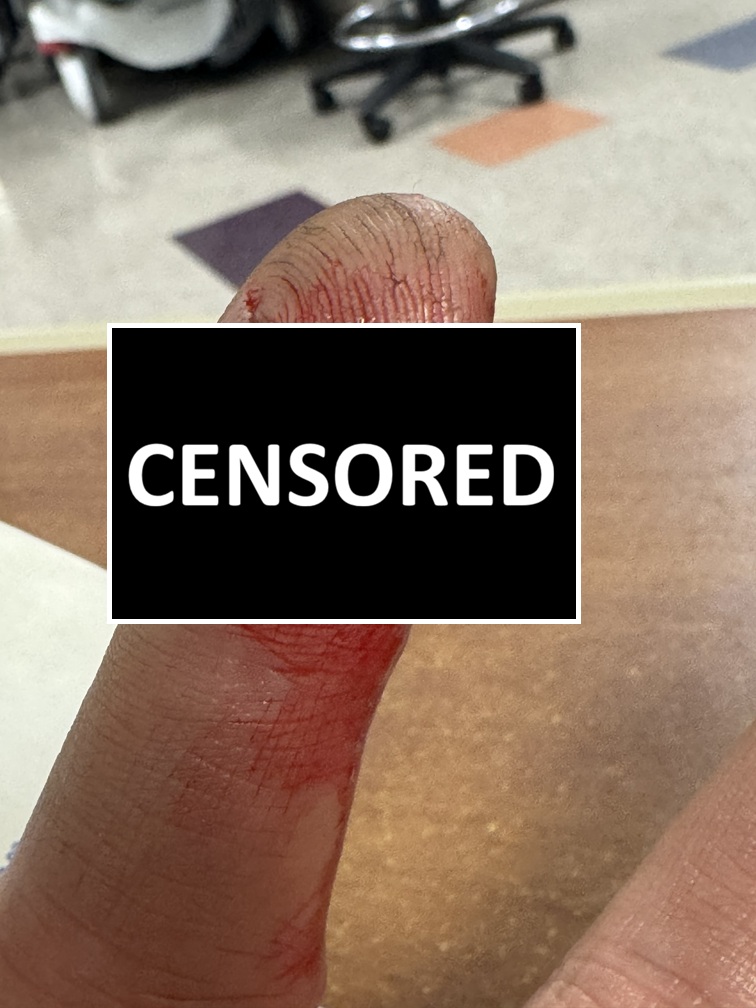 Passed through my finger tip all the way out the other side. 3/16" bit! ouch. Fragmented some bone which will stay there forever. 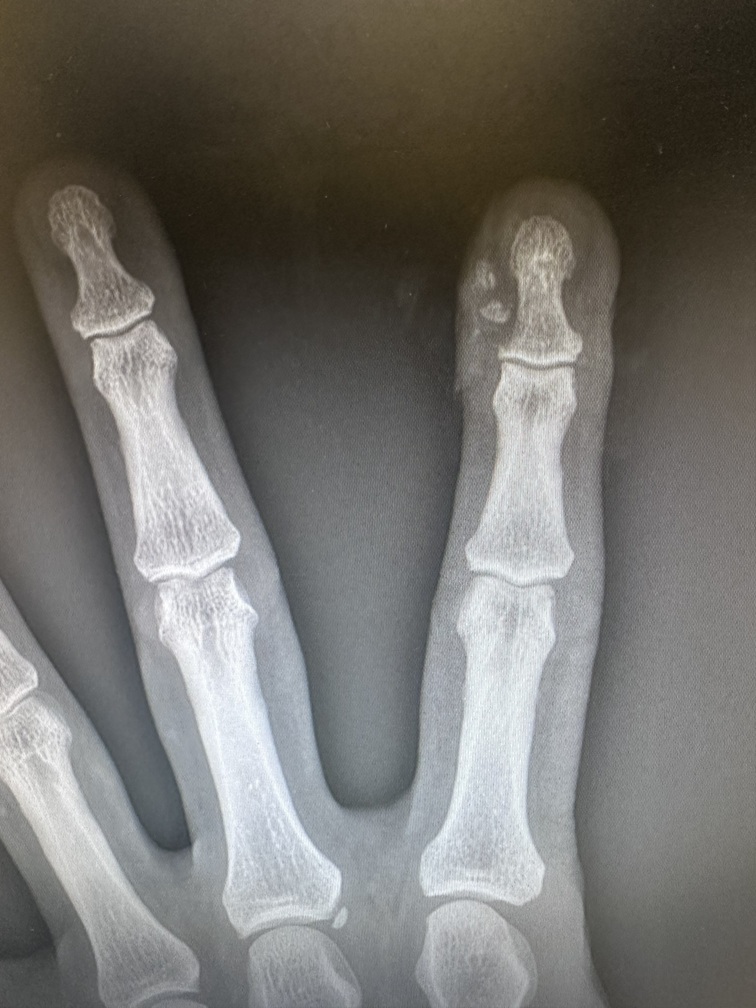 - Test fit the Restoration Design 72-74 front panel that I bought. Found out the hard way that the headlight bucket design changed in 75. So now I either have to modify the remaining bucket and graft the 74 donor bucket in or modify the removed drivers side. Did I mention I bought two more 914s? not sure if I did or not. 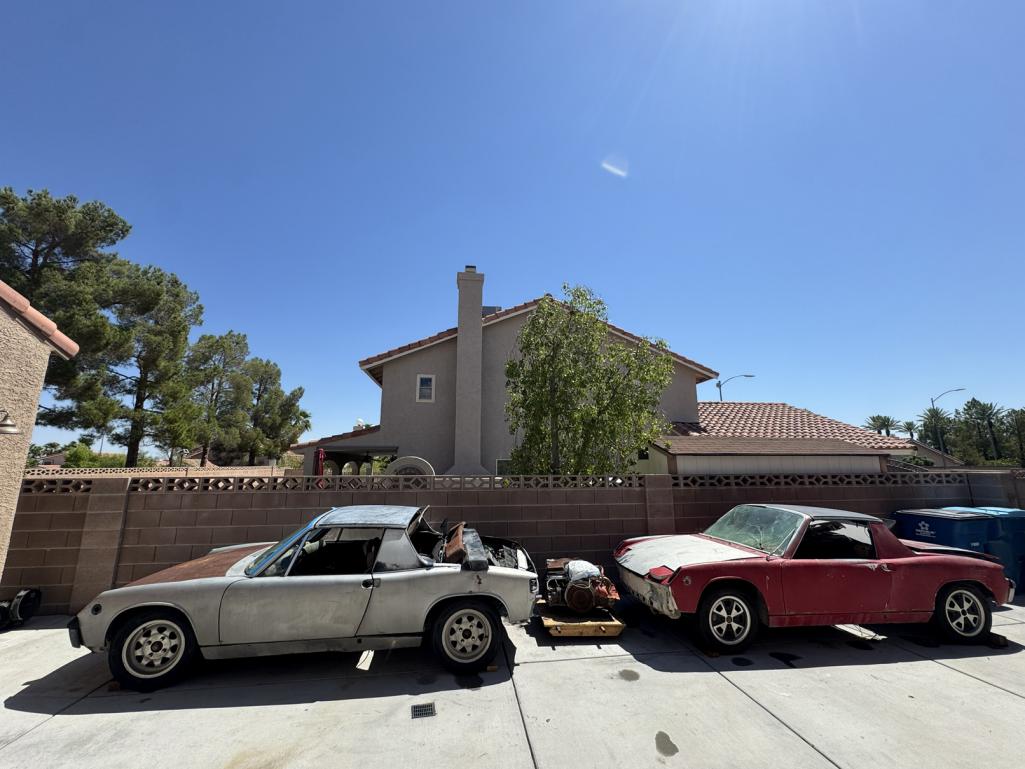 Great deal as they came with a bunch of parts including another set of trailing arms since PMS said my pair off my 75 were bent. I sent them pics of the extra set that was laying in the trunk of the 72 and they said they looked bent too. So then I went on a crazy odyssey of trying to figure out what constitutes a bent 914 trailing arm. I spoke with a bunch of notable 914 peeps and they seemed to think that a visibly bent trailing arm was pretty hard to identify. I also met a gentleman on FB that built a jig to test trailing arm dimensions. His findings are that they vary about 1 degree in terms of the pivot shaft in relation to the hub (which is approximately 12.5 degrees +- 1 degree. All that and I decided I want my trailing arms back from PMS as they don't really want to do the job it seems. I also decided against boxing them. It's not a track car. I don't need the extra unsprung weight and after speaking with a lot of folks who have been doing this way longer than me, they all seemed to agree that if they bend, it's usually the mounting ears or the pivot shaft is bent. Not the arm itself. Anyway the light ivory 72 is for sale in the classifieds. Good project base imho. I also found that the support pieces in the trunk are different on all three examples! The 72, the 74, and the 75 all have different reinforcement bits on the lower wheel well. So my choices are fix the 75 pieces, pull the 74 pieces and weld them in, or sack the 72 and part it out for the best support pieces. hardly seems worth that last option. 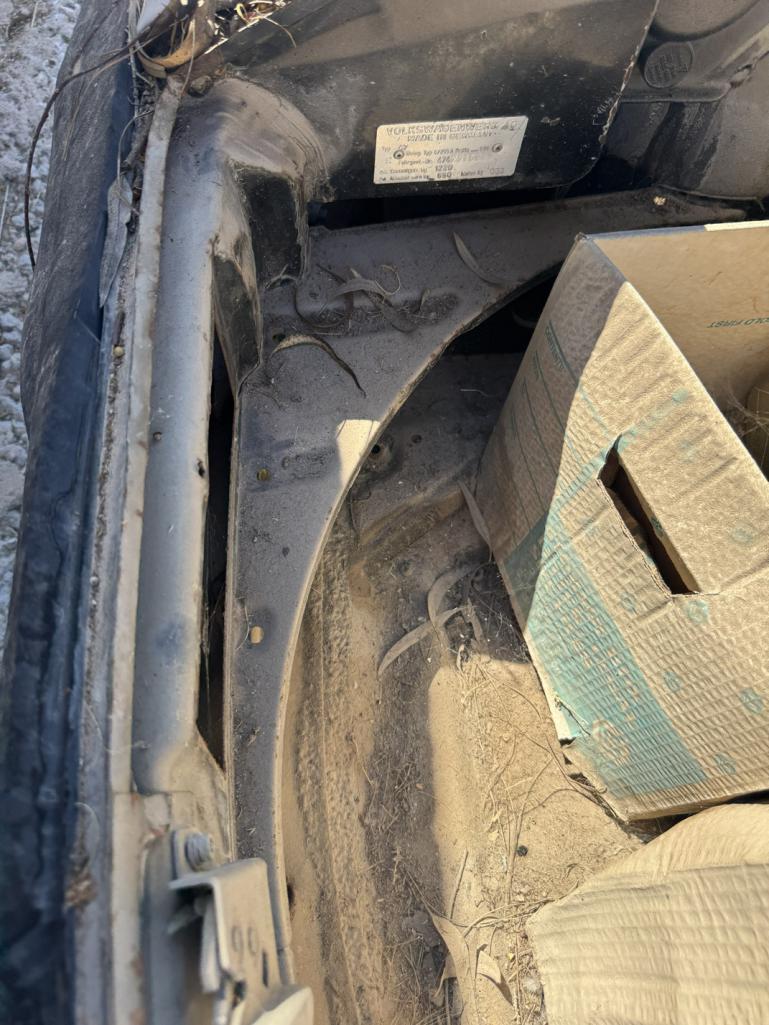 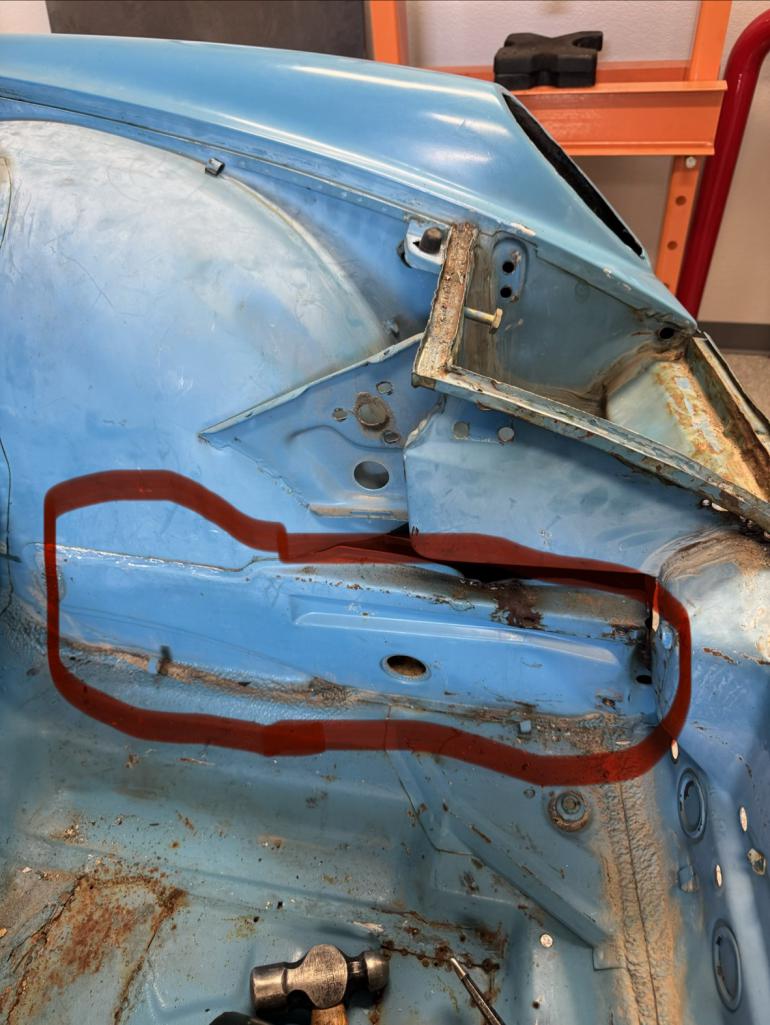 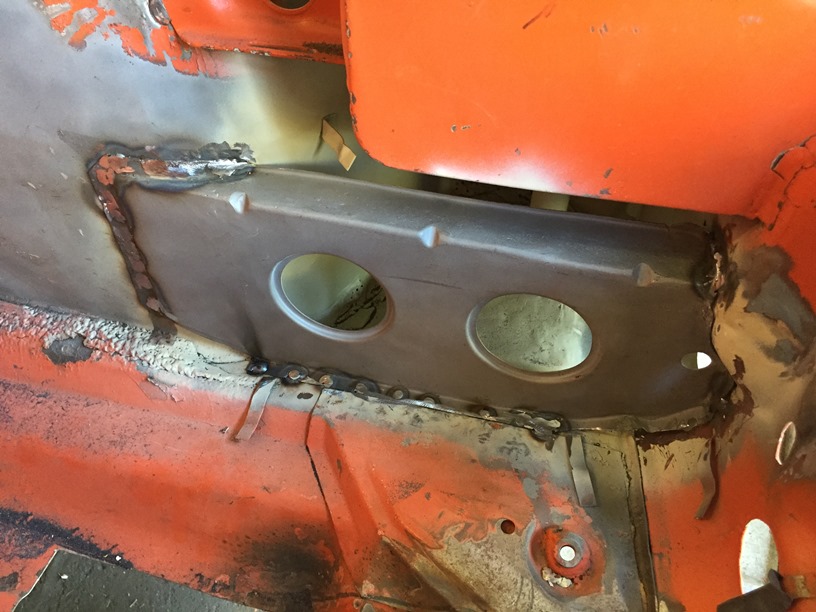 Not sure what I'm going to do there. The 74 has no title, so maybe I'll cut out those bits and move them over. The 72 is listed on the for sale classifieds if anyone is looking for a very dry project car. lastly, does anyone know what size tubing this is? Not that it has to be exact but what have you used if you done the GT cooler reinforcements? 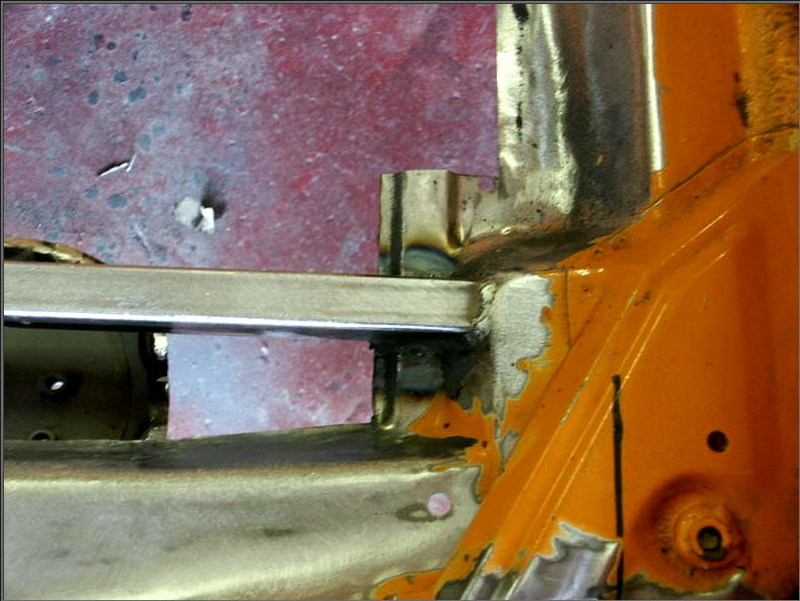 |
|
|
|
| Graydingo |
Sep 6 2026, 02:23 PM
Post
#65
|
|
Member Group: Members Posts: 105 Joined: 12-August 22 From: Las Vegas Member No.: 26,768 Region Association: Southwest Region |
check out this cool RPM gauge I found in one of the donor cars
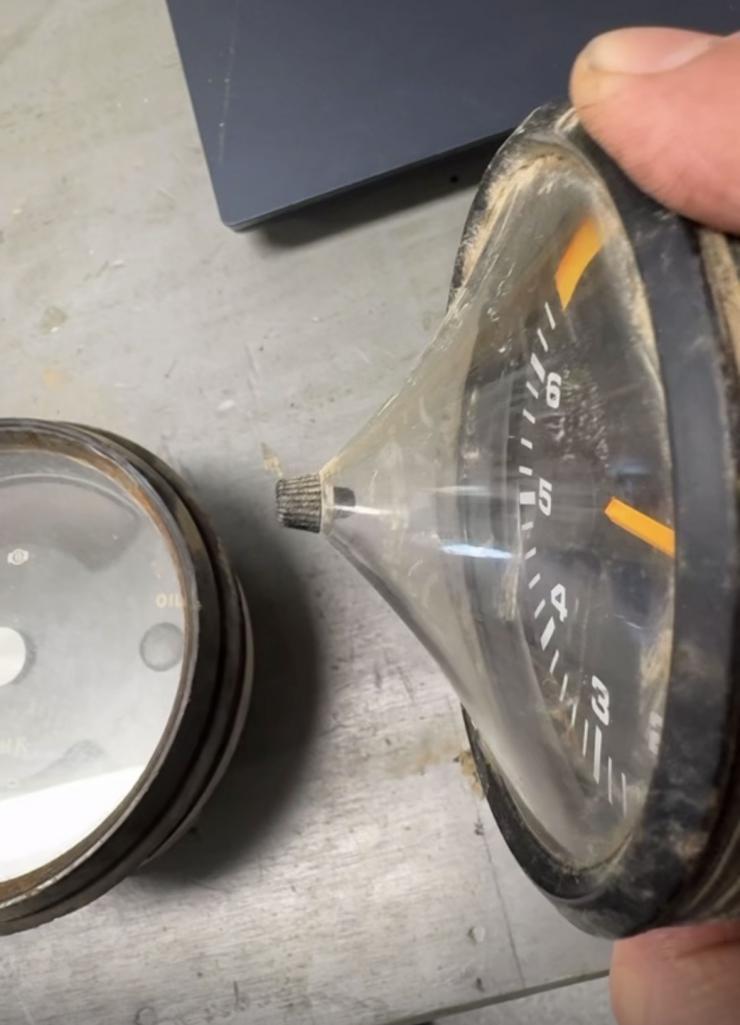 Anyone seen one of these before? 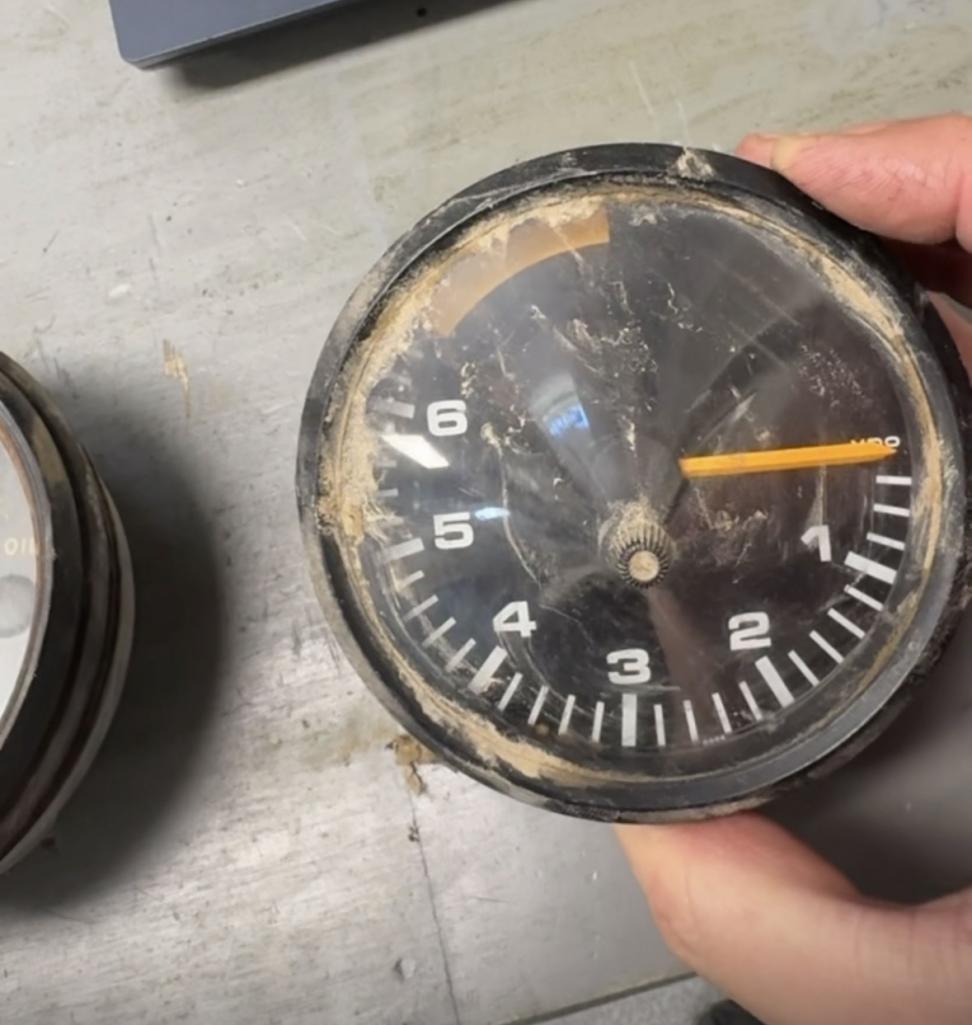 It's a real VDO 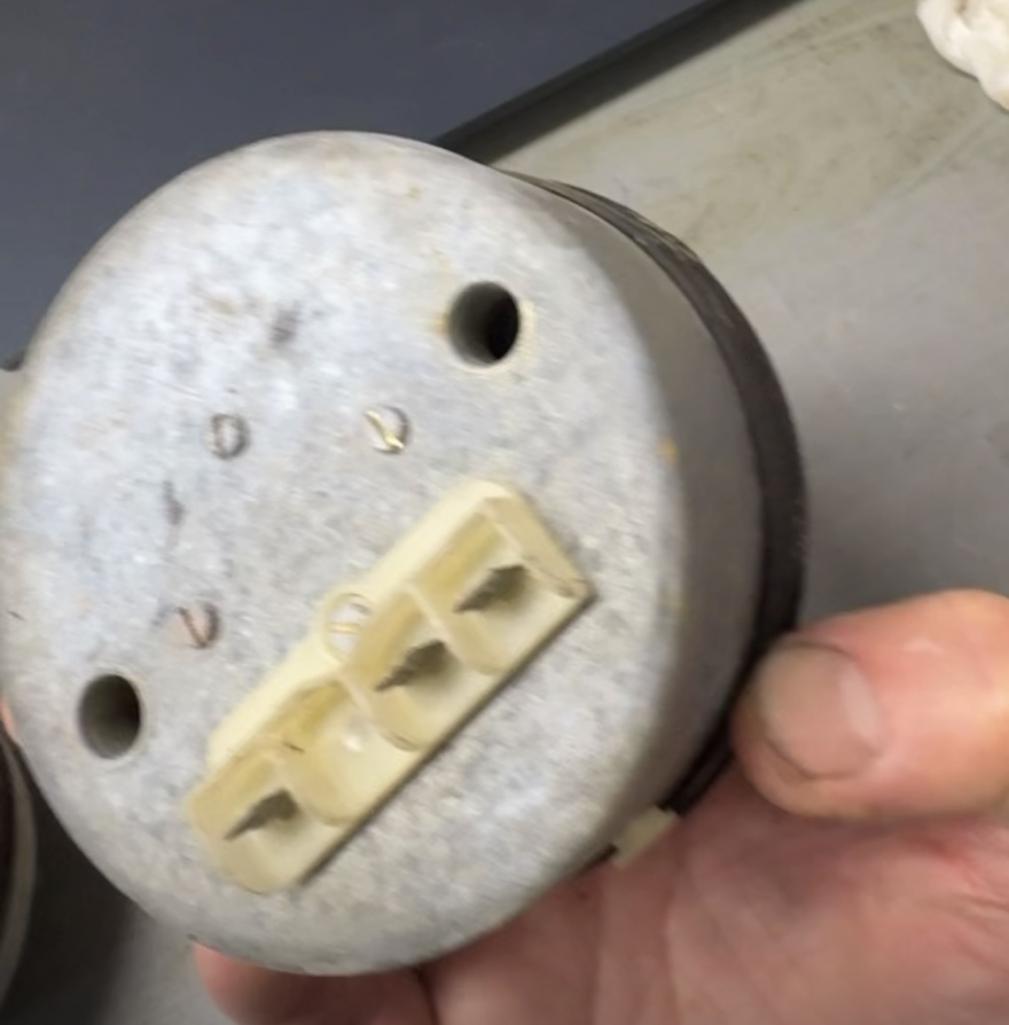 |
|
|
|
| porschetub |
Sep 6 2026, 03:55 PM
Post
#66
|
|
914 Guru Group: Members Posts: 5,189 Joined: 25-July 15 From: New Zealand Member No.: 18,995 Region Association: None |
QUOTE(Graydingo @ Sep 7 2026, 08:23 AM) check out this cool RPM gauge I found in one of the donor cars Anyone seen one of these before? It's a real VDO Series 1 944 or 924 originally, I think the gauge can be changed for a 914 glass or plastic flat one ,cheers. |
|
|
|
| tygaboy |
Sep 7 2026, 09:42 AM
Post
#67
|
|
914 Guru Group: Members Posts: 5,859 Joined: 6-October 15 From: Petaluma, CA Member No.: 19,241 Region Association: Northern California
|
@Graydingo - Sorry to hear about your injury. That had to hurt. Good to see it appears not to have slowed you down. On the "what size tubing is that?" question, I'd use 1" x 1" and probably .095" wall thickness. It should be in stock at your local metal store, though mine only sells in 20' lengths, unless you can find a remnant.
McMaster Carr will sell you short lengths but they aren't the cheapest and they charge a lot for shipping. Anyway, hope that helps and heal up soon! |
|
|
|
| Graydingo |
Sep 7 2026, 09:09 PM
Post
#68
|
|
Member Group: Members Posts: 105 Joined: 12-August 22 From: Las Vegas Member No.: 26,768 Region Association: Southwest Region |
QUOTE(tygaboy @ Sep 7 2026, 08:42 AM) @Graydingo - Sorry to hear about your injury. That had to hurt. Good to see it appears not to have slowed you down. On the "what size tubing is that?" question, I'd use 1" x 1" and probably .095" wall thickness. It should be in stock at your local metal store, though mine only sells in 20' lengths, unless you can find a remnant. McMaster Carr will sell you short lengths but they aren't the cheapest and they charge a lot for shipping. Anyway, hope that helps and heal up soon! Thanks!! I was thinking it was bigger than that, so appreciate the clarification. Yes, finger is healing nicely. Still a bit tingly and sensitive. Good reminder to really be safety conscious in the shop. Love the Red Barn videos BTW. Your custom fabrication skills are excellent. |
|
|
|
| Graydingo |
Sep 9 2026, 06:19 AM
Post
#69
|
|
Member Group: Members Posts: 105 Joined: 12-August 22 From: Las Vegas Member No.: 26,768 Region Association: Southwest Region |
Major front end repair continues.
-Removed right side impact bumper reinforcement. no rust underneath. The downside on this car was the hidden front end damage. The upside is it continues to be a Mohave desert queen - like almost zero rust discovered so far. -discovered that 75, 76 headlight buckets are different than early buckets. Where it meets the front nose panel, it jogs out on the front where it meets up with and welds to the front panel. 74 and earlier seem to be flat here. -Since pulling the passenger bucket would be a lot of work, I simply flattened that jog on the existing bucket. Sorry no pics, but if you have instagram, I'm usually posting videos daily on this stuff @duanewik -Did a few test fits of the restoration design nose panel. I chose the 71-74 panel to make backdating the bumper easier and to replace the damaged 75 panel that was crunched on the drivers side. - played around in chatGPT to try to make a graphic that explained differences in the front sheet metal by year to maybe help someone in the future. Please excuse the AI slop, i played with it for an hour and it refused to follow my instructions, but I think i can make a better one using a different graphic program. Chatgpt is horrible for making images. I probably need a plugin or something. so please excuse the myriad errors visually and probably otherwise. 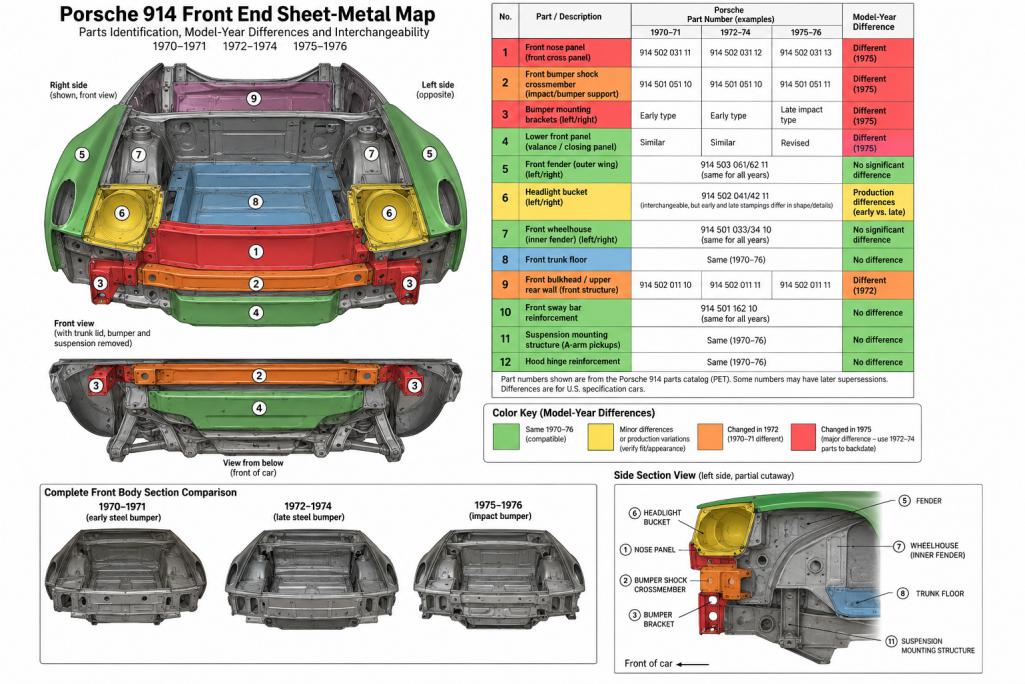 This is my 10th revision, but still goofy in a lot of ways: 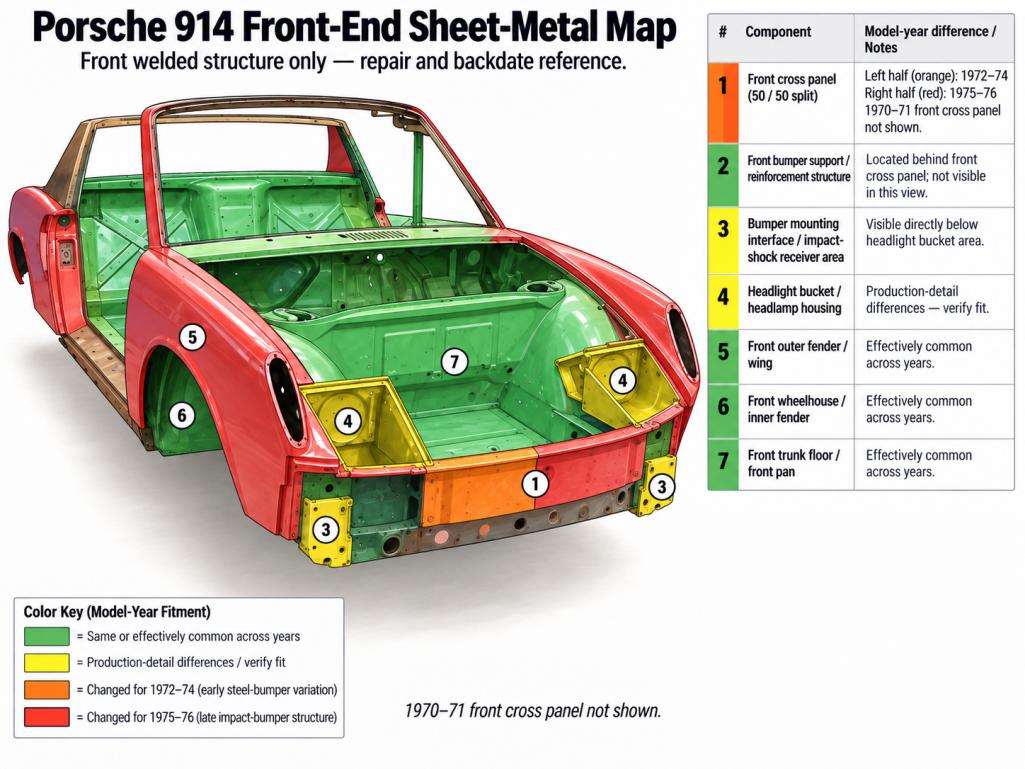 The fenders should be green, but since the reference photo was red, the AI blew a circuit. Anytime I tried to correct it it came up with more goofy iterations like making the headlight buckets round, or mixing the turns with headlights or just adding random car parts lol. I also ordered the front cooler from PMB. I still need to buy the shroud for the GT cooler and the bottom piece -maybe the one from PMS as I like the vented style. I did have a 3am realization that maybe I need a fan on my cooler. It really helps here in Las Vegas on my 911 to have the auto sucker fan on my front cooler. So maybe I build my own shroud that has three small sucker fans. so that way if the car isn't moving I still have cooling. |
|
|
|
| Cairo94507 |
Sep 9 2026, 08:30 AM
Post
#70
|
|
Michael Group: Members Posts: 10,790 Joined: 1-November 08 From: Auburn, CA Member No.: 9,712 Region Association: Northern California
|
Hi Duana - Yikes! That finger injury was painful I bet. Glad it does not appear to have slowed you down in the least.
I see you are going with a 2.7 in your car, in Las Vegas. Temperartures in air-cooled cars is always a concern. I would recommend you consider adding some fans, 3, to your cooler as well as a thermal switch to turn them on automatically. I sourced my stuff from SetRab and it works beautifully. I also wired in a traditional switch to turn the fans on/off so if I enter stopped traffic, I can switch them on before the temperature climbs. I originally had the PMS GT oil cooler they spec. for our GT oil cooler systems. I also had a shroud that ducted the air out the frunk floor. I was not running fans with that set-up with my 3.2. I was also only using the 5 nose plug holes for inlet air. When we swapped the 3.6 in we ended up going with the PMS GT RS oil cooler, about 30% more area, 3 5" fans, and a new shroud. We also opened the nose up by connecting the 5 plug holes. I am happy to say that my car, even sitting in heavy stop 'n go traffic, rarely ever climbs over 200 degrees. When the fans turn on, you can not hear it in the cabin. Good luck as you continue making progress on a great build. Michael (IMG:style_emoticons/default/beerchug.gif) |
|
|
|
| Graydingo |
Sep 17 2026, 07:17 AM
Post
#71
|
|
Member Group: Members Posts: 105 Joined: 12-August 22 From: Las Vegas Member No.: 26,768 Region Association: Southwest Region |
Last week I stopped off at Bill Rader Motorsports here in Las Vegas.
Bill surprised me with the amount of work that has been done on the 901 box. It was way further along than I thought as I had told him there wasn't any particular hurry. Check out the beautiful cerekote finish he did for me! 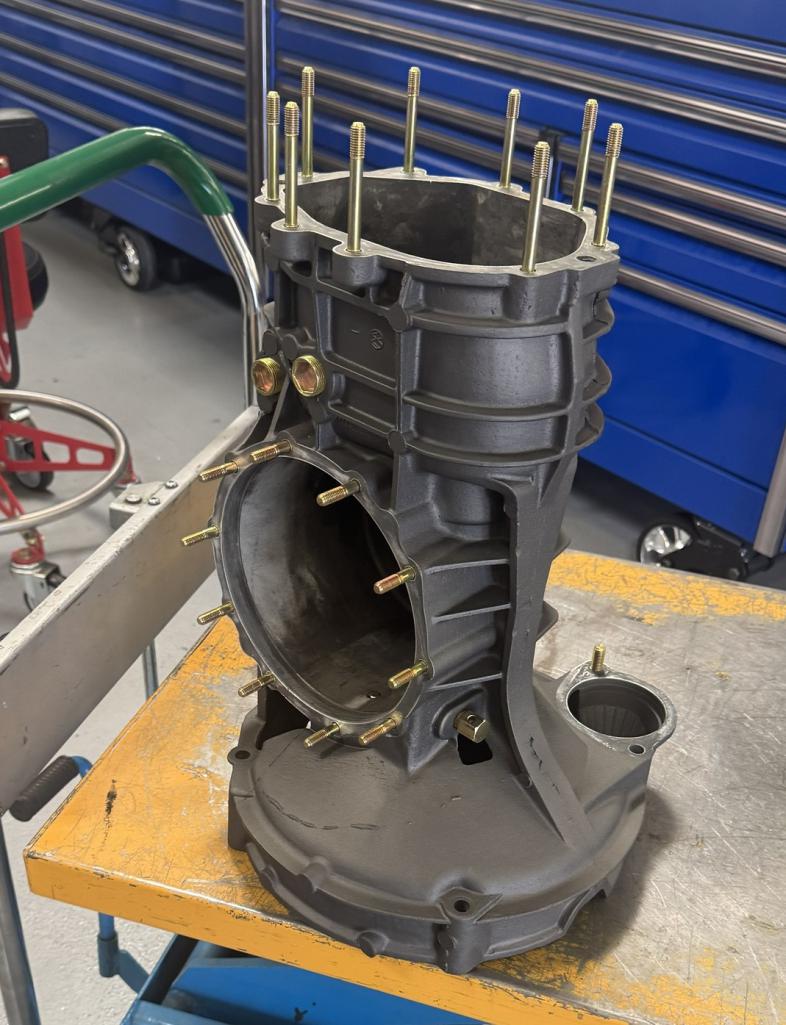 Astute readers may remember I sent my case to Cali last year to have Childs motorsports dip the case and do a protective black chromate coating. When I dropped off that box to Bill, I had already disassembled it and knew that the pinion gear was trashed. I bought a $300 901 side shift out of California for parts and brought it along with me to Bill's. After looking both boxes over Bill concluded the $300 box was far superior. Not to say that the other box was bad, but this one was nicer so we opted to use that box instead. Bill had asked if I wanted to plate the hardware as well and I opted for that service too. 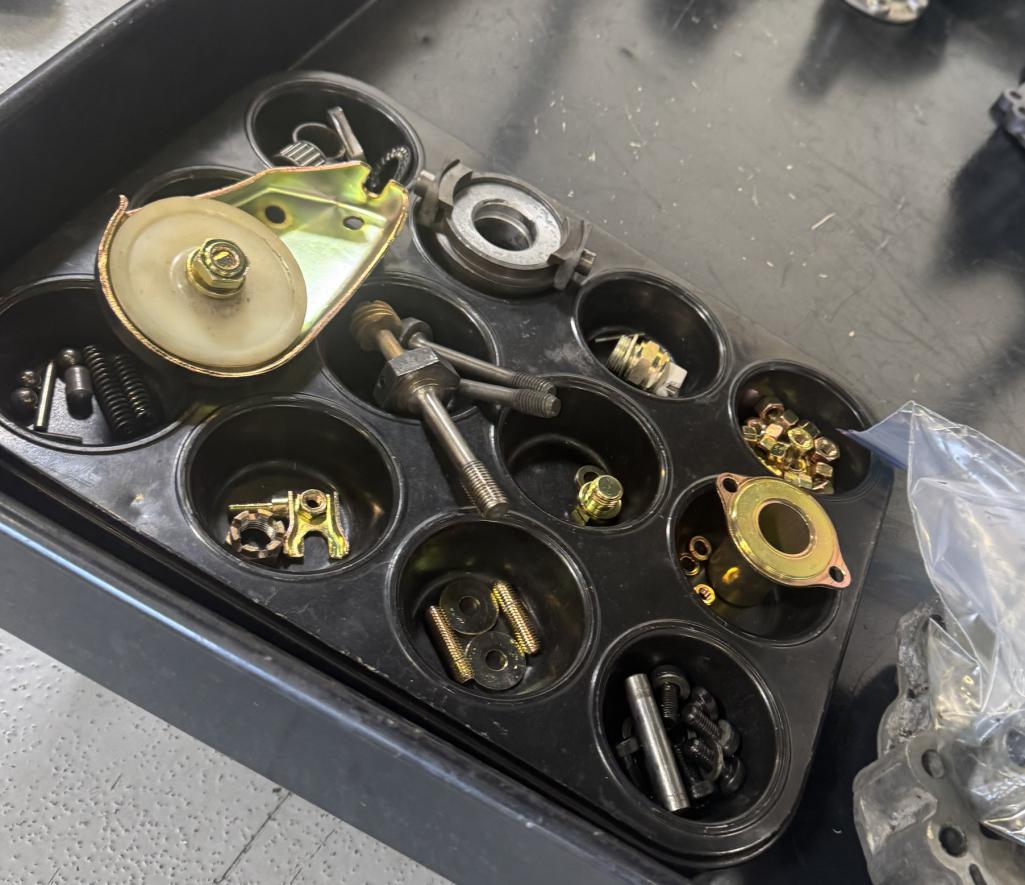 We also added the CMS intermediate plate and side plates and had them cerekoted to match. This will give the 901 much needed added strength for the pepped up 2.7 flat 6. 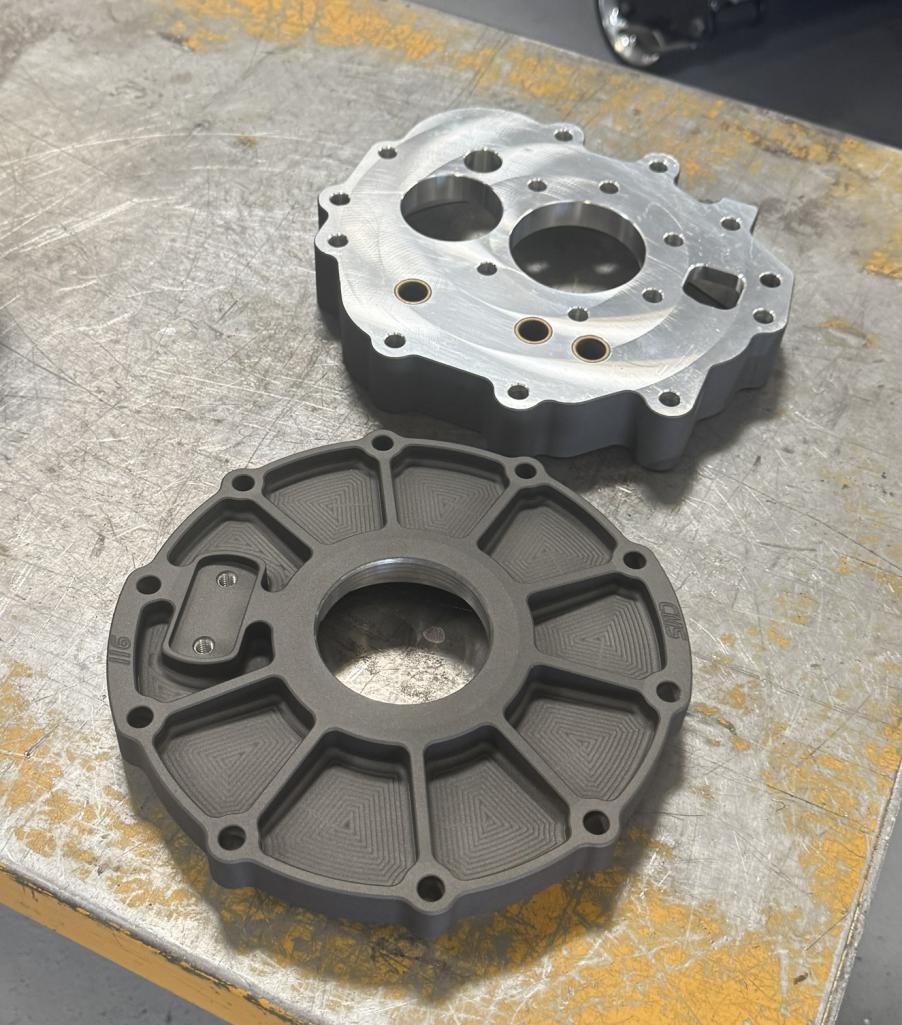 I also received the PMB GT cooler. Sadly, it was grossly under-packed in my opinion, and came to me in the shape of a banana. 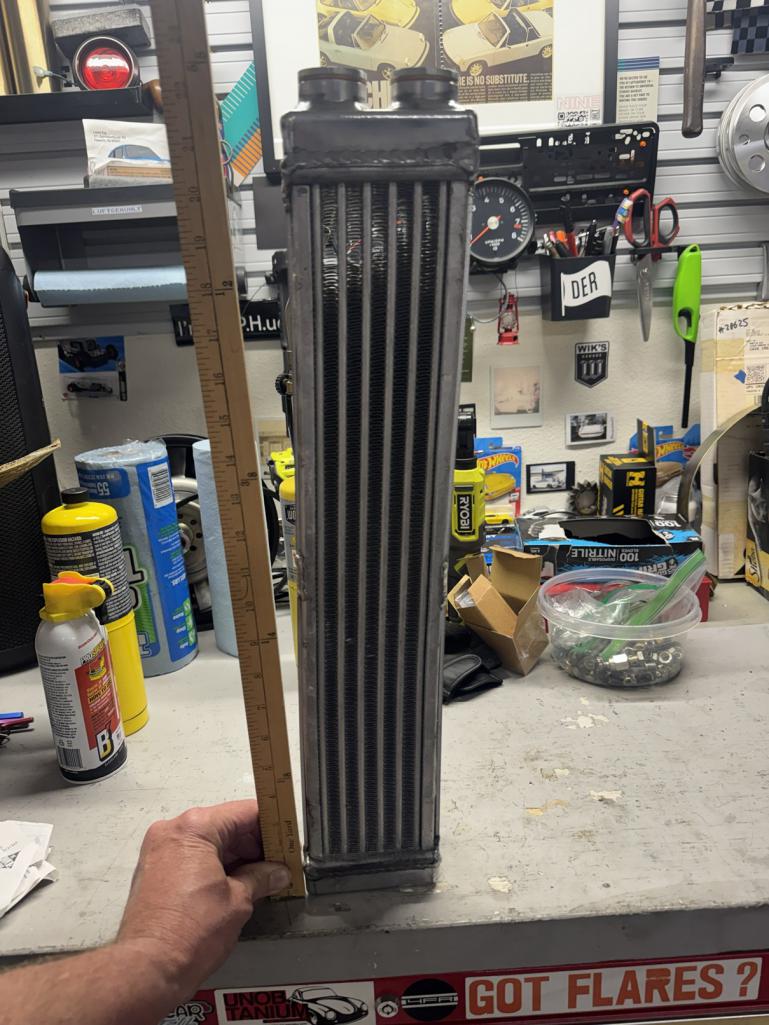 There was some thin foam and one cardboard box. I hope PMB takes this as constructive criticism. I would suggest they follow CSF (coolers) packing methods and either use the spray in foam for such fragile parts, or just add extra foam and double box. Put fragile stickers on the box too. A lot of time and money will be wasted on this problem because of poor packing. 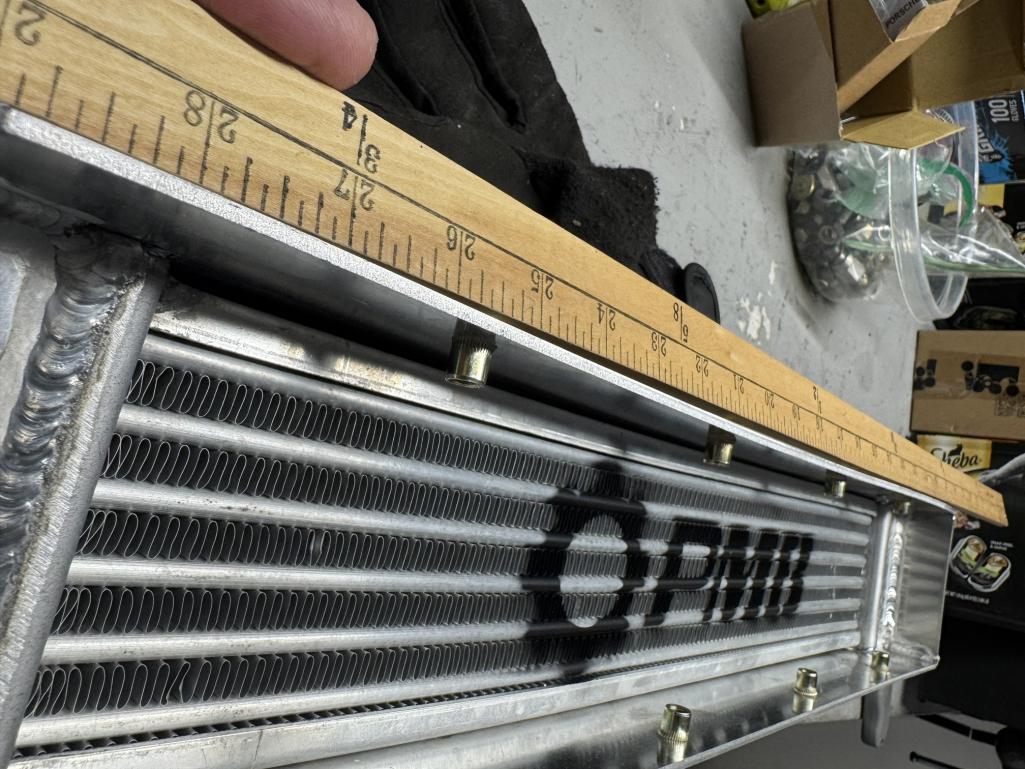 It's fully aluminum so without protection, it can bend probably quite easily if not packaged correctly. I've emailed the sales rep but haven't heard back yet. 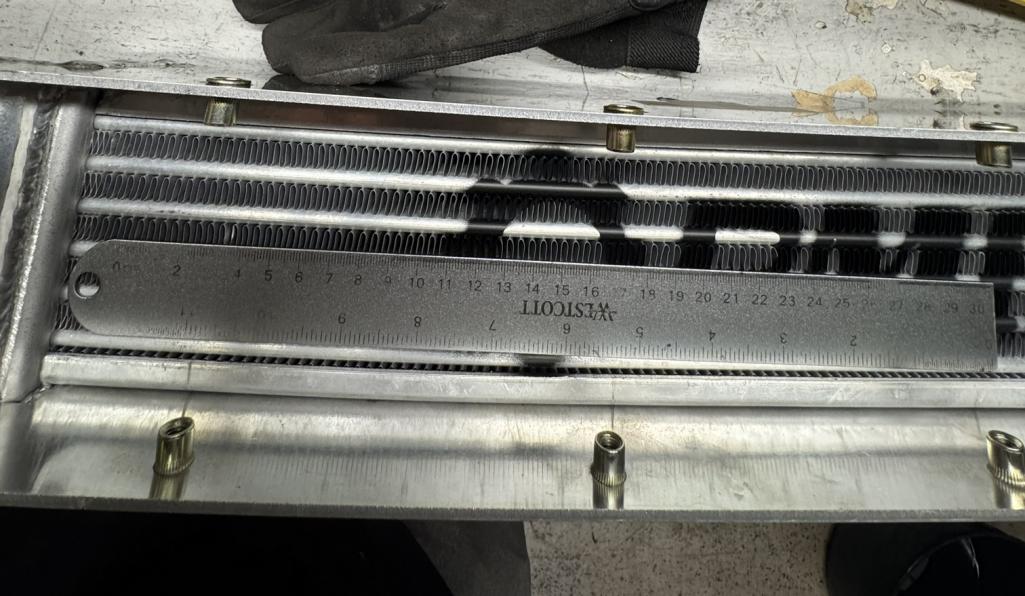 Hopefully I can work with them to get a replacement. |
|
|
|
| Graydingo |
Oct 1 2026, 07:34 PM
Post
#72
|
|
Member Group: Members Posts: 105 Joined: 12-August 22 From: Las Vegas Member No.: 26,768 Region Association: Southwest Region |
A little progress on the 914/6 GT tribute.
PMB sent me a new straight cooler. Huge thanks to their excellent customer service and for taking care of me. I cut up my 72 donor. I removed both headlight buckets and both lower reinforcement pieces in the trunk. 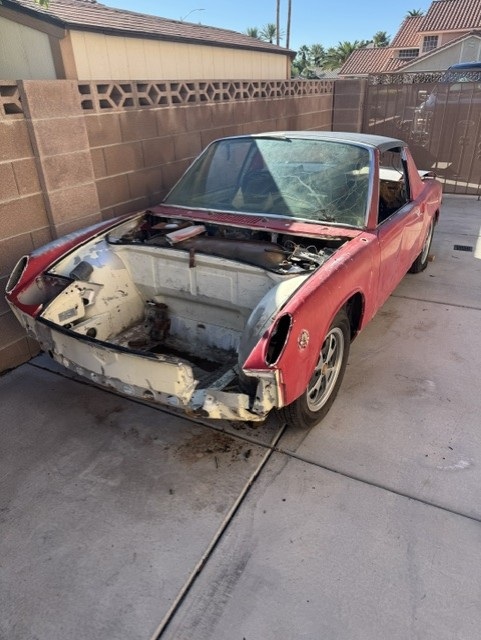 I also was able to save the passenger side bumper reinforcement as a template to make two new ones. The drivers side got cut up a bit, but it will still suffice. This turned into a front clip backdate not just a bumper backdate. Just to remind, there was front end damage on the drivers side. So I decided to purchase a new 71-74 front nose piece from RD and it turns out headlight buckets are not backward compatible forcing me to cut both buckets out. The drivers was crunched anyway so it's fine.. The reinforcements also were damaged and quite a bit different as they mount the impact shocks. So I removed both of those and dug out the 72 donor parts. I need a sanity check. With such major front clip changes, how do I make sure I get this sucker square? I have the frame jig bolted up to the suspension points so my plan is to carefully put it all together and tack it up and then check the gaps and hood latches and headlights. Any tips would be appreciated. |
|
|
|
| Graydingo |
Oct 18 2026, 10:01 AM
Post
#73
|
|
Member Group: Members Posts: 105 Joined: 12-August 22 From: Las Vegas Member No.: 26,768 Region Association: Southwest Region |
More progress on the 914/6 GT tribute project thingy.
I picked up the completed transaxle from Bill Rader Motorsports. Here's my buddy Jon posing with the completed box. Jon is a talented engineer and my sanity check buddy who helps me simplify and get things done. I tend to over complicate stuff and he is really good at course correcting and finishing things. Thanks Jon! 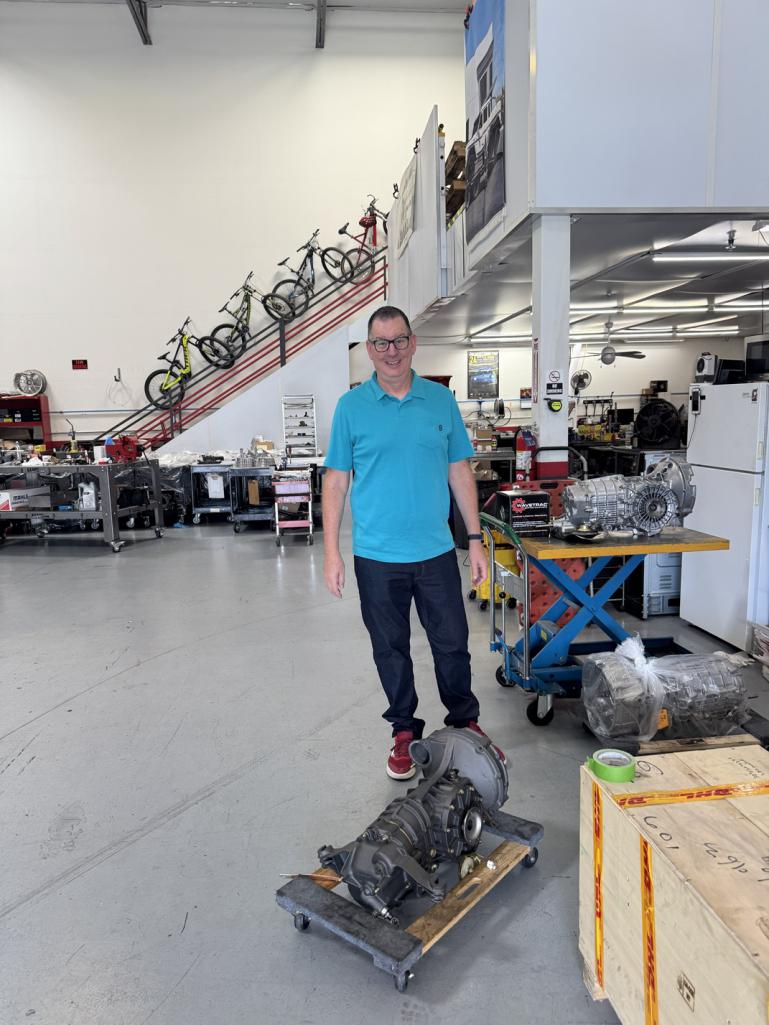 I also sold both of the donor cars. New owner should be picking up in batches in the next few weeks. A lot of great parts left and the black 74 is a restoration candidate. I continue to educate myself on how not to off myself while welding by watching informative YT vids. I'm analytical by nature, so I like to have max info before starting something. Sometimes that means it takes a lot longer to leave port. What i've learned (in a nutshell), don't complete circuits with your face and sweaty hands by pushing up your helmet with the end of the MIG, don't make toxic gas by welding galvanized metals. Don't explode stuff on your workbench like compressed cans of cleaners, and many more. Feel free to add your safety tips here. Along with the safety vids I watch a lot of "How to weld thin sheet metal" videos. I think best practice seems to spot and cool, spot and cool. Use .30 wire, low settings. For body panels I'll be doing the TIG eventually, but for most of the front end structure I think it will be MiG. I picked up the HF Stud welder dent repair tool. Sorry no pics, but I was able to pull out the huge crease that was in the Drivers front fender where the impact folded the front fender a bit. 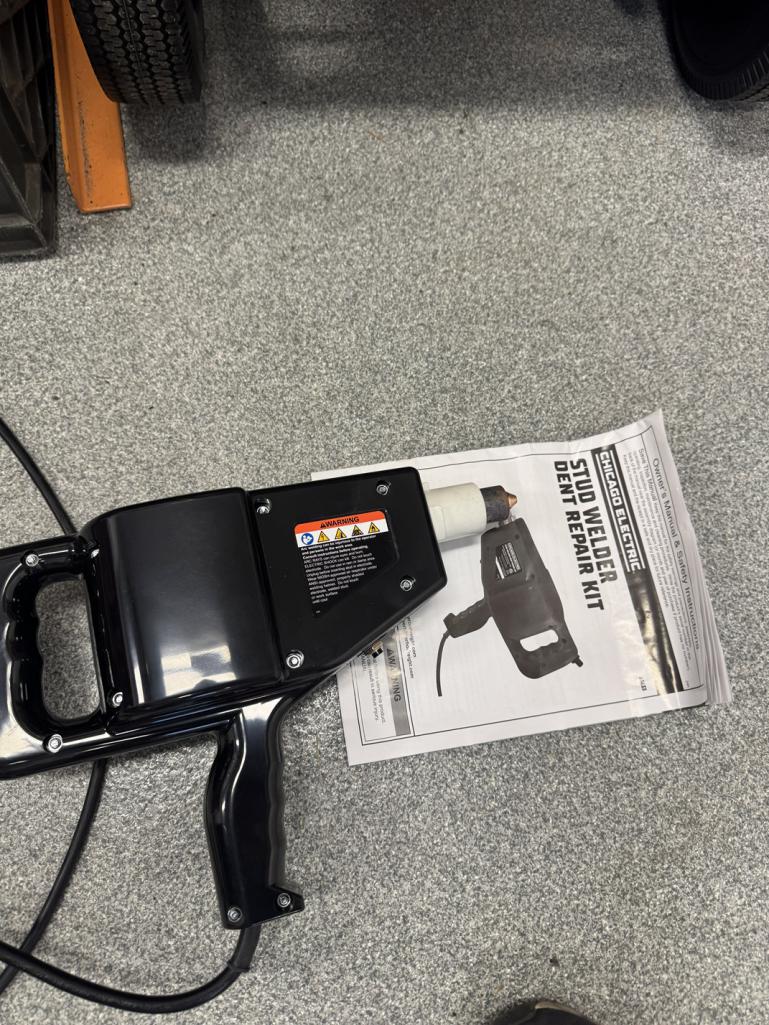 The slide hammer lock mechanism kinda sucks but it does work and the welder itself is great. The drivers inner fender had a lot more damage than I initially discovered. The area where the brace attaches was bent inward quite a bit. So I've spent a fair amount of time hammering it back into place. 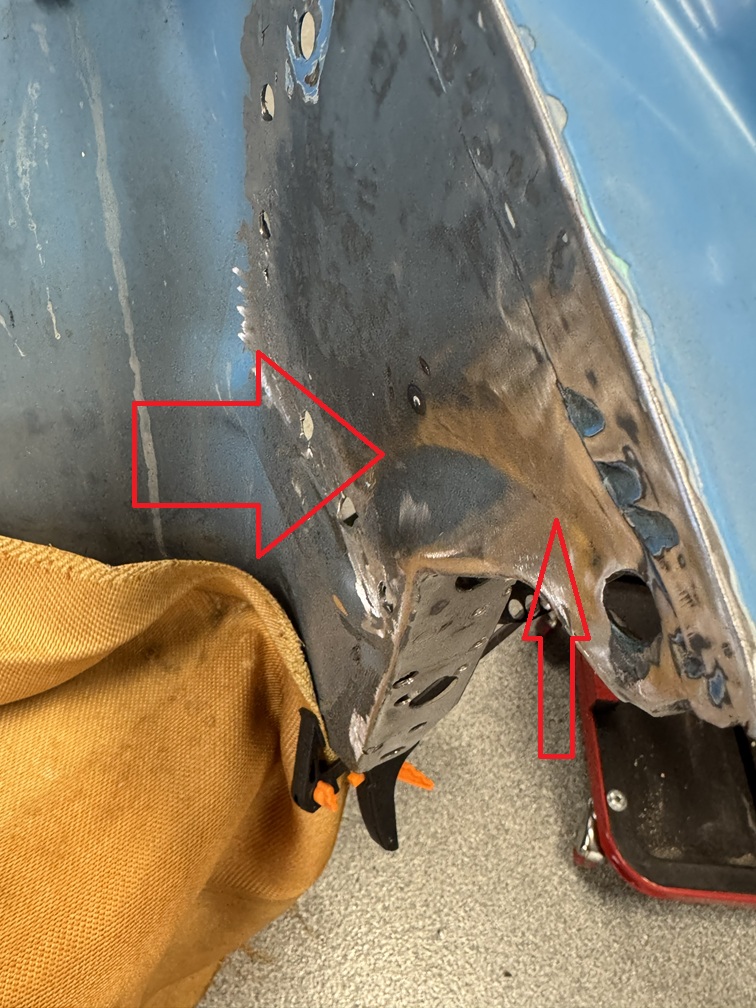 This whole side needed a lot of massaging and more to go: 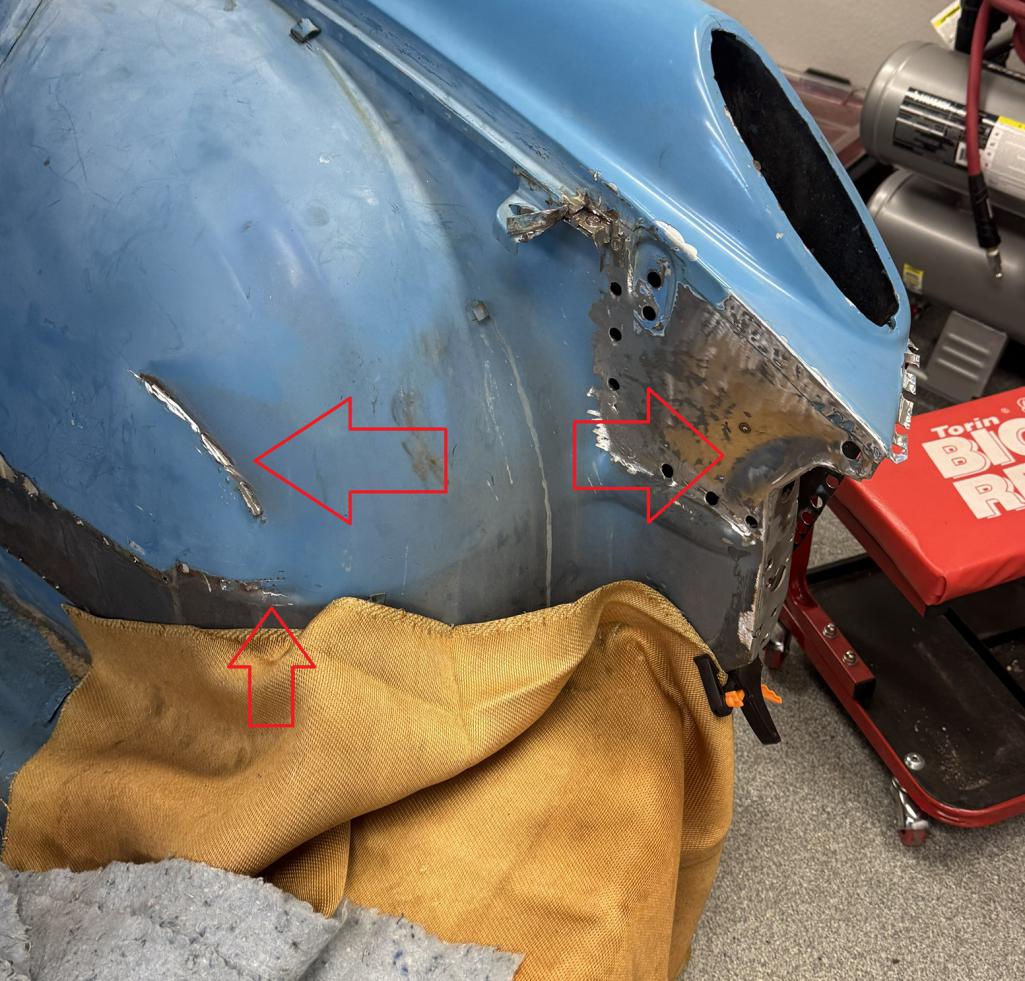 Was also excited to use DYKEM spray. I took the paint off the inner fender, ground down the weld where the headlight bucket was and then sprayed the Dykem over the area. A light sanding with a foam sanding block revealed all my high and low spots. Also found that the early cars had this bumper support bracket. 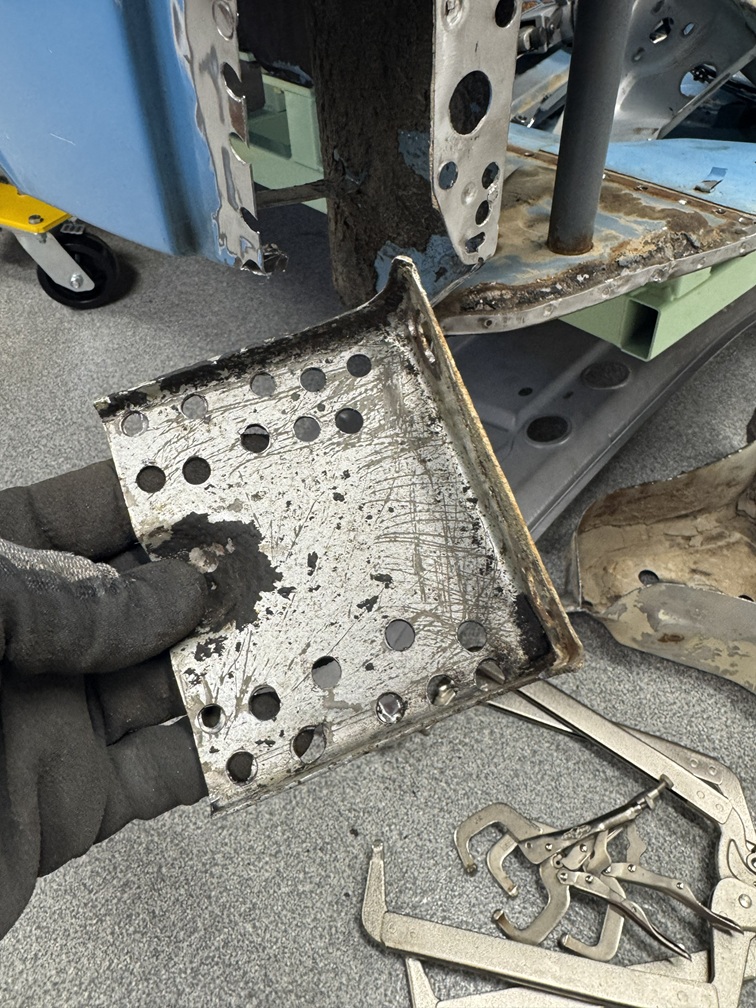 Unfortunately I sawed through the drivers one before I knew it existed. 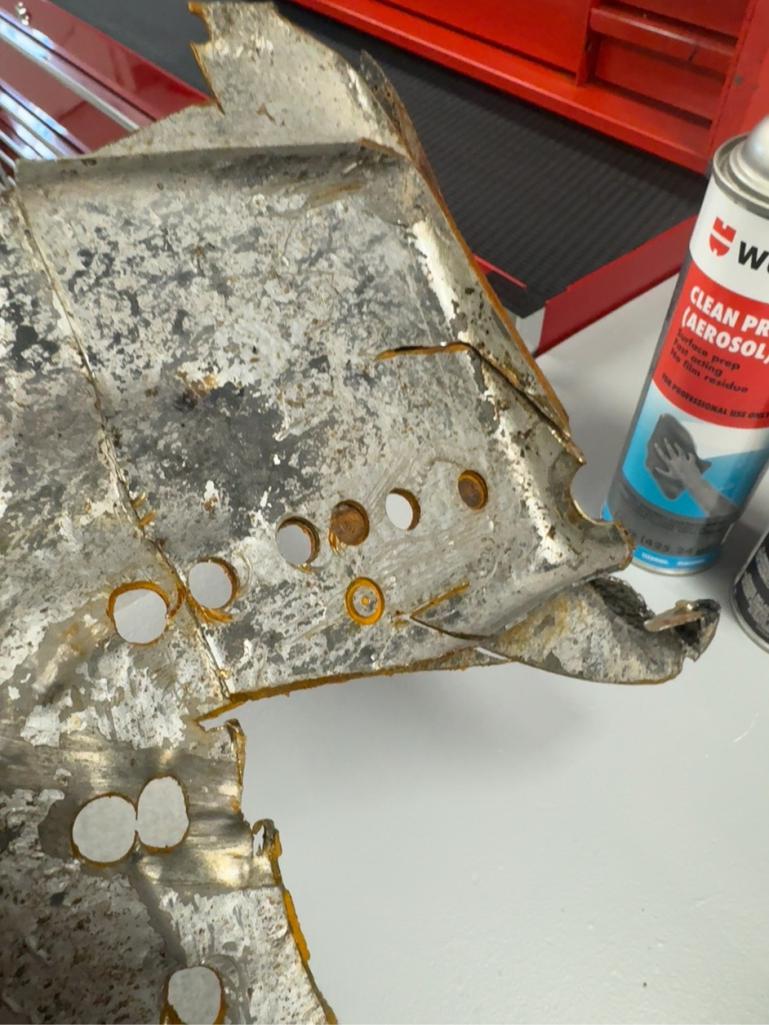 It's really hosed and it's pretty complex. If anyone has a donor car I could use this bracket (just cut out around it and I'll remove the spot welds) Here it is on the passenger side mocked up on my 75. It will go a long way in reinforcing the front bumper. Most backdated bumper cars wont have this extra support. 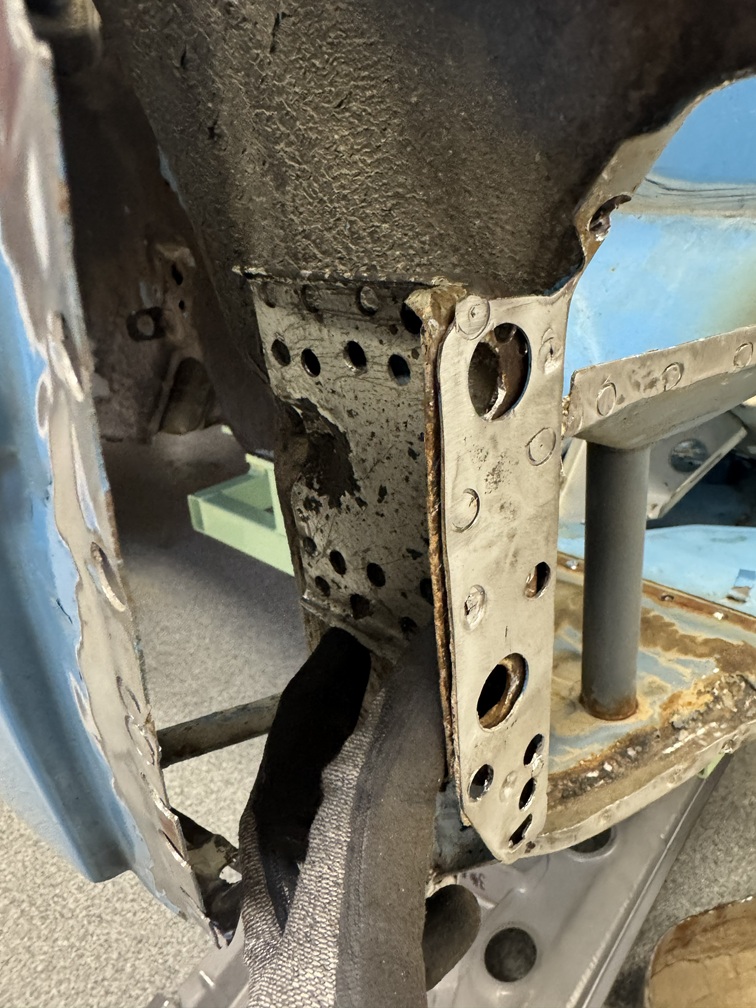 Next up is removing the passenger side headlight bucket (75 bucket is different than earlier buckets) and cleaning up all the donor parts for initial front end fitment. I'll be cleeco 'ing (is that a word?) The entire front end together and then trying to get it as square as possible. Then I'll tack weld each bucket, and the nose piece in place. I think at that point I'll install the headlights and bumper to see if everything is good. I dunno I'm new to all of this. List of to do: -remove donor bit of drv inner fender for patch holes where old longer brace was. -remove pas original headlight bucket -finish metal repair on drv side inner fender -Modify donor buckets for GT manual release -buy GT headlight release kit from PMB -buy better cleeco kit -clean off edges of buckets and donor braces -take all new metal pieces to bead blaster -research and purchase roll on epoxy for all new metal. -get c25 tank filled for MiG -Figure out portable welding table. -MiG some coupons and thin sheet metal scraps (ie practice) |
|
|
|
| MikeK |
Oct 18 2026, 10:53 AM
Post
#74
|
|
Member Group: Members Posts: 147 Joined: 15-June 23 From: 80906 Member No.: 27,418 Region Association: Rocky Mountains |
Double post
|
|
|
|
| MikeK |
Oct 18 2026, 10:53 AM
Post
#75
|
|
Member Group: Members Posts: 147 Joined: 15-June 23 From: 80906 Member No.: 27,418 Region Association: Rocky Mountains |
It looks like you're doing a nice, thorough job.
Just a bit of unsolicited advice... When using the Spitznagel tool, you might consider not using the slide hammer. It's really good at stretching the metal in an un-controlled manner. A better way is to use some side-cutters and a dull file or other improvised device to lift the dent rather than pull it with brute force. It's far more controlled. (IMG:http://www.914world.com/bbs2/uploads_offsite/www.thesamba.com-27418-1792342395.1.jpg) (IMG:http://www.914world.com/bbs2/uploads_offsite/www.thesamba.com-27418-1792342395.2.jpg) (IMG:http://www.914world.com/bbs2/uploads_offsite/www.thesamba.com-27418-1792342396.3.jpg) (IMG:http://www.914world.com/bbs2/uploads_offsite/www.thesamba.com-27418-1792342396.4.jpg) (IMG:http://www.914world.com/bbs2/uploads_offsite/www.thesamba.com-27418-1792342396.5.jpg) |
|
|
|
| MikeK |
Oct 18 2026, 11:10 AM
Post
#76
|
|
Member Group: Members Posts: 147 Joined: 15-June 23 From: 80906 Member No.: 27,418 Region Association: Rocky Mountains |
Seeing how you're currently using MIG and plan to use TIG in the future...
MIG is great for chassis and areas which you have no access to the back-side of the panel. It's not so great for general panel work that you'd like to metal finish to a point of not using filler. There's two reasons for this. A MIG weld tends to be harder and has a greater propensity to crack if hammered and a MIG weld will deposit additional weld material into the area that requires metal finishing. Ideally, you want to have very good panel fitment and use either a torch or TIG to avoid laying more weld into the area which requires hammer work, otherwise the proud of the weld will be an issue. this was TIG welded with little to no filler rod: (IMG:http://www.914world.com/bbs2/uploads_offsite/www.thesamba.com-27418-1792343419.1.jpg) (IMG:http://www.914world.com/bbs2/uploads_offsite/www.thesamba.com-27418-1792343420.2.jpg) (IMG:http://www.914world.com/bbs2/uploads_offsite/www.thesamba.com-27418-1792343421.3.jpg) (IMG:http://www.914world.com/bbs2/uploads_offsite/www.thesamba.com-27418-1792343421.4.jpg) Then metal finished with hammer, dolly and file: (IMG:http://www.914world.com/bbs2/uploads_offsite/www.thesamba.com-27418-1792343421.5.jpg) Keep up the great work! |
|
|
|
| Graydingo |
Oct 18 2026, 01:54 PM
Post
#77
|
|
Member Group: Members Posts: 105 Joined: 12-August 22 From: Las Vegas Member No.: 26,768 Region Association: Southwest Region |
QUOTE(MikeK @ Oct 18 2026, 10:10 AM) Seeing how you're currently using MIG and plan to use TIG in the future... Keep up the great work! Mike, Thank you for those detailed responses. I'm definitely going to try the pull method with the stud welder. I like how you marked one side with black marker to really show the fitment there. The tab and cleco method is helpful too, I saw Ryan Krause doing that for flares on a 911. He teaches moving from one end to the the other end continuously on his flare video. Is that what you did on that panel after you tacked it up? I know some do small sections and move. |
|
|
|
| MikeK |
Oct 19 2026, 10:36 AM
Post
#78
|
|
Member Group: Members Posts: 147 Joined: 15-June 23 From: 80906 Member No.: 27,418 Region Association: Rocky Mountains |
QUOTE(Graydingo @ Oct 18 2026, 01:54 PM) QUOTE(MikeK @ Oct 18 2026, 10:10 AM) Seeing how you're currently using MIG and plan to use TIG in the future... Keep up the great work! Mike, Thank you for those detailed responses. I'm definitely going to try the pull method with the stud welder. I like how you marked one side with black marker to really show the fitment there. The tab and cleco method is helpful too, I saw Ryan Krause doing that for flares on a 911. He teaches moving from one end to the the other end continuously on his flare video. Is that what you did on that panel after you tacked it up? I know some do small sections and move. On a panel which I have access to the back, I'll tack it up, then weld the joint in one pass. Once you get the technique down, it goes quite smoothly and quickly with limited grinding. The panel will definitely distort more vs a MIG, but the idea is to know how to address the distortion with hammer and dolly. If panel fit-up is good, you should only need to go back and stretch the 'heat affected zone'. On panels which I can't get to the back-side, I'll do the 'stack' method of tacking it in, then stacking welds on top of one another, allowing to cool between tacks. Some folks give it a blast of compressed air between welds. Then the joint has to be ground down and leaded or swiped with some waterproof, fiberglass reinforced filler to address any potential pinholes and/or distortion. Are you installing flares? |
|
|
|
| Graydingo |
Oct 19 2026, 08:56 PM
Post
#79
|
|
Member Group: Members Posts: 105 Joined: 12-August 22 From: Las Vegas Member No.: 26,768 Region Association: Southwest Region |
QUOTE(MikeK @ Oct 19 2026, 09:36 AM) Are you installing flares? Yes I am. I got the steel flares from Auto Atlanta. Was going to TiG those on. I measured the panel thickness today maybe you can verify these #s: Fenders 22 gage Front pan 18 gage Inner Fender 16 gage. |
|
|
|
| MikeK |
Oct 20 2026, 10:55 AM
Post
#80
|
|
Member Group: Members Posts: 147 Joined: 15-June 23 From: 80906 Member No.: 27,418 Region Association: Rocky Mountains |
I wish I could help you with that. I'm not that familiar with what the factory used, though I do know that most German vehicles of this era generally used 1mm steel. That works out to 19 gauge.
I generally use 20 gauge on outer panels and any panel with a lot of shape. 18 gauge works well for chassis work. 19 gauge can be difficult to find and my local steel shop doesn't stock it. |
|
|
|
|
4 User(s) are reading this topic (4 Guests and 0 Anonymous Users)
0 Members:

|
Lo-Fi Version | Time is now: 22nd October 2026 - 02:45 PM |
Invision Power Board
v9.1.4 © 2026 IPS, Inc.