|
|
|
Porsche, and the Porsche crest are registered trademarks of Dr. Ing. h.c. F. Porsche AG.
This site is not affiliated with Porsche in any way. Its only purpose is to provide an online forum for car enthusiasts. All other trademarks are property of their respective owners. |
|
|

  |

| Literati914 |
 Aug 24 2023, 06:46 PM Aug 24 2023, 06:46 PM
Post
#1
|
|
Senior Member  Group: Members Posts: 1,463 Joined: 16-November 06 From: Dallas, TX Member No.: 7,222 Region Association: Southwest Region |
Has anyone successfully recovered from stripping the threads from one of the fuel line connections on the bottom of the fuel tank?
The 22mm aluminum nut that’s closest to the tanks perimeter seam was very snug but still moving while I was removing it. Once off I could see that both the male steel threads and the aluminum nut were stripped (basically at the top of the steel male section - so the nut won’t start). I have an extra aluminum nut but it wasn’t making much headway towards recutting those top threads. Perhaps a die would recut them .. but then it is pretty close to that seam. Has anyone had to do this? Did a die work? What dimensions and pitch ? Thanks. . |
   |

 
|
| jhynesrockmtn |
Aug 24 2023, 06:51 PM
Post
#2
|
|
Member Group: Members Posts: 418 Joined: 13-June 16 From: spokane wa Member No.: 20,100 Region Association: Pacific Northwest |
QUOTE(Literati914 @ Aug 24 2023, 05:46 PM)  Has anyone successfully recovered from stripping the threads from one of the fuel line connections on the bottom of the fuel tank? The 22mm aluminum nut that’s closest to the tanks perimeter seam was very snug but still moving while I was removing it. Once off I could see that both the male steel threads and the aluminum nut were stripped (basically at the top of the steel male section - so the nut won’t start). I have an extra aluminum nut but it wasn’t making much headway towards recutting those top threads. Perhaps a die would recut them .. but then it is pretty close to that seam. Has anyone had to do this? Did a die work? What dimensions and pitch ? Thanks. . I have a trashed tank. If you need those pieces cut off so you can weld good ones on, I can cut them and send them to you. I would only bother if the tank is otherwise in great shape. New ones are under $300. |
|
|
|
| Literati914 |
Aug 24 2023, 07:04 PM
Post
#3
|
|
Senior Member Group: Members Posts: 1,463 Joined: 16-November 06 From: Dallas, TX Member No.: 7,222 Region Association: Southwest Region |
QUOTE(jhynesrockmtn @ Aug 24 2023, 07:51 PM) QUOTE(Literati914 @ Aug 24 2023, 05:46 PM) Has anyone successfully recovered from stripping the threads from one of the fuel line connections on the bottom of the fuel tank? The 22mm aluminum nut that’s closest to the tanks perimeter seam was very snug but still moving while I was removing it. Once off I could see that both the male steel threads and the aluminum nut were stripped (basically at the top of the steel male section - so the nut won’t start). I have an extra aluminum nut but it wasn’t making much headway towards recutting those top threads. Perhaps a die would recut them .. but then it is pretty close to that seam. Has anyone had to do this? Did a die work? What dimensions and pitch ? Thanks. . I have a trashed tank. If you need those pieces cut off so you can weld good ones on, I can cut them and send them to you. I would only bother if the tank is otherwise in great shape. New ones are under $300. Yeah the tank is in good shape otherwise.. thanks for the offer (I’ll keep that as an option) however, I’d rather not have to weld on it as I would need to pick up a whole welding tank for just this job (plus I’m spooked about welding old fuel tanks, tho I’ve done it before). A narrow die might work, if there’s such a thing. . |
|
|
|
| Superhawk996 |
Aug 24 2023, 07:14 PM
Post
#4
|
|
914 Guru Group: Members Posts: 5,845 Joined: 25-August 18 From: Woods of N. Idaho Member No.: 22,428 Region Association: Galt's Gulch |
Try a thread file
|
 |
|
| Literati914 |
Aug 24 2023, 09:02 PM
Post
#5
|
|
Senior Member Group: Members Posts: 1,463 Joined: 16-November 06 From: Dallas, TX Member No.: 7,222 Region Association: Southwest Region |
If knew the thread pitch and size, I might could make a die… by purchasing a steel nut and cutting it in half, clamp it low on the threaded section w/ vice grips and work it back and forth. Ghetto (IMG:style_emoticons/default/biggrin.gif) I know! A steel nut is no die but may be a cheap thing to try IF an actual die is not available (IMG:style_emoticons/default/confused24.gif)
Anyone know the specs? . |
|
|
|
| Literati914 |
Aug 25 2023, 09:23 AM
Post
#6
|
|
Senior Member Group: Members Posts: 1,463 Joined: 16-November 06 From: Dallas, TX Member No.: 7,222 Region Association: Southwest Region |
Just to update the thread - I’ve found that the thread dimensions or nut/die needed is M18x1.0 .
Apparently ‘95 Nissan trucks used this size for spindle nuts, and someone here in the distant past has successfully used it as a chase after cutting a V-notch inside the thread area, with a triangular file. A die was tried but was too wide to fit the area. So I’m gonna source an M18x1.0 nut and try the same, with liberal amounts of cutting oil. . |
|
|
|
| r_towle |
Aug 25 2023, 11:29 AM
Post
#7
|
|
Custom Member Group: Members Posts: 24,577 Joined: 9-January 03 From: Taxachusetts Member No.: 124 Region Association: North East States |
I would be very grateful if you could post pictures of how you modify a nut to do this rescue. I can’t figure out what you are going to use/do to create a cutting edge.
|
|
|
|
| worn |
Aug 25 2023, 11:35 AM
Post
#8
|
|
can't remember Group: Members Posts: 3,156 Joined: 3-June 11 From: Madison, WI Member No.: 13,152 Region Association: Upper MidWest |
You might get closer in by flipping the die around so that the starter threads face out. That way you will get cutting pretty much from the start.
|
|
|
|
| cholland_ |
Aug 25 2023, 11:37 AM
Post
#9
|
|
Newbie Group: Members Posts: 48 Joined: 11-October 06 From: Toronto, Ontario Member No.: 7,029 Region Association: None |
I tried a both a thread file and a die, but didn't have any success (not enough space between the two connections).
I ended up getting a NPT tap (I believe 1/4", but don't quote me on this), and using an AN adapter to a 90 degree barb. Works perfectly, no leaks. |
|
|
|
| Literati914 |
Aug 25 2023, 01:40 PM
Post
#10
|
|
Senior Member Group: Members Posts: 1,463 Joined: 16-November 06 From: Dallas, TX Member No.: 7,222 Region Association: Southwest Region |
QUOTE(r_towle @ Aug 25 2023, 12:29 PM) I would be very grateful if you could post pictures of how you modify a nut to do this rescue. I can’t figure out what you are going to use/do to create a cutting edge. back in 2014 a member named @cary had this issue and used a steel M18x1.0 jam nut and cut a groove in it with a file so that it could be walked back and forth in increments and trap cuttings, clean and repeat 'til all threads are uniform. Here's a picture with the inscription: "Cut a groove with a triangle file. Worked like charm." 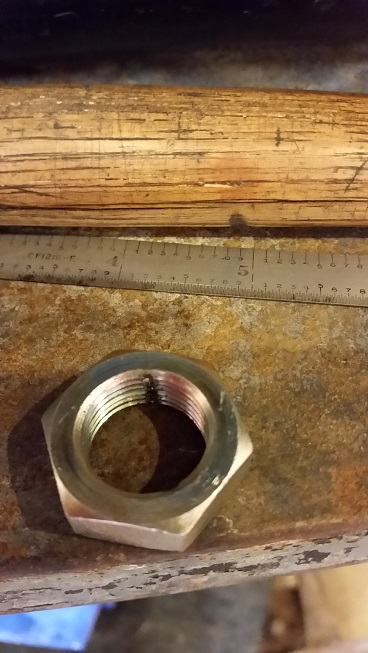 . |
|
|
|
| Literati914 |
Aug 25 2023, 01:48 PM
Post
#11
|
|
Senior Member Group: Members Posts: 1,463 Joined: 16-November 06 From: Dallas, TX Member No.: 7,222 Region Association: Southwest Region |
BTW, I was able to clean up the steel threads with a very sharp pick .. yes there was some aluminum embedded in the steel of the male side, that I couldn't distinguish at first. Some of the steel threading was also damaged tho. After cleaning the threads with the sharp pick, I was able to use a good aluminum nut (because I have extra and no steel one yet), and recut the steel threads enough to get the nut to thread on. This is probably good enough but I don't really like the feel of the threading action, so I'll still be doing some thread chasing with the modified steel nut when it comes in. But, the good news is that, no I did not trash my tank ! (IMG:style_emoticons/default/piratenanner.gif)
. |
|
|
|
| worn |
Aug 26 2023, 09:44 AM
Post
#12
|
|
can't remember Group: Members Posts: 3,156 Joined: 3-June 11 From: Madison, WI Member No.: 13,152 Region Association: Upper MidWest |
QUOTE(Literati914 @ Aug 25 2023, 12:48 PM) BTW, I was able to clean up the steel threads with a very sharp pick .. yes there was some aluminum embedded in the steel of the male side, that I couldn't distinguish at first. Some of the steel threading was also damaged tho. After cleaning the threads with the sharp pick, I was able to use a good aluminum nut (because I have extra and no steel one yet), and recut the steel threads enough to get the nut to thread on. This is probably good enough but I don't really like the feel of the threading action, so I'll still be doing some thread chasing with the modified steel nut when it comes in. But, the good news is that, no I did not trash my tank ! (IMG:style_emoticons/default/piratenanner.gif) . Nothing like the love between aluminum and steel. |
|
|
|
|
1 User(s) are reading this topic (1 Guests and 0 Anonymous Users)
0 Members:

|
Lo-Fi Version | Time is now: 21st May 2024 - 09:48 PM |
Invision Power Board
v9.1.4 © 2024 IPS, Inc.