|
|
|
Porsche, and the Porsche crest are registered trademarks of Dr. Ing. h.c. F. Porsche AG.
This site is not affiliated with Porsche in any way. Its only purpose is to provide an online forum for car enthusiasts. All other trademarks are property of their respective owners. |
|
|

  |

| JCHinCT |
 Nov 19 2023, 12:35 PM Nov 19 2023, 12:35 PM
Post
#1
|
|
Newbie  Group: Members Posts: 2 Joined: 25-January 17 From: CT Member No.: 20,783 Region Association: North East States |
I am starting restoration work on the first car I owned, a 1975 2.0L that I bought in 1979. Though it hasn't run since the mid 1980s. I finally got the car on a rotisserie, and I've just started a long slog to get the undercoating and seam sealer off.
I would appreciate some advice re metal prep. My plan is to eventually have the car media blasted prior to priming and finish paint. But in the near term I plan to attack each structural rust patch, and one-by-one weld in new metal, then hit each with some kind of primer. The goal is to protect each fixed patch temporarily while I go on to the next one. And since this process might take a long time, many months, I need to protect against encouraging rust on the newly patched zones. Only after I think I've got all the patch welds done will I take it for media blasting down to bare metal all over, prior to finish painting. So here are a few questions: - is there any concern about the type of temporary primer I use while the car is piecemeal patch welded? Or is it better to use some zinc or phosphate coating instead of temporary primer? - I do not have a paint shop lined up yet. Is it advisable to find a shop that wants the job, and ensure I'm using a suface prep that is agreeable to the planned paint system? Or can that be dialed in just before media blasting? (I’m worried a reputable paint shop won’t want to deal with a car that they haven’t controlled through the media blasting phase.) - any advice on getting inside the longitudinals to try to remove interior surface rust, and treat it, without actually cutting and opening the longs up? (I think a dumb question but thought I'd throw it out there anyway) - similar question: after 15 minutes of shop-vacuuming, I think I see mild surface rust under the headlight buckets ... how do you get in there and deal with it properly? - regarding sheet metal for the weld patches: I plan on 18 gage for structural areas, and 16 for non-structural ... but plain old low carbon steel? or should one aim for something with a rust-preventative coating on it - even though it needs to be MIG welded? - I found some horrible rust in the front trunk compartment, under the seam sealer on the driver's side. Rusted through, with a couple of index-finger-sized holes. Obviously, this needs to be totally removed and creative weld-in patches made. However, in other places the seam sealer looks really solid with no sign of the "rust-crunch" sound underneath. Option 1: just leave the “good” seam sealer, and later media blast it and paint over it. Option 2: dig it out even though its probably fine, assess the metal underneath, and then later apply more seam sealer over it before painting? What do you think? This is especially a question at the rear shock towers, that seem almost like they're new and almost certainly rust free (though, how really can one tell without digging in?) Thx in advance. 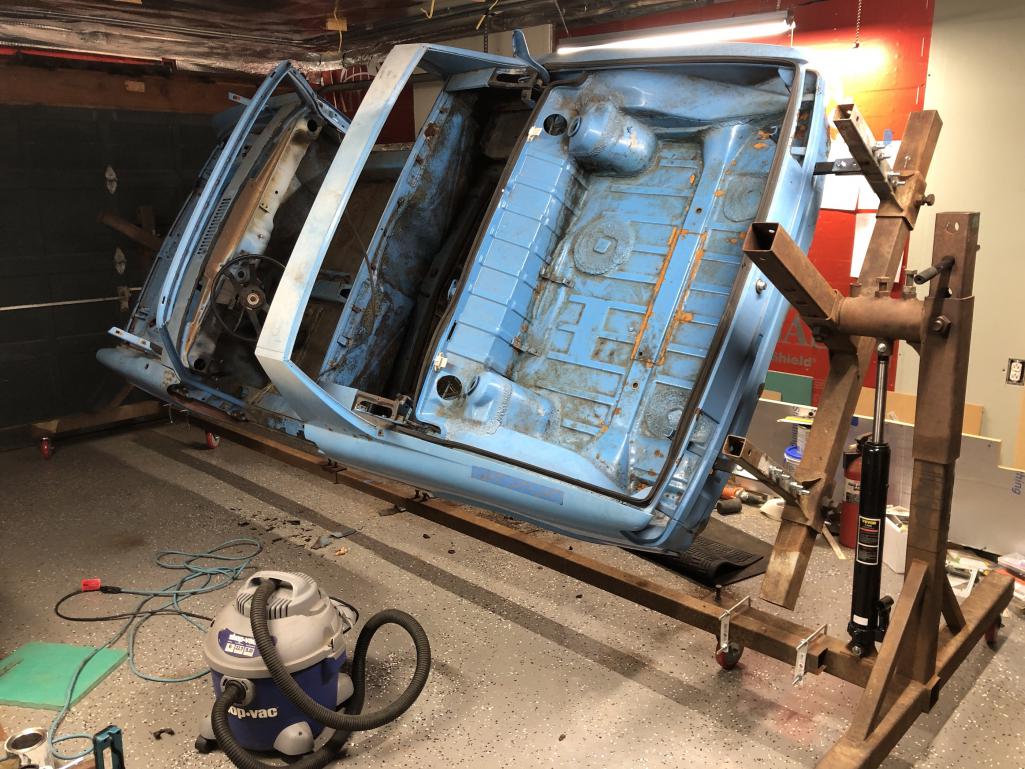 |
   |

 
|
| mepstein |
Nov 19 2023, 12:58 PM
Post
#2
|
|
914-6 GT in waiting Group: Members Posts: 19,286 Joined: 19-September 09 From: Landenberg, PA/Wilmington, DE Member No.: 10,825 Region Association: MidAtlantic Region |
(IMG:style_emoticons/default/welcome.png)
There are a ton of restoration threads on the site. They are worth reading. Good luck with the project. |
 |
|
| Montreal914 |
Nov 19 2023, 01:05 PM
Post
#3
|
|
Senior Member Group: Members Posts: 1,564 Joined: 8-August 10 From: Claremont, CA Member No.: 12,023 Region Association: Southern California |
(IMG:style_emoticons/default/welcome.png)
You found the right place to get the support you can get and I am sure the pros will chime in on your various questions. (IMG:style_emoticons/default/smilie_pokal.gif) Here is a link for your sheet metal needs: https://www.restoration-design.com/store/category/914 Another place you will want to read on is the rebuild thread section here: http://www.914world.com/bbs2/index.php?showforum=78 I am slowly (IMG:style_emoticons/default/rolleyes.gif) rebuilding mine and all I can say is, if there is a hint of rust, dig deeper and you will find more... (IMG:style_emoticons/default/headbang.gif) Good luck with your project and make sure you post your progress here, as we are suckers for pictures and cool rebuilds. (IMG:style_emoticons/default/smash.gif) |
|
|
|
| fiacra |
Nov 19 2023, 03:04 PM
Post
#4
|
|
Person.Woman.Man.Camera.TV Group: Members Posts: 332 Joined: 1-March 19 From: East Bay Region - California Member No.: 22,920 Region Association: Northern California |
Wow, rare to still have your first car after 44 years. Glad to see you are on the way to putting it back on the road. You might find these two specific restoration threads helpful if you haven't seen them yet:
http://www.914world.com/bbs2/index.php?sho...6748&st=600 http://www.914world.com/bbs2/index.php?sho...ng+out+the+dead A link to a Jeff Bowlsby compiled list appropriately titled "Porsche 914 New, Used and Restored Parts and Specialty Services, Links to Online Resources" http://www.914world.com/bbs2/index.php?act...=2&t=361087 Best of luck! |
|
|
|
| Dion |
Nov 19 2023, 03:40 PM
Post
#5
|
|
RN Group: Members Posts: 2,766 Joined: 16-September 04 From: Audubon,PA Member No.: 2,766 Region Association: MidAtlantic Region |
(IMG:style_emoticons/default/piratenanner.gif) (IMG:style_emoticons/default/welcome.png) welcome.
As Mark said read and study some of the fantastic restoration threads on here. Jeff Hall http://www.914world.com/bbs2/index.php?showtopic=76791 Many others…. Best of luck we will be watching and help where we can. |
|
|
|
| Dlee6205 |
Nov 19 2023, 06:39 PM
Post
#6
|
|
Newbie Group: Members Posts: 46 Joined: 9-December 22 From: Burnsville, NC Member No.: 27,017 Region Association: South East States |
"is there any concern about the type of temporary primer I use while the car is piecemeal patch welded? Or is it better to use some zinc or phosphate coating instead of temporary primer?"
-I would use cheap rattle can primer for any surface that will be blasted. For any areas that will be covered up, I like to epoxy primer before welding. Under the battery tray and mount is one area I like to prime before welding those on. Anytime I have the long open, I try to clean up as much surface rust as I can and hit it with epoxy. primer. "I do not have a paint shop lined up yet. Is it advisable to find a shop that wants the job, and ensure I'm using a suface prep that is agreeable to the planned paint system? Or can that be dialed in just before media blasting? (I’m worried a reputable paint shop won’t want to deal with a car that they haven’t controlled through the media blasting phase.)" -Anytime I've had cars blasted, it's been at the body shop so it can be controlled by them. i.e. as soon as it gets blasted, they can roll it in and prime. Some shops are comfortable (with their paint system) priming over a blasted surface, some prefer to knock down the texture of the blasted surface before priming. Some shops still do their filler work before priming, some will epoxy prime the whole car and then begin the filler work. "any advice on getting inside the longitudinals to try to remove interior surface rust, and treat it, without actually cutting and opening the longs up? (I think a dumb question but thought I'd throw it out there anyway)" -I've used products like Ospho with some success to try to convert the rust inside of the long if I don't have full access. If I have a small section of the long open for repairs, I can spray some in there followed by a cavity coating like Eastwood's Internal frame coating or a cavity wax. Even if I don't use an acid to convert the rust, I still use the cavity coatings on all my repairs. "similar question: after 15 minutes of shop-vacuuming, I think I see mild surface rust under the headlight buckets ... how do you get in there and deal with it properly?" -Seems like blasting will take care of most of that? "regarding sheet metal for the weld patches: I plan on 18 gage for structural areas, and 16 for non-structural ... but plain old low carbon steel? or should one aim for something with a rust-preventative coating on it - even though it needs to be MIG welded?" -You meant 16ga for structural and 18ga for non-structural, right? You can use plain carbon steel or try to find galvanneal panels for repairs. As always though, do you research and weld in a well ventilated area. A lot of repair panels available are galvanneal and are more resistant to rusting. "I found some horrible rust in the front trunk compartment, under the seam sealer on the driver's side. Rusted through, with a couple of index-finger-sized holes. Obviously, this needs to be totally removed and creative weld-in patches made. However, in other places the seam sealer looks really solid with no sign of the "rust-crunch" sound underneath. Option 1: just leave the “good” seam sealer, and later media blast it and paint over it. Option 2: dig it out even though it's probably fine, assess the metal underneath, and then later apply more seam sealer over it before painting? What do you think? This is especially a question at the rear shock towers, that seem almost like they're new and almost certainly rust free (though, how really can one tell without digging in?)" -Rust is very common under the seam sealer but it's not under all the seam sealer. I suggest removing any questionable areas until no rust is found and stop. Rear shock towers are a great example, very rarely will there by rust under there so not really a need to remove ALL seam sealer unless you're just adamant. BTW I like to use a textured seam sealer to match the factory stuff for any spot repairs. |
|
|
|
| campbellcj |
Nov 20 2023, 07:45 AM
Post
#7
|
|
I can't Re Member Group: Members Posts: 4,545 Joined: 26-December 02 From: Agoura, CA Member No.: 21 Region Association: Southern California |
(IMG:style_emoticons/default/welcome.png) Looking forward to following your project! This is definitely THE place for 914 technical and moral support as well as parts...
|
|
|
|
| ChrisFoley |
Nov 20 2023, 04:16 PM
Post
#8
|
|
I am Tangerine Racing Group: Members Posts: 7,933 Joined: 29-January 03 From: Bolton, CT Member No.: 209 Region Association: None |
|
|
|
|
| 930cabman |
Nov 20 2023, 05:22 PM
Post
#9
|
|
Advanced Member Group: Members Posts: 3,088 Joined: 12-November 20 From: Buffalo Member No.: 24,877 Region Association: North East States |
(IMG:style_emoticons/default/welcome.png)
Looks like you were not bashful and jumped right in. So far as steel gauge, I would recommend to match the existing. The gauge varies in thickness depending on what part of the car you are working on. Best of luck and keep us in the loop with your progress |
|
|
|
| jd74914 |
Nov 20 2023, 08:18 PM
Post
#10
|
|
Its alive Group: Members Posts: 4,780 Joined: 16-February 04 From: CT Member No.: 1,659 Region Association: North East States |
:welcome:
Whereabouts in CT are you located? There are a few of us spaced throughout the state. |
|
|
|
| bkrantz |
Nov 20 2023, 08:39 PM
Post
#11
|
|
914 Guru Group: Members Posts: 7,774 Joined: 3-August 19 From: SW Colorado Member No.: 23,343 Region Association: Rocky Mountains |
Like others have said
1. Brace the door openings. 2. What you treat/paint local patches with does not matter much if you will blast the entire car. 3. Several things can treat rust inside the longs. And with your car on a rotisserie you can pump stuff in while the car is in different positions, or try to contain stuff in the longs and spin the car (slowly). 4. Pulling all the seam sealant is up to you. Some that might look solid will get displaced by blasting. But if you pull it, you will need to replace it, at least in some strategic places. Best of luck, post photos of progress, and keep asking questions. |
|
|
|
| JCHinCT |
Nov 24 2023, 09:32 AM
Post
#12
|
|
Newbie Group: Members Posts: 2 Joined: 25-January 17 From: CT Member No.: 20,783 Region Association: North East States |
Thanks for all the responses and the links to key threads. Some I had seen but others were new to me and exceedingly helpful. I really appreciate folks taking time to respond and provide advice.
I had removed the rear floor pan many years ago and thought my main focus would be installing a new back half, plus patching a couple of holes in the longs and the front trunk. This fall I was really focused on getting an old rotisserie up to snuff so I could mount the car and really go after the undercoating. I have become a bit discouraged in the past few days because on removing more undercoating, what I thought was surface rust has turned out to be rusted through holes. I think undercoating may be hiding a lot of ugliness. So I guess my job is going to be bigger than I thought. On the other hand, reading these "rustoration" threads suggests that with time and patience I'm going to be able to do this no matter how bad it is. Chris - yes I picked up your door braces at your shop a couple weeks ago ... they look really solid. This coming week I'm lowering the car back on to jack stands to level it, put the doors back long enough to take key measurements, and then install the braces. I am absolutely determined to not only deal with the rust but to have a straight chassis when its done. |
|
|
|
| mlindner |
Nov 24 2023, 12:07 PM
Post
#13
|
|
Senior Member Group: Members Posts: 1,522 Joined: 11-November 11 From: Merrimac, WI Member No.: 13,770 Region Association: Upper MidWest |
Sounds like you have a good handle on it. I had to beg the painter I wanted for almost two years before he said yes (start early). Also, best tool for removing under coating and loose rust ever ( HF extended cut off tool, but instead of the cut off, take the two inch wire wheel and cut off the 1/4 inch drive post and drill and mount. I cleaned the entire underside and all four inner finders in a after noon. Need eye and face protection . Best, Mark
 |
|
|
|
| Freezin 914 |
Nov 24 2023, 12:10 PM
Post
#14
|
|
Senior Member Group: Members Posts: 865 Joined: 27-July 14 From: Wisconsin Member No.: 17,687 Region Association: Upper MidWest |
|
|
|
|
| mlindner |
Nov 24 2023, 12:19 PM
Post
#15
|
|
Senior Member Group: Members Posts: 1,522 Joined: 11-November 11 From: Merrimac, WI Member No.: 13,770 Region Association: Upper MidWest |
And when your finished, you will love it. Mine took five years of part time work, accumulate parts, lots of cleaning/refresh and then off to painter and then reassemble. I've also owned mine for 45 years. Mark
  |
|
|
|
| bkrantz |
Nov 24 2023, 09:07 PM
Post
#16
|
|
914 Guru Group: Members Posts: 7,774 Joined: 3-August 19 From: SW Colorado Member No.: 23,343 Region Association: Rocky Mountains |
That's it--embrace the challenge! And stay positive, at least 98% of the time. Good luck and keep posting.
|
|
|
|
| 930cabman |
Nov 26 2023, 02:25 PM
Post
#17
|
|
Advanced Member Group: Members Posts: 3,088 Joined: 12-November 20 From: Buffalo Member No.: 24,877 Region Association: North East States |
QUOTE(mlindner @ Nov 24 2023, 12:07 PM)  Sounds like you have a good handle on it. I had to beg the painter I wanted for almost two years before he said yes (start early). Also, best tool for removing under coating and loose rust ever ( HF extended cut off tool, but instead of the cut off, take the two inch wire wheel and cut off the 1/4 inch drive post and drill and mount. I cleaned the entire underside and all four inner finders in a after noon. Need eye and face protection . Best, Mark " in an afternoon" when did you accomplish this" in your 20's? (IMG:style_emoticons/default/chowtime.gif) I looked into dry ice blasting a couple times, never got connected. |
|
|
|
|
1 User(s) are reading this topic (1 Guests and 0 Anonymous Users)
0 Members:

|
Lo-Fi Version | Time is now: 25th May 2024 - 06:04 AM |
Invision Power Board
v9.1.4 © 2024 IPS, Inc.