|
|
|
Porsche, and the Porsche crest are registered trademarks of Dr. Ing. h.c. F. Porsche AG.
This site is not affiliated with Porsche in any way. Its only purpose is to provide an online forum for car enthusiasts. All other trademarks are property of their respective owners. |
|
|


| Lilchopshop |
 Dec 3 2023, 08:15 PM Dec 3 2023, 08:15 PM
Post
#1
|
|
Member  Group: Members Posts: 111 Joined: 17-February 20 From: New York Member No.: 23,932 Region Association: North East States |
Hi All,
My name is Aaron. I've been lurking on this site for years, learning from all of you who are kind enough to share your projects and the challenges that go along with them. In an attempt to keep me motivated on my project and as a way to create a place for me to ask questions as they come up (which they will, frequently), I decided it was time to start a proper build thread. I’m not a novice when it comes to tools, fabricating and most things automotive, but I’ve never attempted an engine swap before, and most things electrical tend to stress me out. That being said, I love a good challenge and I’m not afraid to fail. I purchased this car in February of 2020, just before Covid lockdown. I got off to a pretty good start repairing the rust and trying to make a solid chassis for what I thought was going to be a stock-ish restoration (some of that work documented here: http://www.914world.com/bbs2/index.php?sho...ty+jack+points). Then, after watching all the great engine-swap builds on this site, I changed my mind. I knew I wanted more horsepower, but I couldn’t justify the cost of an air-cooled Porsche 6-cyl and I didn’t want to lose the trunk to a big V8. For a while, I was considering keeping the original engine from the car and using a tunable fuel injection package, but for the total cost, the bang for the buck just didn’t seem there. So, I settled on the Suby engine. After some research and some purchasing mistakes, I ended up buying a 2002 legacy outback donor vehicle with an EG25 engine. I harvested the engine, the ECU and whatever else seemed valuable. After selling off the old Porsche engine, transmission, all of the FI components and the saleable parts from the donor Subaru, I probably ended up in the black, financially. Since buying the car in 2020, I’ve gotten pulled away by many other, more important projects, so I’ve only been able to do little stints of work on the car. I’m optimistic this time, that I will be able to finally dedicate some quality time this winter and hopefully make some real headway. I haven’t been great at documenting the little things I’ve done on the car in the last 2 years, so I’ll start this thread off with some of the things I did actually get pictures of and a summary of where I’m at now. The day we met: 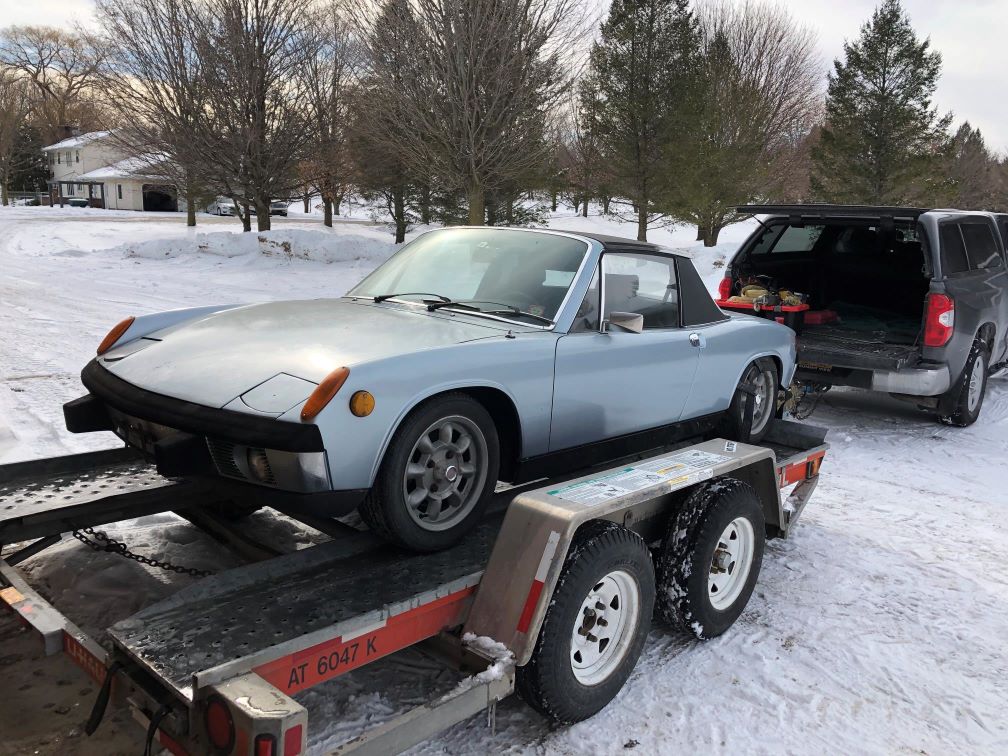 The first attempt at a Suby Engine (EJ22): 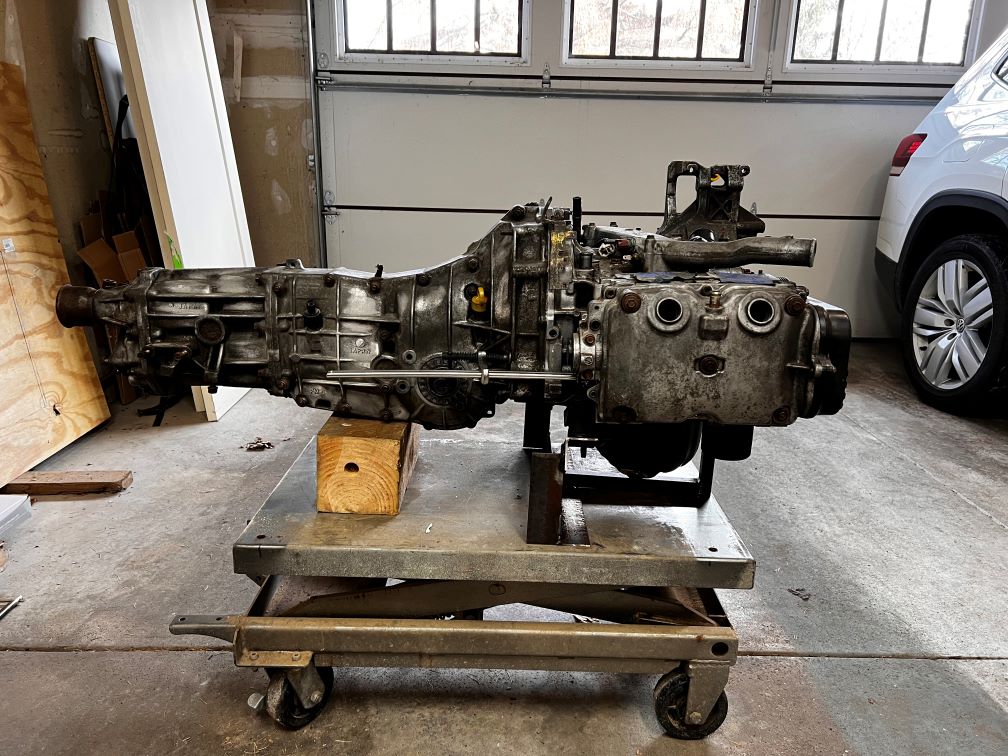 The second attempt (complete donor vehicle): 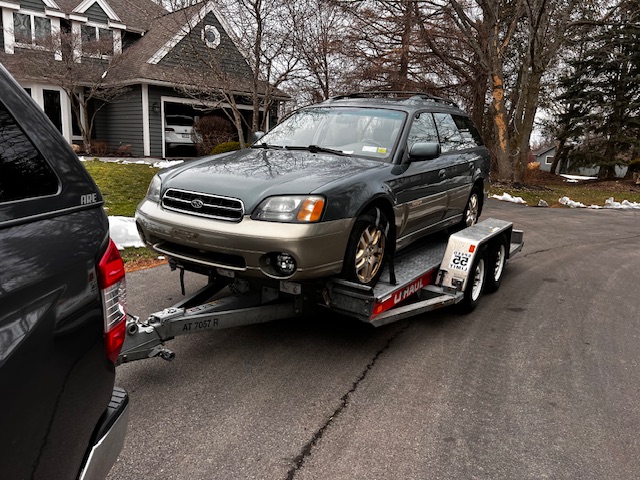 My crazy, home-built cable shift linkage: 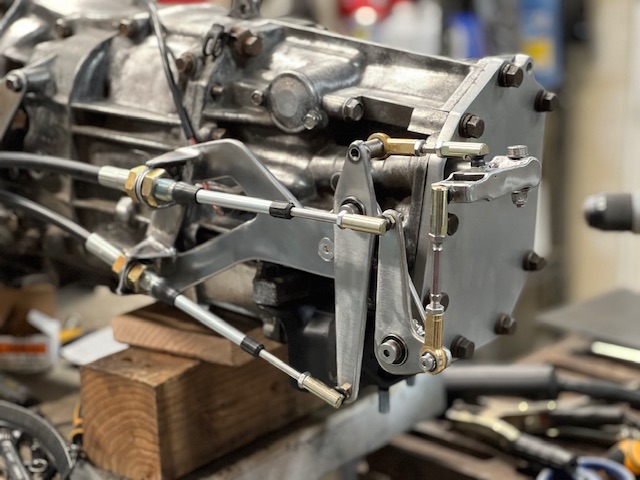 My home-built engine cradle: 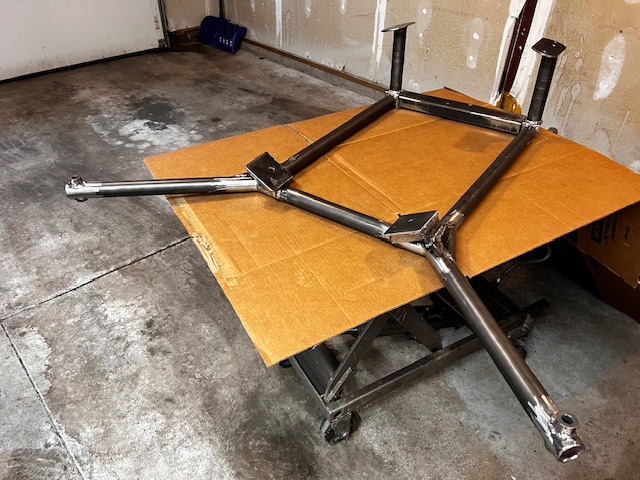 Shifter from a boxter (slightly modified): 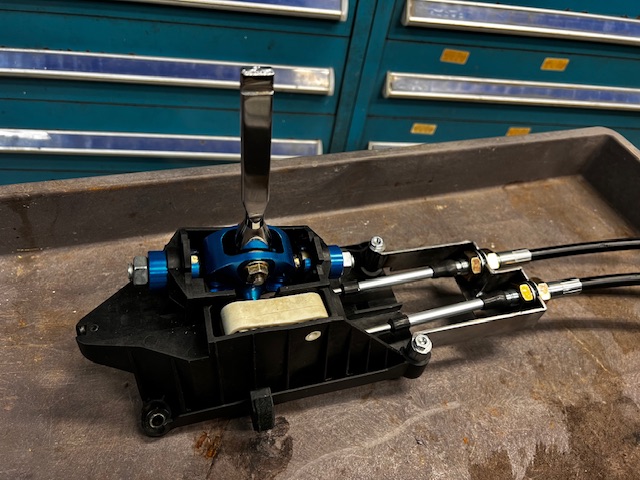 Some suspension ear reinforcement: 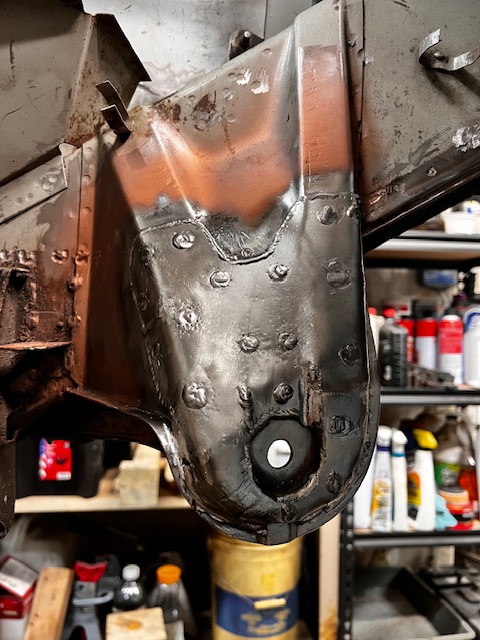 |
   |

 
|
Posts in this topic
 Lilchopshop Lilchopshop’s Subaru Conversion Project Dec 3 2023, 08:15 PM
 Cairo94507 Great; we all love build threads with lots of phot... Dec 4 2023, 10:28 AM gereed75 Nice work so far. That shift linkage looks really ... Dec 4 2023, 10:47 AM 76-914 Looks great. Will you be able to drop straight dow... Dec 4 2023, 03:39 PM
 Lilchopshop
Looks great. Will you be able to drop straight do... Dec 4 2023, 04:32 PM 76-914 Nice looking fab work you have there. Weld the bun... Dec 4 2023, 06:56 PM tygaboy Do these Subaru engines not benefit from the ol... Dec 4 2023, 07:03 PM Lilchopshop @76-914 , thanks for the O2 sensor placement advic... Dec 4 2023, 07:50 PM technicalninja Tygaboy is right!
Every cylinder has an ... Dec 4 2023, 09:07 PM Lilchopshop
Tygaboy is right!
Every cylinder has an ... Dec 5 2023, 07:48 AM 76-914 You could put 3 into 1 and it will still outperfor... Dec 5 2023, 08:49 AM 76-914 You could put 3 into 1 and it will still outperfor... Dec 5 2023, 08:50 AM technicalninja 6 cylinder or less should be run through a single ... Dec 5 2023, 10:44 AM Lilchopshop As I contemplate design changes to my exhaust, I d... Dec 6 2023, 07:48 PM Lilchopshop I’ve had more distractions lately than I expecte... Jan 27 2024, 11:22 AM Lilchopshop Couple more pics of the complete exhaust system.
... Jan 27 2024, 11:27 AM Lilchopshop After finishing the exhaust, I felt like I needed ... Jan 27 2024, 11:39 AM 76-914 Your fabrication work kooks good. Exhaust routing ... Jan 27 2024, 12:15 PM East coaster Looks good! I just wrapped up my Suby exhaust ... Jan 27 2024, 05:32 PM Maltese Falcon Buddy of mine in New Mexico is building "Phys... Jan 27 2024, 06:33 PM Lilchopshop It’s been a while since my last post, but I’ve... Mar 9 2024, 07:54 AM 76-914 It's good that you're back on it. Should b... Mar 9 2024, 08:08 AM Lilchopshop Well, a year went by since my last post… good th... Mar 13 2025, 04:48 PM Lilchopshop Next up, I thought I’d start figuring out radiat... Mar 13 2025, 05:40 PM Cairo94507 Very nice progress. I especially like the new tai... Mar 13 2025, 06:18 PM FL000 I believe the Subarus run pretty cool (compared to... Mar 13 2025, 07:28 PM 914werke It’s been a while since my last post, but I’v... Mar 13 2025, 08:38 PM Lilchopshop
It’s been a while since my last post, but I’... Mar 14 2025, 07:50 AM East coaster I hid mine under a custom center console. Mine is ... Mar 14 2025, 09:18 AM Lilchopshop
I hid mine under a custom center console. Mine is... Mar 14 2025, 09:35 PM 76-914 You should be able to cool the 2.5 with a much sma... Mar 14 2025, 09:15 PM Lilchopshop April '25 update:
I've been able to spend... Apr 17 2025, 06:19 AM East coaster Looking good! Apr 17 2025, 09:16 AM slowrodent Very very nice work.... :beer2: Apr 17 2025, 10:00 AM Lilchopshop Well, it’s been a while since my last update her... Jan 21 2026, 05:00 PM Lilchopshop Enough of that. Here’s the progress on the car... Jan 21 2026, 05:52 PM Lilchopshop With the radiator and tunnel in place, I mocked up... Jan 21 2026, 06:35 PM worn Very nice. I see quality in every post. Jan 21 2026, 06:43 PM tygaboy Lovely bead work! Looks REALLY good. :headban... Jan 21 2026, 07:28 PM Ninja
With the radiator...
Next up, I’m making the... Jan 21 2026, 08:14 PM rick 918-S Nice project. That will be very fast! Kent... Jan 22 2026, 06:02 AM Lilchopshop Thanks guys! Means a lot to me coming from al... Jan 22 2026, 08:56 AM Lilchopshop Hi All,
Made some more progress over the last few ... Feb 10 2026, 07:20 PM Lilchopshop The other project I’ve been working on is a 3D p... Feb 10 2026, 07:40 PM Lilchopshop Been making some progress on the bumper/spoiler/gr... Feb 28 2026, 11:21 AM Montreal914 Just went through the thread. Very nice custom fab... Feb 28 2026, 11:57 AM Lilchopshop A little more progress on the bumper/grille/spoile... Mar 6 2026, 05:39 PM tygaboy Is your printer in your shop or house? I'm pla... Mar 6 2026, 06:36 PM Lilchopshop
Is your printer in your shop or house? I'm pl... Mar 6 2026, 08:43 PM tygaboy
[quote name='tygaboy' post='3248091' date='Mar 6 ... Mar 6 2026, 10:21 PM Lilchopshop Another update. Still working in the frunk. As mu... Mar 22 2026, 07:10 PM Lilchopshop It’s been a minute since my last update, but the... May 19 2026, 08:53 PM
Lilchopshop
Looks great. Will you be able to drop straight do... Dec 4 2023, 04:32 PM 76-914 Nice looking fab work you have there. Weld the bun... Dec 4 2023, 06:56 PM tygaboy Do these Subaru engines not benefit from the ol... Dec 4 2023, 07:03 PM Lilchopshop @76-914 , thanks for the O2 sensor placement advic... Dec 4 2023, 07:50 PM technicalninja Tygaboy is right!
Every cylinder has an ... Dec 4 2023, 09:07 PM Lilchopshop
Tygaboy is right!
Every cylinder has an ... Dec 5 2023, 07:48 AM 76-914 You could put 3 into 1 and it will still outperfor... Dec 5 2023, 08:49 AM 76-914 You could put 3 into 1 and it will still outperfor... Dec 5 2023, 08:50 AM technicalninja 6 cylinder or less should be run through a single ... Dec 5 2023, 10:44 AM Lilchopshop As I contemplate design changes to my exhaust, I d... Dec 6 2023, 07:48 PM Lilchopshop I’ve had more distractions lately than I expecte... Jan 27 2024, 11:22 AM Lilchopshop Couple more pics of the complete exhaust system.
... Jan 27 2024, 11:27 AM Lilchopshop After finishing the exhaust, I felt like I needed ... Jan 27 2024, 11:39 AM 76-914 Your fabrication work kooks good. Exhaust routing ... Jan 27 2024, 12:15 PM East coaster Looks good! I just wrapped up my Suby exhaust ... Jan 27 2024, 05:32 PM Maltese Falcon Buddy of mine in New Mexico is building "Phys... Jan 27 2024, 06:33 PM Lilchopshop It’s been a while since my last post, but I’ve... Mar 9 2024, 07:54 AM 76-914 It's good that you're back on it. Should b... Mar 9 2024, 08:08 AM Lilchopshop Well, a year went by since my last post… good th... Mar 13 2025, 04:48 PM Lilchopshop Next up, I thought I’d start figuring out radiat... Mar 13 2025, 05:40 PM Cairo94507 Very nice progress. I especially like the new tai... Mar 13 2025, 06:18 PM FL000 I believe the Subarus run pretty cool (compared to... Mar 13 2025, 07:28 PM 914werke It’s been a while since my last post, but I’v... Mar 13 2025, 08:38 PM Lilchopshop
It’s been a while since my last post, but I’... Mar 14 2025, 07:50 AM East coaster I hid mine under a custom center console. Mine is ... Mar 14 2025, 09:18 AM Lilchopshop
I hid mine under a custom center console. Mine is... Mar 14 2025, 09:35 PM 76-914 You should be able to cool the 2.5 with a much sma... Mar 14 2025, 09:15 PM Lilchopshop April '25 update:
I've been able to spend... Apr 17 2025, 06:19 AM East coaster Looking good! Apr 17 2025, 09:16 AM slowrodent Very very nice work.... :beer2: Apr 17 2025, 10:00 AM Lilchopshop Well, it’s been a while since my last update her... Jan 21 2026, 05:00 PM Lilchopshop Enough of that. Here’s the progress on the car... Jan 21 2026, 05:52 PM Lilchopshop With the radiator and tunnel in place, I mocked up... Jan 21 2026, 06:35 PM worn Very nice. I see quality in every post. Jan 21 2026, 06:43 PM tygaboy Lovely bead work! Looks REALLY good. :headban... Jan 21 2026, 07:28 PM Ninja
With the radiator...
Next up, I’m making the... Jan 21 2026, 08:14 PM rick 918-S Nice project. That will be very fast! Kent... Jan 22 2026, 06:02 AM Lilchopshop Thanks guys! Means a lot to me coming from al... Jan 22 2026, 08:56 AM Lilchopshop Hi All,
Made some more progress over the last few ... Feb 10 2026, 07:20 PM Lilchopshop The other project I’ve been working on is a 3D p... Feb 10 2026, 07:40 PM Lilchopshop Been making some progress on the bumper/spoiler/gr... Feb 28 2026, 11:21 AM Montreal914 Just went through the thread. Very nice custom fab... Feb 28 2026, 11:57 AM Lilchopshop A little more progress on the bumper/grille/spoile... Mar 6 2026, 05:39 PM tygaboy Is your printer in your shop or house? I'm pla... Mar 6 2026, 06:36 PM Lilchopshop
Is your printer in your shop or house? I'm pl... Mar 6 2026, 08:43 PM tygaboy
[quote name='tygaboy' post='3248091' date='Mar 6 ... Mar 6 2026, 10:21 PM Lilchopshop Another update. Still working in the frunk. As mu... Mar 22 2026, 07:10 PM Lilchopshop It’s been a minute since my last update, but the... May 19 2026, 08:53 PM  |
1 User(s) are reading this topic (1 Guests and 0 Anonymous Users)
0 Members:

|
Lo-Fi Version | Time is now: 20th May 2026 - 02:51 AM |
Invision Power Board
v9.1.4 © 2026 IPS, Inc.