

 Lilchopshop’s Subaru Conversion Project, Making it up as I go |
|
|

|
Porsche, and the Porsche crest are registered trademarks of Dr. Ing. h.c. F. Porsche AG.
This site is not affiliated with Porsche in any way. Its only purpose is to provide an online forum for car enthusiasts. All other trademarks are property of their respective owners. |
|
|
  |
| rick 918-S |
 Jan 22 2026, 06:02 AM
Post
#41
|
|
Hey nice rack! -Celette  Group: Members Posts: 21,378 Joined: 30-December 02 From: Now in Superior WI Member No.: 43 Region Association: Northstar Region 

 |
Nice project. That will be very fast! Kent's car rocks! I was lucky to have been able to drive it once. (IMG:style_emoticons/default/aktion035.gif)
|
   |

 
|
| Lilchopshop |
Jan 22 2026, 08:56 AM
Post
#42
|
|
Member Group: Members Posts: 117 Joined: 17-February 20 From: New York Member No.: 23,932 Region Association: North East States |
Thanks guys! Means a lot to me coming from all you masters! I’m pretty proud of how the shroud is turning out, but then I remember that it’s all going to be hidden by a big ol’ spare tire! (IMG:style_emoticons/default/dry.gif)
|
 |
|
| Lilchopshop |
Feb 10 2026, 07:20 PM
Post
#43
|
|
Member Group: Members Posts: 117 Joined: 17-February 20 From: New York Member No.: 23,932 Region Association: North East States |
Hi All,
Made some more progress over the last few weeks. I switched gears a little bit to work on the front valance/spoiler and a grille for this new hole in the front of the car. For the valance, I started with a fiberglass spoiler that I bought a while back from AIR products. I originally decided on this part because I like the look of the LE spoilers, but I couldn’t find one with a cut-out for an oil cooler/radiator. My rationale was that I could modify the AIR part to make it look more like the LE spoiler but retain the oil cooler cut out. The AIR spoiler was less than half the cost of the cheapest reproduction fiberglass LE spoiler that I could find. I’m questioning my logic now after I see how much chopping up and re-fabricating I’m going to end up doing to convert the AIR spoiler into something that resembles an LE spoiler. Oh well… good thing I don’t do this stuff for money. The AIR spoiler temporarily secured on the car for an initial look. The horizontal sharpie lines show the material I will cut out to shorten the spoiler.   Then, here’s the spoiler with the center section cut out and taped/riveted together in preparation for adding fiberglass to the back side to join the pieces back together.    And then some pictures of the process to add fiberglass to the back side of the spoiler    This is where I stopped with the spoiler. I still have a ways to go on the front side to add material and get it all back to a reasonable shape. I’ll grind away material from the seams I made and scarf in some layers of a lighter-weight fiberglass fabric until I get close to the final shape. Then, I’ll finish the shape with bondo. I also had to cut off some of the original mounting tabs because they didn’t allow the spoiler to line up flush with the bumper. I’ll have to re-build those mounting tabs from fiberglass in the correct shape. |
|
|
|
| Lilchopshop |
Feb 10 2026, 07:40 PM
Post
#44
|
|
Member Group: Members Posts: 117 Joined: 17-February 20 From: New York Member No.: 23,932 Region Association: North East States |
The other project I’ve been working on is a 3D printed grille for the radiator hole in the bumper/spoiler. Here is a picture of the current CAD model I’m working to.
 Here is print #1 out of PLA filament so I can test the shape/fit   This iteration fit fine and I’m happy with the grille pattern, but I wanted to make it a little more beefy looking and design in some proper glue joints. Here is the second print in black ABS. I like how this came out and I may just run with it, but I’m also considering changing some of the features that will fasten this to the metalwork on the car. If I re-print it, I will make it from ASA filament so that it is more UV resistant.   Now that I have the grille figured out, I can shorten the metal inlet that sticks through the bumper so that the grille will sit flush with the bumper and future spoiler. This is exciting, so I hope to be able to post more updates soon! Thanks for looking! |
|
|
|
| Lilchopshop |
Feb 28 2026, 11:21 AM
Post
#45
|
|
Member Group: Members Posts: 117 Joined: 17-February 20 From: New York Member No.: 23,932 Region Association: North East States |
Been making some progress on the bumper/spoiler/grille over the last couple weeks. Got the bumper opening mostly done, but still honing in on the final shape of the spoiler. Man, that thing was WAY off to begin with. Here are some pictures of a very rough fit-up with my 3d printed grille.
   |
|
|
|
| Montreal914 |
Feb 28 2026, 11:57 AM
Post
#46
|
|
Advanced Member Group: Members Posts: 2,220 Joined: 8-August 10 From: Claremont, CA Member No.: 12,023 Region Association: Southern California
|
Just went through the thread. Very nice custom fabrication work all around! (IMG:style_emoticons/default/smilie_pokal.gif)
Hooked, definitely watching! (IMG:style_emoticons/default/popcorn[1].gif) BTW, love the wife's earlier comment... (IMG:style_emoticons/default/lol-2.gif) |
|
|
|
| Lilchopshop |
Mar 6 2026, 05:39 PM
Post
#47
|
|
Member Group: Members Posts: 117 Joined: 17-February 20 From: New York Member No.: 23,932 Region Association: North East States |
A little more progress on the bumper/grille/spoiler. In these pictures, there’s no body filler on the bumper. Just smoothed the welds and shot some primer on it for now. I’m pretty happy with how the spoiler is turning out, but I still need to re-shape the ends at the wheel arches. I’m going to install flares (I think), so I’m waiting on finishing the spoiler until the flares are on (or until I give up on that idea). For the grille, I’m going do another design iteration. I need to make it oversized for the collar that it mounts to so that I can adjust its position to line up better with the bumper and spoiler. You can see that it’s a little crooked in the opening now.
  |
|
|
|
| tygaboy |
Mar 6 2026, 06:36 PM
Post
#48
|
|
914 Guru Group: Members Posts: 5,862 Joined: 6-October 15 From: Petaluma, CA Member No.: 19,241 Region Association: Northern California
|
Is your printer in your shop or house? I'm planning on some ASA parts but I understand there are odor and VOC issues and it REALLY needs to be vented outside.
Do you have specific plans to address this? Thanks. And your build is coming along nicely! Great work on that spoiler mod. |
|
|
|
| Lilchopshop |
Mar 6 2026, 08:43 PM
Post
#49
|
|
Member Group: Members Posts: 117 Joined: 17-February 20 From: New York Member No.: 23,932 Region Association: North East States |
QUOTE(tygaboy @ Mar 6 2026, 07:36 PM)  Is your printer in your shop or house? I'm planning on some ASA parts but I understand there are odor and VOC issues and it REALLY needs to be vented outside. Do you have specific plans to address this? Thanks. And your build is coming along nicely! Great work on that spoiler mod. @tygaboy My 3d printer is in the basement of my house and I don’t have any venting for it. The grille is the only thing I’ve printed in ASA so far, but I didn’t notice the odor to be much stronger than ABS or PETG. The printing temps are a little higher for ASA so that probably contributes to the higher off-gassing. My biggest complaint about ASA is that the speeds are sooo much slower. This grille in ASA took 19 hours to print and that was after I reduced the quality. |
|
|
|
| tygaboy |
Mar 6 2026, 10:21 PM
Post
#50
|
|
914 Guru Group: Members Posts: 5,862 Joined: 6-October 15 From: Petaluma, CA Member No.: 19,241 Region Association: Northern California
|
QUOTE(Lilchopshop @ Mar 6 2026, 06:43 PM) QUOTE(tygaboy @ Mar 6 2026, 07:36 PM) Is your printer in your shop or house? I'm planning on some ASA parts but I understand there are odor and VOC issues and it REALLY needs to be vented outside. Do you have specific plans to address this? Thanks. And your build is coming along nicely! Great work on that spoiler mod. @tygaboy My 3d printer is in the basement of my house and I don’t have any venting for it. The grille is the only thing I’ve printed in ASA so far, but I didn’t notice the odor to be much stronger than ABS or PETG. The printing temps are a little higher for ASA so that probably contributes to the higher off-gassing. My biggest complaint about ASA is that the speeds are sooo much slower. This grille in ASA took 19 hours to print and that was after I reduced the quality. OK, thanks for the update. My set up is in the house so I'm not doing anything but PLA and TPU until I have venting. My wife is pretty understanding but... |
|
|
|
| Lilchopshop |
Mar 22 2026, 07:10 PM
Post
#51
|
|
Member Group: Members Posts: 117 Joined: 17-February 20 From: New York Member No.: 23,932 Region Association: North East States |
Another update. Still working in the frunk. As much as I would really like to start a different part of the project, I don’t want these details hanging over my head later.
I made the exit chute for the radiator. This looks simple, but I think it was harder for me to make than the inlet duct. I was having trouble figuring out all of the angles, even with cardboard mockups, so I tried something new. I downloaded a free 3d scanner app and I scanned the frunk and imported the model into fusion 360. The detail in the scan was pretty coarse, but it was good enough for me to get the angles and the basic surfaces. From there, I modeled the exit chute and then transferred the dimensions to sheet metal. Picture of exit chute   Image of frunk scan  After this, I made a screen for the outlet hole in the frunk. I’m not sure I love this, but I think it will function well. And lastly I made a little cover plate for the underside of the radiator cross support. These pieces still need a little tweaking, but I think I can call them good enough for now.   Next up, I’m going to tackle the spare tire mount. Another project that I’m not particularly excited about, but necessary so better to check it off the list now. That’s it for now! Thanks for looking! |
|
|
|
| Lilchopshop |
May 19 2026, 08:53 PM
Post
#52
|
|
Member Group: Members Posts: 117 Joined: 17-February 20 From: New York Member No.: 23,932 Region Association: North East States |
It’s been a minute since my last update, but there has been some progress.
With the radiator ducting mostly complete, I chose to focus on how I was going to suspend the spare tire above the ductwork. I was going to need some type of structure that wouldn’t take up too much room and could also be removable so that I could get to the radiator/ductwork/etc below. My first thought was to build a tube-steel frame that the tire could mount to. I would have brackets welded to either the gas tank wall or the inner fenders that this frame would bolt to. In hindsight, this is what I should have done and may still. I was a little concerned that the thickness of a tube frame strong enough to suspend a 15-20 lb spare tire plus some clearance to the ductwork would be too tall and the spare tire would interfere with the frunk hood. I probably should have installed the hood at this point and confirmed or disproved my fear. Instead, I decided to go to my local u-pull it and look at spare tire holders from other cars. My thought here was that most spare tires are held in a kind of sheet metal bowl and if I could figure out a way to mount one of these “bowls” in my frunk, it would take up less room than the tube frame idea. After a couple hours searching, a half hour of sawzall chopping and $117 dollars later, I came home with three of these spare tire wells. Two were from early 2000’s Chevy luminas and the third came from a late VW Jetta. The plan was to take pieces from each of these, somehow re-shape them, and then turn them into a removable well that would suspend my spare tire above my radiator in the frunk. Oh, and with enough room to still close the hood. Well, I’m getting close, but man the tube frame idea would have been sooo much easier…. Here are some pictures of the process.           |
|
|
|
| East coaster |
May 20 2026, 03:43 AM
Post
#53
|
|
Senior Member Group: Members Posts: 1,993 Joined: 28-March 03 From: Millville, NJ Member No.: 487 Region Association: None
|
Kudos for the creativity!
|
|
|
|
| rick 918-S |
May 20 2026, 05:52 AM
Post
#54
|
|
Hey nice rack! -Celette Group: Members Posts: 21,378 Joined: 30-December 02 From: Now in Superior WI Member No.: 43 Region Association: Northstar Region
|
I like the hammer form.
|
|
|
|
| Chris H. |
May 20 2026, 06:11 AM
Post
#55
|
|
Senior Member Group: Members Posts: 4,111 Joined: 2-January 03 From: Chicago 'burbs Member No.: 73 Region Association: Upper MidWest
|
Very very nice fabrication work. (IMG:style_emoticons/default/smilie_pokal.gif)
|
|
|
|
| Lilchopshop |
May 20 2026, 07:42 AM
Post
#56
|
|
Member Group: Members Posts: 117 Joined: 17-February 20 From: New York Member No.: 23,932 Region Association: North East States |
Thanks for the kind words!
The wood buck worked really well. That’s the part of this mini project that I’m most proud of actually. I was worried that it wouldn’t hold up to the hammer blows as I was re-shaping the bottom piece, but it did fine. |
|
|
|
| Lilchopshop |
May 28 2026, 07:09 PM
Post
#57
|
|
Member Group: Members Posts: 117 Joined: 17-February 20 From: New York Member No.: 23,932 Region Association: North East States |
It’s all about the journey, right?
So, I’m all over the map with how I work on the different pieces of this project. I actually find that this approach keeps me more excited about working on things as I tend to get bored easily. Anyway, one of the next things I’ll be doing is taking the engine back out so that I can get access on the engine compartment to finish the radiator hose routing. As I started disconnecting things, I realized that the exhaust system I had made was rusting pretty quickly since I never painted it after I was done with fabrication. I figured now was a good time to address this. So, I got some VHT flame proof paint and went to town priming and painting the two sections of the exhaust. I was very careful to read the directions on the can for application EXCEPT for the last sentence that stated the paint must be heat-cured after application!!! This paint is sooo soft after application that I was scratching it just by gently setting the parts down on my workbench. The curing step (that I didn’t read) requires a 3-step cure process with a max temp of 600F. Since my kitchen oven doesn’t get this hot and it isn’t big enough anyway (oh, and I also use it to cook food in), I decided I needed to make my own oven. (IMG:style_emoticons/default/WTF.gif) Pictures below show today’s wild tangent of the project. Without doing any research first about building DIY ovens, I went shopping on Facebook marketplace and came home with a steel 55gal barrel a 240v baseboard heater, some fiberglass insulation and some corrugated metal to form the outer skin of the oven. Total cost so far… ~$100. I quickly jury-rigged the pieces together to test the concept and found that it works. However, I don’t think it will ever reach 600F even when it’s fully insulated. The max internal temp I recorded in this configuration was about 330F. I’m going to abandon the baseboard heater element idea and try an electric oven element instead. I know this looks like a 2nd grader put this together, but it was just a rough mockup to see if this had any promise. If I continue with this, I will make proper wire connections and add some rudimentary safety controls. 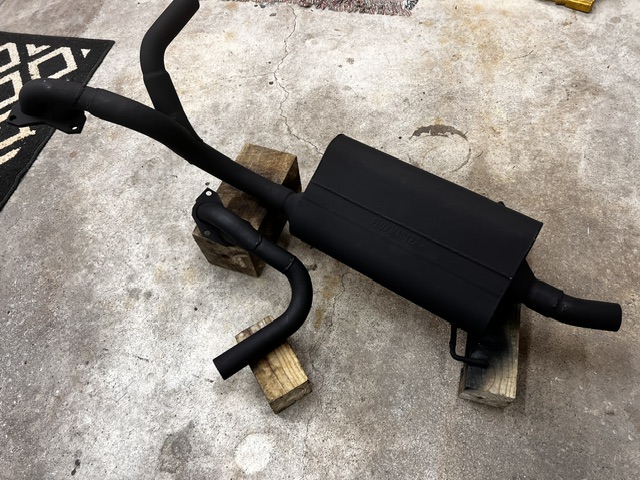 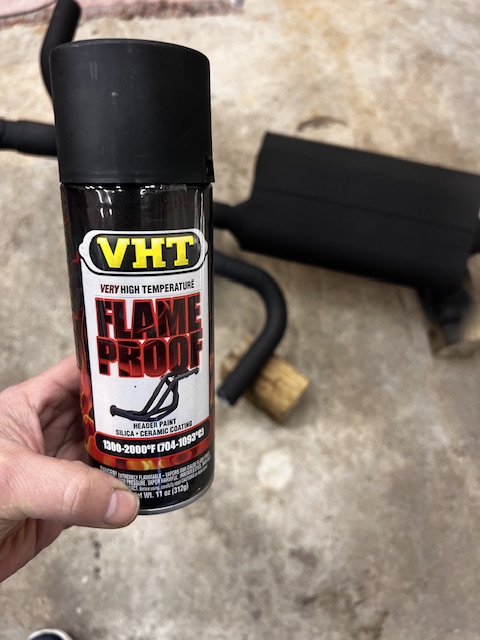 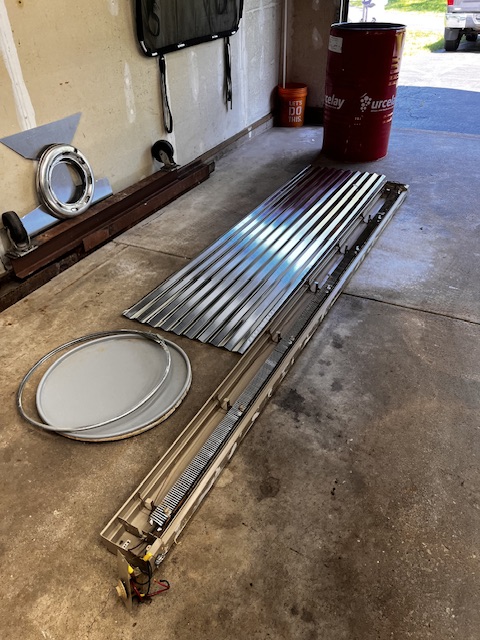 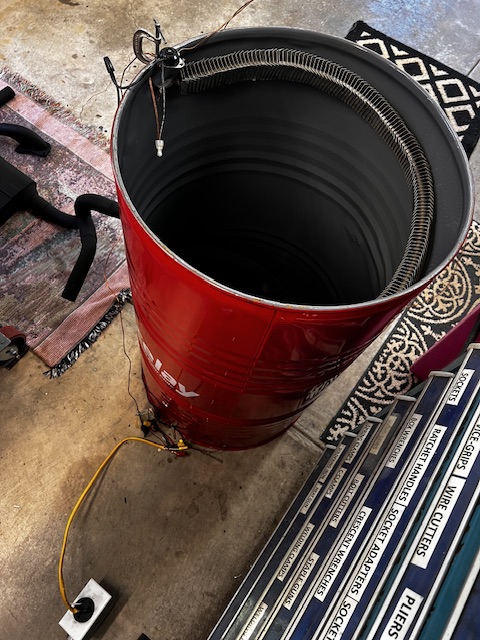 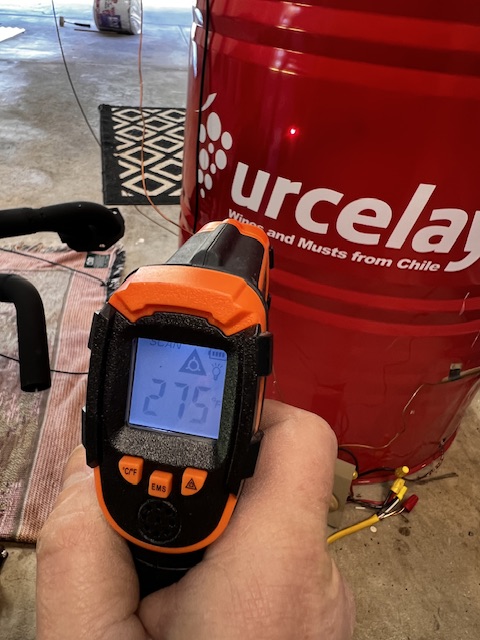 |
|
|
|
| Jack Standz |
May 29 2026, 01:51 PM
Post
#58
|
|
Senior Member Group: Members Posts: 978 Joined: 15-November 19 From: Happy Place (& surrounding area) Member No.: 23,644 Region Association: None
|
We use a dedicated oven we got for free that only gets used for powder coating things and a couple toaster ovens from Goodwill that cost $6 each (for the smaller parts). Maybe this could work for you?
Because of the outgassing from curing the powder coatings, we only use the ovens outside. The oven works great for items like trailing arms, control arms, etc. but, for larger items you can run into problems. We were able to use it on a bar that goes from one side of the 914 to the other that seat belt harnesses attach to, but it required curing half in the oven with some aluminum foil to block heat loss from the partially opened oven door and then turning the bar around to cure the other half. Not ideal. Later came across a YouTube video that showed someone creating an oven from foam board insulation, aluminum tape and a couple Harbor Freight heat guns. This would have worked to cure the seat belt harness bar in one curing step. However, can't find that video right now, but here's a similar one. https://www.tiktok.com/@garage.299/video/7375326760155516193 Again, cure outside and keep an eye on the "foam board insulation oven" just in case the foam can't take the heat. A couple really good features of this type oven is that you can make it different widths or different depths to hold the part you are curing and it can be made to be taken apart so storage takes less space. Haven't tried this yet, but plan to for the next larger piece to be powder coated. |
|
|
|
| Lilchopshop |
May 29 2026, 05:36 PM
Post
#59
|
|
Member Group: Members Posts: 117 Joined: 17-February 20 From: New York Member No.: 23,932 Region Association: North East States |
QUOTE(Jack Standz @ May 29 2026, 03:51 PM) We use a dedicated oven we got for free that only gets used for powder coating things and a couple toaster ovens from Goodwill that cost $6 each (for the smaller parts). Maybe this could work for you? Because of the outgassing from curing the powder coatings, we only use the ovens outside. The oven works great for items like trailing arms, control arms, etc. but, for larger items you can run into problems. We were able to use it on a bar that goes from one side of the 914 to the other that seat belt harnesses attach to, but it required curing half in the oven with some aluminum foil to block heat loss from the partially opened oven door and then turning the bar around to cure the other half. Not ideal. Later came across a YouTube video that showed someone creating an oven from foam board insulation, aluminum tape and a couple Harbor Freight heat guns. This would have worked to cure the seat belt harness bar in one curing step. However, can't find that video right now, but here's a similar one. https://www.tiktok.com/@garage.299/video/7375326760155516193 Again, cure outside and keep an eye on the "foam board insulation oven" just in case the foam can't take the heat. A couple really good features of this type oven is that you can make it different widths or different depths to hold the part you are curing and it can be made to be taken apart so storage takes less space. Haven't tried this yet, but plan to for the next larger piece to be powder coated. @Jack_Standz Thanks for the info, but more importantly, thanks for letting me know that I’m not alone here with my crazy ideas! (IMG:style_emoticons/default/screwy.gif) If you’re interested, stay tuned for my overly-engineered solution to a problem that could have very easily been solved with a heat gun and some patience! |
|
|
|
| Lilchopshop |
May 30 2026, 03:29 PM
Post
#60
|
|
Member Group: Members Posts: 117 Joined: 17-February 20 From: New York Member No.: 23,932 Region Association: North East States |
A couple of little projects before I pull the engine out again and while I wait for my makeshift oven components to arrive.
I needed to add some more restraints for my shift cables. First I made this thing to mount on the engine cradle near the left suspension ear. I will fully weld this to the cradle once it’s out of the car. 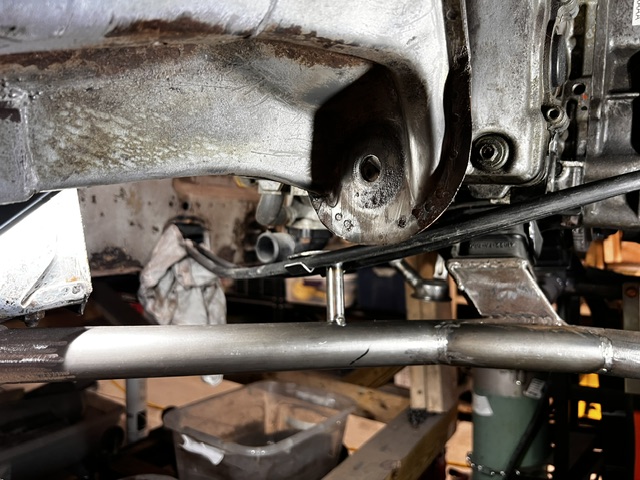 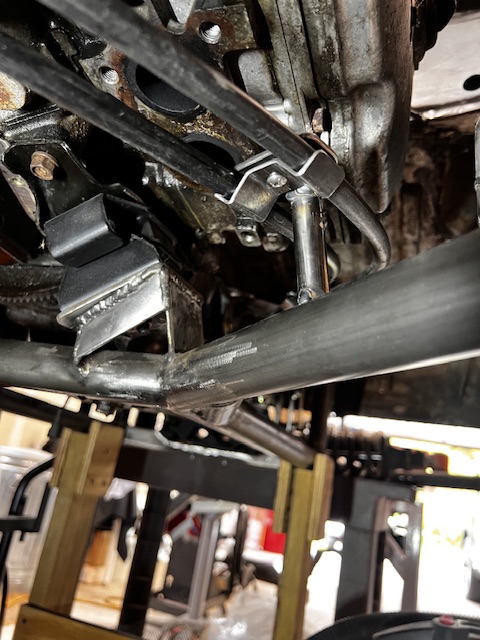 Then, I designed and 3d printed this part that will replace the center tunnel access plate. This is version one, printed with PLA. It fits great, but it needs to be beefed up a little bit before I print version 2 in ABS. 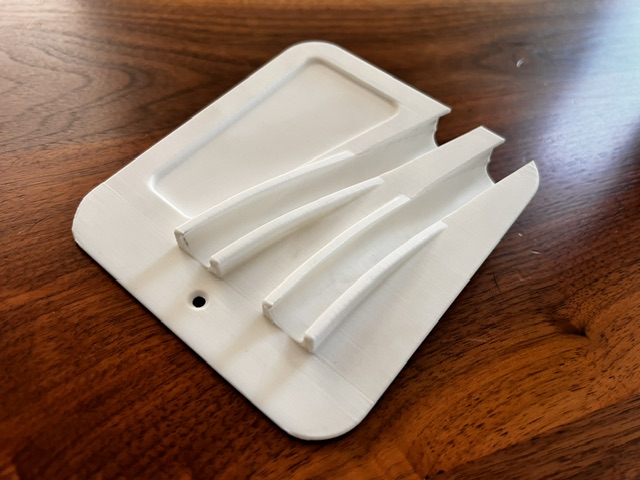 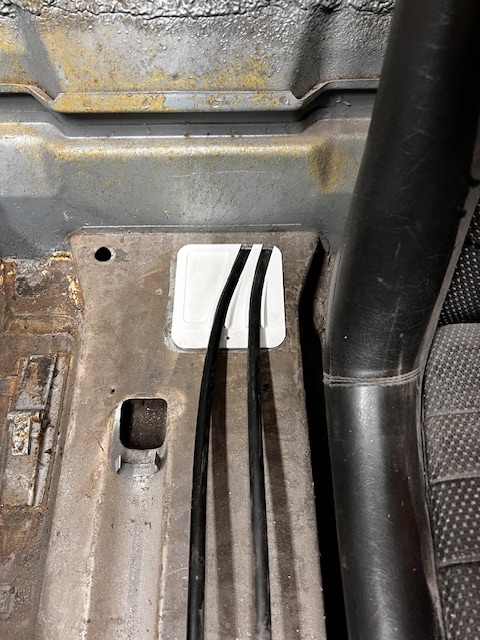 I’ll make one more of these kind of plates for where the shift cables enter the engine compartment through the lower firewall. Not sure yet if that plate will be 3d printed as well or if it will be metal for better durability. Thanks for looking! |
|
|
|
|
5 User(s) are reading this topic (3 Guests and 0 Anonymous Users)
2 Members: mepstein, jesse7flying

|
Lo-Fi Version | Time is now: 11th November 2026 - 12:59 PM |
Invision Power Board
v9.1.4 © 2026 IPS, Inc.