|
|
|
Porsche, and the Porsche crest are registered trademarks of Dr. Ing. h.c. F. Porsche AG.
This site is not affiliated with Porsche in any way. Its only purpose is to provide an online forum for car enthusiasts. All other trademarks are property of their respective owners. |
|
|

  |

| friethmiller |
 Mar 9 2025, 09:27 PM Mar 9 2025, 09:27 PM
Post
#421
|
|
Senior Member  Group: Members Posts: 1,069 Joined: 10-February 19 From: Austin, TX Member No.: 22,863 Region Association: Southwest Region |
I just looked at this area today. Thanks for the pic. I’ll plan on doing something. Lord knows I’ve got a bunch of scrap metal I could use.
|
   |

 
|
| friethmiller |
Mar 23 2025, 08:06 PM
Post
#422
|
|
Senior Member Group: Members Posts: 1,069 Joined: 10-February 19 From: Austin, TX Member No.: 22,863 Region Association: Southwest Region |
Front Fender Area Repair: (3/23/2025):
Feeling pretty jet-lagged after my trip but managed to get a few items knocked-off the list today. Seal Channel Repair Pretty straight forward here, cut out the bad and replacement with new metal. The second pic show 3 areas of concern. Obviously the center section needed to be removed and replaced but the left arrow denotes where the 20 gauge edging had to be cut back; and the arrow to the right shows a layer of rotten metal that needed to be removed after separating it from the inner fender metal. This was metal that was originally part of the fender. I plan on replacing it directly to the fender prior to reinstall. You will also see that I didn't complete all the bends on the patch metal. It's actually easier sometimes to make the bends with channel-locks/vice grips once the piece is partially welded into the car. I just made sure the bottom section had a sufficient gap and started welding. Note: the pic with the single red arrow shows the drain hole that I typically include when replacing the 20 gauge edging in this area. This way, any water in the fender seal gap will drain directly into the light bucket and out. The only trick here is trying not to snag it on anything prior to getting the fender back on. (IMG:style_emoticons/default/blink.gif) 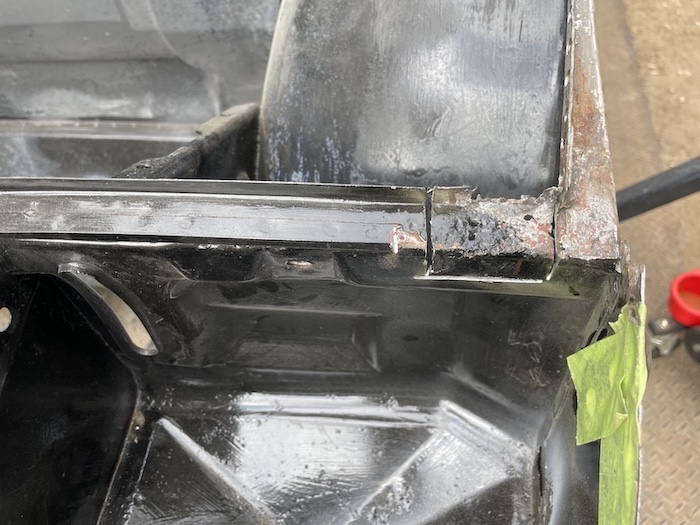 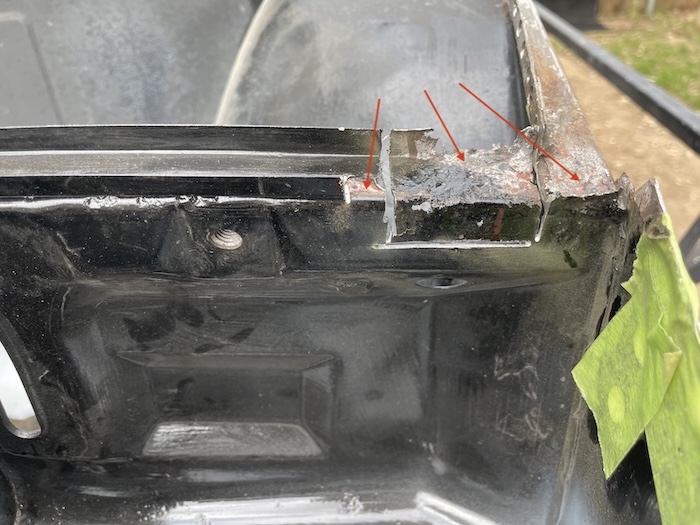 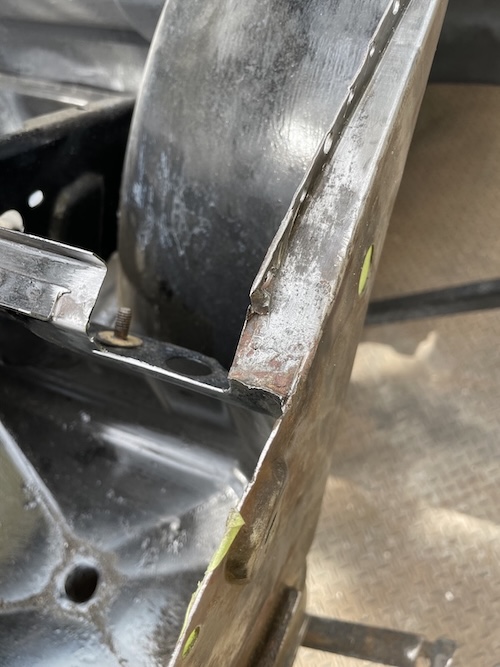 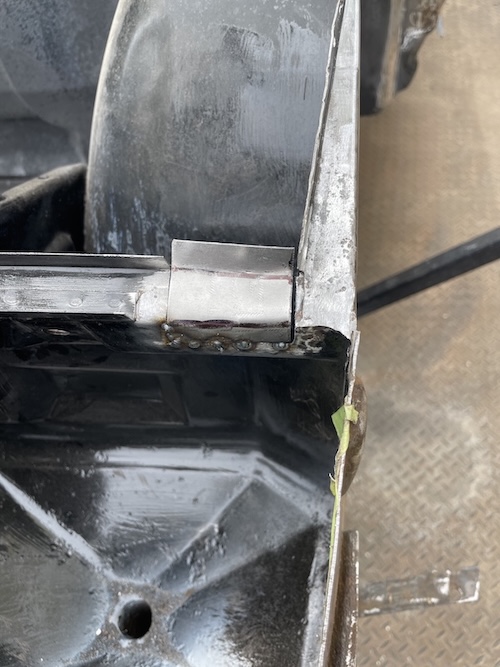 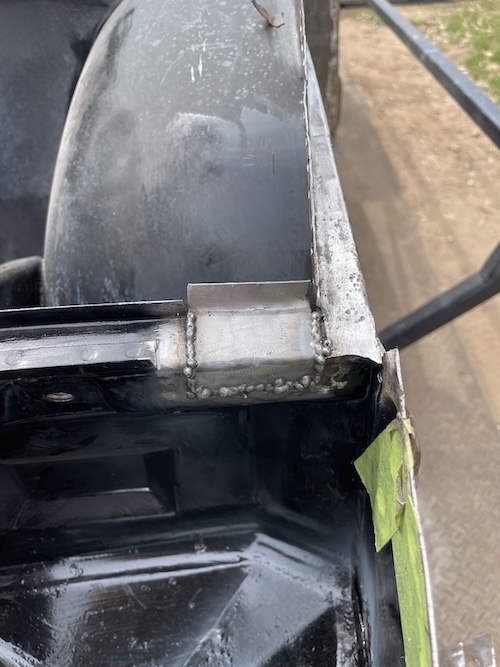 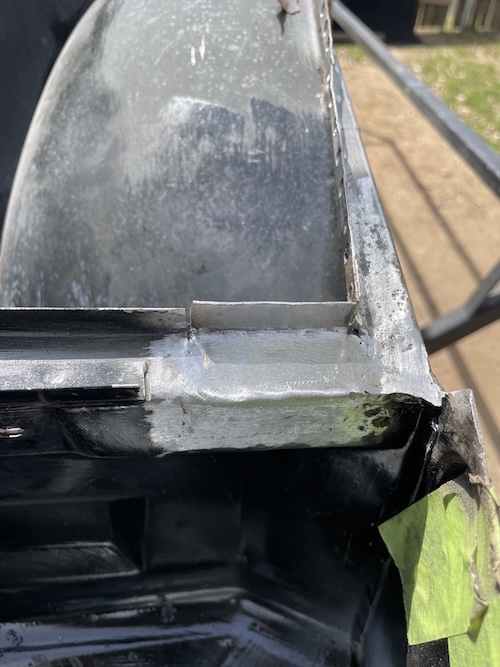 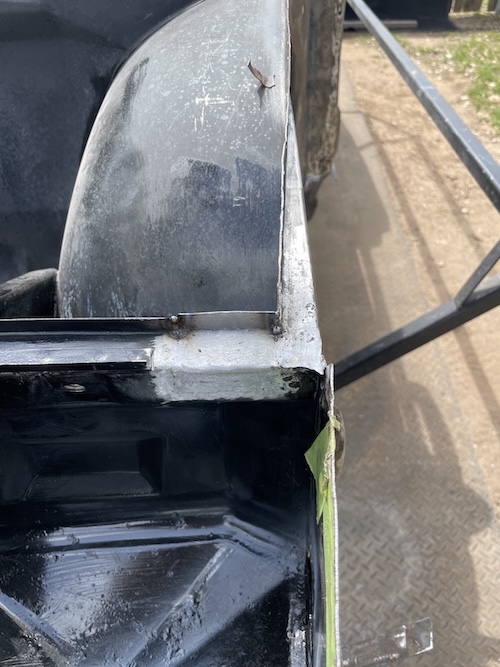 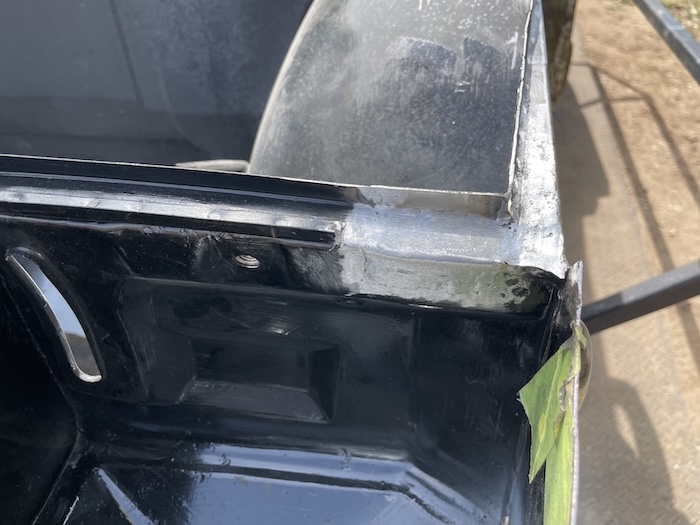 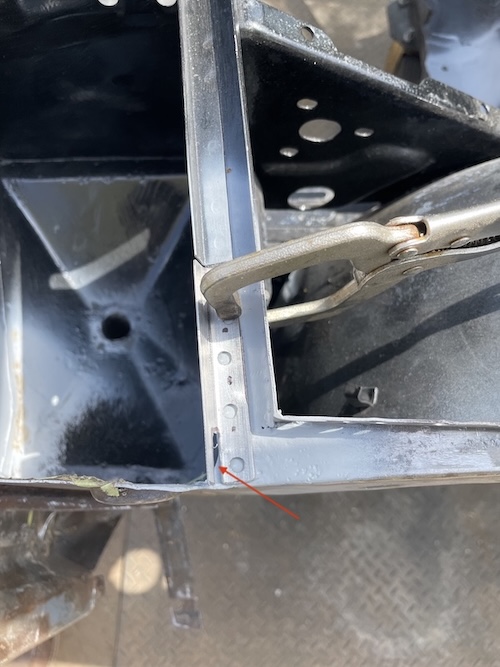 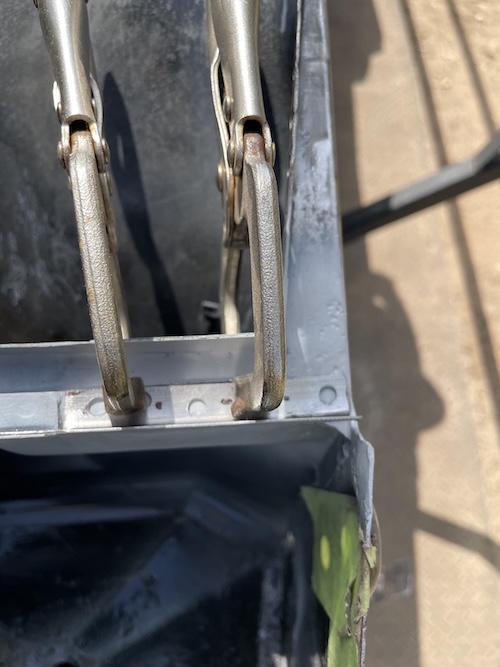  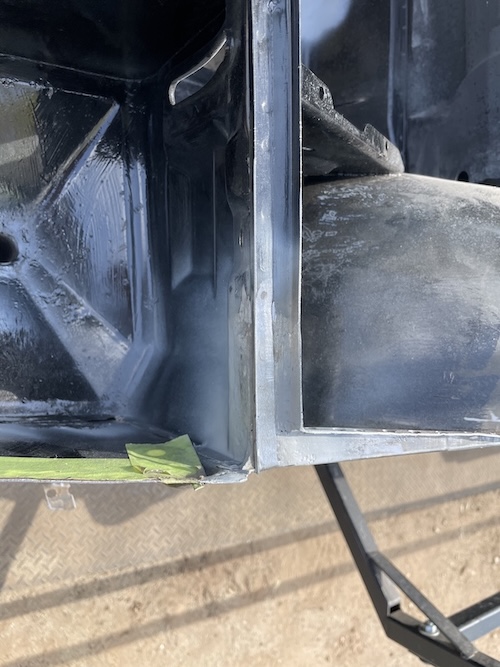 Swaybar Reinforcement Again, nothing too exciting here. I'm just doing what I did before. Going to have to finish grinding my welds later. I didn't want to run the grinder since it was so late on a Sunday (approx. 6pm). One step I had to do here was a quick phosphate treatment prior to applying primer. This can be tricky. Applied a quick light coat, let it sit for a minute, and then dried it off with a towel and compressed air. You may also note that I had to trim the inner edge of the reinforcement metal. This is to prevent overhang and make it easier to weld. I have yet to see these pieces fit with out some sort of modification. But hey! It's a flat piece of metal... no complaints. Onward! (IMG:style_emoticons/default/aktion035.gif) 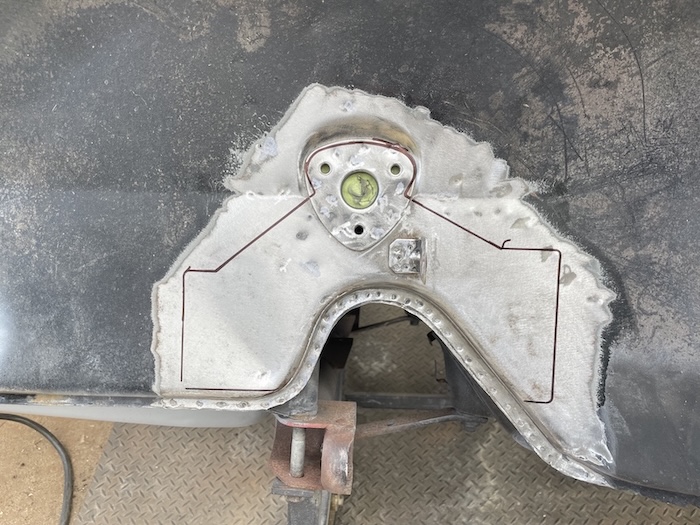     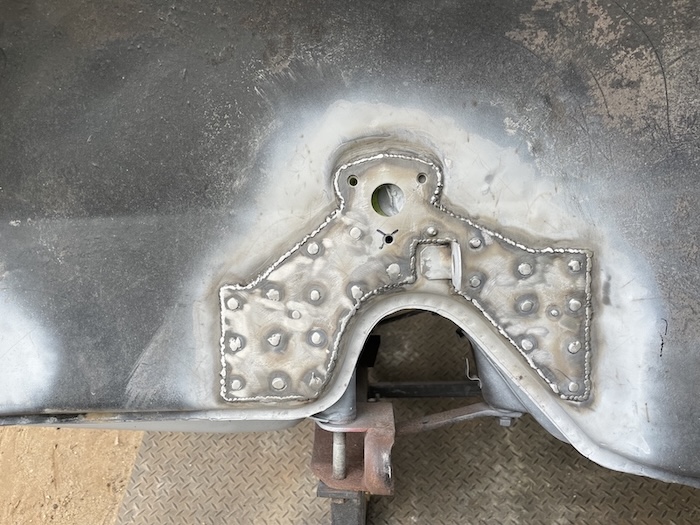 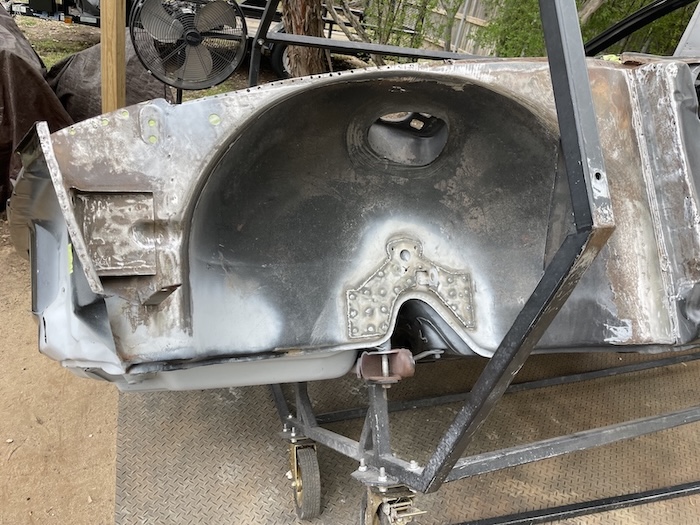 |
|
|
|
| friethmiller |
Mar 24 2025, 01:57 PM
Post
#423
|
|
Senior Member Group: Members Posts: 1,069 Joined: 10-February 19 From: Austin, TX Member No.: 22,863 Region Association: Southwest Region |
Added more text to my post from last night (above). My apologies for attempting to post being so tired. (IMG:style_emoticons/default/yellowsleep[1].gif)
|
|
|
|
| bkrantz |
Mar 24 2025, 07:37 PM
Post
#424
|
|
914 Guru Group: Members Posts: 8,530 Joined: 3-August 19 From: SW Colorado Member No.: 23,343 Region Association: Rocky Mountains |
+1 for drain holes in the frunk gasket channel. Another one of those little details that Porsche and Karmann did not think about (and could have prevented billions of dollars in 914 rust damage).
|
 |
|
| friethmiller |
Mar 25 2025, 05:29 AM
Post
#425
|
|
Senior Member Group: Members Posts: 1,069 Joined: 10-February 19 From: Austin, TX Member No.: 22,863 Region Association: Southwest Region |
QUOTE(bkrantz @ Mar 24 2025, 08:37 PM)  +1 for drain holes in the frunk gasket channel. Another one of those little details that Porsche and Karmann did not think about (and could have prevented billions of dollars in 914 rust damage). Yeah, the issue must have been discovered mid-way through the production years. I know Porsche started to address the issue in the '75+ cars. I tried to mimic the "drain slots" in front-bottom channel and added one above each light bucket. I'll get some better pics later once the fenders have been remounted. (IMG:style_emoticons/default/welder.gif) |
|
|
|
| friethmiller |
Apr 2 2025, 10:37 AM
Post
#426
|
|
Senior Member Group: Members Posts: 1,069 Joined: 10-February 19 From: Austin, TX Member No.: 22,863 Region Association: Southwest Region |
Front Fender Area Repair - (cont.): (3/29/2025):
First up was the task of grinding welds on the front sway-bar support metal. Used a 4 1/2 inch grinder plus the finger sander to feather the perimeter welds. 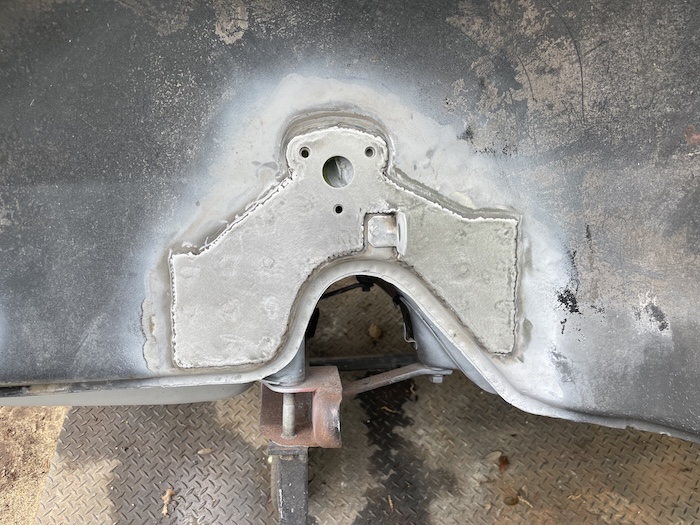 The next photos show the progress of wire wheeling (pic 1), phosphorus treatment (pic 2), and (pic3) blasting with medium grit glass. This was then treated with rustBullet to lock in any remaining rust in order to significantly slow/halt the process (pic 4). I'm only doing one coat here since everything will be roughed up and painted with 2-stage epoxy later. 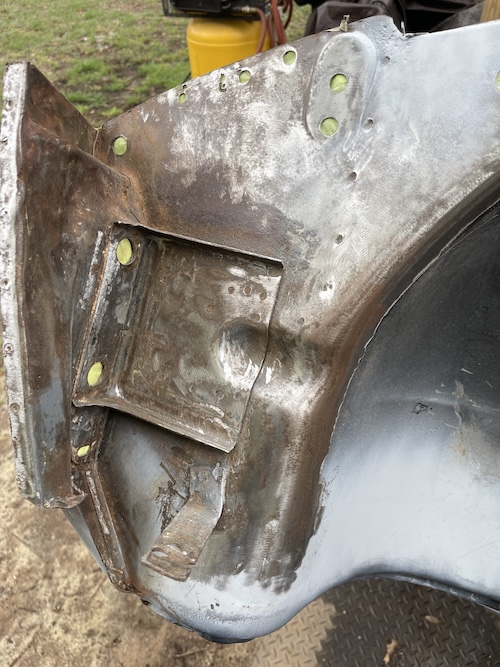 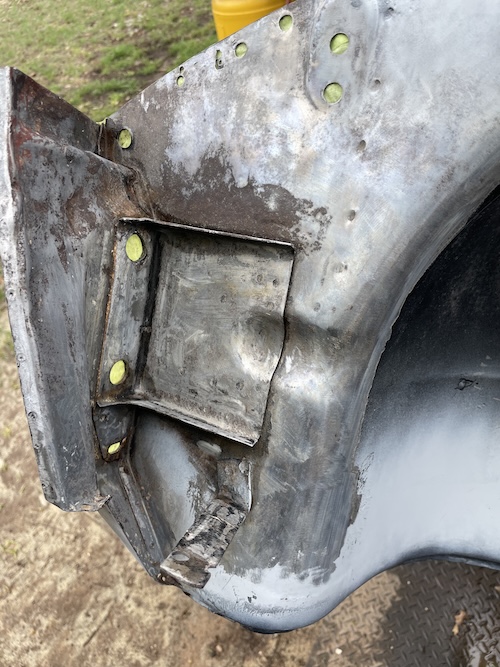 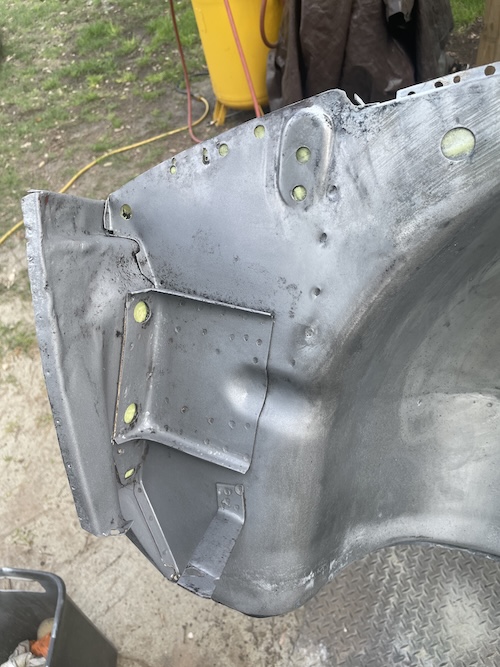 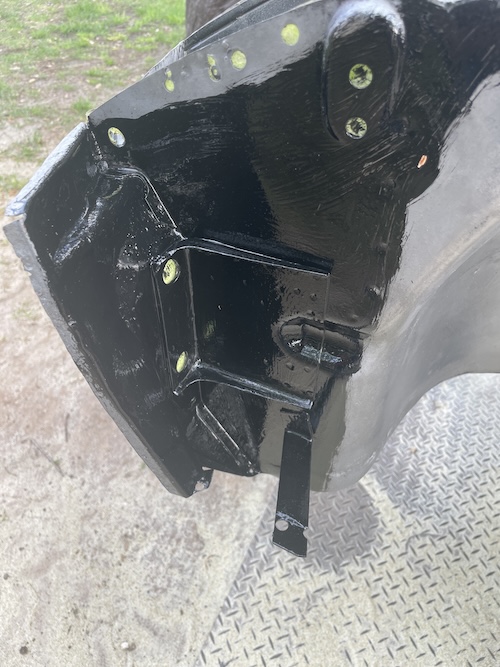 Paint removal was done with a 4 1/2 paint strip disc and finished off with a 120 grit disks using a D/A sander. 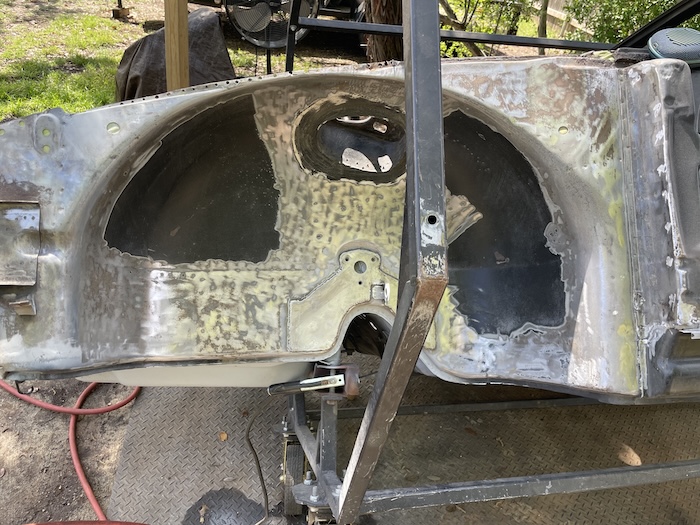 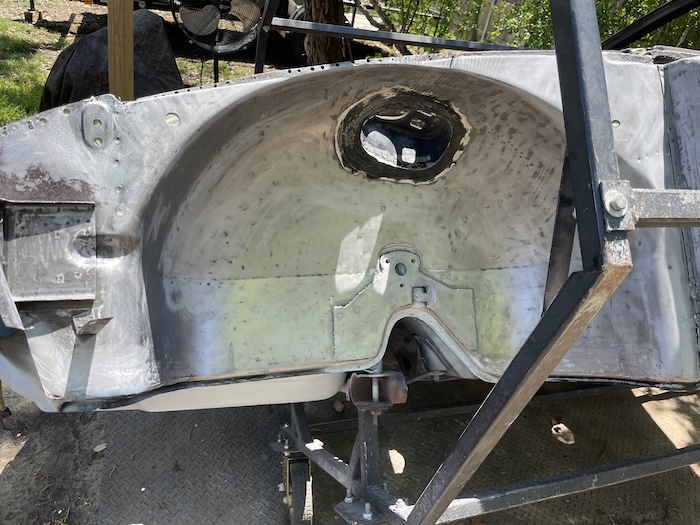 Added metal back into the A-pillar support. I think this saves time during fender install by providing metal that was inadvertently removed when drilling out spot welds. Second photo shows "work-in-progess" on weak or missing metal at the bottom of the fender weld point. Again, preparing the area for the eventual fender reassembly. 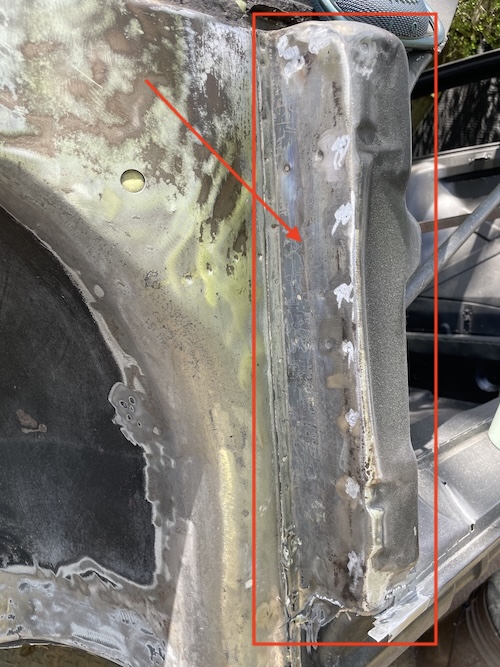 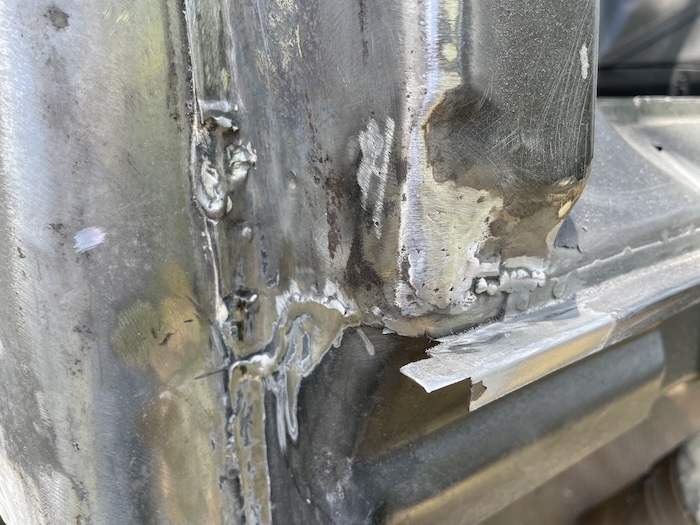 The next photos show me fixing the damage caused during fender removal (my bad (IMG:style_emoticons/default/rolleyes.gif) ). This cut line was welded closed and then ground down using a 3" angle grinder with a narrow cutting blade. Second photo shows the rust in the cowl area and my cuts in preparation for next weekend's "patch-fest"! 3rd photo shows the repair area after grinding & blasting. 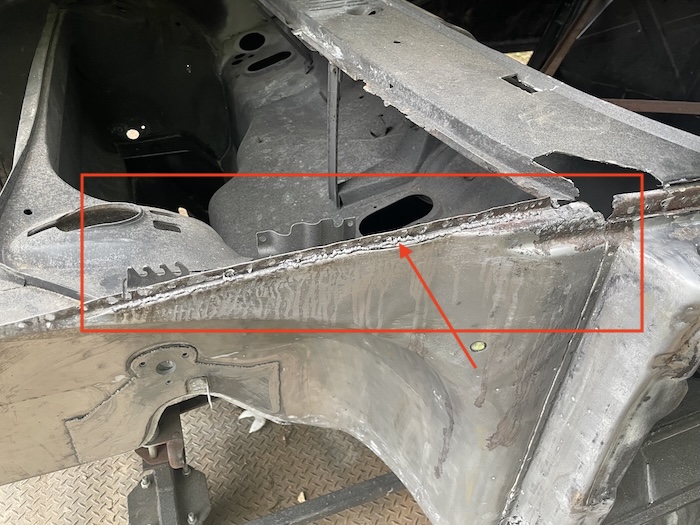 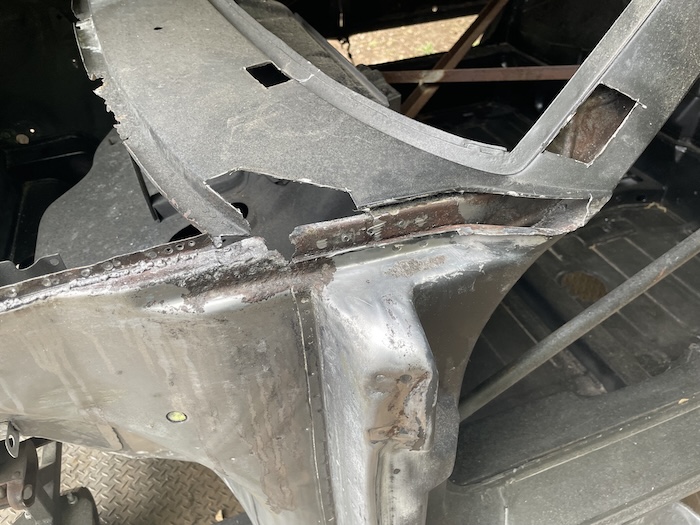 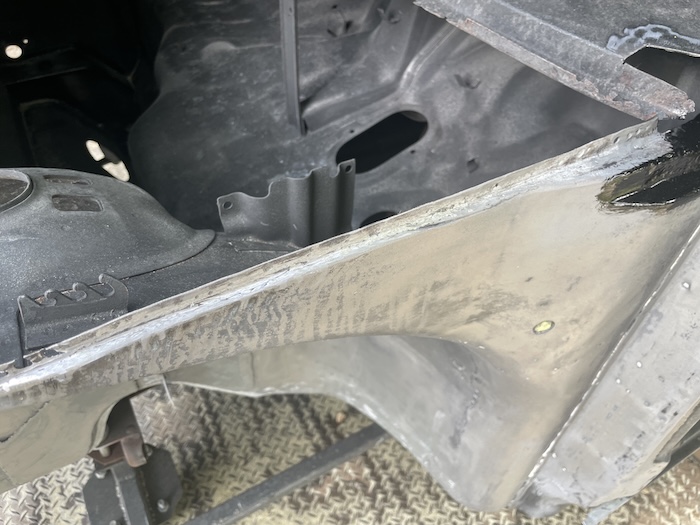 Final photos show the epoxy used in the troubled spots. Sorry I didn't get a photo of this metal after sandblasting (thought I did (IMG:style_emoticons/default/confused24.gif) ). Next weekend will be fun with the metal repair. I'm leaving the replacement of the rear seal gutter for last - that should be exciting! (IMG:style_emoticons/default/huh.gif) Hoping to get it all done by Sunday. We'll see. Cheers (IMG:style_emoticons/default/beer3.gif) 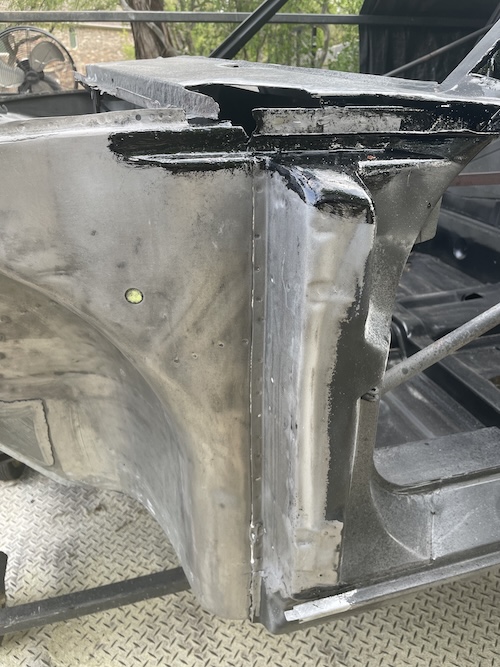 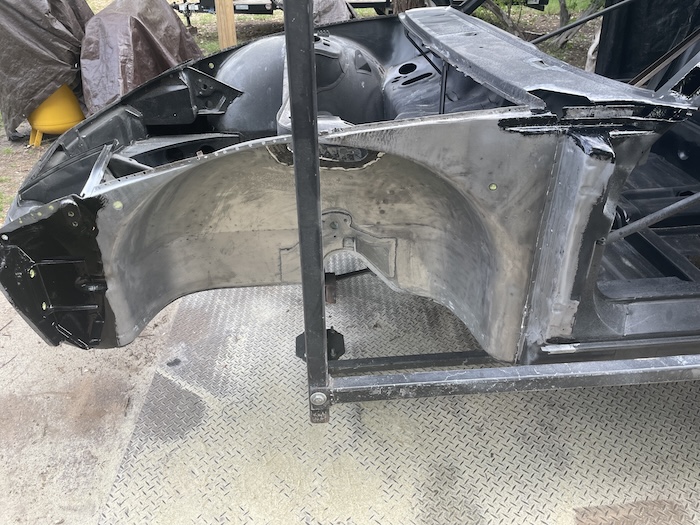 |
|
|
|
| friethmiller |
Apr 6 2025, 04:30 PM
Post
#427
|
|
Senior Member Group: Members Posts: 1,069 Joined: 10-February 19 From: Austin, TX Member No.: 22,863 Region Association: Southwest Region |
Driver Side Cowl / A-Pillar Repair: (4/5 - 4/6/2025):
My goal this weekend was to complete the three patches in the cowl area and repair/install the front threshold stabilizer that mounts to the door support/A-Pillar. However, before I could even weld the first patch, I had to add metal to the 90 degree support on the A-Pillar (arrow). Once this was completed, I worked to fit the cowl patch - making sure I had it all setup/secured. Next, I prep'd the area with weld-through primer and locked the patch in place using screws and clamps. After a good tack around the parameter, I finished the rosettes and then completed the butt welding. The second patch was a few inches up the window frame. This kind of repair is always tricky. A small magnet helped hold things in place till I could tack in the first corner. Didn't bother getting anything perfect here. Cold weather was coming in and wanted to make sure I finished the 3rd patch by the end of the day. The final photos show this repair, which was pretty straight forward. I did use the 3" angle grinder to deal with the heavy weld in the glass channel. Not perfect, nor 100% complete but it will work for now. 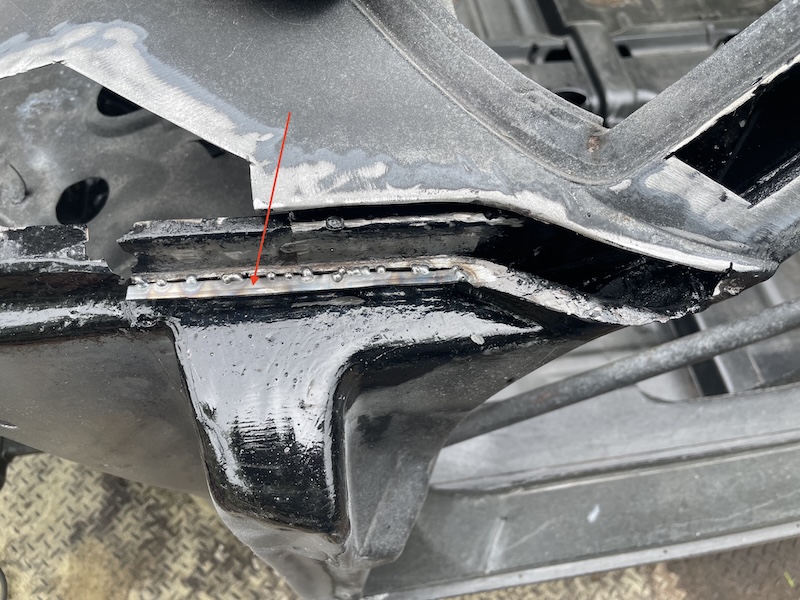 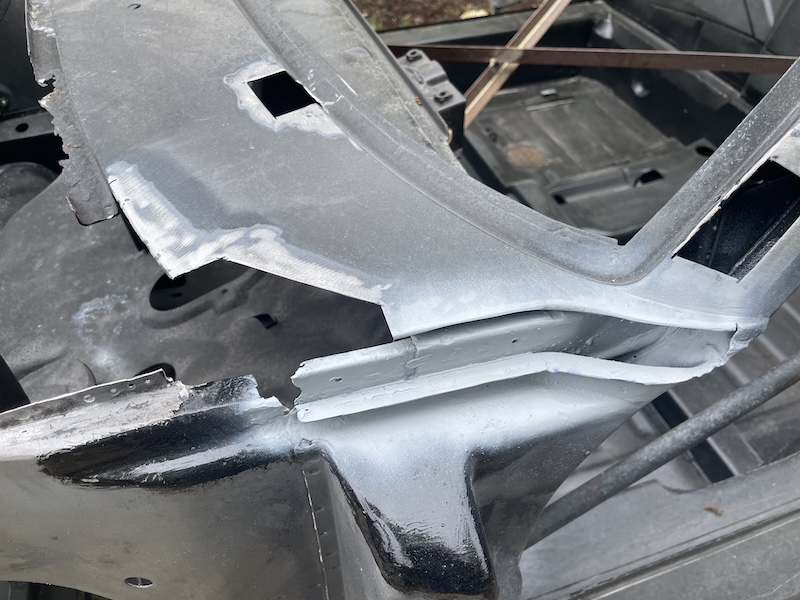 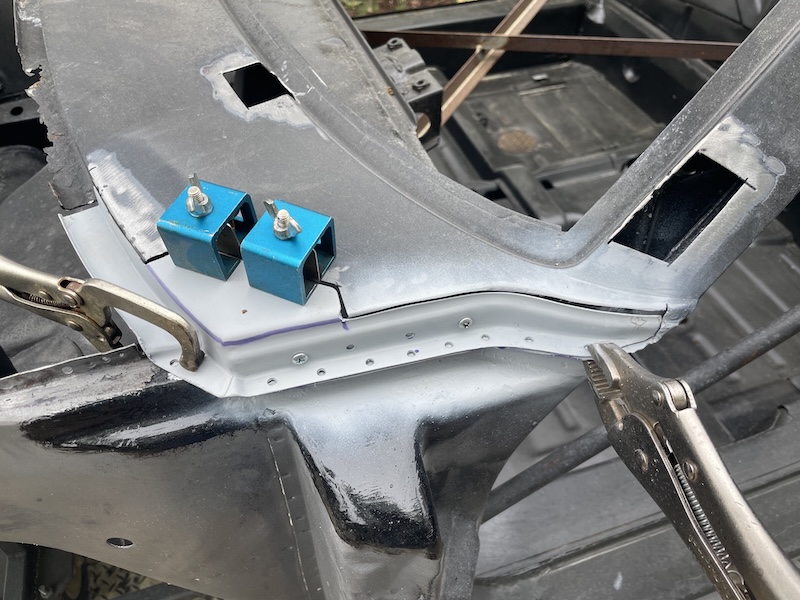 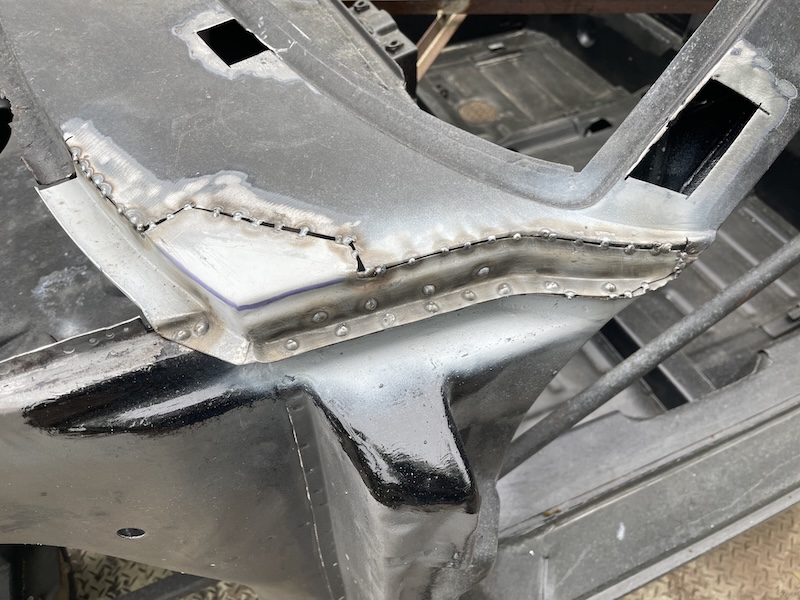 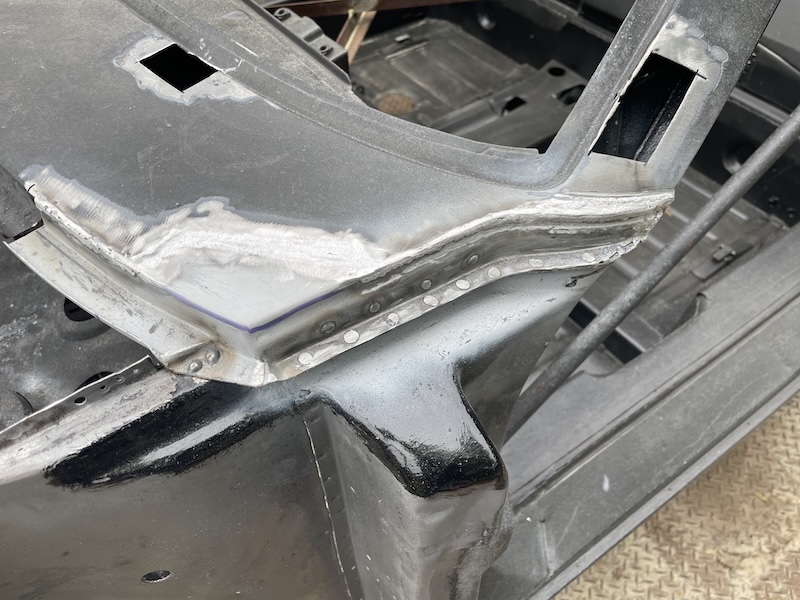 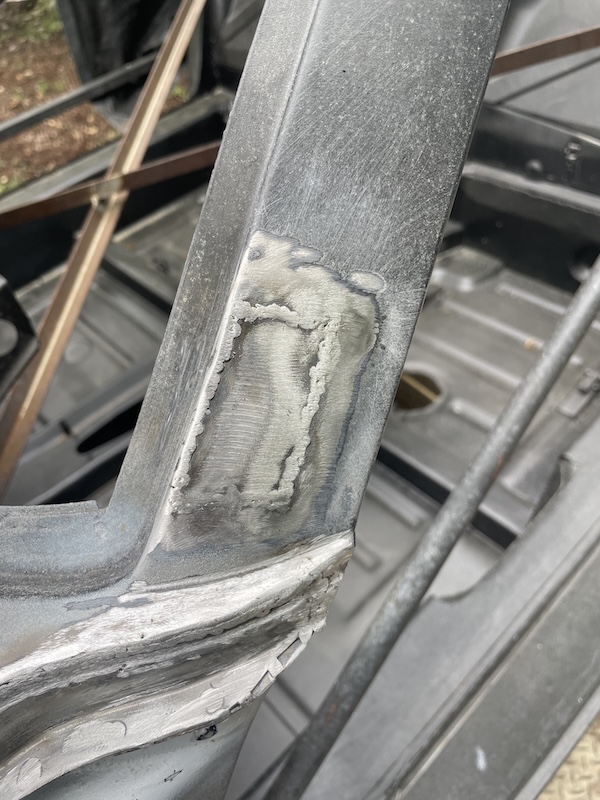 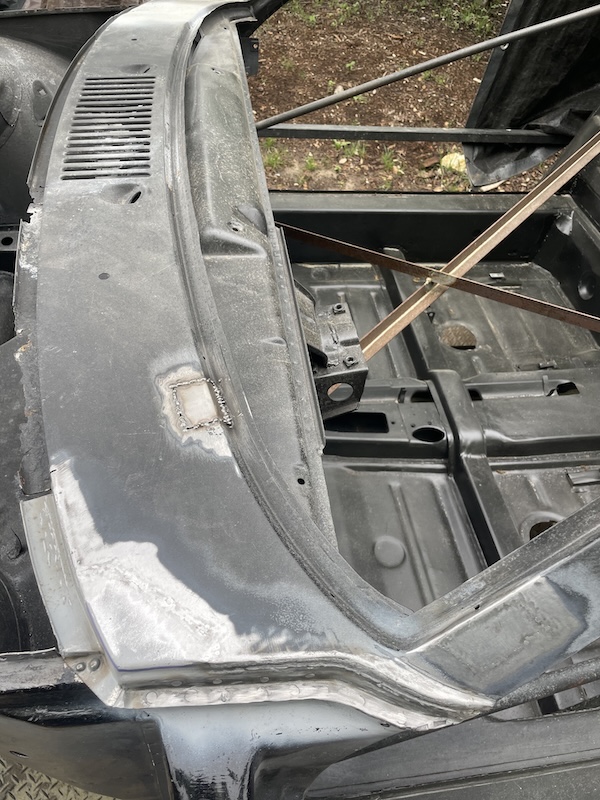 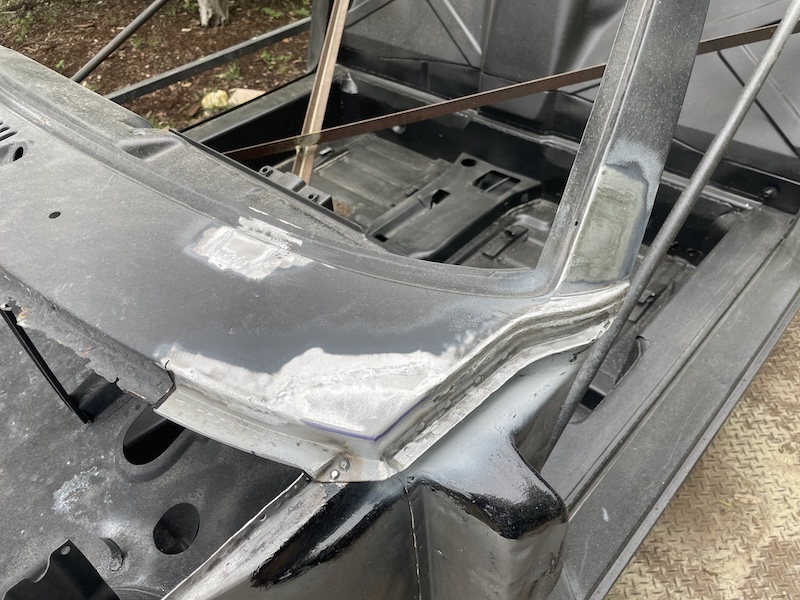 On Sunday, I spent the morning on the other 914 in the garage. This worked well since it was 40 degrees and windy outside. The goal today for the LE was to get the front threshold support welded in place and, if time allowed, get the car up on the 90 and cut out the final rusted-out section on the cowl. This original support metal was deemed "good enough to reuse" so I had to carefully weld this in place. The red arrow in the first photo points to one of the spots where I had to add new metal. The third photo shows the tab at the bottom replaced (not arrowed (IMG:style_emoticons/default/confused24.gif) ) and the entire area primer'd. The arrow in the fourth photo shows a little extra weld I added to help support the part a bit better. 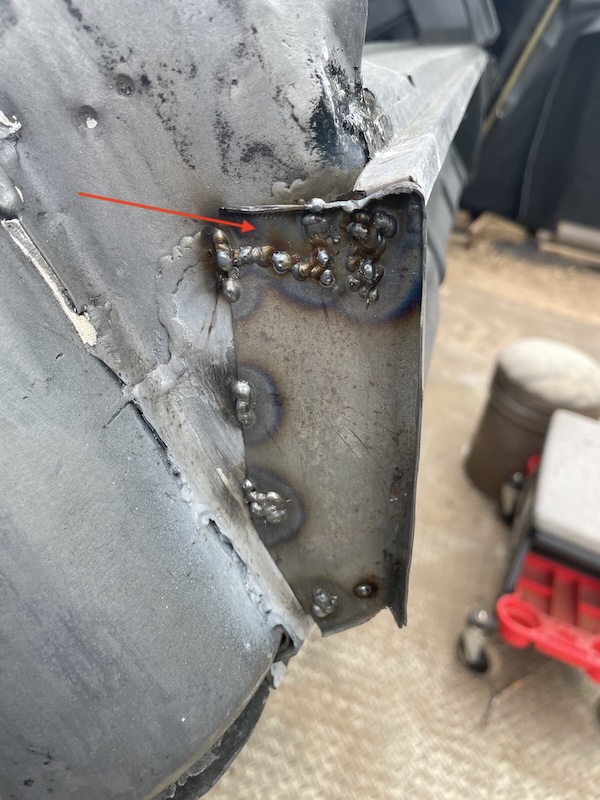 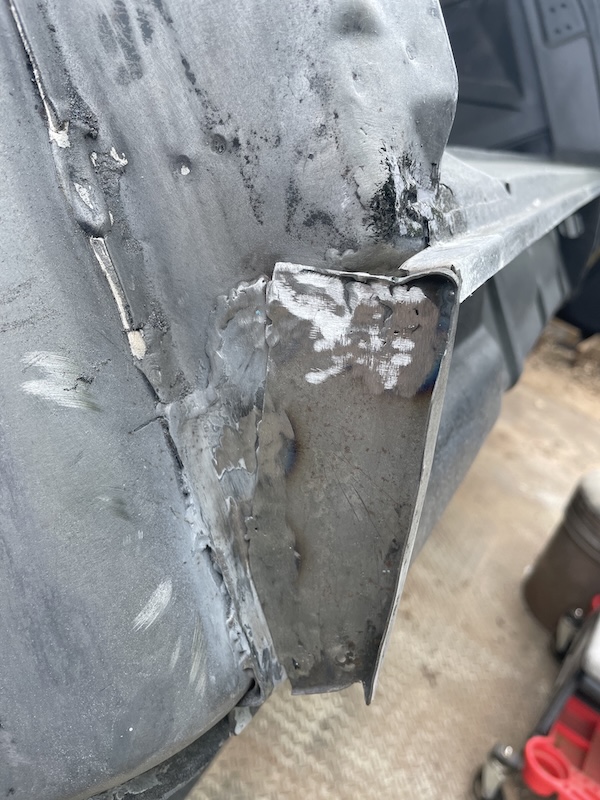  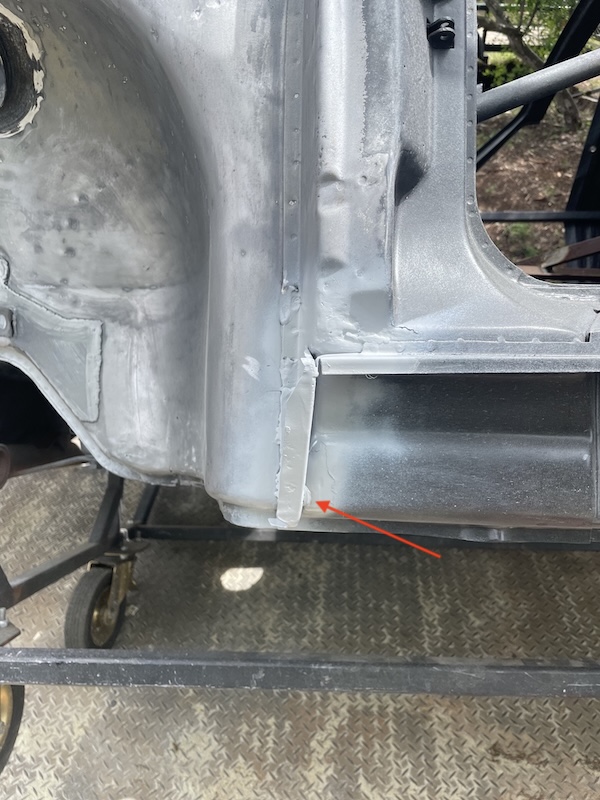 After the sun came out and warmed things up a bit, I decided to flip the car up on its side and cut out the chewed up section of the seal track from the front of the cowl. This cut was surprisingly easy with the 4 1/2' cutter. Ended up undoing the 10mm bolt to remove the piece from the car. Boom! This will be done next weekend. hopefully. Final photo shows the car after cleaning off a bunch of dirt and oak pollen. 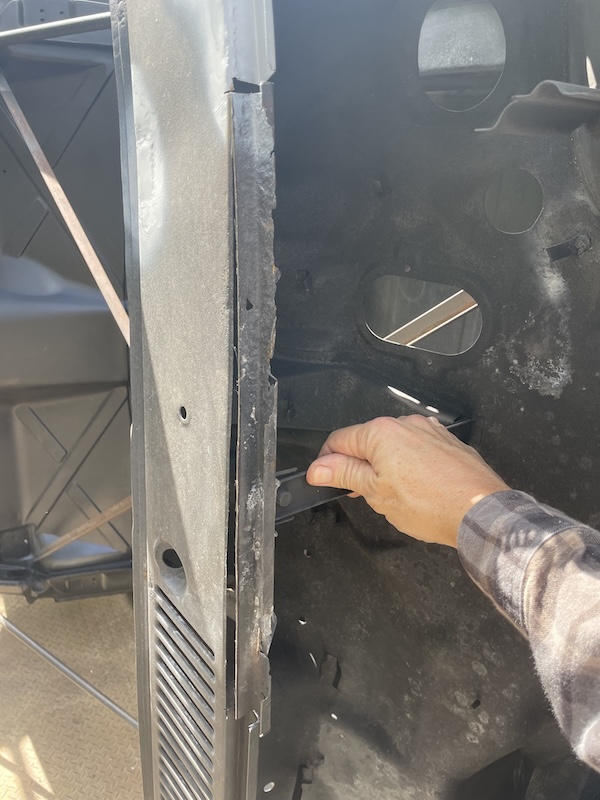 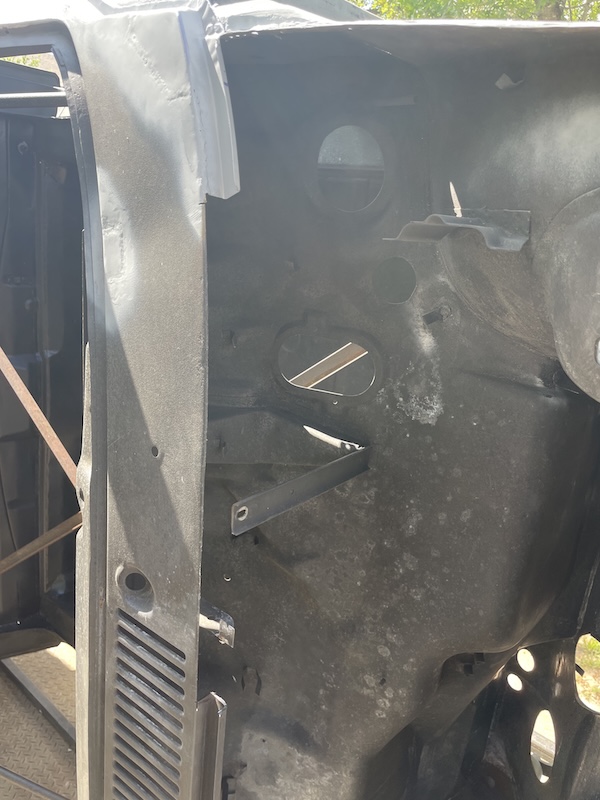 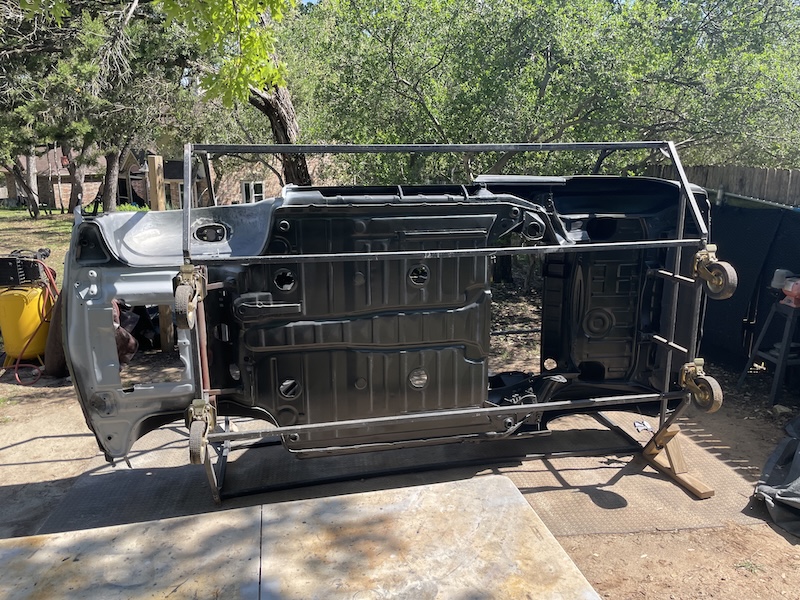 |
|
|
|
| technicalninja |
Apr 6 2025, 04:37 PM
Post
#428
|
|
Advanced Member Group: Members Posts: 2,531 Joined: 31-January 23 From: Granbury Texas Member No.: 27,135 Region Association: Southwest Region |
Metal Whisperer!
(IMG:style_emoticons/default/first.gif) Looks nicer down in Austin than here... Still grey and cool. |
|
|
|
| BillC |
Apr 6 2025, 06:59 PM
Post
#429
|
|
Senior Member Group: Members Posts: 694 Joined: 24-April 15 From: Silver Spring, MD Member No.: 18,667 Region Association: MidAtlantic Region |
Extraordinary!
|
|
|
|
| Puebloswatcop |
Apr 6 2025, 07:21 PM
Post
#430
|
|
Senior Member Group: Members Posts: 1,677 Joined: 27-December 14 From: Mineola, Texas Member No.: 18,258 Region Association: Southwest Region |
Wow Fred,
I am absolutely amazed. Wish I had seen this thread long ago. Now I am eager to make my return trip and swing by to pick up the part. I can't wait to see this project car. You do awesome metal work. See you in a couple of weeks and I look forward to seeing the LE. (IMG:style_emoticons/default/beerchug.gif) |
|
|
|
| friethmiller |
Apr 7 2025, 07:37 AM
Post
#431
|
|
Senior Member Group: Members Posts: 1,069 Joined: 10-February 19 From: Austin, TX Member No.: 22,863 Region Association: Southwest Region |
Thanks y'all! (IMG:style_emoticons/default/smoke.gif)
Kevin, I'll probably be repairing / reinstalling the front fenders by then. Don't hang around too long or I might put you to work. (IMG:style_emoticons/default/sawzall-smiley.gif) |
|
|
|
| 914werke |
Apr 7 2025, 01:41 PM
Post
#432
|
|
"I got blisters on me fingers" Group: Members Posts: 11,447 Joined: 22-March 03 From: USofA Member No.: 453 Region Association: Pacific Northwest |
|
|
|
|
| Puebloswatcop |
Apr 7 2025, 05:28 PM
Post
#433
|
|
Senior Member Group: Members Posts: 1,677 Joined: 27-December 14 From: Mineola, Texas Member No.: 18,258 Region Association: Southwest Region |
QUOTE(friethmiller @ Apr 7 2025, 08:37 AM) Thanks y'all! (IMG:style_emoticons/default/smoke.gif) Kevin, I'll probably be repairing / reinstalling the front fenders by then. Don't hang around too long or I might put you to work. (IMG:style_emoticons/default/sawzall-smiley.gif) I'd be more than happy to help.....I can stand to learn a few things. |
|
|
|
| friethmiller |
Apr 13 2025, 04:33 PM
Post
#434
|
|
Senior Member Group: Members Posts: 1,069 Joined: 10-February 19 From: Austin, TX Member No.: 22,863 Region Association: Southwest Region |
Front Cowl / Seal Track Repair: (4/12/2025):
Here we go, again! It's seal track repair but this time on the front of the cowl. Last weekend I had removed a large section that needed to be replaced. Here, I'm starting with a flat piece of 18 gauge steel. The red arrow in the 2nd pic points to a section that will be on the top of the cowl. This piece wasn't welded into the car, though. It was only included to provide material for the shrinker/stretcher tool. The 3rd picture (excuse the mess) shows this process. Note: I used the shrinker on the top side and the stretcher on the opposite (track) side. Keeping things even was the key here. I needed the track side to curve with the bend on the cowl side. The 4th picture shows how close I got to the original. Not too bad. 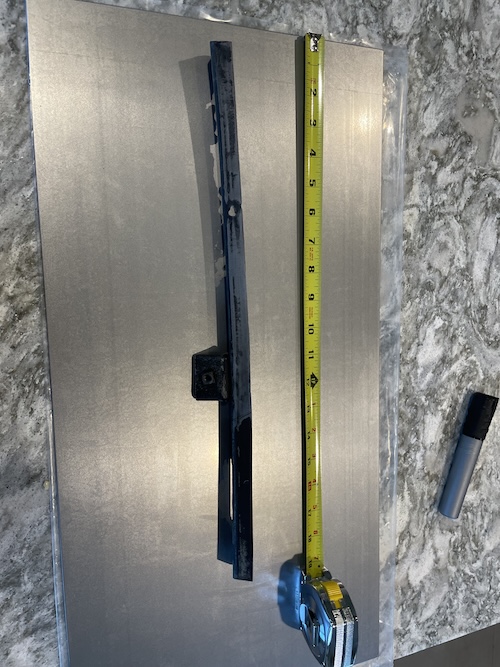 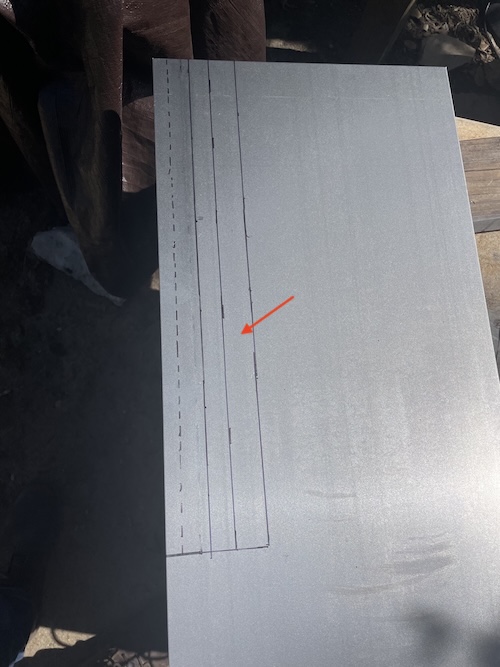 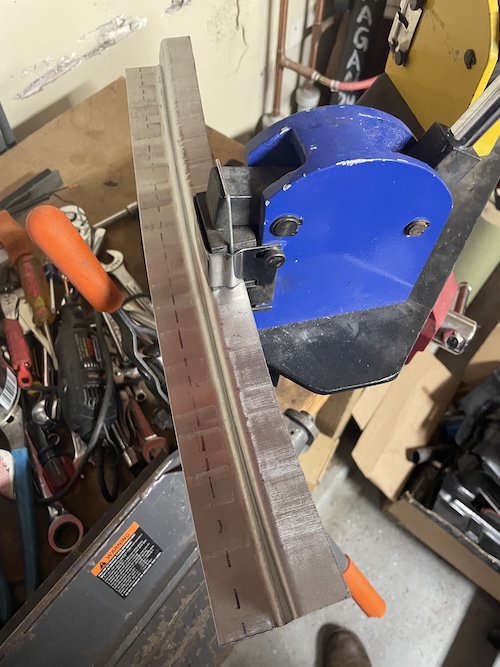 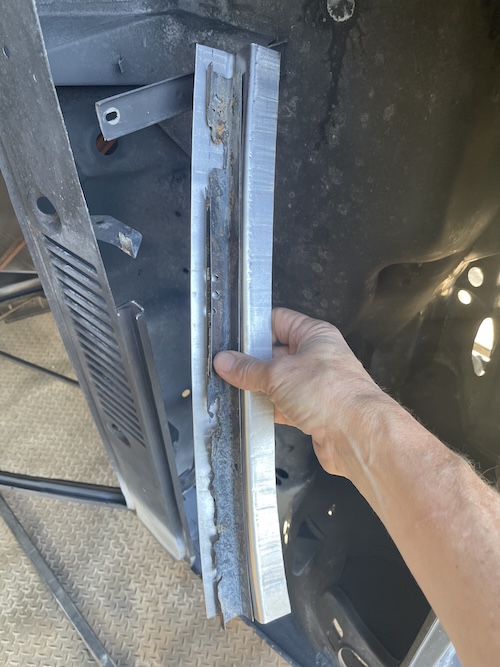 As discussed above, the cowl top section of the patch wasn't needed so it was removed (arrow). At this point the final bend was done by hand using the vice grip/channel lock technique (pics #2 and #3). It takes a little while on a larger piece like this but it wasn't too bad - probably 20mins. (IMG:style_emoticons/default/confused24.gif) The 4th pic shows the initial alignment check. It was so close, I stopped and pulled out the welder to begin tacking this thing in. 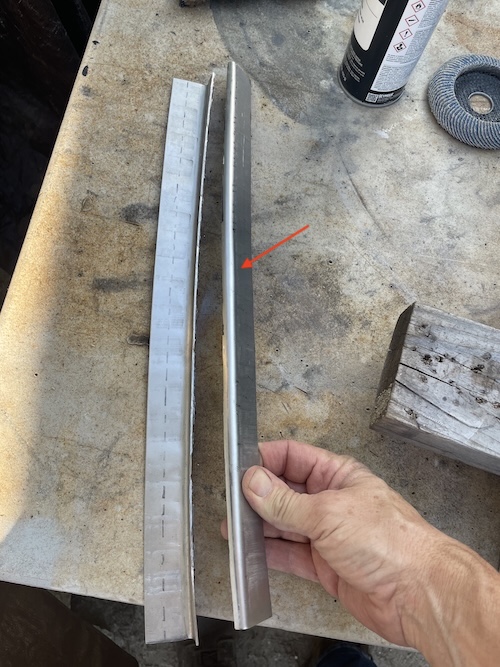 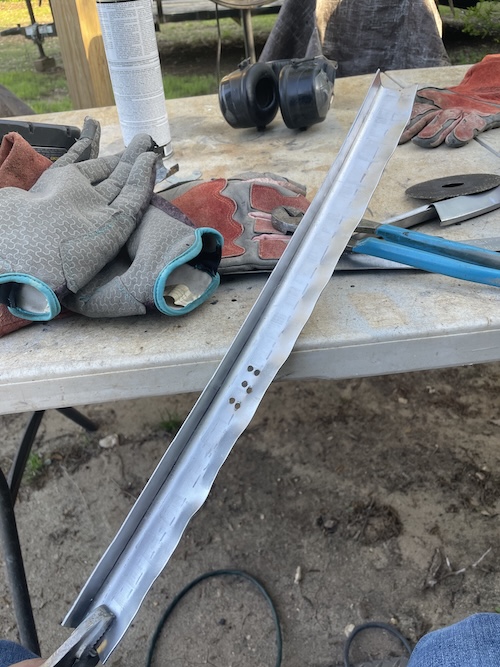 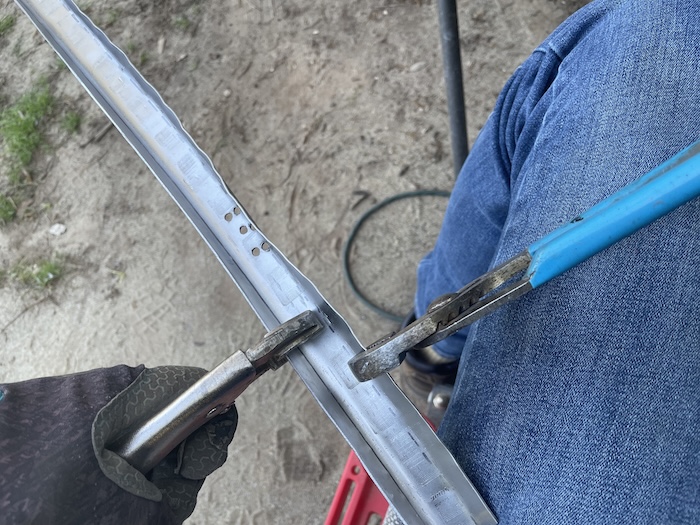 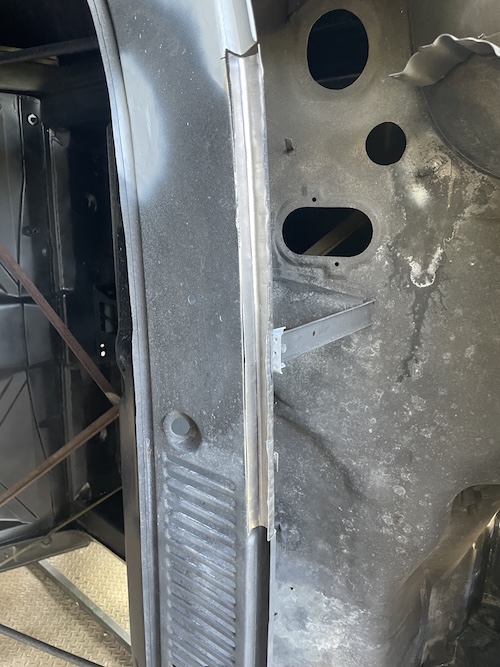 After a few tacks, I deployed the vice grips to help twist the patch just a bit to get it line up (pic #1). Pic #2 shows additional welds to the support post from below. Note how I flatten the bends a bit at the joins (red arrows). This was done to ensure I had the bottom of the track flush and to give me a little bit more room to weld. Next, I inserted the fresh air box, screwed in the nuts, and tacked the right side brace in place (pic #3). Pic #4 shows the quick (and ugly) weld to secure the brace. 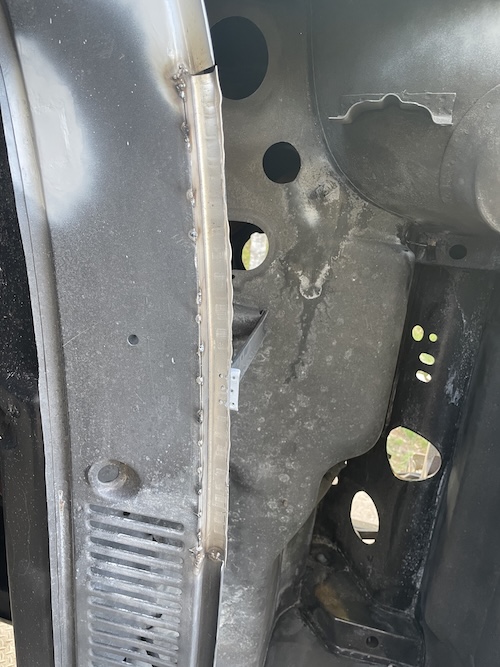 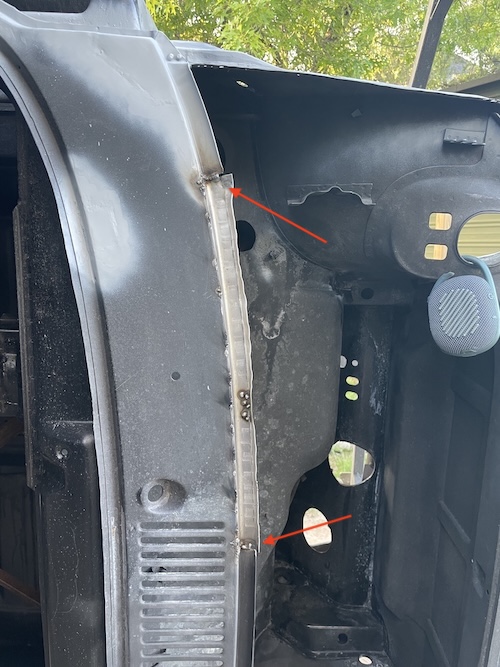  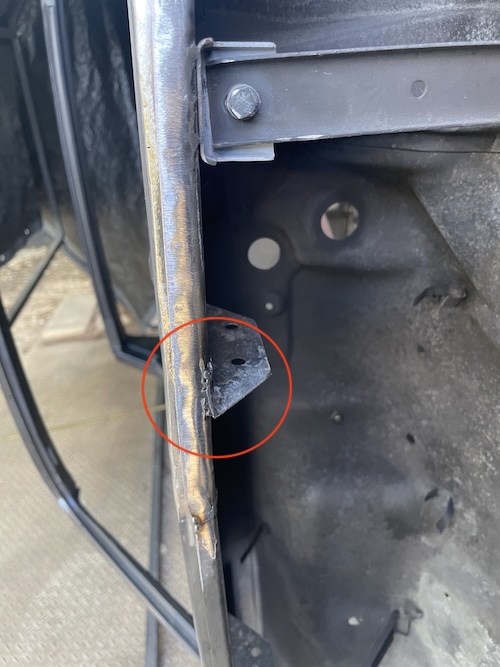 Next up, I had to deal with the front edge of the seal track that was part of the cowl repair patch (see last weekends pics). This piece, unfortunately, wasn't stamped with enough metal on the front edge. Pic #1 show additional metal welded to the top edge (green arrows). Pic #2 and #3, show additional welds. The red arrows in pic#4 shows the measured line that I drew. This was used as a guide for my 4 1/2" grinder to get a nice even edge all the way down the track. 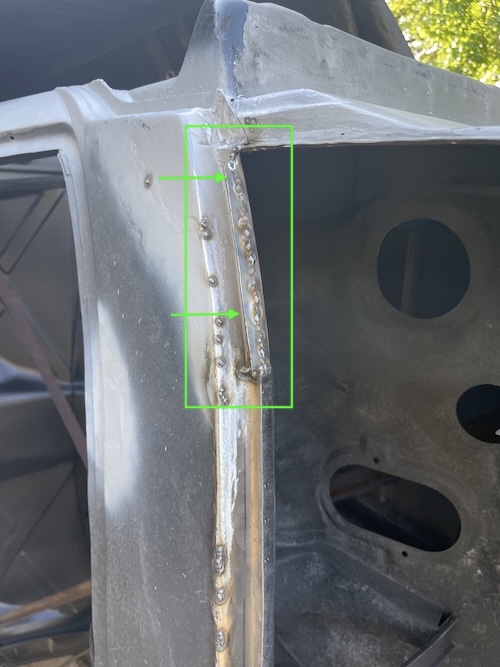 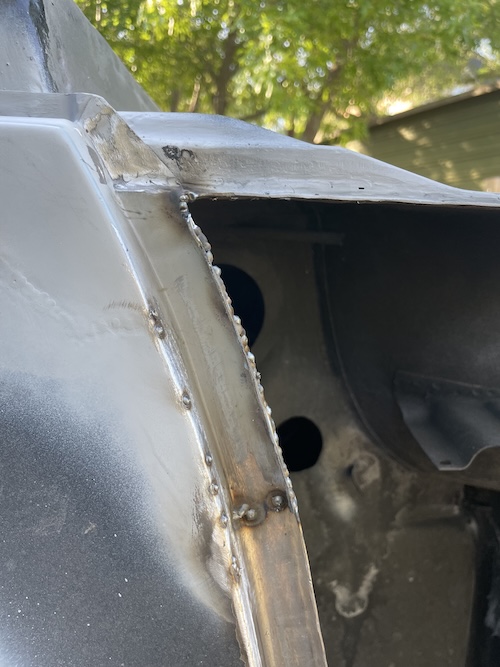  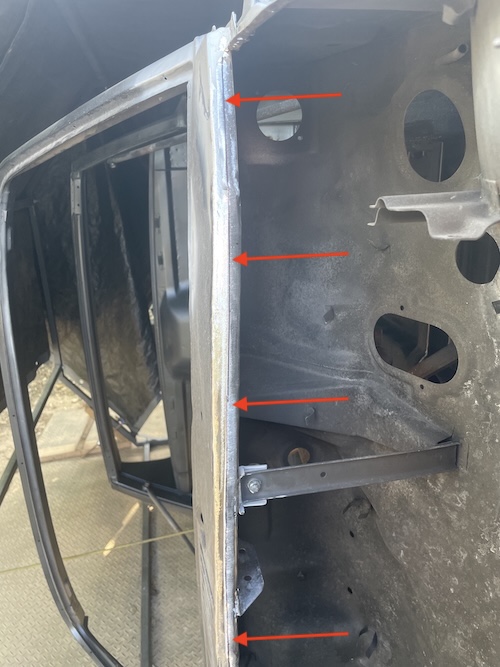 Final photo shows the track after a bit of clean up with the finger sander to remove some of the marks left by the shrinker/stretcher tool. This patch represents the last "body patch" on the car. The rest of the welding work for this restoration will be on the front fenders (next up) and then the hoods and doors. (IMG:style_emoticons/default/beer.gif) 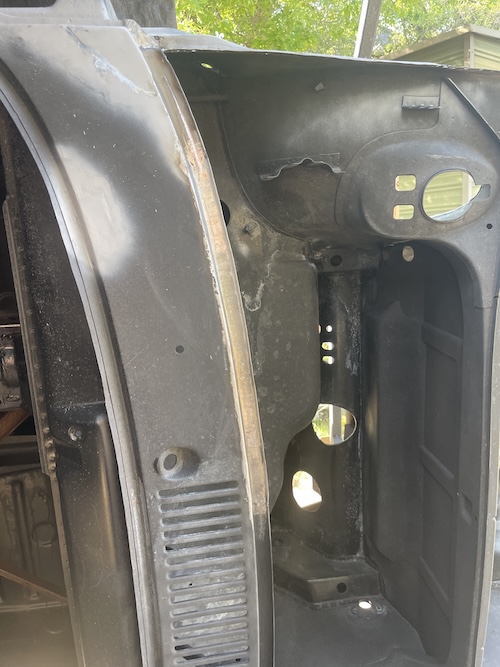 |
|
|
|
| friethmiller |
Apr 13 2025, 07:00 PM
Post
#435
|
|
Senior Member Group: Members Posts: 1,069 Joined: 10-February 19 From: Austin, TX Member No.: 22,863 Region Association: Southwest Region |
Painting Epoxy and Front Fender Prep: (4/13/2025):
With about 1/2 quart of 2K black epoxy in a can, I decided to prepare the front of the cars for paint. I knew I didn't have enough paint for everything so my focus was on the frunk inside and out. After burning through about 15 red scratch pads and 5-6 sanding disks on the orbital, all the surfaces were considered "good enough". I then spent another hour or so cleaning all the surfaces. At this point the gun was deployed and the paint was shot in two light coats. I really didn't have enough paint here but I made it work the best I could. The following pictures show the process/results. Not my best work [for sure] but I got the job done. 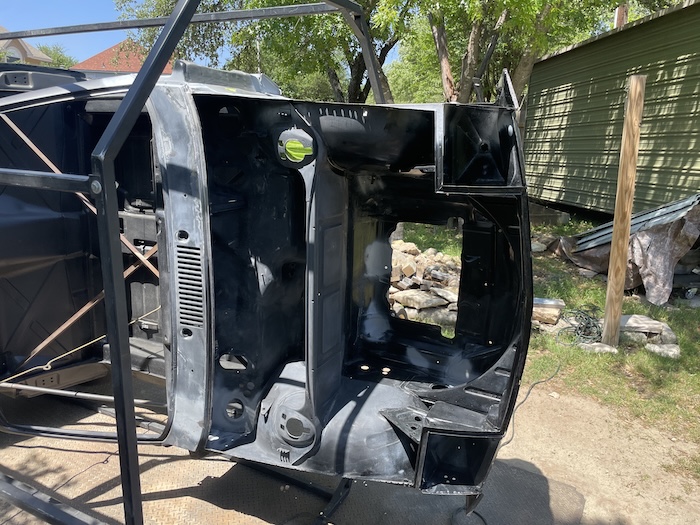 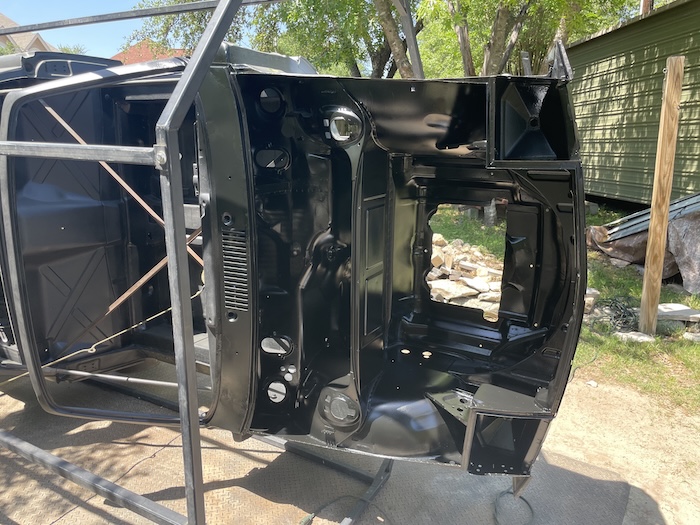 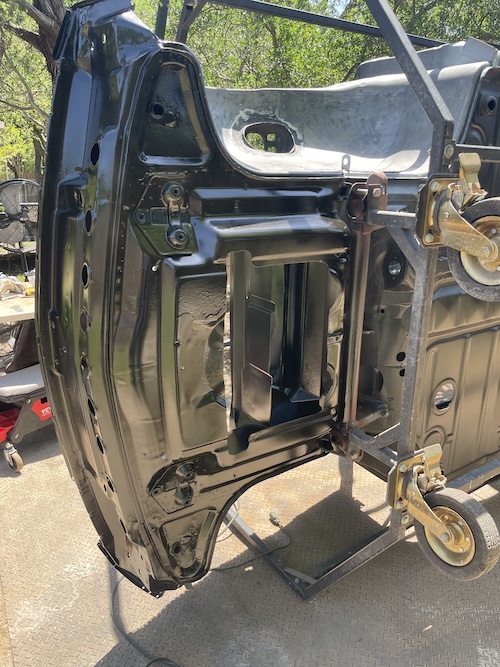 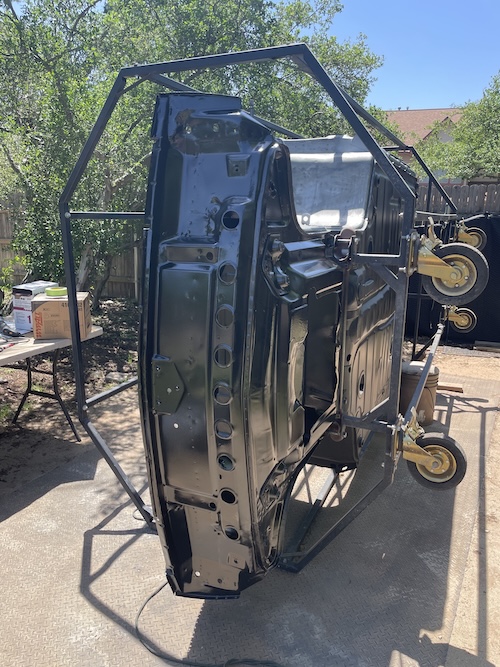 My next job was to begin stripping down the front fenders. Both showed rust damage around the cowl and seal track (of course (IMG:style_emoticons/default/wacko.gif)). So my goal today was to remove sealant and paint, and prepare for repairs at the cowl. The first 4 photos show work to the passenger side cowl area. The damage to the underside here was pretty bad. I was able to cut out the bottom (support) metal to see the under side of the fender. Missed taking a photo of this piece removed (sorry). The entire area will need sand-blasting to determine what metal will need to be replaced. 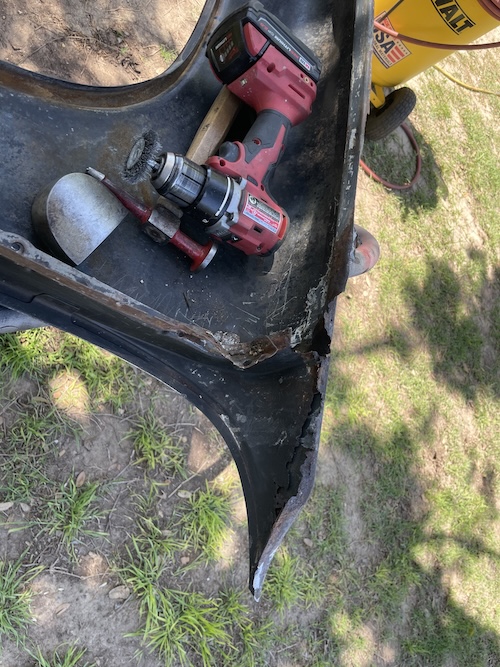 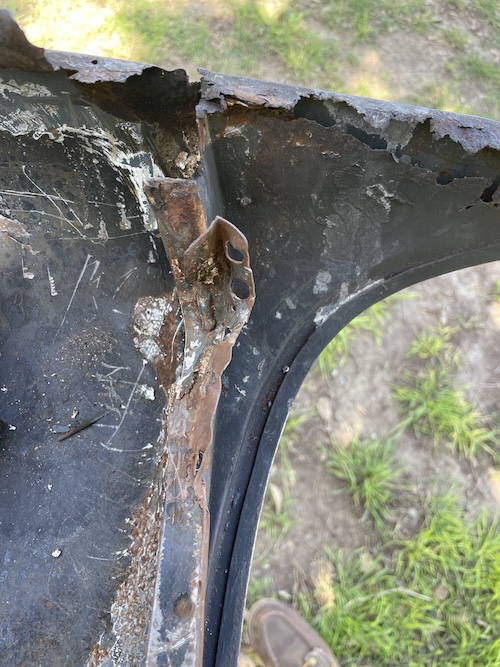  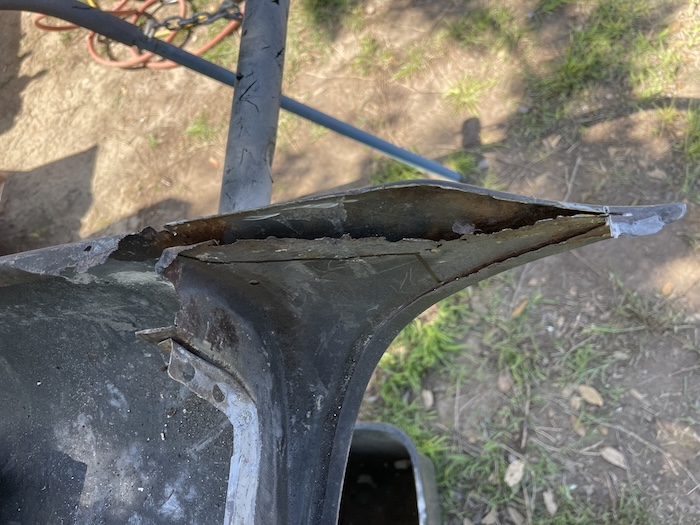 The next two photos show the condition of the driver side. A bit better, IMO. 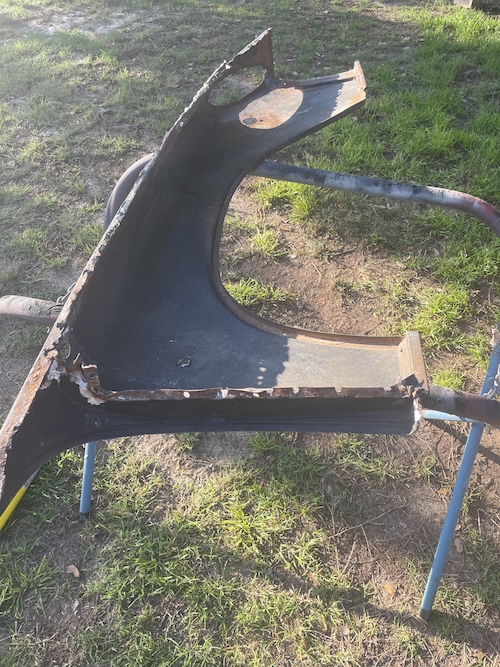 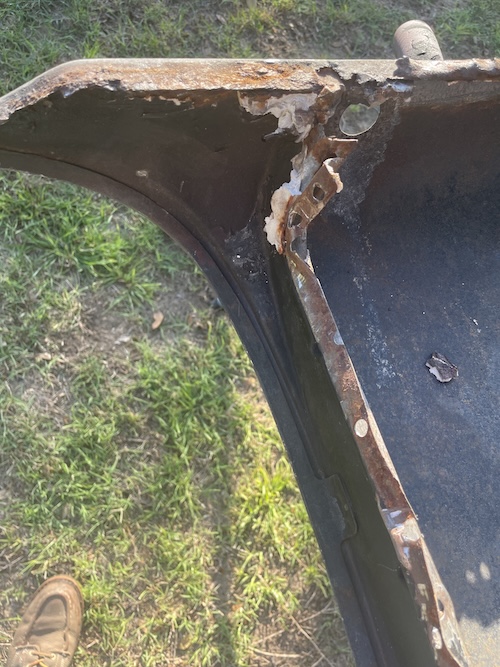 Final four photos show the results of the bead blasting, sanding, and phosphorus treatment. Not 100% ready for paint but rather "ready for repairs". 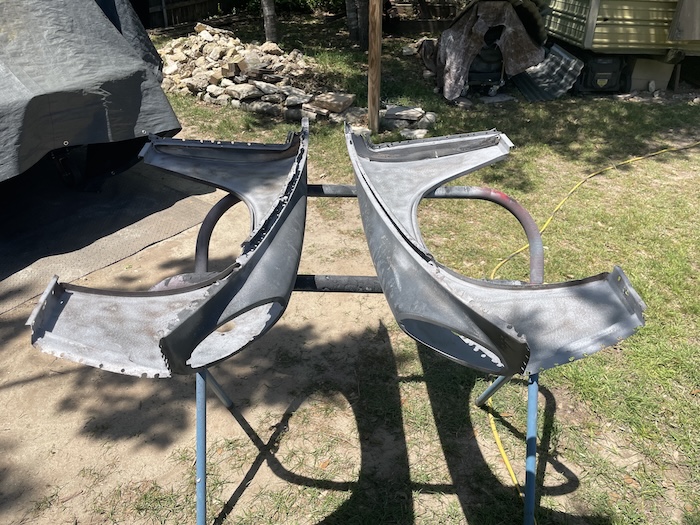 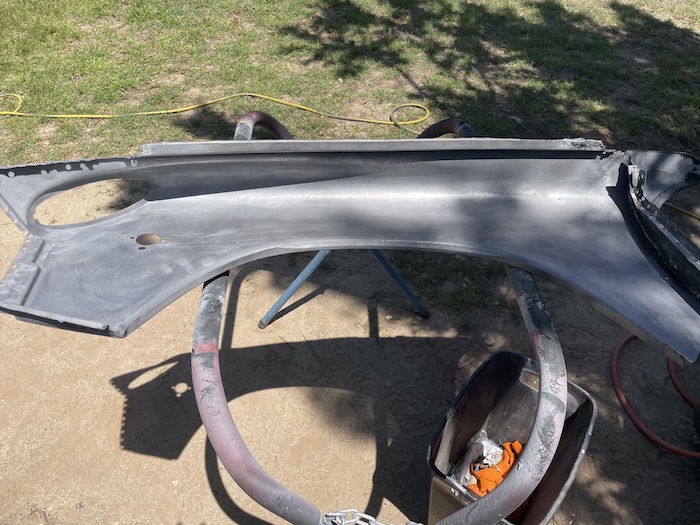 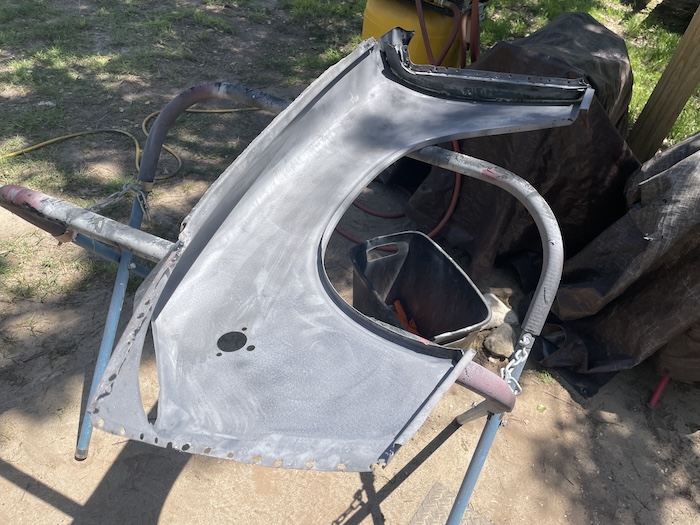 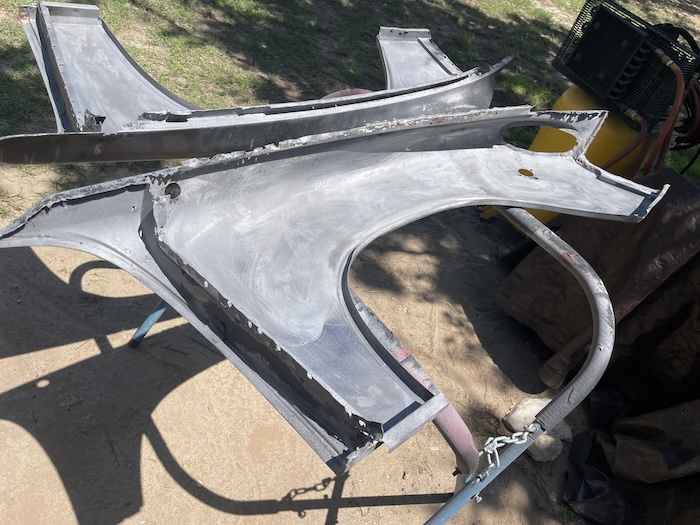 |
|
|
|
| Puebloswatcop |
Apr 15 2025, 08:33 PM
Post
#436
|
|
Senior Member Group: Members Posts: 1,677 Joined: 27-December 14 From: Mineola, Texas Member No.: 18,258 Region Association: Southwest Region |
Wow Fred,
I can hardly wait to see your work in person. It's certainly looking awesome. (IMG:style_emoticons/default/sawzall-smiley.gif) |
|
|
|
| friethmiller |
Apr 16 2025, 08:04 AM
Post
#437
|
|
Senior Member Group: Members Posts: 1,069 Joined: 10-February 19 From: Austin, TX Member No.: 22,863 Region Association: Southwest Region |
Fender Repair - Passenger Side: (4/15/2025):
A little work on a Tuesday evening (IMG:style_emoticons/default/biggrin.gif) . With construction paper in hand, I began forming a replacement piece for the rear edge of the front fender. This will likely be the first of 3 patches. As you can see I used the fender to rub/trace the edges, marked it in, and then measured the edges that will be needed on the sides. I then marked and cut the sheet metal using my 4 1/2" angle grinder with a thin blade. I switched to a 40 grit flap disc to grind the metal down in the curves. Again, with the template, I folded up the sides to trace the bend lines. 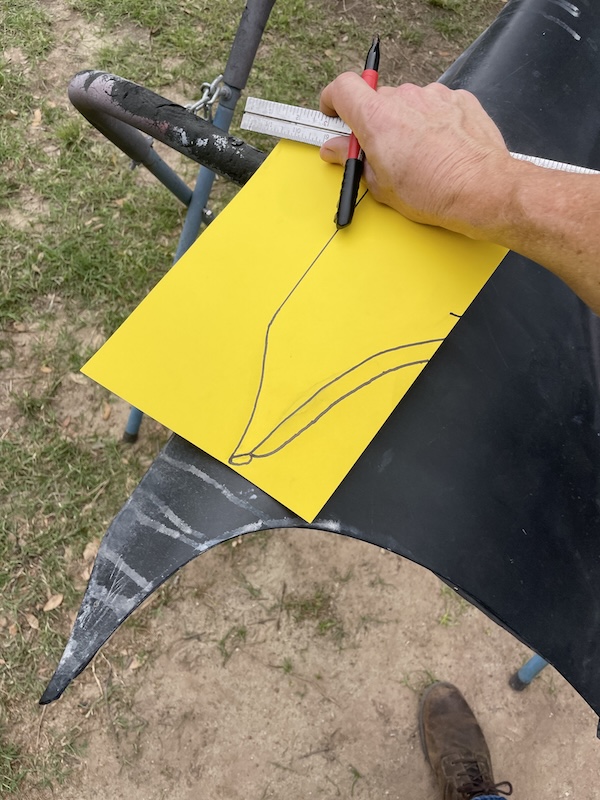 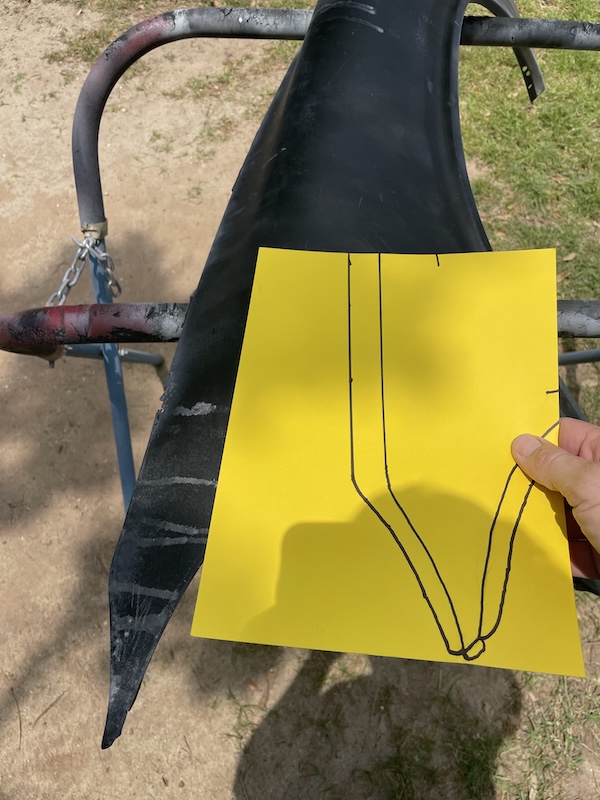 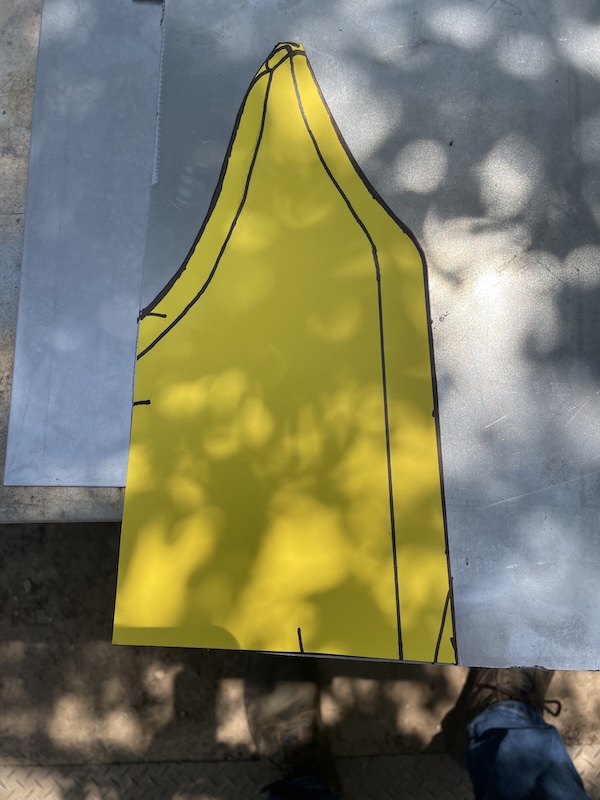 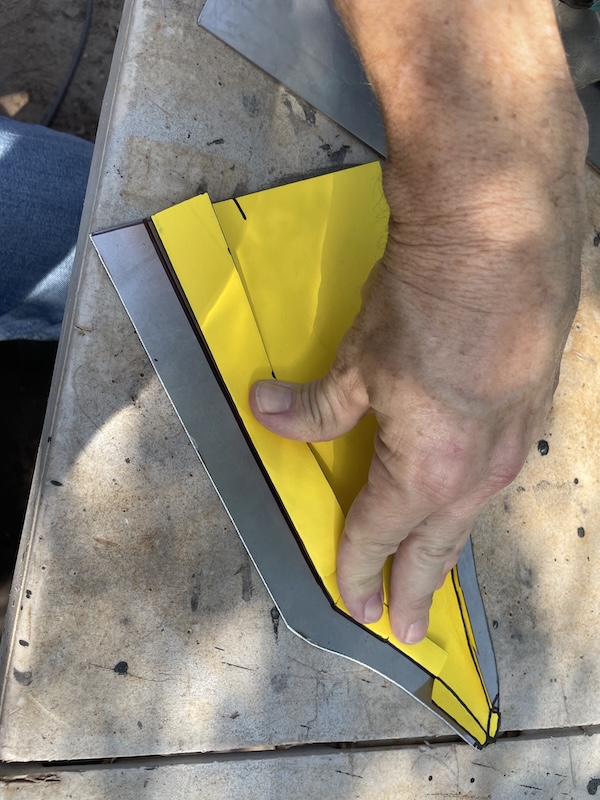 You can see in the first photo how I transferred the vertical cuts that I made to get the paper to fold directly onto the metal. This saves me time during the bending process later. After making these small cuts, I used vice grips and channel locks to bend the sides to the 90 degree position. The curved side of this patch will eventually go to 180 but that will come later. Pics #2 & #3 show the results of the bends. Pic #4 shows the results of loosely fitting the flat piece to the curve of the fender. 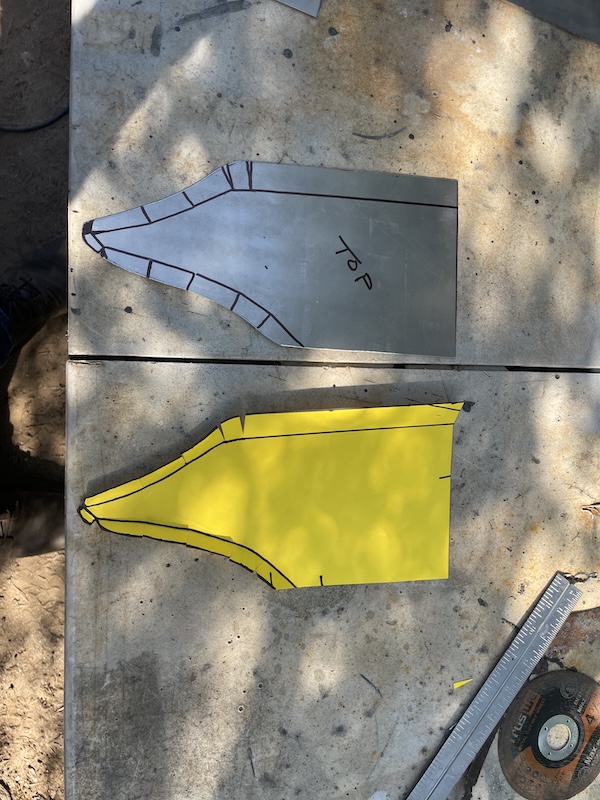 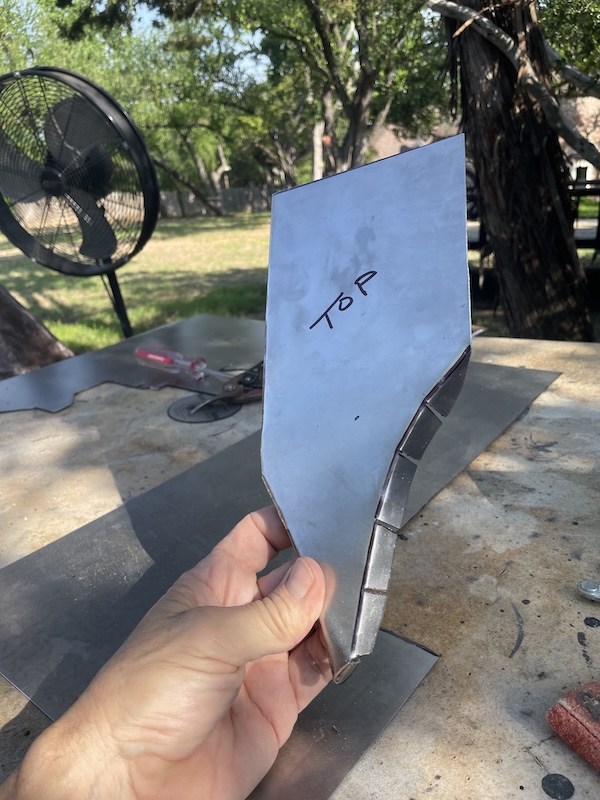 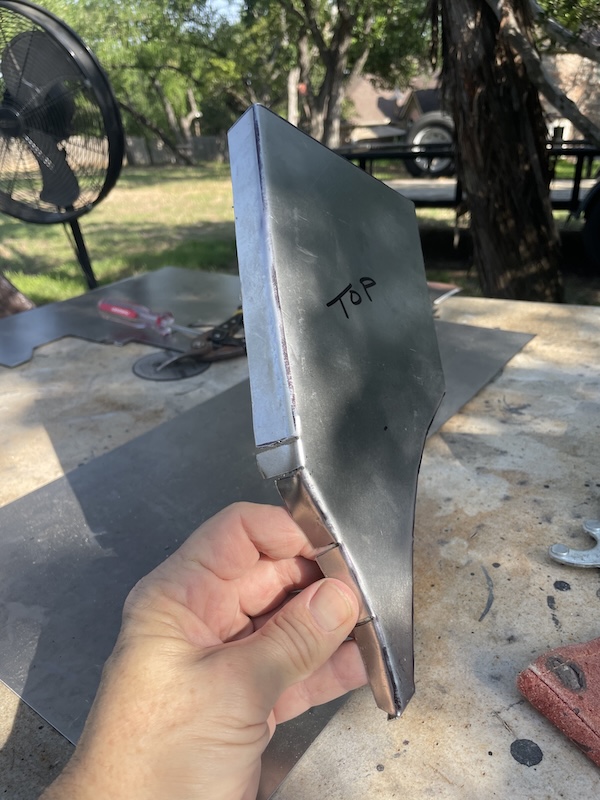 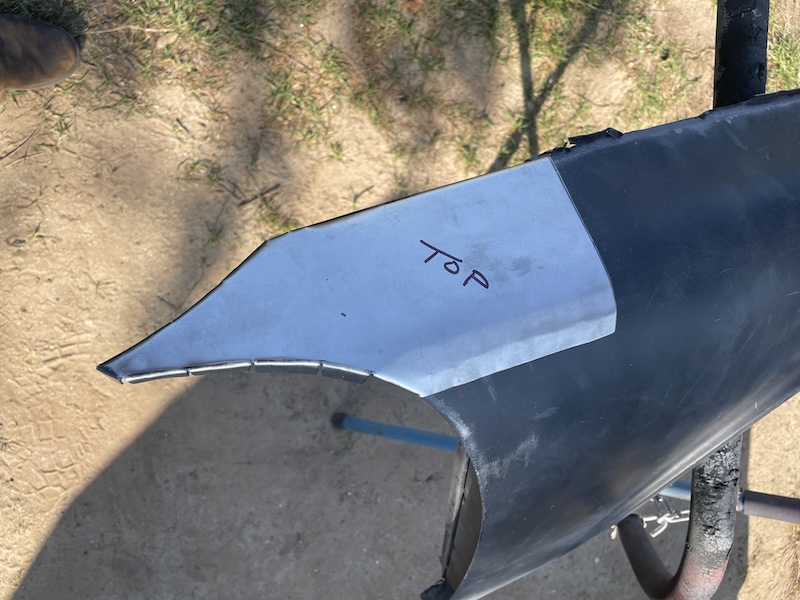 At this point, the patch was marked up to be cut into 3 pieces. I only needed the first few inches of the tip and the metal forming the inside cowl edge will be more easily added as the 2nd stand alone patch. The rest of the metal will be reused for the support metal that goes inside fender. Pic #1 shows the final work to size the patch with the existing metal in place. The 2nd photo shows the panel clamp helping hold things for the initial tacks. The final photo show the weld across the top. This small patch heated up quickly so compressed air was used to minimize any warpage. My next installment will be showing the install of the 2nd cowl side patch as well as the very important support metal that goes inside the fender.  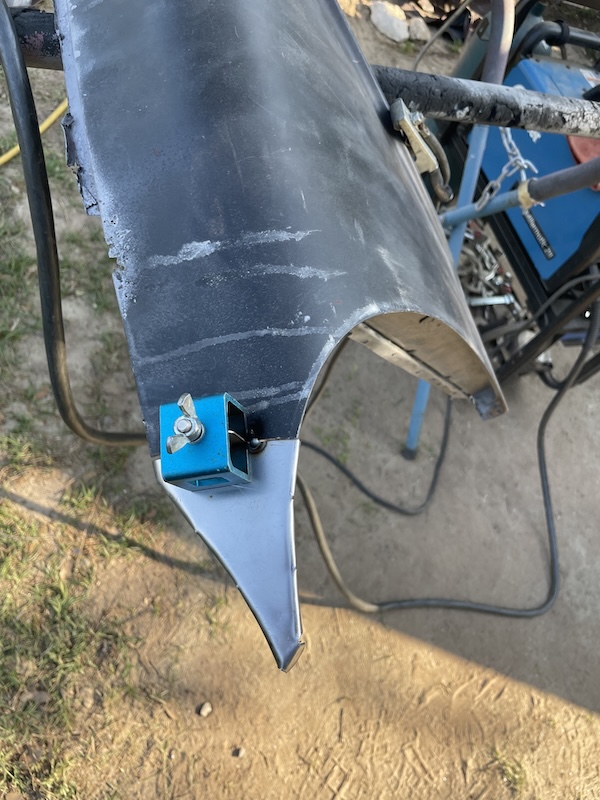  |
|
|
|
| Root_Werks |
Apr 16 2025, 12:18 PM
Post
#438
|
|
Village Idiot Group: Members Posts: 8,841 Joined: 25-May 04 From: About 5NM from Canada Member No.: 2,105 Region Association: Pacific Northwest |
Boy, that corner on 914 fenders can really get rusted out. Kudos on the patch instead of just getting an entirely different fender!
I bet you can't wait to get those fenders back on. (IMG:style_emoticons/default/welder.gif) |
|
|
|
| friethmiller |
Apr 16 2025, 01:59 PM
Post
#439
|
|
Senior Member Group: Members Posts: 1,069 Joined: 10-February 19 From: Austin, TX Member No.: 22,863 Region Association: Southwest Region |
QUOTE(Root_Werks @ Apr 16 2025, 01:18 PM) Boy, that corner on 914 fenders can really get rusted out. Kudos on the patch instead of just getting an entirely different fender! I bet you can't wait to get those fenders back on. (IMG:style_emoticons/default/welder.gif) To be honest I'm a little concern with the fit as my patch might be slightly oversized at the critical point where it meets the door and the A-pillar. But.... I'm in it now! (IMG:style_emoticons/default/stromberg.gif) Can't wait to figure out how to make this all work (IMG:style_emoticons/default/huh.gif) Will likely need to pull out the Clecos for the fender and mount the door. Yes, I want these fenders back on before I get the call from the machine shop about the other 914's engine parts. It'll be a great stopping point to then flip over and rebuild the engine. |
|
|
|
| wonkipop |
Apr 16 2025, 03:55 PM
Post
#440
|
|
914 Guru Group: Members Posts: 5,217 Joined: 6-May 20 From: north antarctica Member No.: 24,231 Region Association: NineFourteenerVille |
oh boy.
incredible work. (IMG:style_emoticons/default/beerchug.gif) it sure has come a long way from what you found sitting out in a texas paddock. |
|
|
|
|
3 User(s) are reading this topic (2 Guests and 0 Anonymous Users)
1 Members: friethmiller

|
Lo-Fi Version | Time is now: 10th November 2025 - 04:44 PM |
Invision Power Board
v9.1.4 © 2025 IPS, Inc.