|
|
|
Porsche, and the Porsche crest are registered trademarks of Dr. Ing. h.c. F. Porsche AG.
This site is not affiliated with Porsche in any way. Its only purpose is to provide an online forum for car enthusiasts. All other trademarks are property of their respective owners. |
|
|

  |

| Artfrombama |
 Apr 16 2025, 09:49 PM Apr 16 2025, 09:49 PM
Post
#441
|
|
Artfrombama  Group: Members Posts: 391 Joined: 21-January 24 From: North Alabama Member No.: 27,870 Region Association: South East States |
QUOTE(friethmiller @ Apr 16 2025, 02:59 PM)  QUOTE(Root_Werks @ Apr 16 2025, 01:18 PM) Boy, that corner on 914 fenders can really get rusted out. Kudos on the patch instead of just getting an entirely different fender! I bet you can't wait to get those fenders back on. (IMG:style_emoticons/default/welder.gif) To be honest I'm a little concern with the fit as my patch might be slightly oversized at the critical point where it meets the door and the A-pillar. But.... I'm in it now! (IMG:style_emoticons/default/stromberg.gif) Can't wait to figure out how to make this all work (IMG:style_emoticons/default/huh.gif) Will likely need to pull out the Clecos for the fender and mount the door. Yes, I want these fenders back on before I get the call from the machine shop about the other 914's engine parts. It'll be a great stopping point to then flip over and rebuild the engine. You are a master at sheet metal and persistence. It will be awesome |
   |

 
|
| friethmiller |
Apr 18 2025, 05:04 PM
Post
#442
|
|
Senior Member Group: Members Posts: 1,069 Joined: 10-February 19 From: Austin, TX Member No.: 22,863 Region Association: Southwest Region |
Fender Repair - Passenger Side (part 2): (4/17/2025):
With a few hours of daylight after work, I spent some time working on the main patch at the back of the fender. My goal was to at least get the rest of the metal welded in and then deal with the fitment issues tomorrow. I started by creating a reinforcement patch that gives support to the outer skin. This first patch is only the first of two pieces that will make up this very important structural part of the fender. The first three photos so this process. The 4th photo shows the current state of the fender. Oops! Look at that gap! (IMG:style_emoticons/default/bootyshake.gif) Going to have to deal with that later. 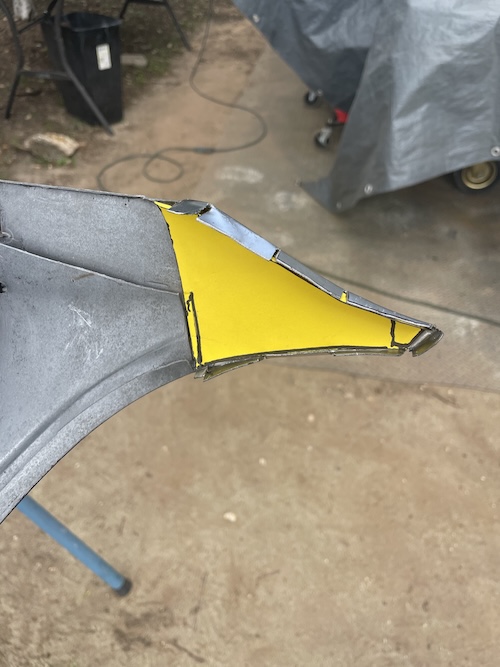 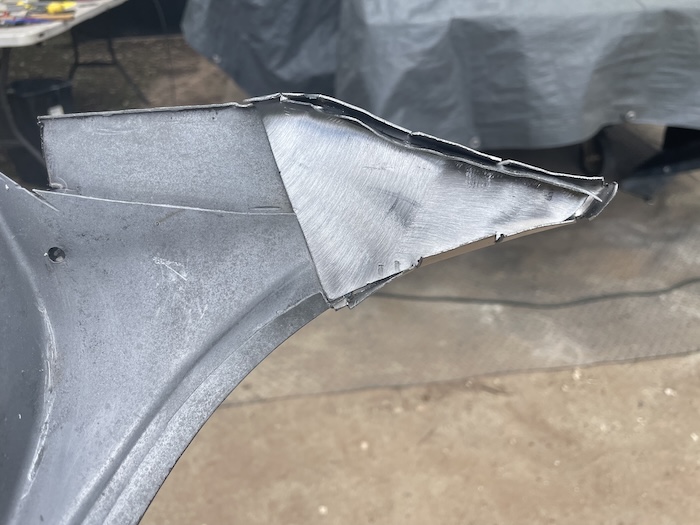 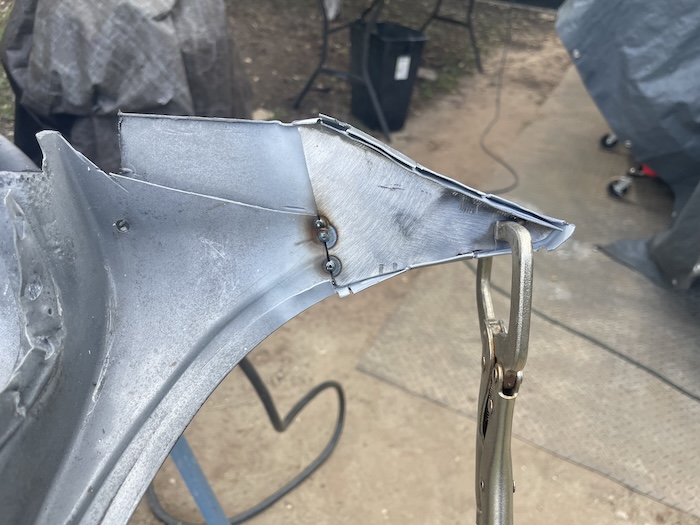 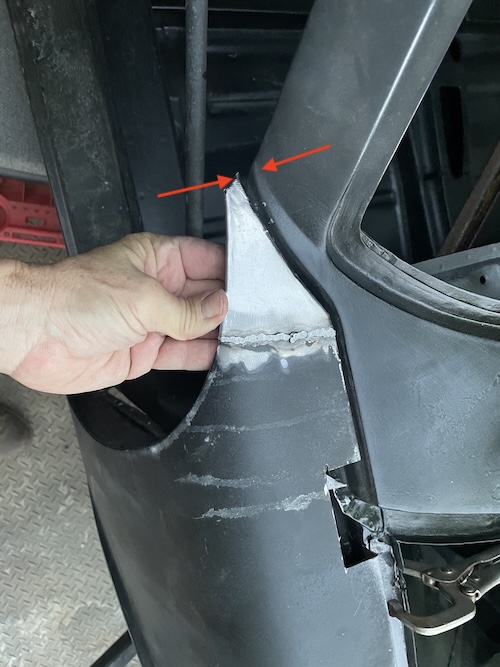 Moving on to the next patch. The following 5 photos show this repair. I used the other fender to make measurements for sizing. I decide to make it slightly larger than needed. I ground down the excess later. Note how this area was drilled out for rosettes to secure the support to the fender down the seam. 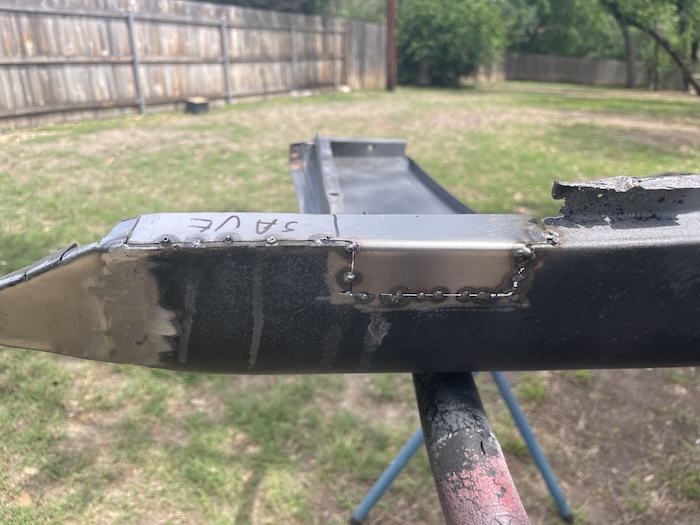 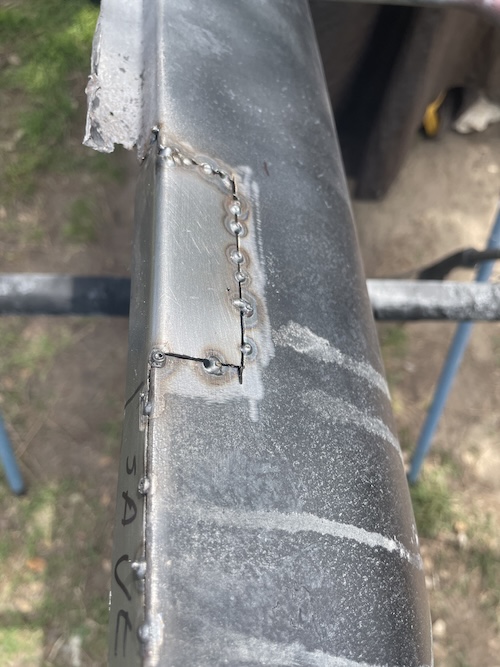 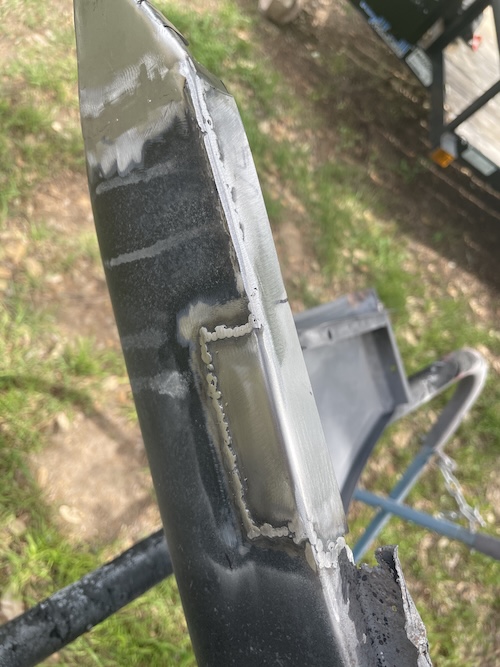 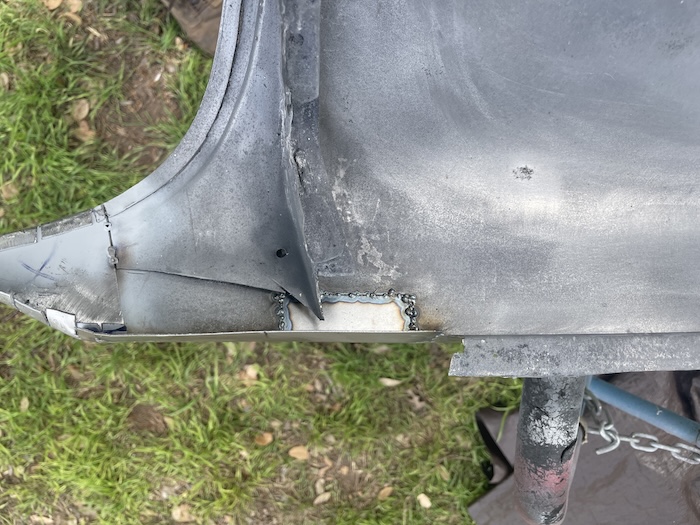 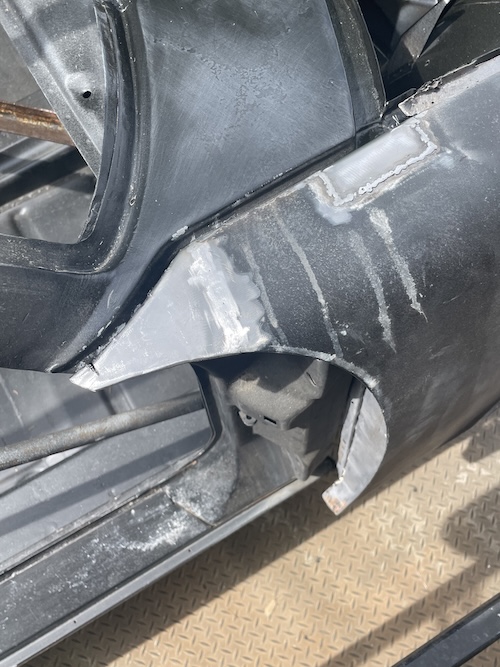 The final set of photos show the 3rd patch going in. This one was a little tricky to form but I was able to get it trimmed up and welded in place. It's interesting how this piece works to support the fender. It was getting pretty late so I decided to wait and grind the welds down next time. 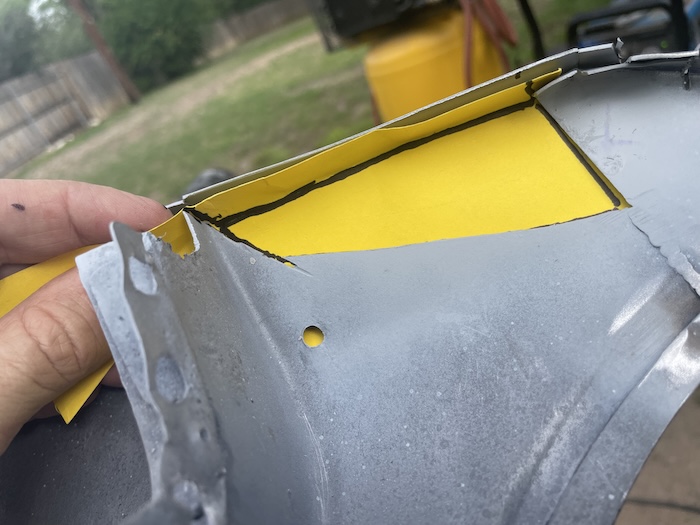 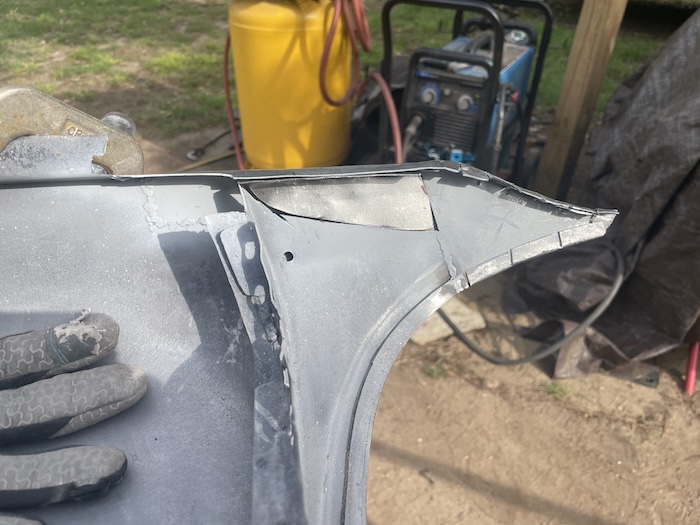 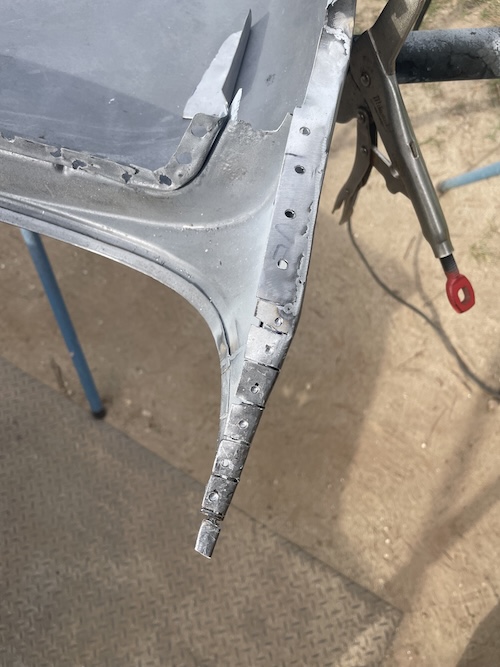 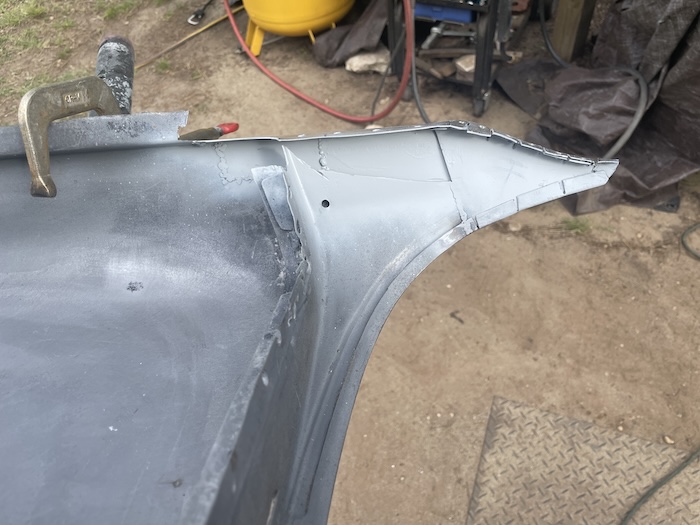 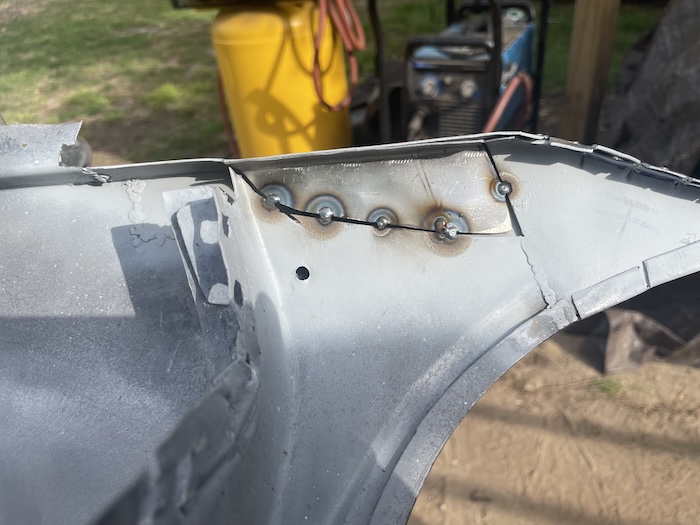 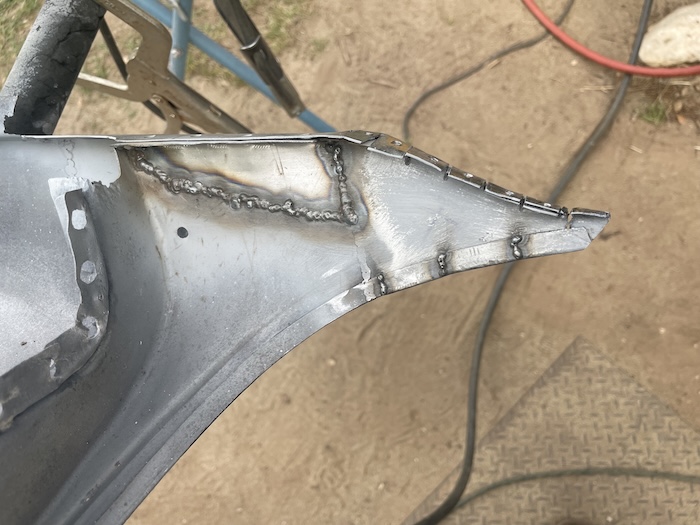 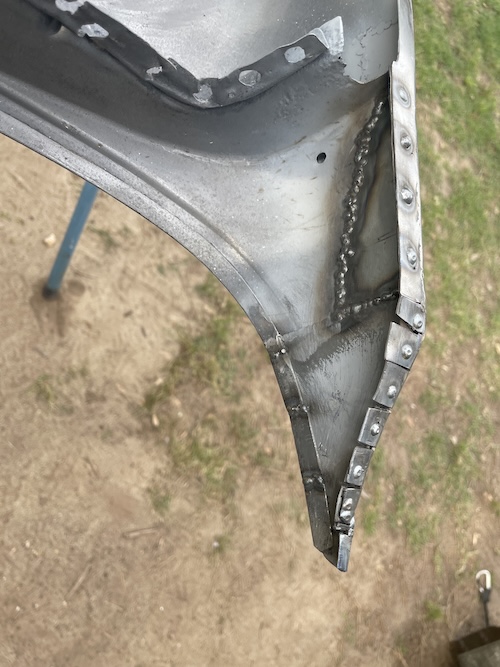 |
 |
|
| friethmiller |
Apr 18 2025, 05:50 PM
Post
#443
|
|
Senior Member Group: Members Posts: 1,069 Joined: 10-February 19 From: Austin, TX Member No.: 22,863 Region Association: Southwest Region |
Fender Repair - Passenger Side (part 3): (4/18/2025):
It was extremely windy today. Not very good for welding but the temperatures were in the 80's (IMG:style_emoticons/default/aktion035.gif) Starting things off by jumping right in on the size/fitment issue with the back tip of this passenger side fender. Photo #1 shows the cut (arrow) the other is a marker line that I decided not to use. Pic #2 shows two more perpendicular cuts that were made to allow the gap to be closed. 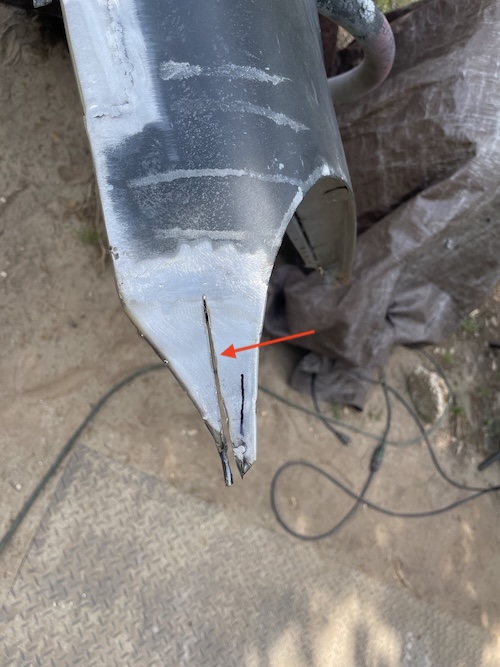 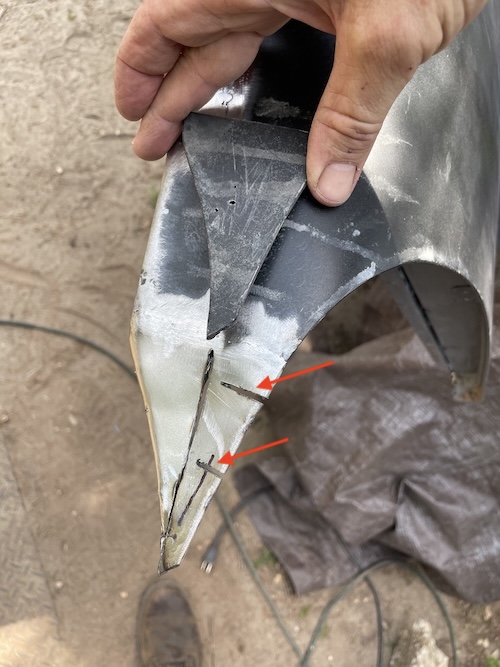 I used a cutting blade to widen the initial cut till I was able to get the sizing correct and the alignment was good with the fender mount to the car. The following photos so more sausage being made as everything is welded close. The amount of heat generated was a major concern for me. I had to keep cooling everything after a just a few welds. This entire process to over two hours to complete. The final photos in this set show the sizing to the original and final grinding of this area. No doubt body filler will be needed but this should be a good starting point. 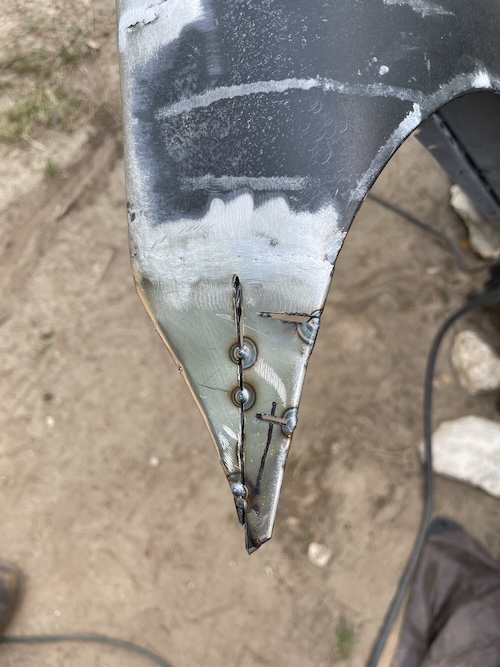 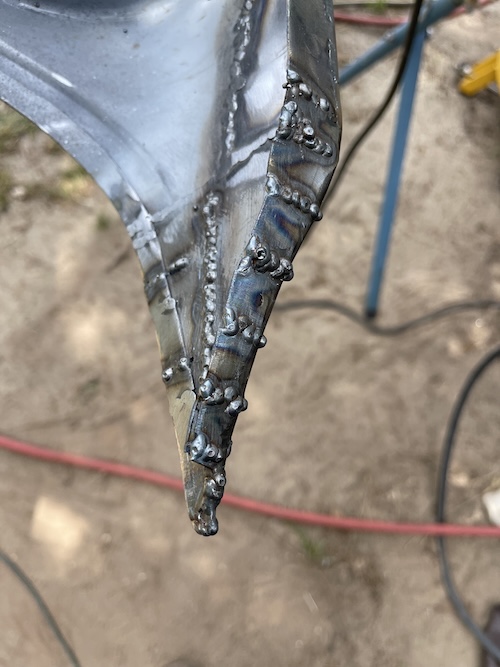    With all that done, I flipped the fender over and gave the backside welds a quick final out, as well (see pic #1). Moving on to the sealant track next. I started off by cutting out the rusted sections and forming new patches. Pic #2 shows this first patch. Pic #3 shows both patches getting welded in. The final 3 photos in this set show the finishing work done to complete the upper portion of the sealant track.   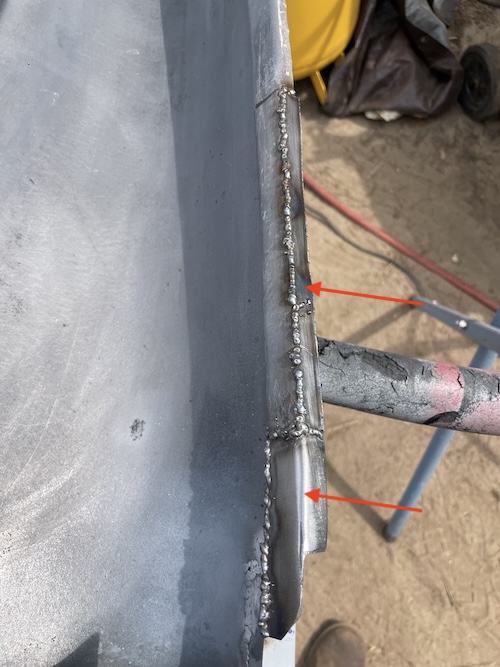 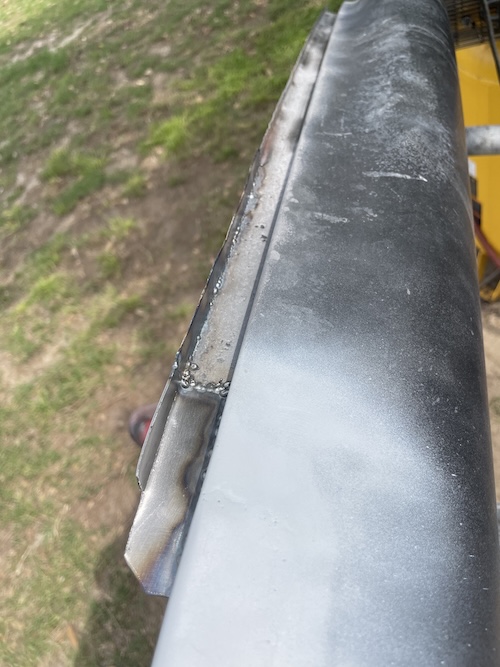 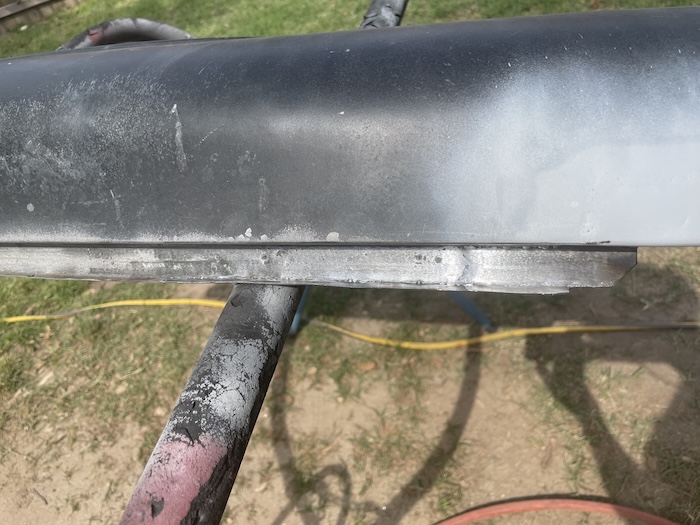 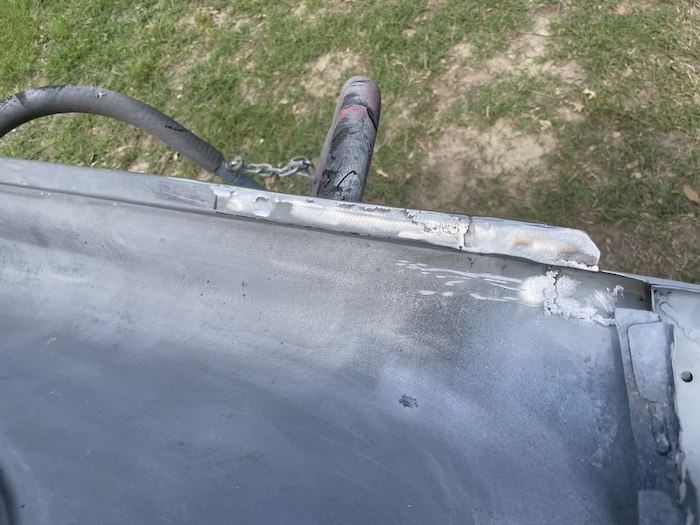 More work was also required at the bottom end of the track right before it hits the light bucket. These patches were small and, once tacked in place, were pretty easy to finish out. 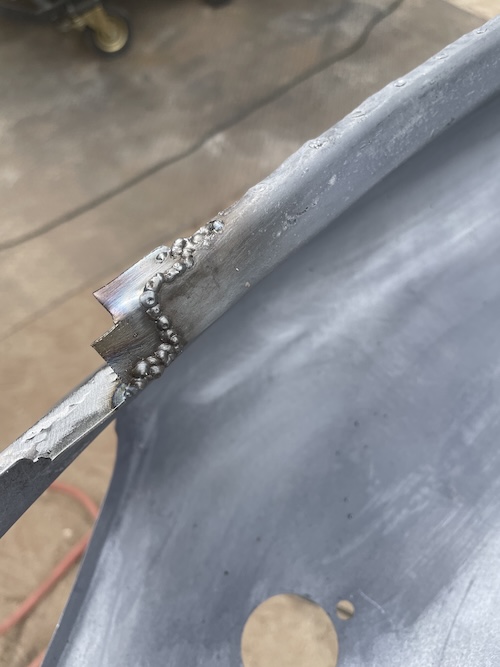 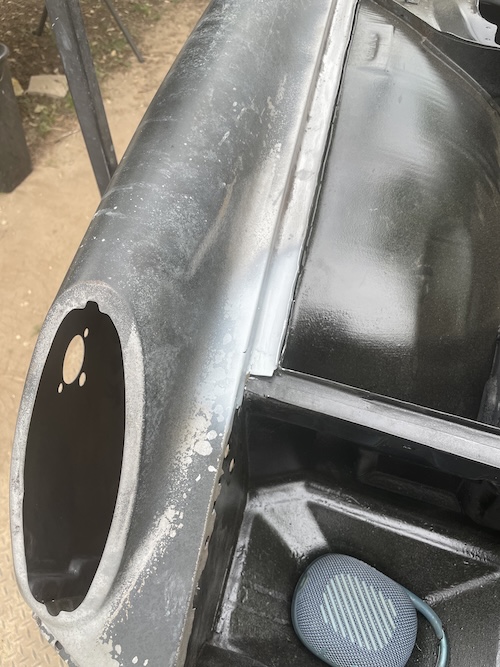 And... with all that... this fender is ready for final prep and install. Next up is the Driver Side Fender Repair. Cheers! (IMG:style_emoticons/default/beerchug.gif) 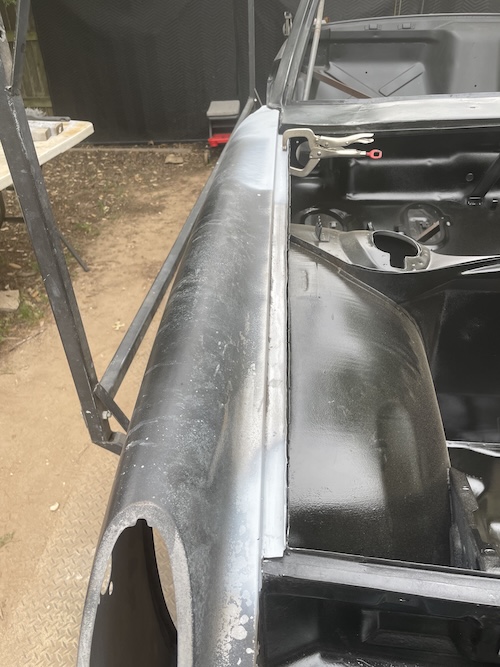 |
|
|
|
| Cairo94507 |
Apr 18 2025, 06:29 PM
Post
#444
|
|
Michael Group: Members Posts: 10,490 Joined: 1-November 08 From: Auburn, CA Member No.: 9,712 Region Association: Northern California |
Amazing; I love seeing the progress shots. (IMG:style_emoticons/default/beerchug.gif)
|
|
|
|
| 930cabman |
Apr 19 2025, 06:11 AM
Post
#445
|
|
Advanced Member Group: Members Posts: 4,323 Joined: 12-November 20 From: Buffalo Member No.: 24,877 Region Association: North East States |
QUOTE(Cairo94507 @ Apr 18 2025, 06:29 PM) Fred's got this (IMG:style_emoticons/default/beerchug.gif) great skills, fortitude, .... (IMG:style_emoticons/default/sawzall-smiley.gif) |
|
|
|
| Puebloswatcop |
Apr 19 2025, 07:14 AM
Post
#446
|
|
Senior Member Group: Members Posts: 1,677 Joined: 27-December 14 From: Mineola, Texas Member No.: 18,258 Region Association: Southwest Region |
It was a pleasure to stop by yesterday and see this piece of art in person. Fred does excellent work and it was so fun seeing his passion for these little cars. We spent over an hour talking 914. Seeing this project in person has given this thread a much more personal experience for me, as well as what I can see as a new long term friendship built around our common passion for these cars. Thanks Fred.
|
|
|
|
| friethmiller |
Apr 19 2025, 07:42 PM
Post
#447
|
|
Senior Member Group: Members Posts: 1,069 Joined: 10-February 19 From: Austin, TX Member No.: 22,863 Region Association: Southwest Region |
QUOTE(Puebloswatcop @ Apr 19 2025, 08:14 AM) It was a pleasure to stop by yesterday and see this piece of art in person. Fred does excellent work and it was so fun seeing his passion for these little cars. We spent over an hour talking 914. Seeing this project in person has given this thread a much more personal experience for me, as well as what I can see as a new long term friendship built around our common passion for these cars. Thanks Fred. Thanks for stopping by, Kevin. It’s always great to meet a fellow enthusiast. Best of luck with your projects. (IMG:style_emoticons/default/beerchug.gif) |
|
|
|
| friethmiller |
Apr 20 2025, 05:44 PM
Post
#448
|
|
Senior Member Group: Members Posts: 1,069 Joined: 10-February 19 From: Austin, TX Member No.: 22,863 Region Association: Southwest Region |
Fender Repair - Driver Side (part 1): (4/19 & 4/20/2025):
A little review to the wreck damage on the front corner of the driver side fender. The arrow in the pic below displays the portion that was damaged. It's nothing too severe but the metal in this area got the crap beat out of it by a hammer and it's thinned to the point of ripping, as you will see. 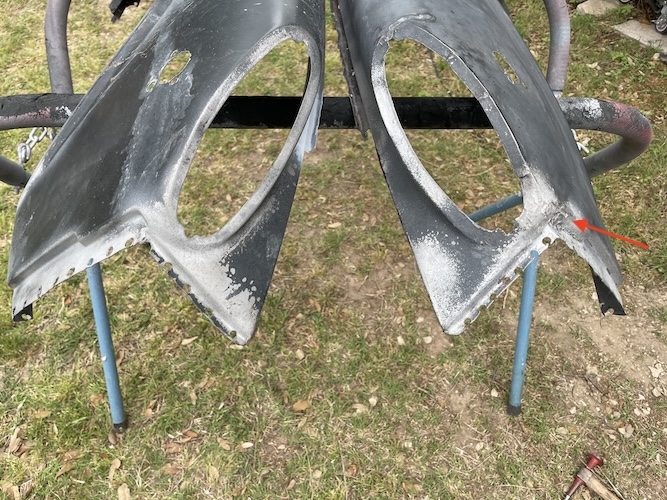 As a comparison, the next two shots so the inside of the passenger side that is fine and the other the inside of the driver side. If anyone has a front piece for a driver side fender please let me know. I will work with what I have if I can't find anything (IMG:style_emoticons/default/unsure.gif) 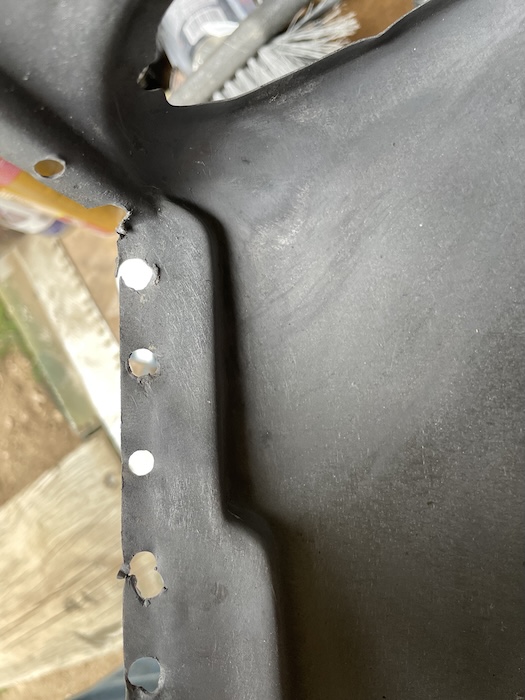 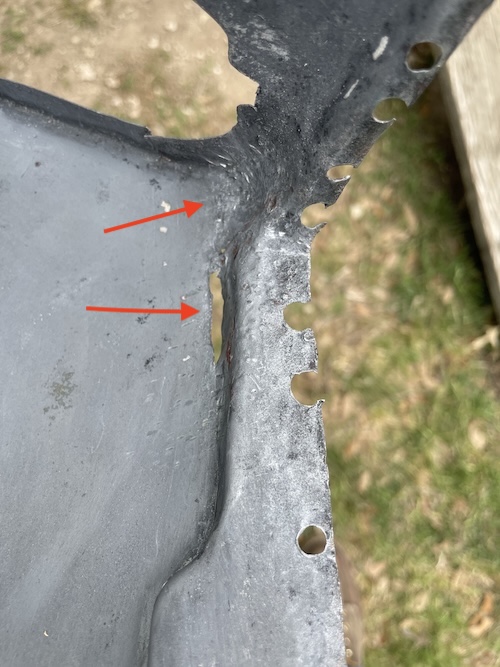 Moving on to fixing things! First up was the backside of the fender where it meets the cowl. While not nearly as bad as the other side, there was still some damage to repair here. I decided to cut the fender just below the edge in the small gap that exists above the support that is welded to it. Pics show this work. Note: this was a good time to drive out the old sealant so the metal in the area can be treated. It was pretty obvious here that the support metal must be replaced. 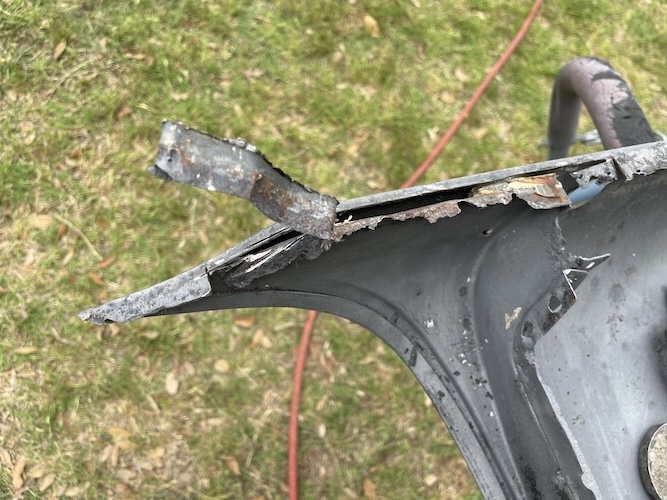 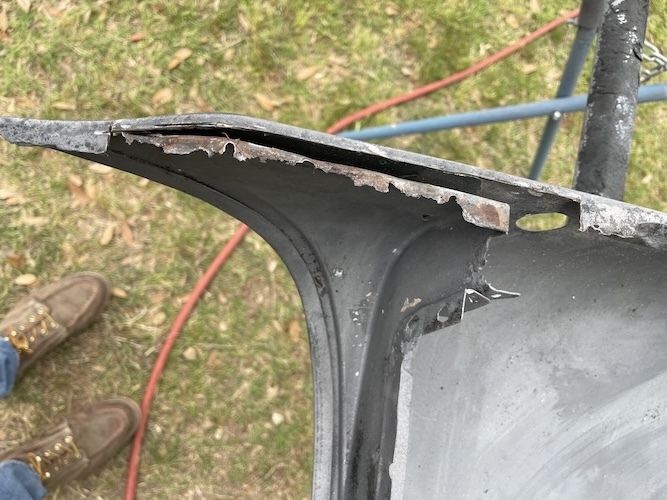 The next two photos show the fitment and welding of this patch on the support. I will use a clamp later to compress the fender down slightly to join with this piece with the new outer metal. 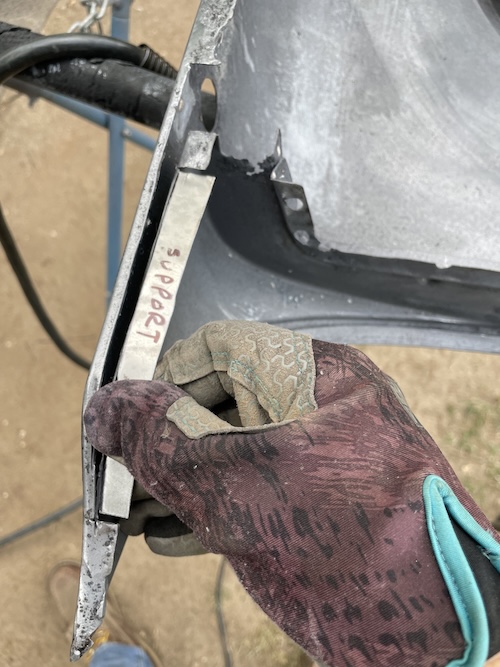 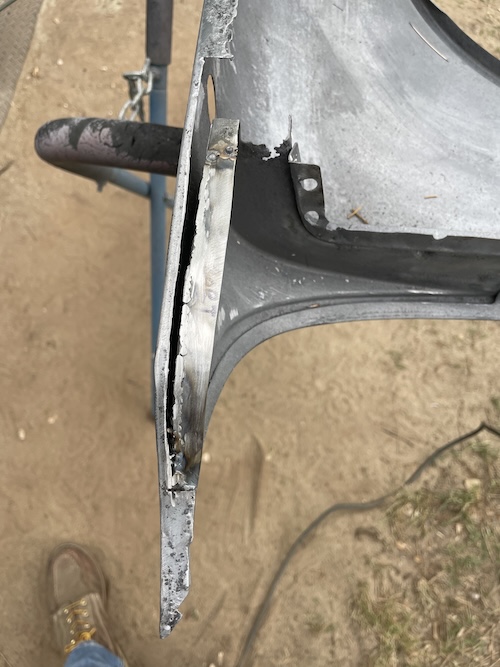 This outside metal at the cowl continues on down the fender as the outside edge of the sealant track. And boy was this track bad! In fact, I ended up cutting it out completely. My task here was to first save and restore this outside the best I could. Once completed, I would then build up a new track welding down the fender piece by piece. I was thinking it'll probably take 2 or 3 pieces. Pic #1 shows my markings of patches that I'll need to save this section. Pic #2 shows a few of my cut-outs used to mark and cut the metal. 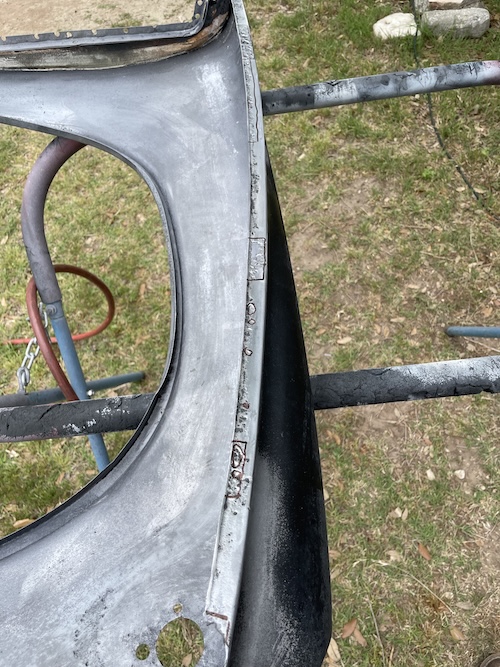 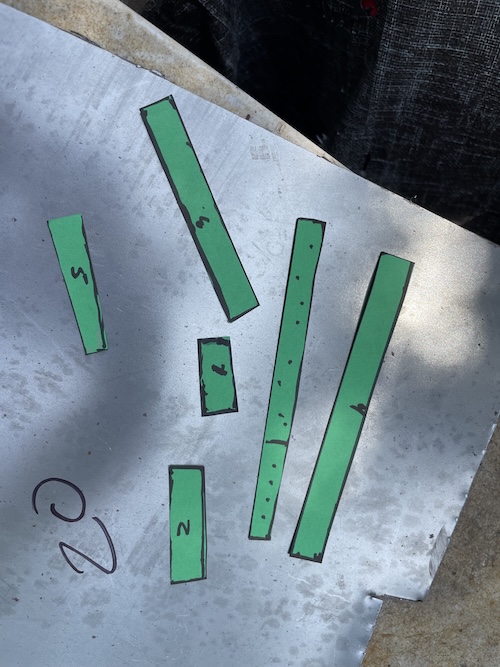 The next photos show the repair work that took several hours to complete. I forgot to take photos during this time (sorry) but there were a total of 9 small patches welded in to restore this vertical track. (IMG:style_emoticons/default/welder.gif) 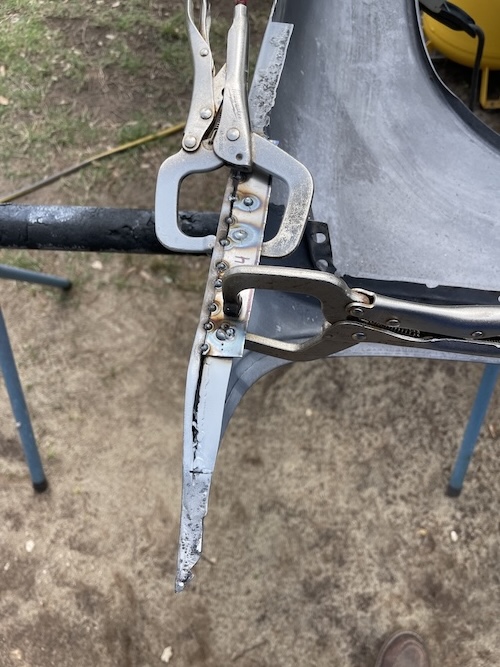 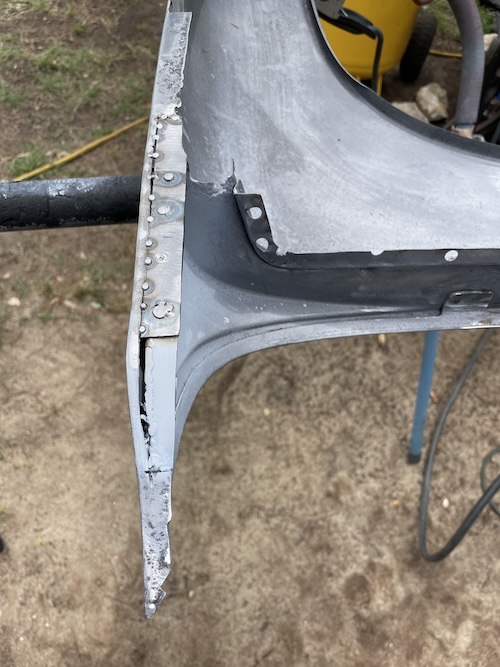 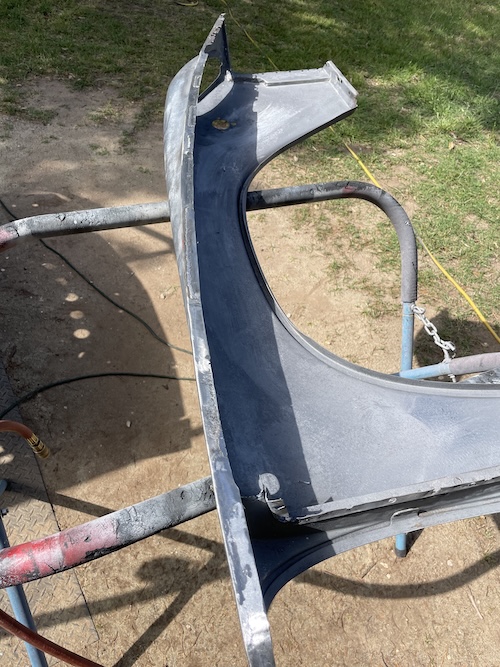 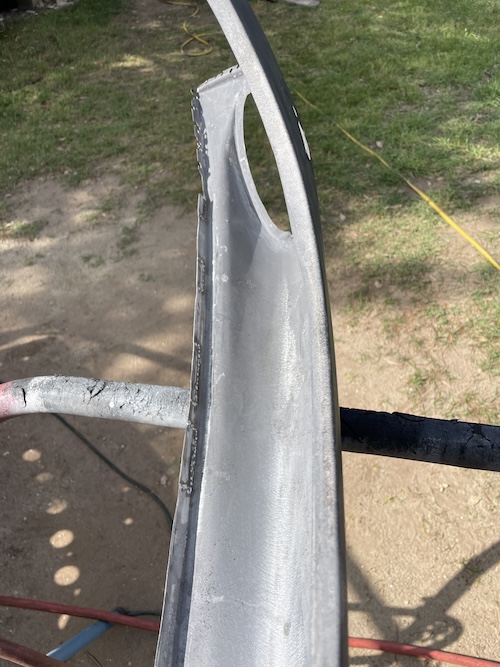 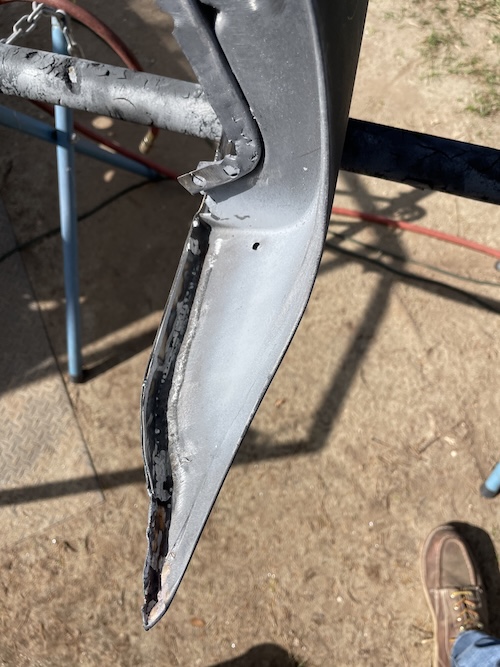 The final two photos show my prep work for next weekend. I measured and cut out three 12 inch sections of metal that will become the sealant track. We'll see how it turns out. Cheers! (IMG:style_emoticons/default/beerchug.gif) 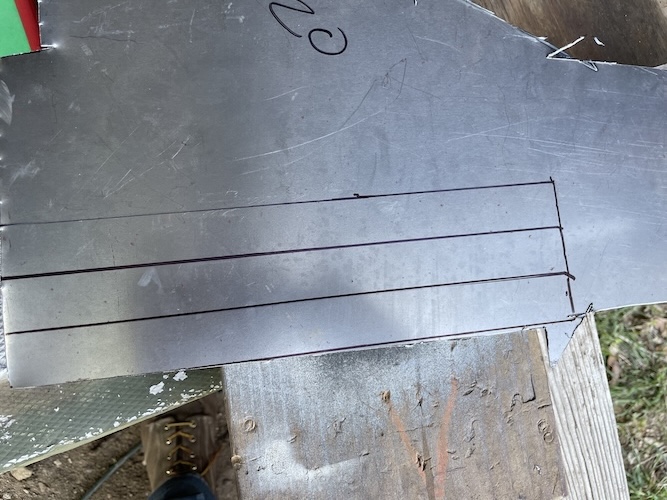 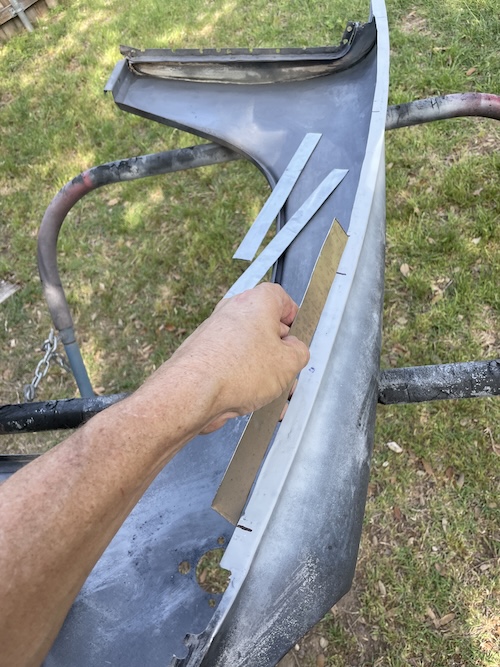 |
|
|
|
| friethmiller |
Apr 21 2025, 11:41 AM
Post
#449
|
|
Senior Member Group: Members Posts: 1,069 Joined: 10-February 19 From: Austin, TX Member No.: 22,863 Region Association: Southwest Region |
@914werke - Can you check to see if you have a driver side front fender. I'm looking for a small section to replace my wreck damage. Maybe from the hockey puck forward. Thanks in advance. (IMG:style_emoticons/default/poke.gif)
|
|
|
|
| 914werke |
Apr 22 2025, 01:51 PM
Post
#450
|
|
"I got blisters on me fingers" Group: Members Posts: 11,447 Joined: 22-March 03 From: USofA Member No.: 453 Region Association: Pacific Northwest |
This is what Ive got (IMG:style_emoticons/default/sad.gif)
Attached image(s) 
|
|
|
|
| friethmiller |
Apr 22 2025, 03:36 PM
Post
#451
|
|
Senior Member Group: Members Posts: 1,069 Joined: 10-February 19 From: Austin, TX Member No.: 22,863 Region Association: Southwest Region |
QUOTE(914werke @ Apr 22 2025, 02:51 PM) Rich, I'm already underway on fixing the damage. I just welded up the rips yesterday and I've been hammering out all the low spots, too. I think I'll be okay without it. Thanks for checking for me. I'll let you know if I decide to switch directions here. Thanks. (IMG:style_emoticons/default/aktion035.gif) |
|
|
|
| slowrodent |
Apr 22 2025, 05:13 PM
Post
#452
|
|
Member Group: Members Posts: 212 Joined: 29-February 20 From: Tucson/Oro Valley Member No.: 23,981 Region Association: Southwest Region |
Welp... I see that you're swiftly running out of rotted panels to work your magic on... You craftsmanship remains so inspiring that I suggest you begin to smash/slash previously undamaged panels to keep the viewers happy. You're very welcome. (IMG:style_emoticons/default/shades.gif)
|
|
|
|
| friethmiller |
Apr 23 2025, 05:08 AM
Post
#453
|
|
Senior Member Group: Members Posts: 1,069 Joined: 10-February 19 From: Austin, TX Member No.: 22,863 Region Association: Southwest Region |
Fender Repair - Driver Side (part 2): (4/22/2025):
Sealant Track Fabrication Moving on to fabricating a new sealant track for this fender. I took each 1" x 12' section on sheet metal and bent a 90 degree at 1/4". Next, I used the stretcher tool to just give the slightest bend to each piece. One of the three I gave just a bit more - this would be the front section that dips down toward the headlight bucket. The following photo shows one of these pieces in the stretcher 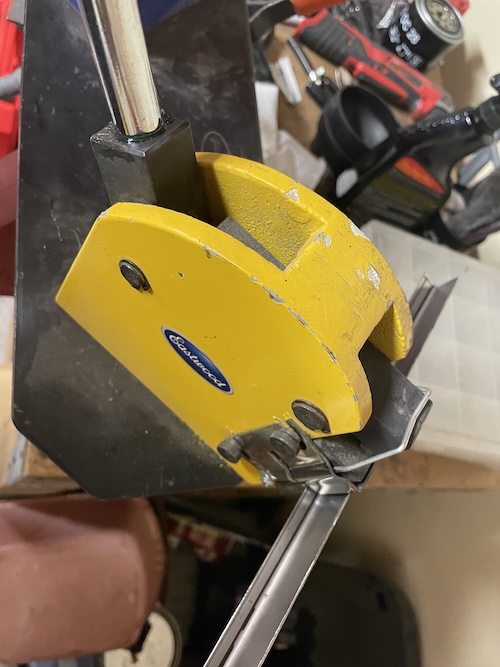 After a lot of thinking, I decided to align/mount the fender on the car and weld each section of metal to the fender with it secured to body of the car. This idea seemed a little crazy but it actually worked. The first piece was the most difficult as the fender had to be pushed down to contact the track before welding. To do this I had push with one hand and apply a tack on either end from the top (seal) side. My plan was to weld this seam from below but this had to be done to get things started. Note: The depth of approximately 3/4" also had to be verified before moving forward. Next, I flipped the car up at the 45 and tacked down the line from below/inside the fender. The following 4 photos show the process for this first section. 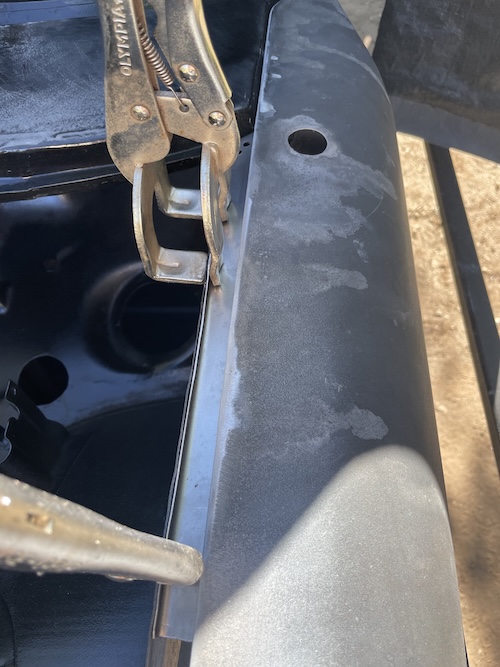 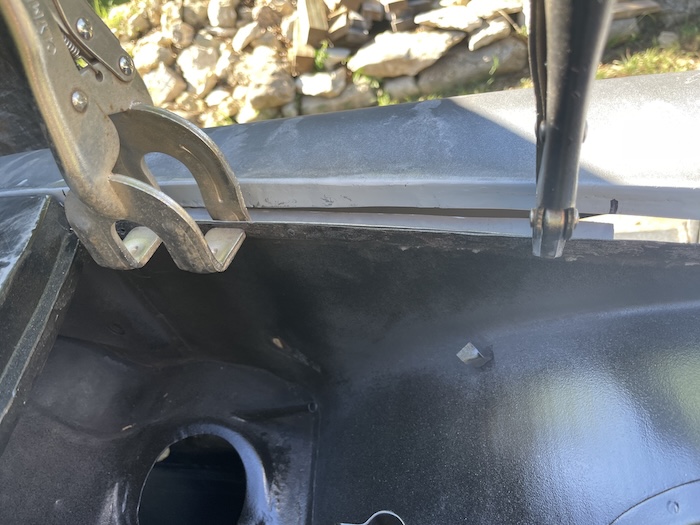 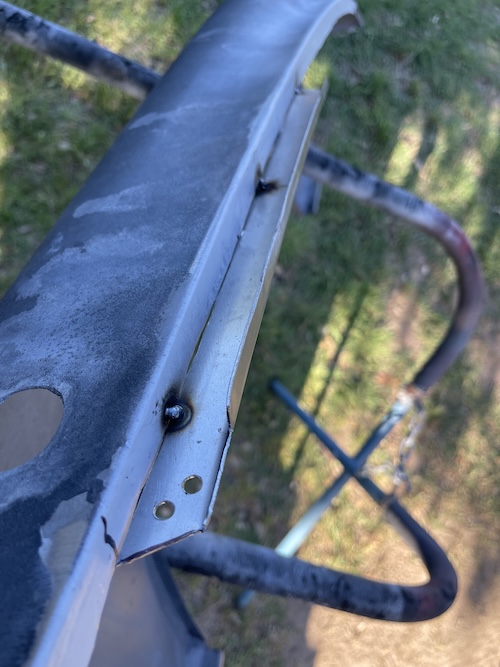 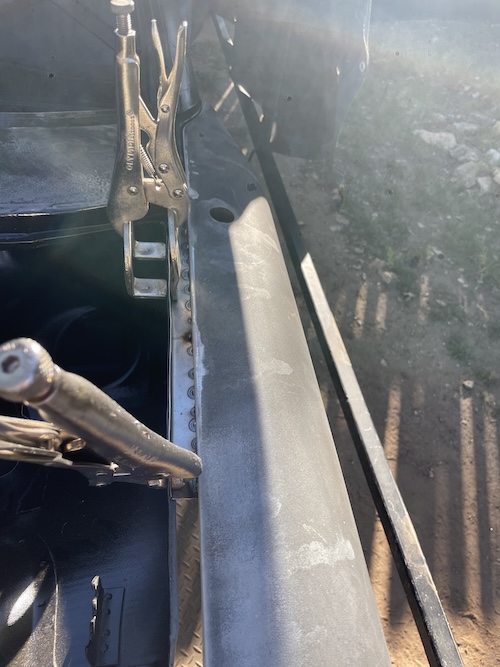 I then added the next section and repeated the process working down the line. Again, my goal was to just tack each piece in place. The finishing welds would be done on the fender stand. The last 12" section was cut down to fit and then it too was tacked in place. The photos below show the 2nd and 3rd sections going in. 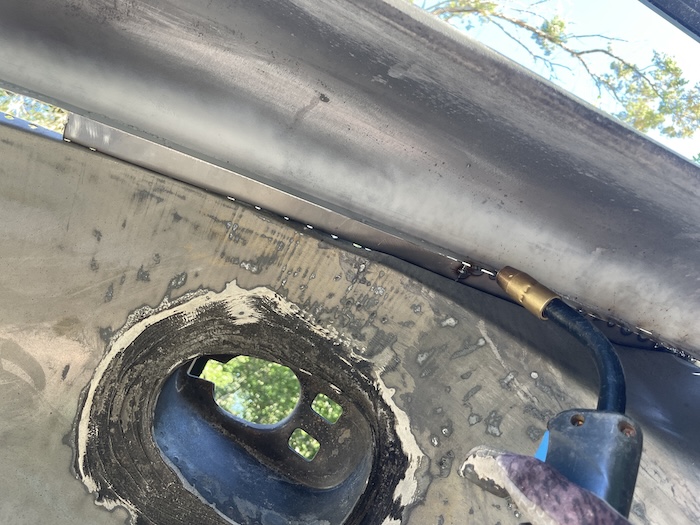 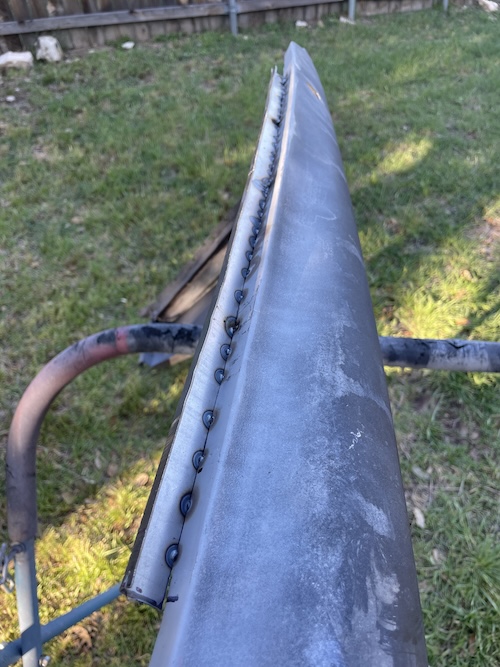 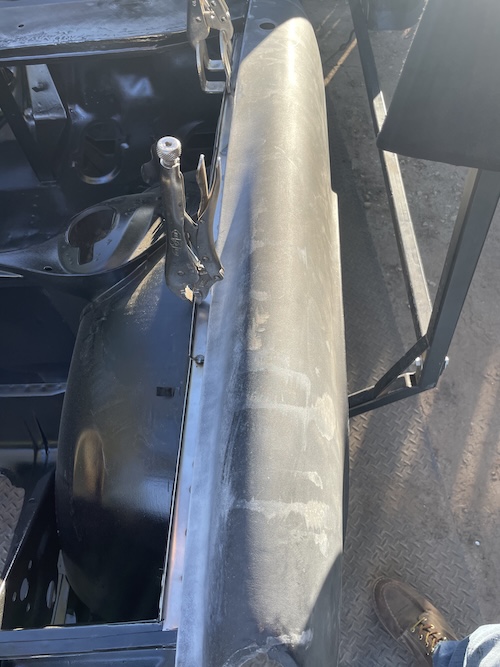 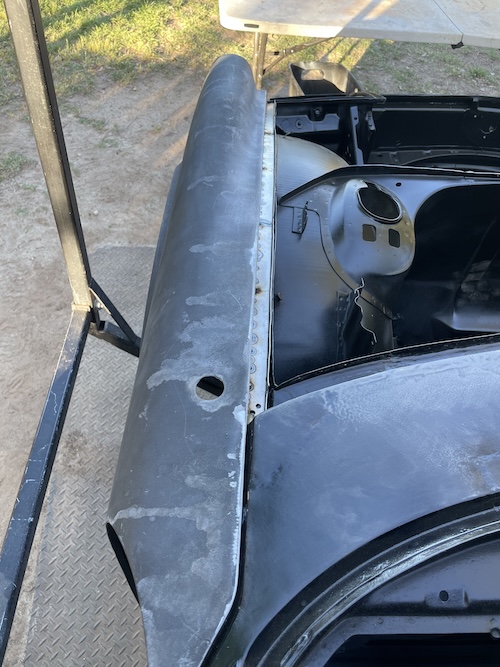 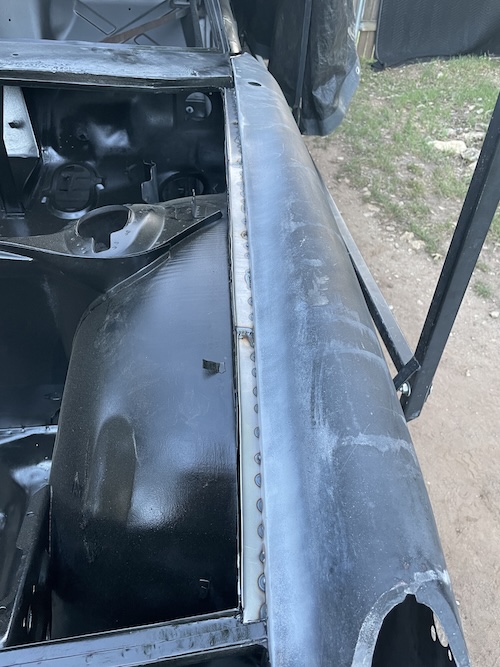 With the track tacked in place, the fender was then removed and the process of welding everything closed began. With over 34" of track, there was a lot of tedious zapping and cooling that went on here. The following photos show the fun that was had here. Note: the goal on grinding was to just flatten everything out without removing a lot of the metal/strength at the join. Final photo shows the fender mounted with the track completed. 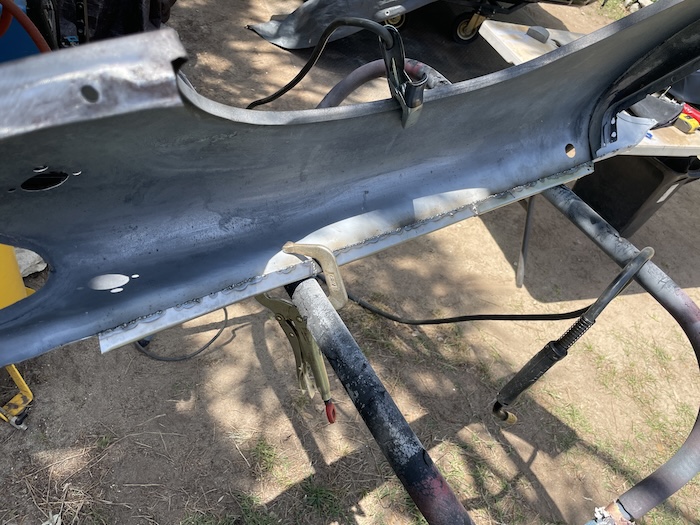 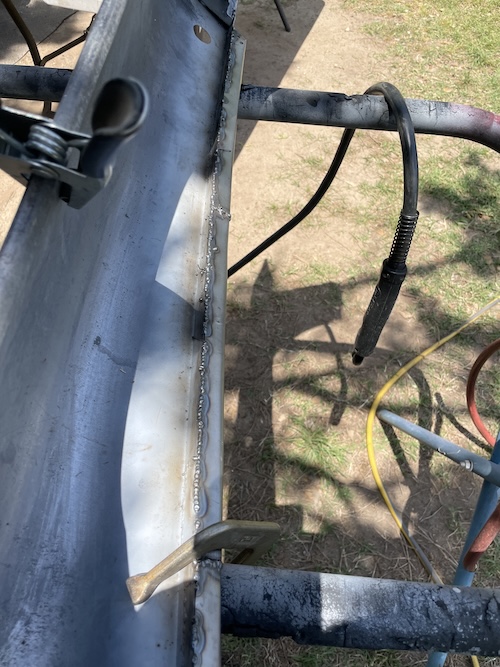 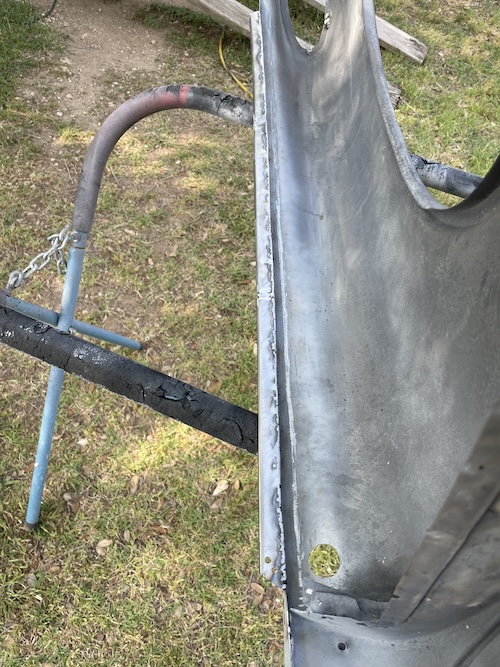 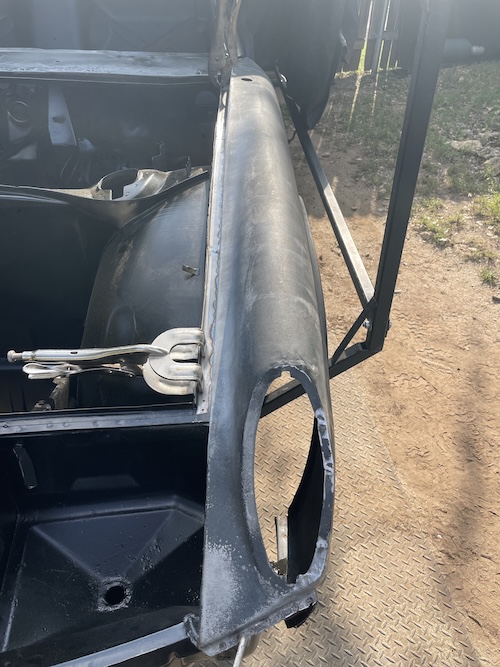 |
|
|
|
| friethmiller |
Apr 23 2025, 09:00 AM
Post
#454
|
|
Senior Member Group: Members Posts: 1,069 Joined: 10-February 19 From: Austin, TX Member No.: 22,863 Region Association: Southwest Region |
QUOTE(slowrodent @ Apr 22 2025, 06:13 PM) Welp... I see that you're swiftly running out of rotted panels to work your magic on... You craftsmanship remains so inspiring that I suggest you begin to smash/slash previously undamaged panels to keep the viewers happy. You're very welcome. (IMG:style_emoticons/default/shades.gif) Thank you @slowrodent! That's an idea (IMG:style_emoticons/default/biggrin.gif) However, I think there's a lot of good stuff ahead in just dealing with the body damage that must be fixed. It'll be just as FUN, I promise. There's wreck damage on the driver side front and rear wheel area, the doors are a hot mess, and I have rust holes in both hoods. Here's just a sample of the "initial fix" on the fender. And this after I spent a bunch of time reforming the corner.  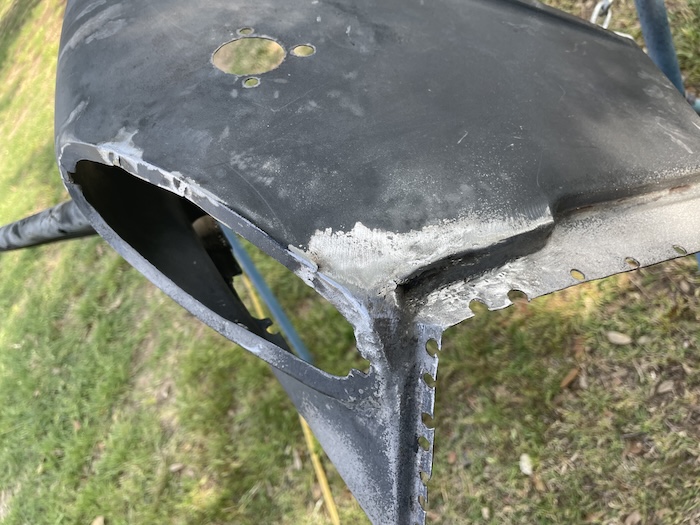 |
|
|
|
| friethmiller |
Apr 27 2025, 08:04 PM
Post
#455
|
|
Senior Member Group: Members Posts: 1,069 Joined: 10-February 19 From: Austin, TX Member No.: 22,863 Region Association: Southwest Region |
Front Fender Install: (4/26/2025):
Here we go! (IMG:style_emoticons/default/flag.gif) After a couple of weeks of repair, the front fenders were finally ready to get reinstalled. And after a lot of on & off fittings. Both front fenders were checked for alignment, secured with screws, clamped, and then finally tacked in-place. The following photos show the passenger side going in. 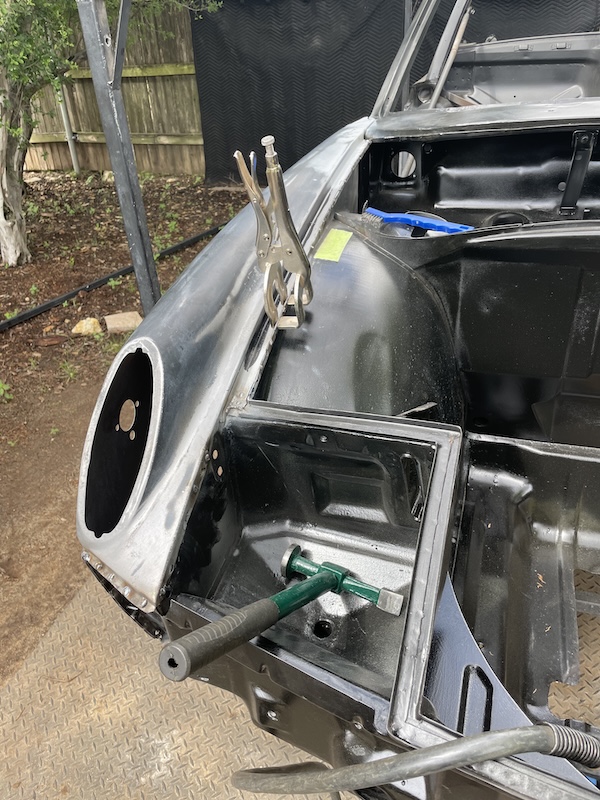 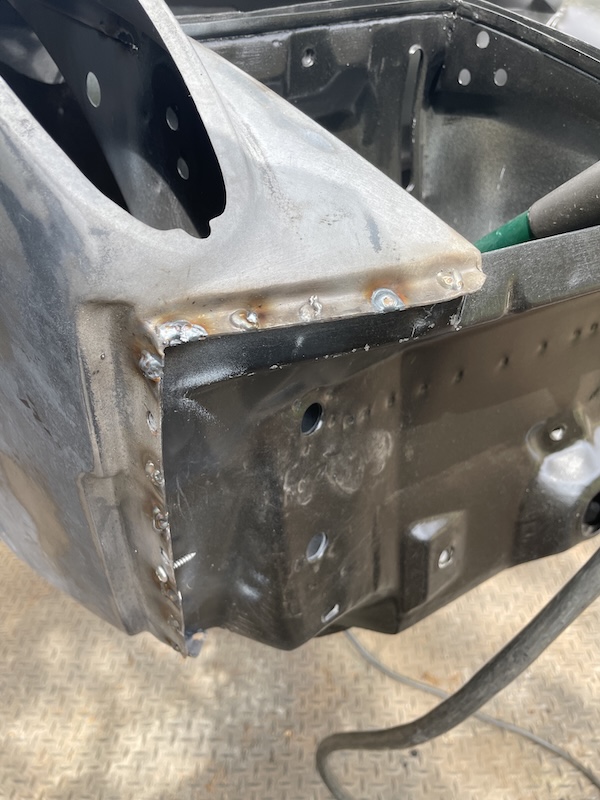 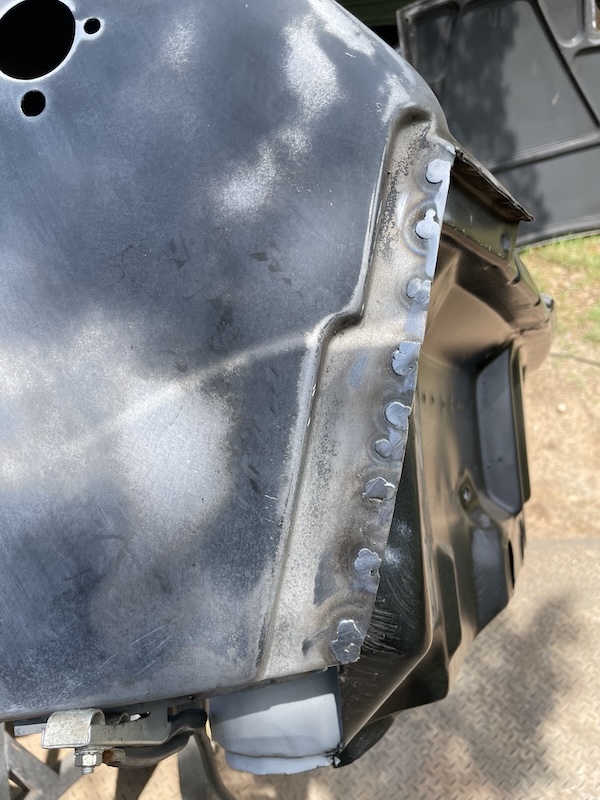 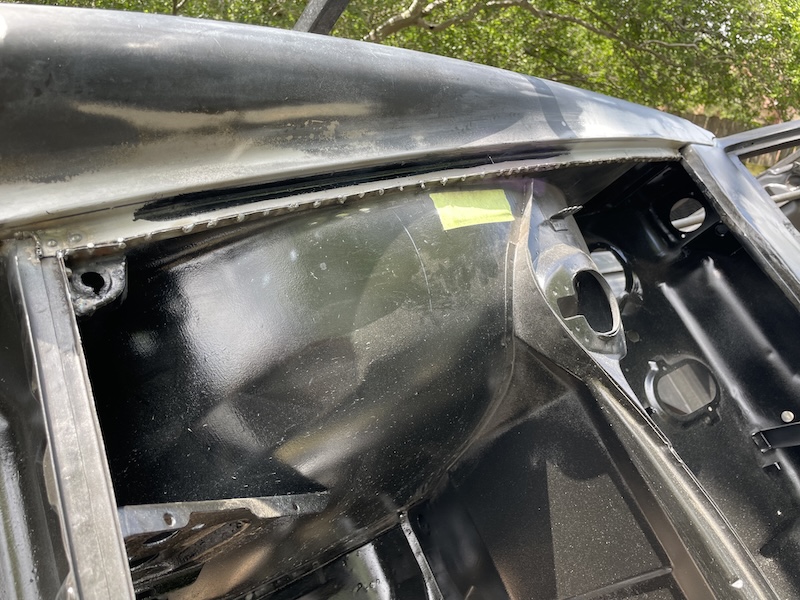 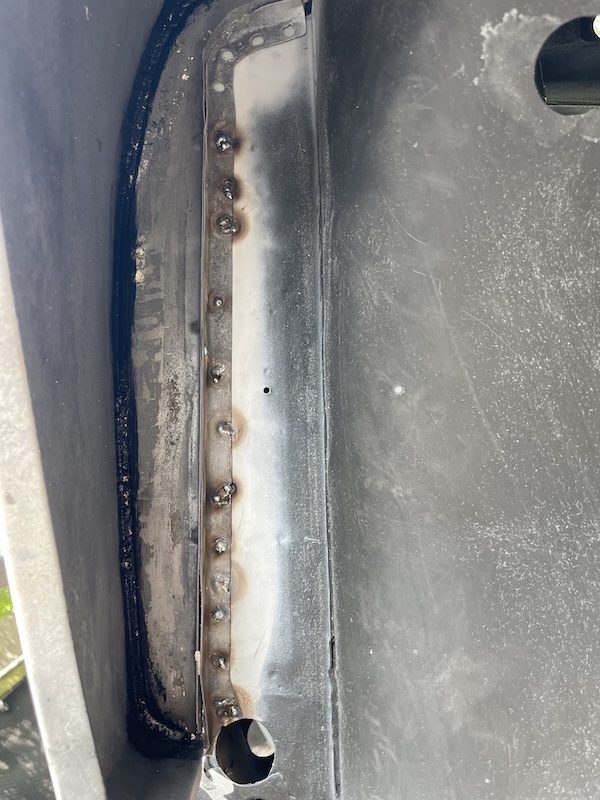 Next, the driver side. By this time my welds were starting to look really ugly (IMG:style_emoticons/default/bootyshake.gif) I hung in there, motivated by the thought of completing such a big task in one day. Few shots of this fender. 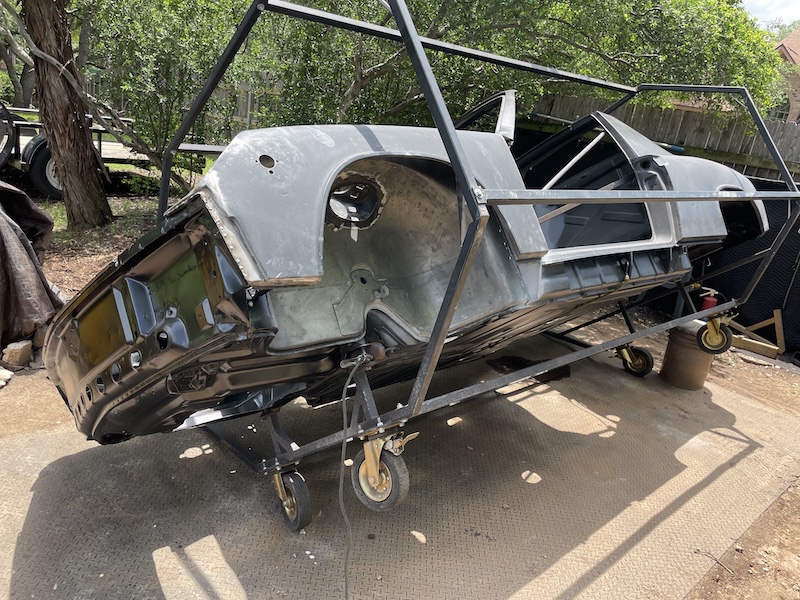 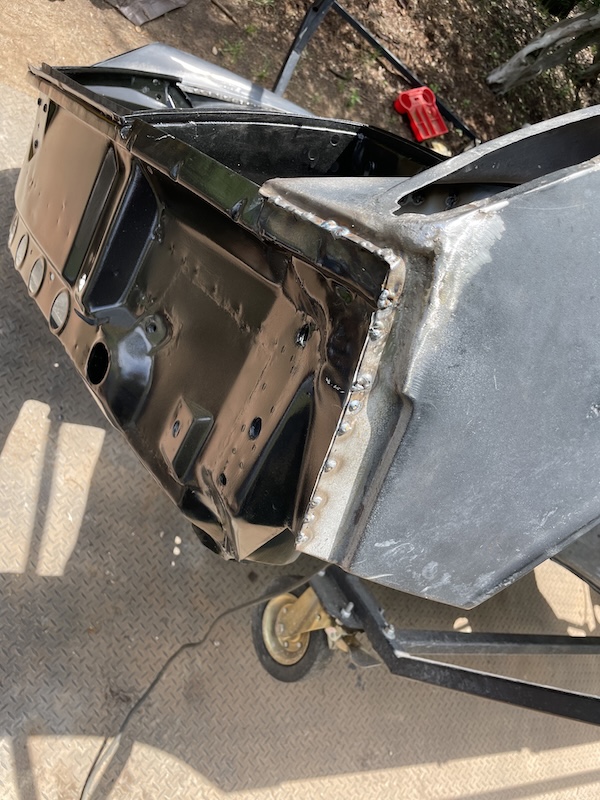 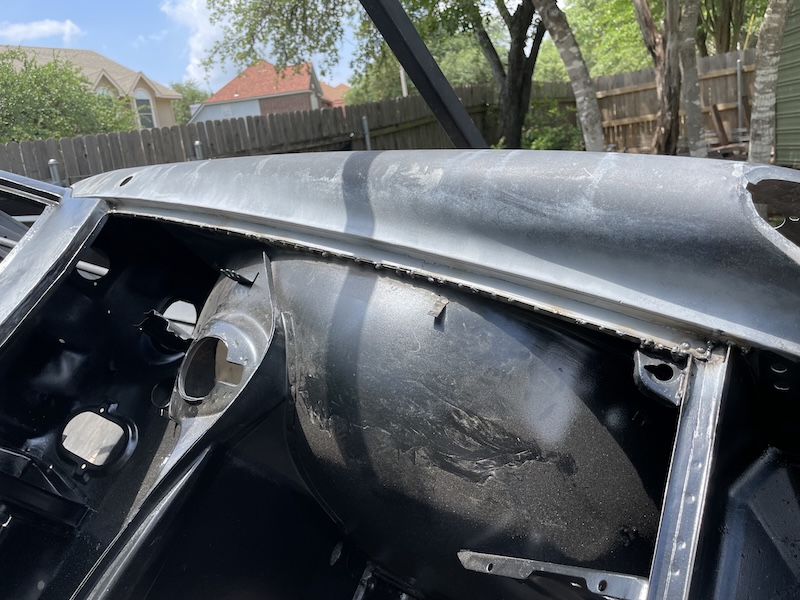 With both fenders secured, it was time to go back and start grinding (IMG:style_emoticons/default/wacko.gif) . I used a 4 1/2" grinder and my 3" cutting wheel to knocked down the majority of the extra metal. The process of grinding down the small welds that run inside the frunk are not easy! You can never find the right angle to see what you're doing most of the time. Having a hole in the bottom of the truck (for the A/C Condenser) certainly helped. I was actually able to save my back a bit by standing in there to get yet another angle on these smaller welds. Harder still, are the welds high up inside the fender. It took some patience but I was able to get most of weld knocked down. Note: Seem sealer will hide/cover much of this area. 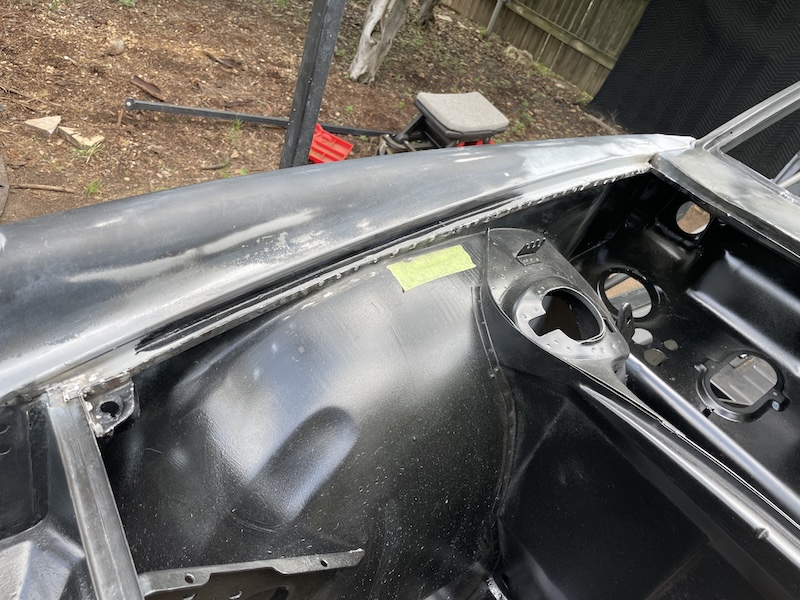 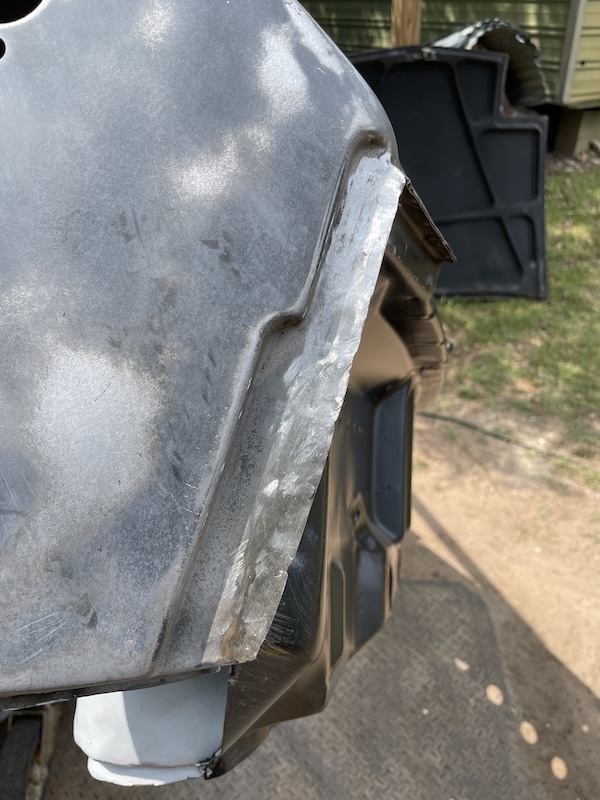 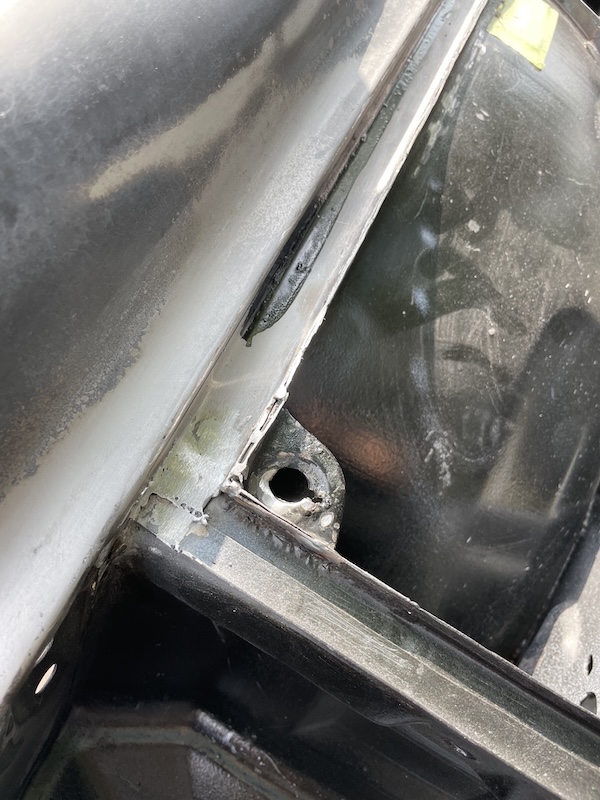 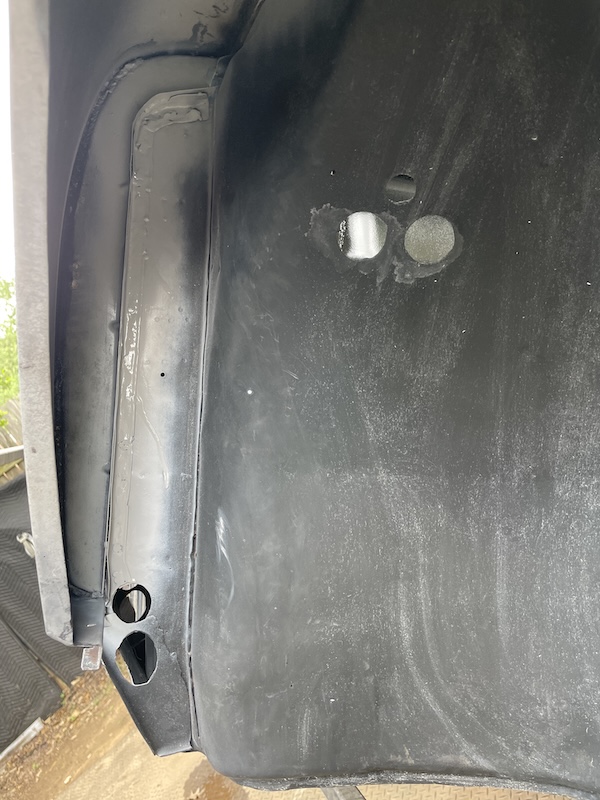 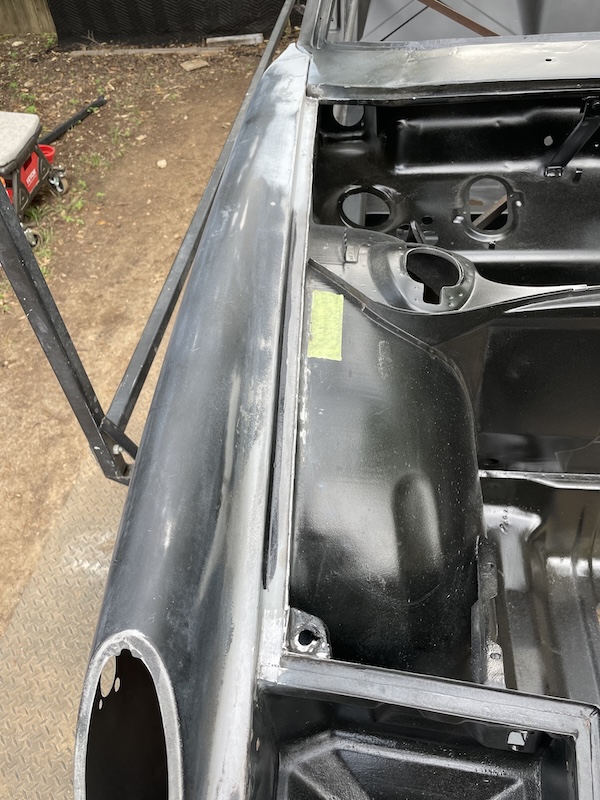 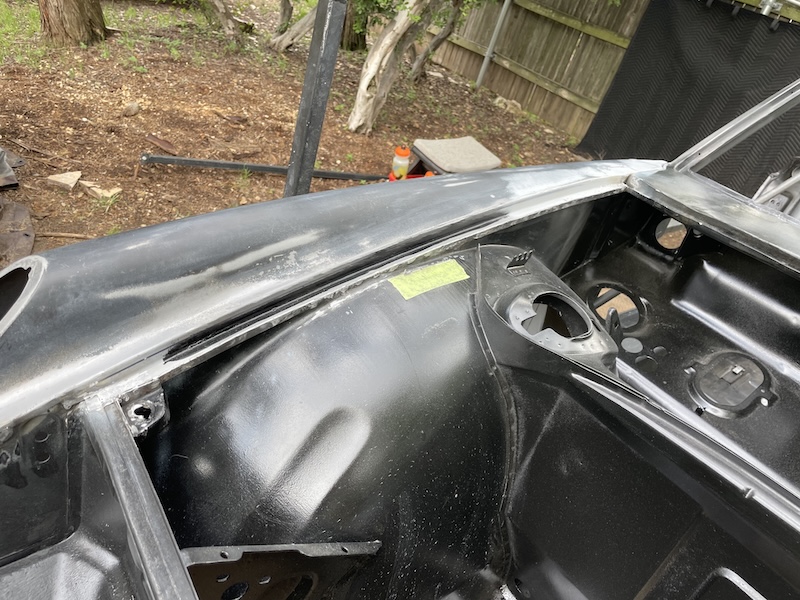 After all that grinding, I decided to get the other fender in the morning. Before quitting for the day, though, I was able to template and cut out the reinforcement plates for the front floors (as recommended by @bkrantz ). After a rough fitting, I painted the plates and left them for the next day's work. Final photo shows the car with both fenders installed with the hood. 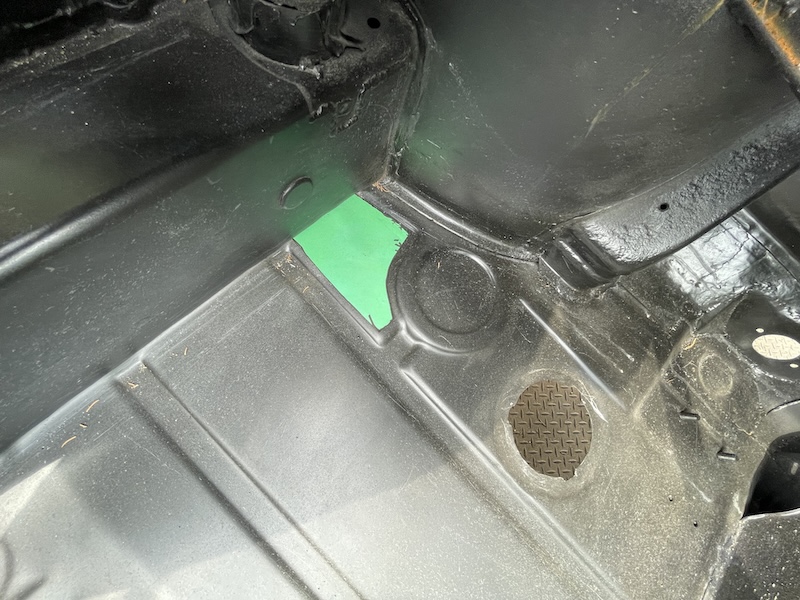 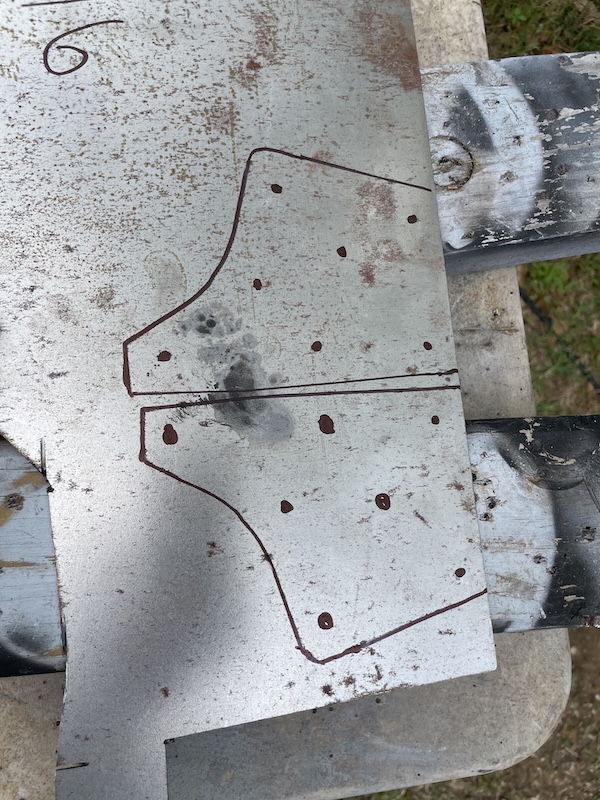 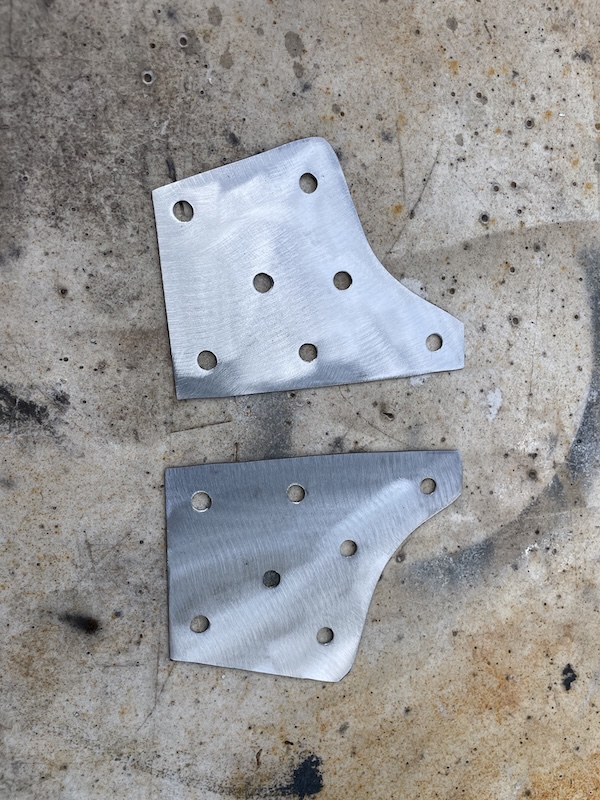 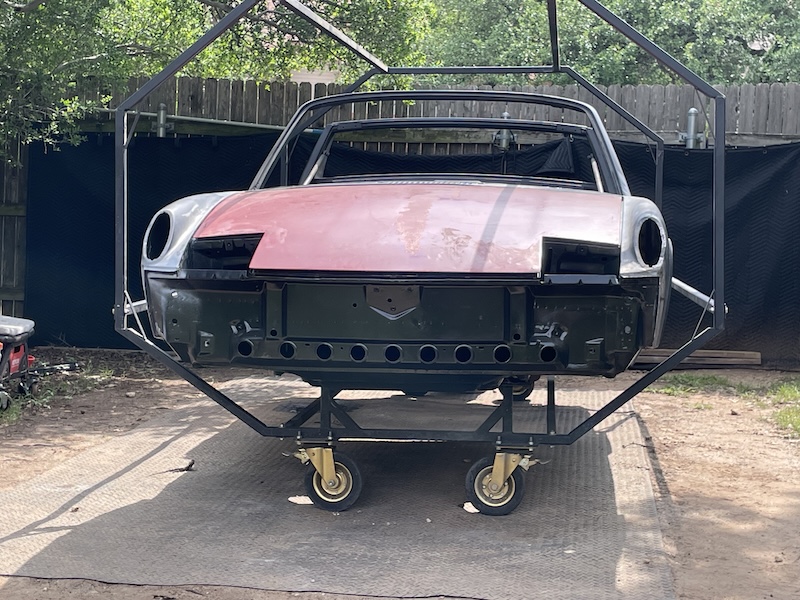 |
|
|
|
| friethmiller |
Apr 27 2025, 08:34 PM
Post
#456
|
|
Senior Member Group: Members Posts: 1,069 Joined: 10-February 19 From: Austin, TX Member No.: 22,863 Region Association: Southwest Region |
Front Fender Install (part 2): (4/27/2025):
Finishing out the Grind Picking up where I left off on the driver side fender, I spent over 2 hours grinding down the remaining welds. It wasn't easy but I got it done. Here's a few photos of the work. 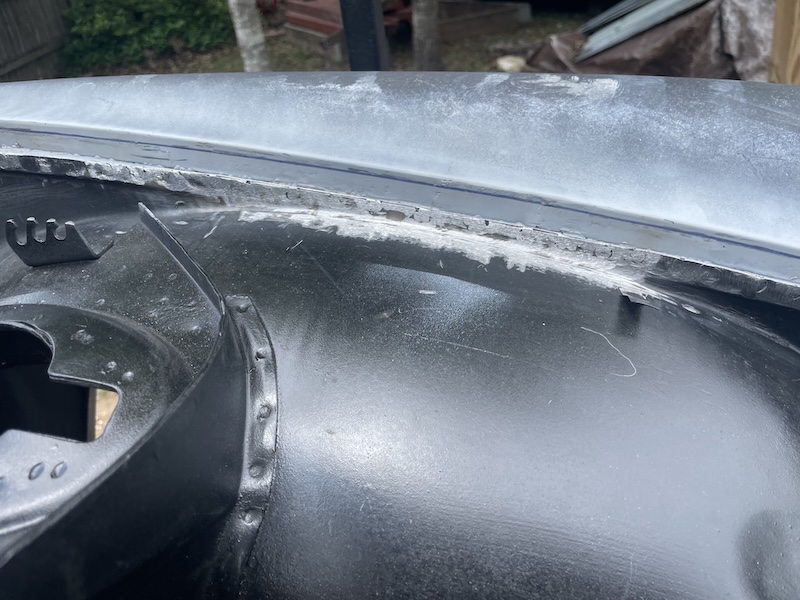  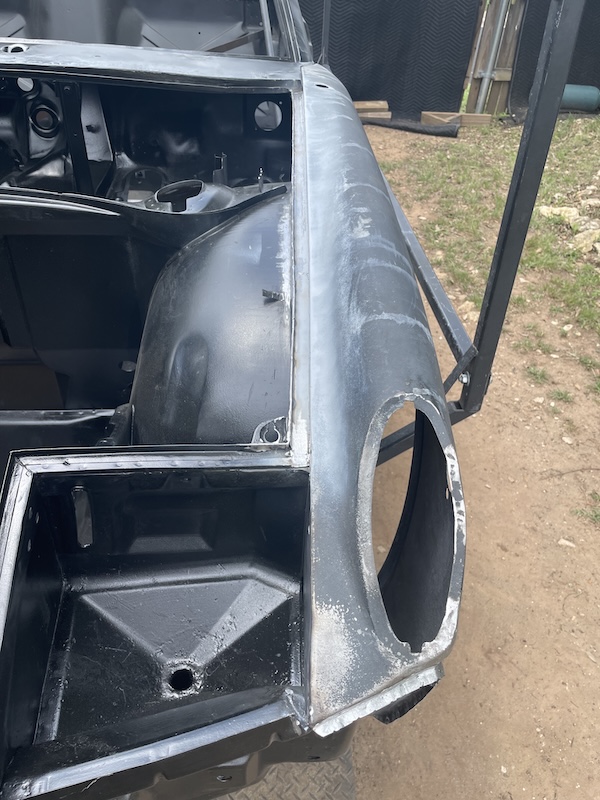 Reinforcement Plate Install: Even after removing some of the reinforcing bars, I found welding up in this corner surprisingly cramped. Did the best I could to get these plates installed but it wasn't pretty. I just did a rough grind on the welds here. I plan to revisit next weekend. I might decide to weld the entire perimeter if I can find a way to get inside the car (IMG:style_emoticons/default/idea.gif) Here are a few photos of this work. 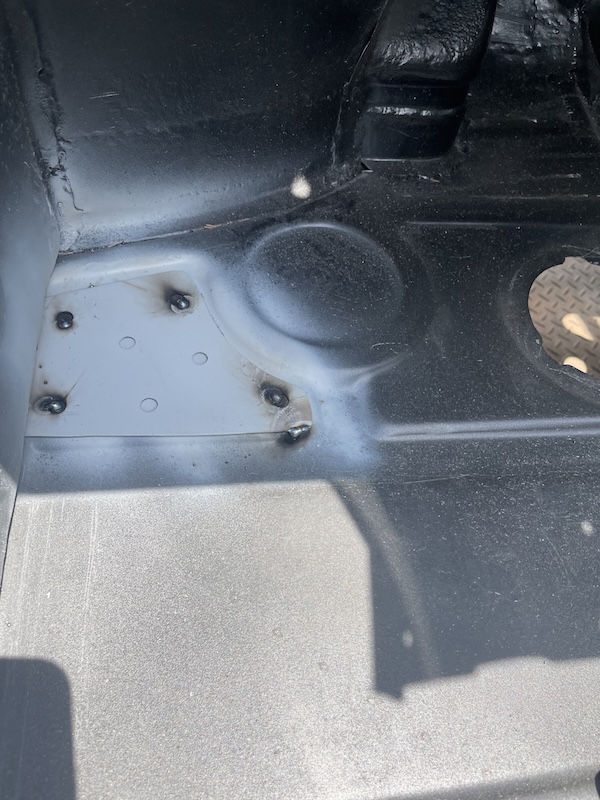 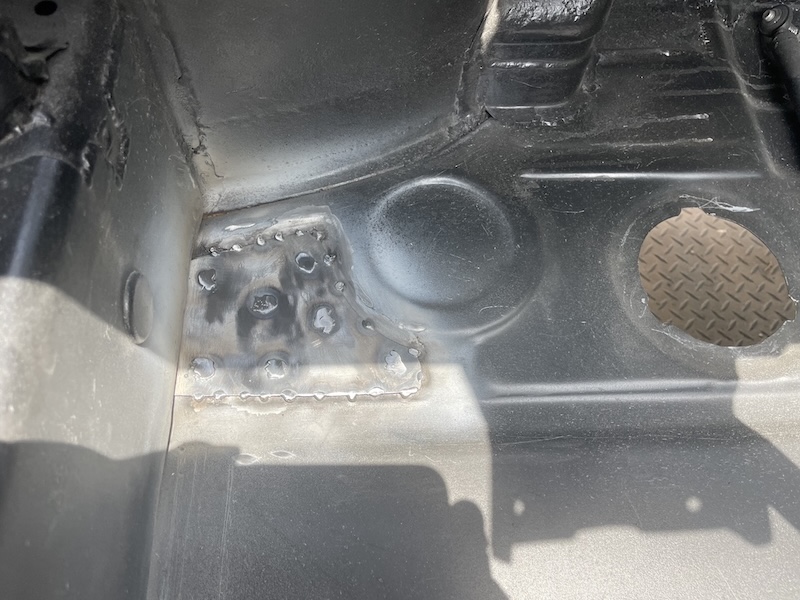 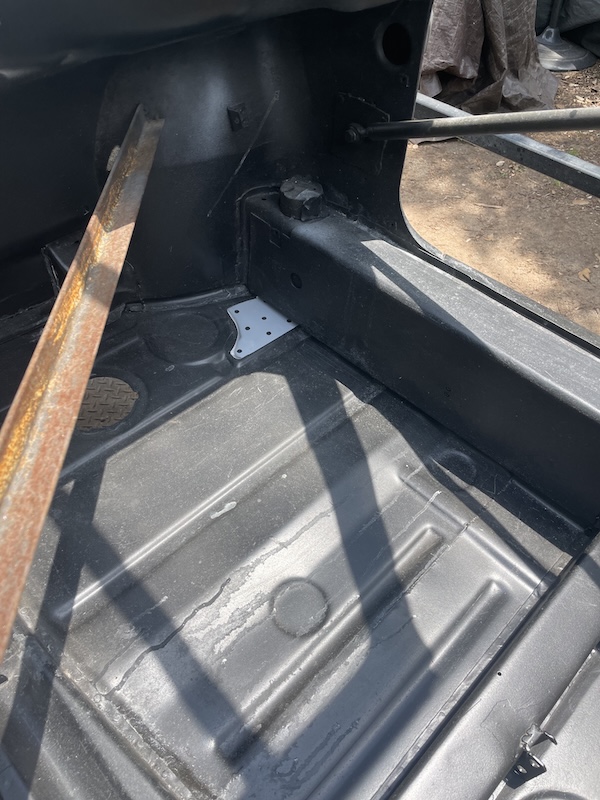 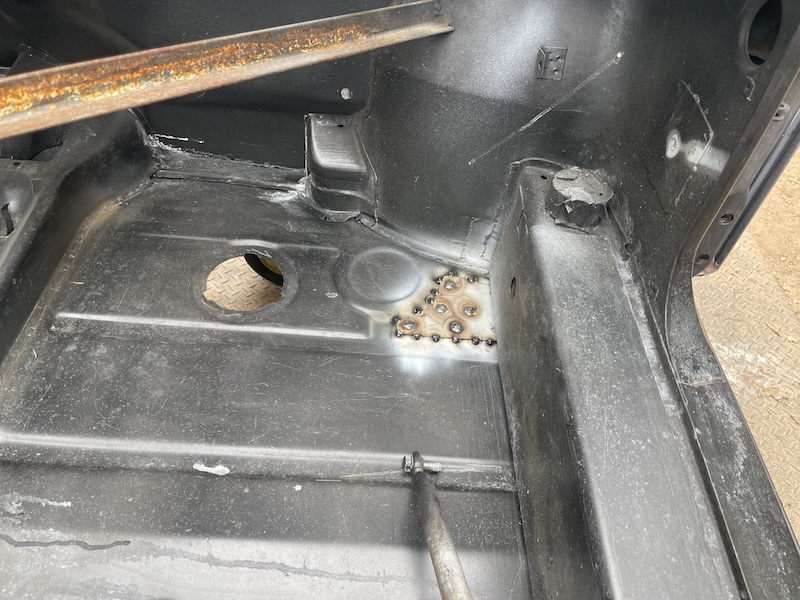 Painting Epoxy At this point in the day (approximately 3pm) I decided to go ahead and clean and prep the fenders to get ready for paint. It has been so humid/rainy lately, the thought of dealing with the flash rust that would most definitely show up by Wednesday motivated me to get at least a quick coat down on these fenders. The following photos show the results of two light coats of 2K black epoxy. You'll notice the damage that is present on the front of the driver side. Black certainly shows everything! Not to worry. Plenty more hammer / dolly action ahead and, of course, body filler. All that comes later. She's coming along. Enjoy the photos! Cheers! (IMG:style_emoticons/default/beerchug.gif)  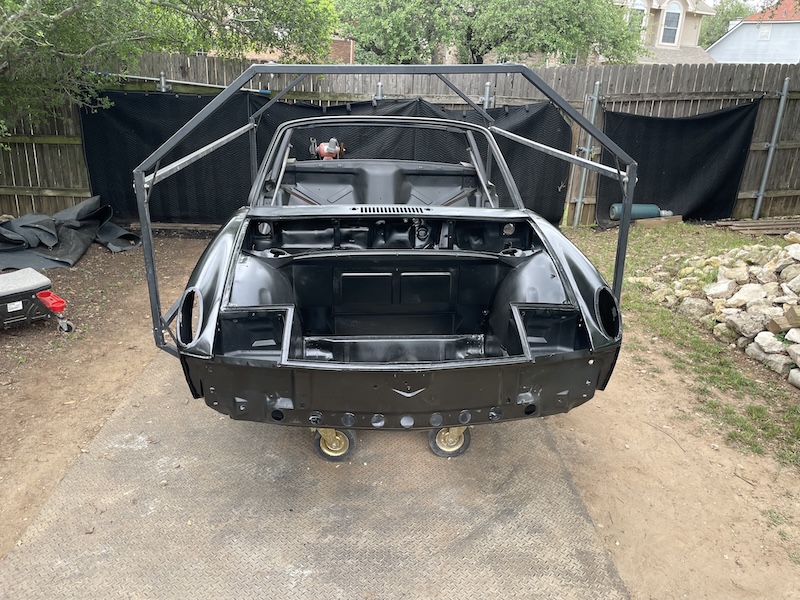 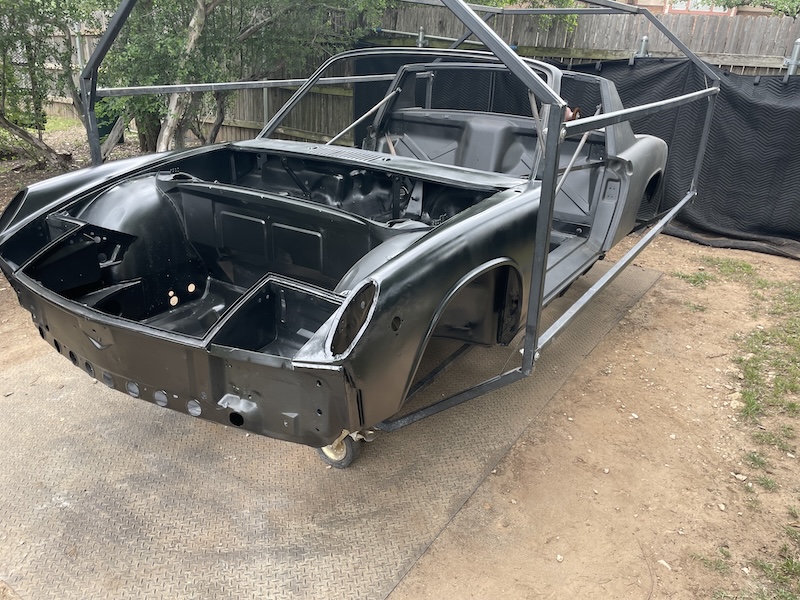  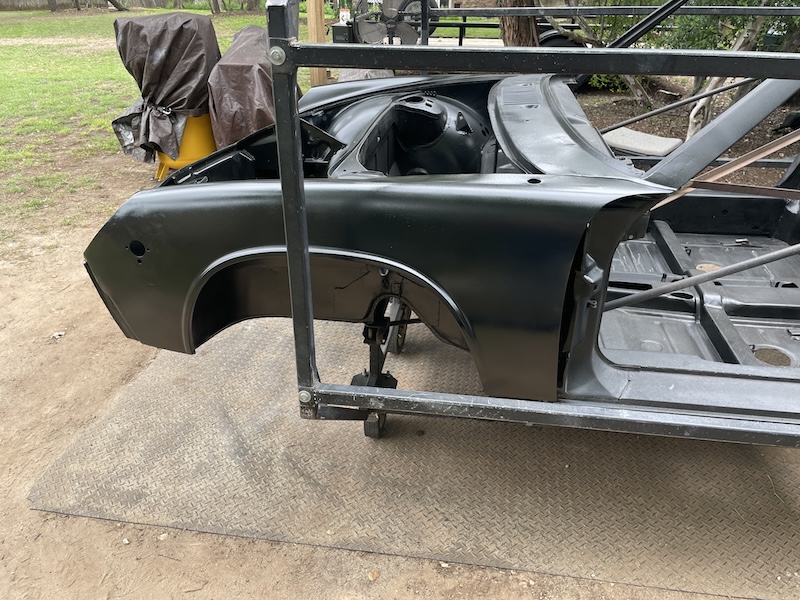 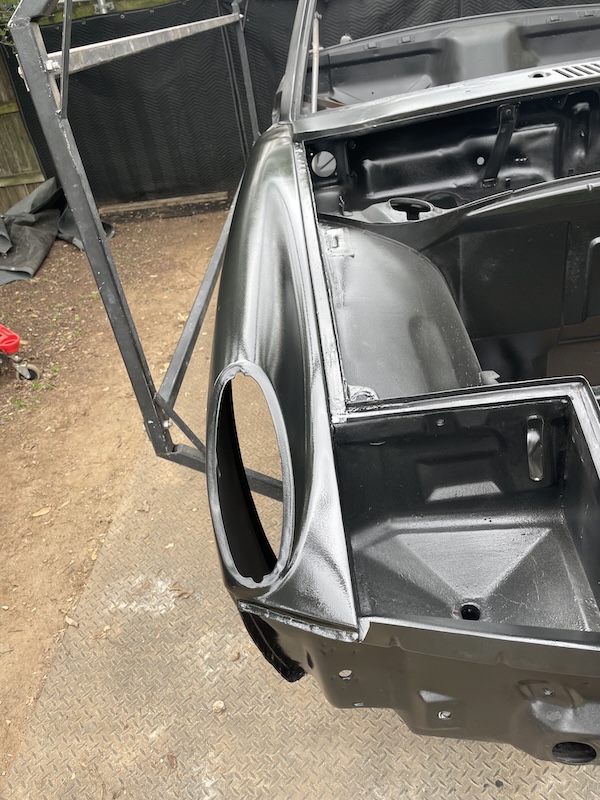  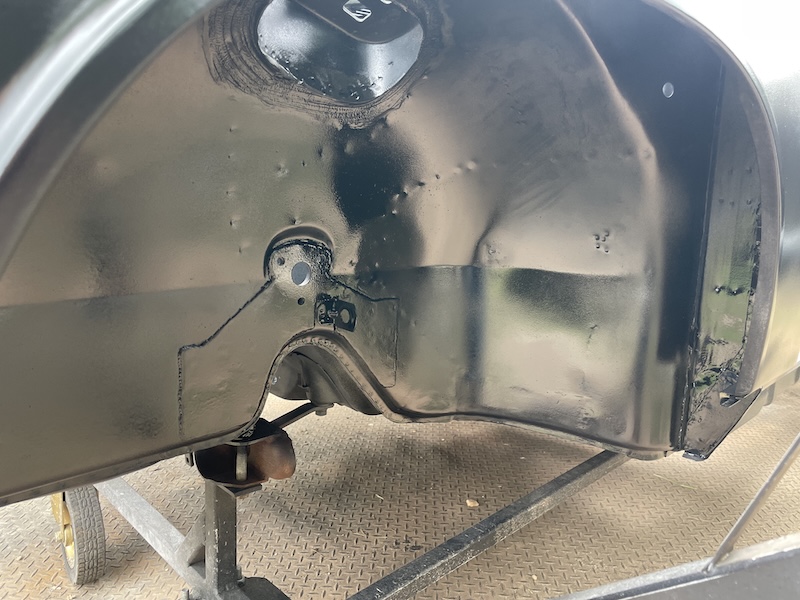 |
|
|
|
| Puebloswatcop |
Apr 28 2025, 06:40 AM
Post
#457
|
|
Senior Member Group: Members Posts: 1,677 Joined: 27-December 14 From: Mineola, Texas Member No.: 18,258 Region Association: Southwest Region |
Looking good Fred. Wish I could have been there to help you replace the fenders, unfortunatly I was a week early.
|
|
|
|
| friethmiller |
Apr 28 2025, 07:28 AM
Post
#458
|
|
Senior Member Group: Members Posts: 1,069 Joined: 10-February 19 From: Austin, TX Member No.: 22,863 Region Association: Southwest Region |
Before / After Photos:
It's always good to look back on where you started! Here's the original photo from 2022 that shows the frontend after I removed all the carpet that had been glued in. What a mess! It took forever to hand scrap that glue off. Of course, looking closely you can see all the sealant track work and some of the rust hole repair. 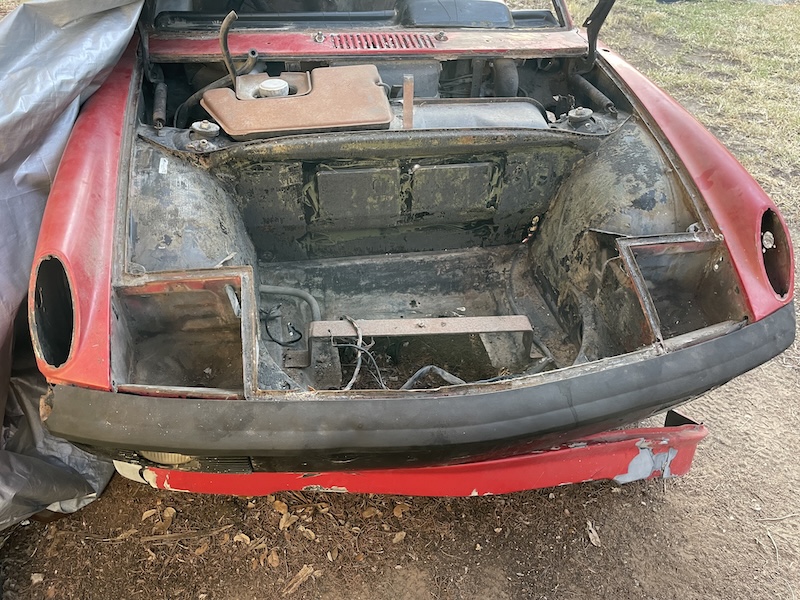 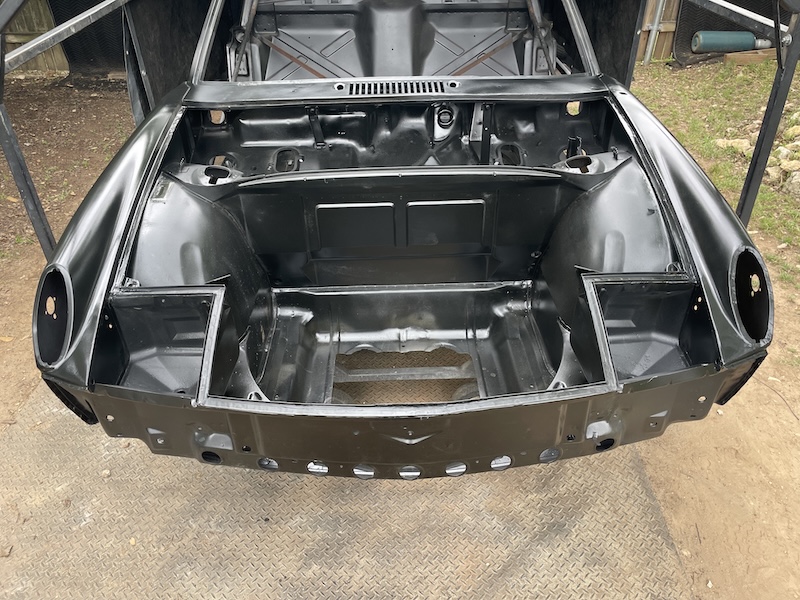 |
|
|
|
| seanpaulmc |
Apr 28 2025, 11:41 AM
Post
#459
|
|
Member Group: Members Posts: 399 Joined: 6-December 16 From: Orlando, FL Member No.: 20,649 Region Association: South East States |
Fred, fantastic work! You’ve come so far with that tub!!! (IMG:style_emoticons/default/pray.gif)
What are you using for the epoxy and how is it being applied? Best, Sean |
|
|
|
| friethmiller |
Apr 28 2025, 12:27 PM
Post
#460
|
|
Senior Member Group: Members Posts: 1,069 Joined: 10-February 19 From: Austin, TX Member No.: 22,863 Region Association: Southwest Region |
QUOTE(seanpaulmc @ Apr 28 2025, 12:41 PM) Fred, fantastic work! You’ve come so far with that tub!!! (IMG:style_emoticons/default/pray.gif) What are you using for the epoxy and how is it being applied? Best, Sean Thanks Sean! With the main body done, things are going to start speeding up, too. Really looking forward to undercoating / painting the bottom next weekend. Stay tuned for that. The 2K epoxy I'm using here is from Restoration Shop. It's a 1:1 mix so its pretty easy to work with - that is once you get it mixed up. I applied it using one of my crappy spray guns with at least a 1.6 - 1.8 tip. Had it running off my small compressor which does have a pre-cooler to help dry the air (see post #200). This is what I call "field-expedient" painting. Not by the book nor perfect but it gets the job done. Cleaning and preparing the metal is way more important for primer, if you ask me. All bare metal is being etched, dried, and then fully cleaned. 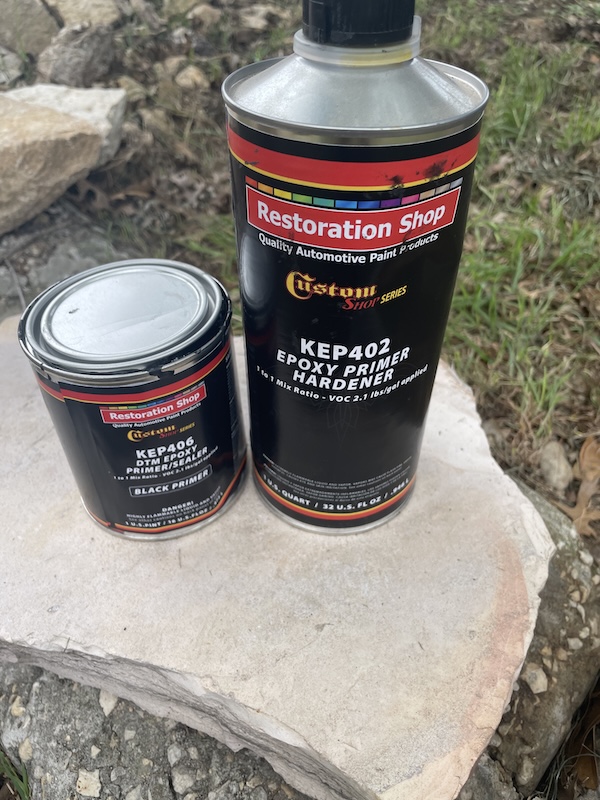 |
|
|
|
|
4 User(s) are reading this topic (3 Guests and 0 Anonymous Users)
1 Members: friethmiller

|
Lo-Fi Version | Time is now: 10th November 2025 - 04:44 PM |
Invision Power Board
v9.1.4 © 2025 IPS, Inc.