|
|
|
Porsche, and the Porsche crest are registered trademarks of Dr. Ing. h.c. F. Porsche AG.
This site is not affiliated with Porsche in any way. Its only purpose is to provide an online forum for car enthusiasts. All other trademarks are property of their respective owners. |
|
|

  |

| bkrantz |
 Jun 6 2025, 10:13 PM Jun 6 2025, 10:13 PM
Post
#521
|
|
914 Guru  Group: Members Posts: 8,530 Joined: 3-August 19 From: SW Colorado Member No.: 23,343 Region Association: Rocky Mountains |
QUOTE(Puebloswatcop @ Jun 6 2025, 12:55 PM)  Hey Fred is it as hot and humid over there as it is here? If it is are you still working on the car in this misery? If so, be careful stay hydrated ansd take long breaks. As always love the work you are doing. (IMG:style_emoticons/default/beerchug.gif) I feel for you guys. I only survived my time in Houston because I installed AC in my detached garage. Here in Colorado we still have morning lows in the low 40s and highs around 75. We do have a heat wave forecast soon with highs up to 85. Don't hate me. (IMG:style_emoticons/default/smash.gif) |
   |

 
|
| friethmiller |
Jun 8 2025, 08:13 PM
Post
#522
|
|
Senior Member Group: Members Posts: 1,069 Joined: 10-February 19 From: Austin, TX Member No.: 22,863 Region Association: Southwest Region |
Driver Side Door - Part 5 (6/6 - 6/7/2025):
Replacing the Bottom Edge of Door Skin Here's a few pics of the process. I didn't exactly cut straight here but it really didn't matter. I simply used the 3" cutting disc to open up any overlap/closed gaps. It was absolutely critical to ensure good gaps along this edge - in order allow for good weld penetration. I didn't really get any photos of all 2,500+ overlapping spot welds but you can see the end result once the excess was ground off. Looks pretty good, IMO. Next step was to weld the inner door's bottom flange to the door skin. I had pre-drilled the holes for this and made sure both pieces of metal were shot with some weld-thru primer. 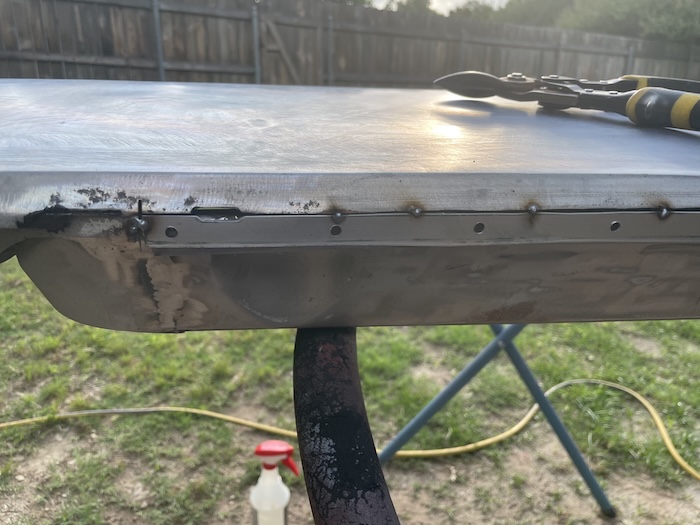 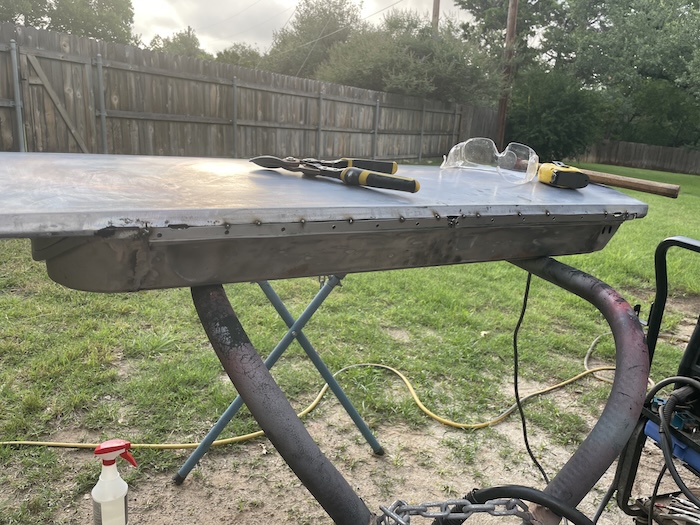 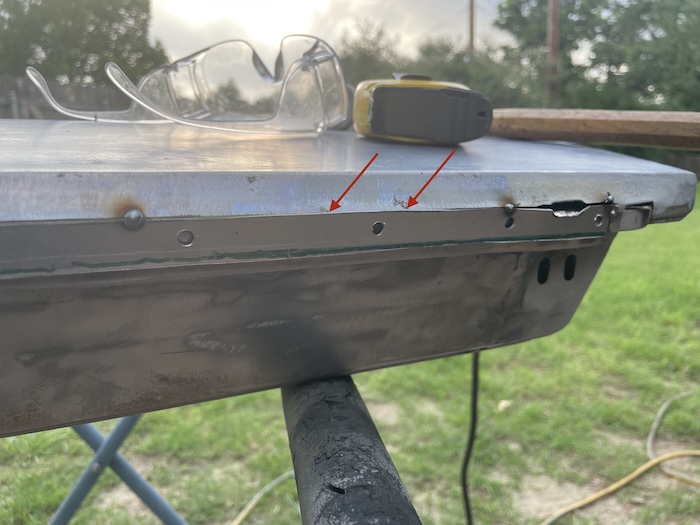 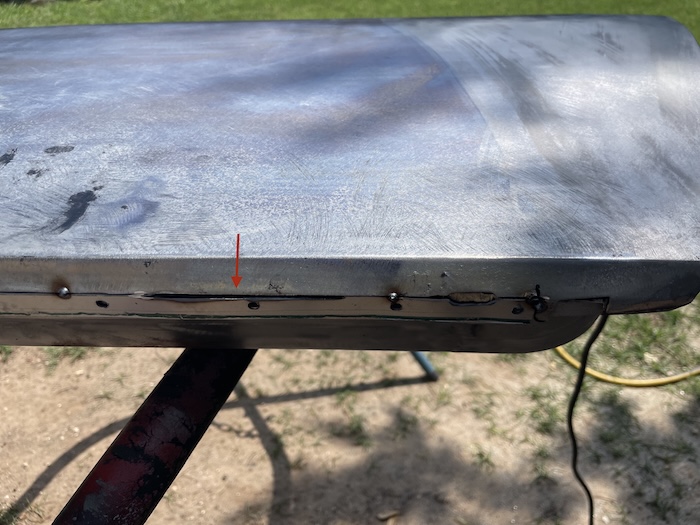 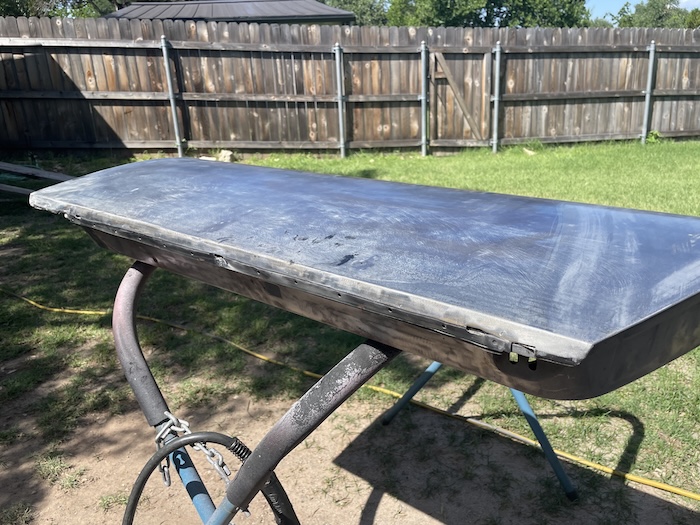 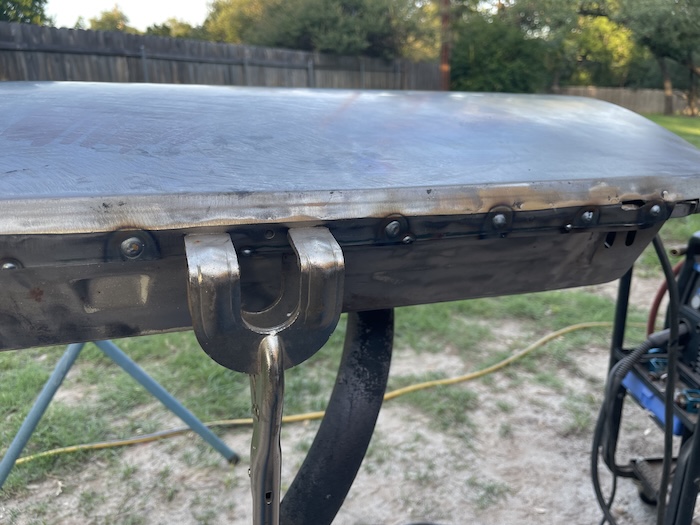 Heat-Shrinking Once the bottom of the door was finally welded together, I noticed a good bit of oil-canning in one section of the door (see marker spot). With the correct backing pad on hand, I was finally able to mount and use my 4 1/2" shrinking disc on my grinder. (IMG:style_emoticons/default/piratenanner.gif) Wow! I forgot how good these thing work. Just took a few short sessions of heating and quenching the area and the oil-canning was gone. There are plenty of videos on YouTube to reference here. IMO, the key is focusing on the high spots. I used a rag in a small bucket of cool water to do the quenching. Stupid-Simple!  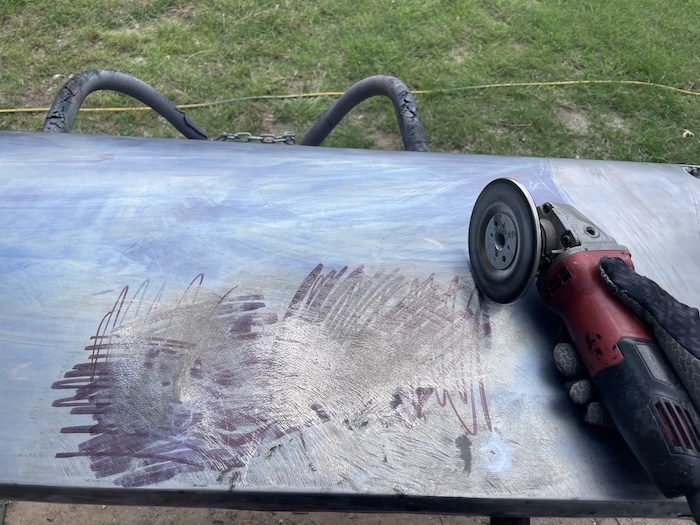 Finishing Work on the Door Couple photos here on preparing the door for paint. Pic 1 shows the results of removing the original paint from the door handle area. Despite the tedious nature of this task, the rust under the original paint had to be removed/treated. I used oil & grease remover to get rid of all that magic marker on the door skin (pic #2). Next, I removed the excess from the new metal that was added at the bottom of the door. This was done by measuring and marking a line across edge (pic #3). After that, I greased and reassembled the hinges (pic #4) and shot the back of the door with 2-3 good coats of epoxy primer. 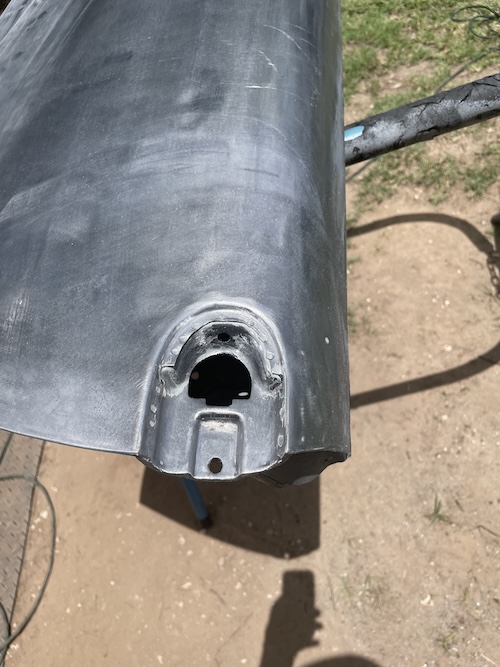 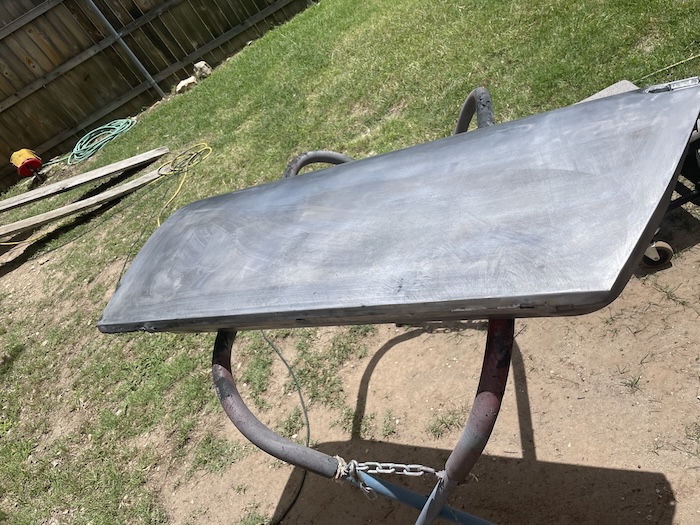 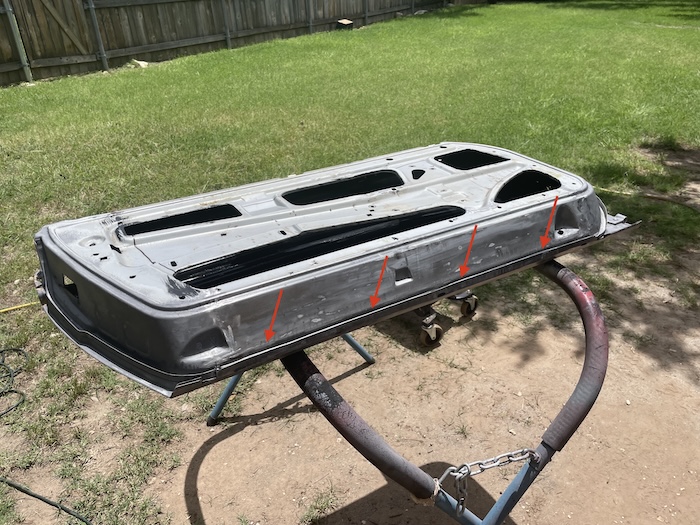 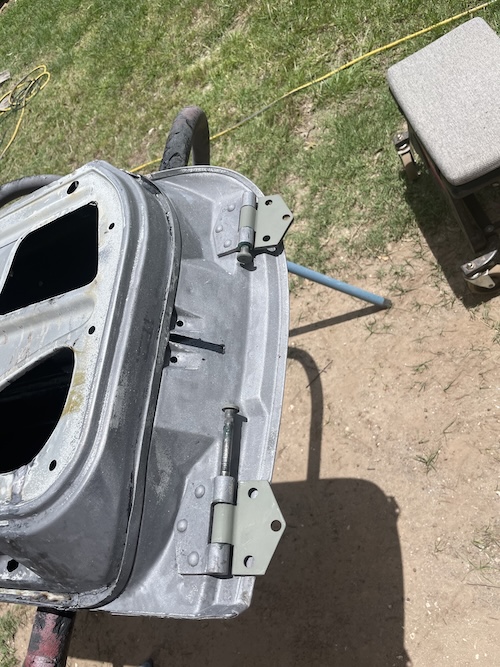 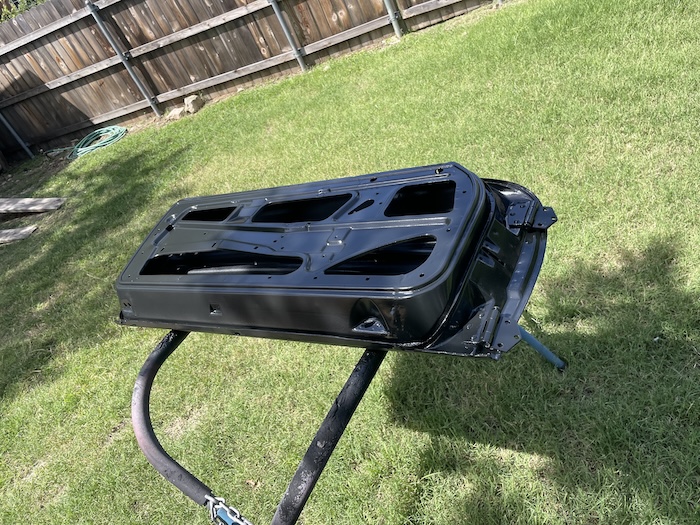 Door Mounting After allowing the door to dry for several hours, I returned and screwed the door into the car. After fiddling with the adjustment for a good bit, I realized that the front fender had been mounted slight inward toward the cowl by a few millimeters. (IMG:style_emoticons/default/blink.gif) And... this was suppose to be the door that aligned without a hitch. Oh well, decided to come back in the morning fresh and see what I could do to fix my predicament. 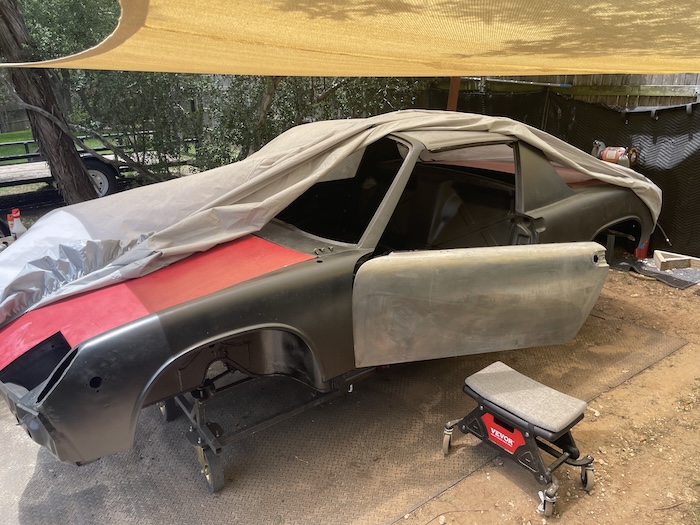 More to come in Part 6 - the door saga continues (IMG:style_emoticons/default/chair.gif) |
 |
|
| friethmiller |
Jun 9 2025, 12:06 PM
Post
#523
|
|
Senior Member Group: Members Posts: 1,069 Joined: 10-February 19 From: Austin, TX Member No.: 22,863 Region Association: Southwest Region |
Driver Side Door - Part 6 (6/8/2025):
Had one of those 2am wake-ups where you can't sleep cause you start thinking about an issue with your car. (IMG:style_emoticons/default/blink.gif) How to fix a fender that's welded on just a little too close to the cowl? Keeping in mind the entire bottom of the car is painted. The answer is "you do what you can". First thing in the morning I was out on the car. Used my long die grinder bits to reach into the rear fender area to knock out my welds (pic 1). Used a screw driver to widen the gap just a bit (pic 2). 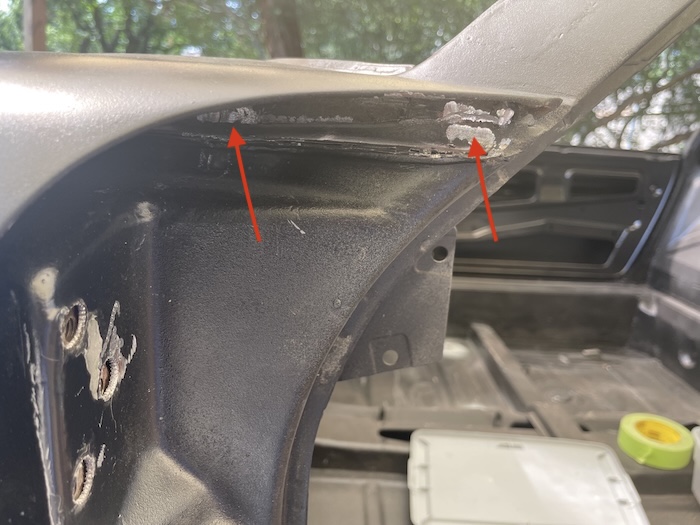 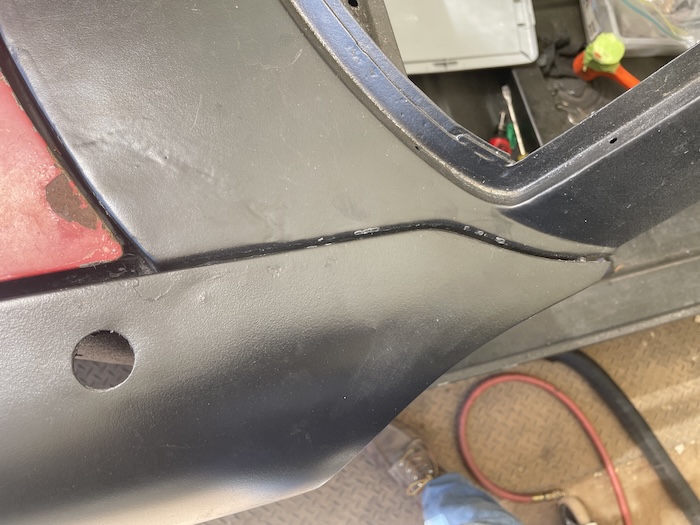 After this, I re-mouted the door and checked gaps again. Still a bit wide at the top for my liking. Decided to add a bit more welding rod to close the gap - knowing the fender will come down just a bit after I re-weld it. Couldn't really move the cowl gap too much without bowing the fender just a bit at the curve with the door. In the end it was a compromise. It's not perfect by any means but at least it gets me in a zone were I can cut to relief the fender or use a few mm of filler to match up the panels. TBD, I guess.  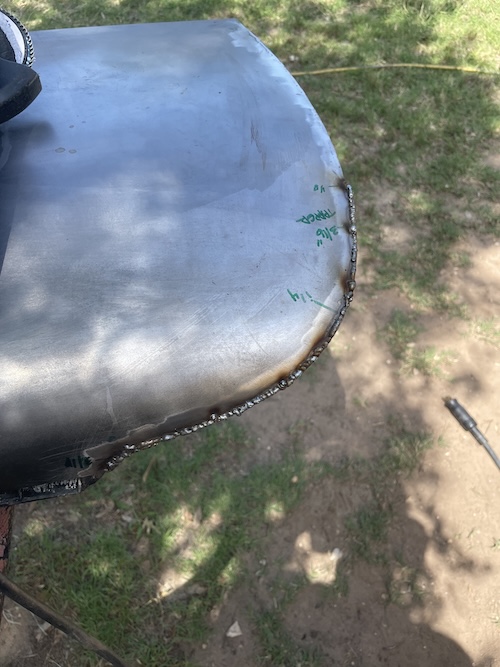 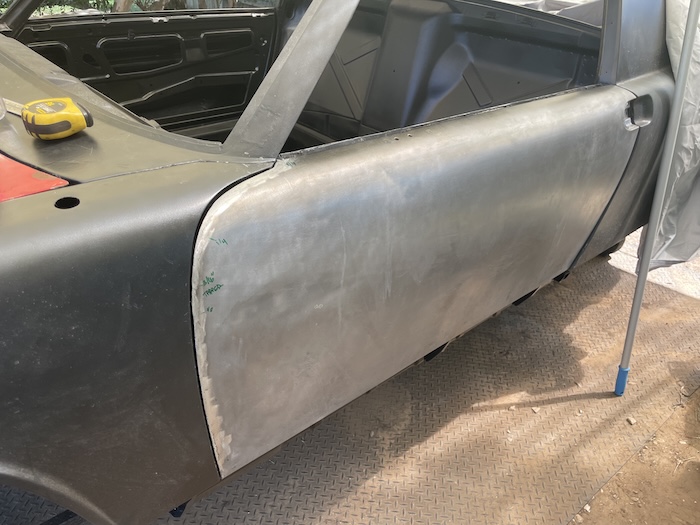 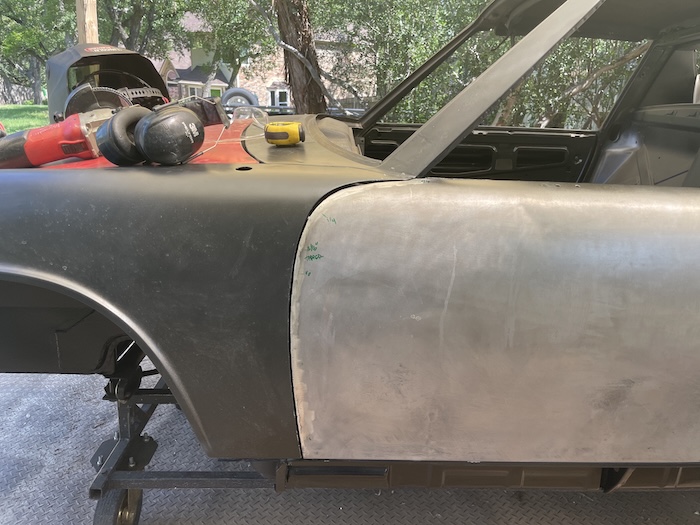 At this point, I cleaned and prep'd the door for paint. We have a week of rain scheduled and I can't hold off any longer. I shot 3 coats of epoxy (pic 1). You can see my upcoming work in Part 7 (pic2) and my mystery dent that I put into the door sometime on Sunday (pic3). I don't recall when this might have happened. At least it's in a spot where I can get a dolly on the backside. Finally, Pic 4 showing the sun screen and the extent of my backyard. 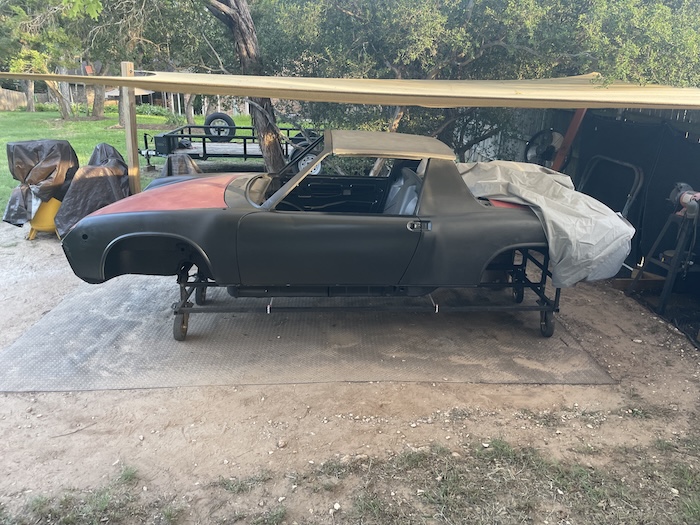 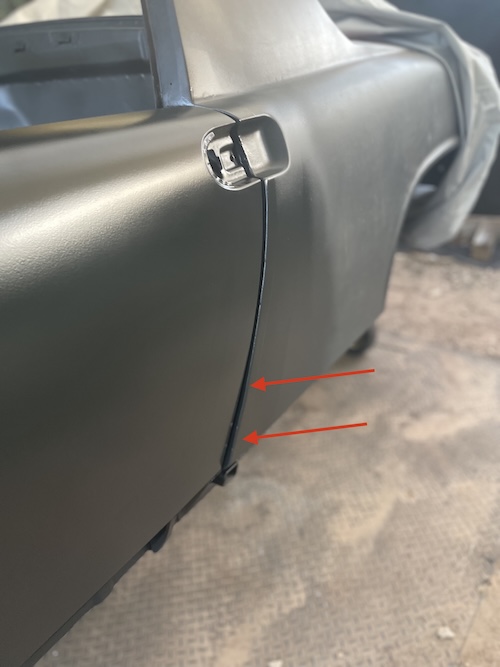 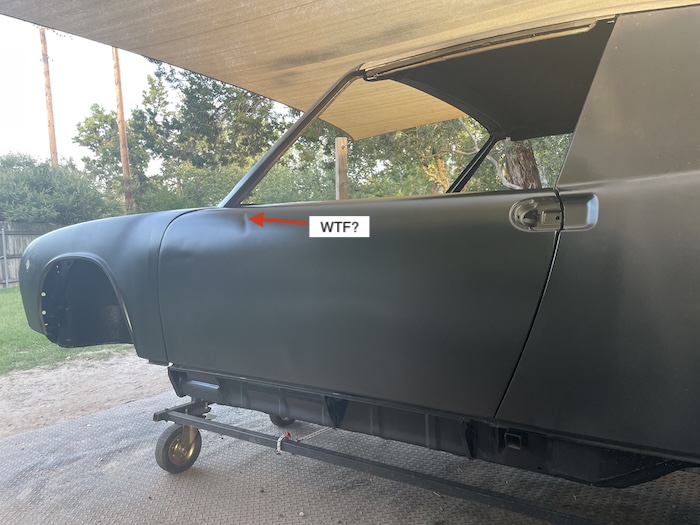 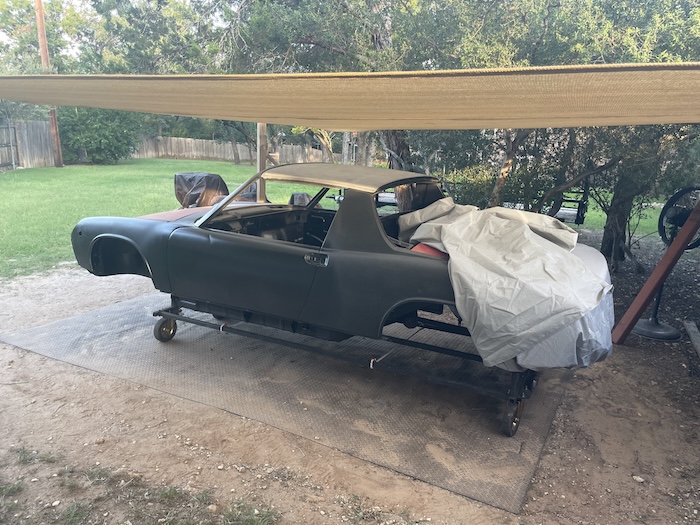 |
|
|
|
| Root_Werks |
Jun 12 2025, 05:16 PM
Post
#524
|
|
Village Idiot Group: Members Posts: 8,841 Joined: 25-May 04 From: About 5NM from Canada Member No.: 2,105 Region Association: Pacific Northwest |
Gotta love mystery dents!
When the bottom of the door is sucked in like that, I've had pretty good luck just grabbing the door and putting a twist on it. I was surprised it actually worked. |
|
|
|
| friethmiller |
Jun 12 2025, 09:16 PM
Post
#525
|
|
Senior Member Group: Members Posts: 1,069 Joined: 10-February 19 From: Austin, TX Member No.: 22,863 Region Association: Southwest Region |
QUOTE(Root_Werks @ Jun 12 2025, 05:16 PM) Gotta love mystery dents! When the bottom of the door is sucked in like that, I've had pretty good luck just grabbing the door and putting a twist on it. I was surprised it actually worked. Nice! I’m out of town at the moment but I’ll give it a try when I get back. Thanks for the suggestion (IMG:style_emoticons/default/beerchug.gif) |
|
|
|
| friethmiller |
Jun 20 2025, 10:24 AM
Post
#526
|
|
Senior Member Group: Members Posts: 1,069 Joined: 10-February 19 From: Austin, TX Member No.: 22,863 Region Association: Southwest Region |
QUOTE(Root_Werks @ Jun 12 2025, 06:16 PM) Gotta love mystery dents! When the bottom of the door is sucked in like that, I've had pretty good luck just grabbing the door and putting a twist on it. I was surprised it actually worked. Any special technique here? The door is pretty solid! I assume you need it mounted tight to the car. Do you close the door and pull/push from the bottom. Need to bring the bottom corner out. |
|
|
|
| Root_Werks |
Jun 20 2025, 10:33 AM
Post
#527
|
|
Village Idiot Group: Members Posts: 8,841 Joined: 25-May 04 From: About 5NM from Canada Member No.: 2,105 Region Association: Pacific Northwest |
QUOTE(friethmiller @ Jun 20 2025, 09:24 AM) QUOTE(Root_Werks @ Jun 12 2025, 06:16 PM) Gotta love mystery dents! When the bottom of the door is sucked in like that, I've had pretty good luck just grabbing the door and putting a twist on it. I was surprised it actually worked. Any special technique here? The door is pretty solid! I assume you need it mounted tight to the car. Do you close the door and pull/push from the bottom. Need to bring the bottom corner out. Yes, door hinges tight and adjusted best to the front fender. Heard of others that have done it using 2x4 for leverage bolted to inside of door. The one time I did it I just grabbed it, almost like a bear hug at the very end and applied pressure a few times. Granted, was a bit younger and my back was stronger. It worked, brought the bottom out and or pushed the top in. Dunno, but the rear gap lined up almost perfectly. |
|
|
|
| Artfrombama |
Jun 20 2025, 10:51 AM
Post
#528
|
|
Artfrombama Group: Members Posts: 392 Joined: 21-January 24 From: North Alabama Member No.: 27,870 Region Association: South East States |
QUOTE(friethmiller @ Jun 20 2025, 11:24 AM) QUOTE(Root_Werks @ Jun 12 2025, 06:16 PM) Gotta love mystery dents! When the bottom of the door is sucked in like that, I've had pretty good luck just grabbing the door and putting a twist on it. I was surprised it actually worked. Any special technique here? The door is pretty solid! I assume you need it mounted tight to the car. Do you close the door and pull/push from the bottom. Need to bring the bottom corner out. Block the top, push in on the bottom |
|
|
|
| friethmiller |
Jun 20 2025, 10:57 AM
Post
#529
|
|
Senior Member Group: Members Posts: 1,069 Joined: 10-February 19 From: Austin, TX Member No.: 22,863 Region Association: Southwest Region |
QUOTE(Root_Werks @ Jun 20 2025, 11:33 AM) Dunno, but the rear gap lined up almost perfectly. Thanks Dan. If that doesn't work, I'll either adjust the quarter panel in or widen the door like I did on my last restoration. I used washers to adjust the gap and then rewelded the door. This is a PITA so I'm hoping the "Bear Hug" works (IMG:style_emoticons/default/biggrin.gif) 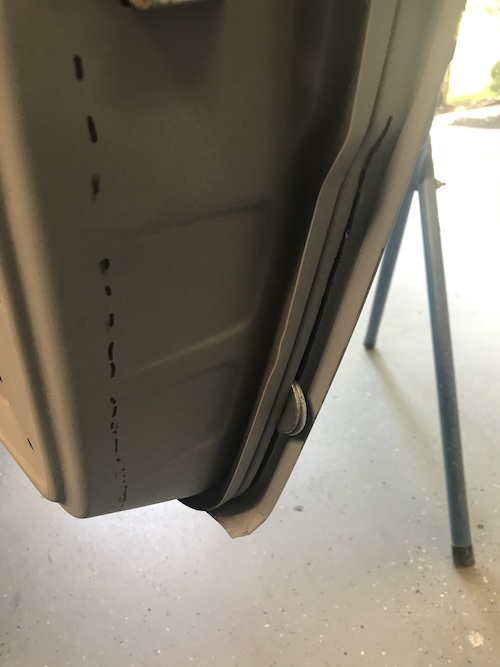 |
|
|
|
| friethmiller |
Jun 22 2025, 05:02 PM
Post
#530
|
|
Senior Member Group: Members Posts: 1,069 Joined: 10-February 19 From: Austin, TX Member No.: 22,863 Region Association: Southwest Region |
Driver Side Door - Part 7 (6/21 & 6/22/2025):
Saturday (6/21) I'm back in town and back on the LE this weekend. Goal was to finally finish the driver's door. I had issues with the fit at the top of the fender, too much gap in the rear and misalignment with at the bottom of the door and the rear quarter panel. Jumping right into the gap above the door at the front fender. Decided on a few vertical cuts to pull the fender down to the door just a bit and added a welding rod on the edge to close the gap along this edge. Just roughing things in for now. I will gap everything once the door is reinstalled. 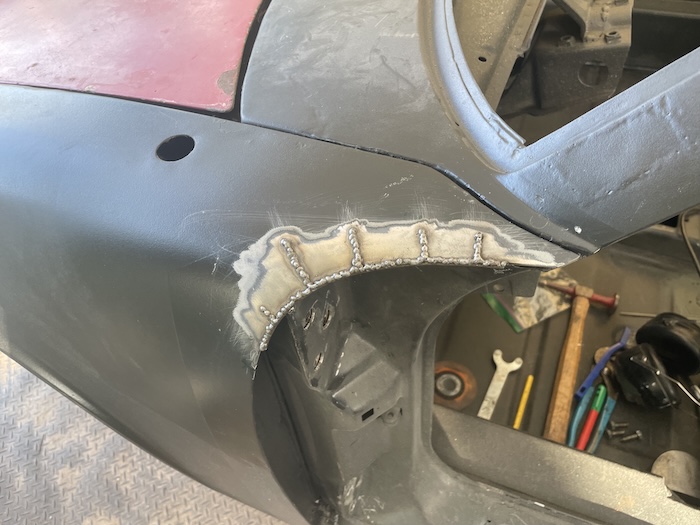 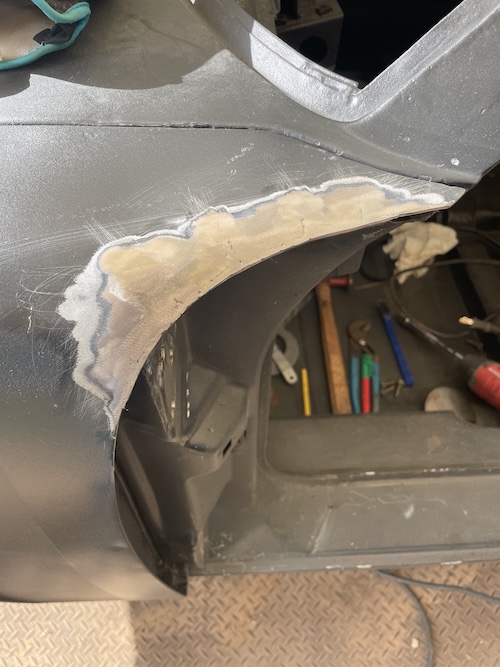 On the other side I cut down the inner edge of the rear quarter to allow for alignment with the door. As recommended, I did get the door to twist slightly to help out here but I stopped because I was worried about re-introducing oil canning to the door. I had just fixed all this two weekends ago and I didn't want to have to strip all the paint to do more heat-shrinking. (IMG:style_emoticons/default/sad.gif)  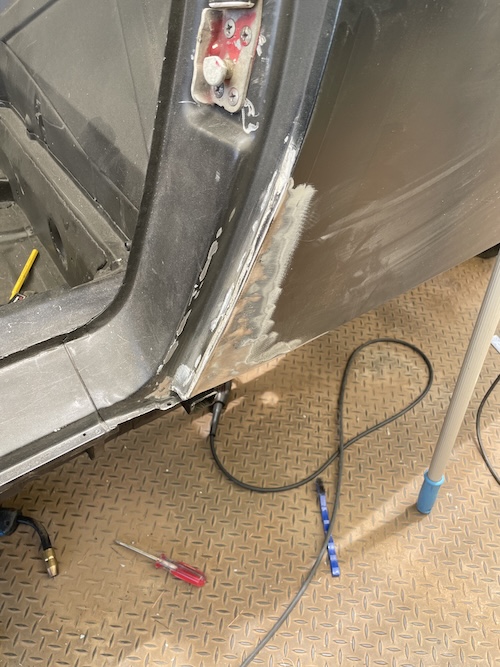 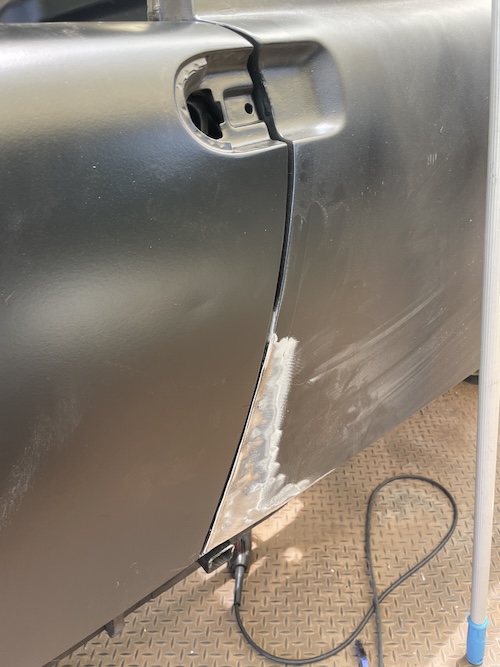 To close the gap at the top of the backend of the door, I stitched in a 1 & 1/2 welding rods to the edge. Once the rods were tacked, I removed the door and welded the rod from both sides. This tedious work is slow and takes a ton of compressed air to keep the heat under control. 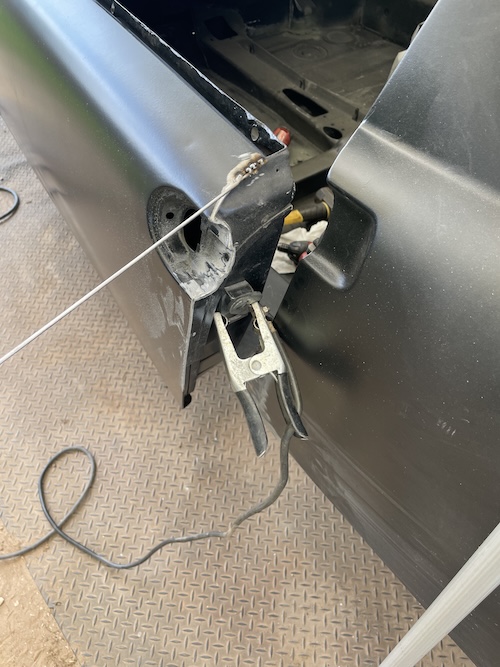 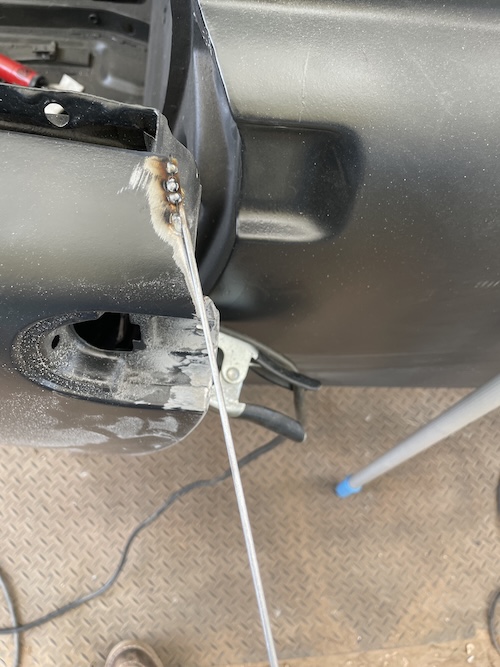 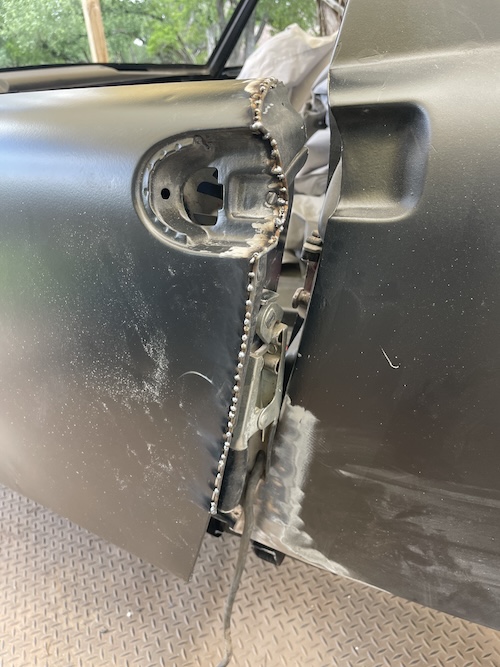 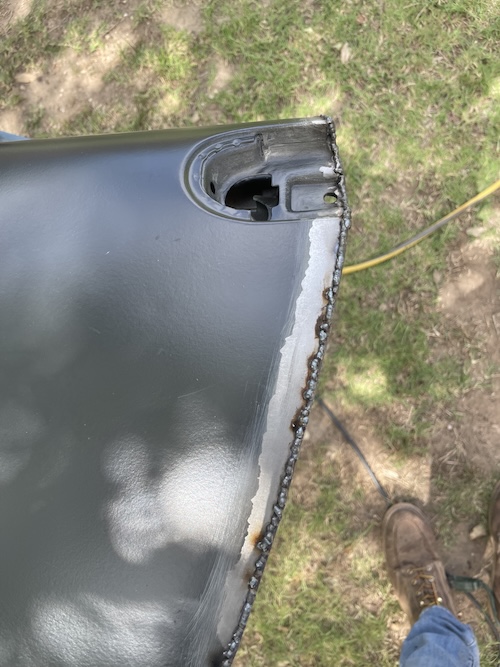  After reinstalling the door, I gapped both sides of the door. I used a flexible block with 40-grit sand paper. This takes a lot longer but allows you to sneak up on the correct spacing. Here's some work-in-process photos.    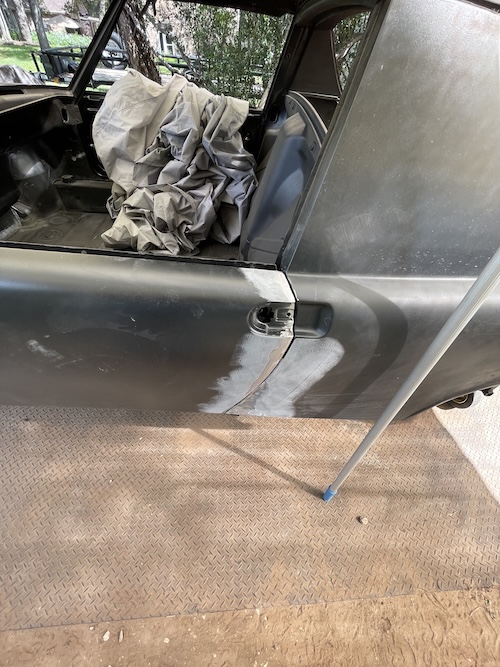 Sunday (6/22) Re-applying epoxy to the door and fenders was the goal of the day. Aside from a little orange-peal in a few places, the bare metal was covered with just two coats. Here's a few photos of the work. Note too bad considering no body filler has been used yet. 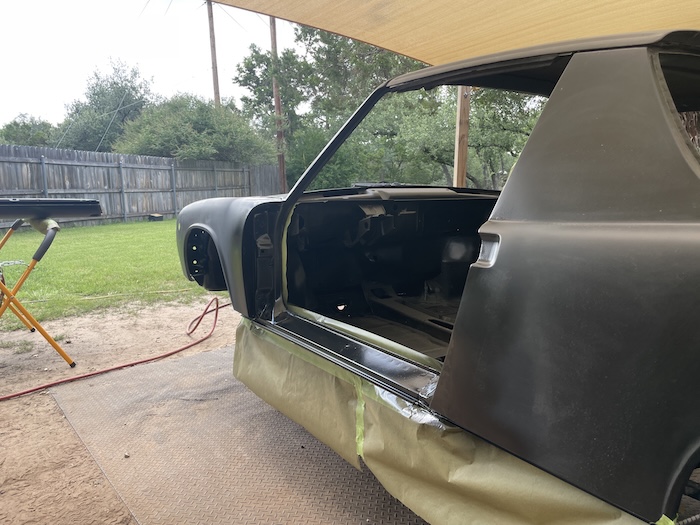 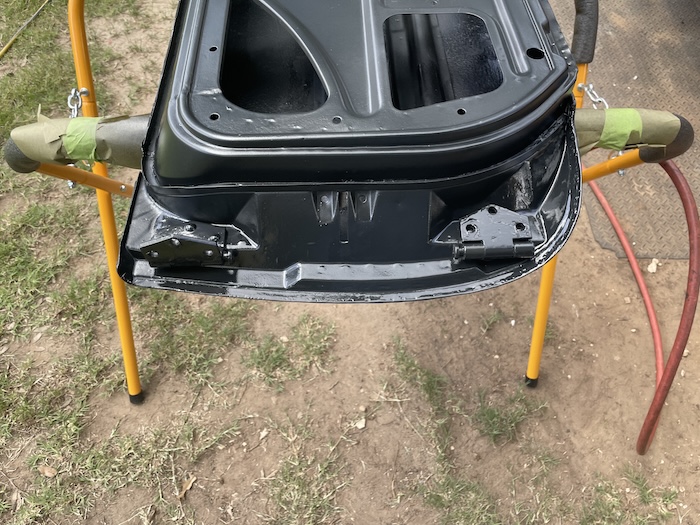 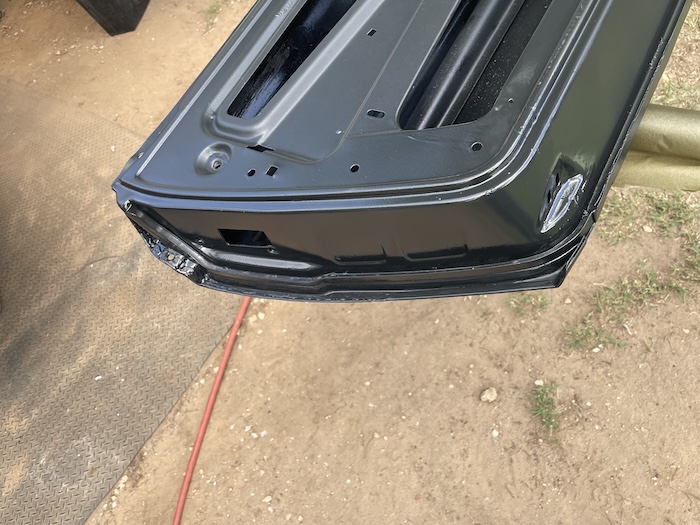 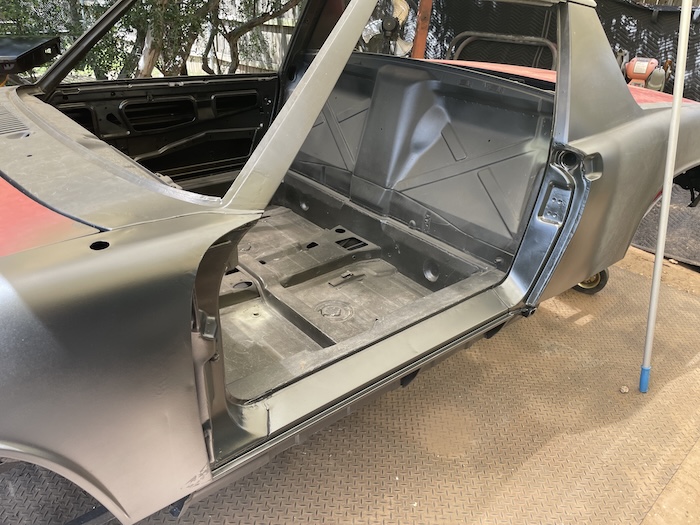 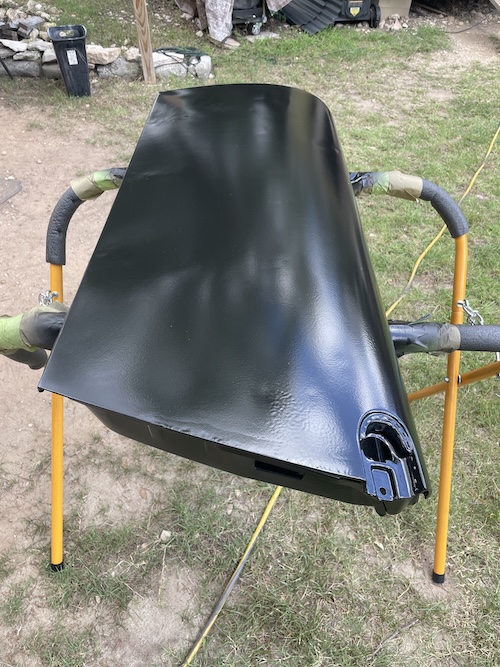 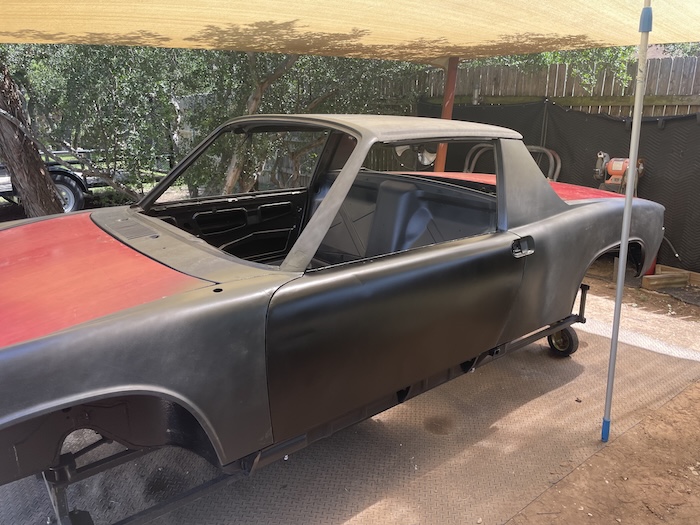 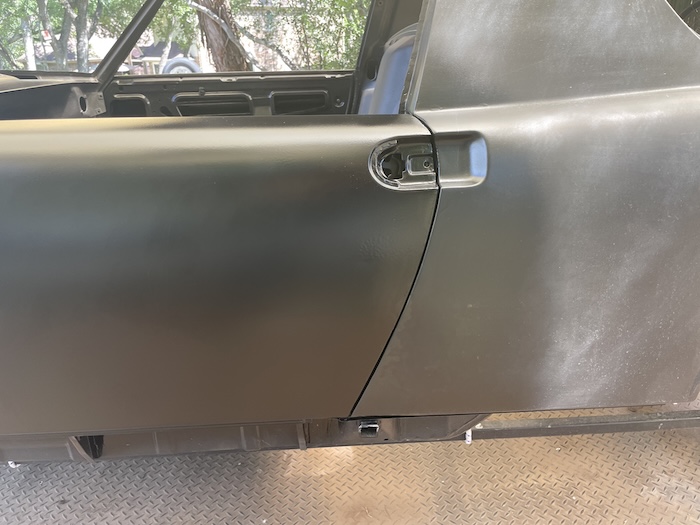 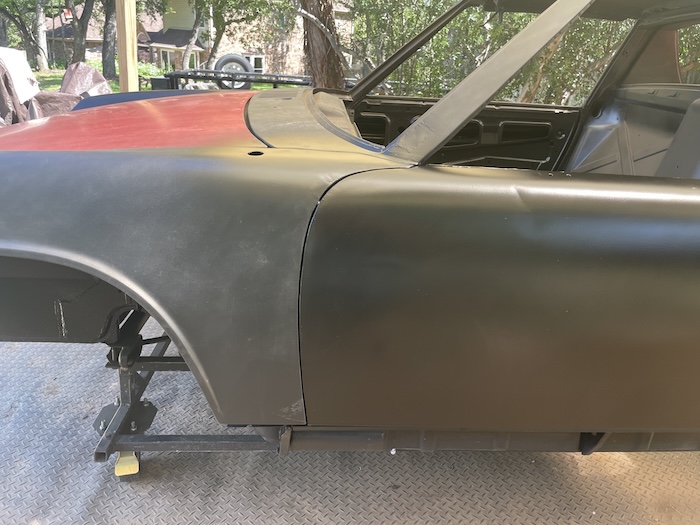 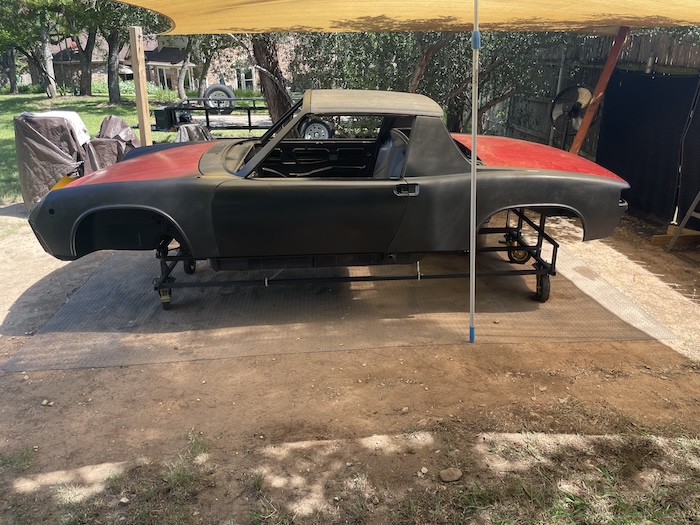 Next up, the hoods! (IMG:style_emoticons/default/aktion035.gif) |
|
|
|
| bkrantz |
Jun 22 2025, 07:03 PM
Post
#531
|
|
914 Guru Group: Members Posts: 8,530 Joined: 3-August 19 From: SW Colorado Member No.: 23,343 Region Association: Rocky Mountains |
Hey, that looks like one of them 914 cars!
|
|
|
|
| Artfrombama |
Jun 22 2025, 10:33 PM
Post
#532
|
|
Artfrombama Group: Members Posts: 392 Joined: 21-January 24 From: North Alabama Member No.: 27,870 Region Association: South East States |
QUOTE(friethmiller @ Jun 22 2025, 06:02 PM) Driver Side Door - Part 7 (6/21 & 6/22/2025): Looks great! |
|
|
|
| friethmiller |
Jun 23 2025, 08:50 AM
Post
#533
|
|
Senior Member Group: Members Posts: 1,069 Joined: 10-February 19 From: Austin, TX Member No.: 22,863 Region Association: Southwest Region |
QUOTE(bkrantz @ Jun 22 2025, 08:03 PM) Hey, that looks like one of them 914 cars! QUOTE(Artfrombama @ Jun 22 2025, 11:33 PM) QUOTE(friethmiller @ Jun 22 2025, 06:02 PM) Driver Side Door - Part 7 (6/21 & 6/22/2025): Looks great! Thanks guys! Next time (if there is one), I'm going to install all the doors and fenders at the same time. It's too easy to be off by a few mm, especially with full fender removal and aftermarket door jams. I say that... I'm sure going that route would have other issues. I'm good with what I've done here but I'm going to have to mock-in all the door components and rubber seals before going to paint. |
|
|
|
| Puebloswatcop |
Jun 25 2025, 07:48 AM
Post
#534
|
|
Senior Member Group: Members Posts: 1,678 Joined: 27-December 14 From: Mineola, Texas Member No.: 18,258 Region Association: Southwest Region |
I love the way you have corrected the door gaps Fred. That is a lot of extra work, but the end result looks fantastic. Cant wait to see it completed. (IMG:style_emoticons/default/beerchug.gif)
|
|
|
|
| Root_Werks |
Jun 25 2025, 10:03 AM
Post
#535
|
|
Village Idiot Group: Members Posts: 8,841 Joined: 25-May 04 From: About 5NM from Canada Member No.: 2,105 Region Association: Pacific Northwest |
Door gaps look great! That is a lot of work and likely better than factory gaps.
|
|
|
|
| friethmiller |
Jun 25 2025, 02:45 PM
Post
#536
|
|
Senior Member Group: Members Posts: 1,069 Joined: 10-February 19 From: Austin, TX Member No.: 22,863 Region Association: Southwest Region |
QUOTE(Puebloswatcop @ Jun 25 2025, 08:48 AM) I love the way you have corrected the door gaps Fred. That is a lot of extra work, but the end result looks fantastic. Cant wait to see it completed. (IMG:style_emoticons/default/beerchug.gif) QUOTE(Root_Werks @ Jun 25 2025, 11:03 AM) Door gaps look great! That is a lot of work and likely better than factory gaps. Thanks guys! There are still a few spots where the gap is a little uneven or a bit narrow. I'll fine tune everything once I get to the body-filler stage. But don't worry, there's still plenty of rust repair ahead. Get to deal with this problem on the front hood this weekend! 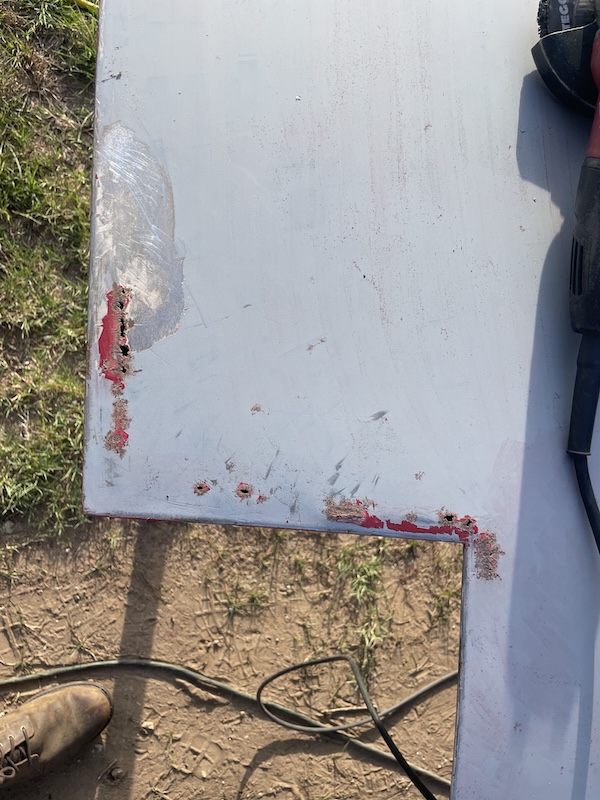 |
|
|
|
| Cairo94507 |
Jun 26 2025, 06:35 AM
Post
#537
|
|
Michael Group: Members Posts: 10,490 Joined: 1-November 08 From: Auburn, CA Member No.: 9,712 Region Association: Northern California |
Amazing gaps! Man, that looks terrific. (IMG:style_emoticons/default/beerchug.gif)
|
|
|
|
| Tim17 |
Jun 26 2025, 06:22 PM
Post
#538
|
|
Member Group: Members Posts: 67 Joined: 3-December 23 From: Newburyport, Massachusetts Member No.: 27,769 Region Association: North East States |
This project is a great demonstration of skill, dedication and perseverance.
Nice work! |
|
|
|
| friethmiller |
Jul 6 2025, 05:22 PM
Post
#539
|
|
Senior Member Group: Members Posts: 1,069 Joined: 10-February 19 From: Austin, TX Member No.: 22,863 Region Association: Southwest Region |
Front Hood Restoration - Part 1 (6/28/2025):
Removing Paint from the Underside I'm not sure what "look" the PO was going for here but it's got to go! (IMG:style_emoticons/default/bootyshake.gif) Used a scraper and lacquer thinner to quickly remove this furry crap. Next up was the paint removing disk on the 4 1/2" grinder. These disks do amazing work on flat surfaces and I removed the paint on the entire support structure in no time. Did a few flat areas with the disk as well but then decided to flip over to using a razor blade and paint remover. This tedious work had to be done. My plan was to minimize what needed to be glass-blasted. Last photo here shows one a few spots of rust on the bottom of the hood. This was later removed with an orbital sander and phosphate solution. 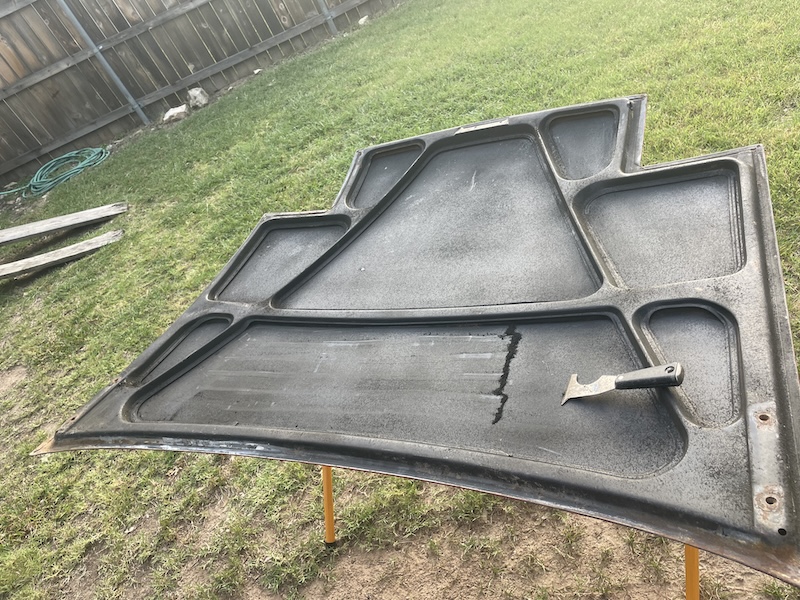 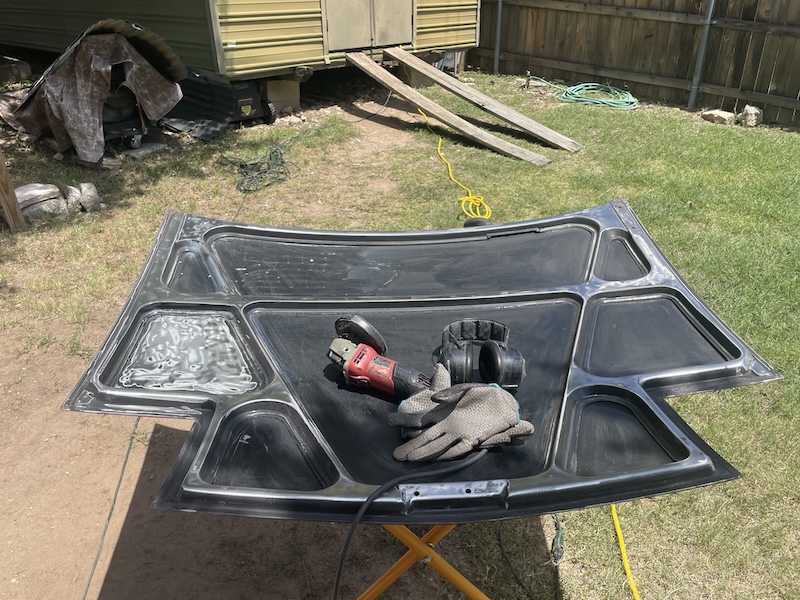 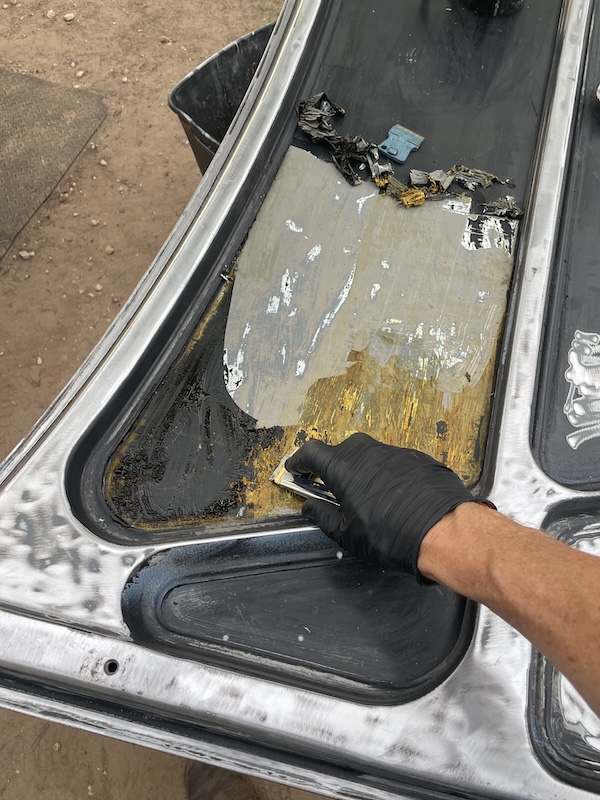 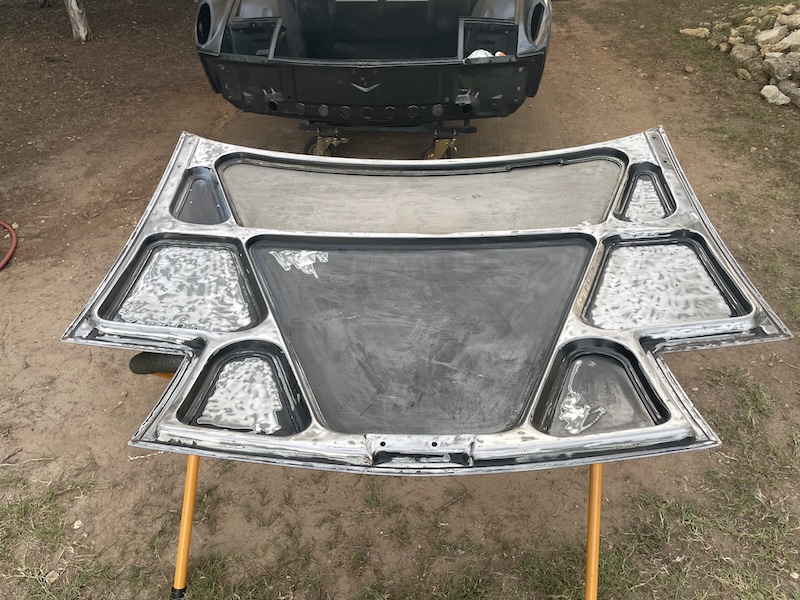 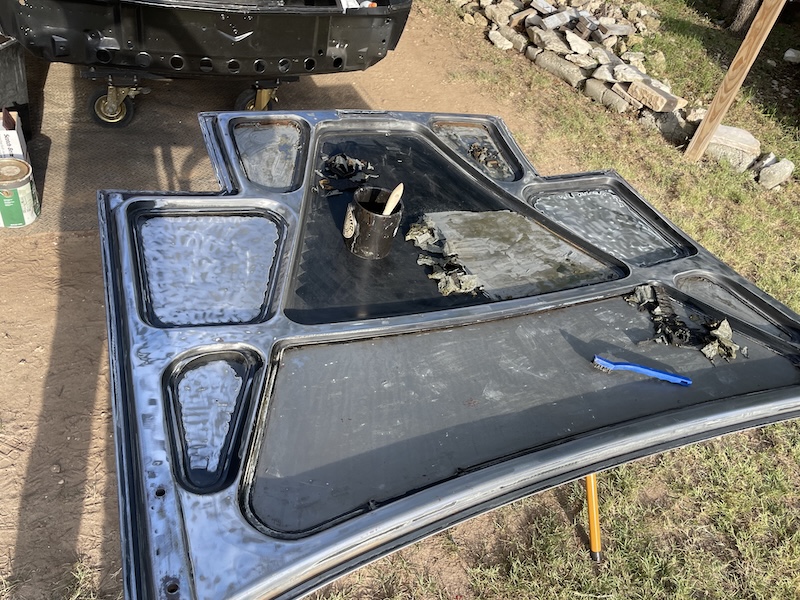 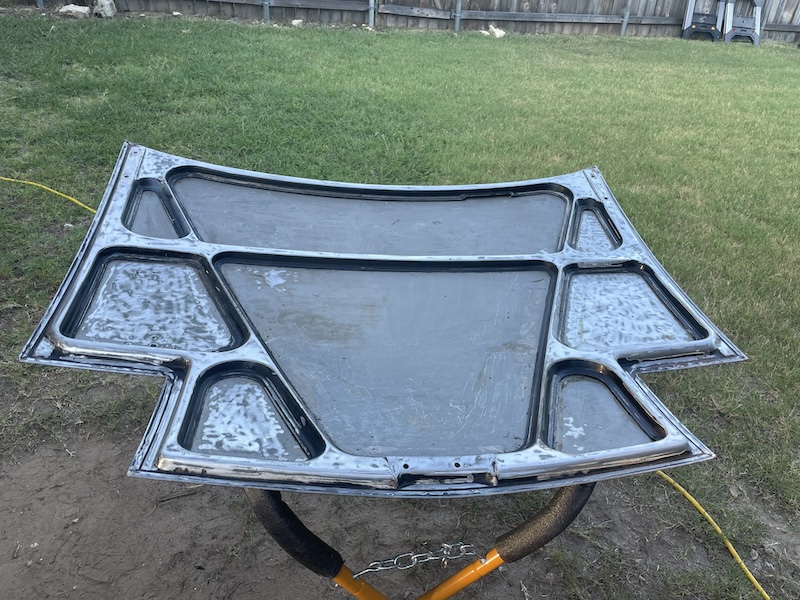 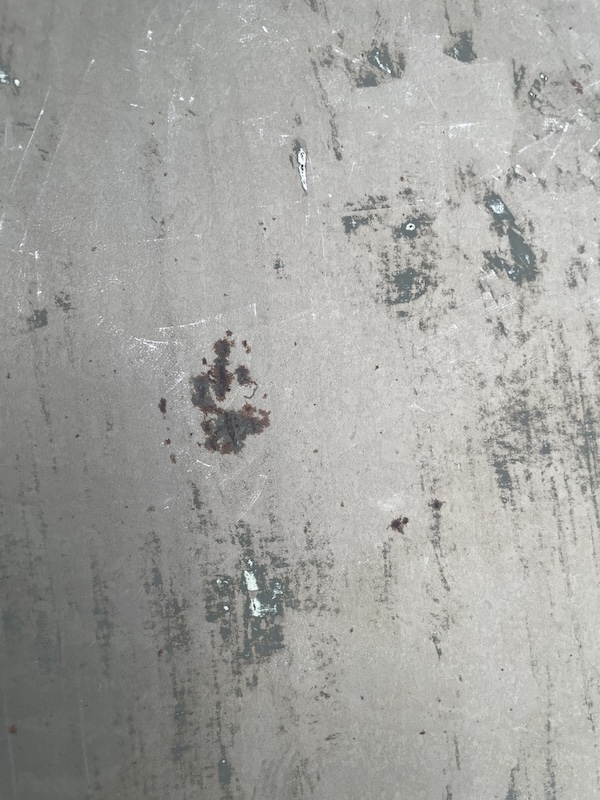 Removing Paint from the Topside This side was a lot easier to do. The first 3 layers of paint came right up with a razor blade. Just worked my way around the panel [over several hours] to get a layer of primer that must have been applied directly over the original black factory paint. From here, I used paint remover/razor blades to get down to bare metal. Thankfully all this paint protected most of the metal. However, there were spots where rust got in under the paint and it was doing it's thing. Final two photos show the rust spiders I found under the paint. 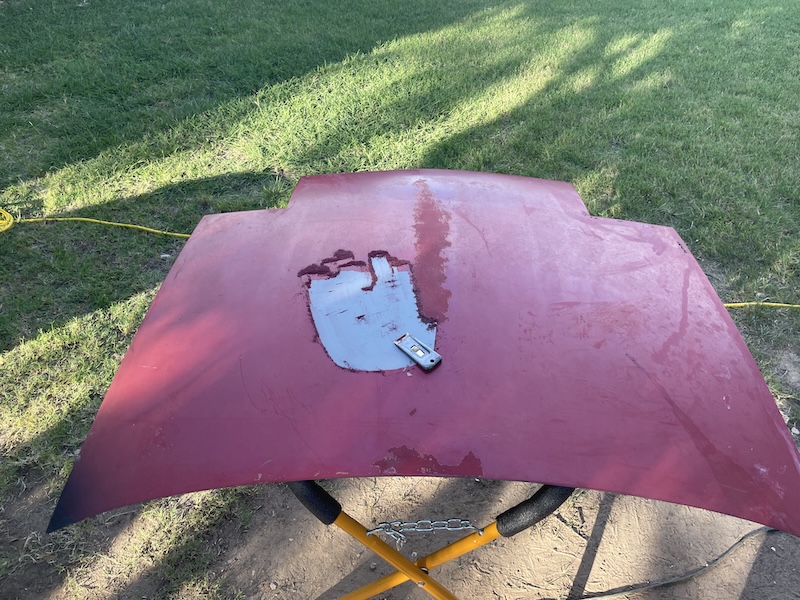 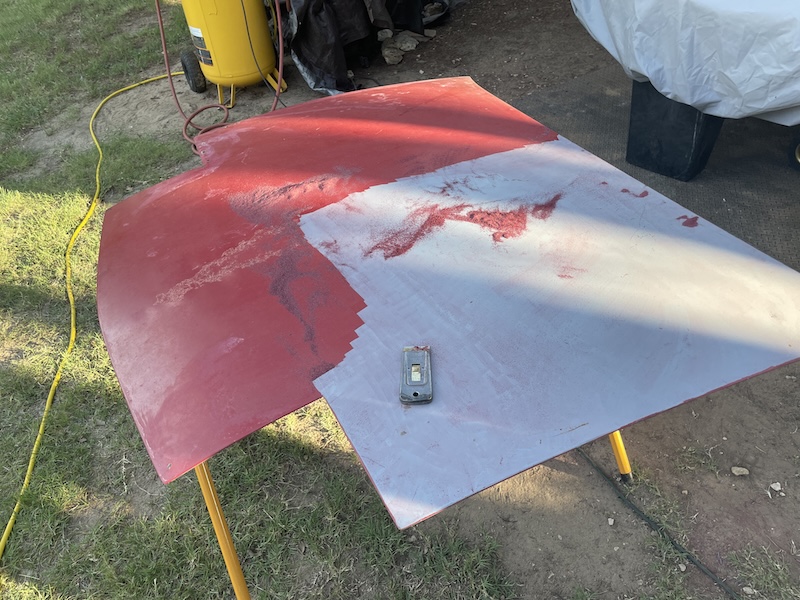 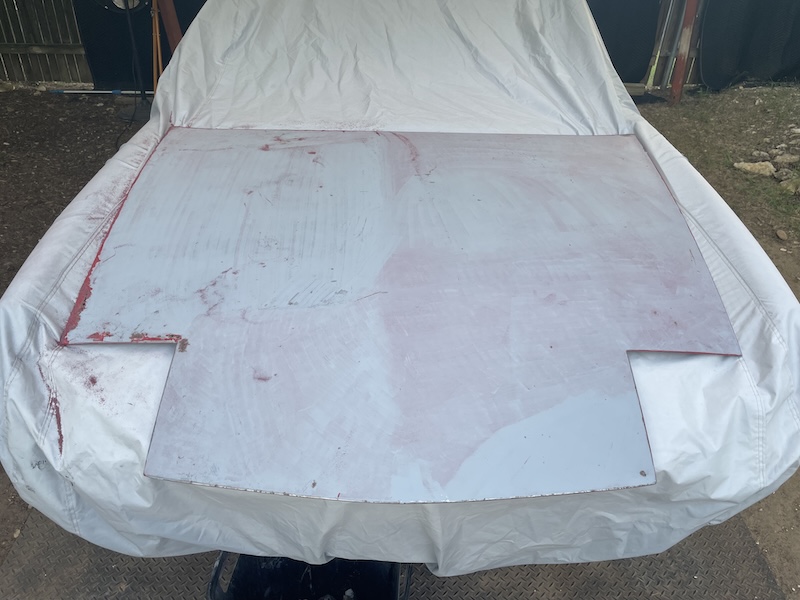 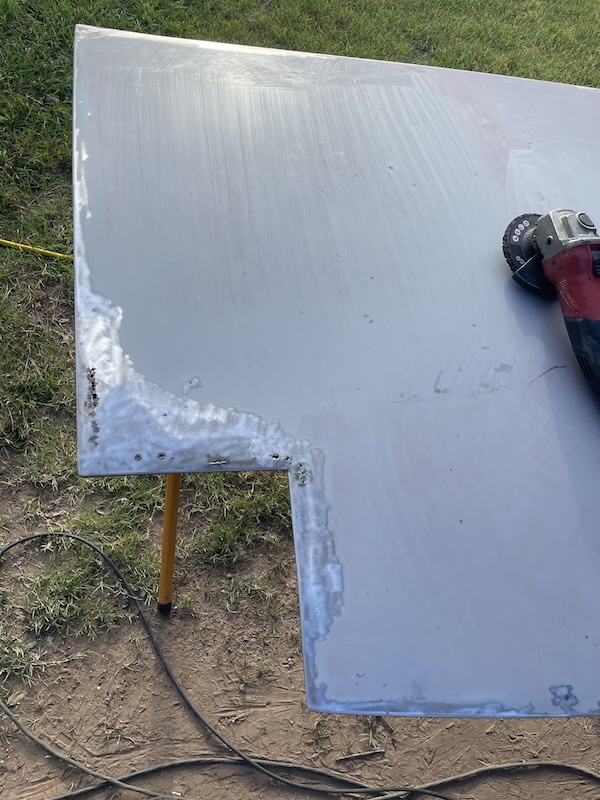 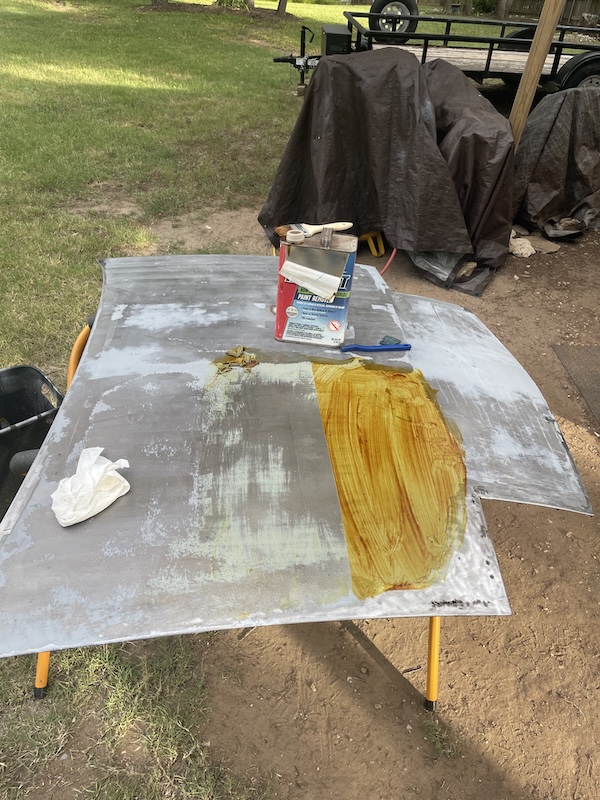 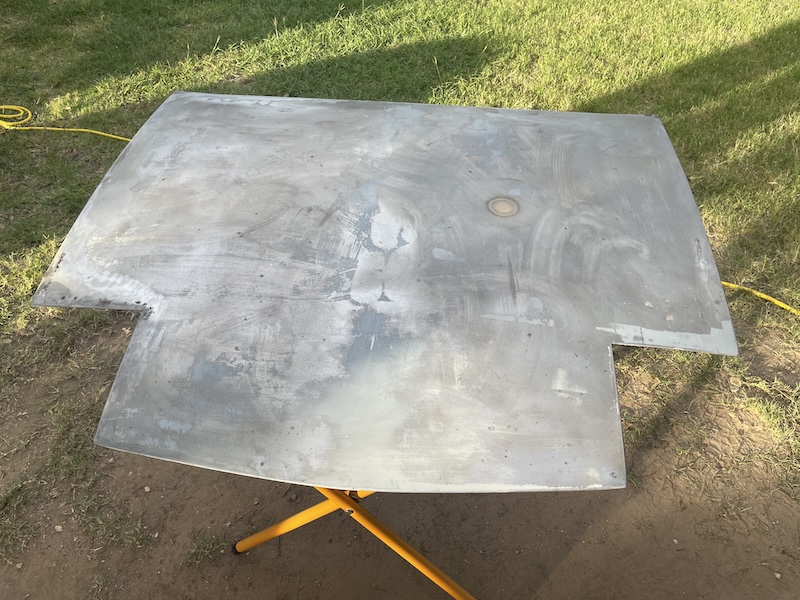 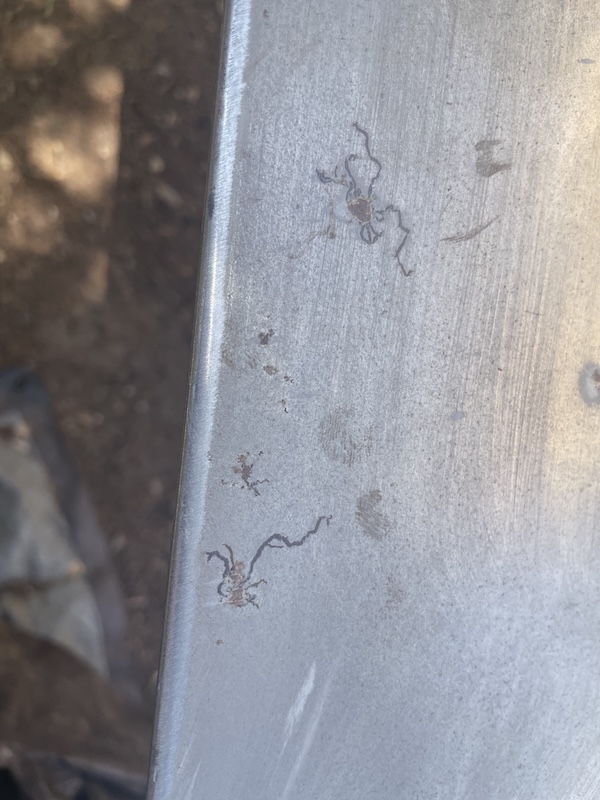 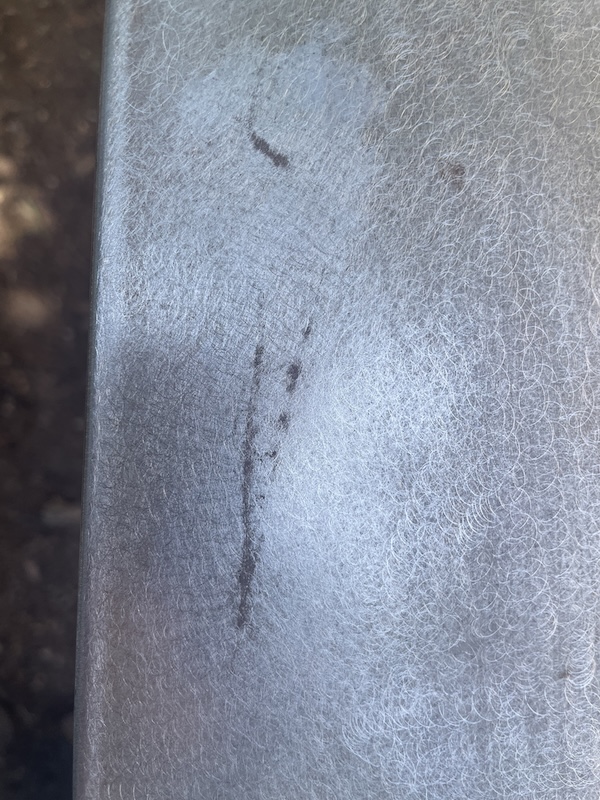 Final two photos show the phosphate treatment that was done at the end of the day. Tomorrow, I plan to blast the bottom, fix the rust holes, and hopefully get some epoxy paint applied. (IMG:style_emoticons/default/beerchug.gif) 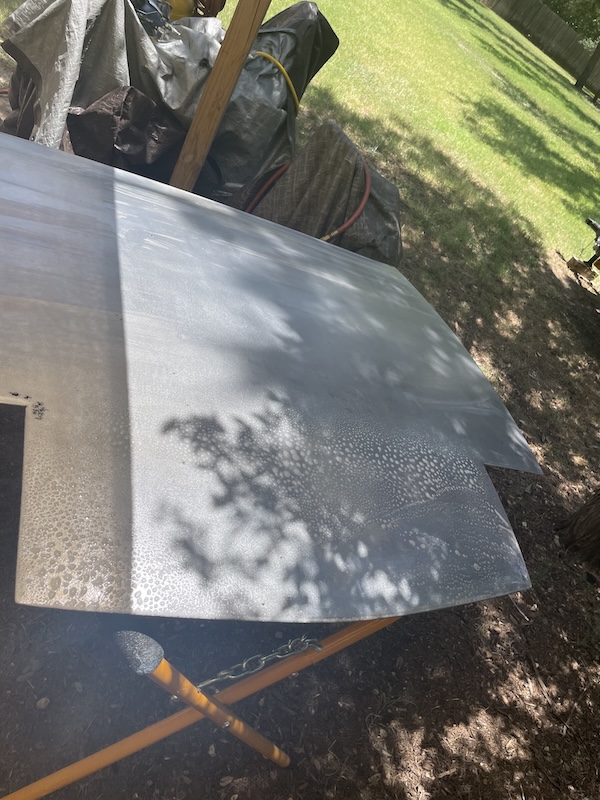 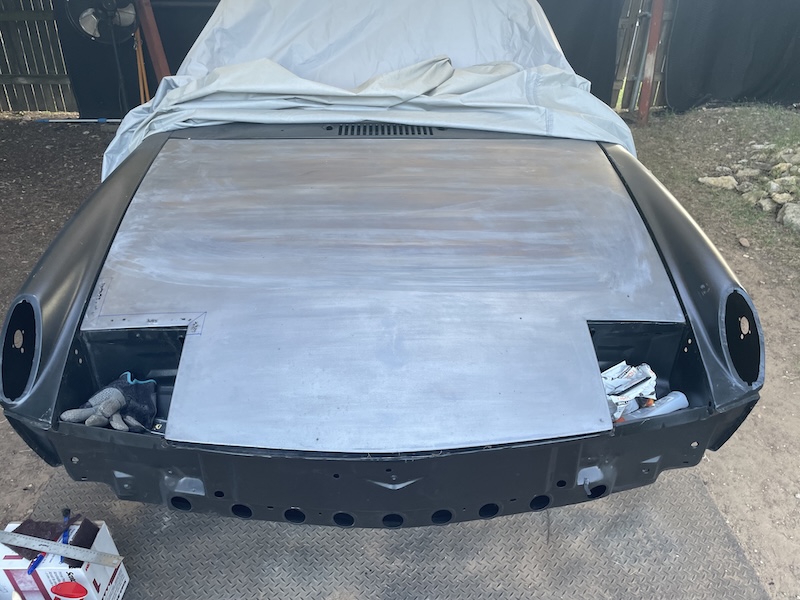 |
|
|
|
| friethmiller |
Jul 6 2025, 06:47 PM
Post
#540
|
|
Senior Member Group: Members Posts: 1,069 Joined: 10-February 19 From: Austin, TX Member No.: 22,863 Region Association: Southwest Region |
Front Hood Restoration - Part 2 (6/29/2025):
Before blasting the "hard to reach" areas on the hood, I marked and cut the metal that needed to be replaced. The cuts were made to the skin to create three small pieces. The hood was then flipped over, cut, and the metal removed. With this much rust coming out here, you know it's not going to be pretty underneath. 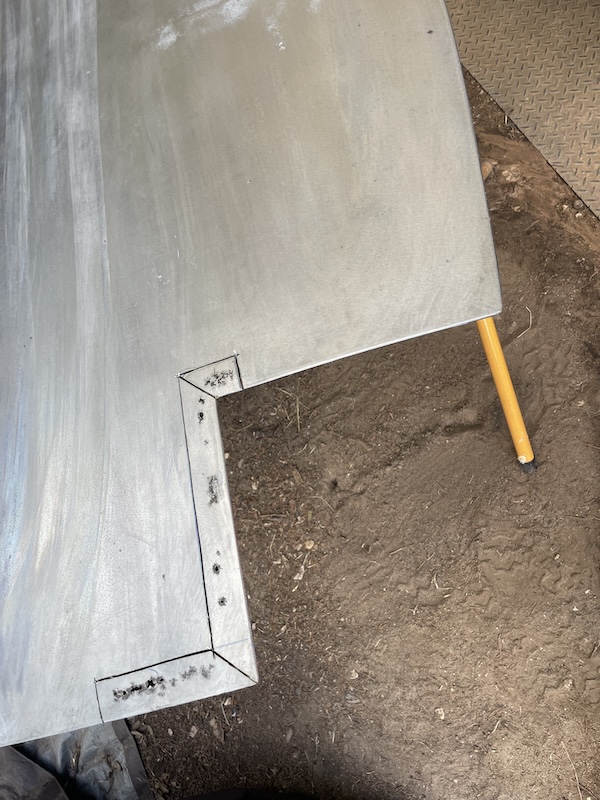 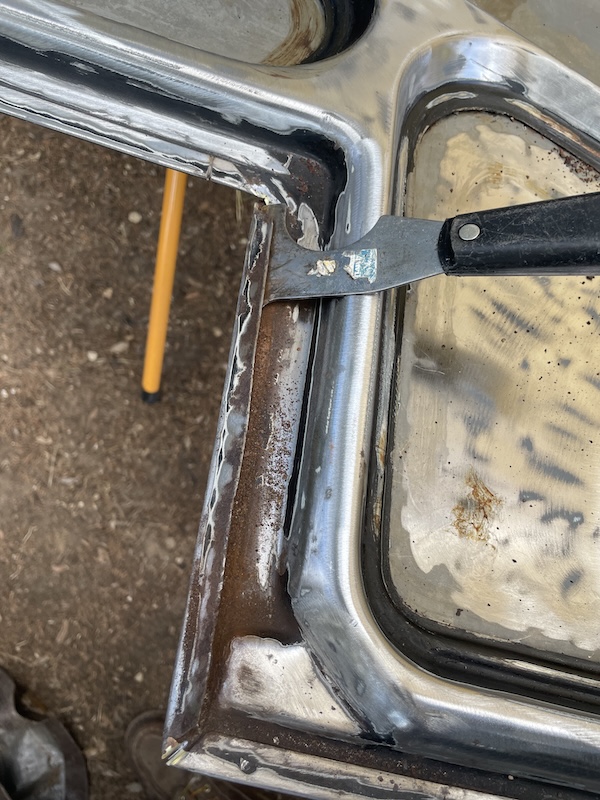 And... it's not pretty! (IMG:style_emoticons/default/blink.gif) 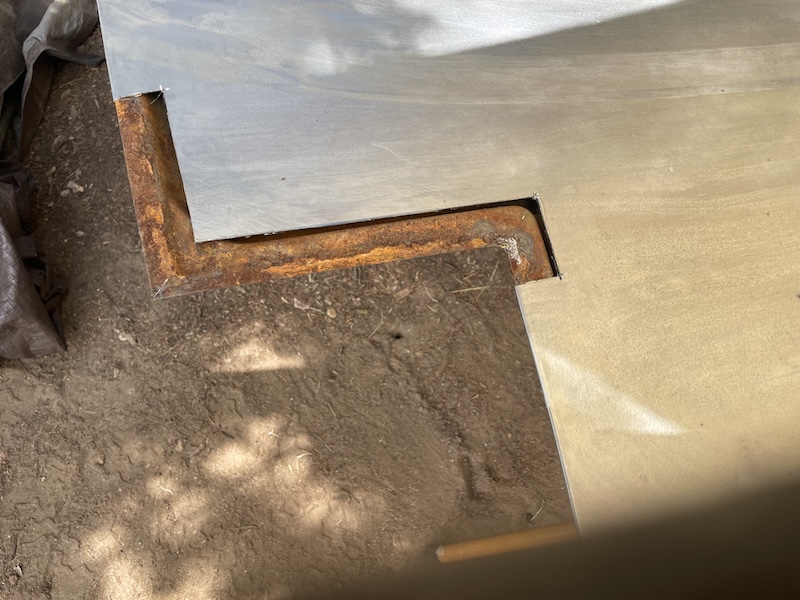 Post-Blasting Treatment After blasting the remaining paint from the backside and all the rusted areas, I then treated the inside of the hood structure with phosphate, followed by Rust Bullet. I also ordered frame rail paint and a flexible wand to get the rest of the internals later. 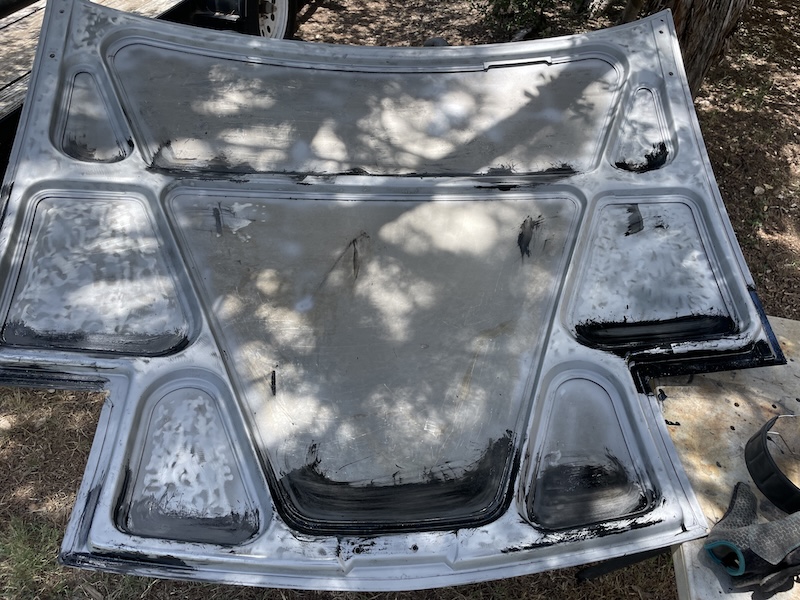 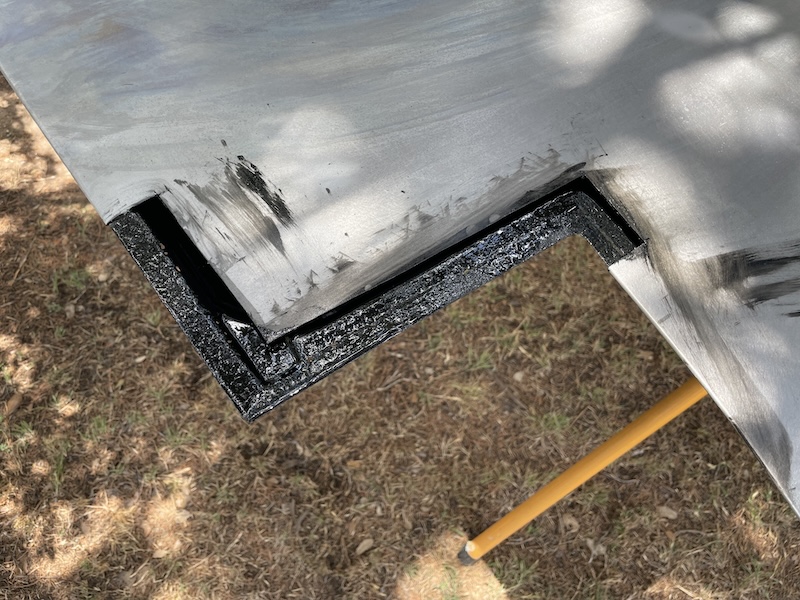 Metal Repair This repair took a very long time to complete. I went slowly, welding just a few spots at a time, and allowed the welds to cool without compressed air. I did this to prevent the welded seam from being drawn inward when rapidly cooled. This technique worked fairly well but body filler will still be needed to flatten everything out. Here's a few photos of the process. 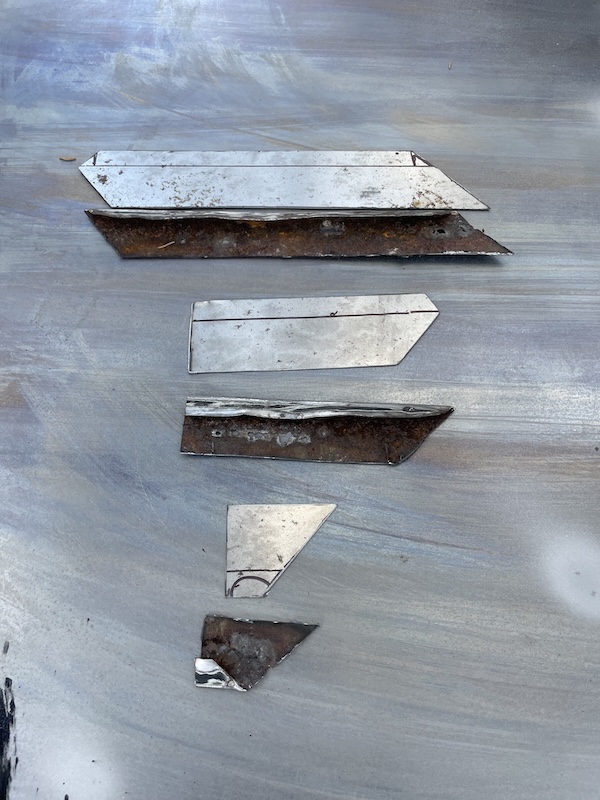 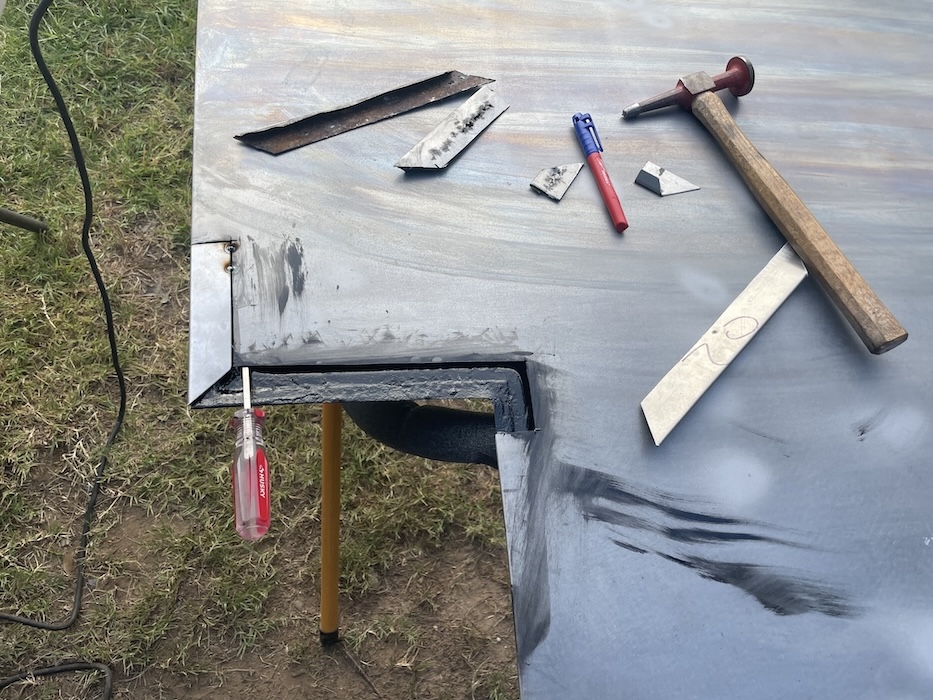 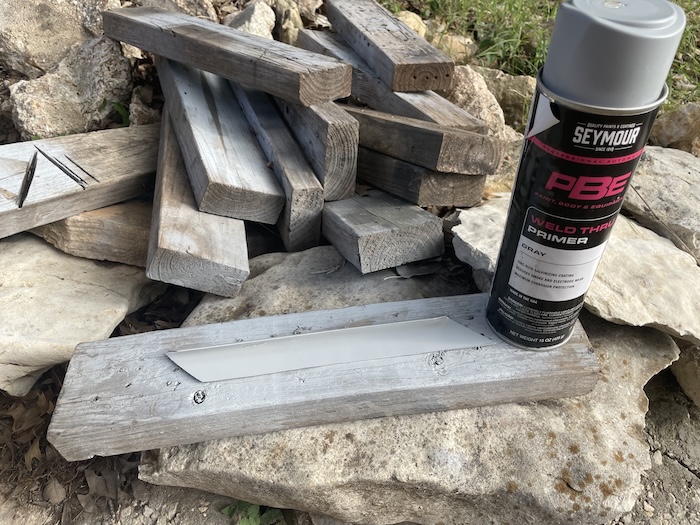 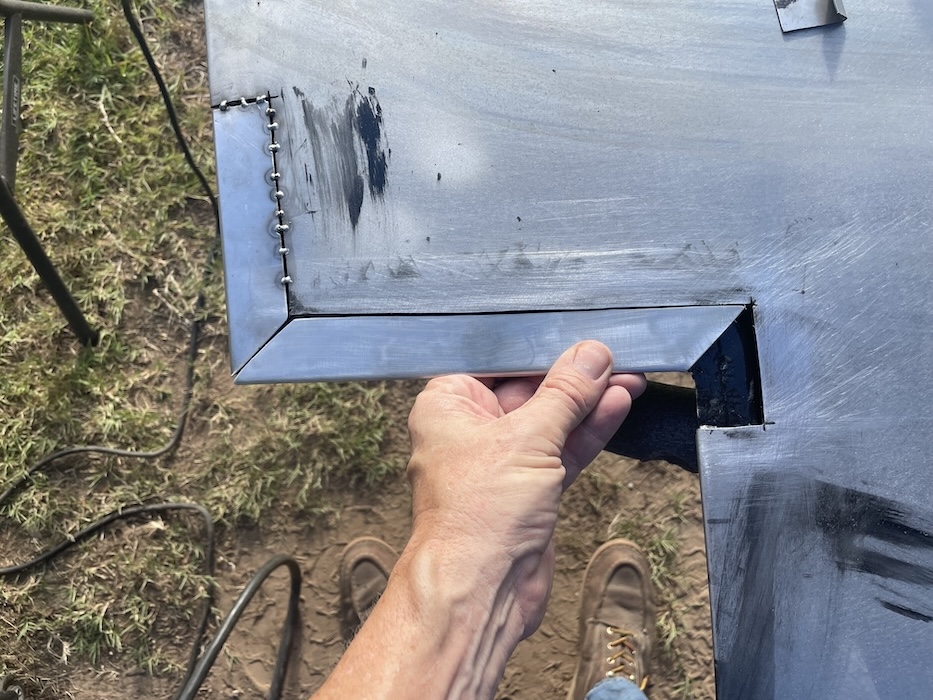 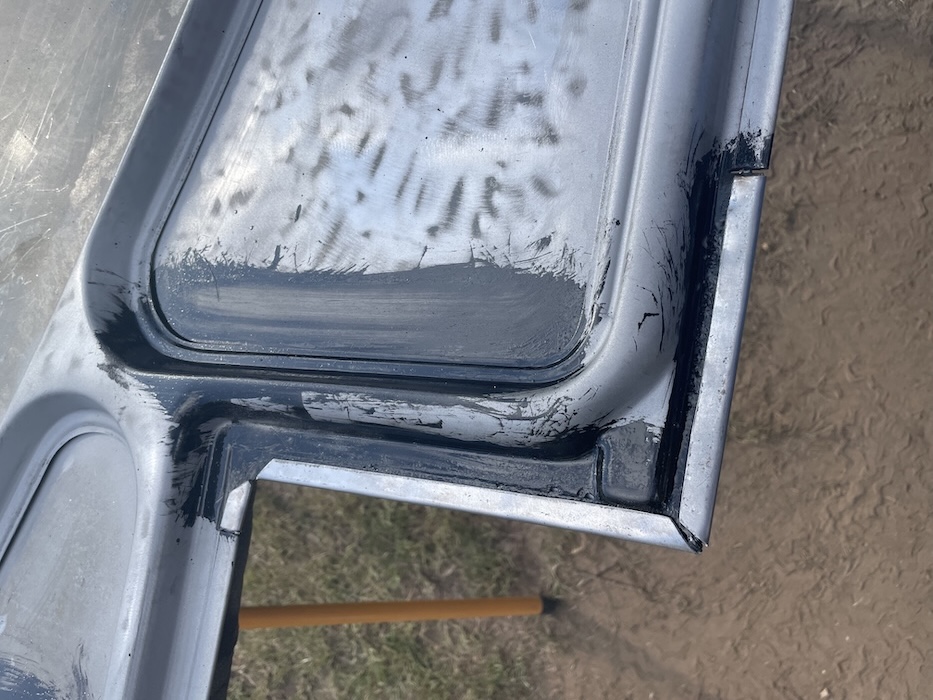 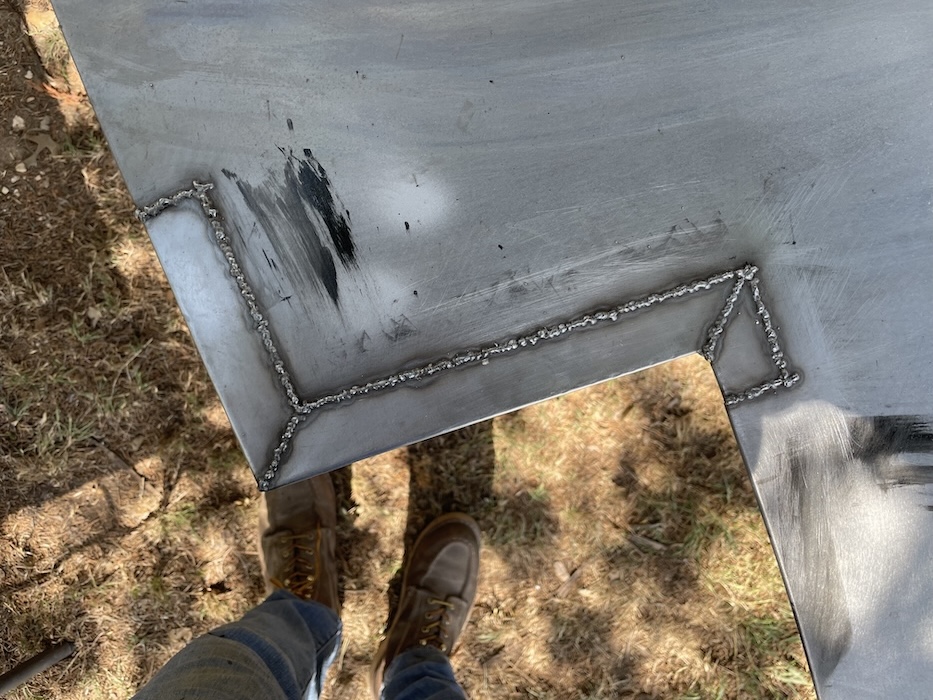  Final Work and Epoxy Paint Despite my best efforts, I still introduced a little bit of oil canning just above the repair. This was quickly fixed with the heat-shrink disk. I then welded the back of the skin in a few places where it was originally brazed. The topside of the hood was then prep'd for paint. Specifically, I cleaned everything with windex and then with wax & grease remover. The following photos show the work and the results. Again, not perfect but close enough to minimize the amount of filler. 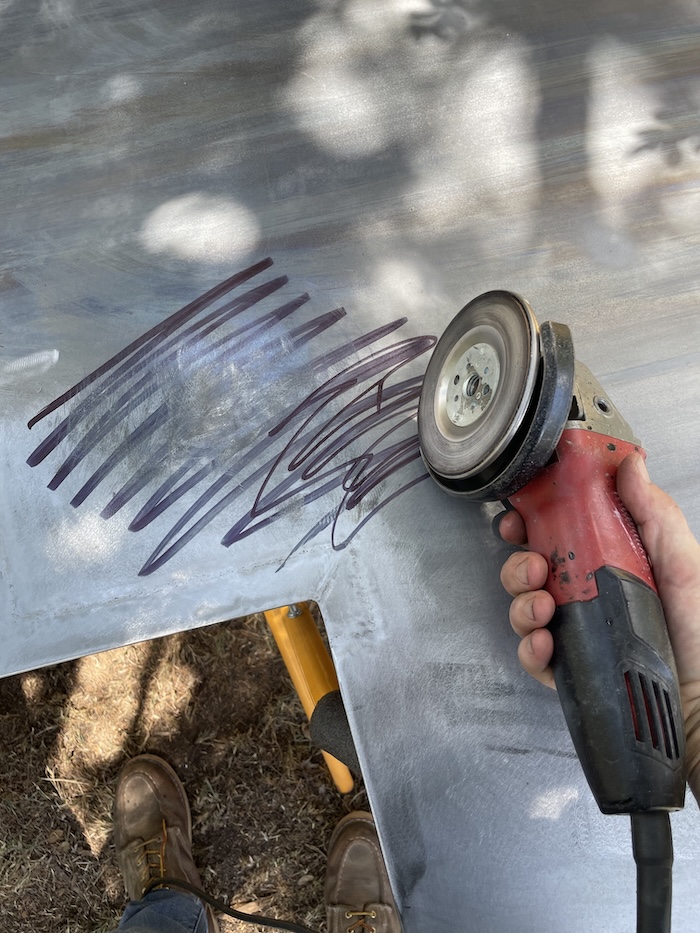 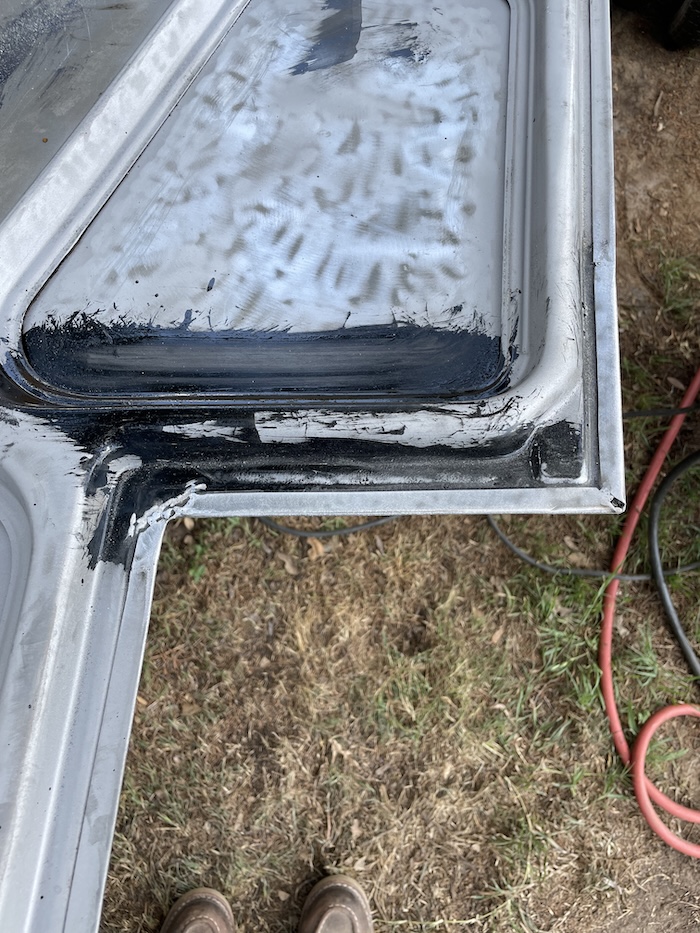 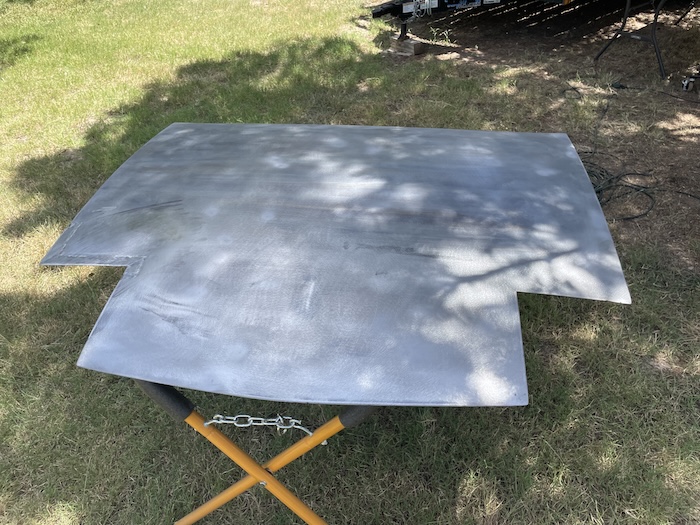 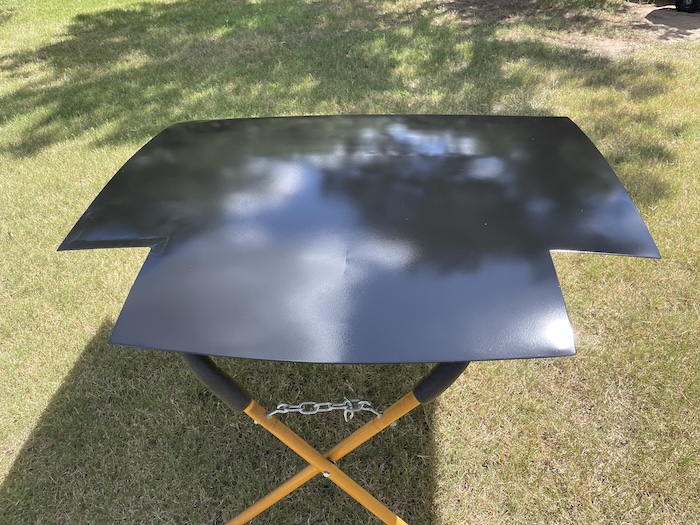 Ran out of time to paint the bottom of the hood so I finished by lightly scuffing the paint. My plan is to apply filler here next weekend. Cheers (IMG:style_emoticons/default/beerchug.gif) 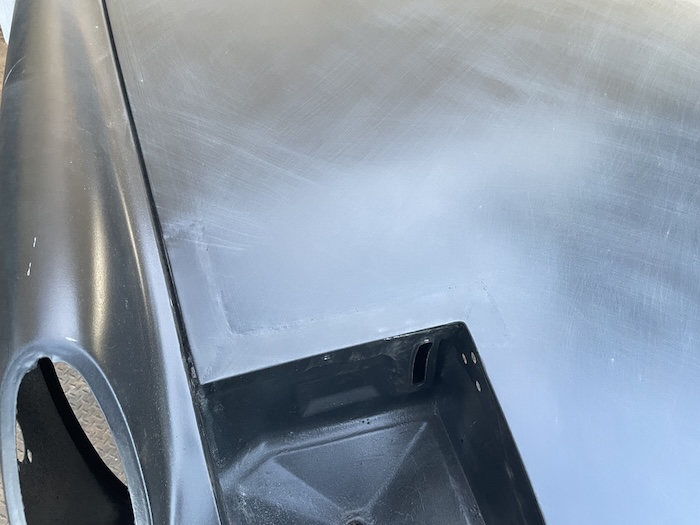 |
|
|
|
|
1 User(s) are reading this topic (1 Guests and 0 Anonymous Users)
0 Members:

|
Lo-Fi Version | Time is now: 10th November 2025 - 07:57 PM |
Invision Power Board
v9.1.4 © 2025 IPS, Inc.