|
|
|
Porsche, and the Porsche crest are registered trademarks of Dr. Ing. h.c. F. Porsche AG.
This site is not affiliated with Porsche in any way. Its only purpose is to provide an online forum for car enthusiasts. All other trademarks are property of their respective owners. |
|
|

  |

| friethmiller |
 Nov 14 2025, 08:38 PM Nov 14 2025, 08:38 PM
Post
#701
|
|
Senior Member  Group: Members Posts: 1,130 Joined: 10-February 19 From: Austin, TX Member No.: 22,863 Region Association: Southwest Region |
Seat Frame Install (11/14/2025)
@bdstone914 - I went to install your beautifully restored seat frames this evening and ran into a snag. It looks like the passenger side was installed upside down with the wrong side part. Can you send the correct end? I've pulled the pin and can mail this end piece back to you. Thanks! 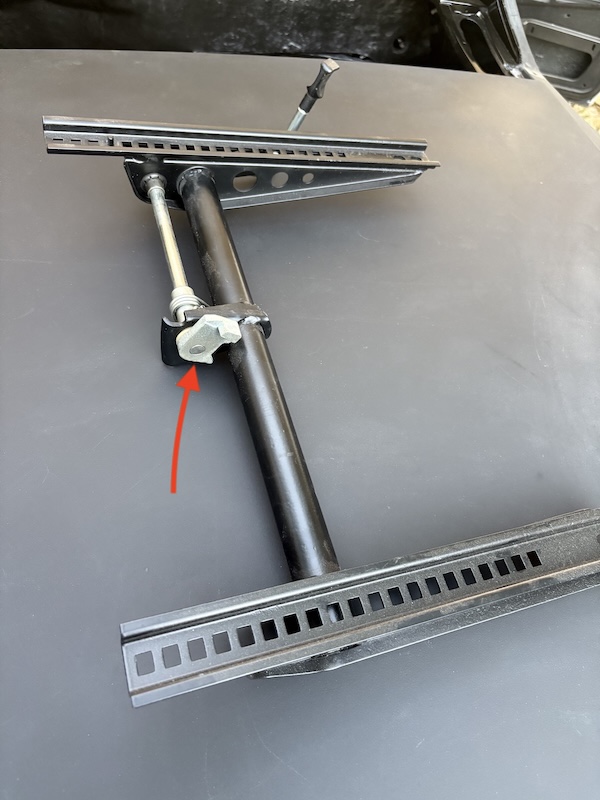 |
   |

 
|
| bdstone914 |
Nov 14 2025, 09:19 PM
Post
#702
|
|
bdstone914 Group: Members Posts: 5,231 Joined: 8-November 03 From: Riverside CA Member No.: 1,319 |
I think it was installed 180 degrees off. Unhook the spring , rotate the catch and i thing it will be correct. I will pull an assembled one tomorrow to compare.
Sorry about that. |
|
|
|
| friethmiller |
Nov 14 2025, 09:49 PM
Post
#703
|
|
Senior Member Group: Members Posts: 1,130 Joined: 10-February 19 From: Austin, TX Member No.: 22,863 Region Association: Southwest Region |
QUOTE(bdstone914 @ Nov 14 2025, 09:19 PM)  I think it was installed 180 degrees off. Unhook the spring , rotate the catch and i thing it will be correct. I will pull an assembled one tomorrow to compare. Sorry about that. No worries, Bruce. I’ll look at it again tomorrow but here’s another pic where I tried to rotate it after pulling the pin. Looks directional. 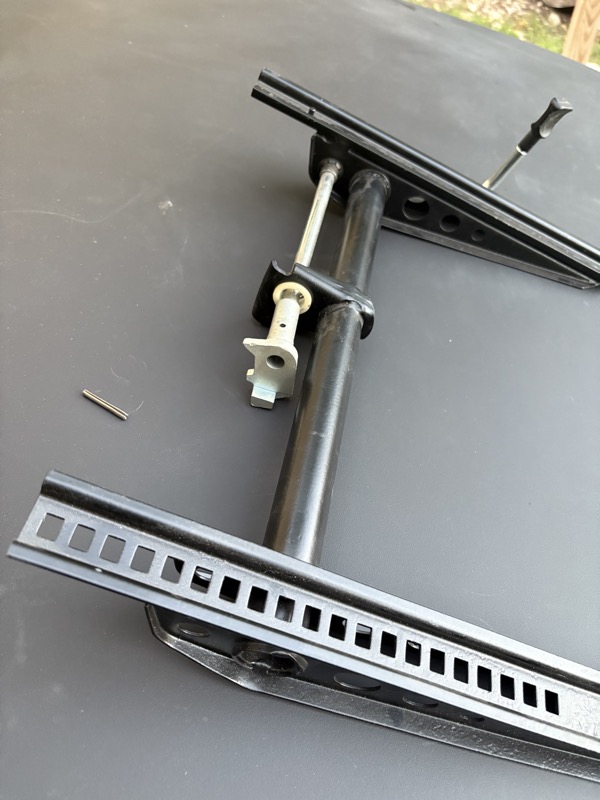 |
|
|
|
| Montreal914 |
Nov 15 2025, 08:12 PM
Post
#704
|
|
Advanced Member Group: Members Posts: 2,004 Joined: 8-August 10 From: Claremont, CA Member No.: 12,023 Region Association: Southern California |
QUOTE(friethmiller @ Nov 13 2025, 11:36 AM) I'm a month out from an endurance race I have scheduled in the WNC in mid-December. Might have to slow my progress as I ramp up my training. Seems to me you've already been running at the Olympics, both the marathon and the hurdles! (IMG:style_emoticons/default/smash.gif) (IMG:style_emoticons/default/smilie_pokal.gif) Thank you for providing the detailed "how-to". Simply AMAZING WORK!!! (IMG:style_emoticons/default/pray.gif) |
|
|
|
| friethmiller |
Nov 17 2025, 08:33 AM
Post
#705
|
|
Senior Member Group: Members Posts: 1,130 Joined: 10-February 19 From: Austin, TX Member No.: 22,863 Region Association: Southwest Region |
QUOTE(Montreal914 @ Nov 15 2025, 08:12 PM) QUOTE(friethmiller @ Nov 13 2025, 11:36 AM) I'm a month out from an endurance race I have scheduled in the WNC in mid-December. Might have to slow my progress as I ramp up my training. Seems to me you've already been running at the Olympics, both the marathon and the hurdles! (IMG:style_emoticons/default/smash.gif) (IMG:style_emoticons/default/smilie_pokal.gif) Thank you for providing the detailed "how-to". Simply AMAZING WORK!!! (IMG:style_emoticons/default/pray.gif) Thanks Eric! I keep reminding myself to enjoy the process while I keep "constant forward momentum". I've got a bunch of little projects going on with the car right now but I'm waiting on parts. I'll post once I get this stuff on-hand and things restored/installed on the car. Cheers! (IMG:style_emoticons/default/beerchug.gif) |
|
|
|
| friethmiller |
Nov 23 2025, 08:45 PM
Post
#706
|
|
Senior Member Group: Members Posts: 1,130 Joined: 10-February 19 From: Austin, TX Member No.: 22,863 Region Association: Southwest Region |
Targa Top Restoration - Part 2 (11/15 - 11/22):
After retexturing and repainting this top, I had planned to go right into restoring the inside fixtures and headliner, however, the headliner piece that I had ordered from AA was unfortunately too small. Not happy (IMG:style_emoticons/default/dry.gif) So, I decided to wait to get one from 914rubber. This picture shows the size comparison. 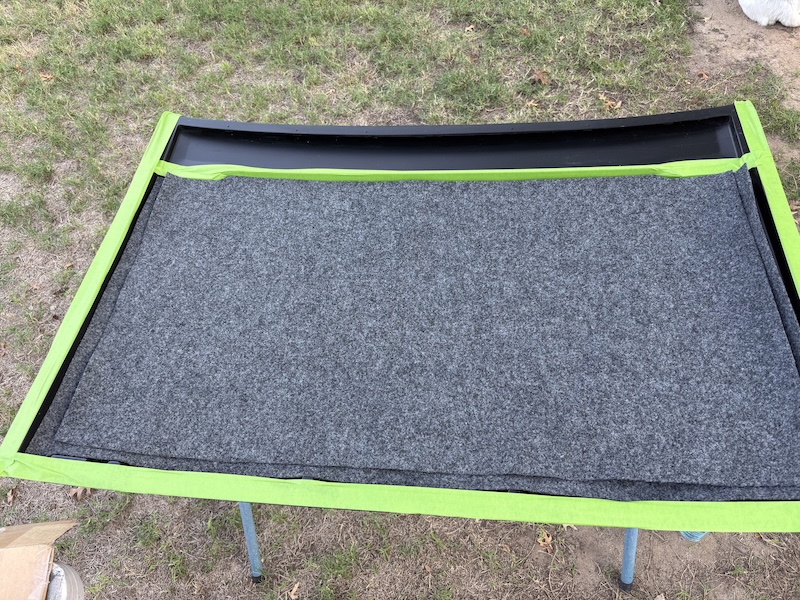 With the 914rubber headliner in place, I went to work and trimmed it in a few places to make it fit correctly. Next, I cleaned and glued in the first half using a piece of cardboard as a backer. I then glued and pressed in the other half to complete the job. It's all pretty easy to do as long as you keep the glue from getting were it shouldn't go. 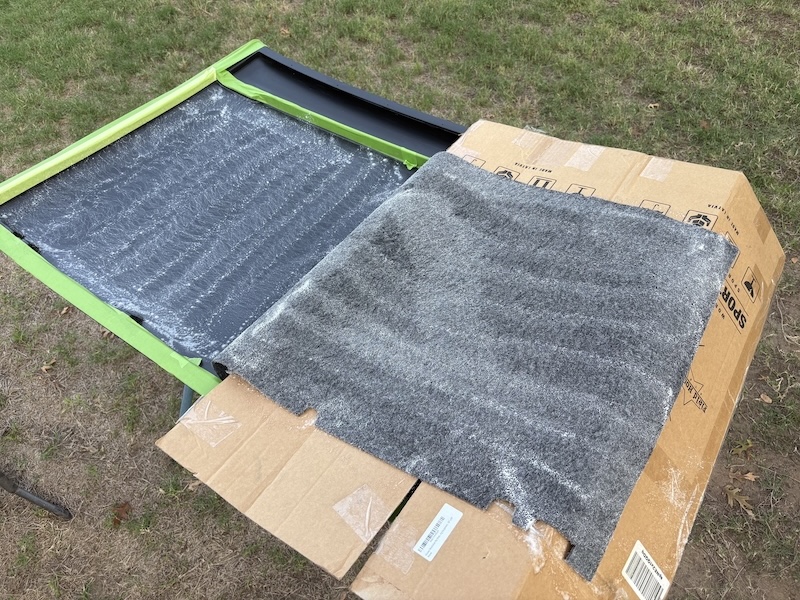 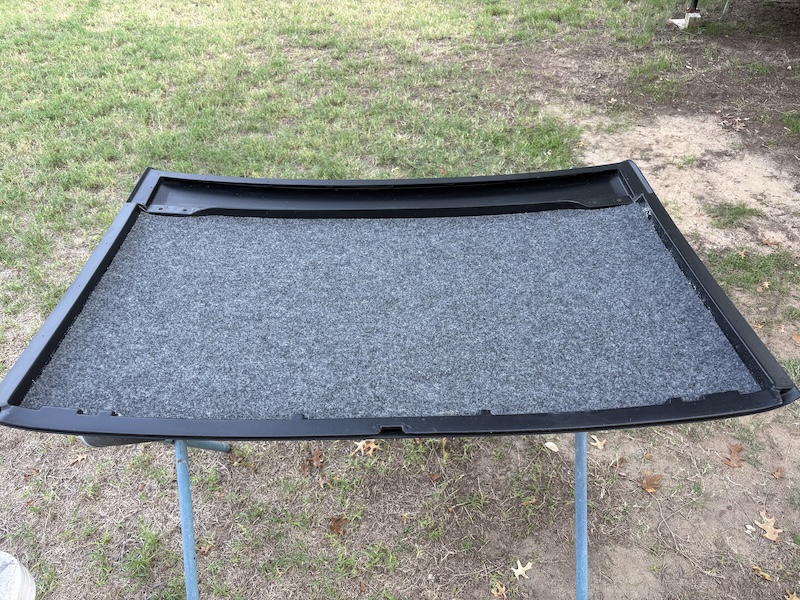 After that, I reassembled all the restored latch hardware with new bolts/screws. I then started the process of installing the rear targa seal using the aluminum trim. This trim was cleaned with soap and water and then shinned up a bit using some #0000 steel wool. I also reinstalled the repainted side targa rails with the original hardware and a little bit of sealant to keep moisture out. 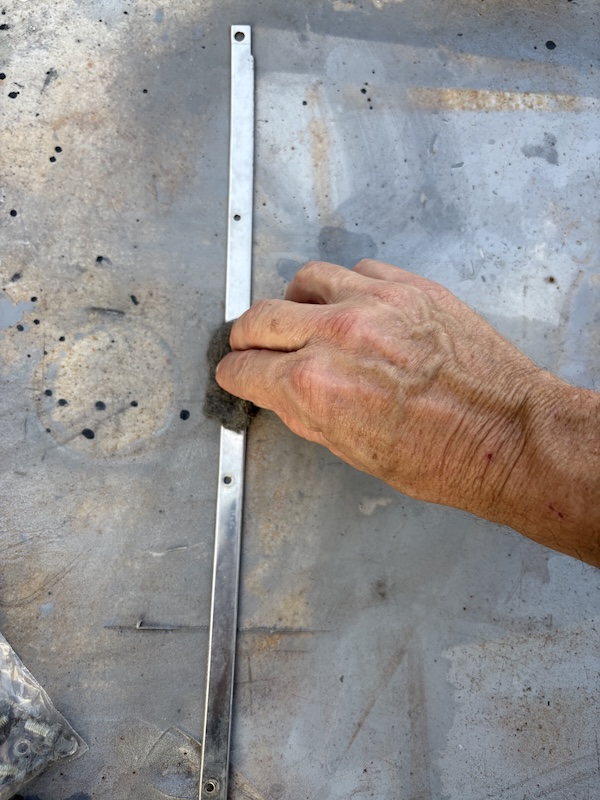 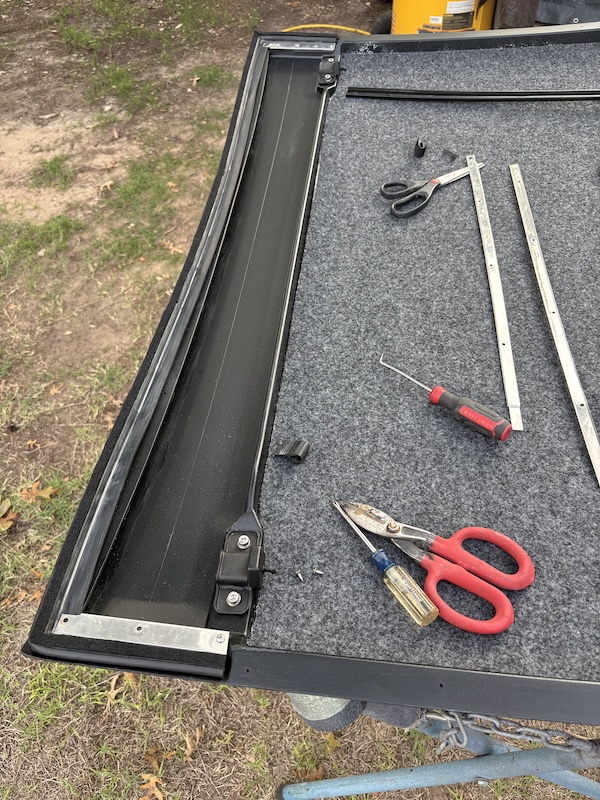  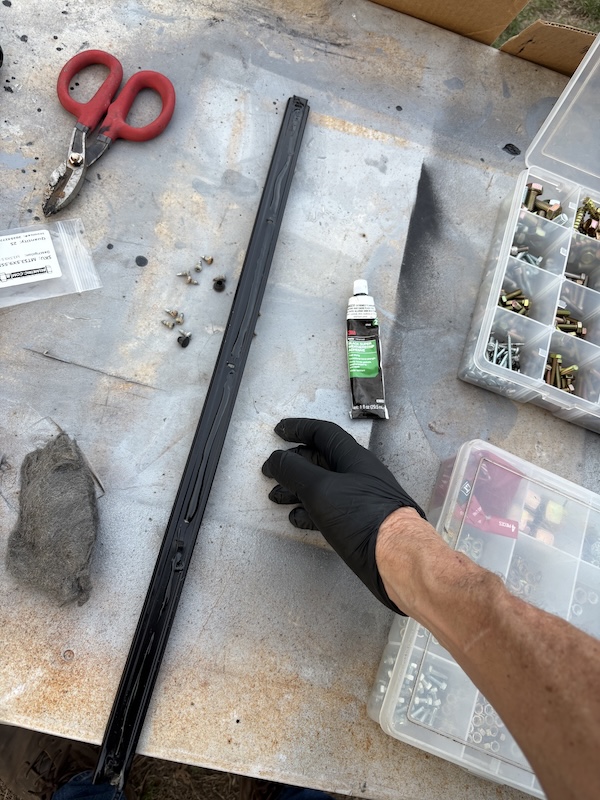  Here are two pics of the results up to this point. 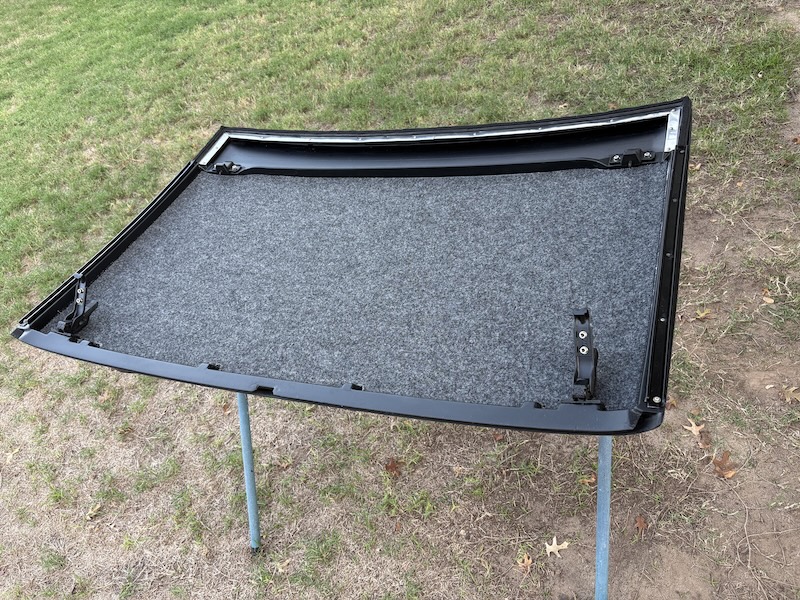 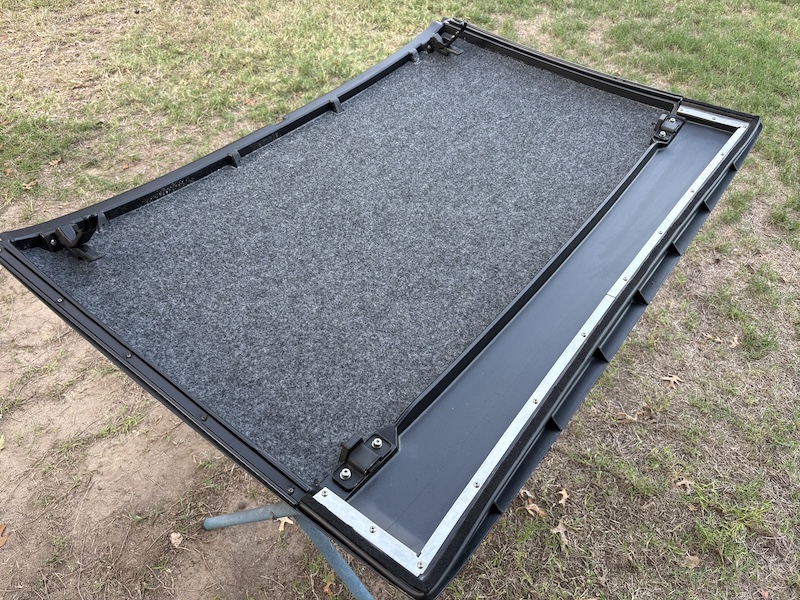 And finally, the installation of the side targa seals using soft soap and a lot of effort and the restoration, clean-up, and install of the front targa pad. This original pad was torn away from its support metal. I simply injected some Landau glue into each end and taped everything together. After drying, the part was installed using its original hardware. Note: I will trim the forward ends of the side targa seals later once the car is painted and the front targa seal has been installed. 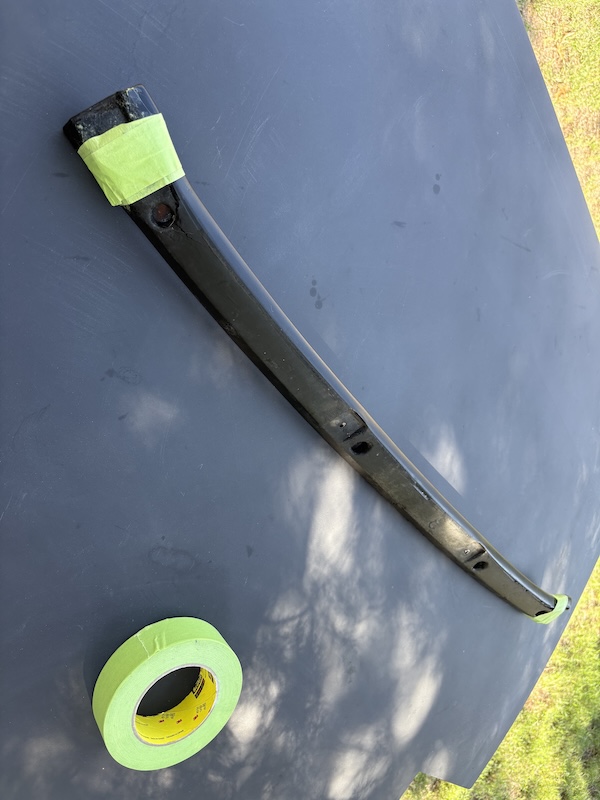 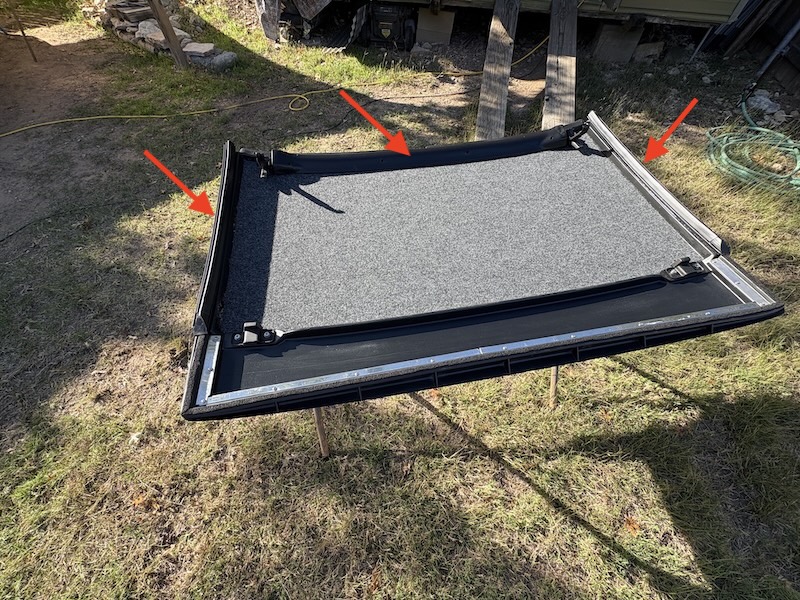 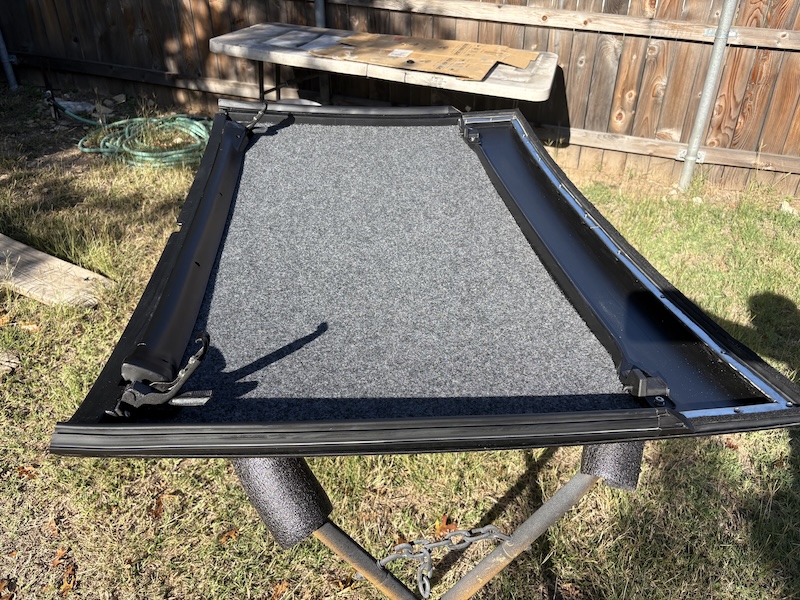 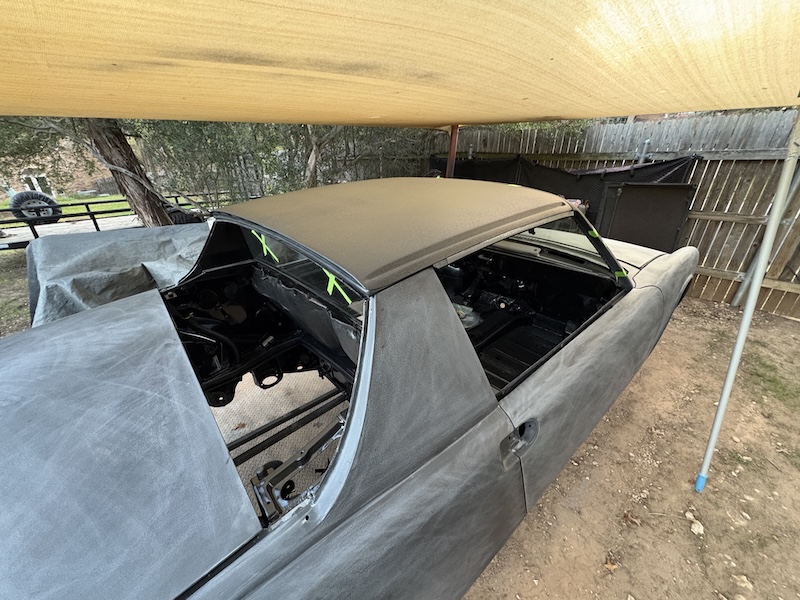 More posts coming soon. Enjoy! (IMG:style_emoticons/default/beerchug.gif) |
|
|
|
| friethmiller |
Nov 23 2025, 09:52 PM
Post
#707
|
|
Senior Member Group: Members Posts: 1,130 Joined: 10-February 19 From: Austin, TX Member No.: 22,863 Region Association: Southwest Region |
Block-sanding Part 1 (11/8 - 11/23):
Having sprayed the entire car with 2-3 coats of Feather Fill G2 polyester primer over a month ago, it was finally time to start blocking out the primer and take another step toward finishing the body for paint. I started on the driver side front fender and, after sampling around with 180 and 220-grit sand paper, I found the Feather Fill a bit tricky to sand. It quickly gummed up the paper and made it very slow-going for me. So, I decided to try wet-sanding to help knock-down the outer skin and it worked great. Having epoxy under everything certainly make wet-sanding an available option. Here are a couple shots of the fender after wet-sanding and with the use of white guide coat for blocking. 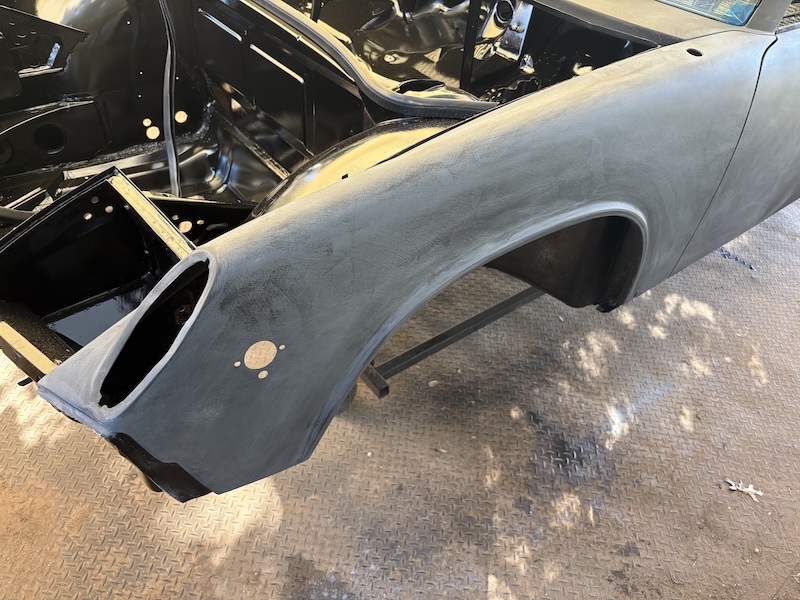 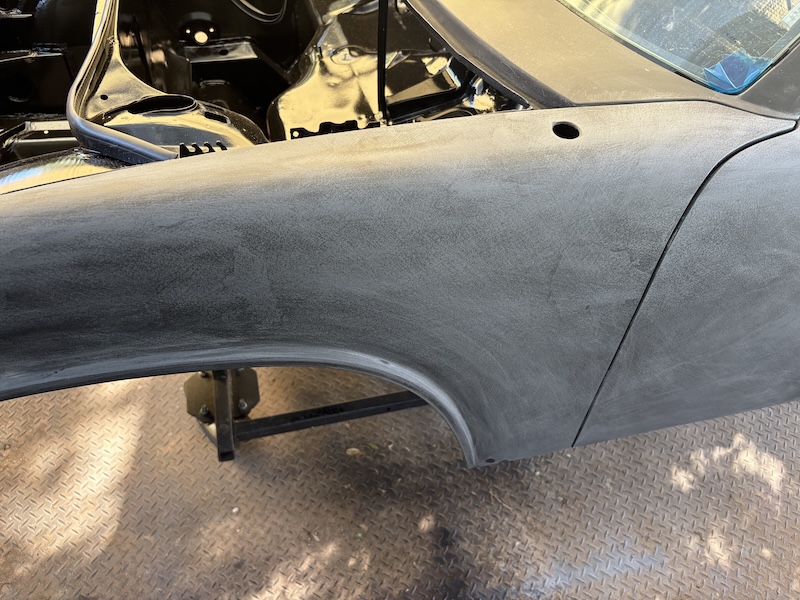 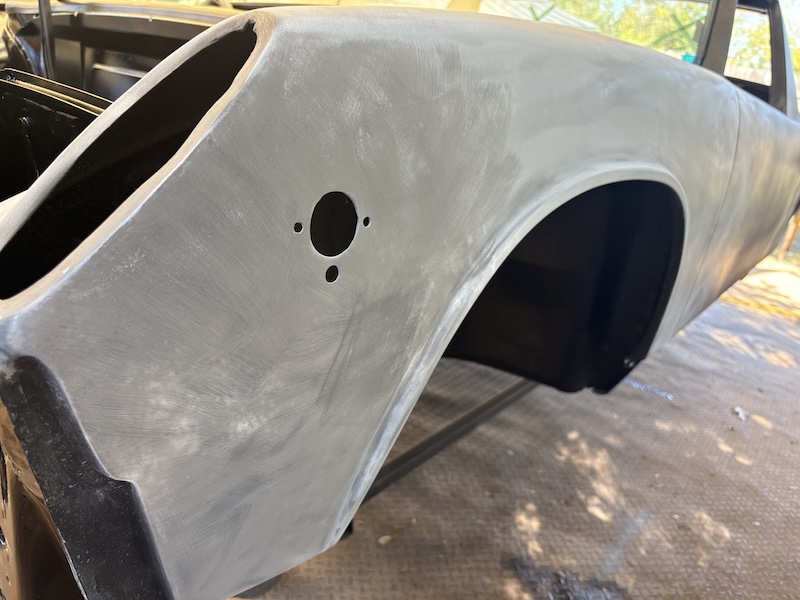 Next, I decided to just wet sand the rest of the car. I thought I might was well get it all done in one step. Used exactly one sheet of 220 wet/dry paper to do the entire car. (IMG:style_emoticons/default/aktion035.gif) 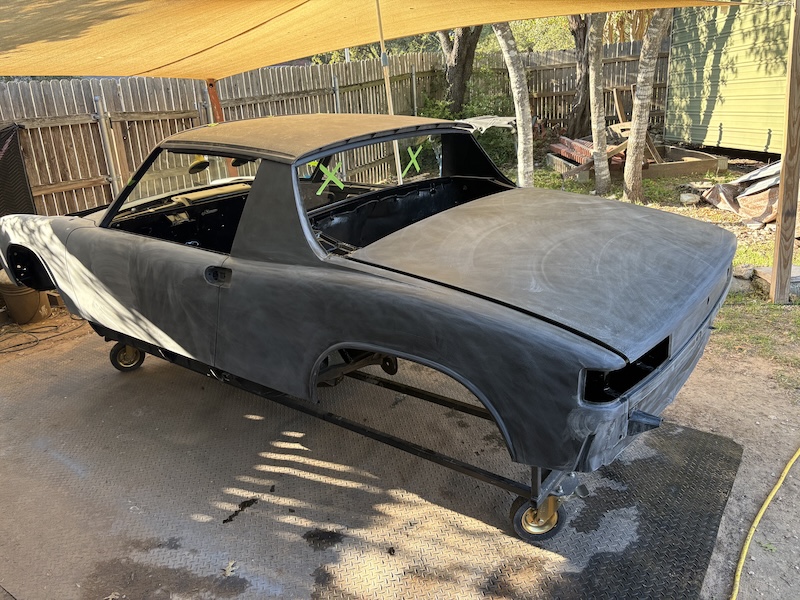 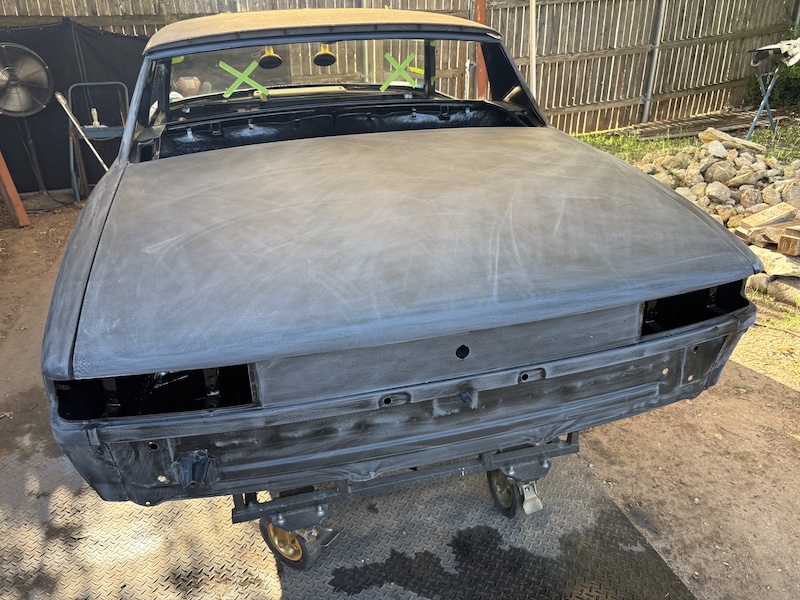 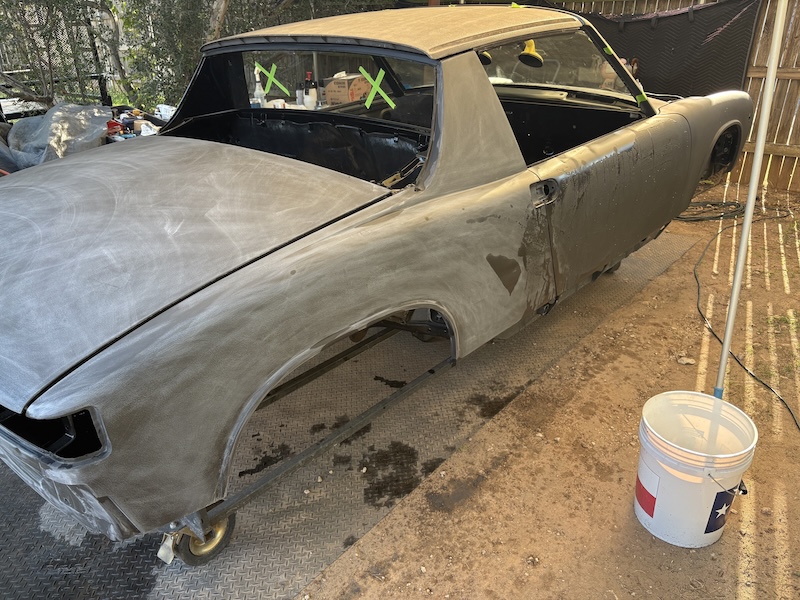 Moving back over to the driver side, I guide-coated the door and blocked it down. You can see in the pics below how the guide coat helps you locate lows so you can attempt to lower the surrounding highs. This is done slowly over the length and width of the panel. You just can't grind the highs down here and there. Otherwise you'll leave waves in the panel. Another good feature of the guide coat is that it shows you where your scratches are. This just alerts you that you've missed or haven't sanded enough in a specific area. 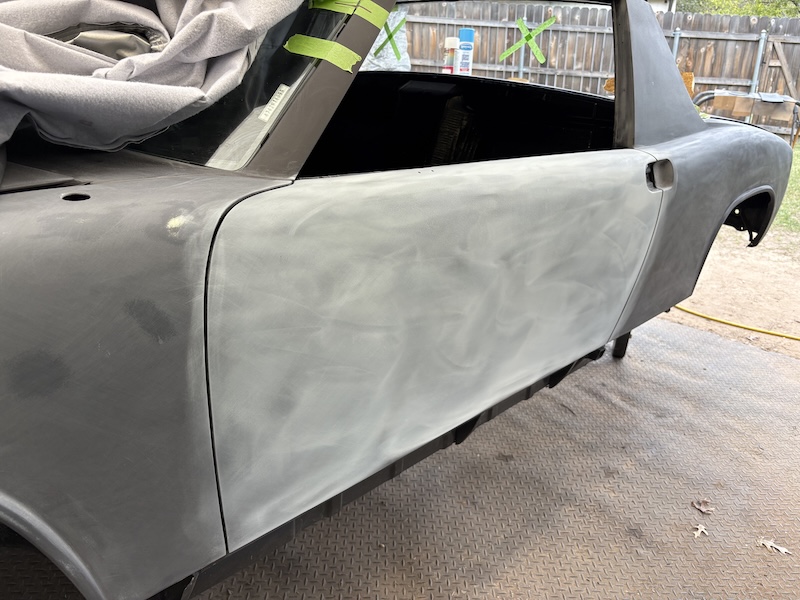 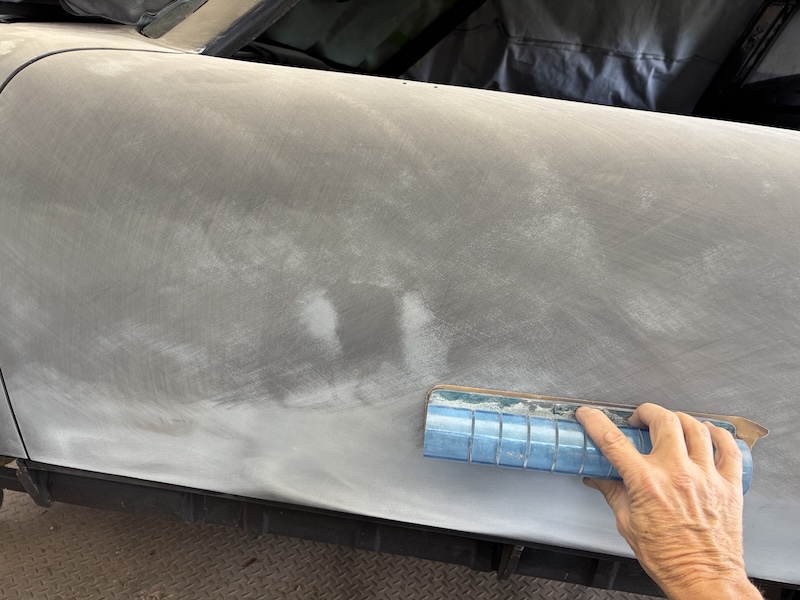  I finished the door in about 2 hours. I then moved over and guide-coated the rear quarter. Taking your time is the key to this work. It can't be rushed in anyway. Note the finished door- you can see where I had to sand through to the body filler to level out the surrounding lows. The rear quarter took another 2+ hours to complete. 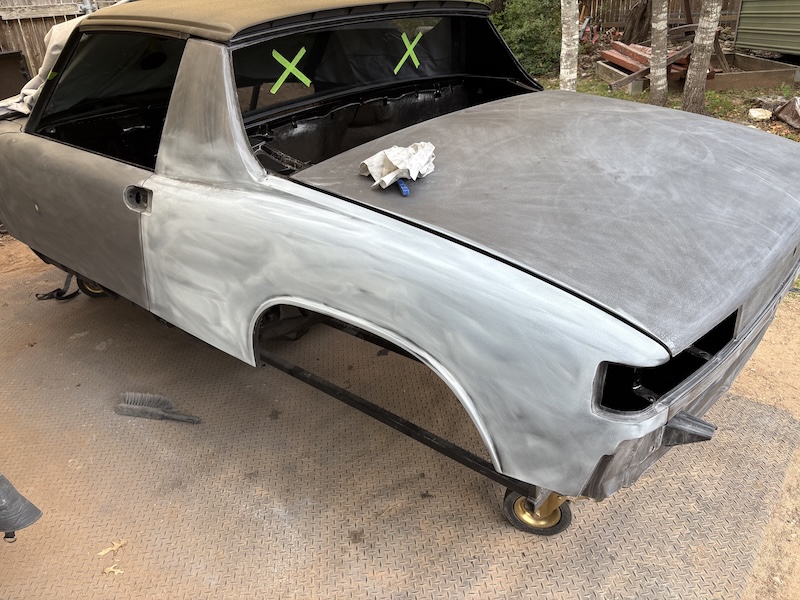 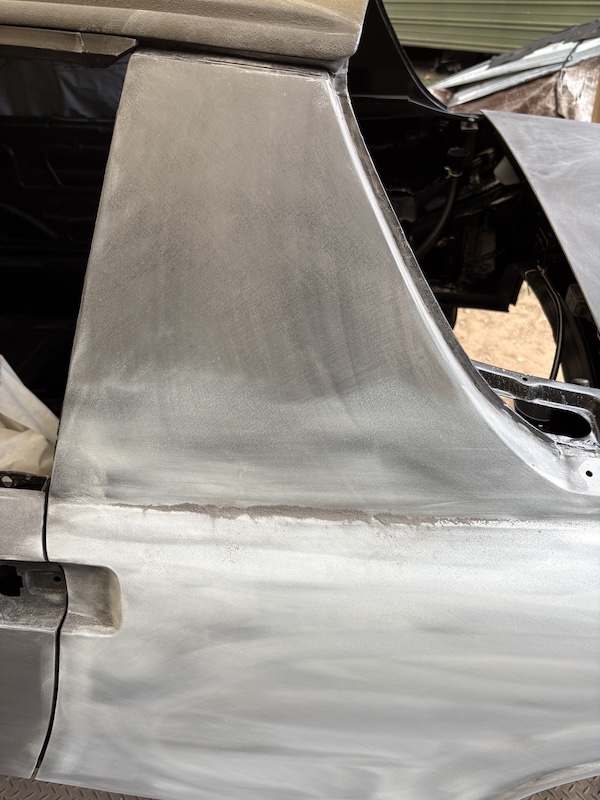 Here's a few shots of the entire driver side "mostly" complete. 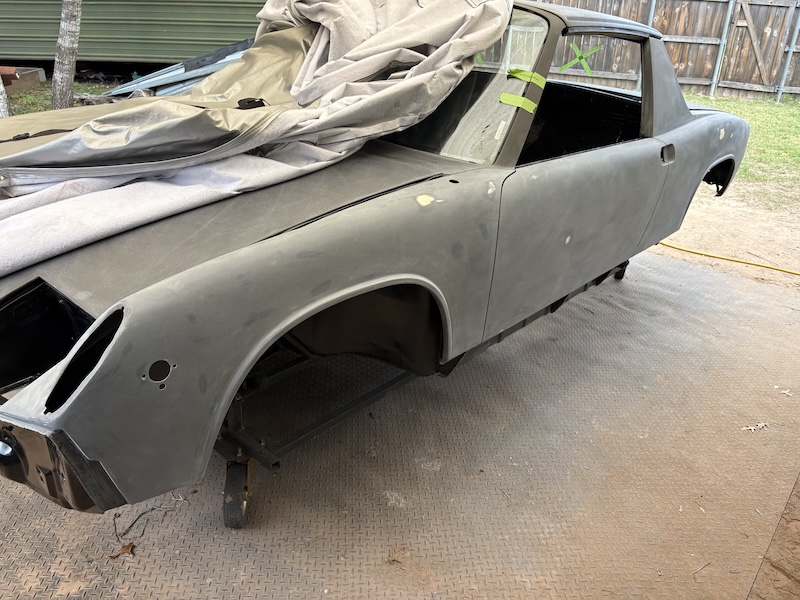 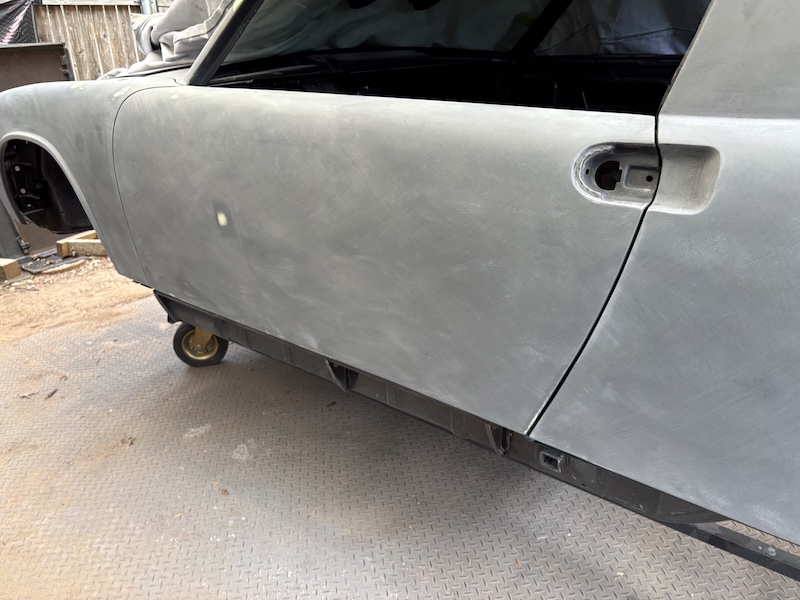 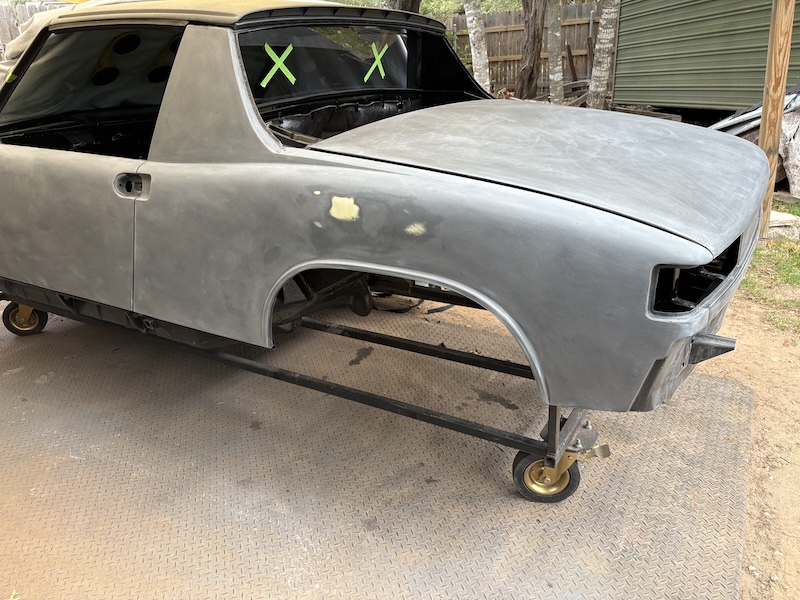 Next, using a can of Quick Check Gloss Simulator, I sprayed each panel and looked for any imperfections in the reflection. I found a small spot around the wheel arch on the rear quarter (no surprise there (IMG:style_emoticons/default/rolleyes.gif) ), the door looked great, and the front fender look pretty good as well. 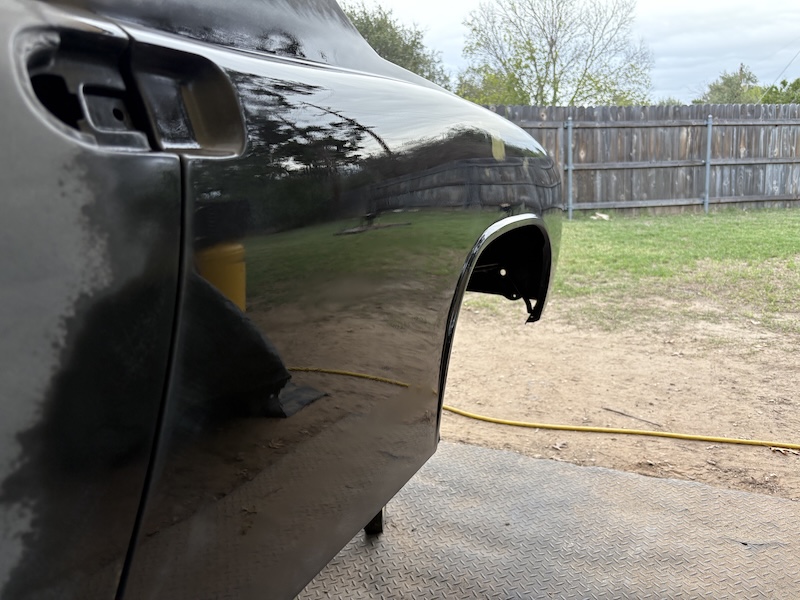 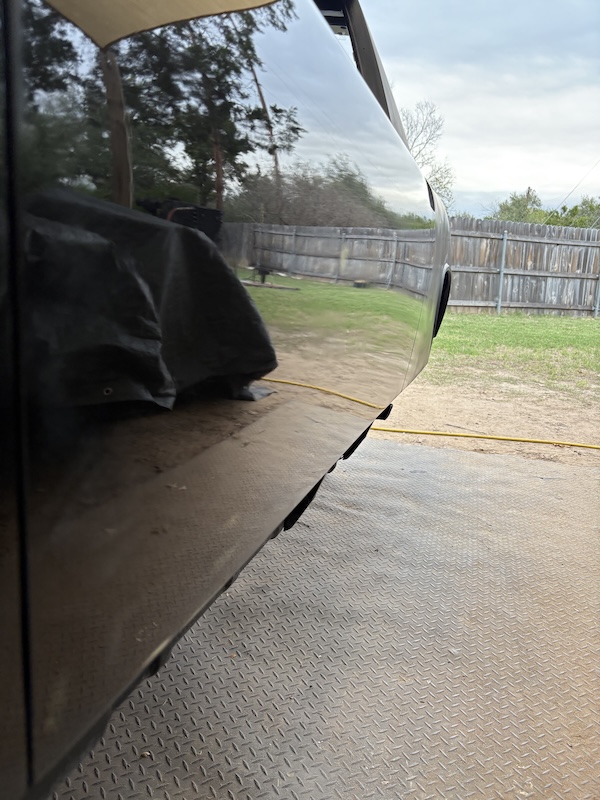  I will continue to document my work as I progress around the other panels on the car. Cheers! (IMG:style_emoticons/default/beerchug.gif) |
|
|
|
| didenpx |
Nov 24 2025, 07:20 AM
Post
#708
|
|
Member Group: Members Posts: 110 Joined: 1-September 23 From: Usa Member No.: 27,556 Region Association: North East States |
Fred, that looks fantastic! And the gloss simulator is a new one for me; making a note of it.
FWIW I used your idea of attaching the quarter to the door pillar/jamb prior to mounting it as a single assy onto the body; worked a charm. Paul |
 |
|
| Cairo94507 |
Nov 24 2025, 08:20 AM
Post
#709
|
|
Michael Group: Members Posts: 10,541 Joined: 1-November 08 From: Auburn, CA Member No.: 9,712 Region Association: Northern California |
Absolutely beautiful work Fred. When you see the reflection in the paint resembling a mirror with no "waves", you know you have it right. (IMG:style_emoticons/default/smilie_pokal.gif) (IMG:style_emoticons/default/beerchug.gif)
|
|
|
|
| Ninja |
Nov 24 2025, 09:30 AM
Post
#710
|
|
Member Group: Members Posts: 68 Joined: 25-September 25 From: Granbury Texas Member No.: 29,004 Region Association: Southwest Region |
When my father would make a buck for a fiberglass mold we would finish said buck with gloss black paint, polish the crap out of it, and then use a pen light in a darkened shop to spot the imperfections.
The human eye can see a variation of .0001 (ten thousands) using this method. Side of your car looks super good from the pictures! After hundreds of hours body finishing the buck, we would make the mold and then destroy the buck with sledgehammers! That step was cathartic! The PDR guys have some light fixtures that would help you and you can cobble them together without spending big bucks. I'm talking about what I call "Zebra lights". These are multiple fluorescent bulbs all parallel to each other about 2" apart. You still need a gloss reflective surface and black is best! You can REALLY see your highs and lows with such a light. When I do the paint on my 914 I will make a set myself. Find a PDR guy down near you and check out his equipment for ideas. A professional set up is $$$ but they don't look difficult to fab up. Rick |
|
|
|
| friethmiller |
Nov 24 2025, 10:30 AM
Post
#711
|
|
Senior Member Group: Members Posts: 1,130 Joined: 10-February 19 From: Austin, TX Member No.: 22,863 Region Association: Southwest Region |
QUOTE(didenpx @ Nov 24 2025, 07:20 AM) Fred, that looks fantastic! And the gloss simulator is a new one for me; making a note of it. FWIW I used your idea of attaching the quarter to the door pillar/jamb prior to mounting it as a single assy onto the body; worked a charm. Paul Nice! It's just one way to do it. (IMG:style_emoticons/default/smilie_pokal.gif) |
|
|
|
| friethmiller |
Nov 24 2025, 12:24 PM
Post
#712
|
|
Senior Member Group: Members Posts: 1,130 Joined: 10-February 19 From: Austin, TX Member No.: 22,863 Region Association: Southwest Region |
QUOTE(Cairo94507 @ Nov 24 2025, 08:20 AM) Absolutely beautiful work Fred. When you see the reflection in the paint resembling a mirror with no "waves", you know you have it right. (IMG:style_emoticons/default/smilie_pokal.gif) (IMG:style_emoticons/default/beerchug.gif) QUOTE(Ninja @ Nov 24 2025, 09:30 AM) Side of your car looks super good from the pictures! Thanks guys. It's just a first look in the fading light of the day. A video would probably have been better here but I just snapped a few shots where I got a reflection. While it looks promising, it's certainly not ready for paint. The high-gloss from this spray doesn't mean that's what the paint will look like. That's a whole other deal but I think knowing when your bodywork is "straight" gives you at least a fighting chance at a good result in the end. I was already planning to rig up some lighting that I could use to check for straightness and also possibly use in the booth. That would be a win-win. We will see! (IMG:style_emoticons/default/shades.gif) |
|
|
|
| Root_Werks |
Nov 24 2025, 12:39 PM
Post
#713
|
|
Village Idiot Group: Members Posts: 8,876 Joined: 25-May 04 From: About 5NM from Canada Member No.: 2,105 Region Association: Pacific Northwest |
Black is such a challenging color for bodywork. Super cool on using gloss check paint. Never heard of that before.
|
|
|
|
| friethmiller |
Nov 24 2025, 12:50 PM
Post
#714
|
|
Senior Member Group: Members Posts: 1,130 Joined: 10-February 19 From: Austin, TX Member No.: 22,863 Region Association: Southwest Region |
QUOTE(Root_Werks @ Nov 24 2025, 12:39 PM) Black is such a challenging color for bodywork. Super cool on using gloss check paint. Never heard of that before. I must have heard about it on one of the restoration/paint videos on YouTube. I found it on amazon and thought I'd try it. It stays on the panel a lot longer than a wax and grease remover, which I really liked. I simply wiped it off when I was done - no residual that I could tell. Search for "Lik 90 LIK-10030 Quick Check Gloss Simulator, Clear" |
|
|
|
| wonkipop |
Nov 24 2025, 01:05 PM
Post
#715
|
|
914 Guru Group: Members Posts: 5,341 Joined: 6-May 20 From: north antarctica Member No.: 24,231 Region Association: NineFourteenerVille |
incredible. (IMG:style_emoticons/default/beerchug.gif) (IMG:style_emoticons/default/beerchug.gif) (IMG:style_emoticons/default/beerchug.gif)
|
|
|
|
| friethmiller |
Nov 26 2025, 09:26 PM
Post
#716
|
|
Senior Member Group: Members Posts: 1,130 Joined: 10-February 19 From: Austin, TX Member No.: 22,863 Region Association: Southwest Region |
Windshield Install (11/22 - 11/26/2025):
Got this new windshield via Rich @914Werke last week but I had to wait on better windshield trim clips before really doing the install. Thanks to advice from Bruce Stone, I ordered the authentic, german-made clips, and I have to say... they're worth every penny (IMG:style_emoticons/default/first.gif) In these first few pictures, I am dry-fitting the glass - using tape and a marker to create alignment points for when the glass goes in for good. 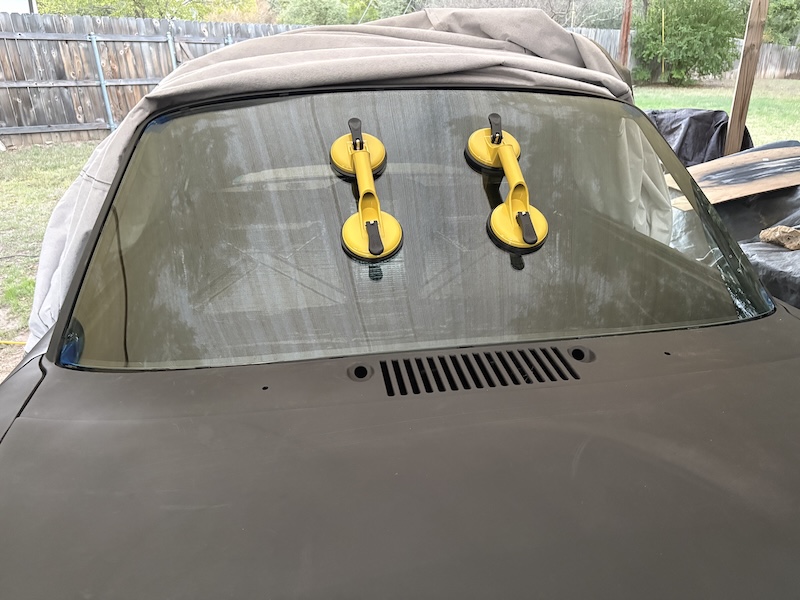 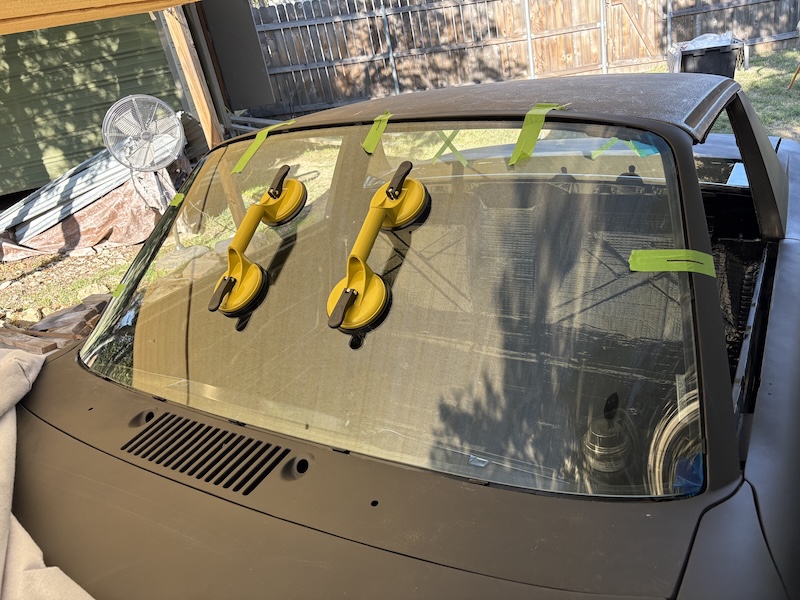 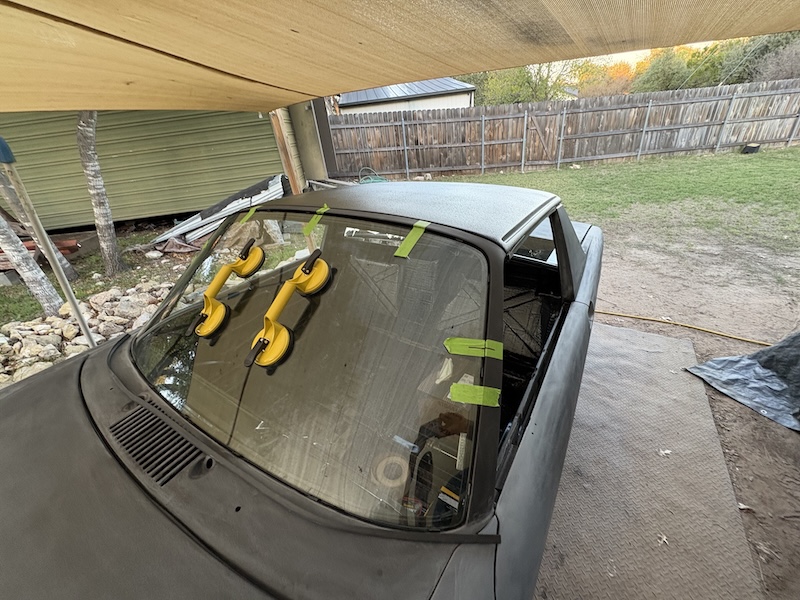 Once all the parts were on-hand, I installed all 18 clips, glued in a spacer on top of all the bottom clips, and glued in the dash to windshield seal. Pic below (see arrow) shows one of the clips with one of the spacers. Next, on the fender stand, I cleaned both sides of the glass, making sure the edges where particularly clean. I then moved back to the car and applied the edge dressing and finally the butyl tape. 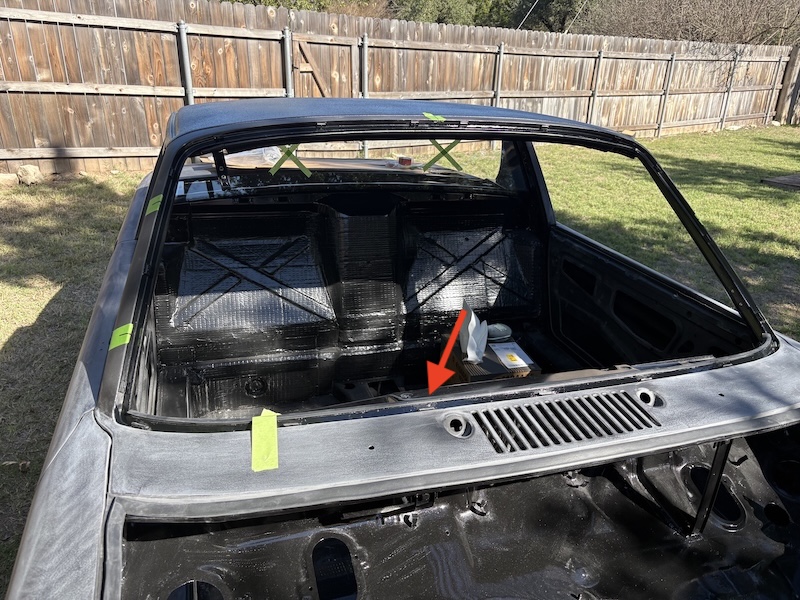 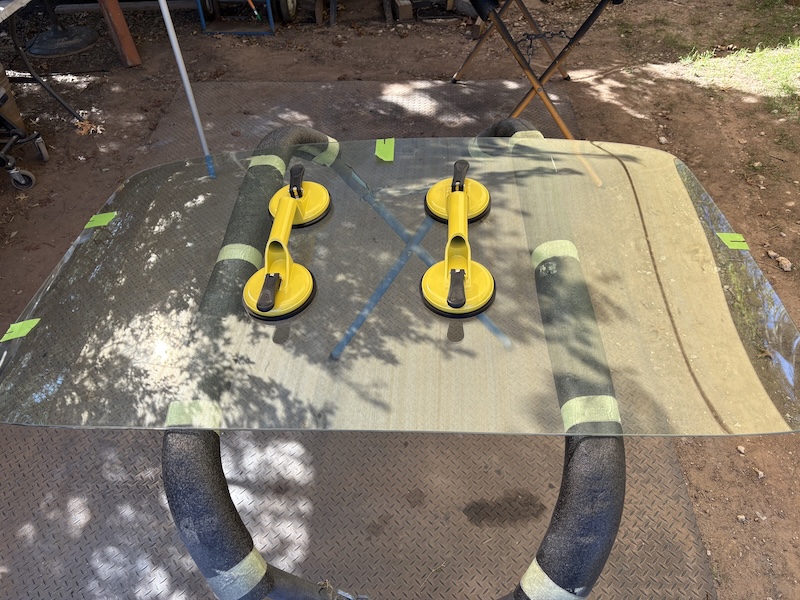 One advantage with having an A/C car is an "easier" glass install. Moving the glass close to the front of the car, I then stepped into the frunk. With both feet on the ground (via the square condenser hole), I simply grabbed both handles attached to the glass, pivoted a full 180 degrees, and then set the glass into place. Just had to make sure to align the glass with the marks. I then spent a few minutes making sure the butyl was where I wanted it. The last step in the process was to carefully push down the glass to adhere to the butyl. Glad this thing is installed (and unbroken) (IMG:style_emoticons/default/biggrin.gif) 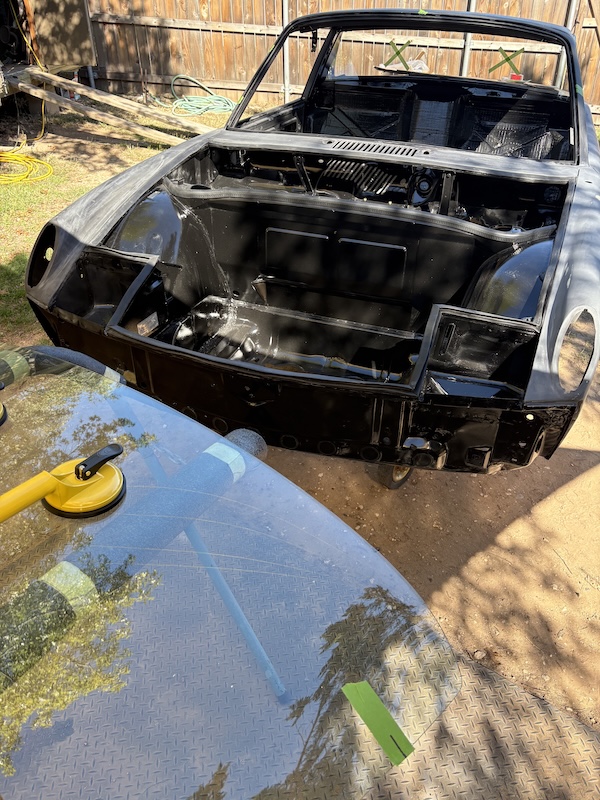 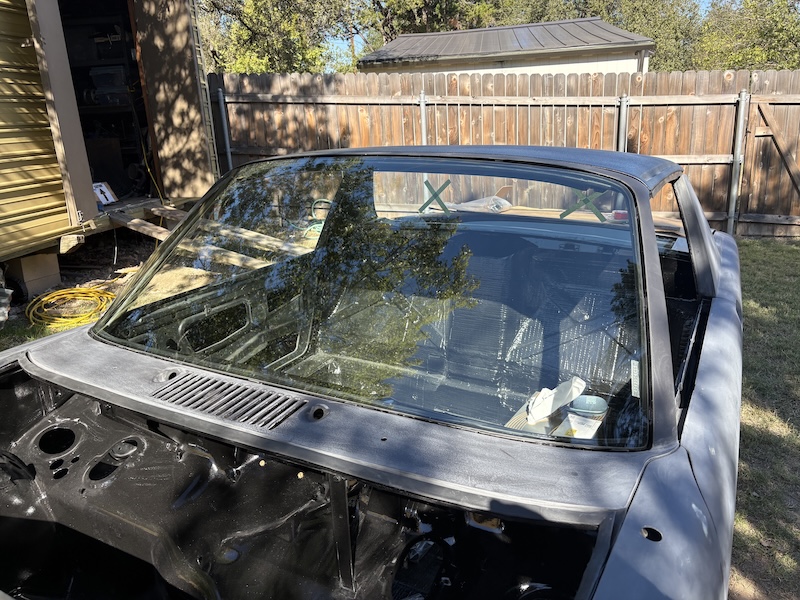 |
|
|
|
| Puebloswatcop |
Nov 27 2025, 12:10 PM
Post
#717
|
|
Senior Member Group: Members Posts: 1,691 Joined: 27-December 14 From: Mineola, Texas Member No.: 18,258 Region Association: Southwest Region |
Fred,
you are the man. your body work is very impressive. I love the gloss simulator. I've never seen it before, but I believe it will be a necessary step after adding the flares. The darn flared rockers are still kicking my @$$. |
|
|
|
| friethmiller |
Nov 27 2025, 03:44 PM
Post
#718
|
|
Senior Member Group: Members Posts: 1,130 Joined: 10-February 19 From: Austin, TX Member No.: 22,863 Region Association: Southwest Region |
QUOTE(Puebloswatcop @ Nov 27 2025, 12:10 PM) Fred, you are the man. your body work is very impressive. I love the gloss simulator. I've never seen it before, but I believe it will be a necessary step after adding the flares. The darn flared rockers are still kicking my @$$. Thanks Kevin! Yeah that type of custom work takes 10X the time to complete. Keep at it!! (IMG:style_emoticons/default/aktion035.gif) |
|
|
|
| friethmiller |
Nov 27 2025, 04:38 PM
Post
#719
|
|
Senior Member Group: Members Posts: 1,130 Joined: 10-February 19 From: Austin, TX Member No.: 22,863 Region Association: Southwest Region |
Dash Restoration and Install (11/22 - 11/27/2025):
Moving things along here, I pulled out the LE's dash and took a few shots of it initial condition. Not too bad. Little rust on the backside. My plan was to clean/repaint the front and then lightly restore the back of the dash preserving the factory paint / body numbers. 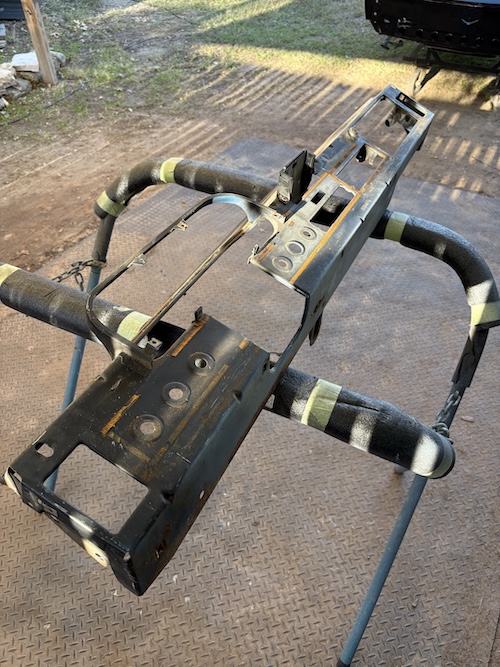 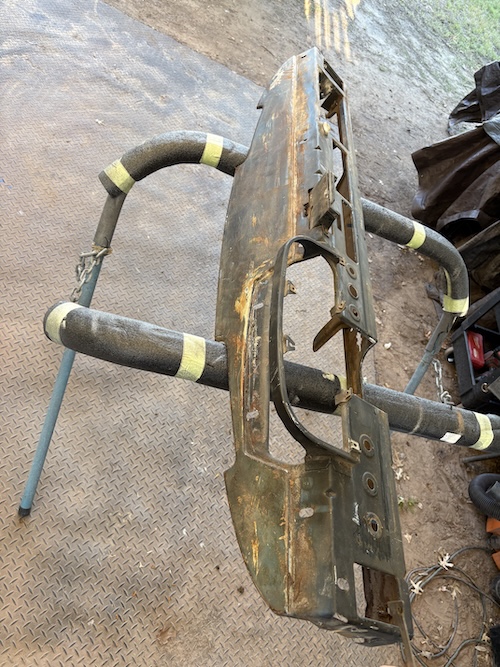  I used Rust Bullet's phosphorus spray and a small wire brush to remove / treat the rust in a few places on the back. After rinsing and drying the dash, I then painted the front with semi-gloss black and the back got 2x coats of flat clear to keep that original look.  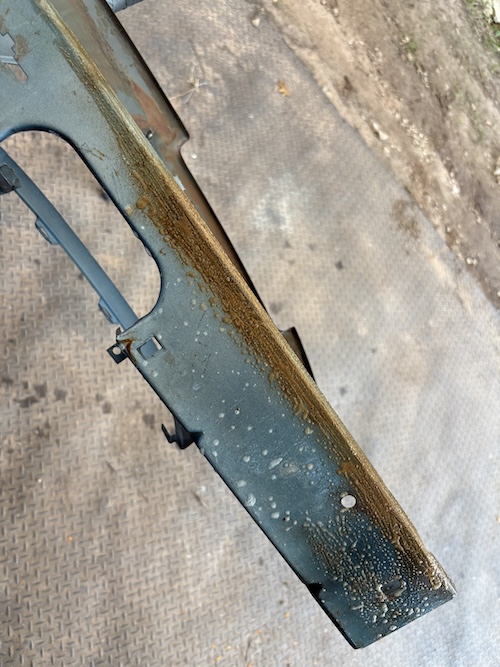 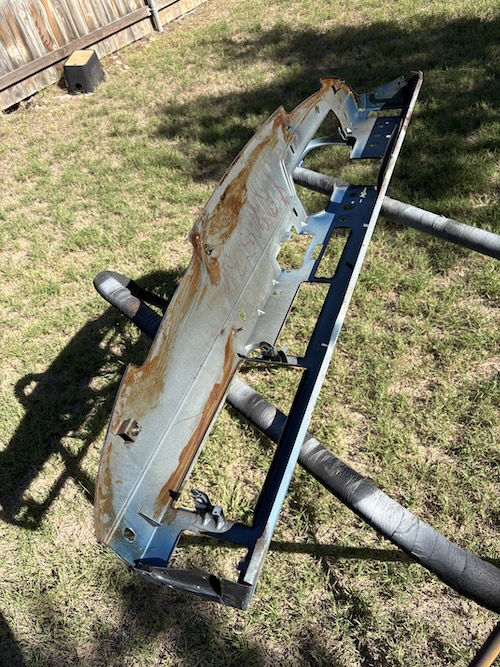 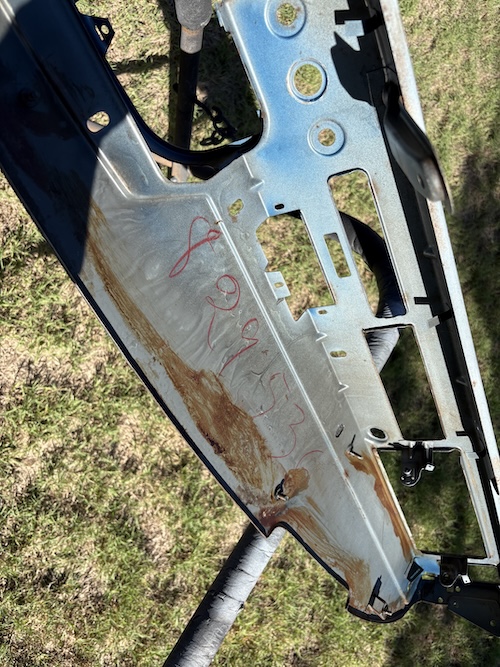 Next, I aligned, marked, and glued in the dash foam pad. This was followed by the dash vinyl. There's plenty how-to videos on this so I'll save you the details (IMG:style_emoticons/default/biggrin.gif)  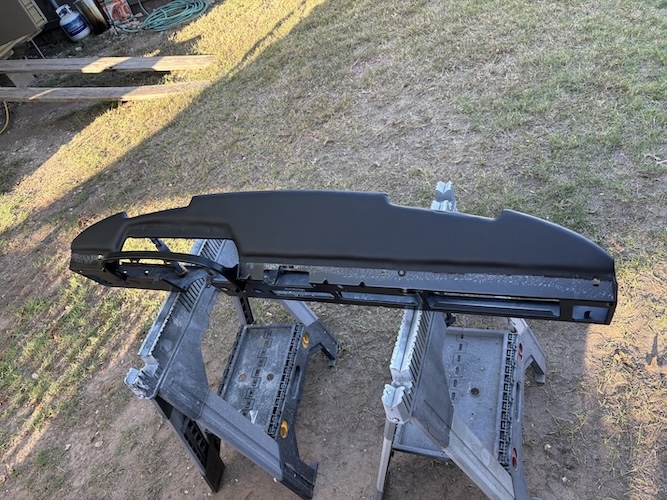 After that, I restored the dash face and radio plate. Again, align, mark, glue, and cut. Easy peasy (IMG:style_emoticons/default/aktion035.gif) Note: the radio face is a few years old. It will match the rest of the brick mold vinyl once I treat everything with a cleaner/protectant. Note: I couldn't find the glove box door, I guess I'll do that at a later date (IMG:style_emoticons/default/rolleyes.gif) 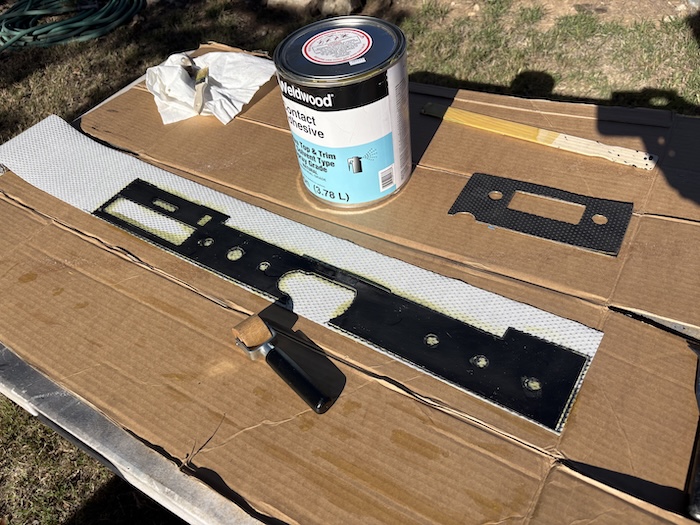 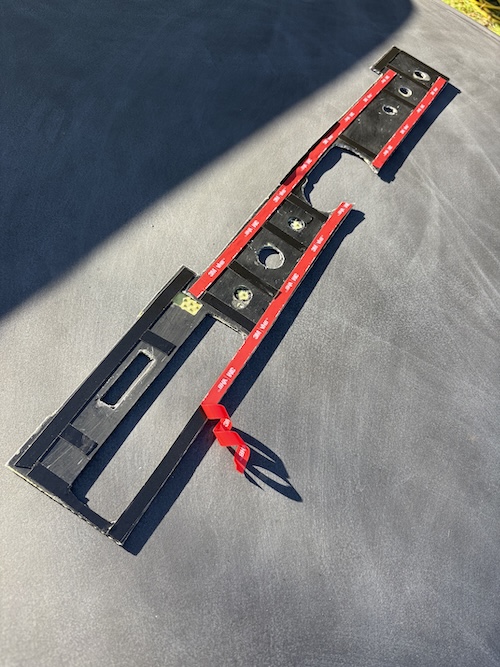 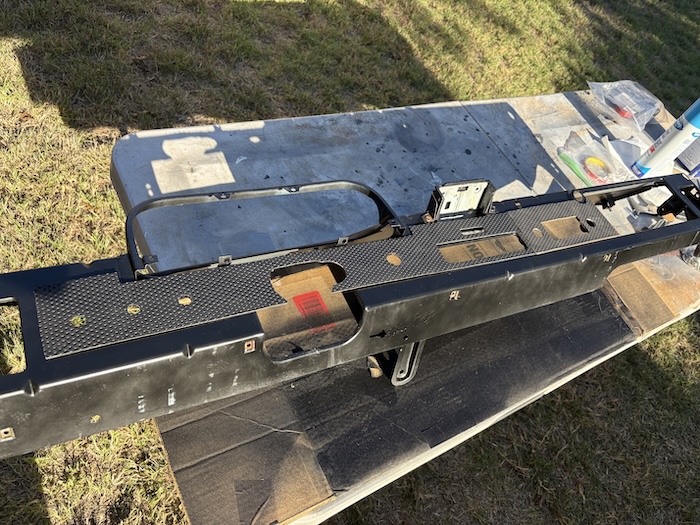 Here are a few shots of the dash installed in the car. It took me a few tries to get the green tape in a position to hold up the 'windshield to dash' seal so that the dash could slip up and under but I finally got it. I think she looks pretty good. 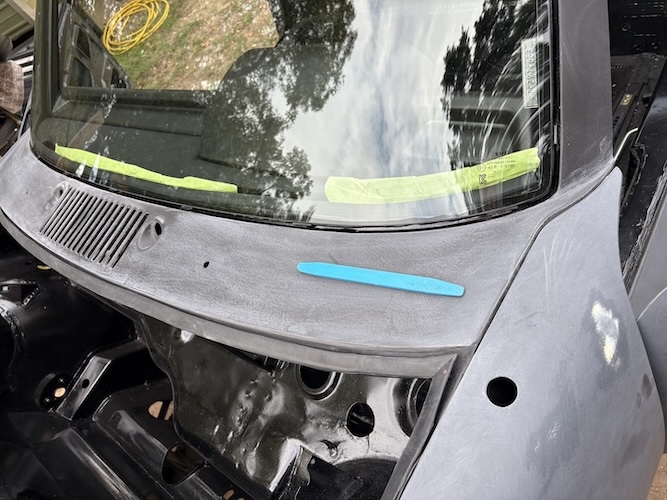 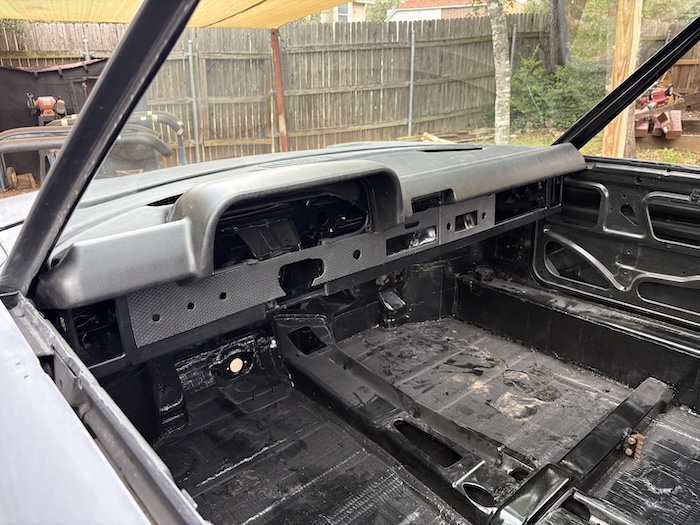 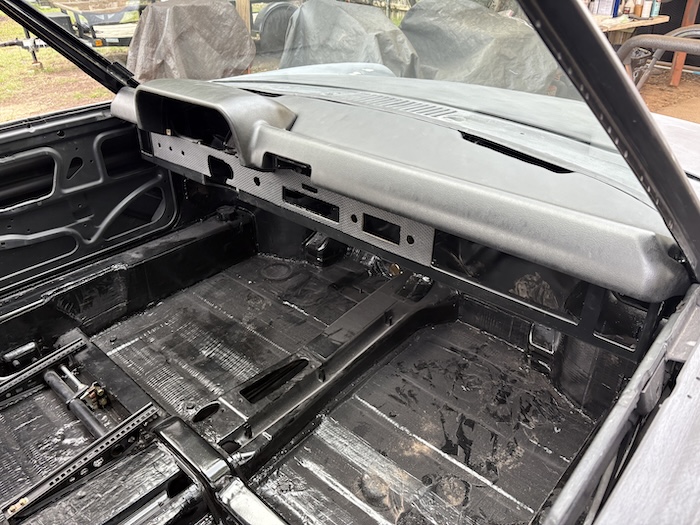 |
|
|
|
| bkrantz |
Nov 27 2025, 08:35 PM
Post
#720
|
|
914 Guru Group: Members Posts: 8,567 Joined: 3-August 19 From: SW Colorado Member No.: 23,343 Region Association: Rocky Mountains |
Nice work! And you were bold doing the windshield solo. I had two experienced friends helping me, and we practiced moving and placing the glass to fit my marks. Even then I was apprehensive until we just went ahead and did it.
|
|
|
|
|
3 User(s) are reading this topic (2 Guests and 0 Anonymous Users)
1 Members: PlantMan

|
Lo-Fi Version | Time is now: 11th January 2026 - 05:56 PM |
Invision Power Board
v9.1.4 © 2026 IPS, Inc.