|
|
|
Porsche, and the Porsche crest are registered trademarks of Dr. Ing. h.c. F. Porsche AG.
This site is not affiliated with Porsche in any way. Its only purpose is to provide an online forum for car enthusiasts. All other trademarks are property of their respective owners. |
|
|

  |

| friethmiller |
 Dec 16 2025, 09:09 PM Dec 16 2025, 09:09 PM
Post
#741
|
|
Senior Member  Group: Members Posts: 1,157 Joined: 10-February 19 From: Austin, TX Member No.: 22,863 Region Association: Southwest Region |
QUOTE(morehills @ Dec 16 2025, 09:03 PM)  Fred. That's beastly stuff. Well done! I rode Paris/Brest two years ago. 745 miles on the bike in 83 hours. Very little sleep. I wasn't thinking about my 914 out there. Wow! That’s a long time ‘in the seat’. Very impressive! Running a 100 miler is never easy but when a course has you climbing close to 20,000 ft of vertical (or more), it really makes things challenging. This one had us climbing up and over boulders in several places in the dark. Wind gusts on the mountain ridges hit 30mph, too. Luckily, it only rained for about 20mins around 3am and the temperatures stayed in the upper 40s. Things could have been much worse, for sure. Glad I was able to keep it moving and complete the race. (IMG:style_emoticons/default/beer3.gif) |
   |

 
|
| friethmiller |
Dec 22 2025, 01:14 PM
Post
#742
|
|
Senior Member Group: Members Posts: 1,157 Joined: 10-February 19 From: Austin, TX Member No.: 22,863 Region Association: Southwest Region |
Block-sanding - Part 5 (12/20 - 12/21/2025):
More sanding.... (IMG:style_emoticons/default/dry.gif) Goal was to get the driver side from 220 grit to 320, and then 400 - using guide coat. Figured I'd see a few minor lows above the rear quarter wheel arch but ran into one at the bottom of the sail (pic #2). Attempting to bring the surrounding area down, I decided to stop just short of this and see how it looked after an additional coat of high-build primer. So right off the bat I knew this would not be the "final" sand. No surprise there. 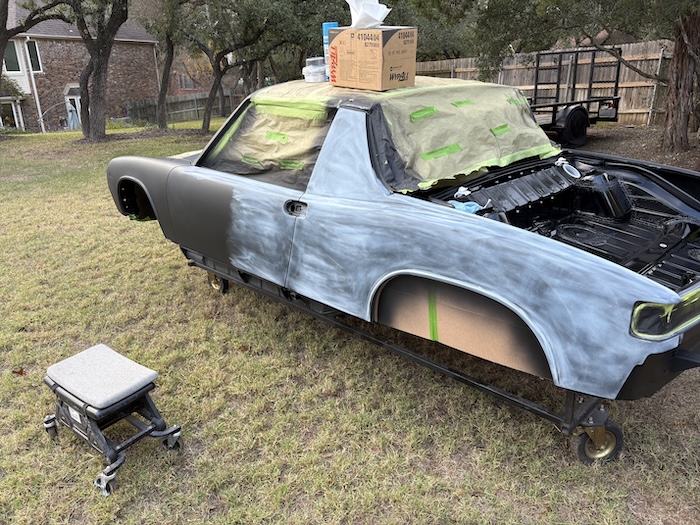 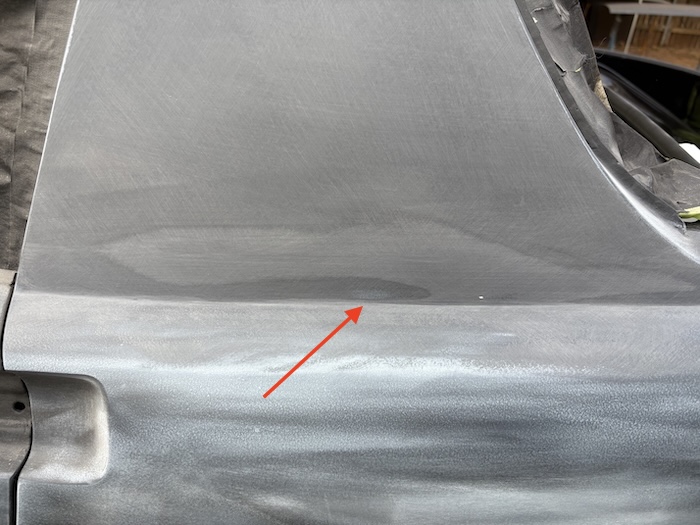 Onward! Knowing the rest of this side was pretty straight, I went with a 320-grit wet and just slowly worked my way forward - using guide coat to verify the previous 220-grit scratches were removed. 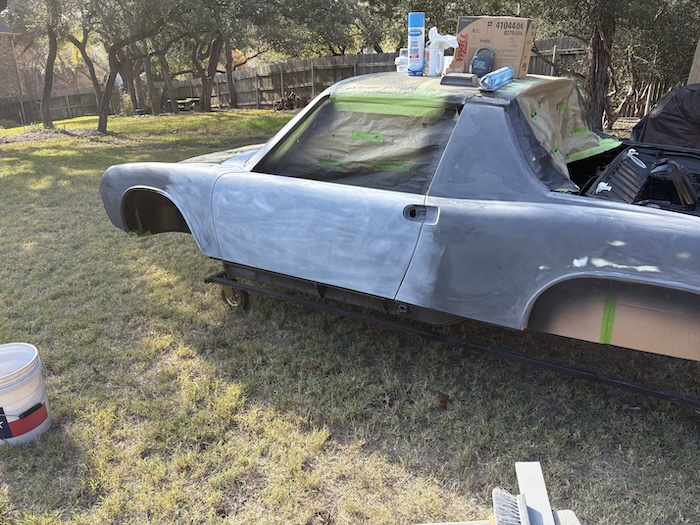 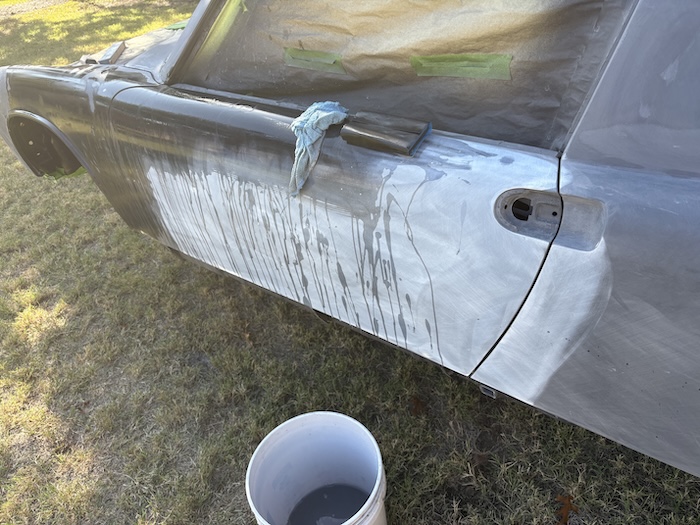 Here I am starting all over but with 400-grit wet. 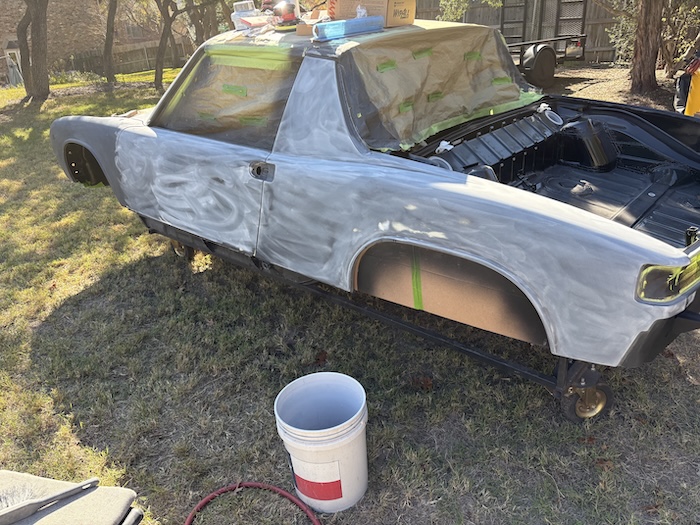 With the entire car at 400-grit, I decided to flip over and start on the passenger side. I began with 600-grit dry on a 12" block just to test the flatness above the wheel arch. I ran into two minor lows. However, this time I was able to block them out. After this one area was done, I switched to 600-grit wet on my new 4" d/a sander with a soft interface pad. Again, I used guide coat to help determine when the 400-grit sanding marks were removed. 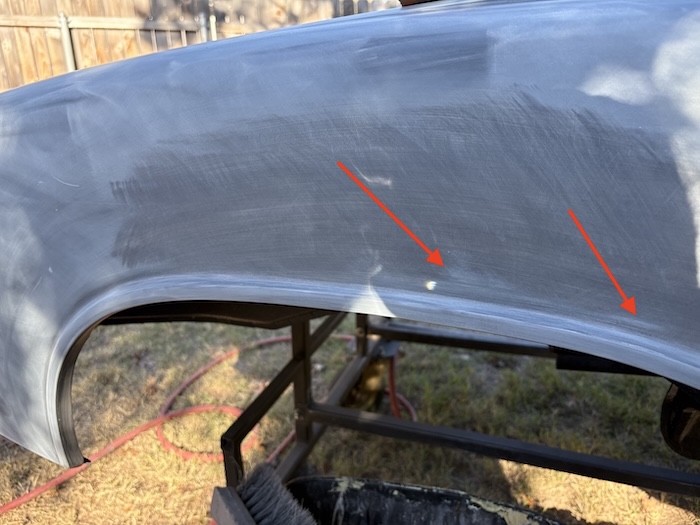 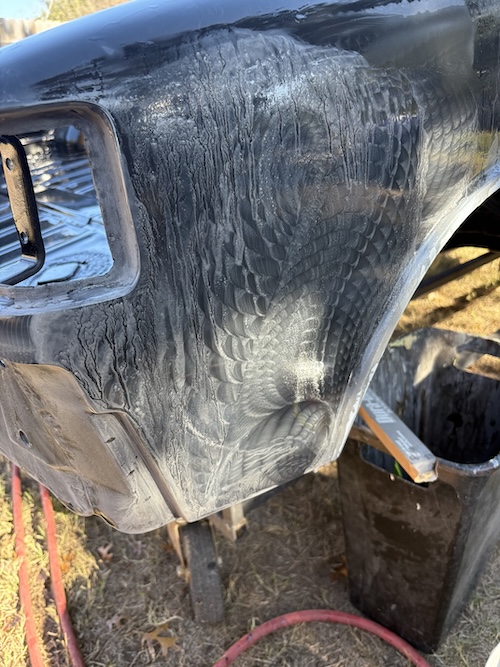 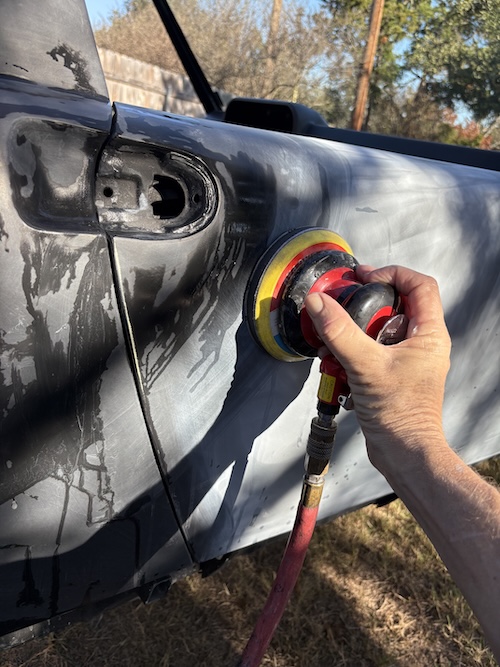 Here are some pics of the car at 600-grit. Remember, I still planned on shooting one more coat of primer on the driver side so anything I paint will need to be re-sanded completely to get it back to 600-grit. (IMG:style_emoticons/default/blink.gif)  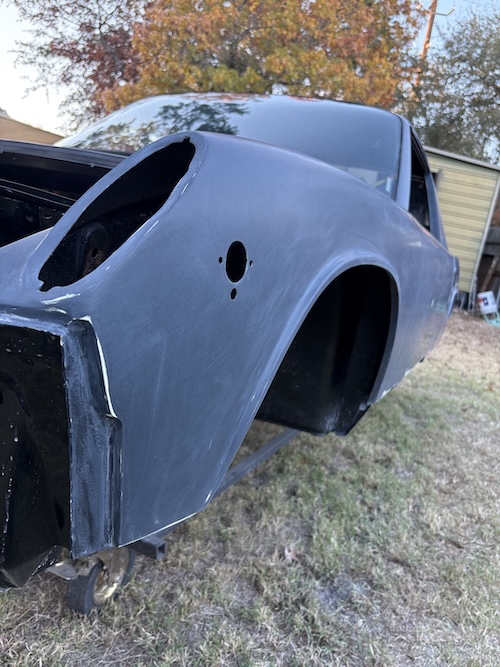 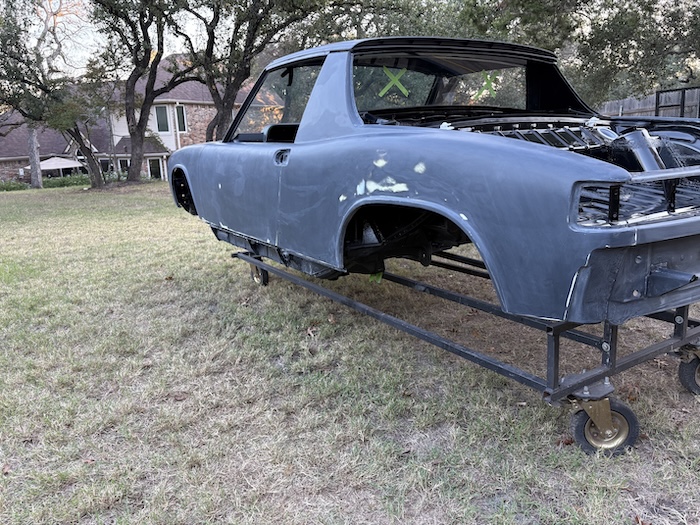 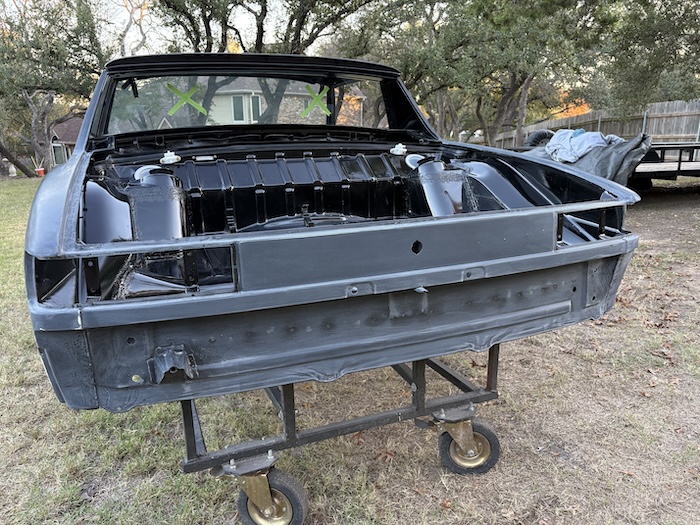 Wet-check Time Again! What you can't see from the photos, that I saw from moving the reflection back and forth down the panel, are the two very small low spots that still exists above the wheel arch. More primer in this area would allow me yet another chance to block things out straight. Added a few photos of just of the rear quarter panel to check out. It's really hard to see but trust me there are two maybe three very small ripples right above the arch. The spotty body filler isn't helping here. I will attempt to find my inner-Zen and patiently work this area flat (IMG:style_emoticons/default/shades.gif) 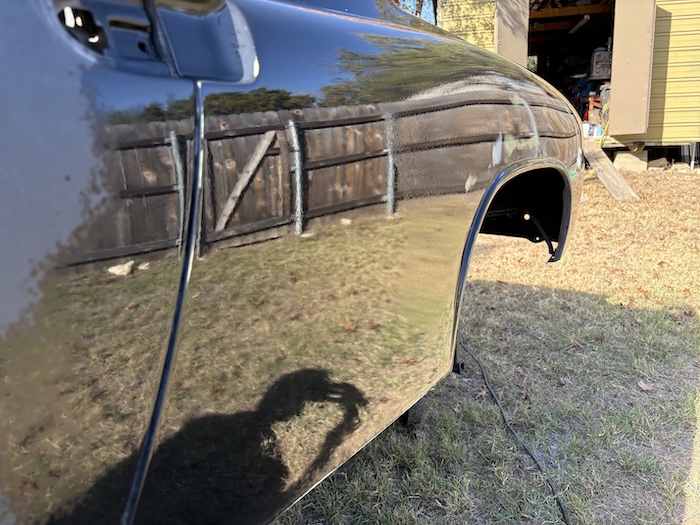 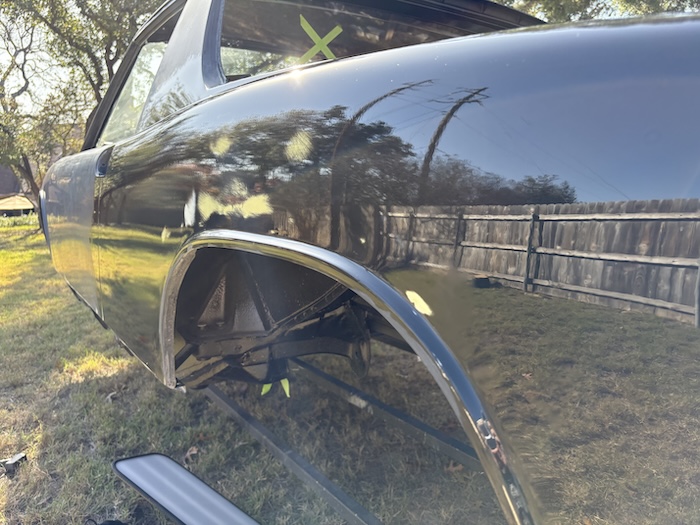 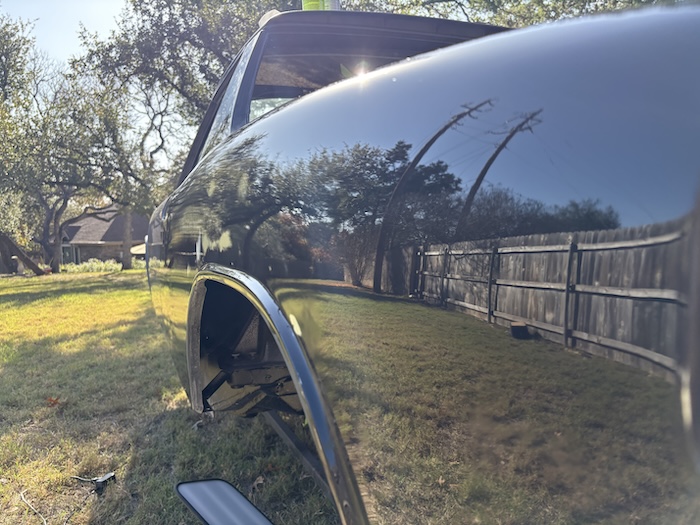 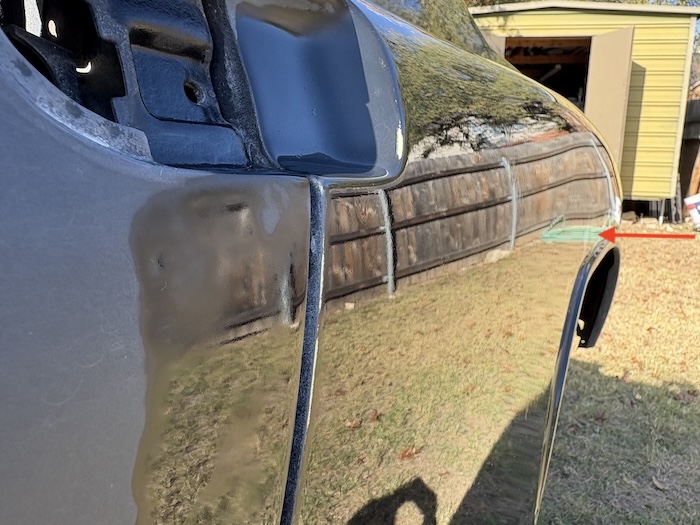 Here are two photos of the drivers side door. This door is looking pretty good. 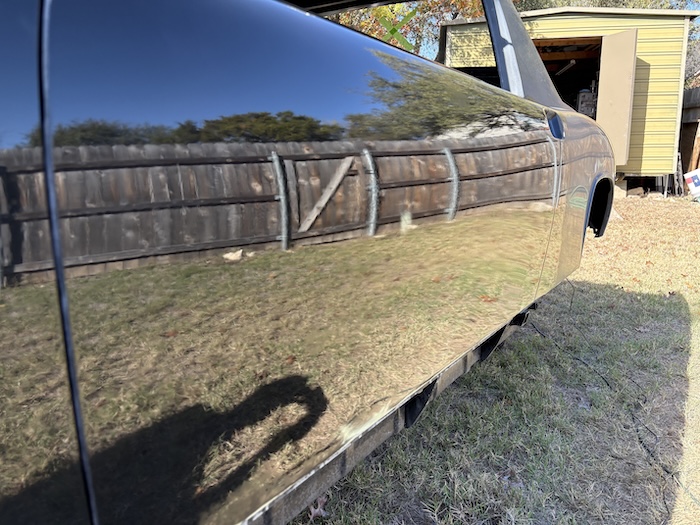 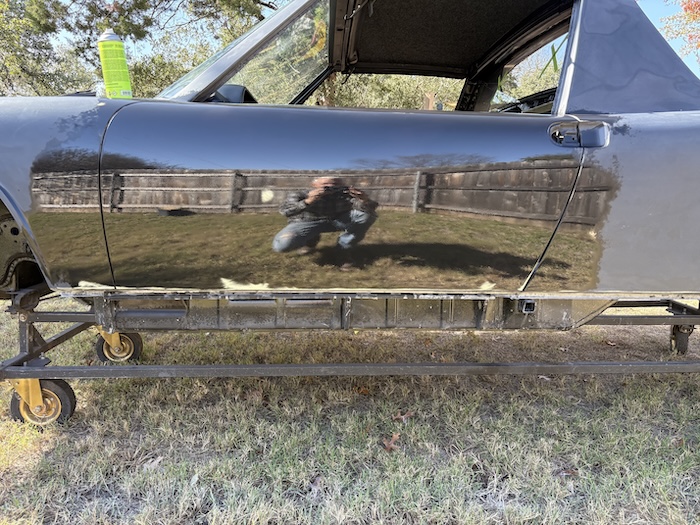 Finally, with all that work done, I re-masked the car and shot the driver side with another coat of 2K high-build primer. I ran out of daylight after I finished painting so I will pick-up on blocking things down again next time. Till then, cheers! (IMG:style_emoticons/default/beerchug.gif) 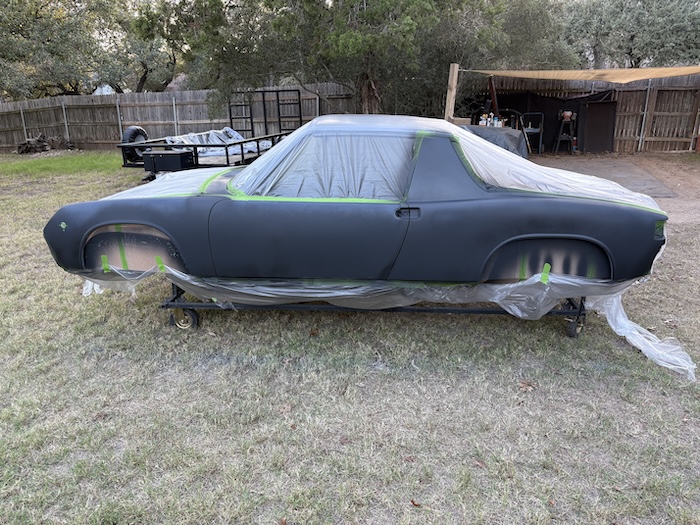 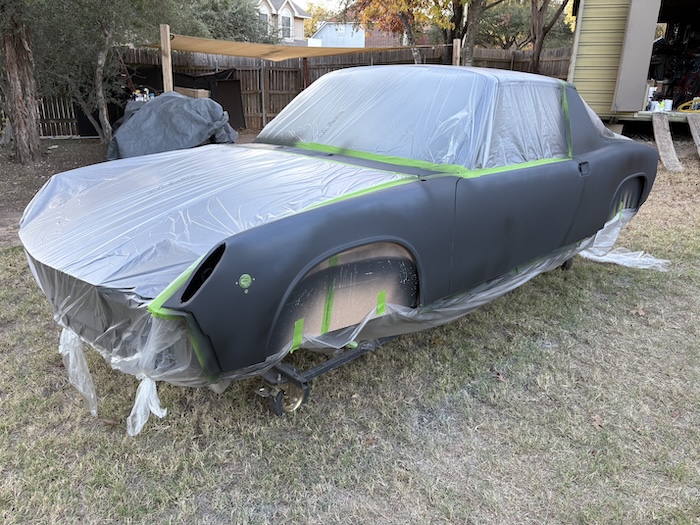 |
|
|
|
| friethmiller |
Dec 23 2025, 08:18 PM
Post
#743
|
|
Senior Member Group: Members Posts: 1,157 Joined: 10-February 19 From: Austin, TX Member No.: 22,863 Region Association: Southwest Region |
Block-sanding - Part 6 (12/22 - 12/23/2025):
Concentrating my efforts on fixing the wave in the driver side rear quarter just above the wheel arch. I decided to drop back to 220-grit and use a 12" block to attempt to flatten the entire area. First picture shows my initial pass. You can clearly see the issue(s) here (IMG:style_emoticons/default/sad.gif). Pic #2 shows results of blocking the entire area down. Better, but not enough. So, I decided to mark, prep, and add glazing putty to the lows to speed the process along (pic #3 and #4). These spots were feathered-in and the entire area was blocked again. 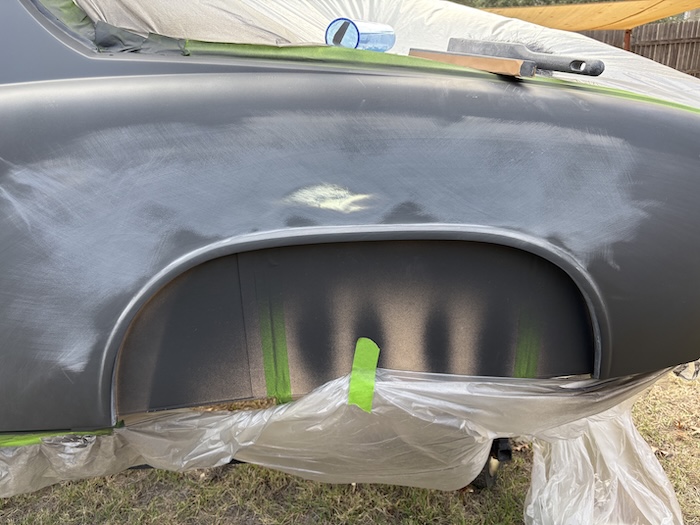  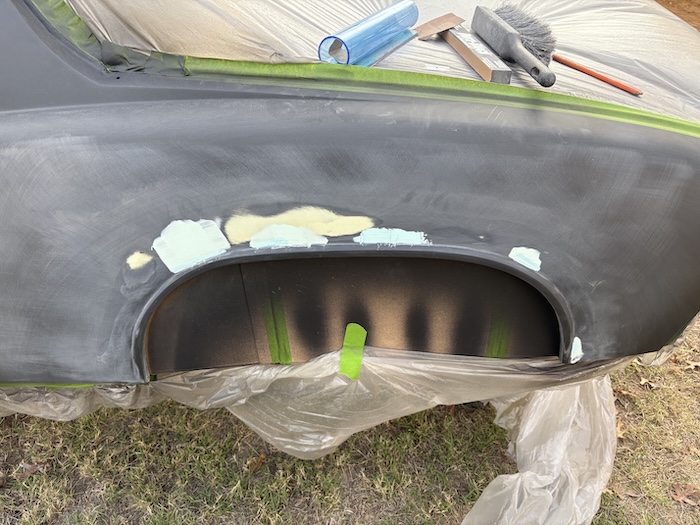 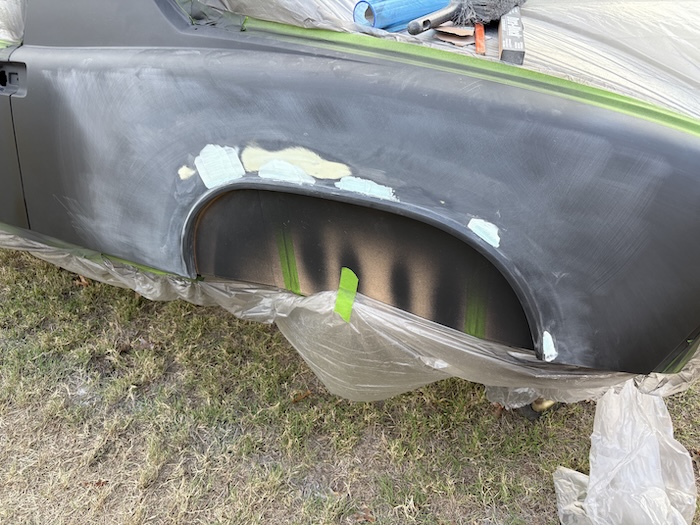 Next, I mixed up more 2K high-build and painted 3x coats of primer over the repair area (allowing 10 mins flash time b/w coats). With the added primer and the filler, I was hoping for something that I could then finally sand flat. The follow pics show the painted area with a little quick gloss applied. At this point, things looked promising. 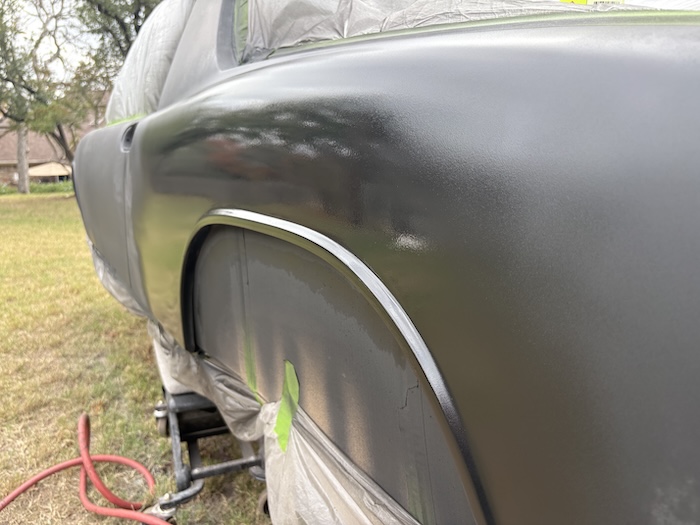 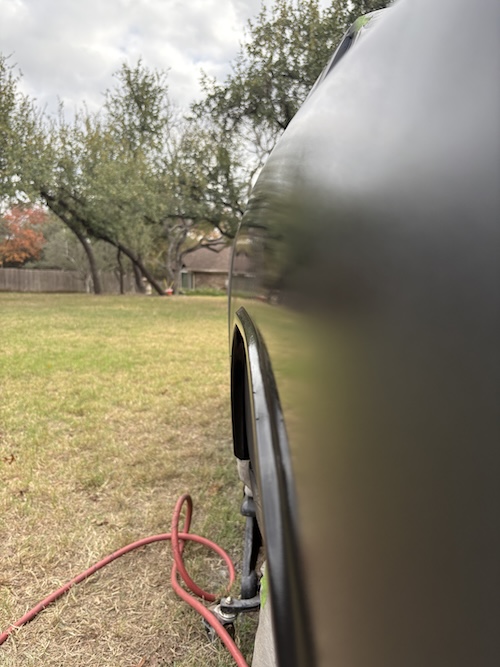 Next, I blocked the entire area with 320-grit on a 14" Dura-block, The first photo shows the area above the wheel arch is finally flat (IMG:style_emoticons/default/cheer.gif) The second photo shows the fender after the entire fender was wet-sanded to 400-grit wet.  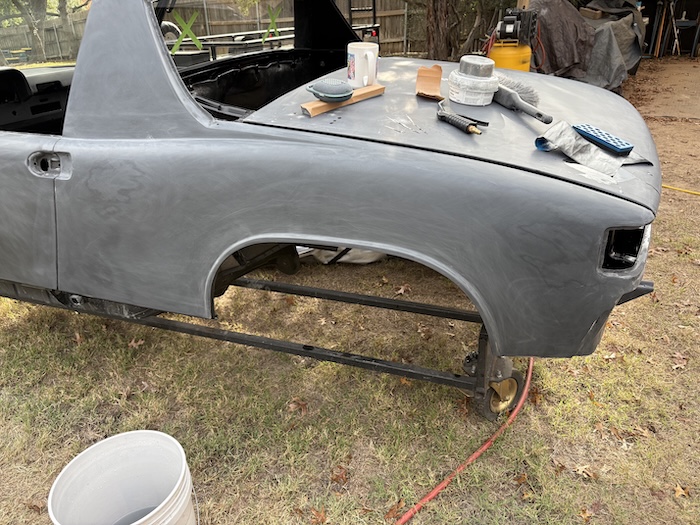 Wet Check Time! Ok, here we go. I've included a few photos of the results. I can't see any issues in this panel now. Even pulled out the PDR light, which shows the dust stuck in the gloss, and moved the reflection around from multiple angles. I'm satisfied with this fender. Merry Christmas/ Happy Holiday everybody! (IMG:style_emoticons/default/santa_smiley.gif) 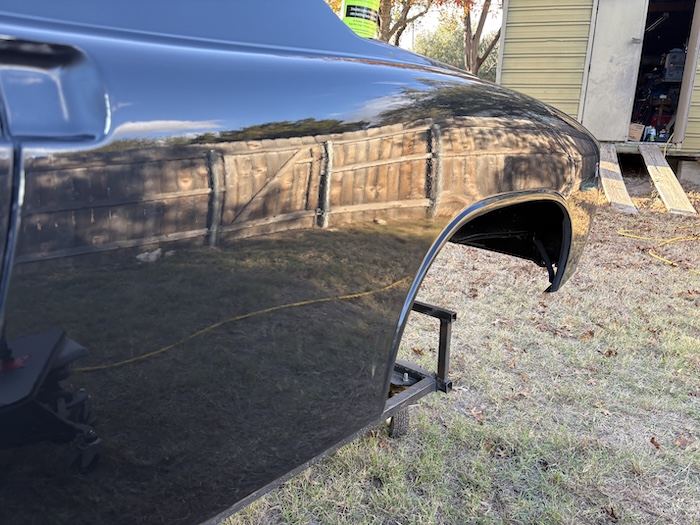 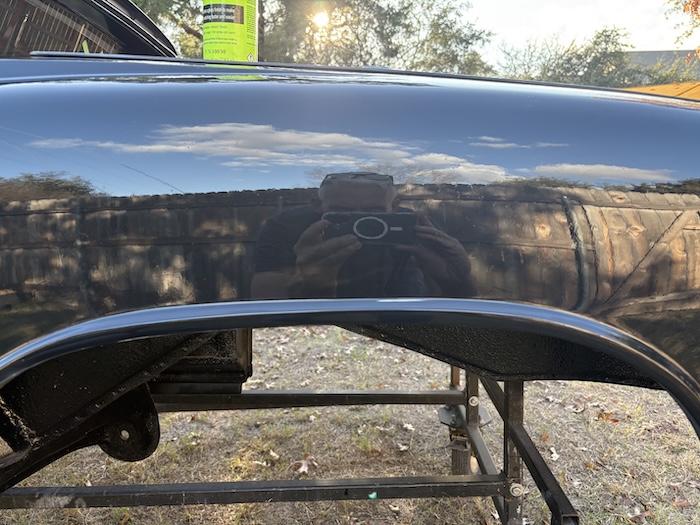 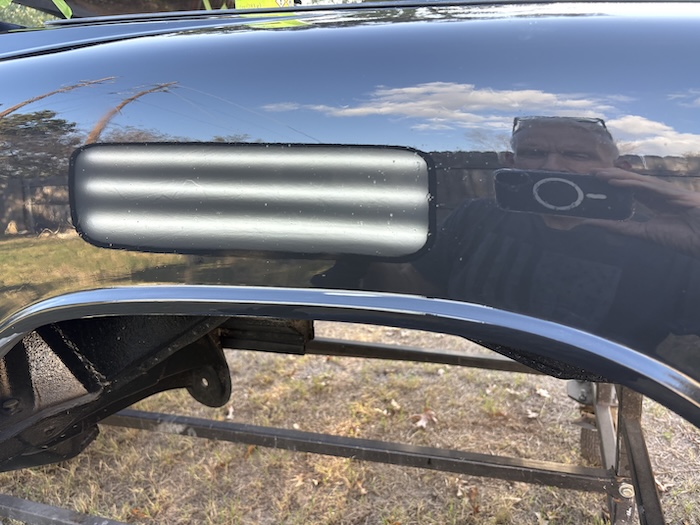 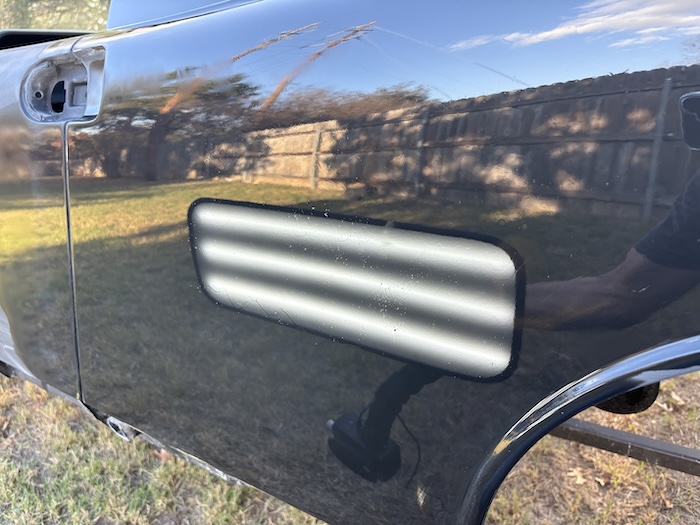 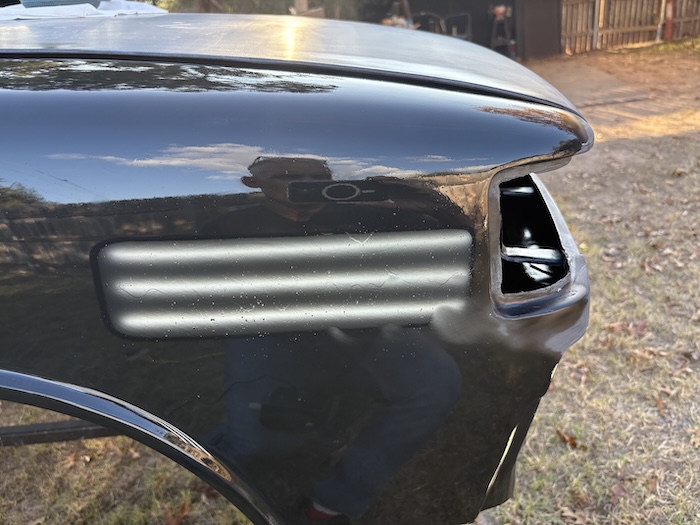  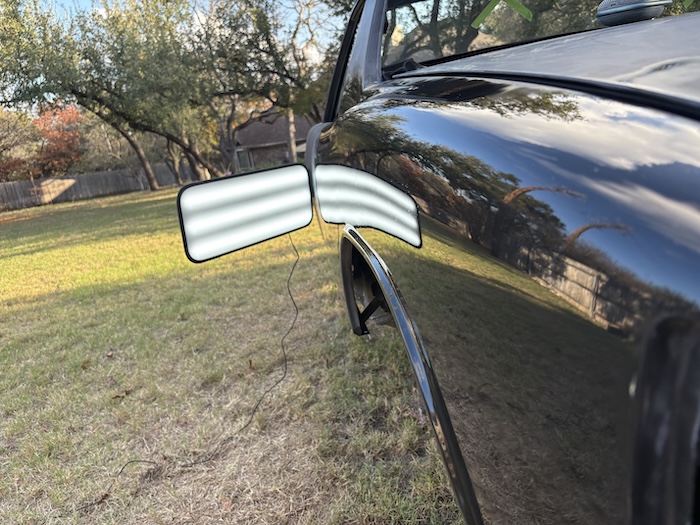 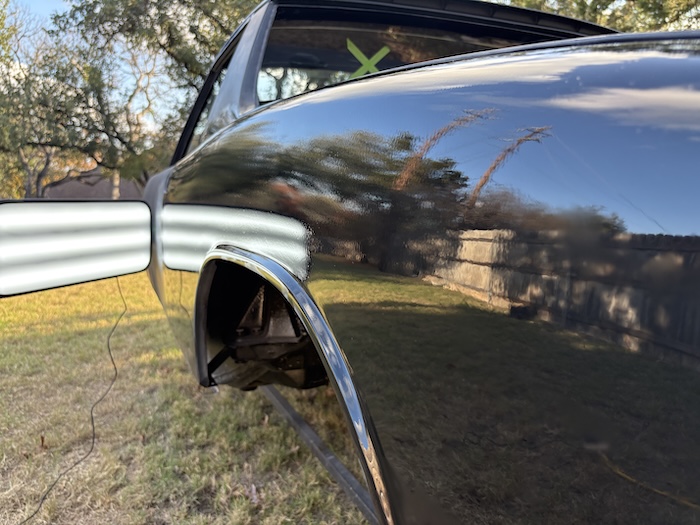 |
|
|
|
| Montreal914 |
Dec 23 2025, 08:26 PM
Post
#744
|
|
Advanced Member Group: Members Posts: 2,021 Joined: 8-August 10 From: Claremont, CA Member No.: 12,023 Region Association: Southern California |
Simply stunning! (IMG:style_emoticons/default/pray.gif)
Happy Holidays! (IMG:style_emoticons/default/santa_smiley.gif) |
|
|
|
| 930cabman |
Dec 24 2025, 06:18 AM
Post
#745
|
|
Advanced Member Group: Members Posts: 4,480 Joined: 12-November 20 From: Buffalo Member No.: 24,877 Region Association: North East States |
Must be the finish paint
Great job Fred Happy Holidays |
 |
|
| friethmiller |
Dec 24 2025, 03:57 PM
Post
#746
|
|
Senior Member Group: Members Posts: 1,157 Joined: 10-February 19 From: Austin, TX Member No.: 22,863 Region Association: Southwest Region |
QUOTE(Montreal914 @ Dec 23 2025, 08:26 PM) Simply stunning! (IMG:style_emoticons/default/pray.gif) Happy Holidays! (IMG:style_emoticons/default/santa_smiley.gif) QUOTE(930cabman @ Dec 24 2025, 06:18 AM) Must be the finish paint Great job Fred Happy Holidays Thanks, gentlemen! It just goes to show how getting the panel flat is the priority. Sanding out scratches with higher grits comes later. |
|
|
|
| burton73 |
Dec 24 2025, 06:25 PM
Post
#747
|
|
Senior member, and old dude Group: Members Posts: 3,962 Joined: 2-January 07 From: Los Angeles Member No.: 7,414 Region Association: Southern California |
Fred @friethmiller
Thank you so much for taking all of the pictures of each step on the restoration of your Bumblebee and explaining it. It's great information in the database plus people can get motivated and give it a try, everything is so clear. Not easy doing all that work and the pictures and explanation, that takes a long time You are doing a fantastic job Agan, thank you Best Bob B (IMG:style_emoticons/default/aktion035.gif) (IMG:style_emoticons/default/aktion035.gif) (IMG:style_emoticons/default/aktion035.gif) |
|
|
|
| friethmiller |
Dec 25 2025, 06:28 AM
Post
#748
|
|
Senior Member Group: Members Posts: 1,157 Joined: 10-February 19 From: Austin, TX Member No.: 22,863 Region Association: Southwest Region |
Thanks, Bob. Im just a guy trying to save a car here. If someone benefits from my successes and/or avoids one of my many missteps, it’s worth the extra time to document. Plus, I like reviewing the pictures in the morning, in my chair, with a cup of coffee. (IMG:style_emoticons/default/biggrin.gif)
|
|
|
|
| Ninja |
Dec 26 2025, 01:37 PM
Post
#749
|
|
Member Group: Members Posts: 118 Joined: 25-September 25 From: Granbury Texas Member No.: 29,004 Region Association: Southwest Region |
The reflections of the PDR light are SO straight it almost looks CGI!
Just outstanding Fred! You ARE aware you are "over-restoring"? I know who I want overseeing the bodywork "finals" on my car.... (IMG:style_emoticons/default/ninja.gif) Are you running primer over the GRASS? |
|
|
|
| wonkipop |
Dec 26 2025, 02:12 PM
Post
#750
|
|
914 Guru Group: Members Posts: 5,385 Joined: 6-May 20 From: north antarctica Member No.: 24,231 Region Association: NineFourteenerVille |
what a stunning result. (IMG:style_emoticons/default/beerchug.gif)
- and all the best for the new year while i am at it. (IMG:style_emoticons/default/beerchug.gif) some trivia. when i was researching my speculation that the LEs were originally conceived as tributes to the LM 917 (creamsicle) and the Sunoco 917 (bumblebee) i dug up the chronology of the drop out graphic porsche side stripe which first appears right around the time of the LEs in the 74 models. the drop out side stripe was intended for the 74 911 range and first appeared on the turbo mock up at the frankfurt auto show in october 73 as well as a range of 911s specially prepared for the stand. the 914s were going to get something else as a side stripe (jeff bowlsby has all those early prototype 914 can am versions). once porsche dropped the can am tribute idea after they withdrew from the can am series when the 917 was banned right around that tine in late 73 they decided to re-arrange things. the 911 range kept the cursive script side strioes they had been using on the carreras and the drop out reverse graphic went across to the 914s instead. my everyday 74 1.8 is likely amongst the earliest to get the new side stripes - it was delivered in april 74 (built jan 74). the LEs start being built a month later. anything built and delivered for 74 before those dates got the earlier style positive side stripes. funny co-incidence back in the 90s - my humble 914 was parked side by side with the turbo prototype in a back alley in melbourne. the turbo prototype (mock up car) ended up here of all places. belonged to a guy who bought it off the aus distributor who had picked it up from the factory back in the 70s. it had a non turbo engine in it, the distributor used it for racing for a time then sold it to the guy in melb. he was a former president of the porsche club in victoria and a good mate of my old friend who owned the crayfords rhd 73 2.0 along with the original assessment 914/6 that had come to aus way back in the very early 70s. i didn't know it at the time but the side stripes were a direct line between that silver 911 and my eye wateringly powerful 1.8 with its go faster stripes. (IMG:style_emoticons/default/biggrin.gif) |
|
|
|
| _stickykitty79_ |
Dec 26 2025, 02:47 PM
Post
#751
|
|
Newbie Group: Members Posts: 32 Joined: 20-August 24 From: socal Member No.: 28,302 Region Association: None |
this thread is so great. im using it as motivation for my resto as well
|
|
|
|
| friethmiller |
Dec 26 2025, 03:27 PM
Post
#752
|
|
Senior Member Group: Members Posts: 1,157 Joined: 10-February 19 From: Austin, TX Member No.: 22,863 Region Association: Southwest Region |
QUOTE(Ninja @ Dec 26 2025, 01:37 PM) The reflections of the PDR light are SO straight it almost looks CGI! Just outstanding Fred! You ARE aware you are "over-restoring"? I know who I want overseeing the bodywork "finals" on my car.... (IMG:style_emoticons/default/ninja.gif) Are you running primer over the GRASS? Thanks! Yes, I’m spotting primer on right there in the grass. The car sits pretty high on the cart which helps. |
|
|
|
| friethmiller |
Dec 26 2025, 03:38 PM
Post
#753
|
|
Senior Member Group: Members Posts: 1,157 Joined: 10-February 19 From: Austin, TX Member No.: 22,863 Region Association: Southwest Region |
QUOTE(wonkipop @ Dec 26 2025, 02:12 PM) … Interesting…Thanks for the info. I’ve already purchased the negative yellow PORSCHE stripe. I was thinking about having the corn flower yellow paint matched to the sticker color. Not sure if that would be the best way to go or not. I’ve seen a few bumblebees where the “yellows” don’t match. Trying to avoid that if possible. |
|
|
|
| friethmiller |
Dec 26 2025, 03:41 PM
Post
#754
|
|
Senior Member Group: Members Posts: 1,157 Joined: 10-February 19 From: Austin, TX Member No.: 22,863 Region Association: Southwest Region |
QUOTE(_stickykitty79_ @ Dec 26 2025, 02:47 PM) this thread is so great. im using it as motivation for my resto as well Awesome! (IMG:style_emoticons/default/biggrin.gif) |
|
|
|
| friethmiller |
Jan 3 2026, 08:35 PM
Post
#755
|
|
Senior Member Group: Members Posts: 1,157 Joined: 10-February 19 From: Austin, TX Member No.: 22,863 Region Association: Southwest Region |
Hood Sanding - Part 1 (1/1/2026):
[New Years Day] (IMG:style_emoticons/default/cheer.gif) After getting most of the main body of the car completed last time, I thought I'd flip over and get the hoods ready to go. First up was the front hood starting with 220-grit dry just to make sure the shape was correct and the body work was flat. I'm of course using white guide coat here. Dry sanding is kind of a pain at this grit - the paper clogs easily and you have to constantly brush the panel and the sanding block. I do prefer this method for straightening versus wet sanding to remove scratches. 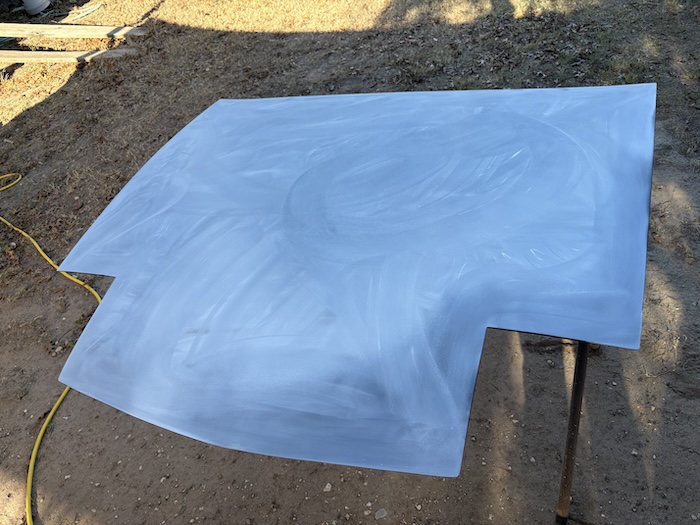 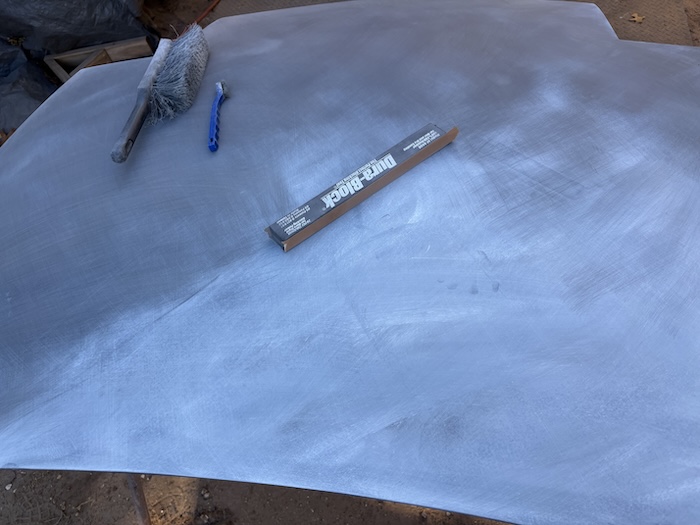 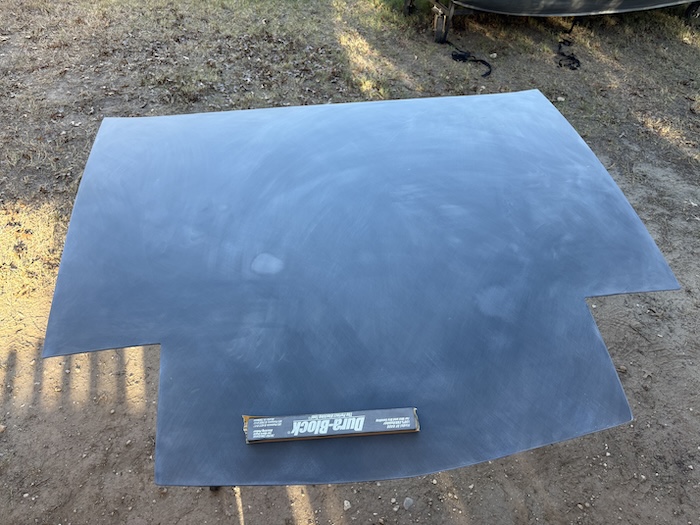 Next up was 320-grit - first dry and then finished up with 320 wet. First photo shows the guide coat going on again prior to sanding. 2nd pic shows the end result. At this point I decided with the filler showing a bit here and there, it would probably be best to shoot additional primer [on Saturday] before progressing an further. 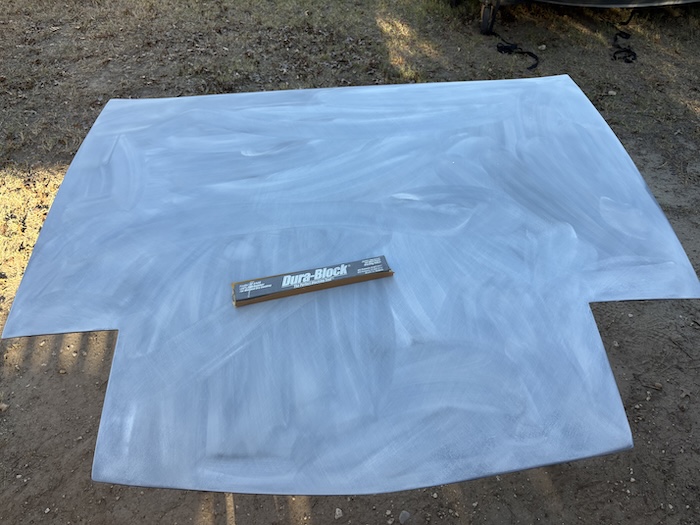 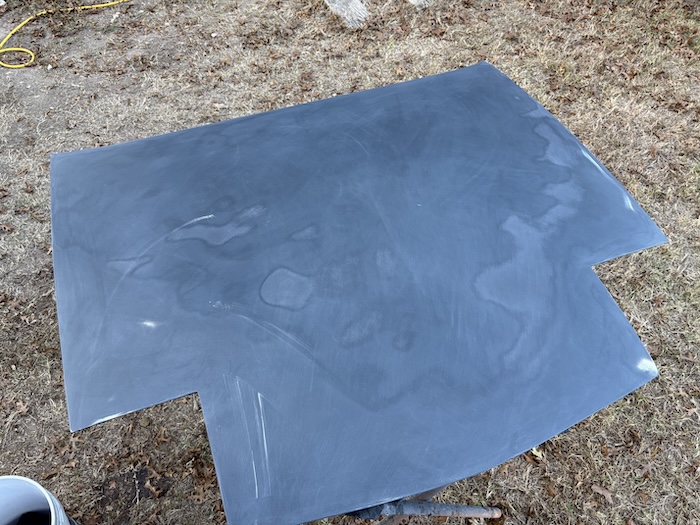 Snapped this photo of the rear trunk being wet-sanded with 320-grit. This panel is already flat and this was more about removing the 220 scratches. 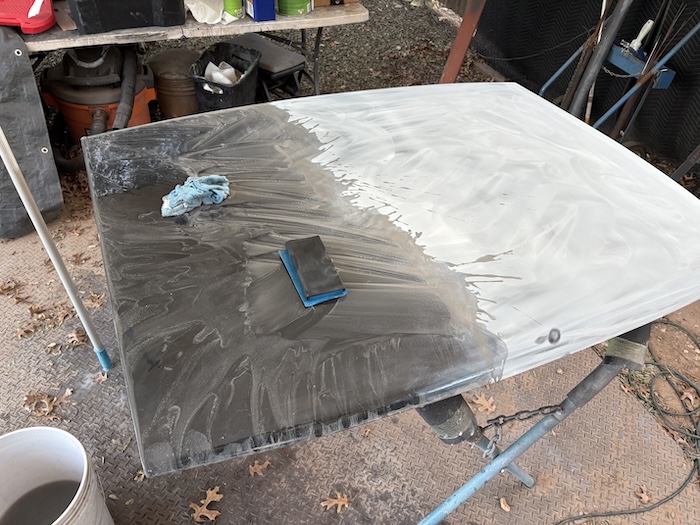 My next post will show the hoods as they progress to 400 and then finally to 600-grit. Cheers! (IMG:style_emoticons/default/beerchug.gif) |
|
|
|
| bkrantz |
Jan 3 2026, 08:45 PM
Post
#756
|
|
914 Guru Group: Members Posts: 8,593 Joined: 3-August 19 From: SW Colorado Member No.: 23,343 Region Association: Rocky Mountains |
Sanding--finally a job really suited to outdoors!
|
|
|
|
| friethmiller |
Jan 3 2026, 09:44 PM
Post
#757
|
|
Senior Member Group: Members Posts: 1,157 Joined: 10-February 19 From: Austin, TX Member No.: 22,863 Region Association: Southwest Region |
Hood Sanding - Part 2 (1/3/2026):
First up today was priming the hoods. Here I'm using the 2K high-build primer as a sealer. The difference is paint thickness. I added in 1 part reducer with the paint and activator. So, a 4:1:1 mix. The TDS (Technical Data Sheet) recommends using a 1.3 or 1.4mm paint gun tip and allows for sanding starting at 400-grit. This is perfect since my hoods were at 320. Pic #2 shows the panels prior to 1x coat of sealer. Note: I spent a good bit of time filling in pin holes before painting. 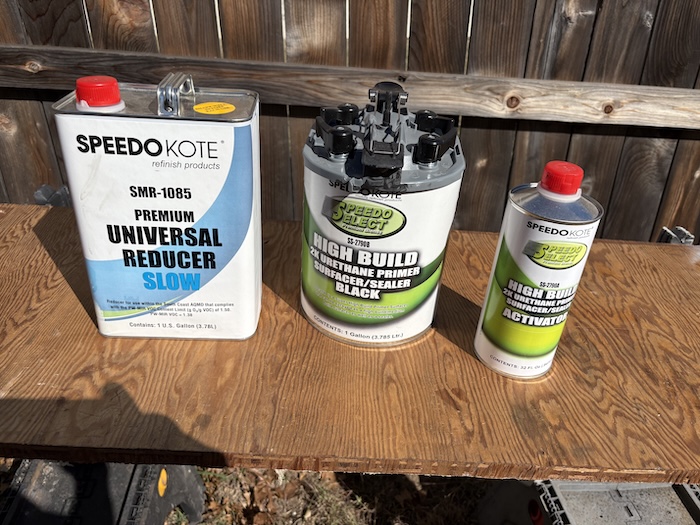 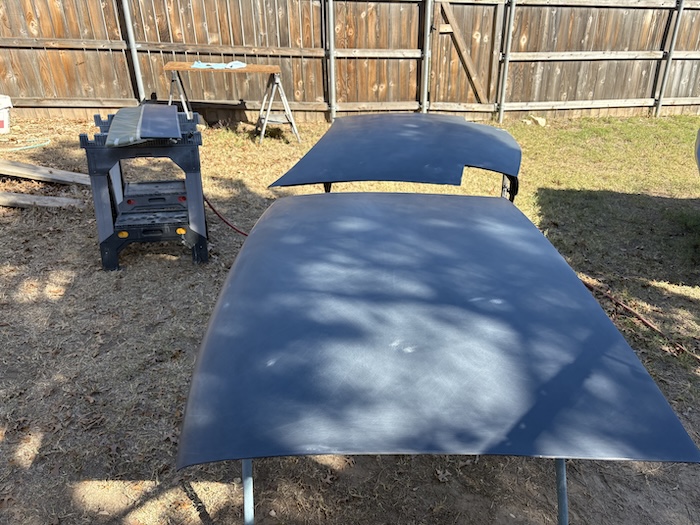 With a required 90 minute dry-time, I decided to hit the panels on the main body of the car that we're still sitting at 400-grit. After applying guide coat, I "finish sanded" these areas with 600-grit. Nice to get that done!  With the panels dry, I was ready to start the final sanding process. The following photos show the starting point. These hoods, light covers, and eyebrows represent the remaining parts of the car that will be painted black. 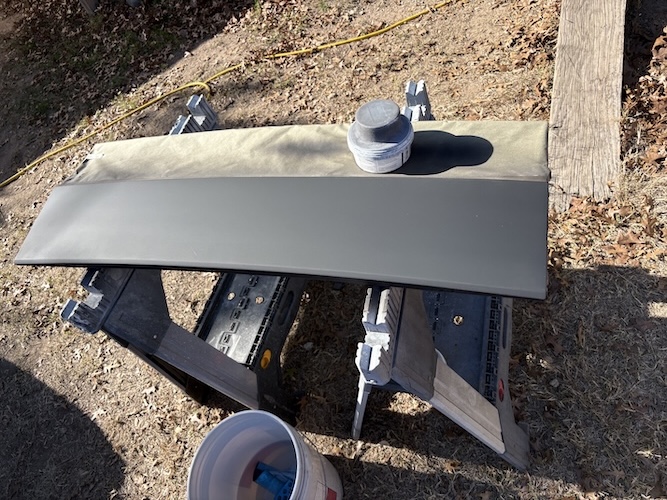 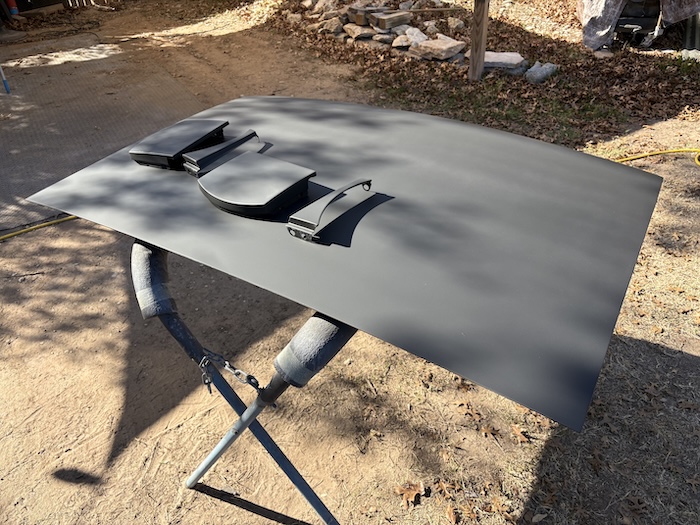 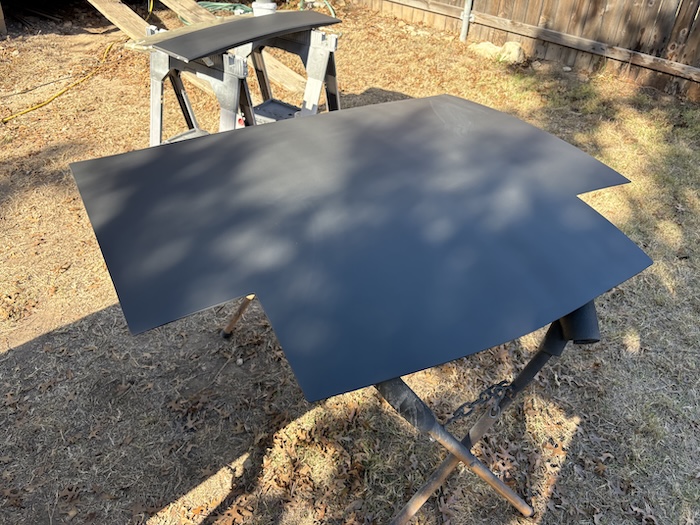 Again, using guide coat I started on the engine hood. The second photo here show how the guide coat is used to determine "when" the area is sanded. Keeping things wet and clear is the key. 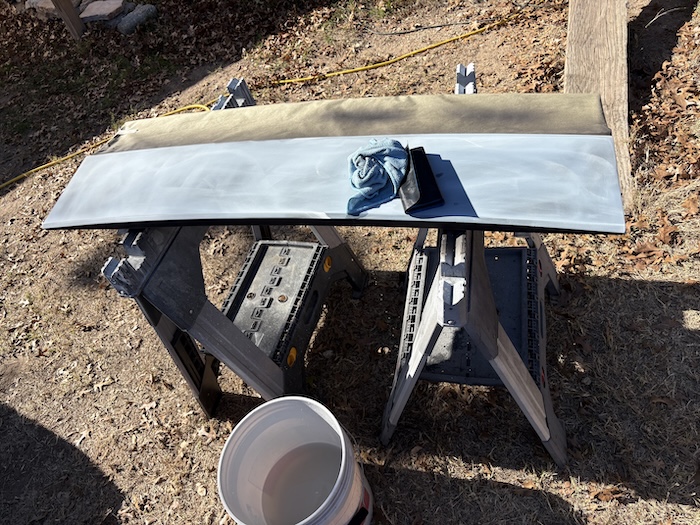 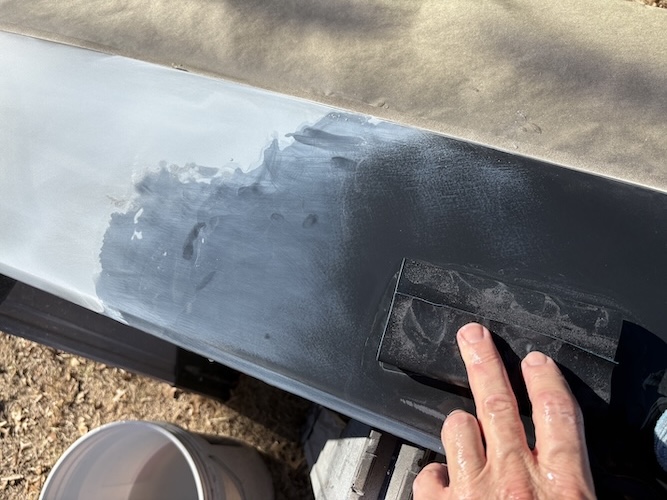 Here's a few additional shots of wet sanding the front hood and rear trunk. The process is a little messy but there's no dust and the results make it worthwhile. (IMG:style_emoticons/default/drooley.gif) 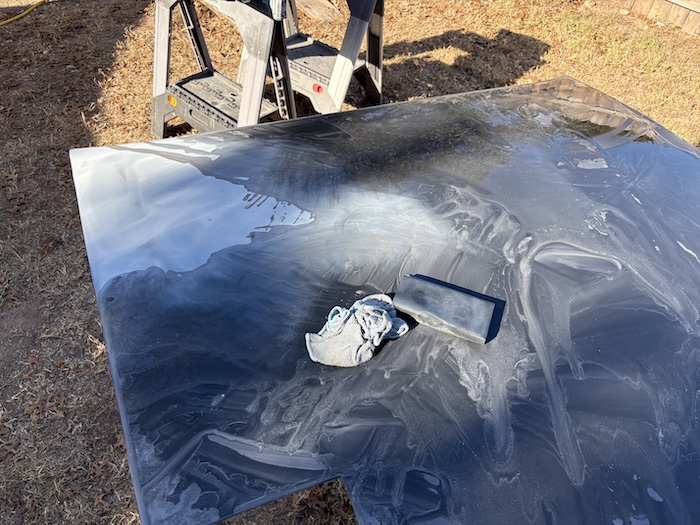 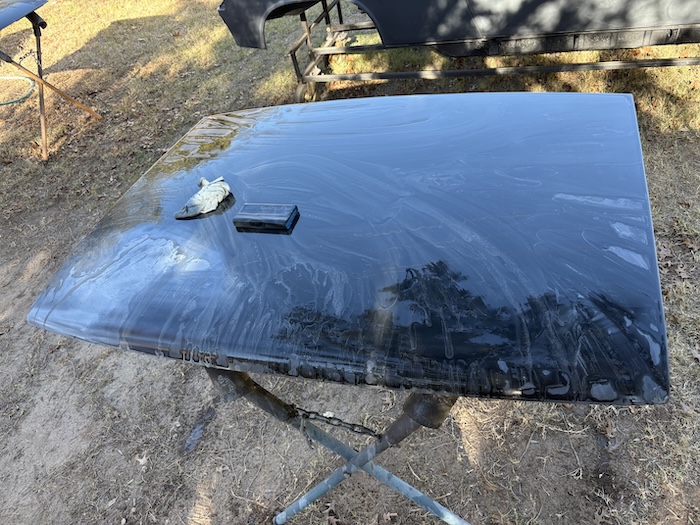 With everything at 400, it was time for the "final sand" at 600-grit. I used both the 4" D/A with an interface pad and a 5" soft block to get the job done. Using guide coat yet again, I sand out all the 400-grit scratches. 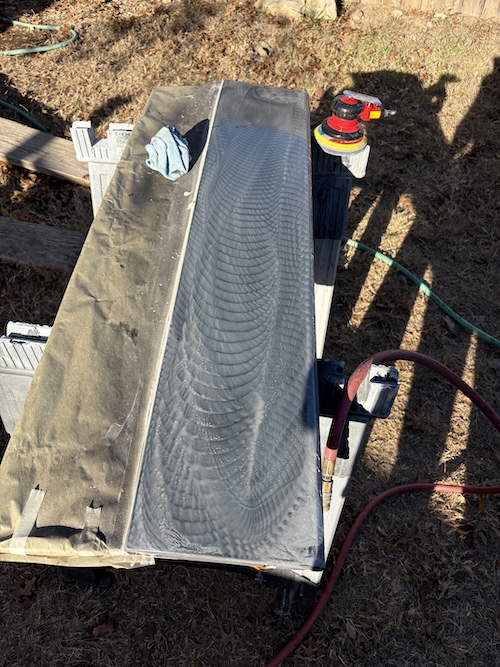 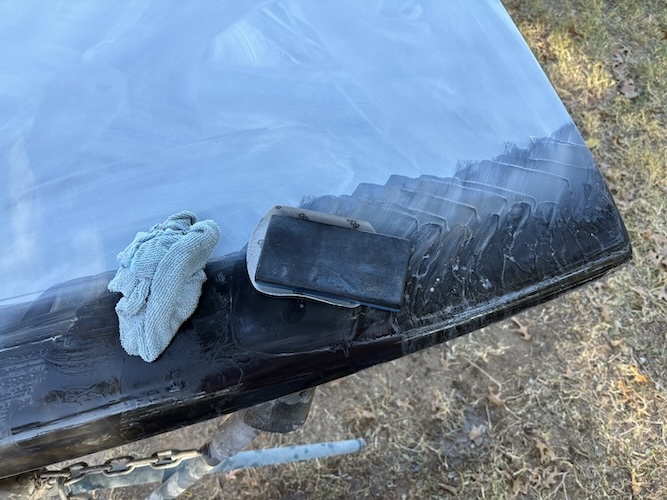  After finish sanding all the panels were cleaned with soap and water. 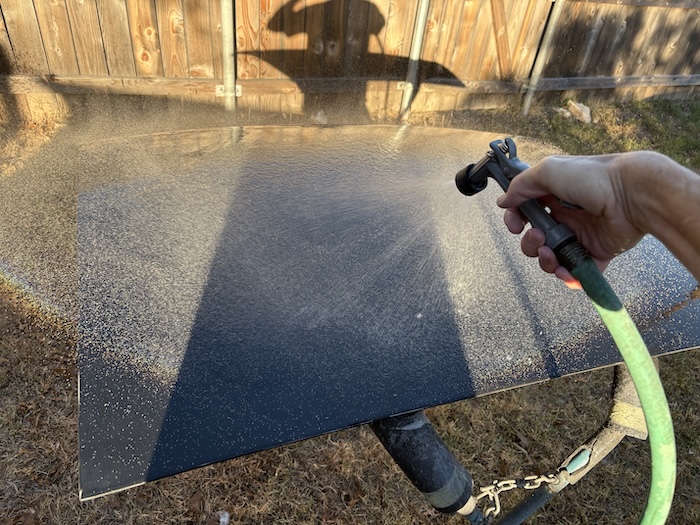 Wet Check Time! Here's a few pics of the panels with some quick gloss. I was loosing light fast so I didn't have much time to properly set up the PDR light. Things looked pretty straight but I may need to check again tomorrow. Enjoy! (IMG:style_emoticons/default/beer.gif) 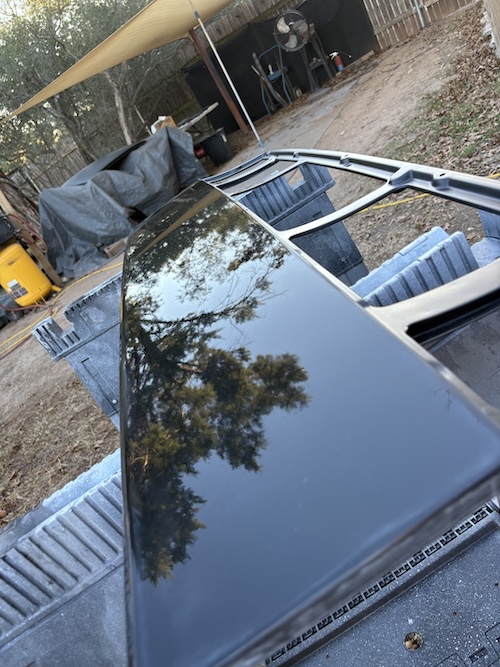 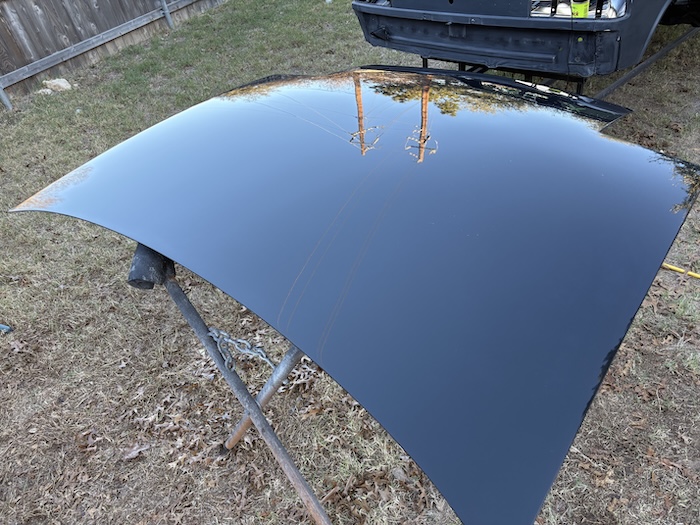  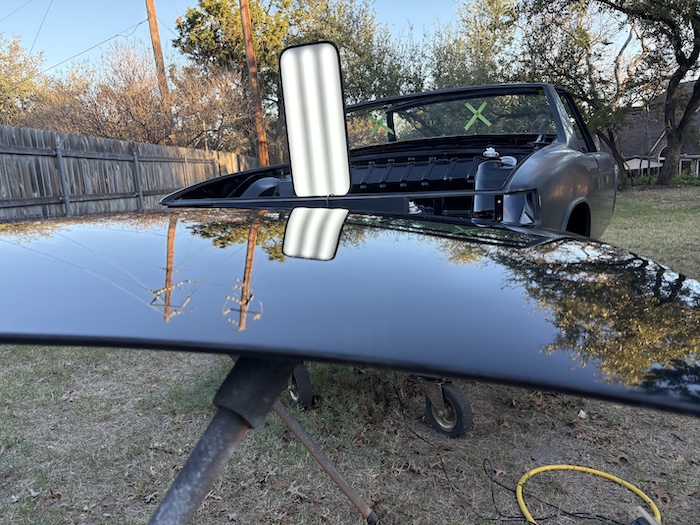 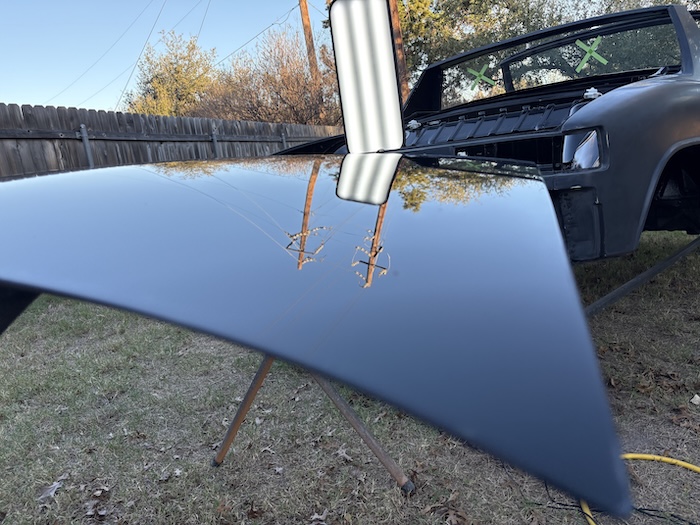 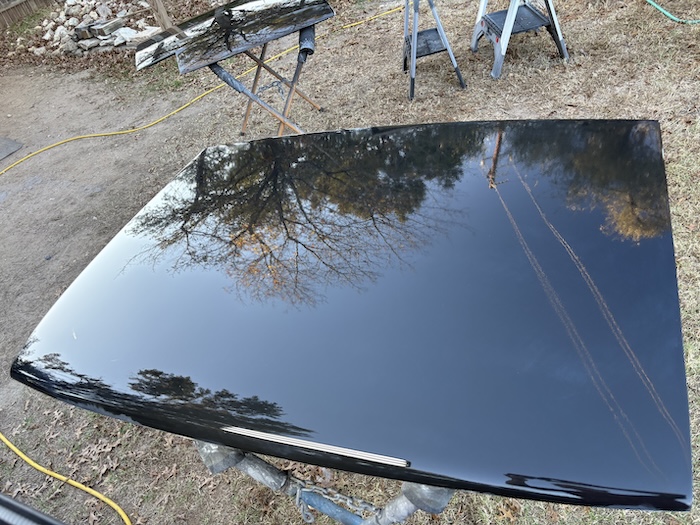 |
|
|
|
| slowrodent |
Jan 4 2026, 08:44 AM
Post
#758
|
|
Member Group: Members Posts: 221 Joined: 29-February 20 From: Tucson/Oro Valley Member No.: 23,981 Region Association: Southwest Region |
Dang! Those are some straight panels! Considering your process, I'm not surprised!! (IMG:style_emoticons/default/smilie_pokal.gif)
|
|
|
|
| Cairo94507 |
Jan 4 2026, 08:47 AM
Post
#759
|
|
Michael Group: Members Posts: 10,566 Joined: 1-November 08 From: Auburn, CA Member No.: 9,712 Region Association: Northern California |
(IMG:style_emoticons/default/beerchug.gif) Amazing Fred.
|
|
|
|
| friethmiller |
Jan 4 2026, 09:52 AM
Post
#760
|
|
Senior Member Group: Members Posts: 1,157 Joined: 10-February 19 From: Austin, TX Member No.: 22,863 Region Association: Southwest Region |
QUOTE(bkrantz @ Jan 3 2026, 08:45 PM) Sanding--finally a job really suited to outdoors! Yeah! No kidding! (IMG:style_emoticons/default/biggrin.gif) |
|
|
|
|
5 User(s) are reading this topic (3 Guests and 0 Anonymous Users)
2 Members: FlacaProductions, Aayala

|
Lo-Fi Version | Time is now: 8th February 2026 - 11:39 AM |
Invision Power Board
v9.1.4 © 2026 IPS, Inc.