|
|
|
Porsche, and the Porsche crest are registered trademarks of Dr. Ing. h.c. F. Porsche AG.
This site is not affiliated with Porsche in any way. Its only purpose is to provide an online forum for car enthusiasts. All other trademarks are property of their respective owners. |
|
|

  |

| seanpaulmc |
 Oct 27 2024, 04:28 PM Oct 27 2024, 04:28 PM
Post
#21
|
|
Member  Group: Members Posts: 455 Joined: 6-December 16 From: Orlando, FL Member No.: 20,649 Region Association: South East States |
There’s more there to cut out and replace than you think. Ask me how I know?
It’s rewarding though. Looks like a nice one to get back on the road. You will definitely need to do door braces and fix those areas in the longs. I’ve done a lot of the same repairs on my project. I may even have some of the metal you’ll need. You’re in good hands with Fred looking over your shoulder. You may want to consider adding a stiffening kit to the longs for added piece of mind. Take a look at my thread, you can find it with my name seanpaulmc, and you can see the same repair areas. I was trying to minimize how much I cut out, not always successful, but Fred is on a different level with his LE resurrection. Have fun. Best, Sean |
   |

 
|
| didenpx |
Oct 27 2024, 05:18 PM
Post
#22
|
|
Member Group: Members Posts: 127 Joined: 1-September 23 From: Usa Member No.: 27,556 Region Association: North East States |
Sean, I've referenced your thread a few times to get an idea what sorts of things to anticipate.
Can't wait to peel off those inner rockers and see what I'm dealing with! Probably looking at sometime in December. Maybe I can make an Advents calendar out of the rusty patches that I cut out. Paul |
|
|
|
| friethmiller |
Oct 27 2024, 06:41 PM
Post
#23
|
|
Senior Member Group: Members Posts: 1,319 Joined: 10-February 19 From: Austin, TX Member No.: 22,863 Region Association: Southwest Region |
@didenpx - yep gotya! Thanks for the additional pics! I'd always assume the P.O. did a sh*tty job until you can prove otherwise (IMG:style_emoticons/default/biggrin.gif). Look, you've got a good car here. It's going to be some work but its totally savable. I'd brace the doors and start on the passenger side longitudinal. Be prepared to cut the front of the rear fender out. It'll give you better access. Make sure you cut high enough to get to the hell hole area. My advice is to focus on just the longitudinal / jack point area, fix it up and then attack the hell hole. If needed, do the suspension consoles after that. Replace the lower fender and then move to the other side and repeat the process. It's all up to you and how you decide to go. That's the best part of YOUR restoration. Remember, don't get overwhelmed. As they say... “Eat the elephant one bite at a time”.
Having the car up and up at a 45 degree angle is where I like to have the car most of the time. If you want to know more about how to make a rotisserie let me know. I have built two in the last 6 years (IMG:style_emoticons/default/blink.gif) |
|
|
|
| didenpx |
Jan 4 2025, 09:37 AM
Post
#24
|
|
Member Group: Members Posts: 127 Joined: 1-September 23 From: Usa Member No.: 27,556 Region Association: North East States |
An update on the project….but first an admission that my description of the work at hand as “trivial” in comparison to a previous Volvo project was a bit optimistic.
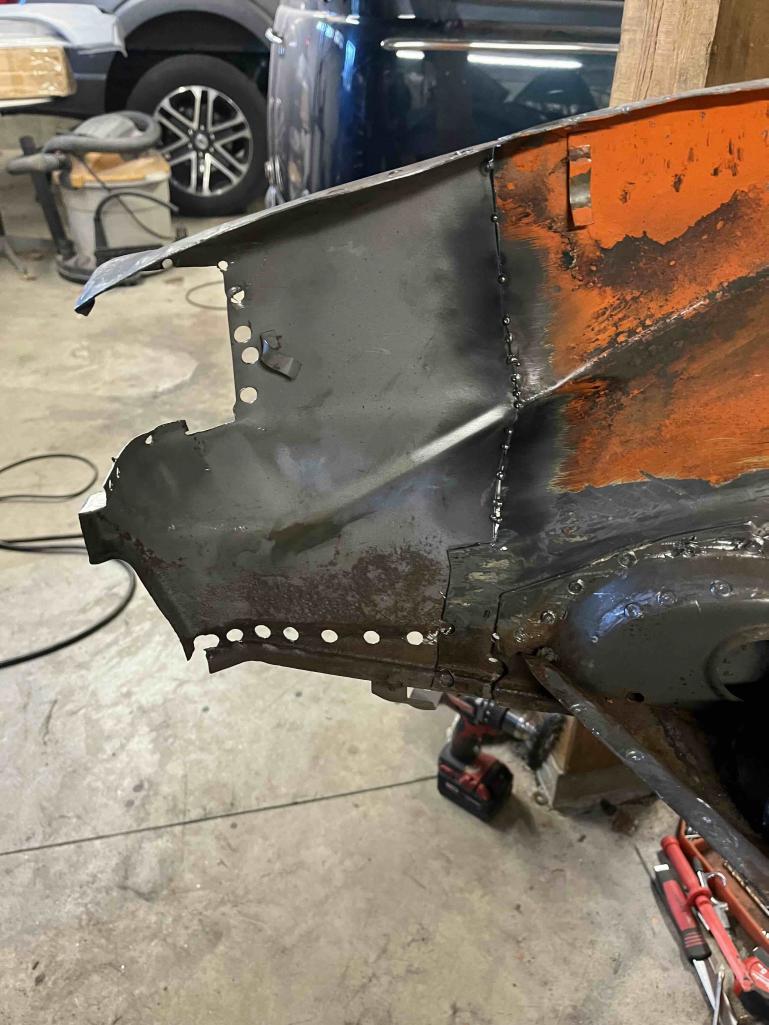
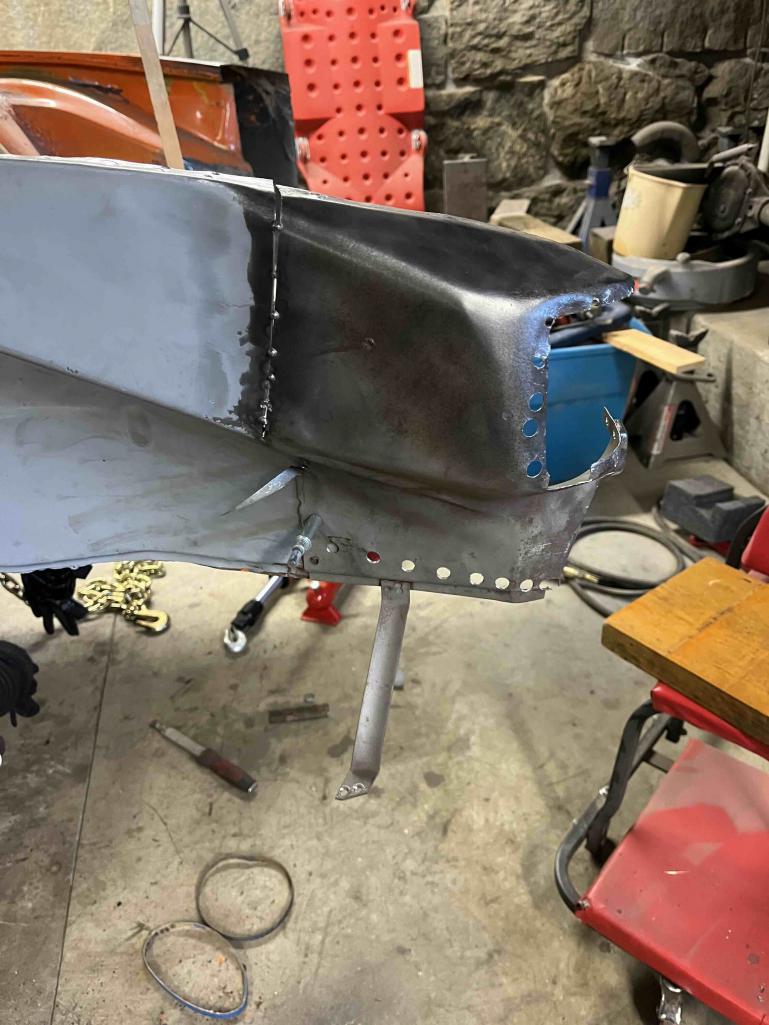
Nevertheless the car is structurally sound, though needing a lot of attention in LOTS AND LOTS of different places. I re-awakened my welding “skills” by concentrating on the nose section first and that’s done-ish until body work begins. 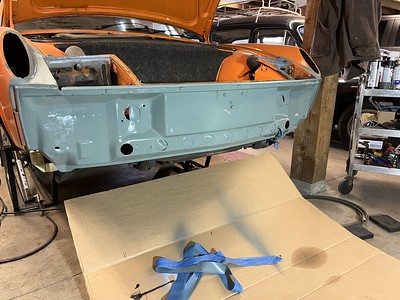 Next I dug in on the LH longitudinal. Initially I was thinking I could get away with simply patching, but after cutting it open a bit and getting a better look at the inside I decided to open it up from aft of the A-pillar backwards. I used Tangerine Racing chassis braces to stabilize the structure. Sections of the inner rocker, especially the section behind where the jacking point used to be, were badly compromised, but inside the inner long section was not too bad. there was some surface rust and scale on the bottom of this section which I cleaned up and then sealed. 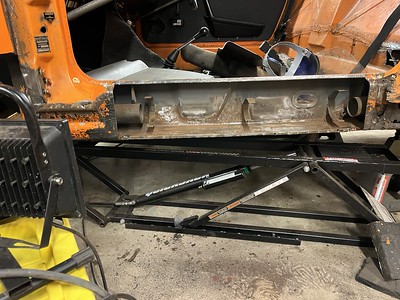 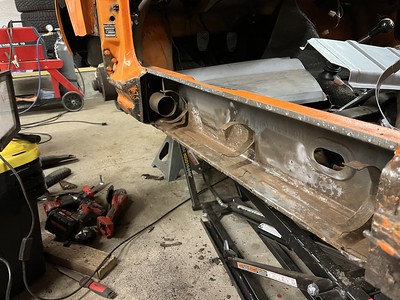 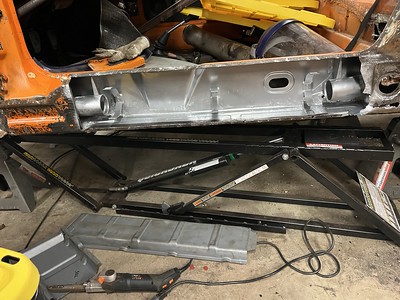 After I got the middle part of the long sorted out I sectioned out the piece that goes behind the jack point (the part with the two circular holes, into one of which the jacking box section protrudes). This was weak/rotted away on the lower section below the holes so I patched it up with 16 gauge material. I also found some rot on the interior the part of the long that starts kicking up and inward toward the engine, so I fabricated a stiffening piece and welded that in before priming everything. I also used Eastwood frame sealer to treat the upper portions of the interior of the long in the trunk/engine bay area. Hopefully this will stabilize things for as long as it will be relevant to me. Once this was done I welded back in the patched section that reinforces the area behind the jacking point and then welded in the aft section of the inner rocker. The most time consuming part came next; fabricating a patch for the inner rocker skin over the rear part of the long where it starts to kick up/in and covering the area where the jacking point attaches. I ultimately used 20 gauge steel which I cut and formed to fit the shape of the area. Where the jacking box section goes through the skin I spot welded in a piece of 16 gauge backer. This repair section was plug welded to the pieced behind and spot welded to the flange of the inner long section. 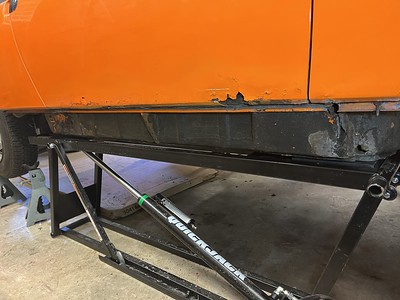  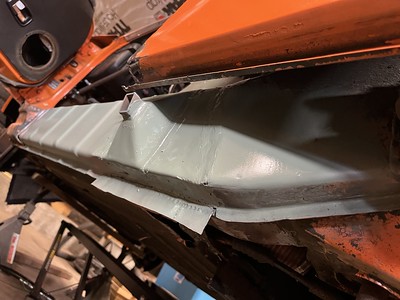 Now I’m moving on to the front section of the long including the bottom part of the A-pillar. Got that all peeled apart and the inner part of the long here looks solid with just surface rust and scale which I will Ospho and then seal before closing things back up. 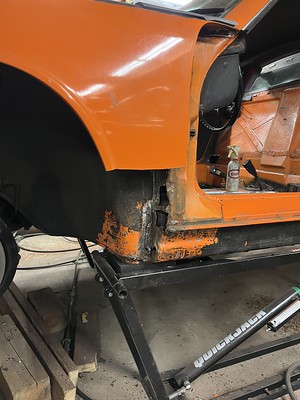 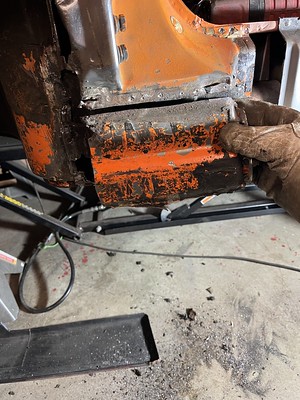 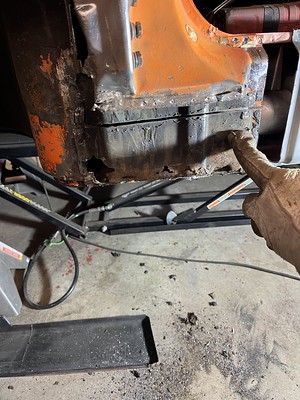 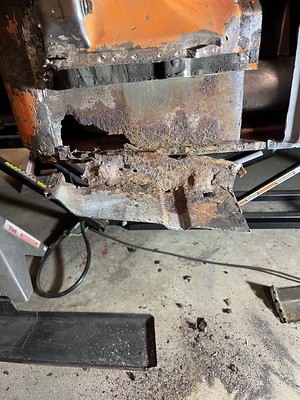  After this it’s on to patching up the front fender and then back to the sail panel rot and replacing the LH door jamb. There’s so much more yet to do that it seems pretty daunting….thank goodness for all of the Porsche resurrection videos on Youtube! When it all seems to much I watch one of those and think to myself “one patch at a time.” Still hoping to have all welding done and (stretch goal) body work complete by the time the salt is off the roads in New England. |
|
|
|
| didenpx |
Apr 28 2025, 05:55 AM
Post
#25
|
|
Member Group: Members Posts: 127 Joined: 1-September 23 From: Usa Member No.: 27,556 Region Association: North East States |
OK, the dream of a quick refresh and recommissioning is dead and this has become the full blown restoration project that I swore it wouldn't. Readers probably are not surprised.
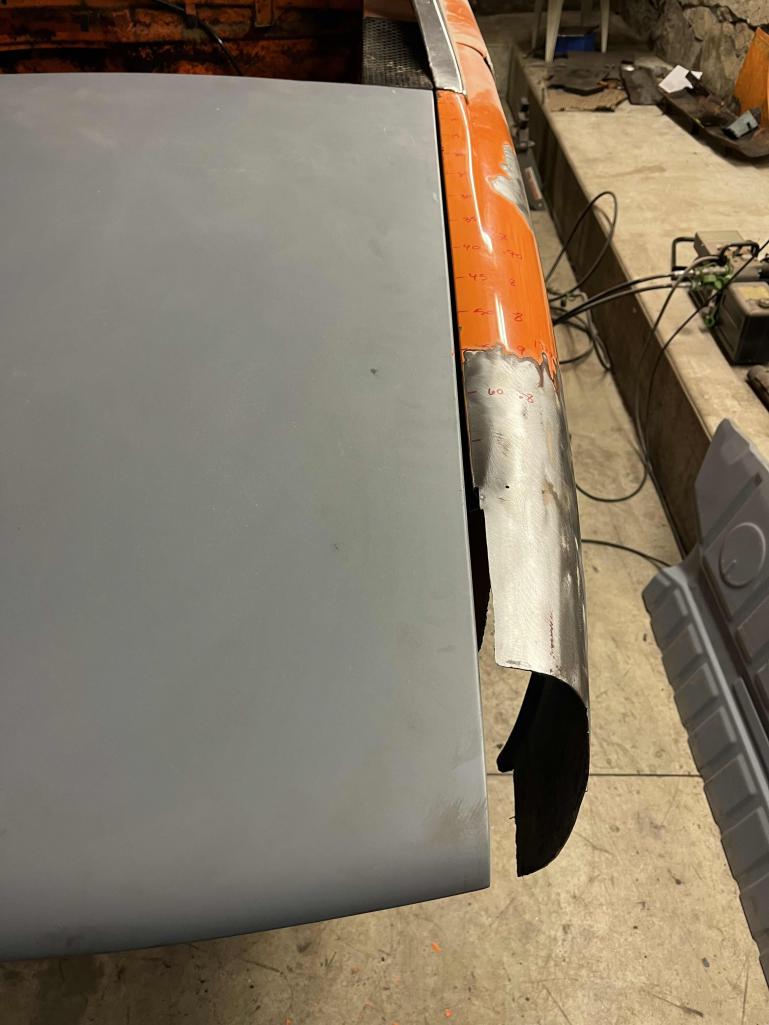
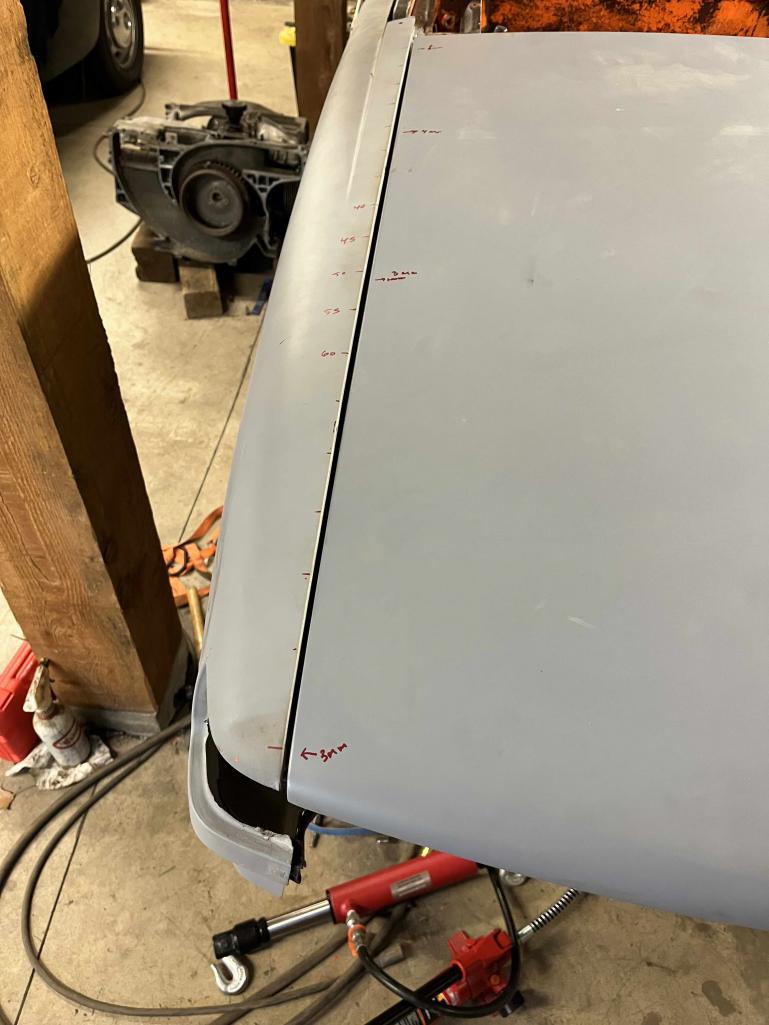
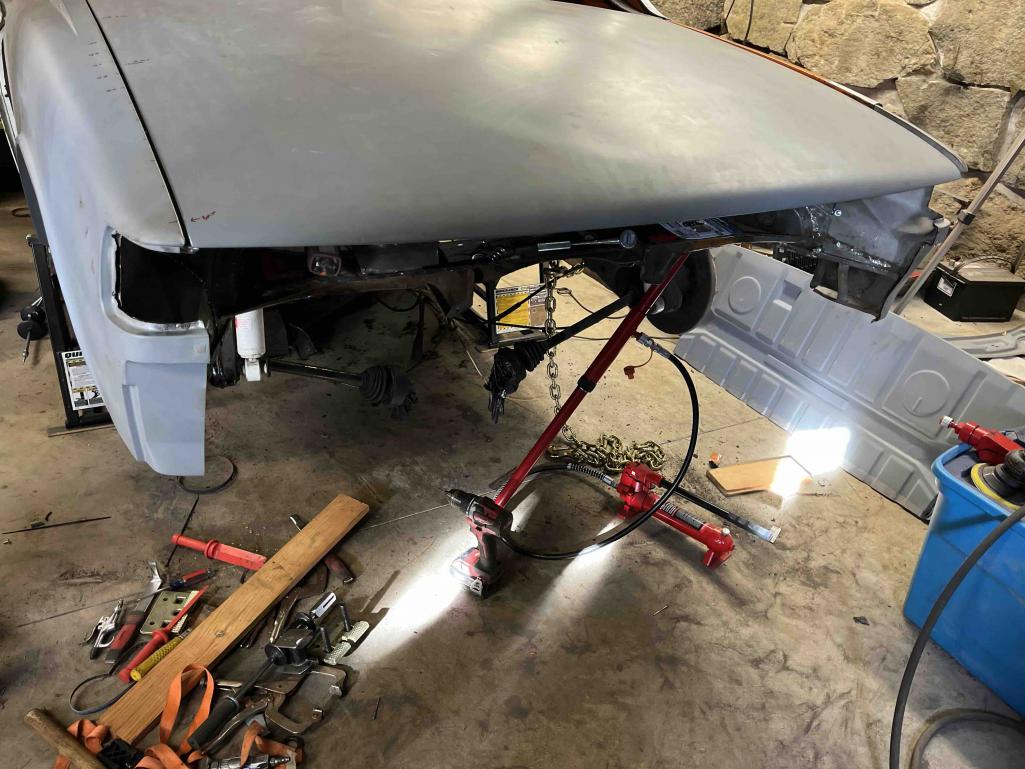
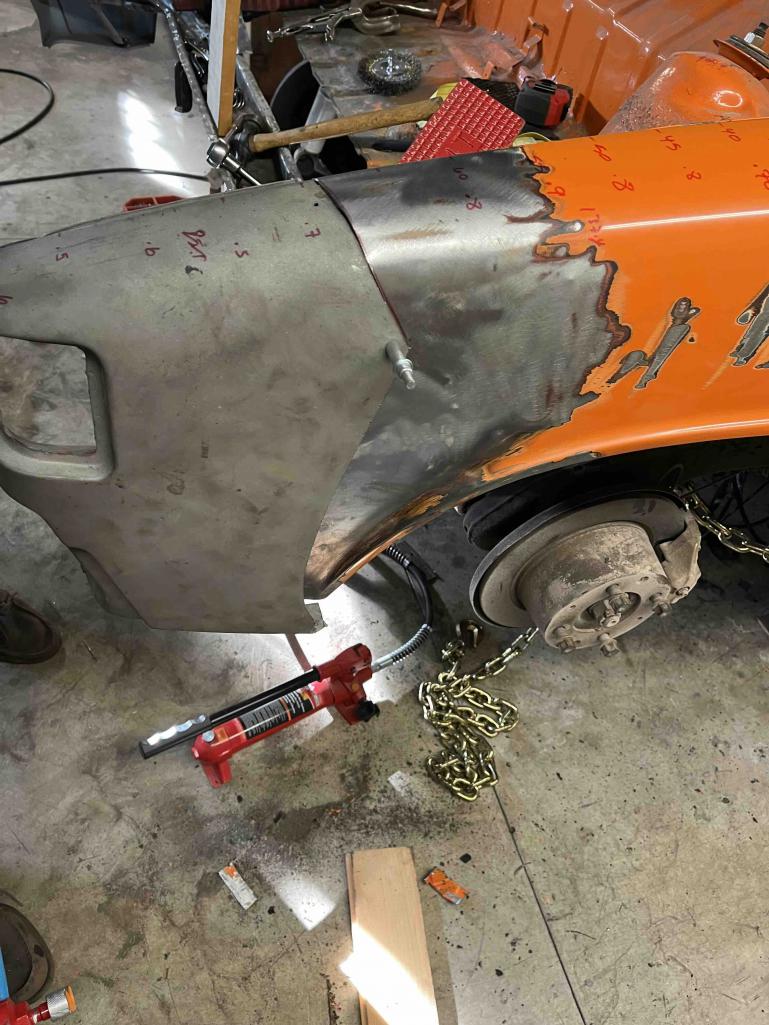
My intent all along was to leave the drivetrain in the car as it was running and driving. My logic was that I could fix what needed fixing on the body and get it back on the road quicker. That began to go out the window once I found that an old rear impact had gone so far as to start crumpling the crumple zone. Off came the LH rear quarter to sort that out. In the close up photo below you can see that the inner quarter was trimmed back extensively near the tail lights, presumably to cut out metal that was too mangled to make look right. In the photo I'm holding the repair piece in its proper position on the outside of the inner quarter. I knew all along that I'd need to replace the rear of the trunk floor and the rear panel (badly repaired after collision and bodged by PO who had mounted a 911 "Porsche" rear panel). This weekend I pulled rear panel and started looking at structure and how the transaxle is mounted and started thinking that maybe it's just ridiculous to try to do all of this work around the drivetrain in situ. What's the advice of the experienced who have worked through similar problems? Are there any pros to going with my original plan? Was I crazy to formulate it in the first place? In other developments: originally I was going to keep the car as stock as possible (read: keep the BUBs). I've now decided to ditch that plan and backdate the bumpers. I figure the weight savings on a stock 1.8 will be helpful and I have always really liked the look of the early bumpers. It also helps that going this route will let me use the RD rear trunk floor pan piece without modification. 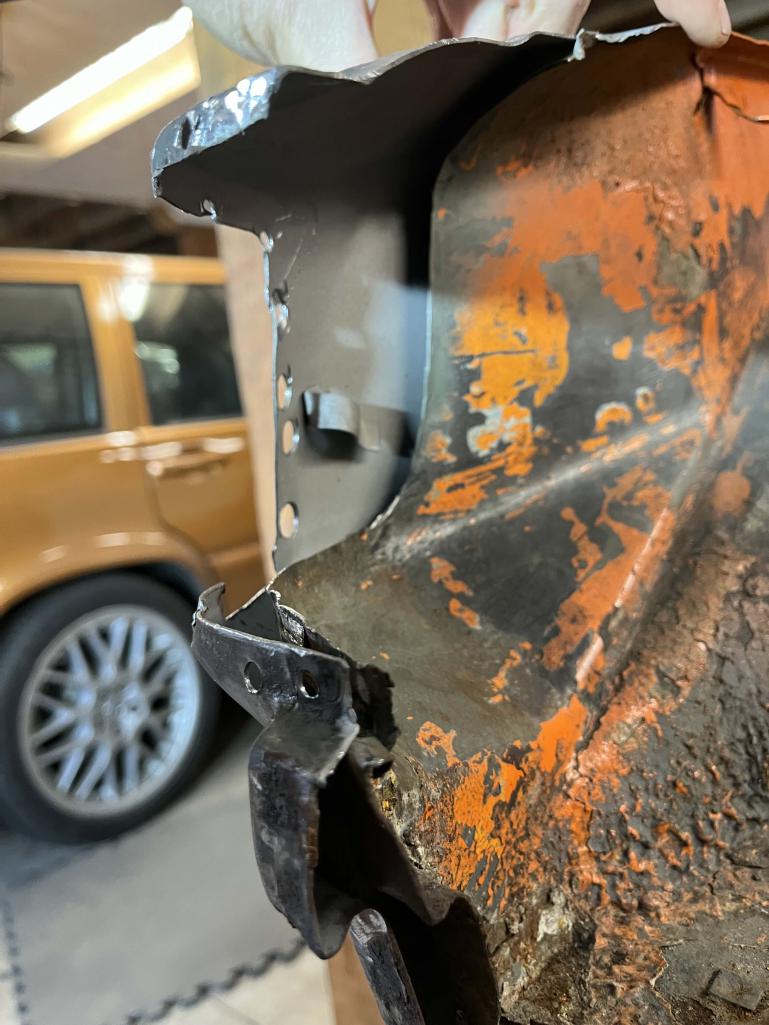 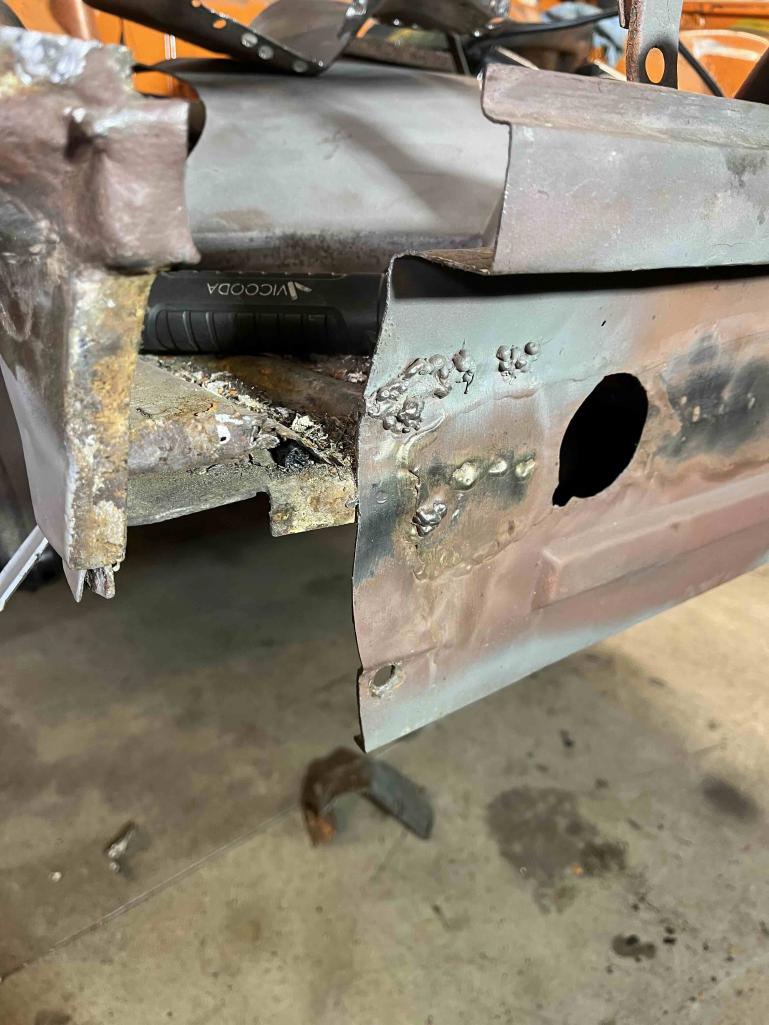  |
|
|
|
| Geezer914 |
Apr 28 2025, 06:25 AM
Post
#26
|
|
Geezer914 Group: Members Posts: 2,318 Joined: 18-March 09 From: Salem, NJ Member No.: 10,179 Region Association: North East States |
Welcome to 914 World! That's the problem buying a car from Maine. Rock salt and snow. You have your work cut out for you but you are doing a nice job on the restoration. Hope you got a good deal.
|
|
|
|
| friethmiller |
Apr 28 2025, 07:38 AM
Post
#27
|
|
Senior Member Group: Members Posts: 1,319 Joined: 10-February 19 From: Austin, TX Member No.: 22,863 Region Association: Southwest Region |
You are the owner of this car. If you want to backdate the bumpers... go for it. For me, I'd leave it what it is... a '75. But don't let anyone tell you which way to go. It just a choice that you need to make. Regardless, you've got some fabrication work ahead of you. Nice! What you've done so far looks great. Keep it up (IMG:style_emoticons/default/smilie_pokal.gif)
|
|
|
|
| didenpx |
Apr 29 2025, 06:41 AM
Post
#28
|
|
Member Group: Members Posts: 127 Joined: 1-September 23 From: Usa Member No.: 27,556 Region Association: North East States |
@geezer914 the rust isn't as bad as you might expect...it's the old collision damage that has slowed me down the most. I think I got a decent deal on it....$5,700 running and lot driving with a bunch of spare parts and some new replacement sheet metal from RD.
@friethmiller thanks Fred...I lurk on your thread in the background and am amazed at what you are doing there. If this were an LE I'd obviously be going for bone stock, but I don't think a base level 75 1.8 is ever going to have any real collector value (unless it's an unrestored survivor or something). |
|
|
|
| friethmiller |
Apr 29 2025, 07:03 AM
Post
#29
|
|
Senior Member Group: Members Posts: 1,319 Joined: 10-February 19 From: Austin, TX Member No.: 22,863 Region Association: Southwest Region |
QUOTE(didenpx @ Apr 29 2025, 07:41 AM)  @geezer914 the rust isn't as bad as you might expect...it's the old collision damage that has slowed me down the most. I think I got a decent deal on it....$5,700 running and lot driving with a bunch of spare parts and some new replacement sheet metal from RD. @friethmiller thanks Fred...I lurk on your thread in the background and am amazed at what you are doing there. If this were an LE I'd obviously be going for bone stock, but I don't think a base level 75 1.8 is ever going to have any real collector value (unless it's an unrestored survivor or something). Sounds good! Can't wait to see the results! (IMG:style_emoticons/default/popcorn[1].gif) |
|
|
|
| burton73 |
Apr 29 2025, 01:16 PM
Post
#30
|
|
Senior member, and old dude Group: Members Posts: 4,031 Joined: 2-January 07 From: Los Angeles Member No.: 7,414 Region Association: Southern California |
@didenpx
You have a lot on you plate and it looks like you have that handled but, you may need to address the pan on your car. After you remove the tar, poke the metal hard because it can look good but may have rust in the channels on the pan. This is my 6 run from 1970 to 1986 till it could not pass smog. It is a Los Angeles car with no rust except what you see. (The red on pan) I personally stripped the paint down to metal. The PO told me he used to take it to the snow to go So California skiing. Best Bob B (IMG:style_emoticons/default/driving-girl.gif) (IMG:style_emoticons/default/driving-girl.gif)    |
|
|
|
| didenpx |
Apr 29 2025, 03:06 PM
Post
#31
|
|
Member Group: Members Posts: 127 Joined: 1-September 23 From: Usa Member No.: 27,556 Region Association: North East States |
Thanks @burton73 . I have found a few very small holes in floor pan so far. I’m looking forward to getting the big stuff done so that I can get to finishing touches like that! Maybe by the late Summer or Fall…..
|
|
|
|
| didenpx |
Oct 2 2025, 05:11 PM
Post
#32
|
|
Member Group: Members Posts: 127 Joined: 1-September 23 From: Usa Member No.: 27,556 Region Association: North East States |
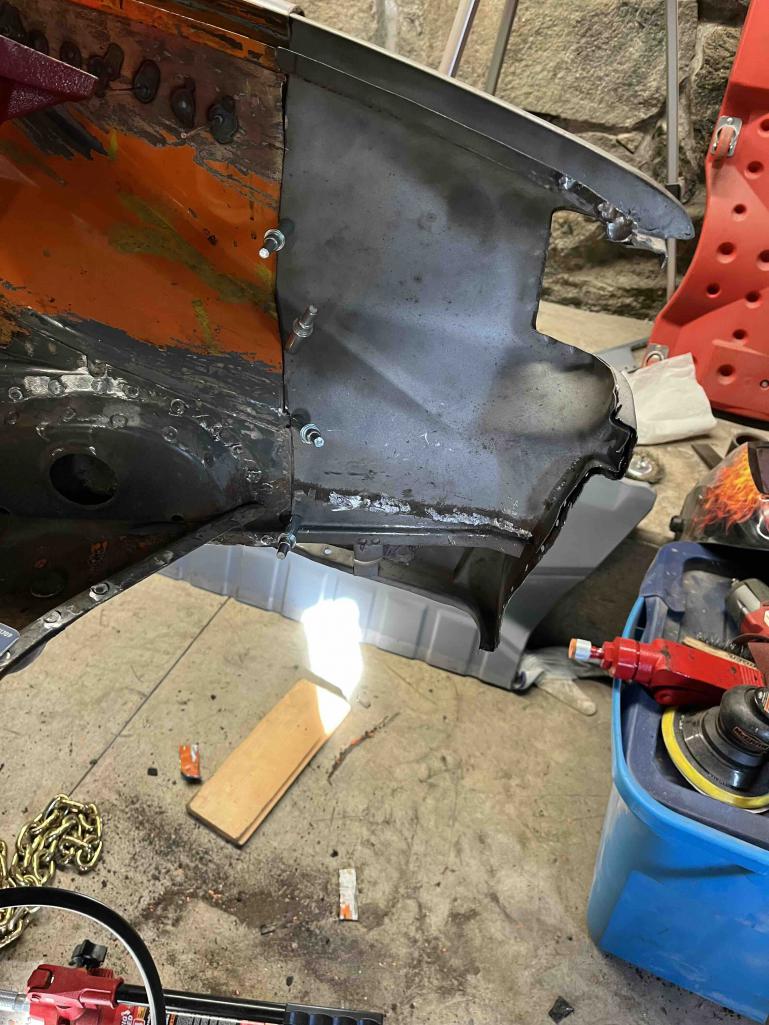
Finally have made some progress in piecing together the rear of the car. It had been in a LH rear impact that was serious enough to start to fold things in at the crumple zone and hadn't been properly repaired (there's another thread on the crumple zone damage specifically). Once I got that pulled out I still had a lot of fixing to do. I knew things were off kilter because I had 1+ CM gaps on the LH trunk lid to quarter and on the RH side the gap was basically non existent.
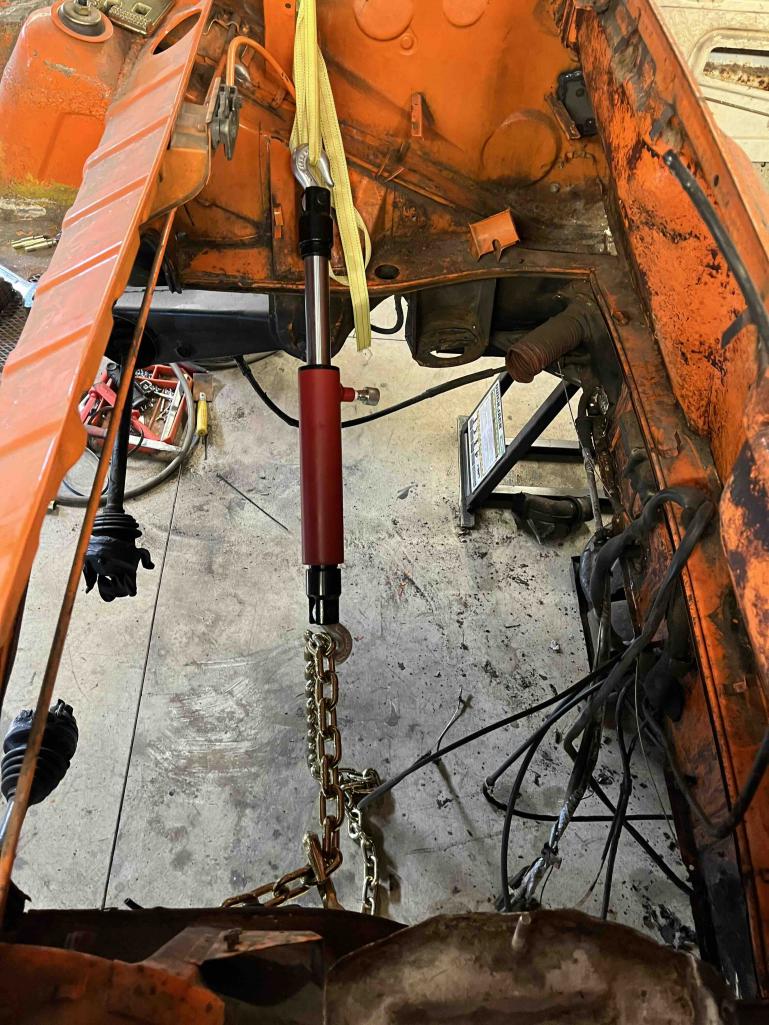
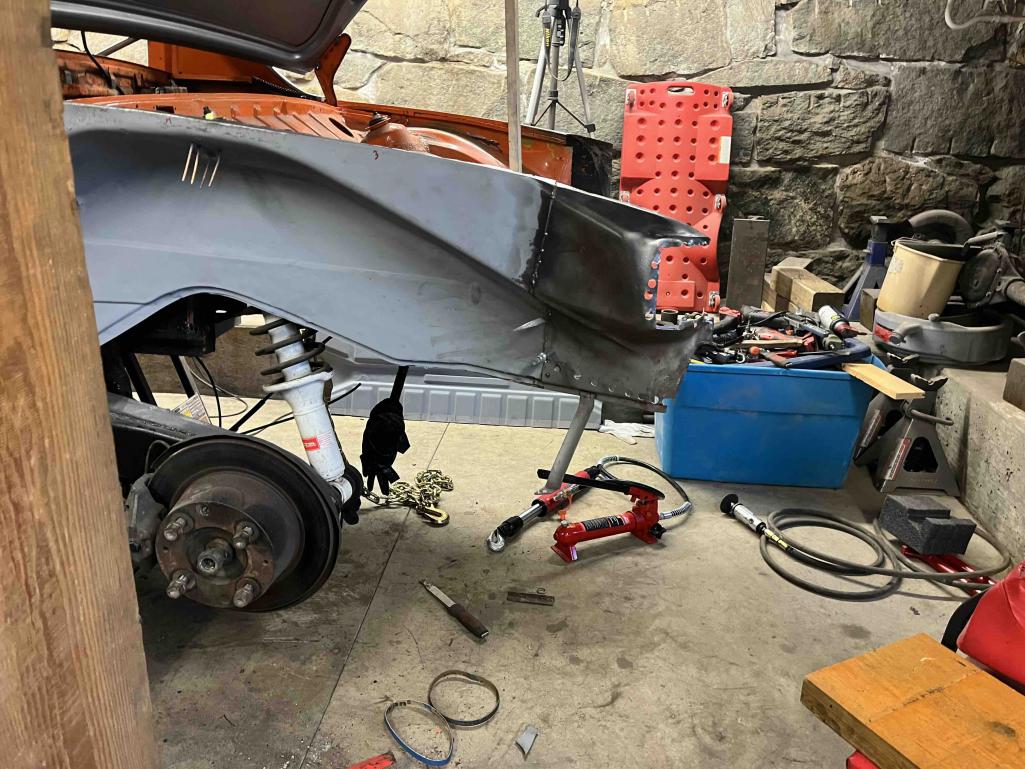
I reluctantly gave in and dropped the engine so I’d be able to get into the engine bay to use a ports-power to “persuade” shift things around and after some pushing and pulling I was able to get the inner quarters roughly to where they should be, using two parts cars to get reference measurements. Part of the challenge involves re-constructing the rear-most section of the inner quarters which had suffered from the crash damage and also had rot between the inner and outer where the white factory seam sealer was used. I got a good clean repair section from another member quite some time ago and used that to get good patch pieces for the LH inner and RH inner/outer quarters. Right now the LH patch is tacked in, the LH outer quarter is dry fitted (self-tappers), and the RH patch piece is dry fitted (Clecos). Thankfully the RH and LH gaps between the quarters and the rear trunk lid look decent. I’ll be tacking in the RH patch panel next and then fitting the tail panel before moving on to the trunk floor pan repair panel (thanks to Restoration Design for both of those pieces which are excellent!). Photos follow..... |
|
|
|
| didenpx |
Oct 2 2025, 05:13 PM
Post
#33
|
|
Member Group: Members Posts: 127 Joined: 1-September 23 From: Usa Member No.: 27,556 Region Association: North East States |
    |
|
|
|
| didenpx |
Oct 2 2025, 05:15 PM
Post
#34
|
|
Member Group: Members Posts: 127 Joined: 1-September 23 From: Usa Member No.: 27,556 Region Association: North East States |
   |
|
|
|
| didenpx |
Oct 2 2025, 05:17 PM
Post
#35
|
|
Member Group: Members Posts: 127 Joined: 1-September 23 From: Usa Member No.: 27,556 Region Association: North East States |
   |
|
|
|
| didenpx |
Oct 2 2025, 05:18 PM
Post
#36
|
|
Member Group: Members Posts: 127 Joined: 1-September 23 From: Usa Member No.: 27,556 Region Association: North East States |
 |
|
|
|
| Root_Werks |
Oct 3 2025, 11:30 AM
Post
#37
|
|
Village Idiot Group: Members Posts: 9,011 Joined: 25-May 04 From: About 15NM from Canada Member No.: 2,105 Region Association: Pacific Northwest |
|
|
|
|
| friethmiller |
Oct 3 2025, 01:06 PM
Post
#38
|
|
Senior Member Group: Members Posts: 1,319 Joined: 10-February 19 From: Austin, TX Member No.: 22,863 Region Association: Southwest Region |
I love this! (IMG:style_emoticons/default/popcorn[1].gif) Keep up the great work!
|
|
|
|
| didenpx |
Oct 3 2025, 03:08 PM
Post
#39
|
|
Member Group: Members Posts: 127 Joined: 1-September 23 From: Usa Member No.: 27,556 Region Association: North East States |
Thanks Fred and @Root_Werks .
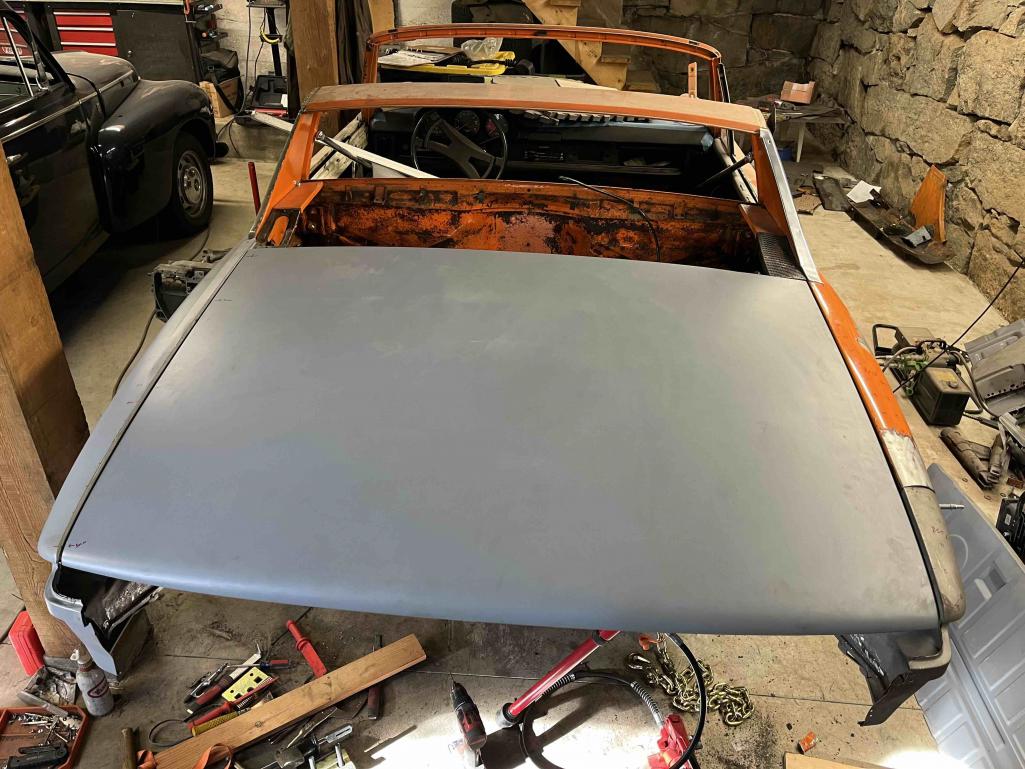
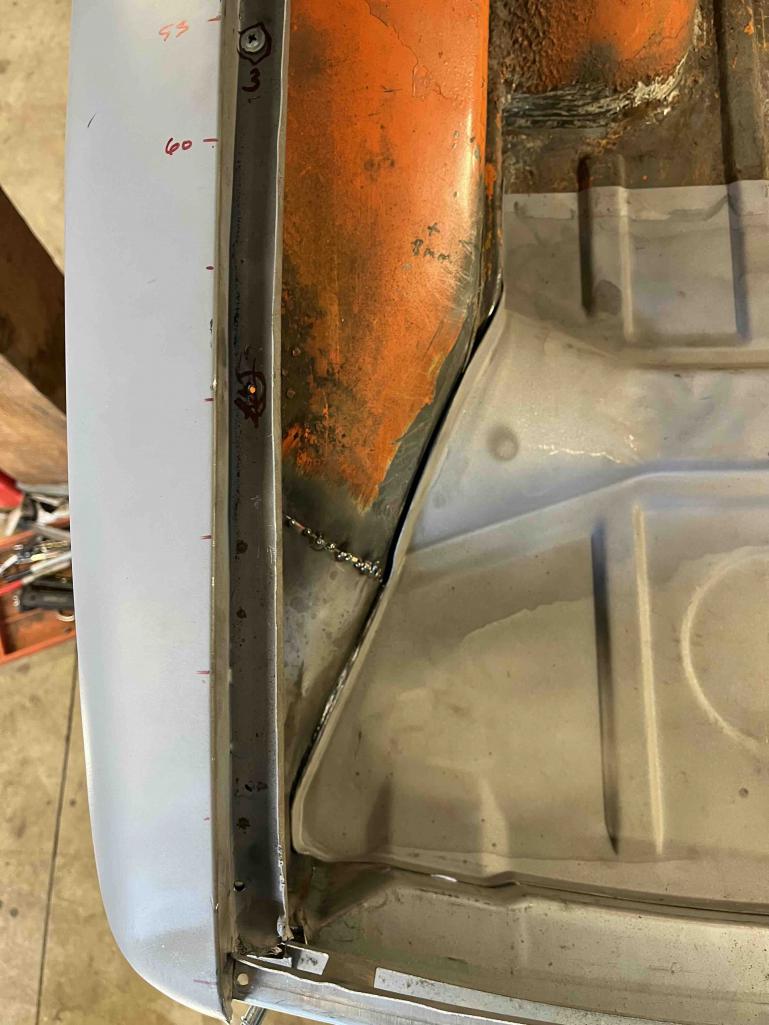
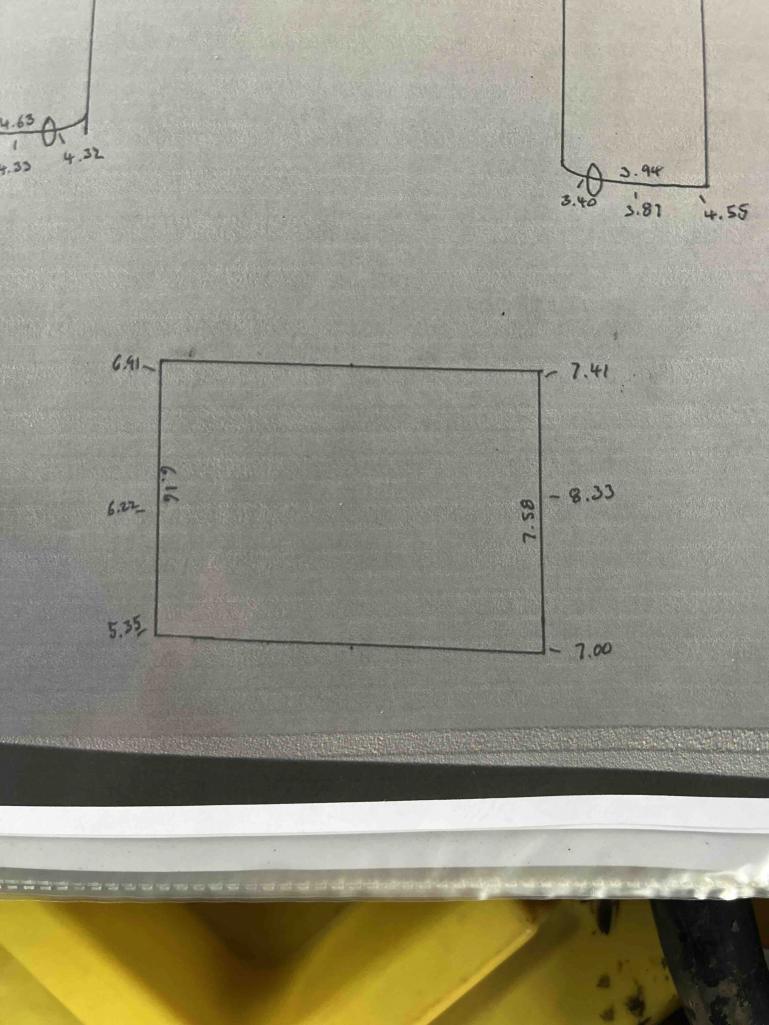
Got a couple more hours in today and was able to fit the rear valence (which required more tweaking of the fender gaps) and also loosely fit the trunk floor pan just to see how well it is lining up with the inner quarters and rear valence (pretty well!). I'm using a diagram of average panel gaps that I found on a thread here somewhere and printed off; I'm not sure who produced it, but it is very handy. It also relieves a lot of stress over them not being perfect of exact...since they apparently never were to begin with. Next week I will start welding in the RH rear quarter patch followed by the rear valence. Still lots of cleaning and prep work to do but at least I can see the light at the end of this particular tunnel! 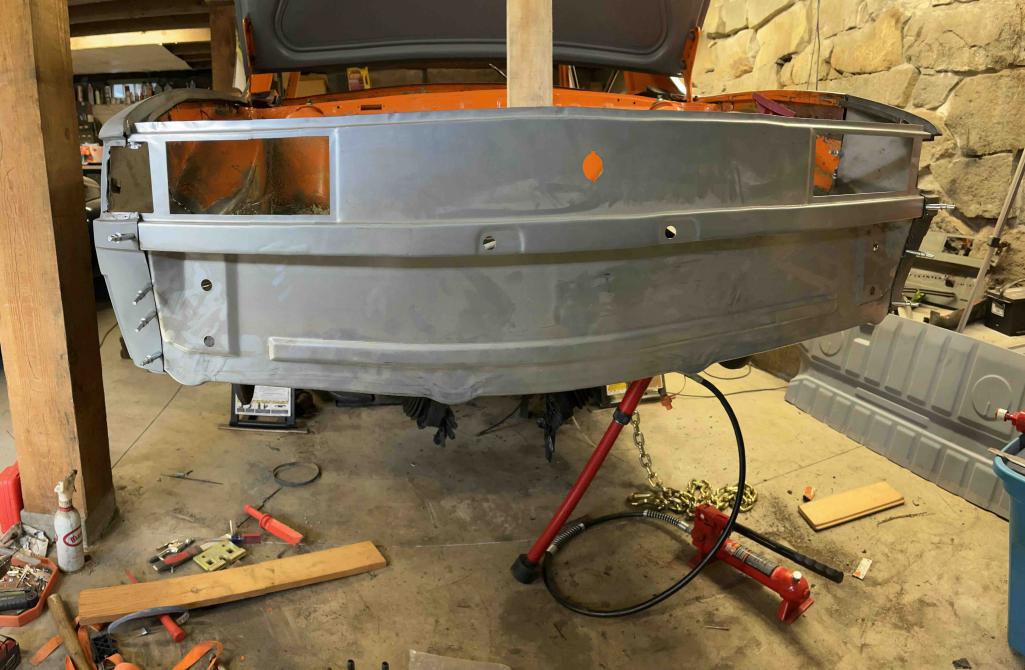 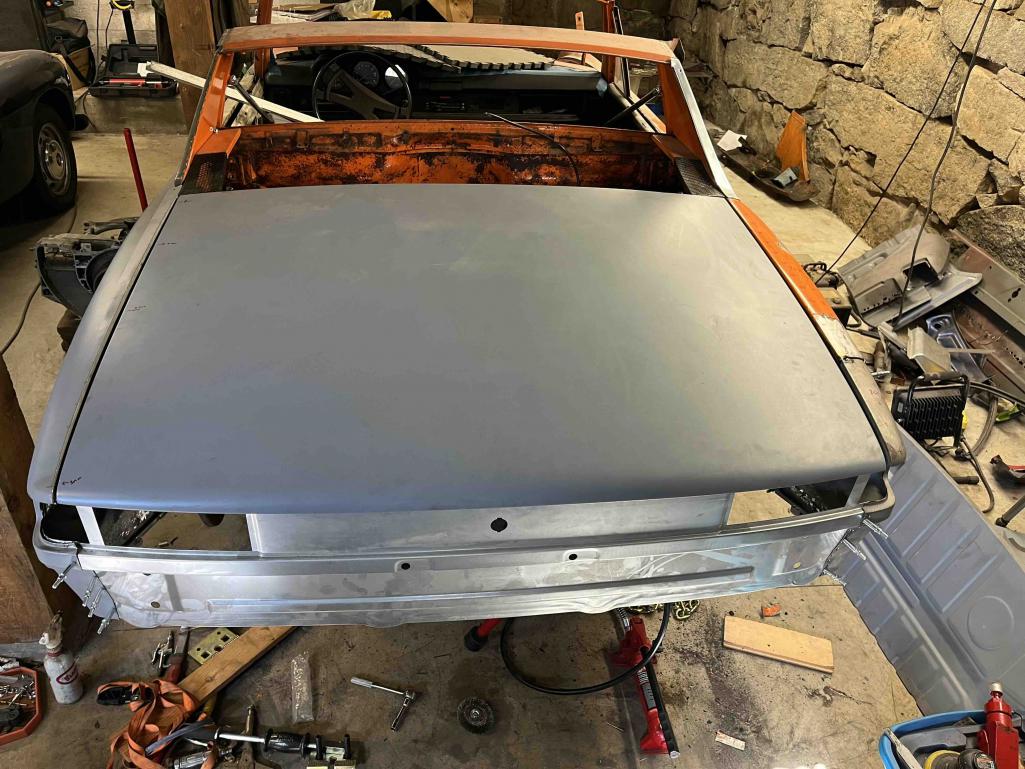  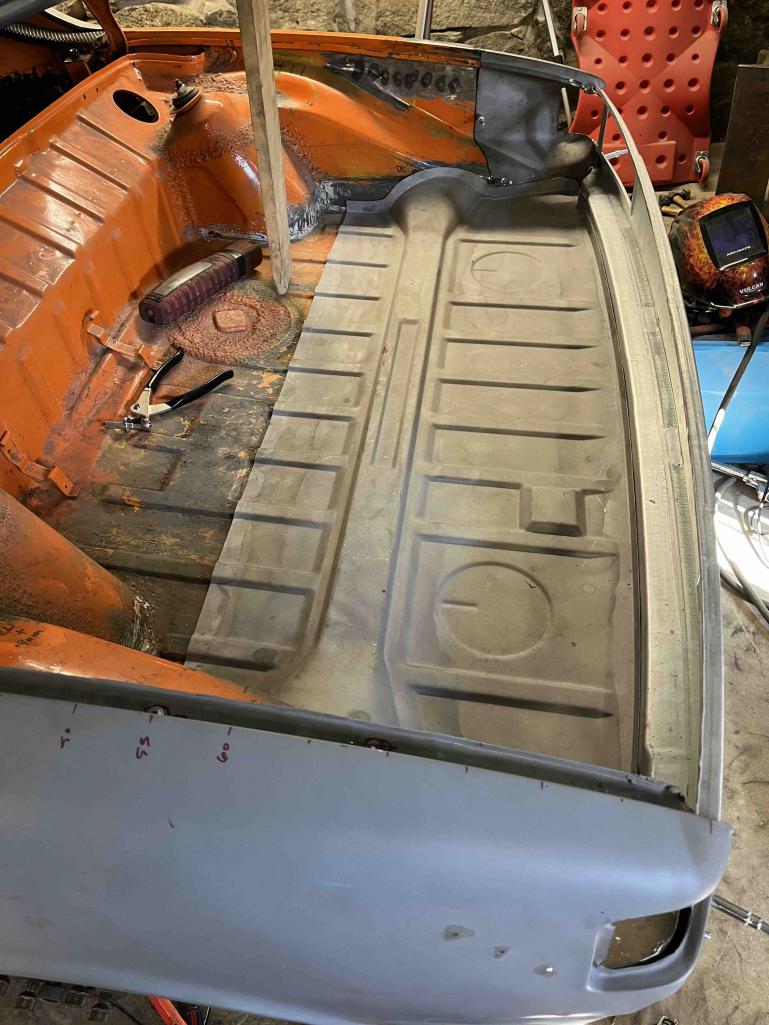 [attachmentid=955 [attachmentid=955734] Attached thumbnail(s) 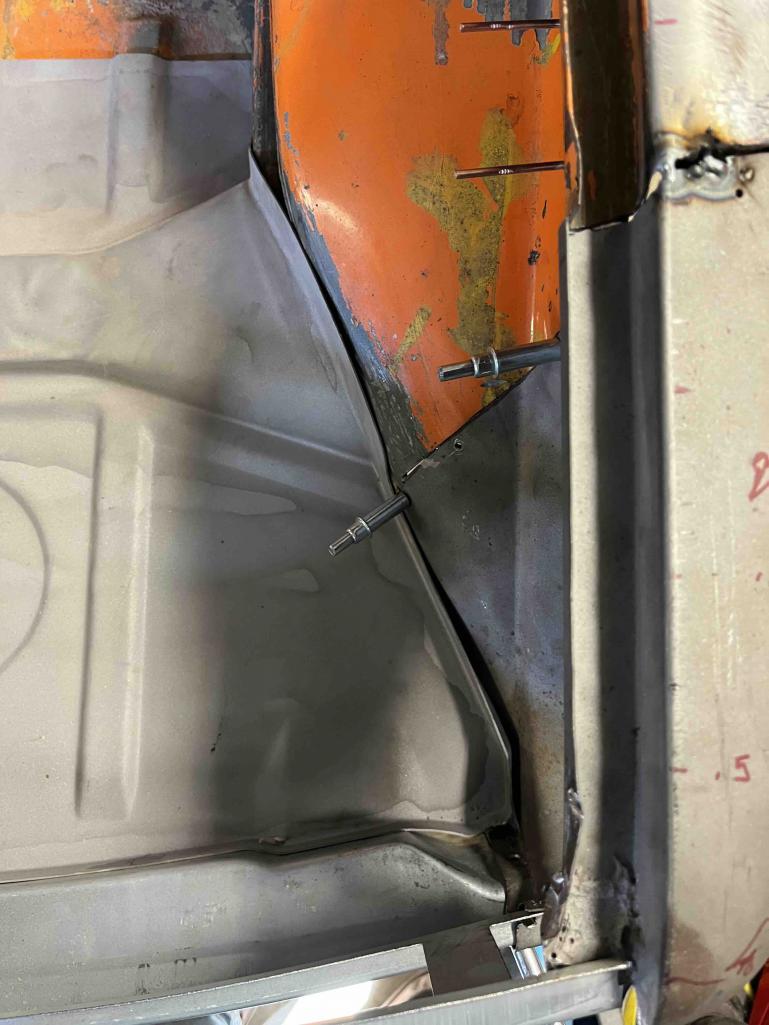
|
|
|
|
| didenpx |
Oct 3 2025, 03:09 PM
Post
#40
|
|
Member Group: Members Posts: 127 Joined: 1-September 23 From: Usa Member No.: 27,556 Region Association: North East States |
  |
|
|
|
|
2 User(s) are reading this topic (2 Guests and 0 Anonymous Users)
0 Members:

|
Lo-Fi Version | Time is now: 24th June 2026 - 02:08 AM |
Invision Power Board
v9.1.4 © 2026 IPS, Inc.