|
|
|
Porsche, and the Porsche crest are registered trademarks of Dr. Ing. h.c. F. Porsche AG.
This site is not affiliated with Porsche in any way. Its only purpose is to provide an online forum for car enthusiasts. All other trademarks are property of their respective owners. |
|
|

  |

| didenpx |
 Oct 18 2025, 09:20 AM Oct 18 2025, 09:20 AM
Post
#41
|
|
Member  Group: Members Posts: 127 Joined: 1-September 23 From: Usa Member No.: 27,556 Region Association: North East States |
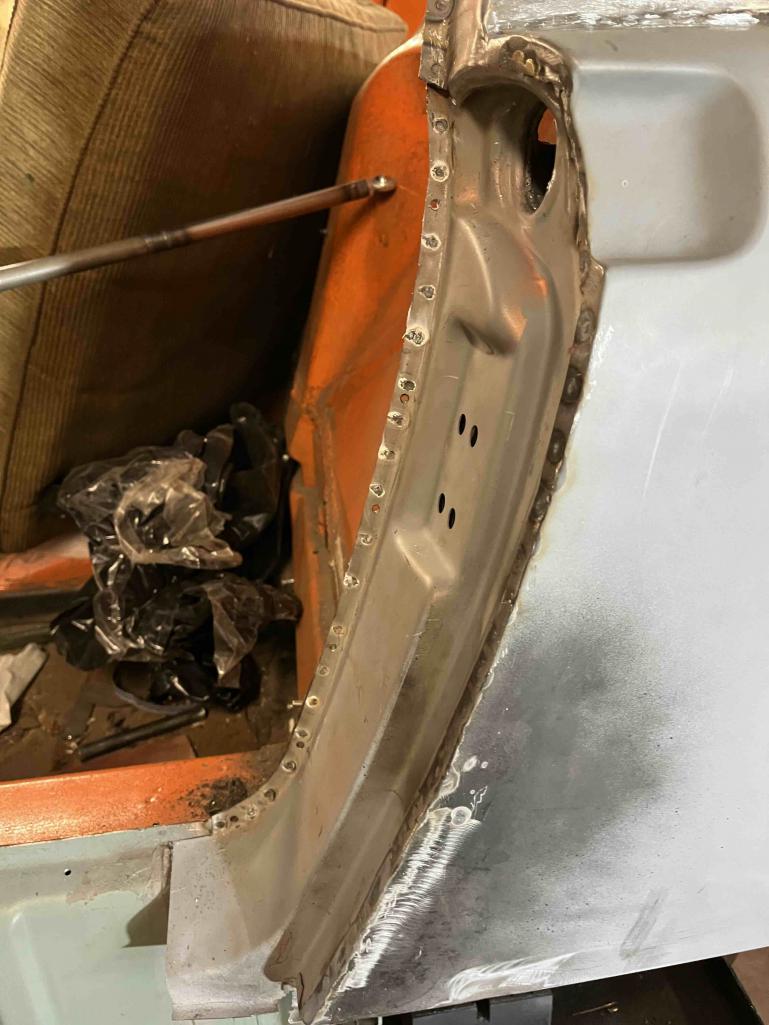
Good progress this week. The quarter patches are welded in and the rear valence is welded on the RH side; prepping for the LH quarter install and once that’s done I will start welding the inner quarter/rear valence/outer quarter sandwich on the LH side….hopefully early next week.
The RH inner/outer quarter patch came out ok except one low spot on the top of the fender and the vertical part dropping into the weather stripping channel not lining up. I tried to work the metal but this was the best I could get. I am considering using body panel adhesive and glueing a metal strip on that vertical area leading toward the tail to even things out. Still in the process of removing tail light mounting brackets, trunk lock latch bracket, and the corner brackets from the 1975 rear valence that go on either side of the latch bracket and connect the valence to the floor. Definitely back-dating bumpers. Once all of this is done I still need to weld in the rear door jamb panel and work the gaps between the rear quarter and the door opening, stitch together the RD sail panel and my quarter panel, and weld in the door threshold. As things are lining up now (i.e. tip of LH rear quarter coming flush to the end of the trunk lid) the gap is looking too big… 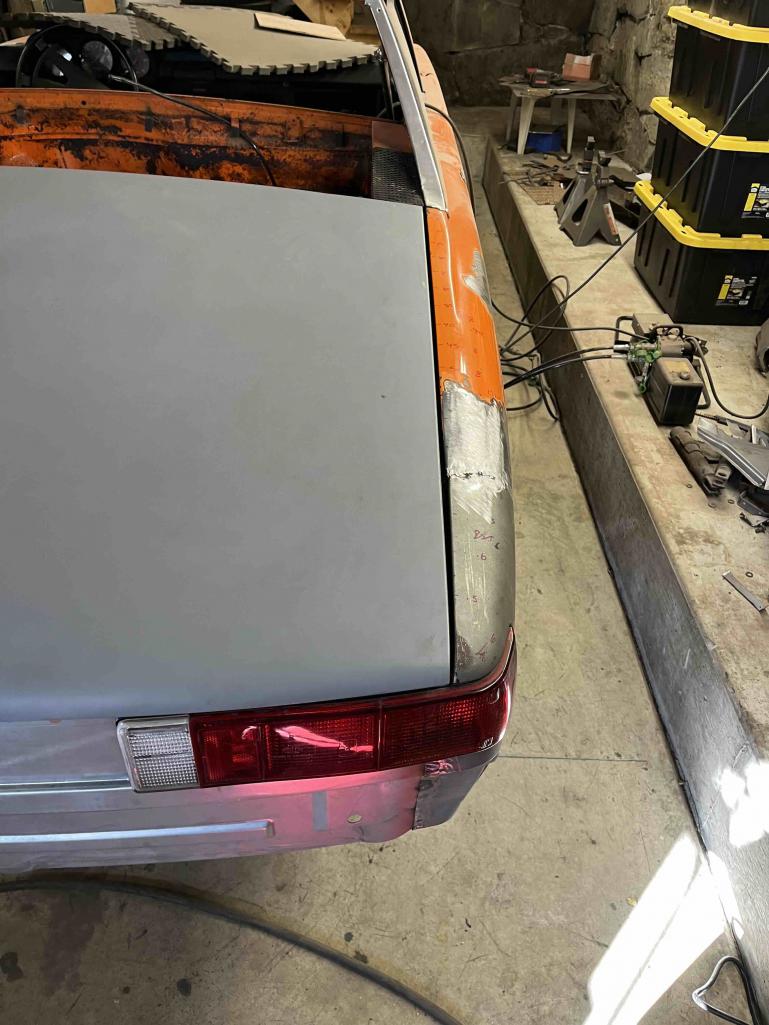 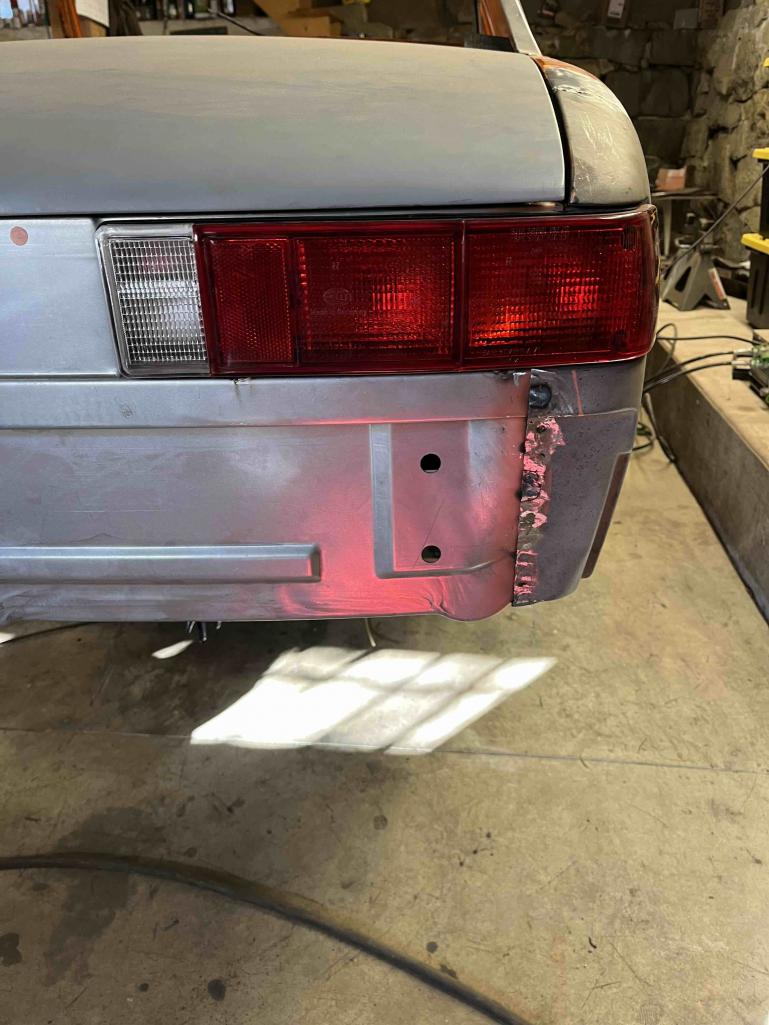 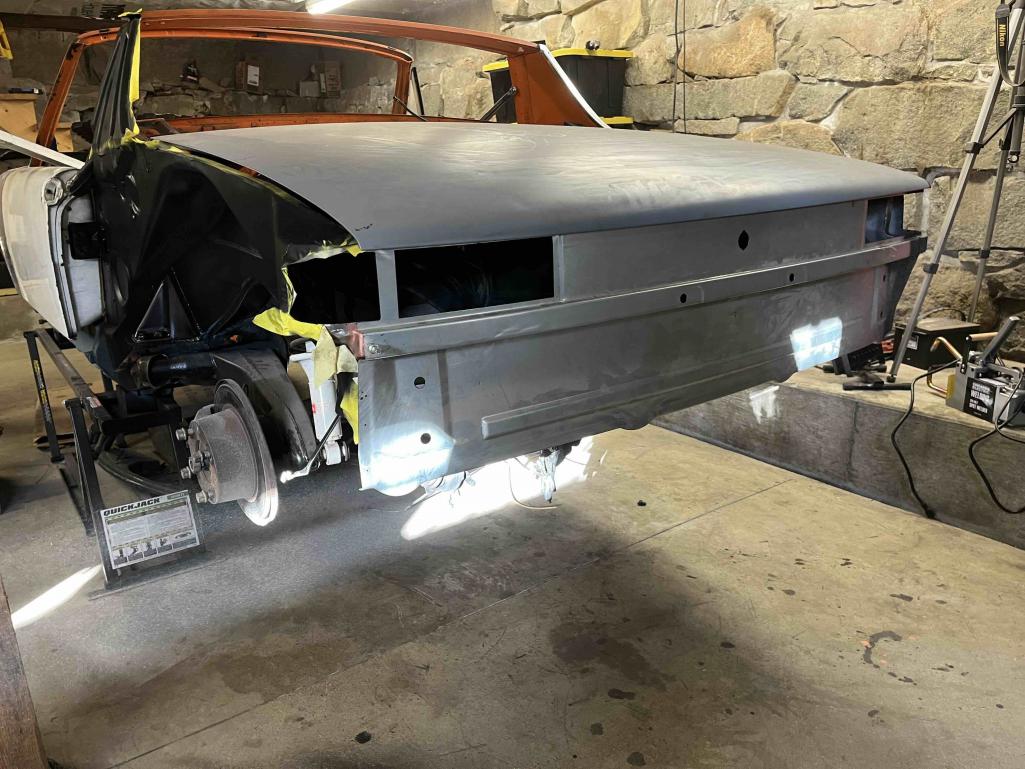  [attachmentid=957 [attachmentid=957046] 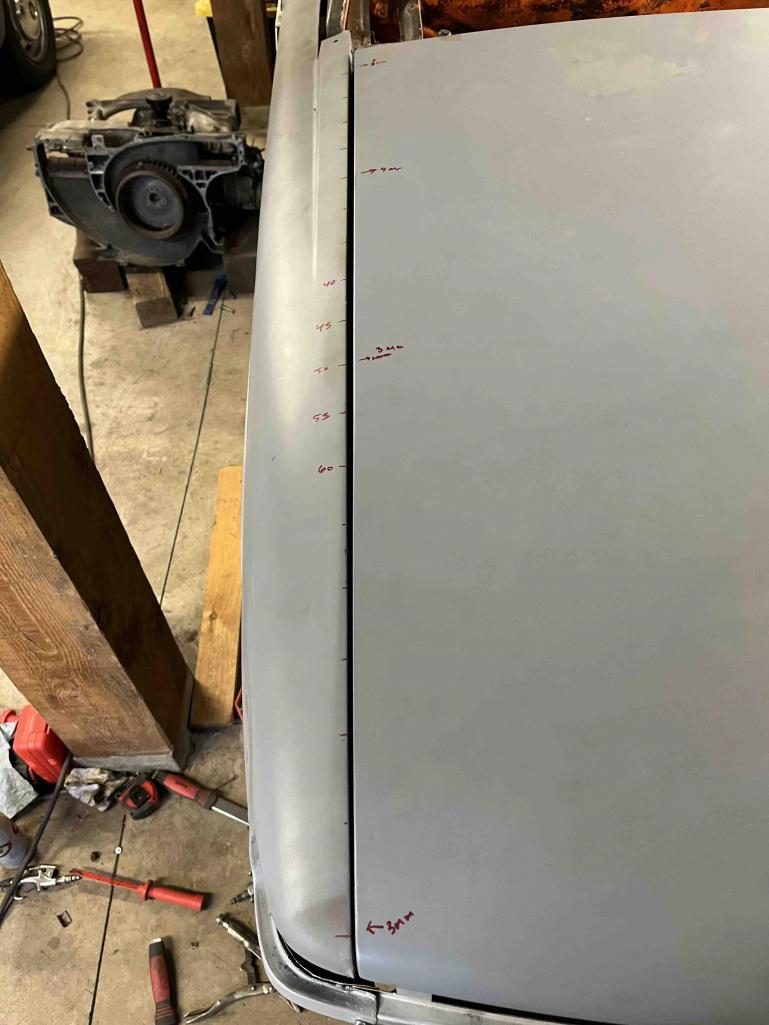 Attached thumbnail(s) 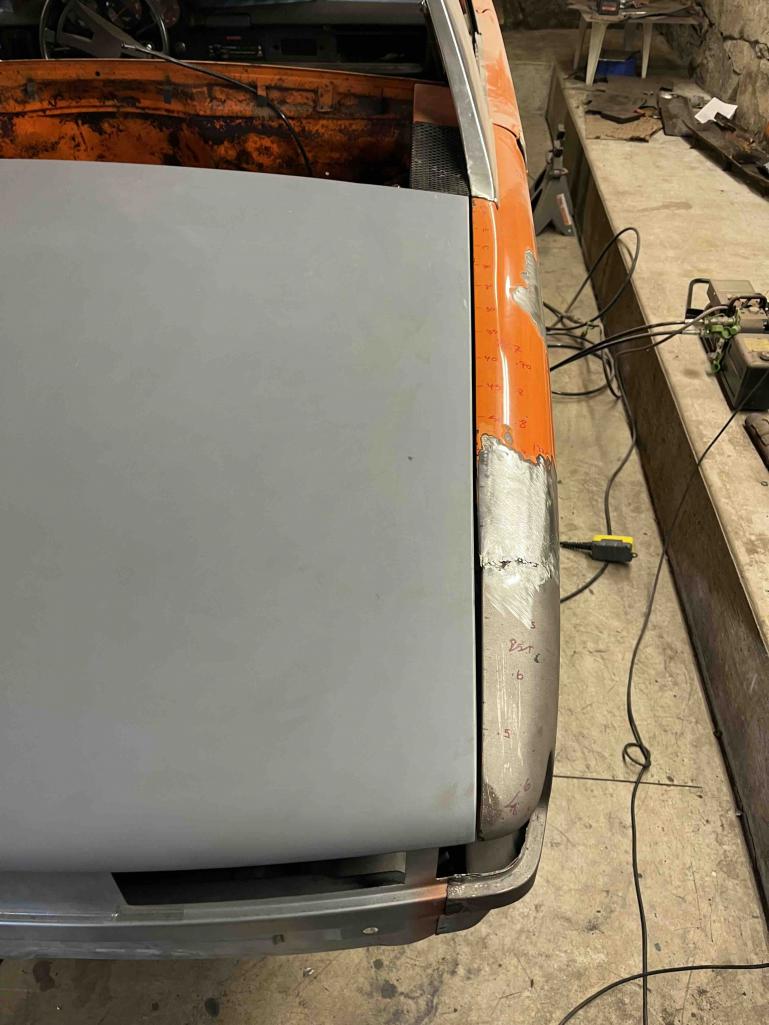
|
   |

 
|
| seanpaulmc |
Oct 19 2025, 11:26 AM
Post
#42
|
|
Member Group: Members Posts: 455 Joined: 6-December 16 From: Orlando, FL Member No.: 20,649 Region Association: South East States |
Paul, this has come a long way. You have some great skills!
Would you have any more pictures of where the top corner of the tail panel comes together with top rear corner of the fender/quarter? I understand this to be a leaded joint from the factory so it gets smoothed out but I’m not clear on how the panels meet and connect. Thanks in advance if you can. Again, great work! -Sean QUOTE(didenpx @ Oct 3 2025, 05:09 PM)  |
|
|
|
| didenpx |
Oct 19 2025, 12:36 PM
Post
#43
|
|
Member Group: Members Posts: 127 Joined: 1-September 23 From: Usa Member No.: 27,556 Region Association: North East States |
QUOTE(seanpaulmc @ Oct 19 2025, 11:26 AM) Paul, this has come a long way. You have some great skills! Would you have any more pictures of where the top corner of the tail panel comes together with top rear corner of the fender/quarter? I understand this to be a leaded joint from the factory so it gets smoothed out but I’m not clear on how the panels meet and connect. Thanks in advance if you can. Again, great work! -Sean QUOTE(didenpx @ Oct 3 2025, 05:09 PM) Thanks @Seanpaulmc; not sure about the skill part. But lots of stubbornness and determination. On the RD rear valence I made a relief cut on the top edge where it meets the weather stripping lip that forms part of the outer quarter. I then folded that down into the rain channel, spot welded it in place, and then welded the seam between that tab and the rain channel best as I could. Before it goes into paint there will obviously be bondo to smooth the area out and I plan to slather body seam sealer on the underside of that area just in case any water finds its way in. I also spot welded the rear valence where it meets the inner quarter; you can see that I still have some metal persuasion to do to get the inner quarter up a few mm on the LH side. I'm not sure if this is how it was originally done but it seemed to make sense as things came together. Paul  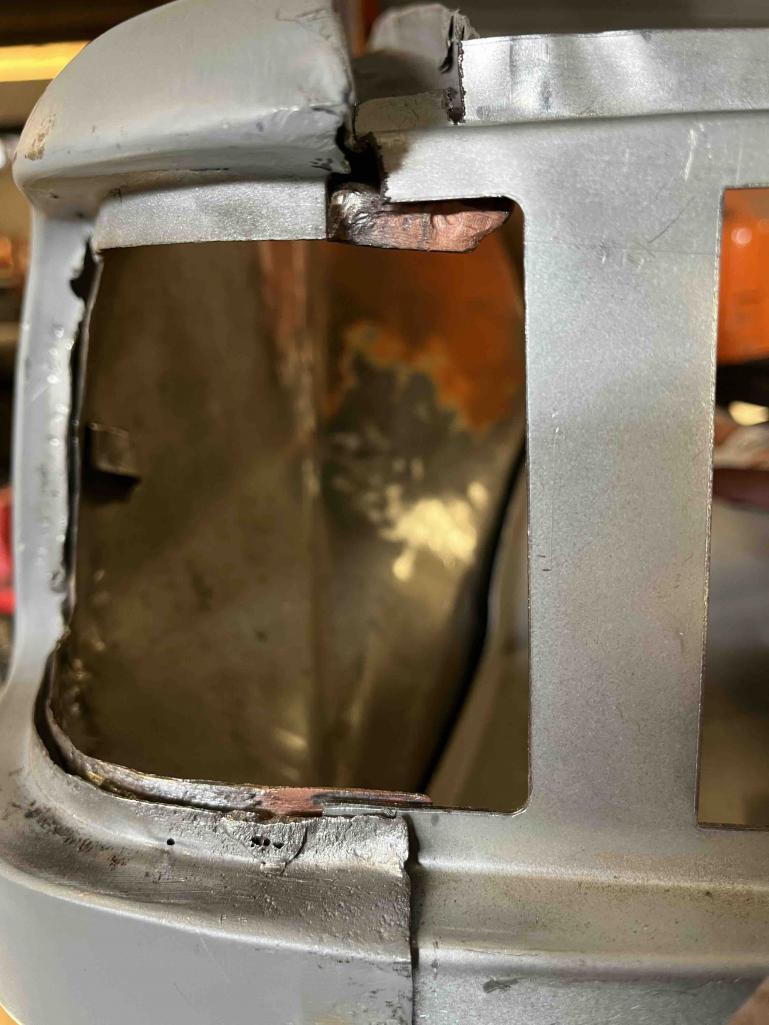 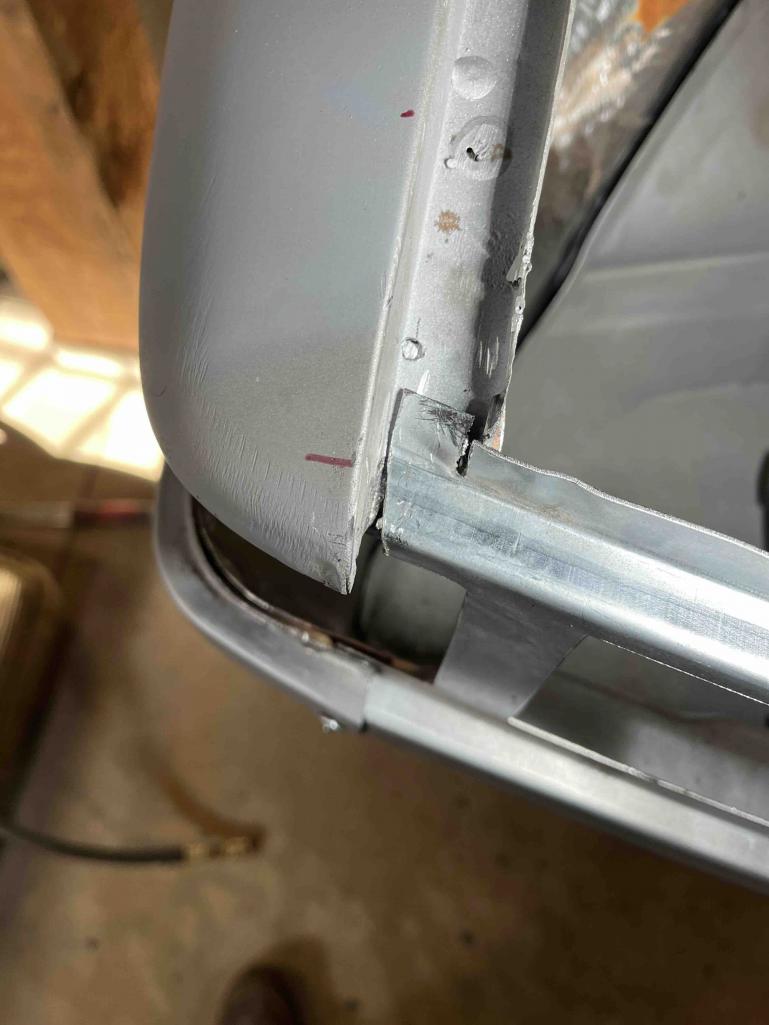 |
|
|
|
| trojanhorsepower |
Oct 19 2025, 06:26 PM
Post
#44
|
|
Senior Member Group: Members Posts: 1,051 Joined: 21-September 03 From: Marion, NC Member No.: 1,179 Region Association: None |
Looks familiar.
Great work. Keep after it. It will end eventually. I think. Still not there personally, but I have heard that rumor...... |
|
|
|
| seanpaulmc |
Oct 20 2025, 05:20 AM
Post
#45
|
|
Member Group: Members Posts: 455 Joined: 6-December 16 From: Orlando, FL Member No.: 20,649 Region Association: South East States |
Paul, thanks for the additional explanation of where the rear panel and quarter panel come together. That is what I needed.
|
|
|
|
| didenpx |
Jan 3 2026, 07:11 PM
Post
#46
|
|
Member Group: Members Posts: 127 Joined: 1-September 23 From: Usa Member No.: 27,556 Region Association: North East States |
Been plugging away at this consistently since the last update, with some breaks for family time over Thanksgiving and Christmas; lots of progress and I'm a lot more hopeful this will be a real car again.
I used Fred's suggestion of assembling the rear quarter and door jamb as a single unit before spot welding to the chassis. This allowed me to properly treat and seal the quarter to door jamb area. In my case this meant not only putting those two pieces together, but also stitching on the RD sail panel repair section. 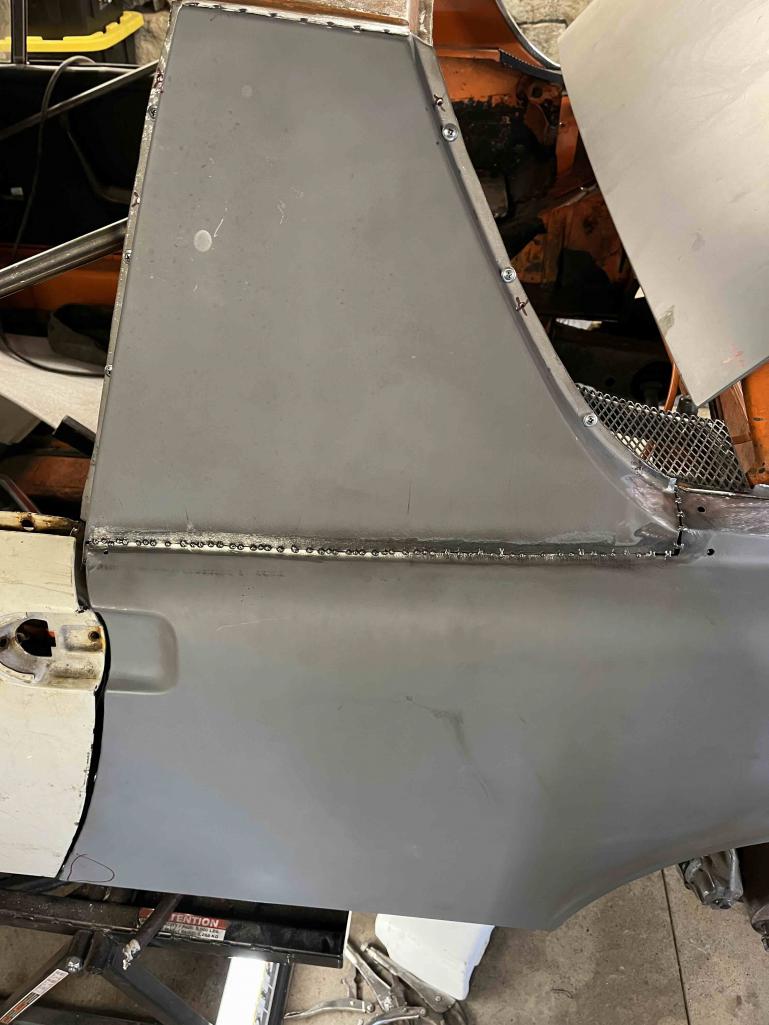 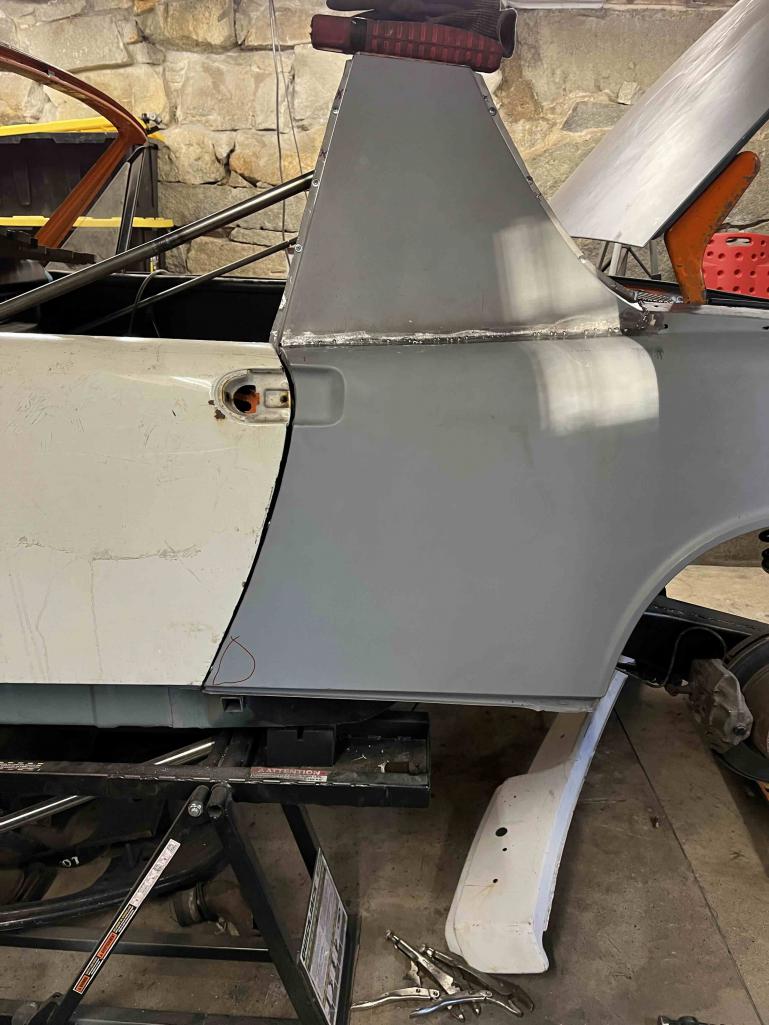 I had to re-create the baffle that seals crap from getting between the rear quarter and into the sail panel area; came out ok. 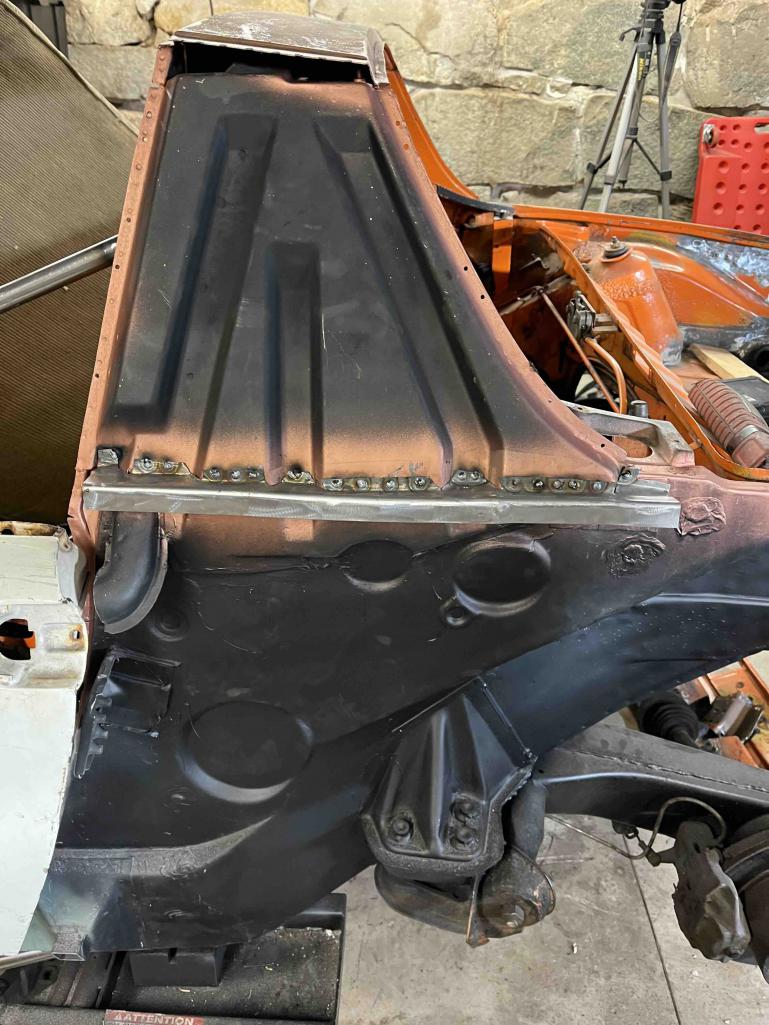 There was a lot of repetitive fitting, checking, re-fitting, re-checking as I got things pieced together and before I started spot welding the quarter to the chassis. 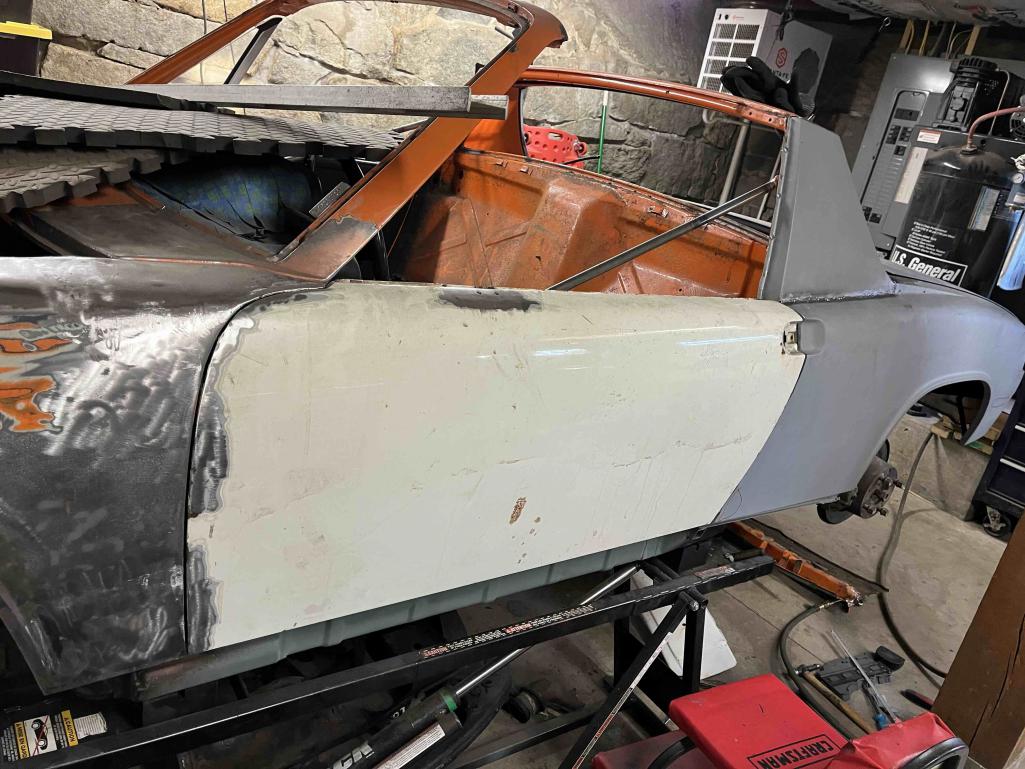 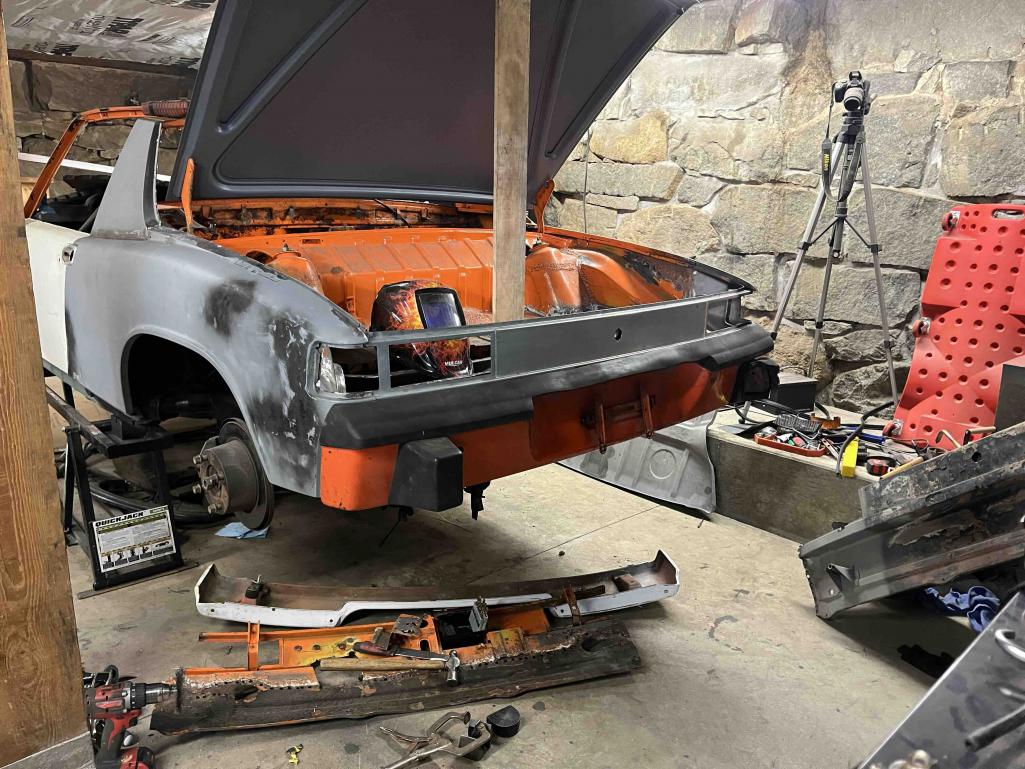 |
|
|
|
| didenpx |
Jan 3 2026, 07:26 PM
Post
#47
|
|
Member Group: Members Posts: 127 Joined: 1-September 23 From: Usa Member No.: 27,556 Region Association: North East States |
Once I was confident that things were lining up properly at all of the various reference points I summoned up the gumption to weld the quarter onto the chassis.
 Then I welded the door threshold back on to complete the welding work from LH front fender area. 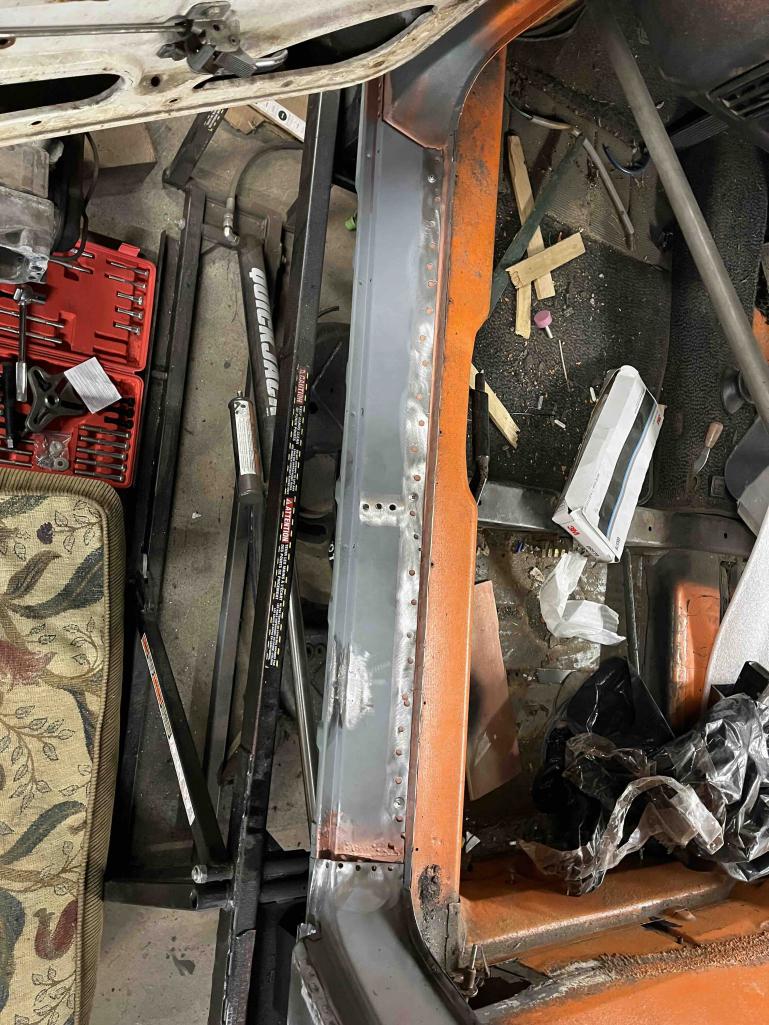 I wasn't sure (and still am not) why some cars have and some don't have the bracket for the rear tow eye loop. I was scavenging brackets off of a tail section piece that had a nice tow hook bracket so I figured I'd throw it on the car. I've abandoned the idea of a stock car and am basically modifying on the fly at this point, so what the hell. Getting all the tail panel brackets welded on was a lot more time consuming than I counted on.... 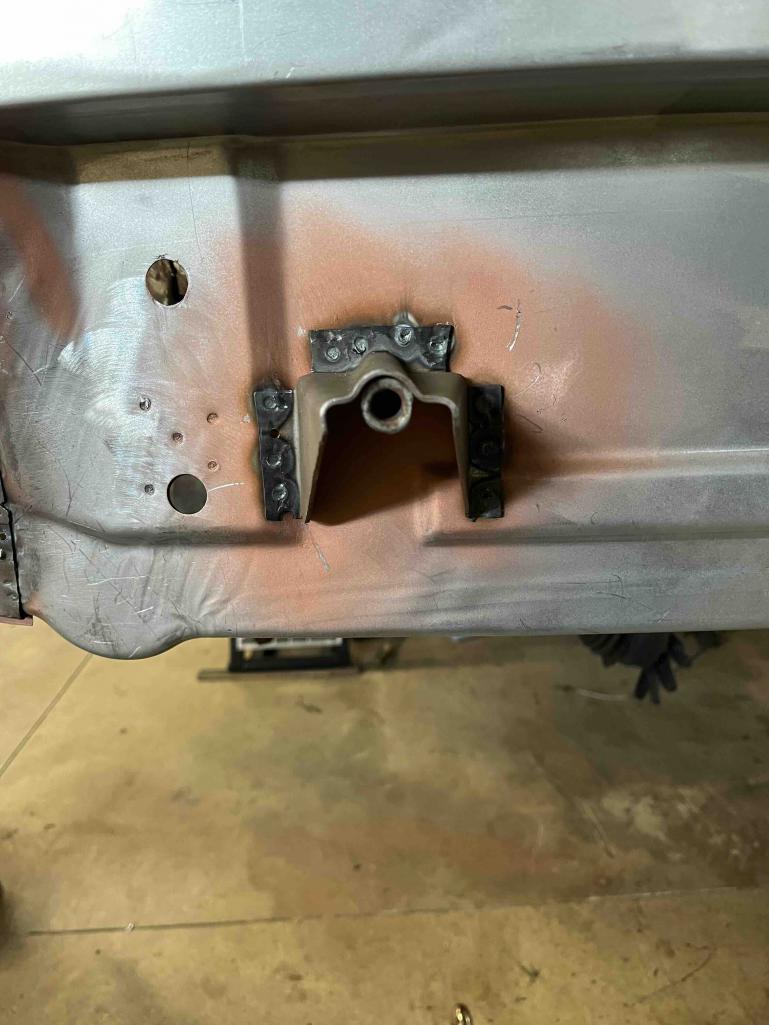 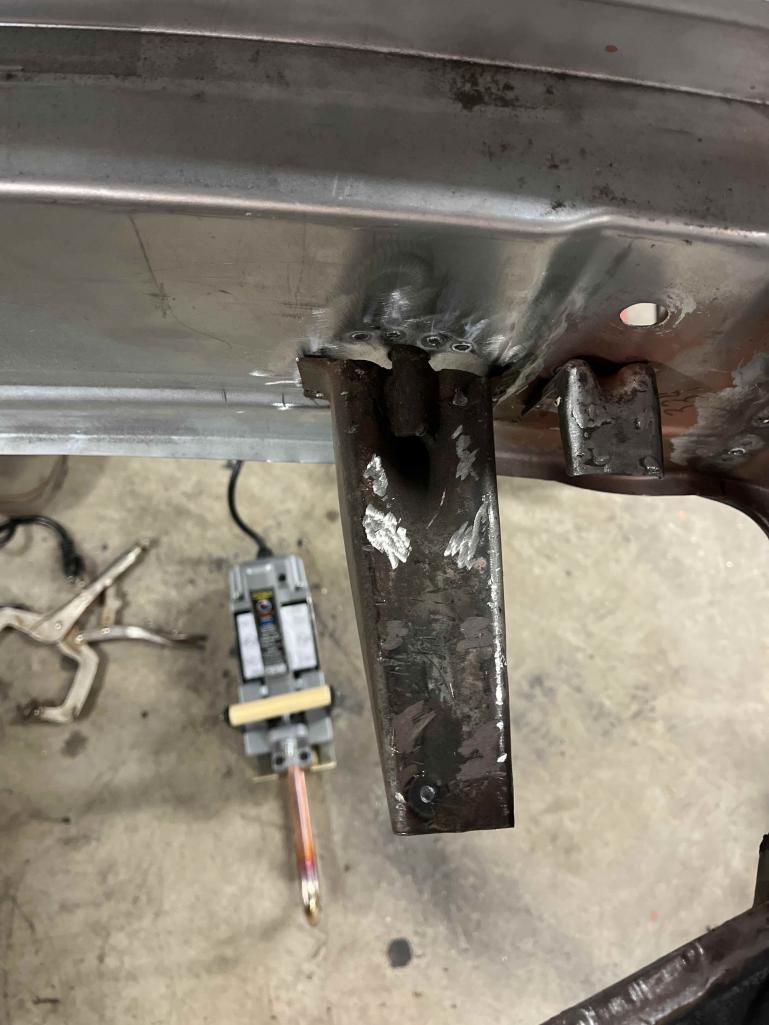 Attached thumbnail(s) 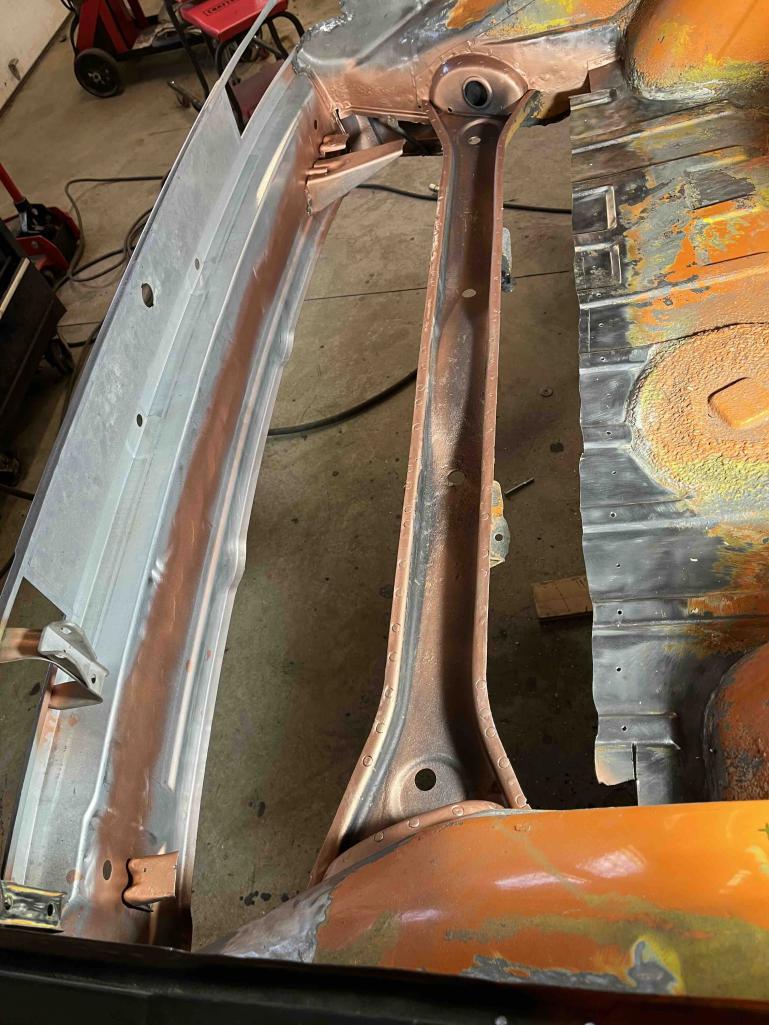
|
|
|
|
| didenpx |
Jan 3 2026, 07:33 PM
Post
#48
|
|
Member Group: Members Posts: 127 Joined: 1-September 23 From: Usa Member No.: 27,556 Region Association: North East States |
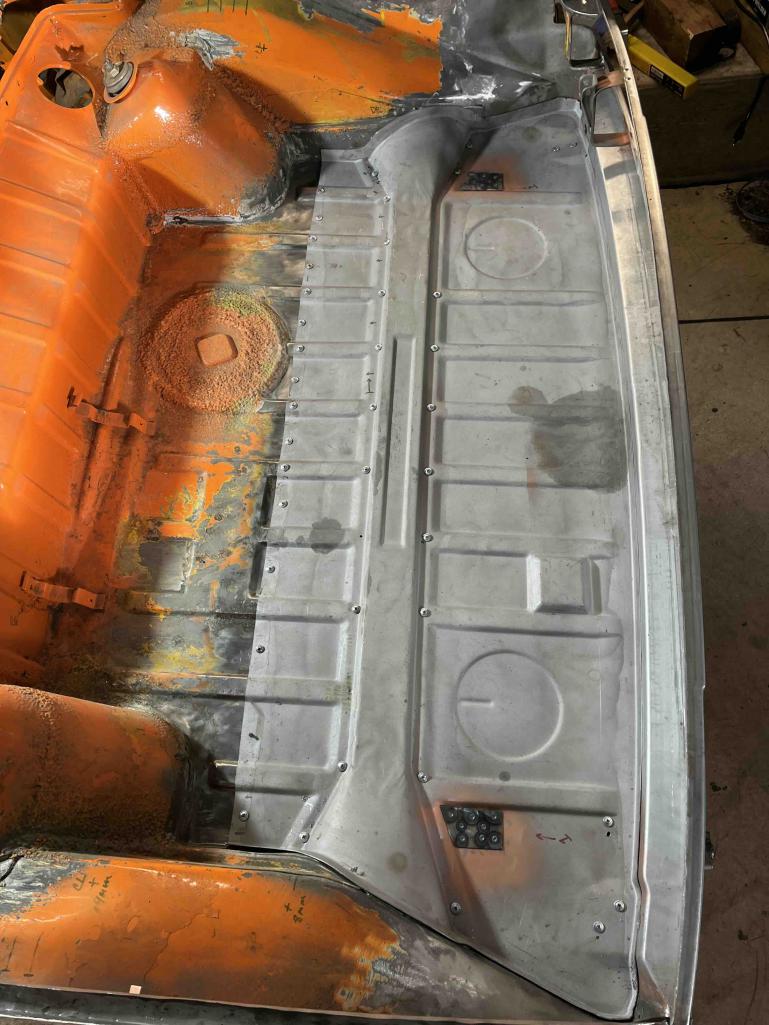
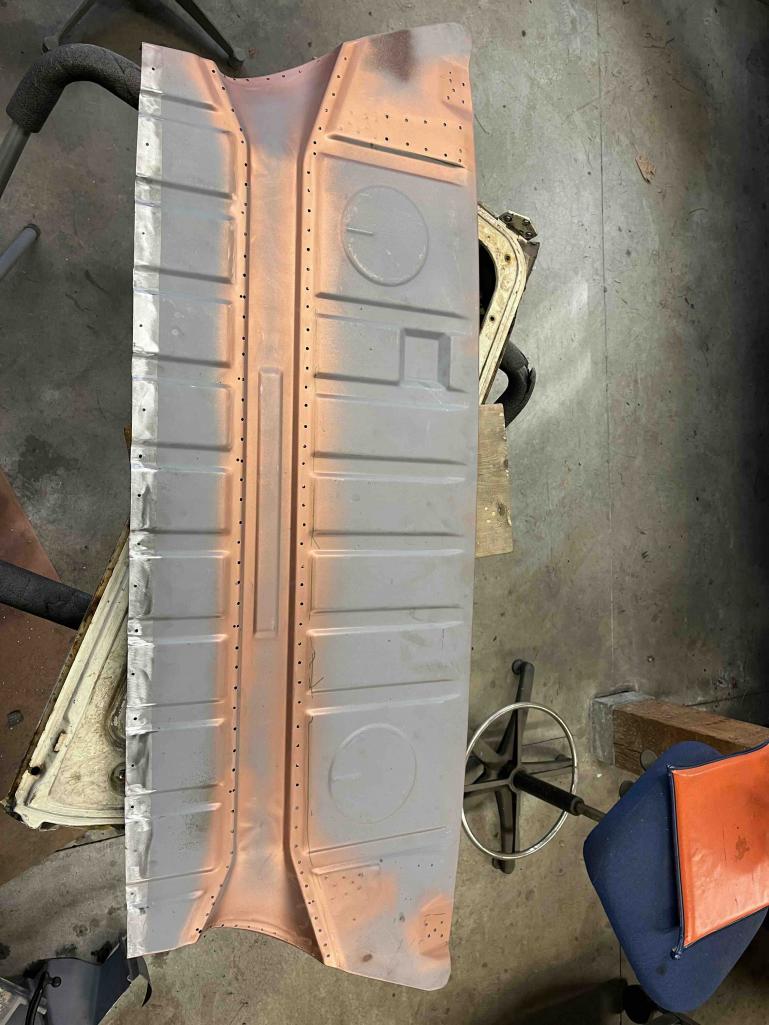
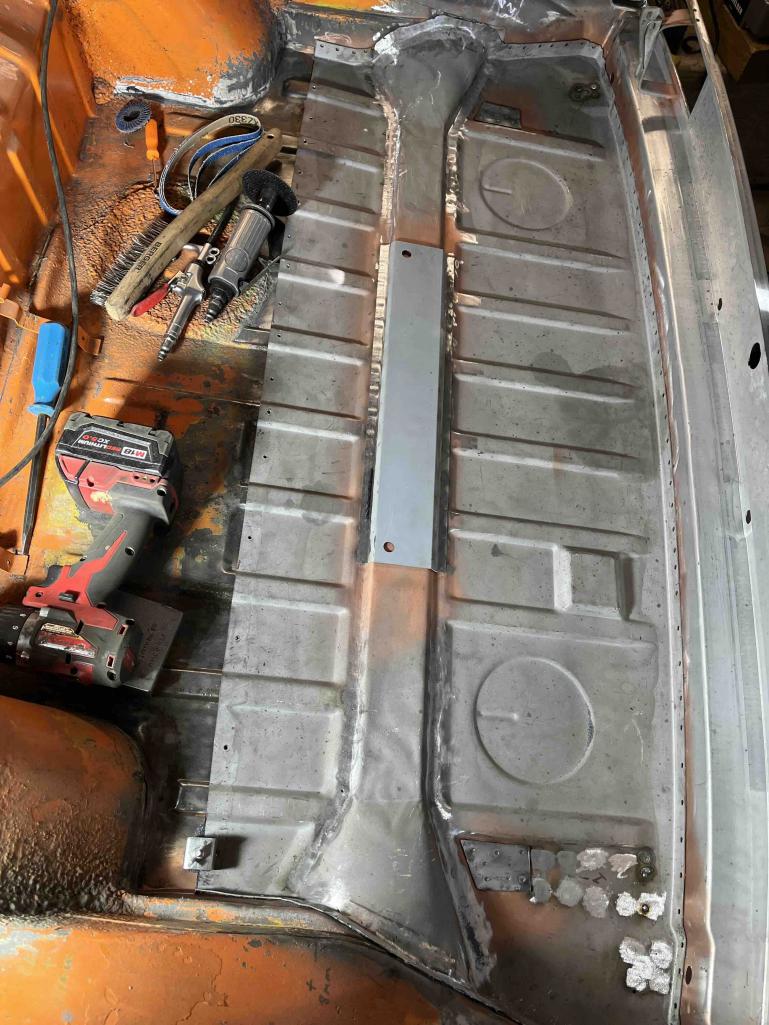
Next came final fitting and welding of the RD trunk floor patch. Lots of fitting, removing, re-checking, tweaking, and prep before the satisfaction of practicing my plug weld technique.
     |
|
|
|
| didenpx |
Jan 3 2026, 07:50 PM
Post
#49
|
|
Member Group: Members Posts: 127 Joined: 1-September 23 From: Usa Member No.: 27,556 Region Association: North East States |
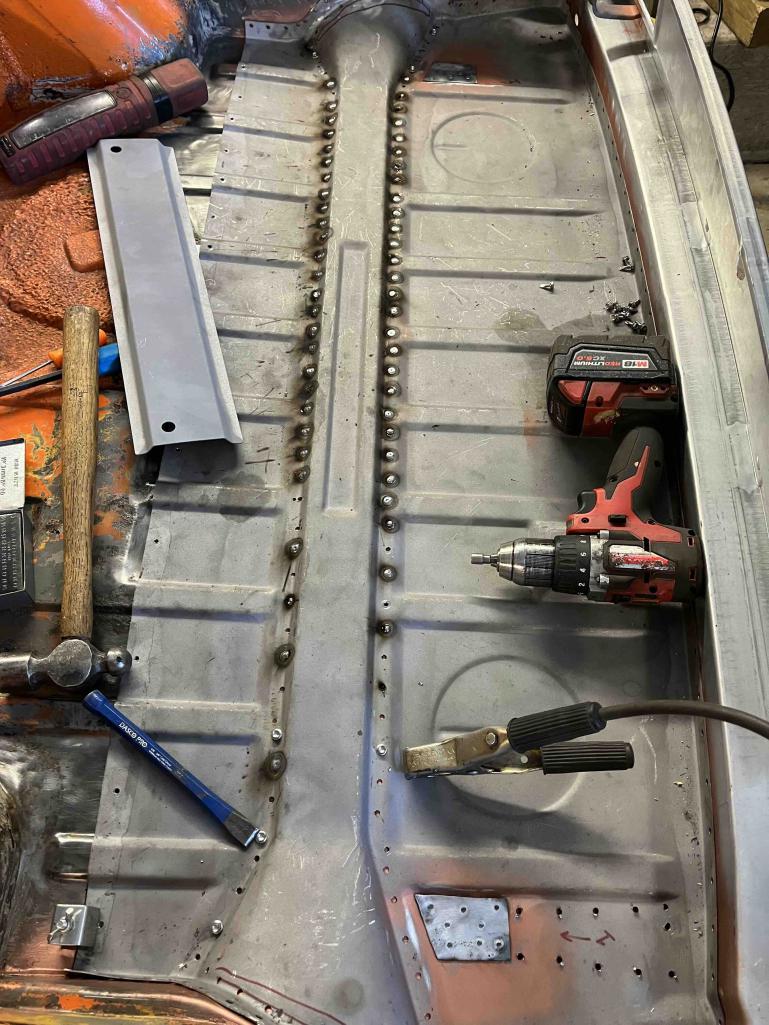
Next came the butt welding of the rear trunk floor repair section which gave me LOTS AND LOTS of practice on my welding technique...and let me try out some improvements thanks to lots of great contributors on YouTube.
Once that butt weld was finished there were a few plug welds to complete and then the LH tail light brackets, corner reinforcement bracket, and the trunk latch bracket. These were all salvaged so there was a lot of time to clean, straighten, and prep them before welding them in. 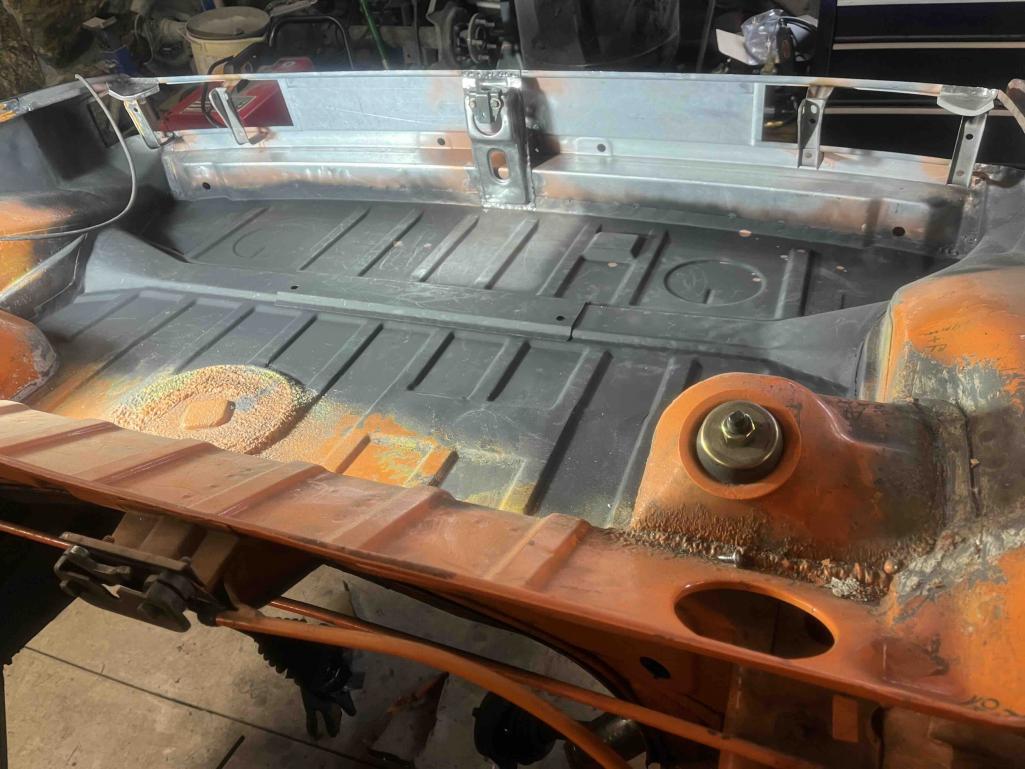 At this point, since I had a complete rear end and a functioning latch, I pivoted back to the trunk lid and the problem of the gaps to the quarters. I figured I could "fix" the position of the deck lid by adjusting the latch and then figure out where I needed to add material to the deck lid to get acceptable gaps. This has been the most frustrating and time consuming exercise so far (farting around with these particular body gaps). That said, they are looking ok and I think that with some judicious welding on of TIG rod and then some grinding things will be good enough for filler work down the road.  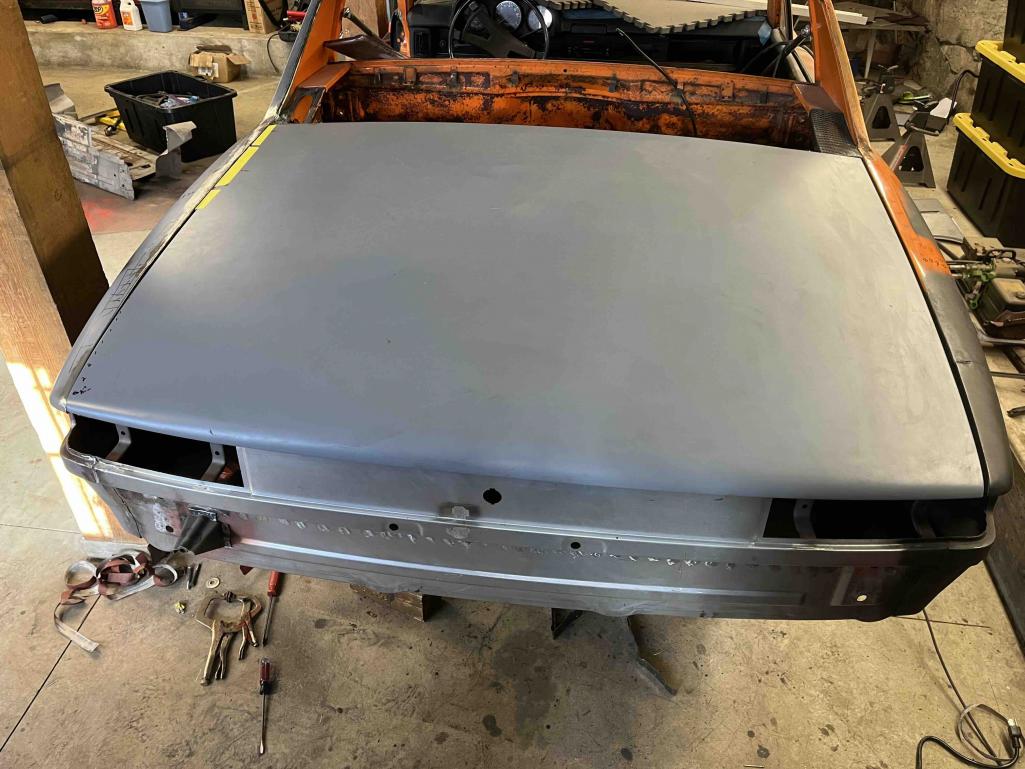 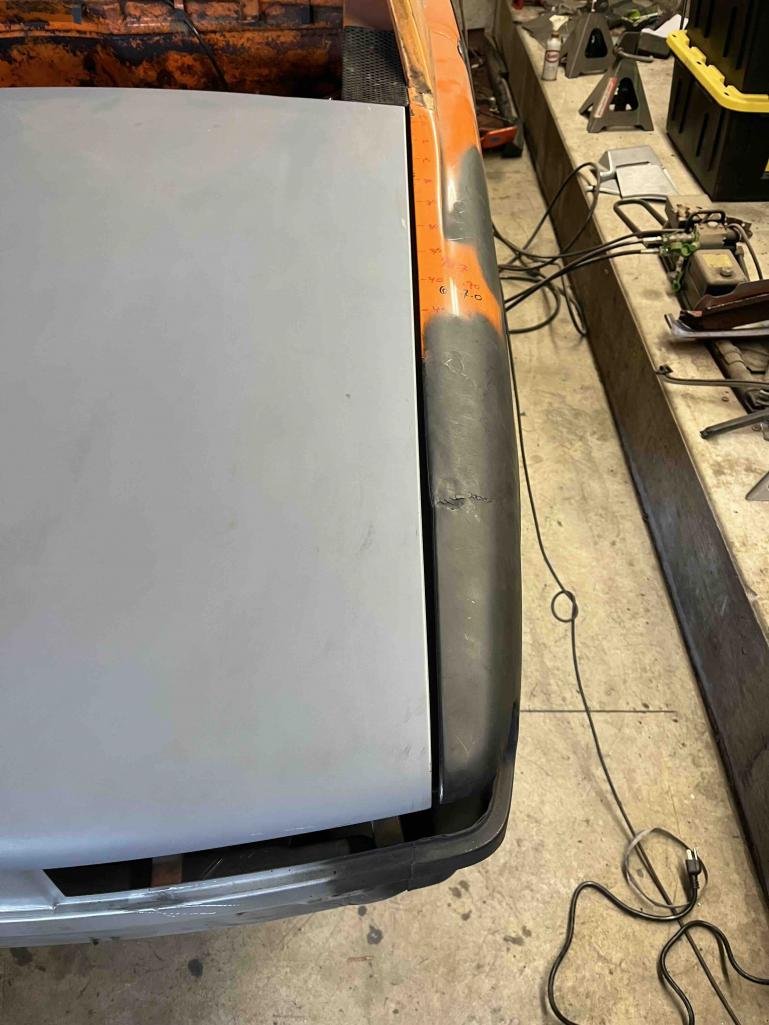 [attachmentid=963 [attachmentid=963686] 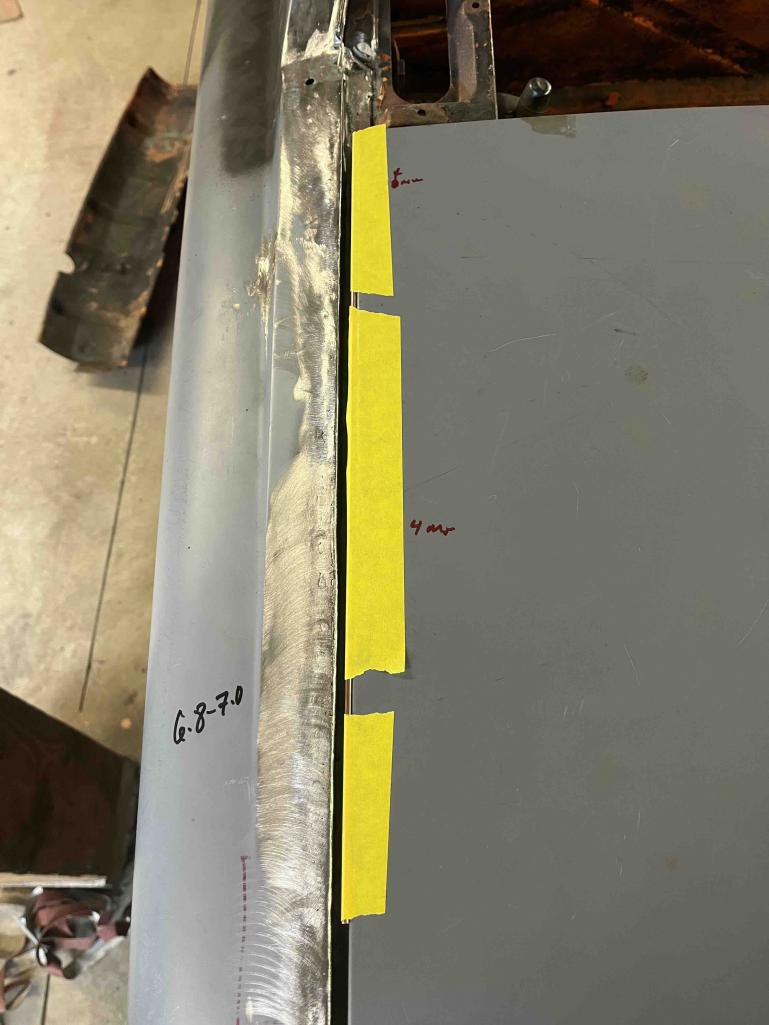 |
|
|
|
| didenpx |
Jan 3 2026, 07:53 PM
Post
#50
|
|
Member Group: Members Posts: 127 Joined: 1-September 23 From: Usa Member No.: 27,556 Region Association: North East States |
After I add material and grind the trunk lid gaps I plan to fit the engine lid and make sure those gaps are good (and if not rinse, wash, and repeat the TIG welding rod trick). Then it will be on to the mounting brackets for the rear stock sway bar that I'm adding, patching up and figuring out where to fit the muffler heat shield, rattle can truck bed liner of the area under the trunk followed by rattle can body color and then.....FINALLY, on to something new.
The something new will be patching up the engine compartment area which should be really straightforward after this epic goat rope.....he said. Oh - and in terms of where this project is now headed: I'm obviously back dating the bumpers and going with painted bumpers since I happened into some decent ones in a large parts lot that I acquired. In that lot I also got a (I think) 1974 2.0 engine that is complete but was stored outside for one winter under a tarp with a cylinder head pulled. I have a local resource who is a retired VW and Porsche engine mechanic so the plan is to assess the 2.0 and (fingers crossed) if it can be salvaged without ridiculous cost it's going into this shell along with the stock L-Jet from the 1.8. And if the 2.0 is no bueno I'll work with help to sort out the stock 1.8 that came with the car properly before it goes back into this shell. Beyond that there will be the stock 16mm sways in the rear and stock sways in the front (also acquired in the large parts lot). |
|
|
|
| 930cabman |
Jan 4 2026, 06:46 AM
Post
#51
|
|
Advanced Member Group: Members Posts: 4,722 Joined: 12-November 20 From: Buffalo Member No.: 24,877 Region Association: North East States |
Great project with great progress, keep moving forward. Are you planning to have her on the road this season?
also admiring the stone work, looks like granite. must be ancient |
|
|
|
| friethmiller |
Jan 4 2026, 08:33 AM
Post
#52
|
|
Senior Member Group: Members Posts: 1,319 Joined: 10-February 19 From: Austin, TX Member No.: 22,863 Region Association: Southwest Region |
Just checked back in on this thread. Wow! Great job, Paul. Keep up the momentum! (IMG:style_emoticons/default/welder.gif)
|
|
|
|
| didenpx |
Jan 4 2026, 11:21 AM
Post
#53
|
|
Member Group: Members Posts: 127 Joined: 1-September 23 From: Usa Member No.: 27,556 Region Association: North East States |
Thanks Fred and Cabman. I joke with my better half that it's going to be on the road in "the Spring." Of course I said that last winter too.
I think I'm going to DIY some of the paint (what parts of the underbody I do paint and the engine bay) where it's not really critical and outsource the finish body work and paint. That's assuming I can find a quality and economical option in the area. Getting it to the point where I could have someone blast, prime, fill, finish, and paint it probably makes Spring a pipe dream. Plus I still need to figure out which engine I'm going to put in it and get someone to mentor me through QCing it etc. If I could get it running and driving by Fall 2026 and then finish it so it's ready to go Spring 27 I'll be happy. On the topic of engines, if anyone has first-hand experience and associated pros/cons of using L-Jet (all of which components I have and were functional before tear down) on a GA engine, please share or point me to a thread. I'm a ways off from dealing with engine stuff but I have casually inspected the one I have and am encouraged that the heads seem to be ceramic coated so maybe it's been loved and improved. Paul |
|
|
|
| didenpx |
Jan 5 2026, 04:33 PM
Post
#54
|
|
Member Group: Members Posts: 127 Joined: 1-September 23 From: Usa Member No.: 27,556 Region Association: North East States |
I took a break from welding to begin considering engine options. As I mentioned earlier, my initial plan was to put the original 1.8 with L-jet back into the car once it's finished.
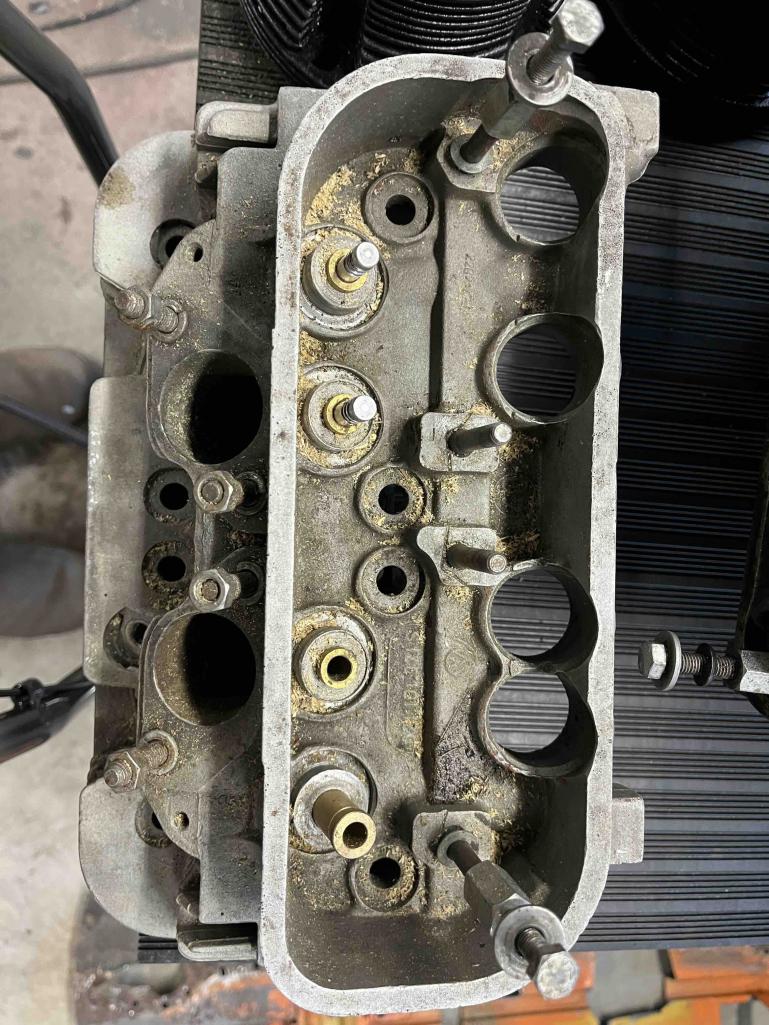
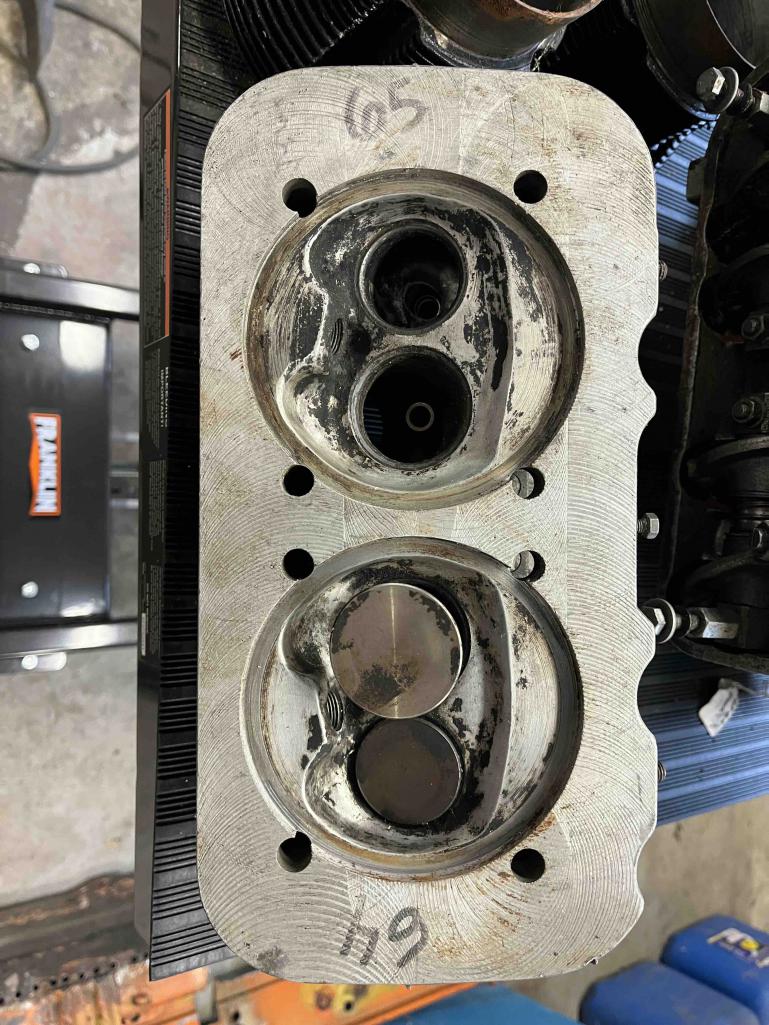
In June I picked up a future project car, 2 parts cars, and a horde of assorted parts that included what I was told was a 2.0 engine and which I assumed was stock. As I've been working on the welding and drifting away from a stock build I thought it might make more sense to swap in the 2.0 if it was serviceable. So on to the 2.0..... When I got the engine it had the #3-4 head pulled, missing two valves, and the jugs loose. I measured the jugs and found they are 102mm so I went from thinking I had stock engine to excitement about a big bore. Today I took a closer look at it and here's what I'm dealing with (spoiler: probably just a case and internals and maybe pistons that need to be fully built back up). The jugs are magnetic and steel, with some minor rust on one end from where they were sitting. The pistons are Marked JE SRP 40F and as the photos show the (?) #4 has a surface scuff. I've never rebuilt an engine so I don't know if that means the pistons are junk or if they can be reused. Stroke measured out at 71.76mm which the chatbot tells me makes this a 2.3L displacement engine. It has a stock clutch and a Bosch 0231178009 dizzy. At this point my plan is to rely on a local acquaintance who is a retired air cooled engine mechanic to help me assess what would be required to make this a viable engine. Assuming that doesn't involve five digit sums that's probably the route I will go. 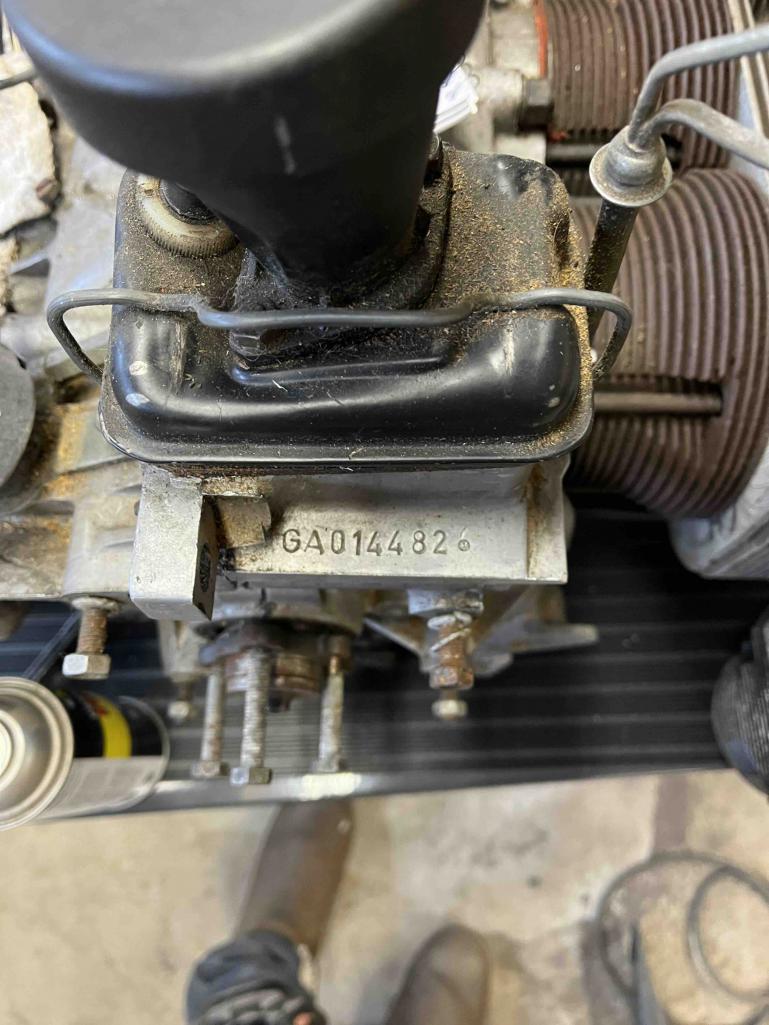 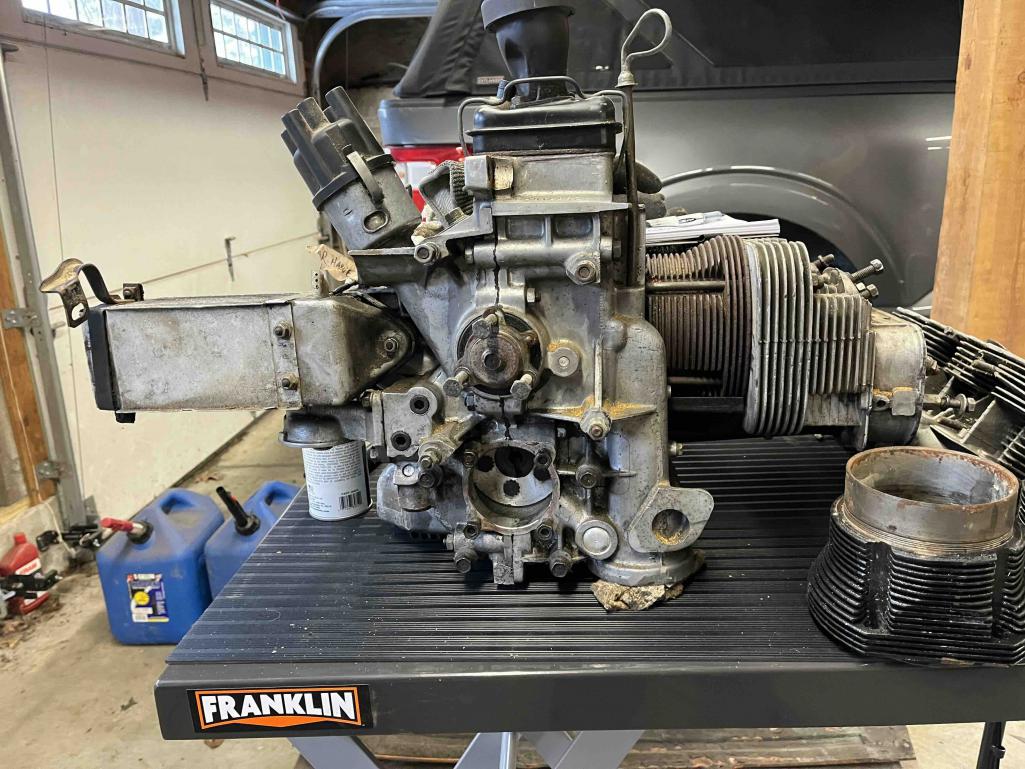  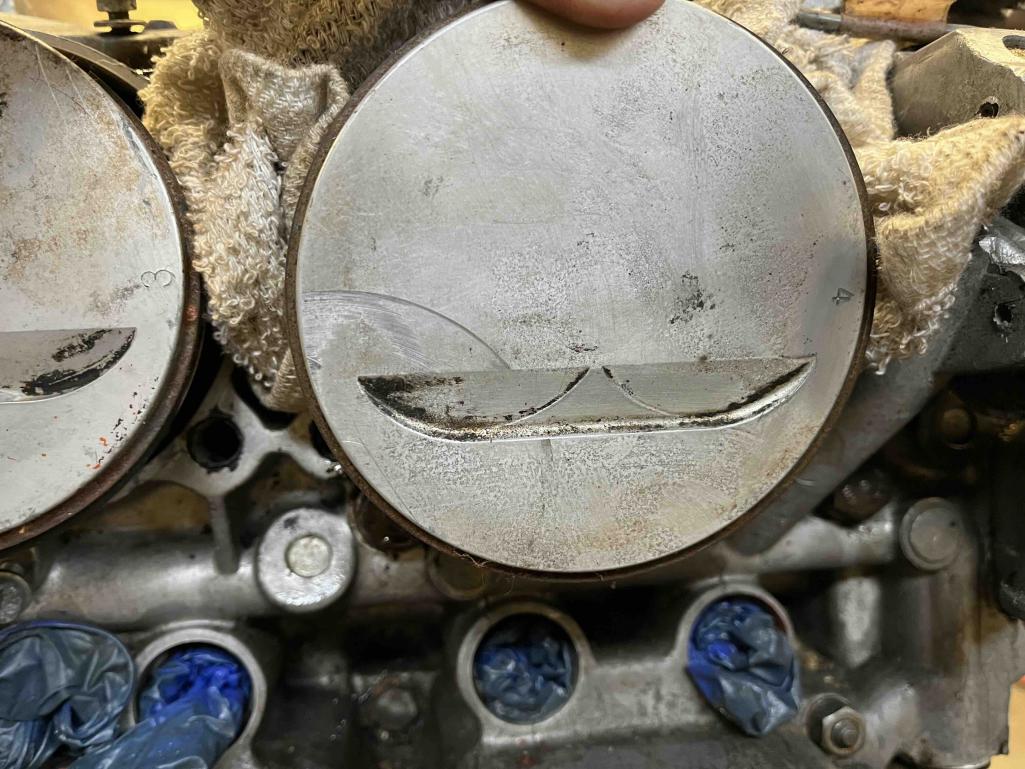 |
|
|
|
| didenpx |
Jan 5 2026, 04:35 PM
Post
#55
|
|
Member Group: Members Posts: 127 Joined: 1-September 23 From: Usa Member No.: 27,556 Region Association: North East States |
  |
|
|
|
| 930cabman |
Jan 5 2026, 04:59 PM
Post
#56
|
|
Advanced Member Group: Members Posts: 4,722 Joined: 12-November 20 From: Buffalo Member No.: 24,877 Region Association: North East States |
Can you (or will your wife allow) swing a brand new PMB 2.3 mill?
I have had luck rebuilding cyl heads, but they can be problematic. P&C's are very reasonable if you go that route many options |
|
|
|
| Artfrombama |
Jan 5 2026, 05:01 PM
Post
#57
|
|
Artfrombama Group: Members Posts: 463 Joined: 21-January 24 From: One of the chosen few Member No.: 27,870 Region Association: South East States |
|
|
|
|
| didenpx |
Jan 5 2026, 05:01 PM
Post
#58
|
|
Member Group: Members Posts: 127 Joined: 1-September 23 From: Usa Member No.: 27,556 Region Association: North East States |
Cabman, I’m not sure how much that would cost but I’m assuming I’d choke on the number. Cheap Yankee here.
Update: I just went to their website and am now off to the liquor cabinet for a medicinal snoot to calm my nerves. I’m used to the apparently ridiculously low cost of rebuilding Volvo B20 engines. |
|
|
|
| 930cabman |
Jan 5 2026, 06:54 PM
Post
#59
|
|
Advanced Member Group: Members Posts: 4,722 Joined: 12-November 20 From: Buffalo Member No.: 24,877 Region Association: North East States |
QUOTE(didenpx @ Jan 5 2026, 06:01 PM) Cabman, I’m not sure how much that would cost but I’m assuming I’d choke on the number. Cheap Yankee here. Update: I just went to their website and am now off to the liquor cabinet for a medicinal snoot to calm my nerves. I’m used to the apparently ridiculously low cost of rebuilding Volvo B20 engines. It's all good, many of us have been tagged as CSOB, I wear it proudly (IMG:style_emoticons/default/cheer.gif) (IMG:style_emoticons/default/cheer.gif) |
|
|
|
| Montreal914 |
Jan 5 2026, 07:26 PM
Post
#60
|
|
Advanced Member Group: Members Posts: 2,148 Joined: 8-August 10 From: Claremont, CA Member No.: 12,023 Region Association: Southern California |
The two liter crankshaft is 71mm stroke. I am pretty sure yours has been slightly stroked by 0.76mm for racing applications in the 2 liter class. Your crankshaft with stock 94mm cylinders adds up to 1992cc compared to the stock 1971cc. Every bits counts!
I bet, the engine was later bored out with the 102mm. Cool project and great progress on the metal! |
|
|
|
|
1 User(s) are reading this topic (1 Guests and 0 Anonymous Users)
0 Members:

|
Lo-Fi Version | Time is now: 24th June 2026 - 02:08 AM |
Invision Power Board
v9.1.4 © 2026 IPS, Inc.