|
|
|
Porsche, and the Porsche crest are registered trademarks of Dr. Ing. h.c. F. Porsche AG.
This site is not affiliated with Porsche in any way. Its only purpose is to provide an online forum for car enthusiasts. All other trademarks are property of their respective owners. |
|
|


| seanpaulmc |
 Oct 15 2024, 05:26 PM Oct 15 2024, 05:26 PM
Post
#21
|
|
Member  Group: Members Posts: 458 Joined: 6-December 16 From: Orlando, FL Member No.: 20,649 Region Association: South East States |
Greetings 914World !
I am seeking advice / guidance / instruction from you metal masters on how to approach and tackle this rear corner repair. Panels involved include: • Left rear quarter • Taillight panel • Trunk floor & cross brace • Left side inner trunk fender Some initial questions: • Does the whole quarter panel need to be replaced, or just part? • Does the whole tail panel need to be replaced, or just part? • Can this repair be done well with partial panels spliced in? (Like what was done to the fender in the past but better executed with butt joints and less, a lot less, filler.) • Should I start with cutting off what I think is bad or begin by striping the whole quarter panel of paint and bondo? Exposed metal rusts quickly in Florida. • How and where to cut? What tools and wire size to use? How to finish, prep, and paint? -This is where I need your expertise to lead me. 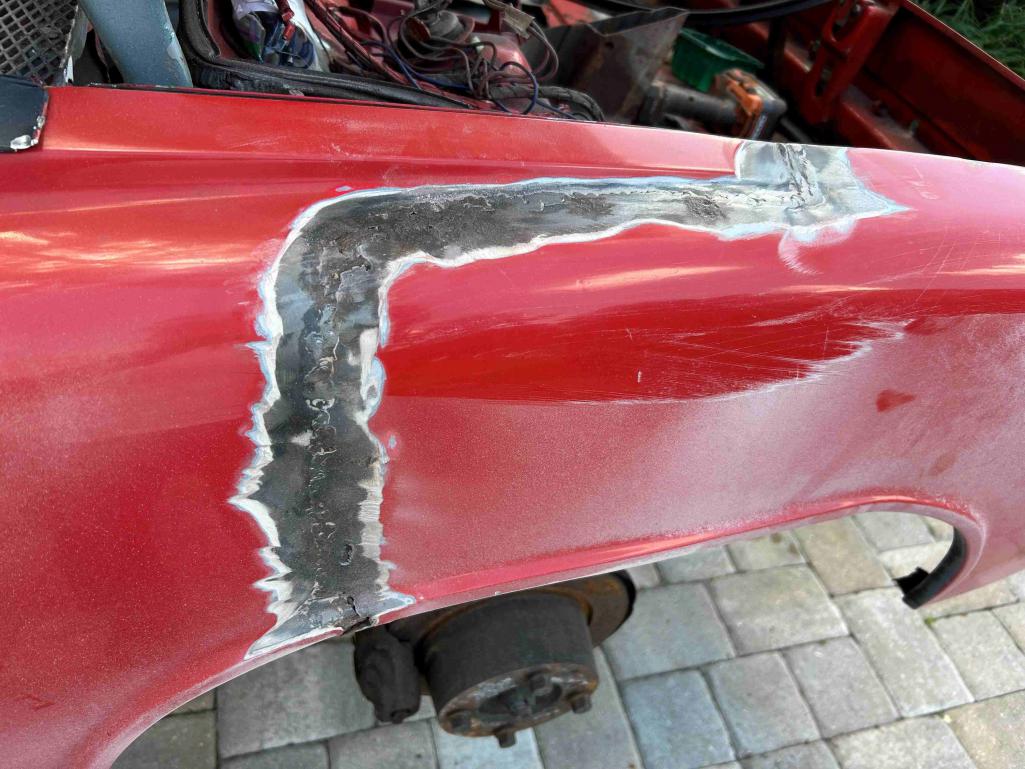 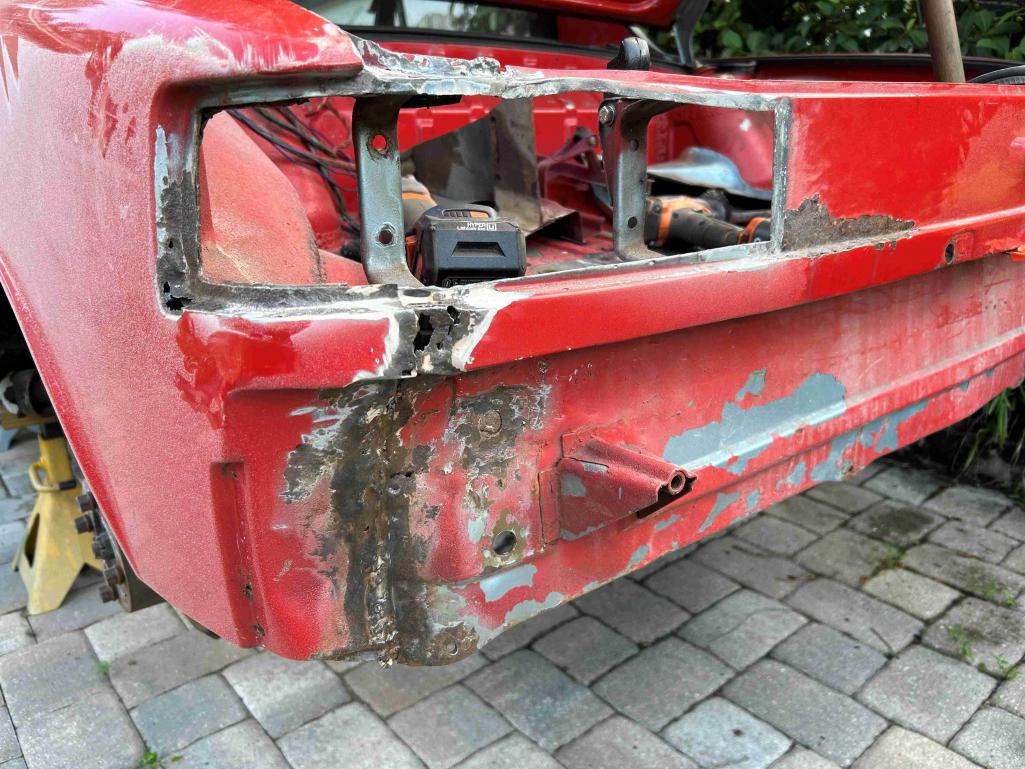 This is my first go around at this. Everything I do is a first-time attempt, and thinking about fixing this fender and taillight area while making it look presentable gives me a lot of apprehension. So far, I have learned to MIG weld and do simple panel forming by working on this project – jack points, floor, hell hole, longs, firewall, and some tools and fixtures. I can make solid welds in structural areas that are strong but don’t necessarily have to be pretty. I do not (yet) have the metal finishing skills for this fender and am hoping I can get your guidance along the way to help me get through what I see to be a complicated, multi panel repair. By making this fender repair its own topic thread, hopefully it encourages greater feedback from the community rather than if it stays buried in my long, slow build thread. If interested in how it got here and the work done to the car thus far, then the thread is this one: here I know I need to go take some measurements before cutting it apart just to get the baseline of where things are at. I hope to do that this coming weekend. Thank you in advance for the feedback and support. Gratefully, Sean |
   |

 
|
Posts in this topic
seanpaulmc Help wanted for rear fender repair Oct 15 2024, 05:26 PM worn gives me a lot of apprehension.
So far, I have le... Oct 15 2024, 07:00 PM bkrantz It al depends on what results you want. Perfectio... Oct 15 2024, 08:02 PM Ishley I would buy panels before you cut anything apart. ... Oct 15 2024, 08:56 PM
worn gives me a lot of apprehension.
So far, I have le... Oct 15 2024, 07:00 PM bkrantz It al depends on what results you want. Perfectio... Oct 15 2024, 08:02 PM Ishley I would buy panels before you cut anything apart. ... Oct 15 2024, 08:56 PM
 930cabman
I would buy panels before you cut anything apart.... Oct 16 2024, 09:44 AM rick 918-S I would check to see if someone has a used quarter... Oct 16 2024, 05:53 AM mepstein Remember that almost every panel on the car is str... Oct 16 2024, 06:30 AM Montreal914 Sean, I too am at my first round in this type of w... Oct 16 2024, 08:34 AM MikeK Looking at what you have, I'd suggest strippin... Oct 16 2024, 10:41 AM dtmehall Try this youtube video for starters. He also has o... Oct 16 2024, 05:27 PM seanpaulmc You guys are great! I appreciate all the good... Oct 16 2024, 05:34 PM Ishley Honestly looking at your pics I think you might be... Oct 16 2024, 07:10 PM seanpaulmc
Honestly looking at your pics I think you might b... Oct 18 2024, 05:07 AM friethmiller Interesting... that previous fender weld looks li... Oct 18 2024, 06:05 AM seanpaulmc The diagonal rear truck dimension is given as “s... Oct 19 2024, 10:26 AM seanpaulmc
The diagonal rear truck dimension is given as “... Oct 22 2024, 05:25 AM SirAndy I’m thinking “s” gets measured at the edge o... Oct 22 2024, 10:13 AM 930cabman
I’m thinking “s” gets measured at the edge ... Oct 22 2024, 10:21 AM dr914@autoatlanta.com Install a new quarter panel and new rear panel for... Oct 19 2024, 12:14 PM friethmiller Having just replaced both of my rear quarters a fe... Oct 22 2024, 12:39 PM 930cabman
Having just replaced both of my rear quarters a f... Oct 22 2024, 01:26 PM bkrantz I used this tool a lot to get the right spacing an... Oct 22 2024, 06:52 PM DennisV
I used this tool a lot to get the right spacing a... Dec 31 2025, 06:38 PM _stickykitty79_
I used this tool a lot to get the right spacing a... Jan 1 2026, 08:15 PM seanpaulmc
I used this tool a lot to get the right spacing a... Jan 3 2026, 03:57 PM friethmiller
Sean, what kind of welder are you using? It l... Jan 4 2026, 08:41 AM volksaddict CAD = Cardboard Aided Design? :D
Just kidding, y... Jan 4 2026, 09:24 AM seanpaulmc
Sean, what kind of welder are you using? It ... Jan 4 2026, 06:05 PM didenpx Sean,
How does the quarter to rear door jamb area... Oct 19 2025, 05:38 PM seanpaulmc
Sean,
How does the quarter to rear door jamb are... Oct 20 2025, 05:13 PM peteyd We have a used quarter panel if you head down that... Oct 21 2025, 07:29 AM didenpx
We have a used quarter panel if you head down tha... Oct 21 2025, 06:19 PM peteyd
We have a used quarter panel if you head down th... Oct 22 2025, 11:14 AM didenpx
[quote name='didenpx' post='3229314' date='Oct 21... Oct 22 2025, 04:52 PM TRP Moses' Sandals!!? I wouldn't even ... Oct 21 2025, 08:56 AM friethmiller Sean, reread all the posts here. I'd strip th... Oct 21 2025, 11:49 AM friethmiller Sean,
On my first 914, I had a lot to do on my dr... Oct 22 2025, 01:39 PM seanpaulmc
Sean,
On my first 914, I had a lot to do on my d... Oct 25 2025, 03:42 AM Montreal914 Sean, I was having the same question a while back ... Oct 22 2025, 04:34 PM seanpaulmc
Sean, I was having the same question a while back... Oct 25 2025, 03:55 AM seanpaulmc It’s been a bit. Happy holidays folks.
This is... Dec 27 2025, 04:04 PM friethmiller
Let me know your thoughts on this.
Thank you,
... Dec 31 2025, 07:38 PM Montreal914 Will enjoy reading/learning what the pros will say... Dec 27 2025, 04:26 PM seanpaulmc Thought I took more photos but it’s only the one... Dec 28 2025, 06:00 PM seanpaulmc Working on repairs to the repair quarter panel whi... Dec 31 2025, 05:20 PM seanpaulmc And like Bob said, take measurements from the good... Jan 3 2026, 04:02 PM Montreal914 Looking good! :popcorn: Jan 3 2026, 04:08 PM 930cabman I am also in this boat with the drivers rear quart... Jan 4 2026, 06:54 AM friethmiller Yep, I could say the same thing about some of my w... Jan 4 2026, 07:43 PM seanpaulmc
My penance practice has been the repair of this ... Jan 18 2026, 05:09 PM friethmiller
Thanks again for the advice.
You bet! I en... Jan 18 2026, 09:39 PM seanpaulmc Progress has been made. Mistakes have also been ma... Feb 16 2026, 06:32 PM Montreal914 So, I am not a pro, far from it... :rolleyes:
I... Feb 16 2026, 07:28 PM friethmiller I’ve done this sorta thing before. Either optio... Feb 16 2026, 08:11 PM seanpaulmc Thanks Eric and Fred. Good feedback.
Hopefully I�... Feb 17 2026, 06:18 PM seanpaulmc With a little help from my friends (you all), we g... Apr 10 2026, 04:30 PM bkrantz That looks great. Well done! Apr 10 2026, 08:47 PM
930cabman
I would buy panels before you cut anything apart.... Oct 16 2024, 09:44 AM rick 918-S I would check to see if someone has a used quarter... Oct 16 2024, 05:53 AM mepstein Remember that almost every panel on the car is str... Oct 16 2024, 06:30 AM Montreal914 Sean, I too am at my first round in this type of w... Oct 16 2024, 08:34 AM MikeK Looking at what you have, I'd suggest strippin... Oct 16 2024, 10:41 AM dtmehall Try this youtube video for starters. He also has o... Oct 16 2024, 05:27 PM seanpaulmc You guys are great! I appreciate all the good... Oct 16 2024, 05:34 PM Ishley Honestly looking at your pics I think you might be... Oct 16 2024, 07:10 PM seanpaulmc
Honestly looking at your pics I think you might b... Oct 18 2024, 05:07 AM friethmiller Interesting... that previous fender weld looks li... Oct 18 2024, 06:05 AM seanpaulmc The diagonal rear truck dimension is given as “s... Oct 19 2024, 10:26 AM seanpaulmc
The diagonal rear truck dimension is given as “... Oct 22 2024, 05:25 AM SirAndy I’m thinking “s” gets measured at the edge o... Oct 22 2024, 10:13 AM 930cabman
I’m thinking “s” gets measured at the edge ... Oct 22 2024, 10:21 AM dr914@autoatlanta.com Install a new quarter panel and new rear panel for... Oct 19 2024, 12:14 PM friethmiller Having just replaced both of my rear quarters a fe... Oct 22 2024, 12:39 PM 930cabman
Having just replaced both of my rear quarters a f... Oct 22 2024, 01:26 PM bkrantz I used this tool a lot to get the right spacing an... Oct 22 2024, 06:52 PM DennisV
I used this tool a lot to get the right spacing a... Dec 31 2025, 06:38 PM _stickykitty79_
I used this tool a lot to get the right spacing a... Jan 1 2026, 08:15 PM seanpaulmc
I used this tool a lot to get the right spacing a... Jan 3 2026, 03:57 PM friethmiller
Sean, what kind of welder are you using? It l... Jan 4 2026, 08:41 AM volksaddict CAD = Cardboard Aided Design? :D
Just kidding, y... Jan 4 2026, 09:24 AM seanpaulmc
Sean, what kind of welder are you using? It ... Jan 4 2026, 06:05 PM didenpx Sean,
How does the quarter to rear door jamb area... Oct 19 2025, 05:38 PM seanpaulmc
Sean,
How does the quarter to rear door jamb are... Oct 20 2025, 05:13 PM peteyd We have a used quarter panel if you head down that... Oct 21 2025, 07:29 AM didenpx
We have a used quarter panel if you head down tha... Oct 21 2025, 06:19 PM peteyd
We have a used quarter panel if you head down th... Oct 22 2025, 11:14 AM didenpx
[quote name='didenpx' post='3229314' date='Oct 21... Oct 22 2025, 04:52 PM TRP Moses' Sandals!!? I wouldn't even ... Oct 21 2025, 08:56 AM friethmiller Sean, reread all the posts here. I'd strip th... Oct 21 2025, 11:49 AM friethmiller Sean,
On my first 914, I had a lot to do on my dr... Oct 22 2025, 01:39 PM seanpaulmc
Sean,
On my first 914, I had a lot to do on my d... Oct 25 2025, 03:42 AM Montreal914 Sean, I was having the same question a while back ... Oct 22 2025, 04:34 PM seanpaulmc
Sean, I was having the same question a while back... Oct 25 2025, 03:55 AM seanpaulmc It’s been a bit. Happy holidays folks.
This is... Dec 27 2025, 04:04 PM friethmiller
Let me know your thoughts on this.
Thank you,
... Dec 31 2025, 07:38 PM Montreal914 Will enjoy reading/learning what the pros will say... Dec 27 2025, 04:26 PM seanpaulmc Thought I took more photos but it’s only the one... Dec 28 2025, 06:00 PM seanpaulmc Working on repairs to the repair quarter panel whi... Dec 31 2025, 05:20 PM seanpaulmc And like Bob said, take measurements from the good... Jan 3 2026, 04:02 PM Montreal914 Looking good! :popcorn: Jan 3 2026, 04:08 PM 930cabman I am also in this boat with the drivers rear quart... Jan 4 2026, 06:54 AM friethmiller Yep, I could say the same thing about some of my w... Jan 4 2026, 07:43 PM seanpaulmc
My penance practice has been the repair of this ... Jan 18 2026, 05:09 PM friethmiller
Thanks again for the advice.
You bet! I en... Jan 18 2026, 09:39 PM seanpaulmc Progress has been made. Mistakes have also been ma... Feb 16 2026, 06:32 PM Montreal914 So, I am not a pro, far from it... :rolleyes:
I... Feb 16 2026, 07:28 PM friethmiller I’ve done this sorta thing before. Either optio... Feb 16 2026, 08:11 PM seanpaulmc Thanks Eric and Fred. Good feedback.
Hopefully I�... Feb 17 2026, 06:18 PM seanpaulmc With a little help from my friends (you all), we g... Apr 10 2026, 04:30 PM bkrantz That looks great. Well done! Apr 10 2026, 08:47 PM  |
2 User(s) are reading this topic (2 Guests and 0 Anonymous Users)
0 Members:

|
Lo-Fi Version | Time is now: 1st August 2026 - 12:49 AM |
Invision Power Board
v9.1.4 © 2026 IPS, Inc.