|
|
|
Porsche, and the Porsche crest are registered trademarks of Dr. Ing. h.c. F. Porsche AG.
This site is not affiliated with Porsche in any way. Its only purpose is to provide an online forum for car enthusiasts. All other trademarks are property of their respective owners. |
|
|


| nditiz1 |
 May 5 2025, 07:49 PM May 5 2025, 07:49 PM
Post
#21
|
|
Senior Member  Group: Members Posts: 1,263 Joined: 26-May 15 From: Mount Airy, Maryland Member No.: 18,763 Region Association: MidAtlantic Region |
*****Update**** No longer a 6 conversion project, maybe in the distant future, but lets get this off the lift and driving again.
I figured since I finally started shelling out money I would begin a build thread. No set timeline in mind, maybe by the Sept ski roundtop swap meet??? I hate having a pcar down, BUT I have a Rallye and family trips coming up, plus boating season will be starting, just a lot of things going on. I may try to do some vids of the build as those are always helpful to me. Raw footage of me in boxers and flip-flops dropping an engine and trans is always a treat (IMG:style_emoticons/default/cheer.gif) ....Ok, enough blabbing on about life, down to the meat and potatoes. 1974 Ivory White 914. Going to assume it was a 1.8, by it not having fog lights. Idk, I just came up with that theory. "You know Nick, some of the 914s in 74 could have had the 2.0 without the appearance package" She's a basic B is what im trying to say. Too high of a vin in case you were wondering Jeff. Bought her off another world member, Don, down in Charlotte. It was sporting a 1.7 dual Carbs setup with 75/76 heat exchangers and a monza muffler. Black Forest racing did some rust repair years ago, back half of the floor pans. Anyway, I bought a one way ticket from Baltimore to Charlotte and drove her home. She made it eventually and I did not baby her. Once home I began to go over everything. Rocking 8 spoke empi wheels, rear reflector bar, primer spray in some areas, cracked targa. She was a driver, but she was mine. I immediately began formulating what my plans were. 5 lug conversion GT engine lid Restore rear trunk to factory look, sorry not a reflector bar guy Drop the 916 front and rear bumpers, not a 916 guy either Redo seats Add more gauges The list continued So I started to work on minor things, like a breather setup for the engine. During the trip 3/4 was blowing oil everywhere. Upon further inspection the 1/2 and oil fill were leading to atmosphere, soooooo the ground essentially. The hose on the 3/4 side didn't exist (IMG:style_emoticons/default/confused24.gif) I upgraded the gauge lights with leds and swapped in a working odometer. I replaced the rear lenses with euro 914rubber ones - which are mediocre fit at best, big gaps. Removed several useless switches and wiring under the dash. If there's one thing im decent at it's the wiring in these old cars. While playing with the shifter in the garage, I lost all the gears. Jack up the rear, shift console cover full of oil - add that fix to the list - the cone screw came out, easy fix, all gears back. Decided to do a minor tune-up with new plugs, and carb resetting. Don knew it wasn't right and I have tons of jets for webers. I began making adjustments. I did not however check the valves, I did the timing, not the valves, stupid me. (IMG:style_emoticons/default/headbang.gif) the last voyage I took her on, devastation hit a mile from my house. Kaboom down goes the valve and engine on cyl 3 (IMG:style_emoticons/default/hissyfit.gif) So i circle the wagons deciding what to do, top end rebuild the 1.7 OR drop in a 6. I have a 3.0 on the test stand currently. That made it less of a challenge, but a lot of work is involved to get everything so that engine can drop in. Money, time, patience. I did it once before and made some mistakes that I hope to not make this time around. So join me on this journey.... The old for sale ad http://www.914world.com/bbs2/index.php?showtopic=372901 Current state of things: 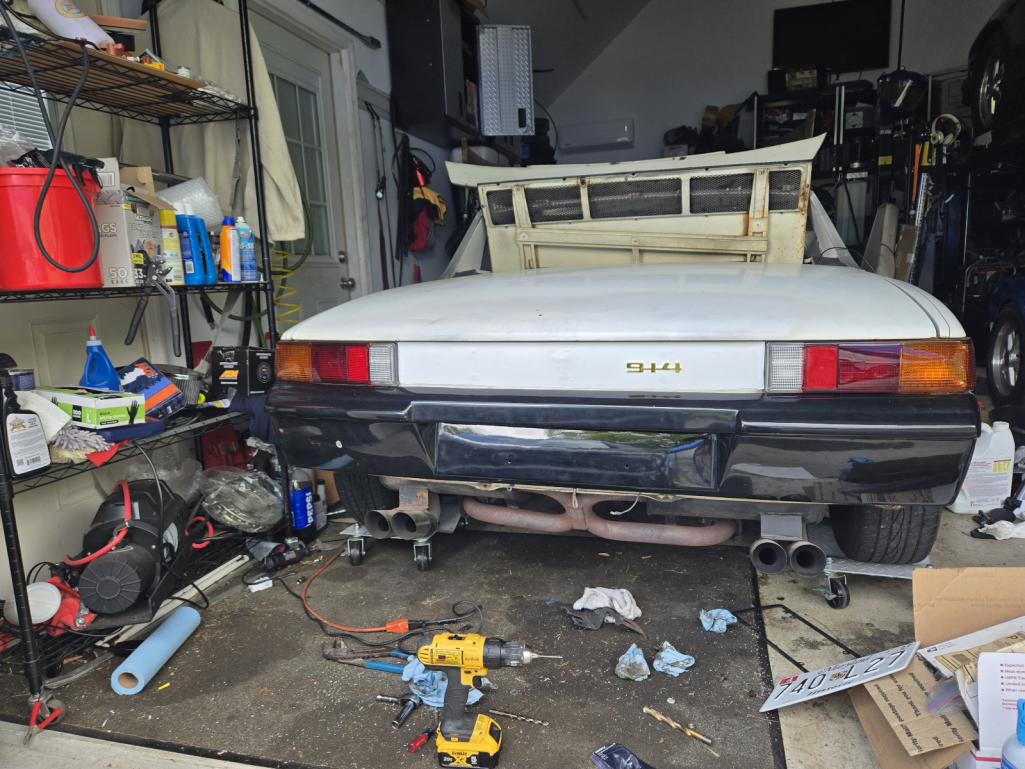 |
   |

 
|
Posts in this topic
 nditiz1 Nditiz1's 2nd 914-6 conversion 1974 build thread...nope now a 4 again May 5 2025, 07:49 PM
 mb911 Parts incoming. Might even have a GT bumper if you... May 6 2025, 05:38 AM campbellcj Sorry to hear about the engine mishap but looking ... May 6 2025, 06:28 AM Root_Werks This should be a good thread! May 6 2025, 10:14 AM OrangeBones How about getting it ready for the NEG??? May 6 2025, 10:35 AM nditiz1 Rdy for NEG will be tough. I still need to pull t... May 6 2025, 01:56 PM mb911 Shipped the first items today. Tank ,filler, conso... May 6 2025, 03:39 PM racer914 I bought Peter's car and parts up in N Georgia... May 6 2025, 04:55 PM nditiz1 Thanks Dave I did get the pics.
I guess starting ... May 7 2025, 06:28 AM scrz914 “I did it once before and made some mistakes tha... May 8 2025, 10:38 AM Shivers Nice bumper. Is it a survivor or is that glass?
... May 8 2025, 11:09 AM Root_Werks Always like how quickly you can drop the entire dr... May 8 2025, 11:54 AM nditiz1 @shivers - this is a one piece fiberglass bumper.... May 8 2025, 12:37 PM
mb911 Parts incoming. Might even have a GT bumper if you... May 6 2025, 05:38 AM campbellcj Sorry to hear about the engine mishap but looking ... May 6 2025, 06:28 AM Root_Werks This should be a good thread! May 6 2025, 10:14 AM OrangeBones How about getting it ready for the NEG??? May 6 2025, 10:35 AM nditiz1 Rdy for NEG will be tough. I still need to pull t... May 6 2025, 01:56 PM mb911 Shipped the first items today. Tank ,filler, conso... May 6 2025, 03:39 PM racer914 I bought Peter's car and parts up in N Georgia... May 6 2025, 04:55 PM nditiz1 Thanks Dave I did get the pics.
I guess starting ... May 7 2025, 06:28 AM scrz914 “I did it once before and made some mistakes tha... May 8 2025, 10:38 AM Shivers Nice bumper. Is it a survivor or is that glass?
... May 8 2025, 11:09 AM Root_Werks Always like how quickly you can drop the entire dr... May 8 2025, 11:54 AM nditiz1 @shivers - this is a one piece fiberglass bumper.... May 8 2025, 12:37 PM
 Shivers
[b]@[url=http://www.914world.com/bbs2/index.php?s... May 8 2025, 03:34 PM nditiz1 Making some steady progress on not only the 6 conv... May 15 2025, 11:20 AM Root_Werks Looks like you'll be installing the "Fact... May 15 2025, 11:28 AM Dion Good luck with project! Will be following. May 16 2025, 04:58 PM nditiz1 @Root_Werks you are correct. I prefer the OEM mo... May 20 2025, 06:26 PM mb911 Your tank is done and waiting on filler necks to c... May 21 2025, 06:20 AM nditiz1 Woot! The tank.
Got 1 of the 2 major hurdles ... May 22 2025, 05:21 PM mb911 Looking good. Hopefully shipping your tank etc Tue... May 23 2025, 06:14 AM mb911 Tank shipped today sorry for the delay. The plater... May 30 2025, 04:51 PM nditiz1 No worries Ben, I have been making slow progress w... May 30 2025, 08:41 PM racer914 I got the metal channel from Restoration Design fo... May 31 2025, 08:50 AM nditiz1 Thanks for the lead Dave, I'll make a purchase... May 31 2025, 11:23 AM nditiz1 Ok so im back from the Ruchlos Rallye. Got to han... Jun 10 2025, 10:21 PM Root_Werks Great time to fix all those things when the engine... Jun 11 2025, 09:12 AM nditiz1 And just like that the tank is 90% in. I need to ... Jun 11 2025, 12:37 PM porschetub
And just like that the tank is 90% in. I need to... Jun 20 2025, 08:54 PM mb911 Looks great Jun 11 2025, 01:48 PM Root_Werks Looks pretty good to me! My six conversion - ... Jun 11 2025, 02:42 PM OrangeBones Great progress! Had a blast at RR5 with you... Jun 11 2025, 09:43 PM jaredmcginness Looks great man! I am pretty busy this summer,... Jun 12 2025, 07:28 AM Dion Wow an intact emissions sticker! Oil tank hole... Jun 13 2025, 05:36 PM nditiz1 @jaredmcginness - I will take you up on that offe... Jun 20 2025, 11:40 AM Root_Werks I can't remember what side needed milled down ... Jun 20 2025, 01:11 PM nditiz1 @Root_werks - curious about the 180 flip of the a... Jun 30 2025, 08:35 PM mate914
[b]@[url=http://www.914world.com/bbs2/index.php?s... Jul 1 2025, 05:43 AM Root_Werks Quote:
@Root_werks - curious about the 180 flip of... Jul 2 2025, 10:38 AM nditiz1 I worked on almost finishing up the wiring. I nee... Jul 9 2025, 07:24 AM nditiz1 So.....Its been over 6 months since I touched this... Jan 19 2026, 08:38 AM OrangeBones Al is a great guy and fantastic engine builder... Jan 19 2026, 09:20 AM
Shivers
[b]@[url=http://www.914world.com/bbs2/index.php?s... May 8 2025, 03:34 PM nditiz1 Making some steady progress on not only the 6 conv... May 15 2025, 11:20 AM Root_Werks Looks like you'll be installing the "Fact... May 15 2025, 11:28 AM Dion Good luck with project! Will be following. May 16 2025, 04:58 PM nditiz1 @Root_Werks you are correct. I prefer the OEM mo... May 20 2025, 06:26 PM mb911 Your tank is done and waiting on filler necks to c... May 21 2025, 06:20 AM nditiz1 Woot! The tank.
Got 1 of the 2 major hurdles ... May 22 2025, 05:21 PM mb911 Looking good. Hopefully shipping your tank etc Tue... May 23 2025, 06:14 AM mb911 Tank shipped today sorry for the delay. The plater... May 30 2025, 04:51 PM nditiz1 No worries Ben, I have been making slow progress w... May 30 2025, 08:41 PM racer914 I got the metal channel from Restoration Design fo... May 31 2025, 08:50 AM nditiz1 Thanks for the lead Dave, I'll make a purchase... May 31 2025, 11:23 AM nditiz1 Ok so im back from the Ruchlos Rallye. Got to han... Jun 10 2025, 10:21 PM Root_Werks Great time to fix all those things when the engine... Jun 11 2025, 09:12 AM nditiz1 And just like that the tank is 90% in. I need to ... Jun 11 2025, 12:37 PM porschetub
And just like that the tank is 90% in. I need to... Jun 20 2025, 08:54 PM mb911 Looks great Jun 11 2025, 01:48 PM Root_Werks Looks pretty good to me! My six conversion - ... Jun 11 2025, 02:42 PM OrangeBones Great progress! Had a blast at RR5 with you... Jun 11 2025, 09:43 PM jaredmcginness Looks great man! I am pretty busy this summer,... Jun 12 2025, 07:28 AM Dion Wow an intact emissions sticker! Oil tank hole... Jun 13 2025, 05:36 PM nditiz1 @jaredmcginness - I will take you up on that offe... Jun 20 2025, 11:40 AM Root_Werks I can't remember what side needed milled down ... Jun 20 2025, 01:11 PM nditiz1 @Root_werks - curious about the 180 flip of the a... Jun 30 2025, 08:35 PM mate914
[b]@[url=http://www.914world.com/bbs2/index.php?s... Jul 1 2025, 05:43 AM Root_Werks Quote:
@Root_werks - curious about the 180 flip of... Jul 2 2025, 10:38 AM nditiz1 I worked on almost finishing up the wiring. I nee... Jul 9 2025, 07:24 AM nditiz1 So.....Its been over 6 months since I touched this... Jan 19 2026, 08:38 AM OrangeBones Al is a great guy and fantastic engine builder... Jan 19 2026, 09:20 AM  |
4 User(s) are reading this topic (3 Guests and 0 Anonymous Users)
1 Members: nditiz1

|
Lo-Fi Version | Time is now: 19th January 2026 - 02:39 PM |
Invision Power Board
v9.1.4 © 2026 IPS, Inc.