|
|
|
Porsche, and the Porsche crest are registered trademarks of Dr. Ing. h.c. F. Porsche AG.
This site is not affiliated with Porsche in any way. Its only purpose is to provide an online forum for car enthusiasts. All other trademarks are property of their respective owners. |
|
|

  |

| Ron914 |
 May 8 2025, 05:06 PM May 8 2025, 05:06 PM
Post
#1
|
|
Senior Member  Group: Members Posts: 550 Joined: 19-April 22 From: Huntington Beach,Ca Member No.: 26,487 Region Association: Southern California |
Hello to all who have helped me with this project . @emerygt350 ,@TJB/914, @Superhawk996 , @ChrisFoley , @rjames , @MDTerp
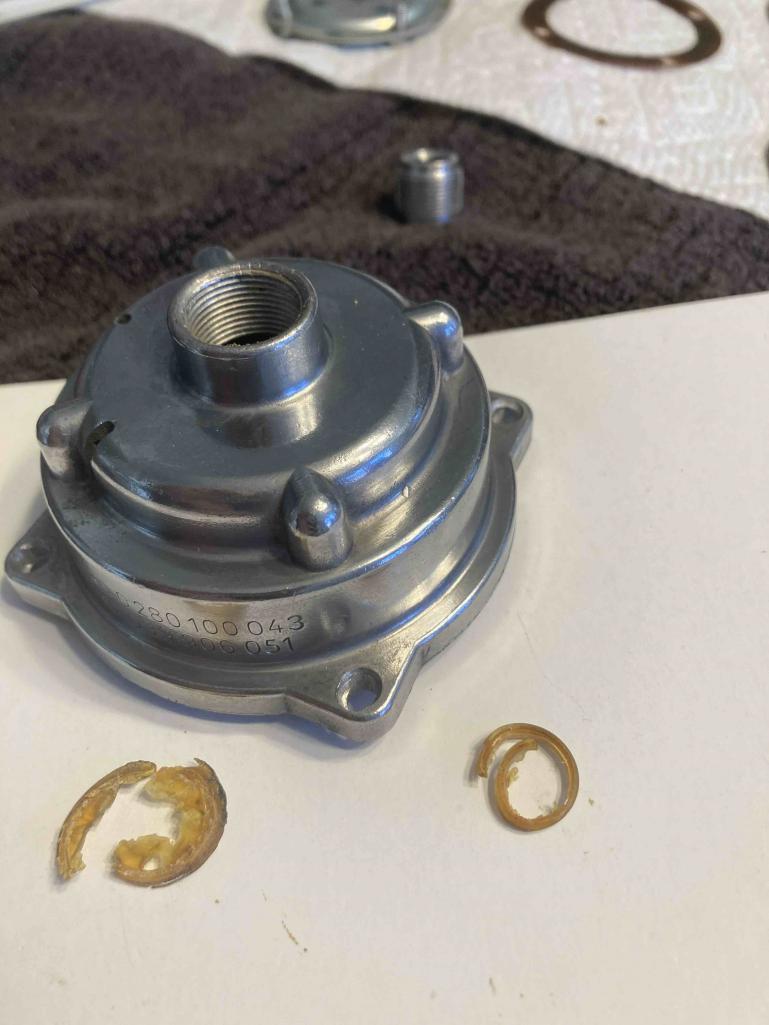
I am in the middle of rebuilding my MPS and have a couple of comments and questions . First when I opened up the unit I found the most difficult job was removing the rivets holding the two halves together. When I removed the retainer plate to take out the old diaphragm it was in two pieces . 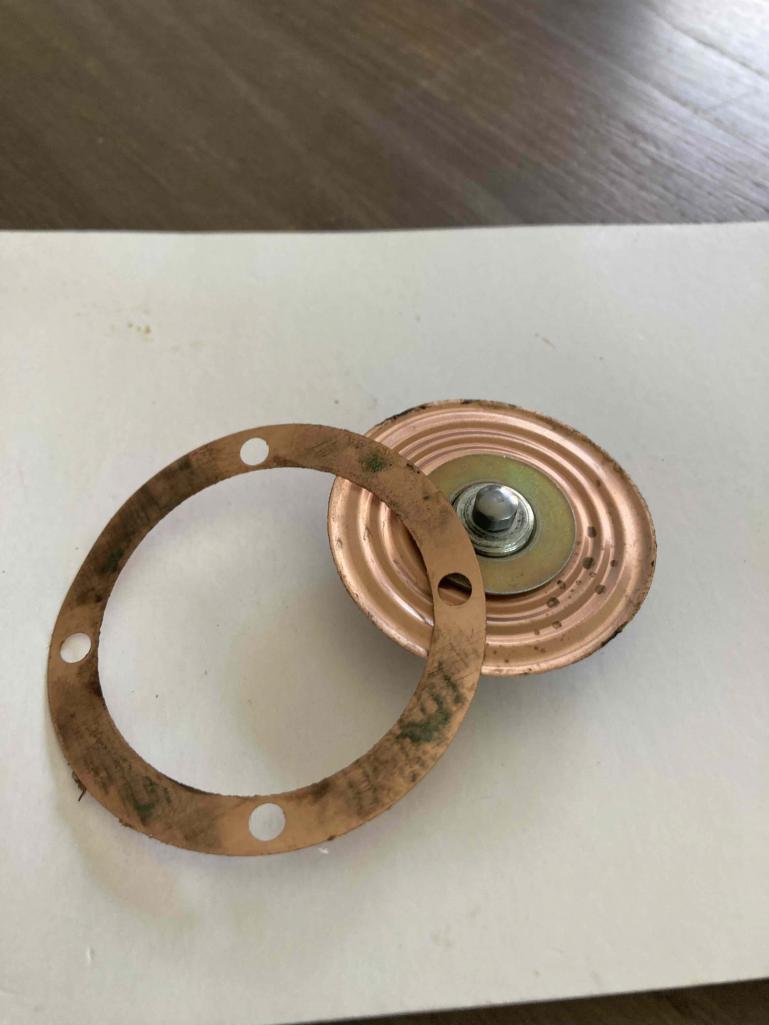 I needed to take two measurements since I was replacing the stop screw , I needed to measure the the stop screw protrusion into the housing . The instruction sheet sent to me by a member had the measurements he must have made when rebuilding his MPS . His stop screw protrusion was 1.97mm and mine only measured 1.72mm. His inner/outer screw assembly depth in the old diaphragm measured 6.51mm . Here's one of my questions ? when I measured mine I got two measurements depth to inner/outer screw assembly was 4.03 and depth to the washer outside the inner/outer screw assembly was 5.46mm. Again there is a difference and since mine was never accessed before (epoxy over screw was not disturbed) is the difference in measurements ok and which measurement should I use I will try to attach a photo or two to help with my question. this one . 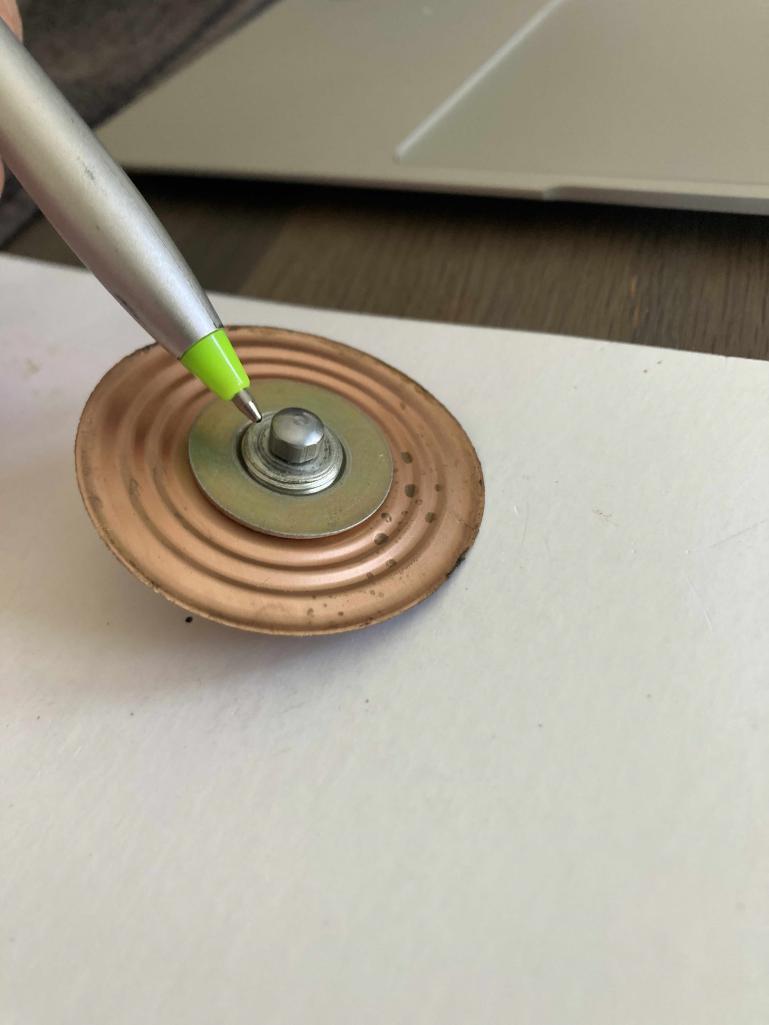 I have not touched either of these measurements yet and awaiting any help/comments. I think it's this one to the washer on diaphragm . 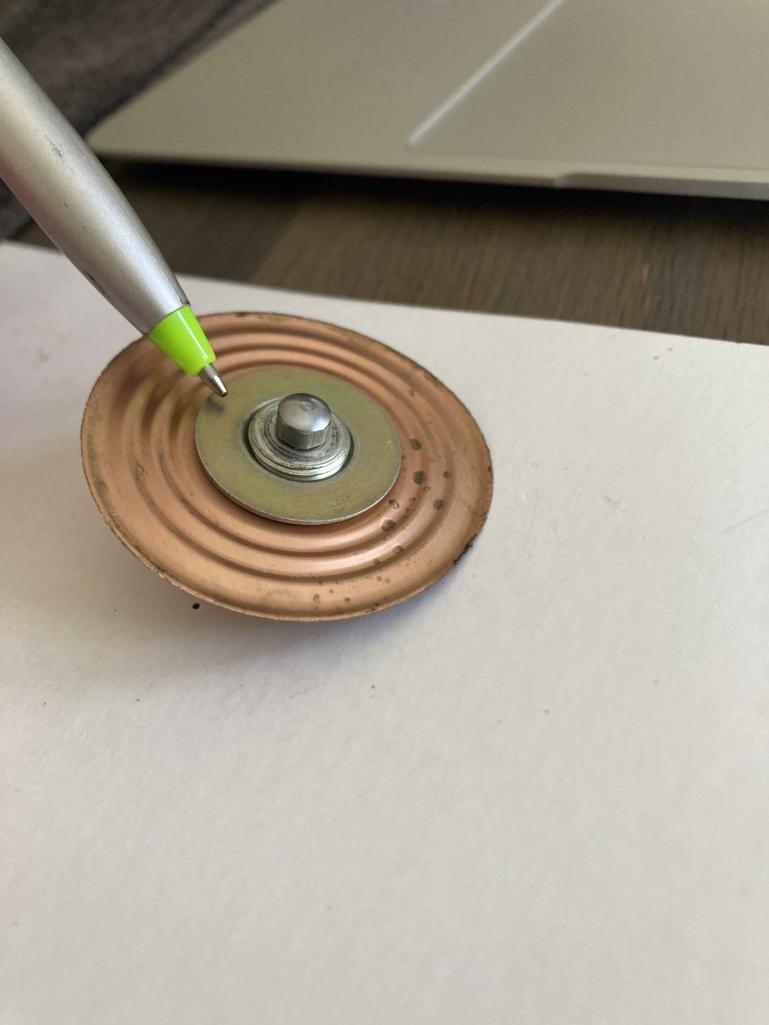 |
   |

 
|
| Superhawk996 |
May 8 2025, 06:36 PM
Post
#2
|
|
914 Guru Group: Members Posts: 7,961 Joined: 25-August 18 From: Woods of N. Idaho Member No.: 22,428 Region Association: Galt's Gulch |
There you have it, now you know why it was a leaker. Good job! (IMG:style_emoticons/default/smilie_pokal.gif) The last unit I did had a diaphragm do exactly the same thing upon disassembly.
The measurements are just to get you close . . . In the ballpark . . . Instead of being way out just randomly assembling. It will ultimately still need tuning which is why you have the tuning tools too. Pay attention to reassembly directions - gasket placement matters. Chris’ instructions will get you there. |
|
|
|
| Ron914 |
May 8 2025, 06:58 PM
Post
#3
|
|
Senior Member Group: Members Posts: 550 Joined: 19-April 22 From: Huntington Beach,Ca Member No.: 26,487 Region Association: Southern California |
QUOTE(Superhawk996 @ May 8 2025, 07:36 PM)  There you have it, now you know why it was a leaker. Good job! (IMG:style_emoticons/default/smilie_pokal.gif) The last unit I did had a diaphragm do exactly the same thing upon disassembly. The measurements are just to get you close . . . In the ballpark . . . Instead of being way out just randomly assembling. It will ultimately still need tuning which is why you have the tuning tools too. Pay attention to reassembly directions - gasket placement matters. Chris’ instructions will get you there. Thanks , I just needed some encouraging words , I will start assembly later or in the morning . |
|
|
|
| MDTerp |
May 8 2025, 08:17 PM
Post
#4
|
|
Member Group: Members Posts: 119 Joined: 20-May 08 From: Maryland Member No.: 9,075 Region Association: MidAtlantic Region |
QUOTE(Superhawk996 @ May 8 2025, 08:36 PM) There you have it, now you know why it was a leaker. Good job! (IMG:style_emoticons/default/smilie_pokal.gif) The last unit I did had a diaphragm do exactly the same thing upon disassembly. The measurements are just to get you close . . . In the ballpark . . . Instead of being way out just randomly assembling. It will ultimately still need tuning which is why you have the tuning tools too. Pay attention to reassembly directions - gasket placement matters. Chris’ instructions will get you there. I agree the measurements just get you close when you reassemble everything. I wouldn’t worry that your numbers are off from mine. I would just reassemble back to your measurements and use the same reference points when measuring the new parts. |
|
|
|
| Ron914 |
May 8 2025, 08:30 PM
Post
#5
|
|
Senior Member Group: Members Posts: 550 Joined: 19-April 22 From: Huntington Beach,Ca Member No.: 26,487 Region Association: Southern California |
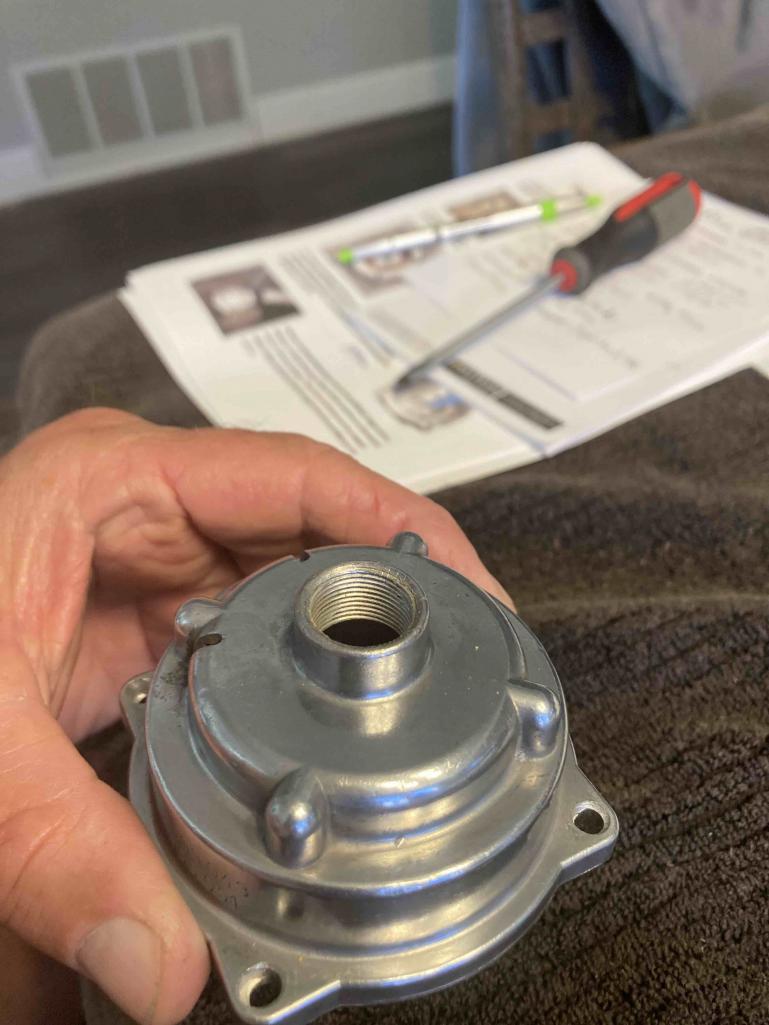
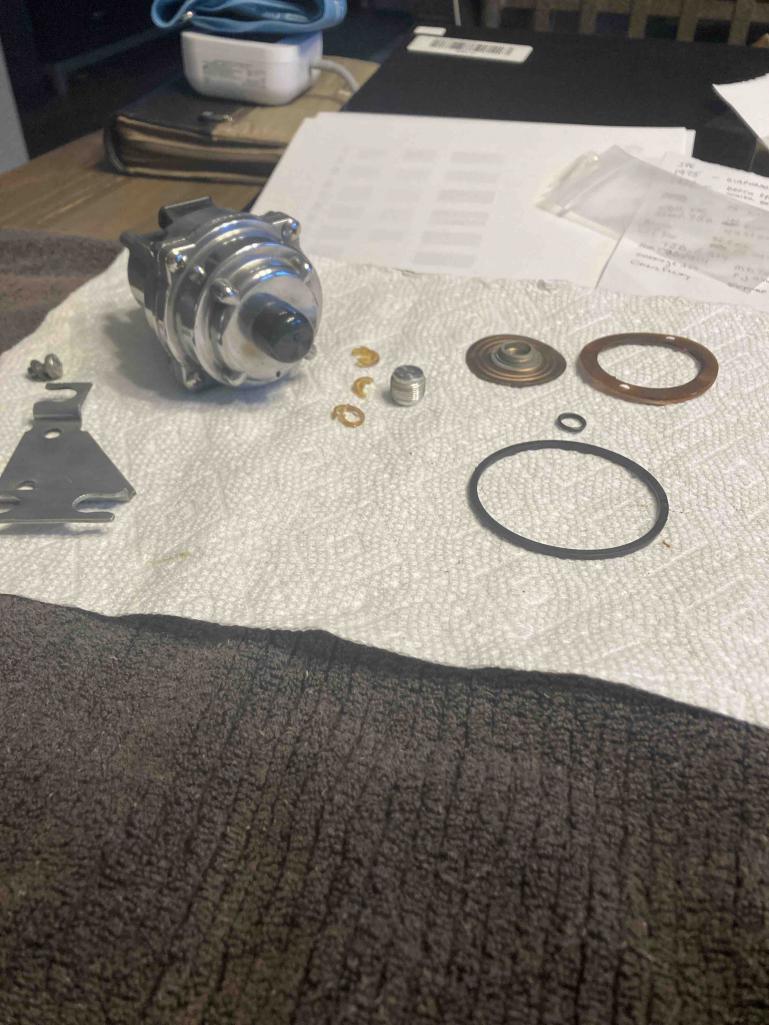
Well all done . I must say it was easier than I thought I was just making a bigger deal of it since this rebuild was my first . I actually found by using a heat gun to soften the epoxy it came out very easy . Even the threads cleaned up nicely with a little heat and a pick , no need for a tap to chase the threads came out nice and clean the screw removed easily . Here's a few more photos . Now for the fun part ,tuning my car to run better for my 2056 motor . More things to learn for me
    |
|
|
|
| JeffBowlsby |
May 8 2025, 10:15 PM
Post
#6
|
|
914 Wiring Harnesses & Beekeeper Group: Members Posts: 9,316 Joined: 7-January 03 From: San Ramon CA Member No.: 104 Region Association: None |
Another documented case of a completely fractured MPS diaphragm holding at least some vacuum. Amazing that it holds any vacuum at all, which affects the inductance values of the internal coils and ultimately injector pulse width.
|
|
|
|
| emerygt350 |
May 9 2025, 06:57 AM
Post
#7
|
|
Advanced Member Group: Members Posts: 3,677 Joined: 20-July 21 From: Upstate, NY Member No.: 25,740 Region Association: North East States |
Way to go. I mean you are disassembling the most important sensor in the system so a little worry is called for the first time you do it. I will send you some info on checking the curve.
|
|
|
|
| rjames |
May 9 2025, 10:01 AM
Post
#8
|
|
I'm made of metal Group: Members Posts: 4,467 Joined: 24-July 05 From: Shoreline, WA Member No.: 4,467 Region Association: Pacific Northwest |
Crazy that it could hold vacuum at all!
|
|
|
|
| Superhawk996 |
May 9 2025, 01:24 PM
Post
#9
|
|
914 Guru Group: Members Posts: 7,961 Joined: 25-August 18 From: Woods of N. Idaho Member No.: 22,428 Region Association: Galt's Gulch |
QUOTE(rjames @ May 9 2025, 12:01 PM) Crazy that it could hold vacuum at all! Mine did the same thing. It’s my belief that they don’t actually fracture into two pieces until you crack the case open. I think it’s basically a giant stress crack but it’s not fully fractured. Thus the partial leakage. Because there is the partial leak it basically prevents the diaphragm from moving anywhere near full travel - thus limiting further stress on the diaphragm when it’s assembled. Then when the case is pulled open, it lets go all the way around. I can’t prove that but like you, seems to me if the whole thing was literally in two pieces it wouldn’t even hold the partial vacuum. |
|
|
|
| Ron914 |
May 9 2025, 05:37 PM
Post
#10
|
|
Senior Member Group: Members Posts: 550 Joined: 19-April 22 From: Huntington Beach,Ca Member No.: 26,487 Region Association: Southern California |
Well I was optimistic that my car was going to run a lot better this morning after installing the rebuilt MPS but that was not the case .I reconnected the retard to the distributor and removed that resistor I bought from AA in the CHT circuit and started the car and it would barely start , changing the timing did not make difference in the rough idling .Quite different from before I changed the diaphragm in the MPS . The car was rocking back and forth and running very rough . I first checked my plug wires and found them all intact . I then removed the distributor cap and inspected it and could see that the 4 contact points and the end of the rotor were burnt .Did not know what to think of this but figured this must be the rough running issue . I had installed a Pertronix system and removed the point/condenser several months ago so I decided to remove the pertaronix and reinstall my points /condenser. I also cleaned up the burn marks on the cap and rotor ( I installed brand new cap/rotor and plug wires after the rebuild of my motor) . I have not tried installing a new set of plugs since it was running ok yesterday .
  This did not make much change and after several hours of scratching my head on this one . I needed to take a break . Its going to be a busy weekend with Mothers day and another comitment so I may not get back. to this until next week . |
|
|
|
| emerygt350 |
May 9 2025, 06:09 PM
Post
#11
|
|
Advanced Member Group: Members Posts: 3,677 Joined: 20-July 21 From: Upstate, NY Member No.: 25,740 Region Association: North East States |
You can pull the wires one at a time till you find the cylinder not firing. It also looks like your dizzy has shot bushings.
If it was rocking really bad I would say you were on two cylinders and I bet something is up with the wiring to the trigger points. Remember, it ran before you moved all kinds of wires in the passenger side of the motor. |
|
|
|
| Superhawk996 |
May 9 2025, 07:26 PM
Post
#12
|
|
914 Guru Group: Members Posts: 7,961 Joined: 25-August 18 From: Woods of N. Idaho Member No.: 22,428 Region Association: Galt's Gulch |
This is going to be a tough love post.
When you encounter a problem - don’t run off like a squirrel on meth and start changing and swapping parts. You’re getting distracted and confused by all kinds of parts changes and assumptions. The random changes to timing and/or retard aren’t helping. You should have visually checked and verified spark at each plug before jumping to conclusions and swapping from Pertronix back to points. Maybe I’m misunderstanding what led to that decision. There is nothing going on in the distributor cap that would have changed overnight / since the MPS swap that would account for the behavior you’re describing. Could be as simple as the cap not having been properly seated or bumped during the MPS removal / install. Again I’m probably not understanding all that happened. There is literally no telling what’s going on after all that chaos. When you encounter the unexpected - go back to the basics. Avoid the urge to start swapping parts. Change one thing at a time. If it doesn’t help, revert to the original condition and don’t keep stacking changes. The basics: 1) Spark. Visually observe spark at the plug. Set static timing at 7-8 degrees if the points are still in there. If you don’t know how to do this - ask and we’ll post instructions or provide a YouTube link. Avoid moving the timing around randomly. Verify you haven’t disturbed coil wiring. Test the condenser if need be - again post if you don’t know how. 2) Fuel - in this particular case (with a new and untuned MPS) I’d have stated by putting vacuum directly on the MPS and verifying the MPS connection all the way back to the ECU if necessary. I’d be verifying CHT resistance and wiring after playing with the resistor (which shouldn’t be in a late car anyway). observing plugs condition for grossly rich or lean conditions post photos. Use stating fluid if need if you think you aren’t getting fuel. Trigger points wiring as suggested by Emery. Grounds - did you knock off - disturb grounds serving injectors? Edit: did you bench test, the MPS for leakage - primary coil resistance, inductance etc on the bench before throwing it in the car? 3) Compression - don’t touch valves or anything at the moment. It certainly didn’t change due to a MPS swap or any of the other changes that were made. Ron, here to help but at this point I’m not sure where to start - you need to get settled on what condition you want (points vs Pertronix) and how you intend to run the fuel injection (with resistor or not; I recommend without). You need to stabilize your timing settings. You can work through this! Don’t give up. Be methodical in the approach. |
|
|
|
| Superhawk996 |
May 9 2025, 07:53 PM
Post
#13
|
|
914 Guru Group: Members Posts: 7,961 Joined: 25-August 18 From: Woods of N. Idaho Member No.: 22,428 Region Association: Galt's Gulch |
I’m going to post this over here
This is another change you’re completely neglecting. Generally speaking - you’ll find NGK and other spark plug makers recommend against anti-seize. This is because the plug needs a good ground path to the head to spark. Anti-seize also modifies the torque spec - so the spec they give you is for no anti-seize. Torquing to their spec with lube can lead to stripping threads. Now for reality. I use copper based anti-seize but very sparingly (not like this photo). You should get a good enough ground from contact between the plug shoulder and the head. But - - you’ve also added the CHT sender in the mix and ground path. If the CHT sender isn’t allowing a solid connection between the plug and head - ground path could be compromised. I’m not posting this to shame you but rather to get you thinking about how many changes were introduced since it ran last and that things as simple as too much goop and/or a improperly seated CHT sensor could be causing your misfire / engine rocking that you initially described. Note: if you don’t have a slot cut into the head to allow that CHT to seat properly, it often takes some creative bending to get that CHT down into the spark plug pocket correctly. Examples / pictures http://www.914world.com/bbs2/index.php?showtopic=312118 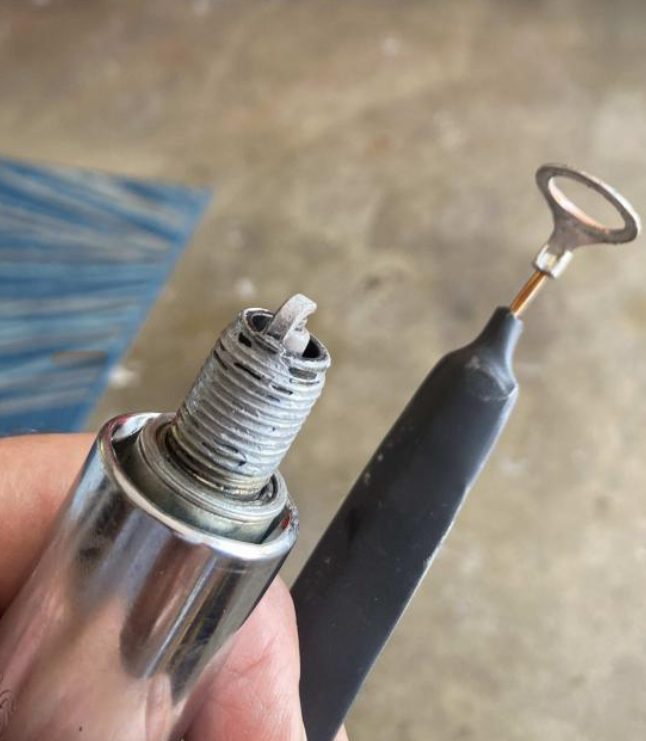 |
|
|
|
| rjames |
May 9 2025, 08:17 PM
Post
#14
|
|
I'm made of metal Group: Members Posts: 4,467 Joined: 24-July 05 From: Shoreline, WA Member No.: 4,467 Region Association: Pacific Northwest |
What Hawk said.
And you just rebuilt your MPS, so it’s quite possible the rough running is it being way out of tune. After rebuilding mine and thinking I had all of the adjustment screws close to where they were before the rebuild, the car was running so rich that it barely ran and was stumbling badly. Not saying this is the cause, it’s hard to say now given that you made multiple changes. Finding a baseline may be difficult now. Methodically check all the non-MPS changes you made. If after that it’s still running badly, try turning just the inner screw on the MPS 1/4 to 1/2 turn clockwise to lean it out a bit and see if that makes a difference. This assumes your timing is in the ballpark. Good luck. |
|
|
|
| Ron914 |
May 9 2025, 08:27 PM
Post
#15
|
|
Senior Member Group: Members Posts: 550 Joined: 19-April 22 From: Huntington Beach,Ca Member No.: 26,487 Region Association: Southern California |
Thank you Superhawk and emery ,You are correct in all you wrote I did a bit of squirreling today . I should have verified all the points you made . I basically need to pull back and start over but at this point I am beating myself up a bit as I should have known better . I will start correcting all these points next week when my head is clear and I have the time to commit to correcting my mistakes . When things went bad today I made a few bad choices . I should have asked about the CHT install since I was not well informed . I really screwed this one up today .
Thanks in advance for the questions coming next week . |
|
|
|
| emerygt350 |
May 10 2025, 04:22 AM
Post
#16
|
|
Advanced Member Group: Members Posts: 3,677 Joined: 20-July 21 From: Upstate, NY Member No.: 25,740 Region Association: North East States |
Once it is all back together, remember that inner screw on the mps is a freebee. You can change that without disturbing all the other interconnected adjustments on the mps (outer and full stop interact). You can turn it in our out without worry as long as you hold the outer screw steady with Foley's tool. As rjames mentioned, once it's going again you can try leaning it out while in the car and running.
|
|
|
|
| Ron914 |
May 12 2025, 03:17 PM
Post
#17
|
|
Senior Member Group: Members Posts: 550 Joined: 19-April 22 From: Huntington Beach,Ca Member No.: 26,487 Region Association: Southern California |
QUOTE(Superhawk996 @ May 9 2025, 08:26 PM) This is going to be a tough love post. When you encounter a problem - don’t run off like a squirrel on meth and start changing and swapping parts. You’re getting distracted and confused by all kinds of parts changes and assumptions. The random changes to timing and/or retard aren’t helping. You should have visually checked and verified spark at each plug before jumping to conclusions and swapping from Pertronix back to points. Maybe I’m misunderstanding what led to that decision. There is nothing going on in the distributor cap that would have changed overnight / since the MPS swap that would account for the behavior you’re describing. Could be as simple as the cap not having been properly seated or bumped during the MPS removal / install. Again I’m probably not understanding all that happened. There is literally no telling what’s going on after all that chaos. When you encounter the unexpected - go back to the basics. Avoid the urge to start swapping parts. Change one thing at a time. If it doesn’t help, revert to the original condition and don’t keep stacking changes. The basics: 1) Spark. Visually observe spark at the plug. Set static timing at 7-8 degrees if the points are still in there. If you don’t know how to do this - ask and we’ll post instructions or provide a YouTube link. Avoid moving the timing around randomly. Verify you haven’t disturbed coil wiring. Test the condenser if need be - again post if you don’t know how. 2) Fuel - in this particular case (with a new and untuned MPS) I’d have stated by putting vacuum directly on the MPS and verifying the MPS connection all the way back to the ECU if necessary. I’d be verifying CHT resistance and wiring after playing with the resistor (which shouldn’t be in a late car anyway). observing plugs condition for grossly rich or lean conditions post photos. Use stating fluid if need if you think you aren’t getting fuel. Trigger points wiring as suggested by Emery. Grounds - did you knock off - disturb grounds serving injectors? Edit: did you bench test, the MPS for leakage - primary coil resistance, inductance etc on the bench before throwing it in the car? 3) Compression - don’t touch valves or anything at the moment. It certainly didn’t change due to a MPS swap or any of the other changes that were made. Ron, here to help but at this point I’m not sure where to start - you need to get settled on what condition you want (points vs Pertronix) and how you intend to run the fuel injection (with resistor or not; I recommend without). You need to stabilize your timing settings. You can work through this! Don’t give up. Be methodical in the approach. Hello @Superhawk996 @emerygt350 , I started confirming the points you have made here, I wanted to undo all the mistakes I made on Friday so first to address why I changed the Pertronix out - 1)My brother in law thought it was a good idea,2) I read if you accidental left the ignition on it could damage the ignitor part .I don't think I have done this more than 5-10 seconds max when messing with the motor and it died after starting . Because of the burn marks I discovered on the cap and rotor I thought maybe it had been damaged . I would like to reinstall it as it eliminates the dwell setting . Should I do this to get back to where I was ? I tried to start the car after installing the MPS and the car would not start . there was no vacuum on my new gauge and the car would not start,( this was my fault because I removed the gauge the night before and I forgot to connect the vacuum line ) reconnected vacuum and tried to start car again. Car did not want to start so I retarded the timing as I had done before to get the car to start, once started I noticed the vacuum was only 13-15 inHG and was idling rough. I tried to advanced the timing but the gauge no longer showed a high vacuum reading of 21inHg any more , no matter which way I moved my timing the vacuum stayed at 13-15inHg . 1) Spark - I checked all plug wire connections and then (not sure if this was correct) used the timing light on each plug 1-4 and checked for a pulse ( Had a pulse on all four). Pulled cap/rotor ( it was not disturbed ) and checked ,that's when I noticed the black arcing marks on the four plug connections and on the rotor I cleaned the contact points and reinstalled the cap/rotor but I still had rough/shaky idling. Here's where I squirreled and decided to change the Pertronix unit for points/condenser (new point and condenser set gap to .016), this made no difference. Now for a bigger problem I think I have created for myself to correct , this is when I did my worst squirreling around. When I tried to start car after reinstalling the distributor I did not have the distributor seated all the way as I had thought by rotating it so that it seemed properly seated . I know this because I again pulled the cap and discovered the rotor would turn telling me it was not seated properly before I turned the motor over , this is why I assume I need to get establish TDC position and reinstall the distributor . I need some guidance here before I proceed . Since I have to pull the distributor I would like to install the pertonix back before I proceed any further . 2) Fuel- I did some checks first today and have the following new information for you . Rechecked the coil resistance on the MPS between pins 7-15 94.2 ohms , pins 8-10 347.1 ohms . No continuity from the MPS case to any pins . Applied vacuum to MPS and verified the same resistance valued form the coils I did a leak down test @ 10 & 15 inHg start points ,see photo for results 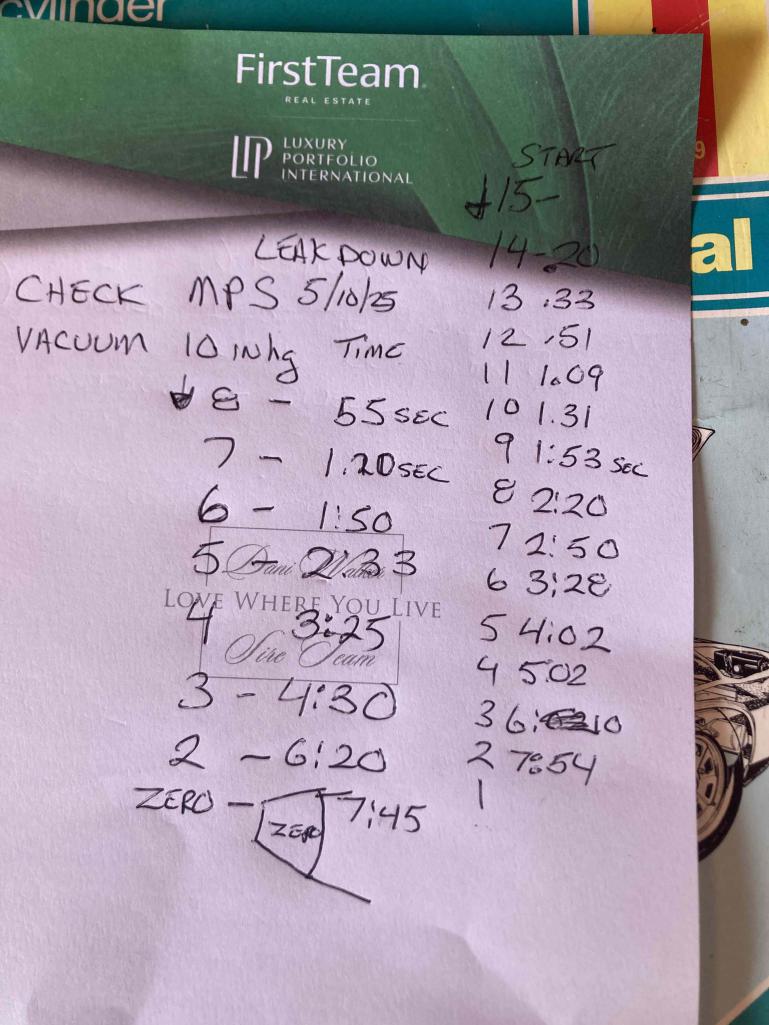 I also removed my ECU and verified good continuity from the MPS plug back to the ECU plug . I also pulled my plugs and verified if I had a groove cut in my cylinder heads for proper seating of the CHT sensor and removed the anti-seize . here's a photo of the plugs and groove which I have #3 . 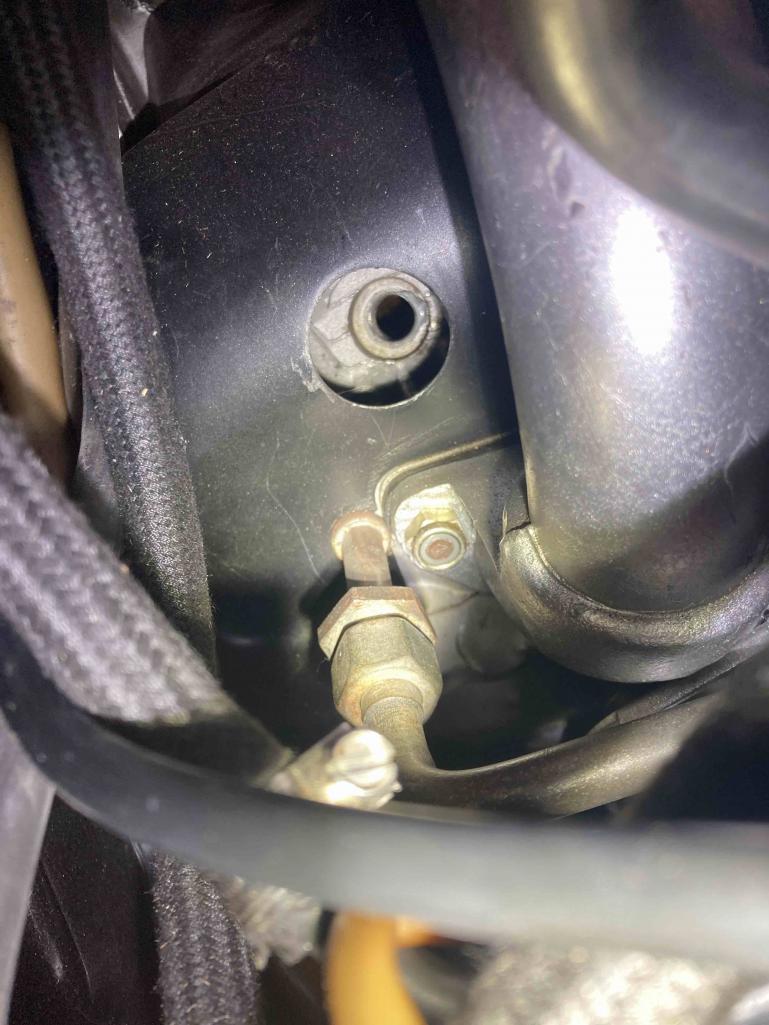 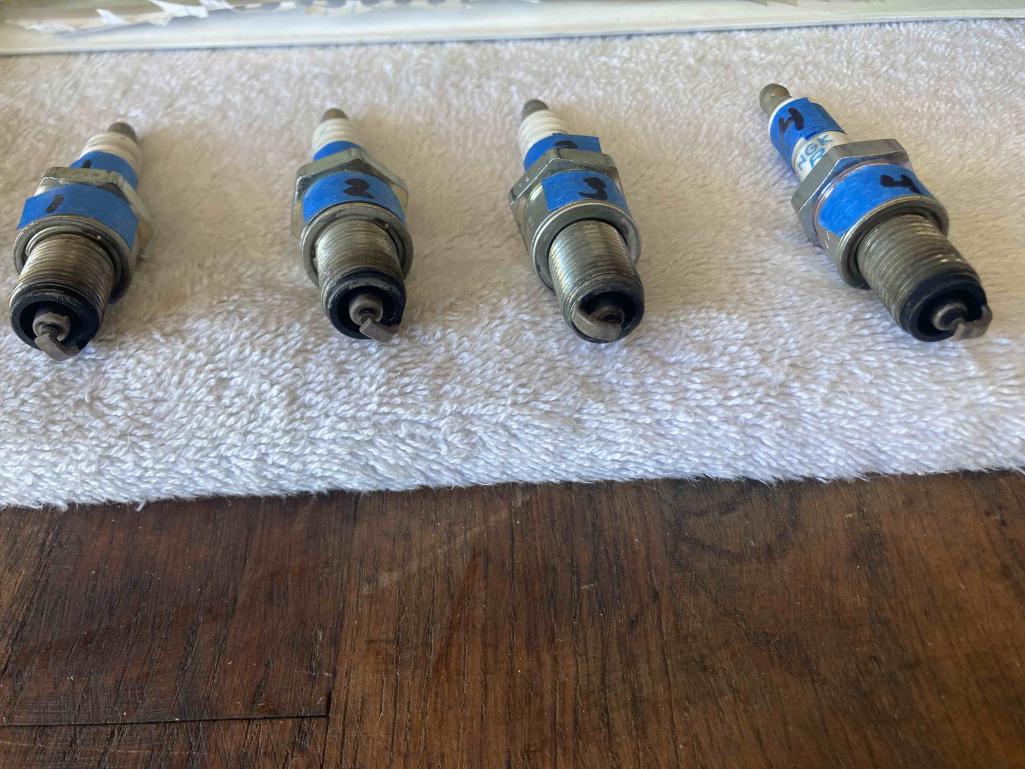 Distributor trigger contacts : connection to ECU 12-22 continuity , 12-21 no continuity (I must not have had my probe in correctly . 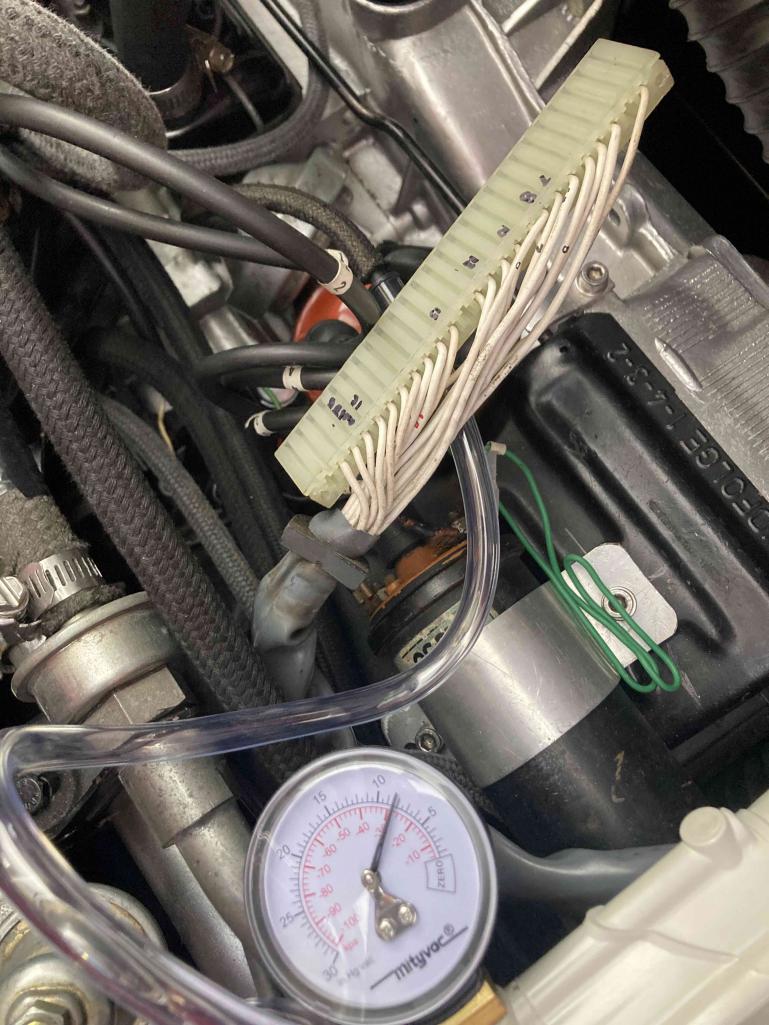 CHT resistance ( with the resistor removed) ECU pin 23to GND (my outside temp.71 deg) =6.28 k ohms . I also tested the trigger point wires themselves dizzy pin 22-ECU pin 22 000.4ohms , dizzy pin21-ECU pin21 000.3 ohms , dizzy pi2 12-ECU pin 12 000.5 ohms |
|
|
|
| emerygt350 |
May 12 2025, 05:50 PM
Post
#18
|
|
Advanced Member Group: Members Posts: 3,677 Joined: 20-July 21 From: Upstate, NY Member No.: 25,740 Region Association: North East States |
Don't worry about TDC, the distributor only goes in one way, it has an offset on the shaft. You can put it in wrong and clamp it down so hard it will spin but don't do that.
I would go back to the pertronix for the moment. Did you double check your trigger points connections? If you can get it back to where it was when you tried running it, that would be great. |
|
|
|
| Ron914 |
May 12 2025, 06:57 PM
Post
#19
|
|
Senior Member Group: Members Posts: 550 Joined: 19-April 22 From: Huntington Beach,Ca Member No.: 26,487 Region Association: Southern California |
QUOTE(emerygt350 @ May 12 2025, 06:50 PM) Don't worry about TDC, the distributor only goes in one way, it has an offset on the shaft. You can put it in wrong and clamp it down so hard it will spin but don't do that. I would go back to the pertronix for the moment. Did you double check your trigger points connections? If you can get it back to where it was when you tried running it, that would be great. Hi , yes I rang out the wires from the trigger points plug to the ECU plug and I have continuity on all three ( I must not have had the probe inserted correctly (I added resistance values for the individual wires for both the MPS and the trigger points . Also checked the resistance of the CHT wire without that added resistor in circuit and it was 000.2 ohms. I will reinstall the Pertronix back and follow up here on this post . What about the bad bushings in my distributor you mentioned ? Can I purchase parts and replace them or do I need to look for a new distributor . If only I didn't live in California I would buy a 123 . |
|
|
|
| Superhawk996 |
May 12 2025, 06:57 PM
Post
#20
|
|
914 Guru Group: Members Posts: 7,961 Joined: 25-August 18 From: Woods of N. Idaho Member No.: 22,428 Region Association: Galt's Gulch |
First on the to do list
MPS is leaking down too fast. Something not right. Did you use a light coat of grease on the gasket. Did you assemble the gasket / diaphragm in the order indicated? 1st time i did one it didn’t seal properly - didn’t grease the gasket to see what happens - it leaked. It should be holding vacuum much longer than it is. The other stand out is the ECU trigger points. They alternate as you rotate the engine. Did you only check them in only one position? Whether or not I go back to Pertronix would depend on which you have. The newer version 2 & 3 supposedly has a protection built into them to prevent the ignition on burnout problem of the originals. So if I had an original - stay points. If you have one of the later 2 or 3’s I’d be fine to change back. The main downside of Pertronix is it just isn’t as easy to see it work but if you’re getting spark at the plugs - good enough. FWIW - check spark visually. The timing light method can fool you if you have soot fouling of plugs. Just because the timing light flashes doesn’t not guarantee a spark has jumped the gap. Your plugs are looking janky but i don’t think they are the root cause of your problem. They have been too rich due to the CHT resistor and the fact that your MPS isn’t working properly. |
|
|
|
|
1 User(s) are reading this topic (1 Guests and 0 Anonymous Users)
0 Members:

|
Lo-Fi Version | Time is now: 26th July 2026 - 03:32 PM |
Invision Power Board
v9.1.4 © 2026 IPS, Inc.