|
|
|
Porsche, and the Porsche crest are registered trademarks of Dr. Ing. h.c. F. Porsche AG.
This site is not affiliated with Porsche in any way. Its only purpose is to provide an online forum for car enthusiasts. All other trademarks are property of their respective owners. |
|
|

  |

| TRP |
 Jan 18 2026, 06:55 PM Jan 18 2026, 06:55 PM
Post
#1
|
|
Member  Group: Members Posts: 421 Joined: 2-September 23 From: Morgan Hill, CA Member No.: 27,559 Region Association: None |
This escalated quickly! 1.8 is out, getting ready ready for the 2056 to go in.
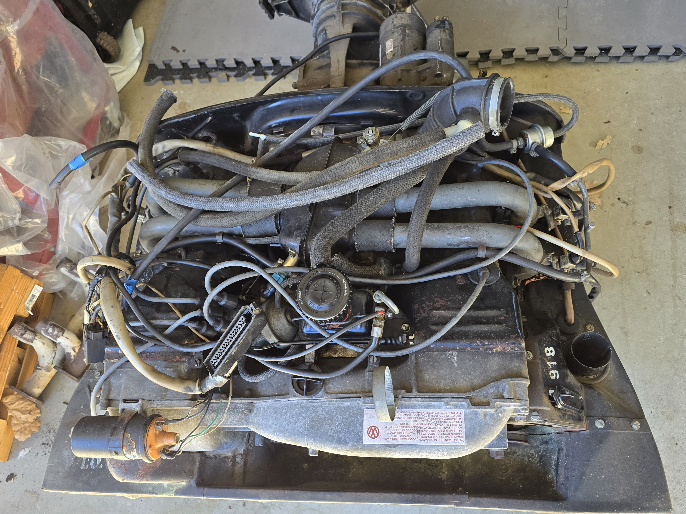 I will start to clean up the engine bay and the underside of the car to prep for the new motor.] |
   |

 
|
| rfinegan |
Jan 18 2026, 07:27 PM
Post
#2
|
|
Senior Member Group: Members Posts: 1,208 Joined: 8-February 13 From: NC Member No.: 15,499 Region Association: MidAtlantic Region |
WoooHooo, the real fun begins
Best Regards -Robert |
 |
|
| TRP |
Jan 18 2026, 08:23 PM
Post
#3
|
|
Member Group: Members Posts: 421 Joined: 2-September 23 From: Morgan Hill, CA Member No.: 27,559 Region Association: None |
I hope I can get the new one back in! It's still being built, but the new 2.0 AMC heads arrived on Wednesday, they are beautiful. I picked up my tins from the powder coat shop on Friday.
It's official happening. |
|
|
|
| wonkipop |
Jan 19 2026, 01:52 AM
Post
#4
|
|
914 Guru Group: Members Posts: 5,628 Joined: 6-May 20 From: north antarctica Member No.: 24,231 Region Association: NineFourteenerVille |
you know i can't endorse you for rejecting the eye watering power of a stock 1.8.
(IMG:style_emoticons/default/biggrin.gif) (IMG:style_emoticons/default/biggrin.gif) (IMG:style_emoticons/default/biggrin.gif) (IMG:style_emoticons/default/biggrin.gif) (IMG:style_emoticons/default/biggrin.gif) (IMG:style_emoticons/default/biggrin.gif) (IMG:style_emoticons/default/biggrin.gif) (IMG:style_emoticons/default/biggrin.gif) (IMG:style_emoticons/default/biggrin.gif) but go for it. (IMG:style_emoticons/default/beerchug.gif) |
|
|
|
| SirAndy |
Jan 19 2026, 09:52 AM
Post
#5
|
|
Resident German Group: Admin Posts: 42,488 Joined: 21-January 03 From: Oakland, Kalifornia Member No.: 179 Region Association: Northern California |
I'm pretty sure we have a thread somewhere about engine tin markings. Would be nice to get yours documented.
(IMG:style_emoticons/default/idea.gif) PS: @JeffBowlsby |
|
|
|
| TRP |
Jan 19 2026, 10:00 AM
Post
#6
|
|
Member Group: Members Posts: 421 Joined: 2-September 23 From: Morgan Hill, CA Member No.: 27,559 Region Association: None |
Haa! Yeah, it was hard to see through all the tears in my eyes. (IMG:style_emoticons/default/biggrin.gif)
(IMG:style_emoticons/default/beerchug.gif) I hope I can get it back in properly! Im used to basic VW aircooled and gen 1 small block Chevrolet motors. There are more wires and hoses here... I don't know what the heck Im looking at?! My plan is to use the existing motor as my blueprint for reassemble. (IMG:style_emoticons/default/biggrin.gif) I was looking at the wiring harness and it looks like someone modified it for something different than stock. There is a dual relay attached to it which has also been modified. I may send the harness out and have it fixed properly. What's the name of the FI harness guru? |
|
|
|
| SirAndy |
Jan 19 2026, 11:24 AM
Post
#7
|
|
Resident German Group: Admin Posts: 42,488 Joined: 21-January 03 From: Oakland, Kalifornia Member No.: 179 Region Association: Northern California |
QUOTE(TRP @ Jan 19 2026, 08:00 AM)  What's the name of the FI harness guru? I already tagged him in my post above. (IMG:style_emoticons/default/biggrin.gif) |
|
|
|
| wonkipop |
Jan 19 2026, 01:38 PM
Post
#8
|
|
914 Guru Group: Members Posts: 5,628 Joined: 6-May 20 From: north antarctica Member No.: 24,231 Region Association: NineFourteenerVille |
QUOTE(SirAndy @ Jan 19 2026, 09:52 AM) I'm pretty sure we have a thread somewhere about engine tin markings. Would be nice to get yours documented. (IMG:style_emoticons/default/idea.gif) PS: @JeffBowlsby we got all the engine label and markings info from @TRP when he first got hold of the car. @TRP - your dual relay (black plastic) is just the replacement type that superceded the original metal ones. standard mod would have been done to allow for wiring it in. my car is the same - i had it done back in 1989 when i first got the car. even then the metal can dual relay had been superceded. (IMG:style_emoticons/default/beerchug.gif) |
|
|
|
| TRP |
Jan 24 2026, 09:30 PM
Post
#9
|
|
Member Group: Members Posts: 421 Joined: 2-September 23 From: Morgan Hill, CA Member No.: 27,559 Region Association: None |
@wonkipop - sorry man, I'm weak... (IMG:style_emoticons/default/biggrin.gif)
Thank you all for the info on the wiring harness, I will follow-up about having the harness cleaned up while the motor is being built. I just dont like the black electrical tape on the harness. With the motor out, I spent last Sunday cleaning the engine bay and cleaned up under the battery tray and under the relay board removed two substantial piles of dirt and junk.Happy to report no holes in the 'floor' of these areas. I did find 4 or 5 pea sized holes near the drain hole under the relay board. On the other side, under thr battery tray, near the drain hole has a 2 or 3" area has some larger holes. I can post photos later from my laptop. With the new 2.0 AMC heads, ia fellow board member suggested I replace the 1975 1.8 exhaust. So today I took a road trip and picked up some used 2.0 SSI headers, they look used but otherwise in great shape. I spoke with Bruce this week to see if he has all the required heat/cooling bits required to finish replacing the 1975 1.8 heat extractors. Progress is slow but it's progress. |
|
|
|
| wonkipop |
Jan 25 2026, 10:10 AM
Post
#10
|
|
914 Guru Group: Members Posts: 5,628 Joined: 6-May 20 From: north antarctica Member No.: 24,231 Region Association: NineFourteenerVille |
QUOTE(TRP @ Jan 24 2026, 09:30 PM) @wonkipop - sorry man, I'm weak... (IMG:style_emoticons/default/biggrin.gif) Thank you all for the info on the wiring harness, I will follow-up about having the harness cleaned up while the motor is being built. I just dont like the black electrical tape on the harness. With the motor out, I spent last Sunday cleaning the engine bay and cleaned up under the battery tray and under the relay board removed two substantial piles of dirt and junk.Happy to report no holes in the 'floor' of these areas. I did find 4 or 5 pea sized holes near the drain hole under the relay board. On the other side, under thr battery tray, near the drain hole has a 2 or 3" area has some larger holes. I can post photos later from my laptop. With the new 2.0 AMC heads, ia fellow board member suggested I replace the 1975 1.8 exhaust. So today I took a road trip and picked up some used 2.0 SSI headers, they look used but otherwise in great shape. I spoke with Bruce this week to see if he has all the required heat/cooling bits required to finish replacing the 1975 1.8 heat extractors. Progress is slow but it's progress. yes - the exhaust "headers/heat exchanger" on the 75s is pretty weird. hard to believe the engine had the same total horsepower as the 74 given the exhaust system. esp the way it feeds into a single pipe each side that goes forwards instead of backwards and then does a tight 180 degree turn. (IMG:style_emoticons/default/sad.gif) i think the idea was to make a kind of quasi thermal reactor out of the exhaust in that section that dealt with unburned hydrocarbons. emissions!!!! the 74 system is much more plausible. (IMG:style_emoticons/default/biggrin.gif) |
|
|
|
| TRP |
Jan 26 2026, 03:30 PM
Post
#11
|
|
Member Group: Members Posts: 421 Joined: 2-September 23 From: Morgan Hill, CA Member No.: 27,559 Region Association: None |
Here are some photos of the clean up work I started a week or so ago.
The Firewall: 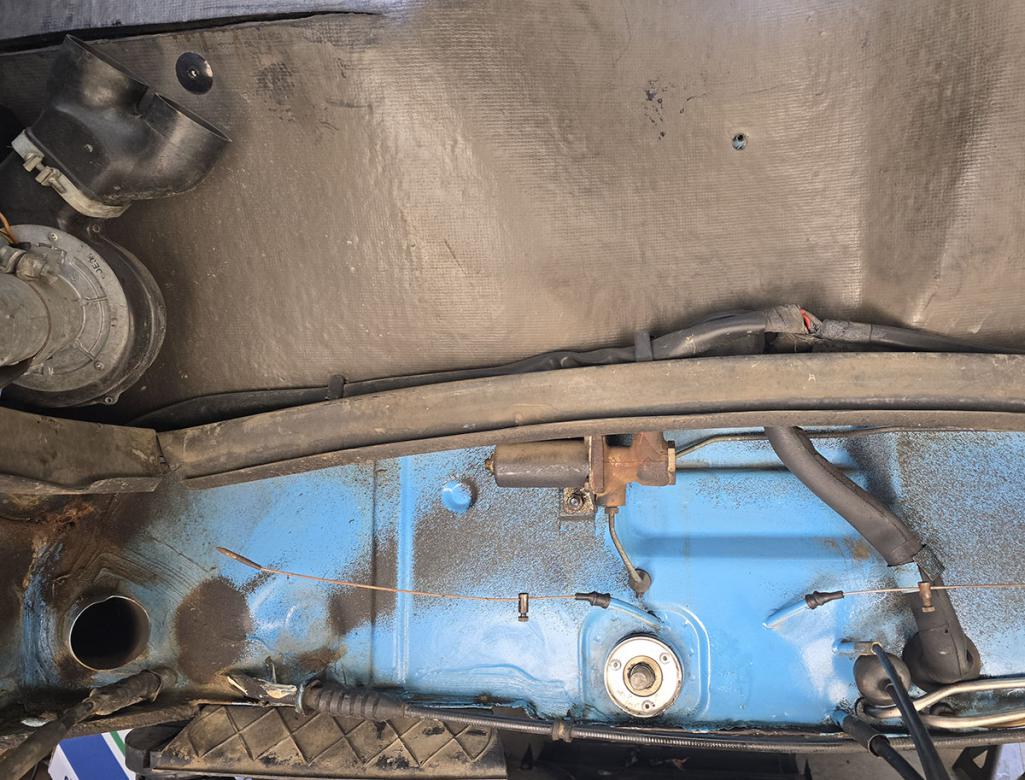 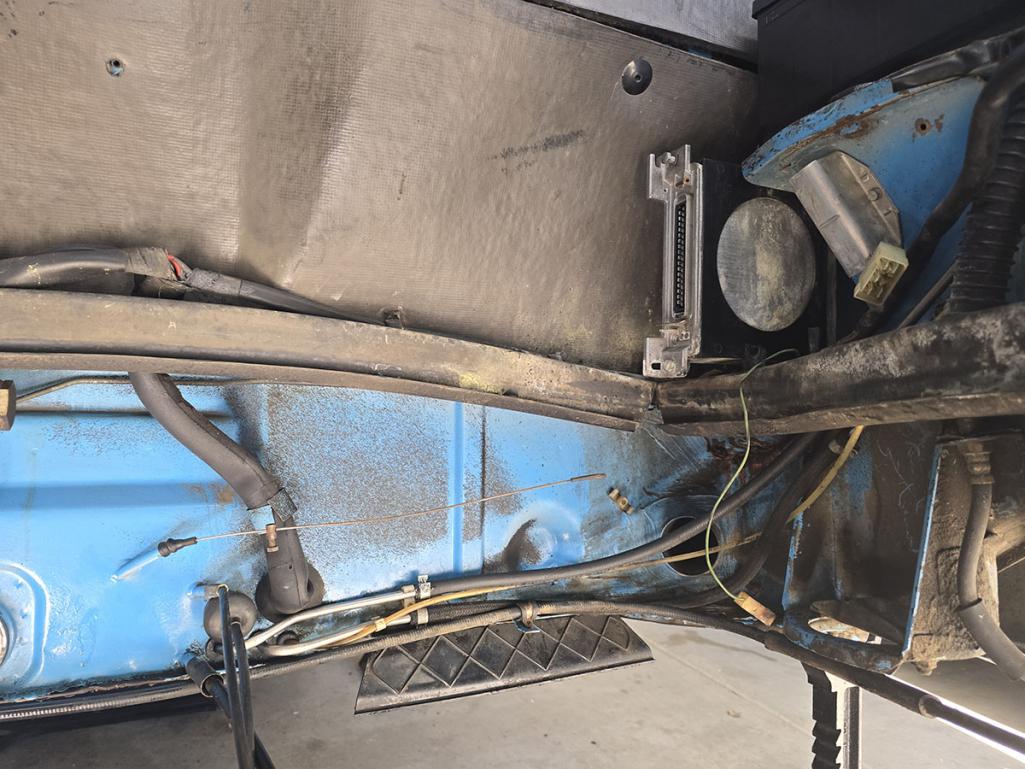 After a bit of cleaning, on day 1: 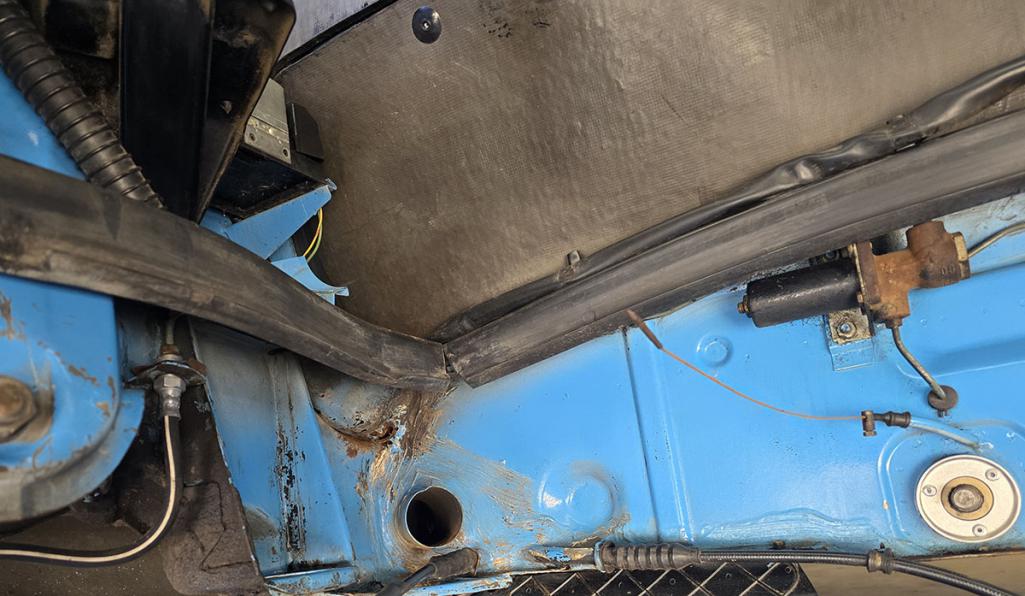 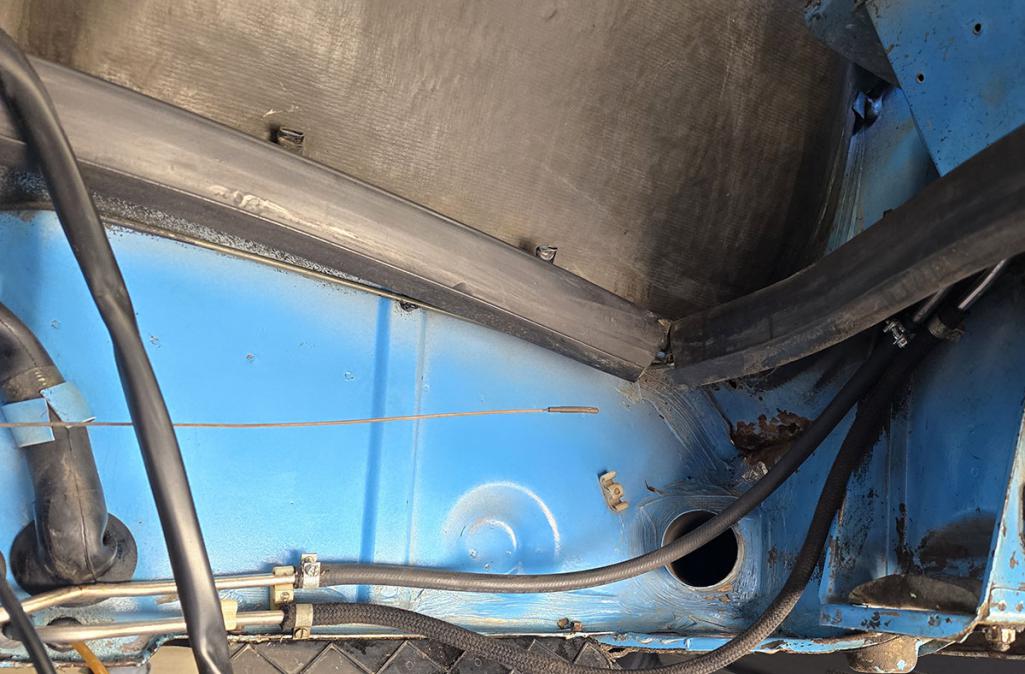 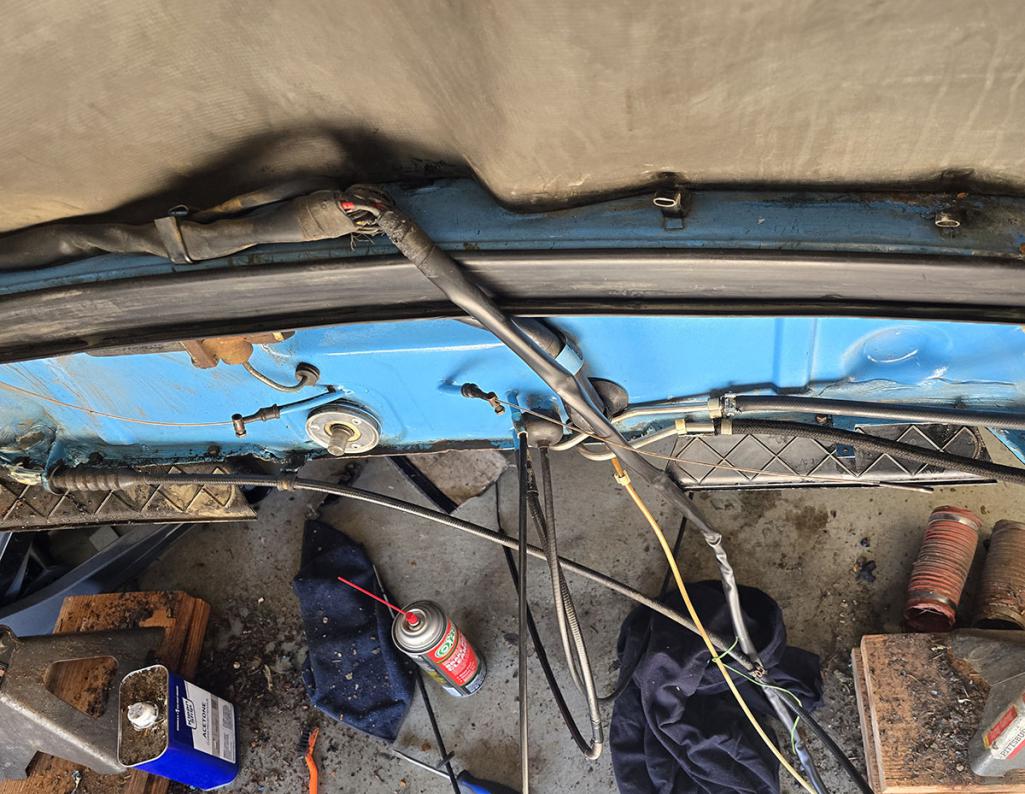 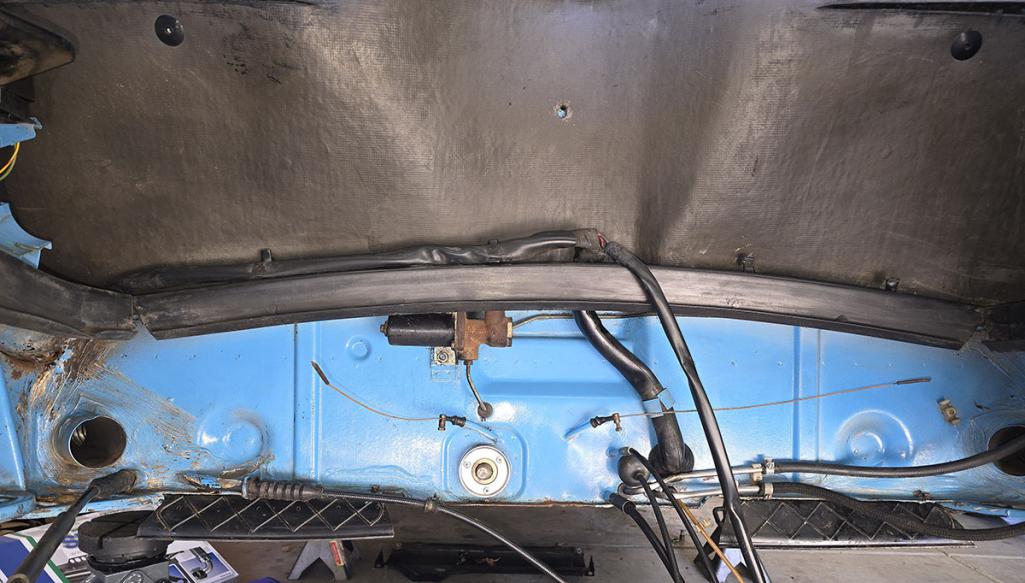 Looking at the rusted areas after the first pass at cleaning things up:[b] 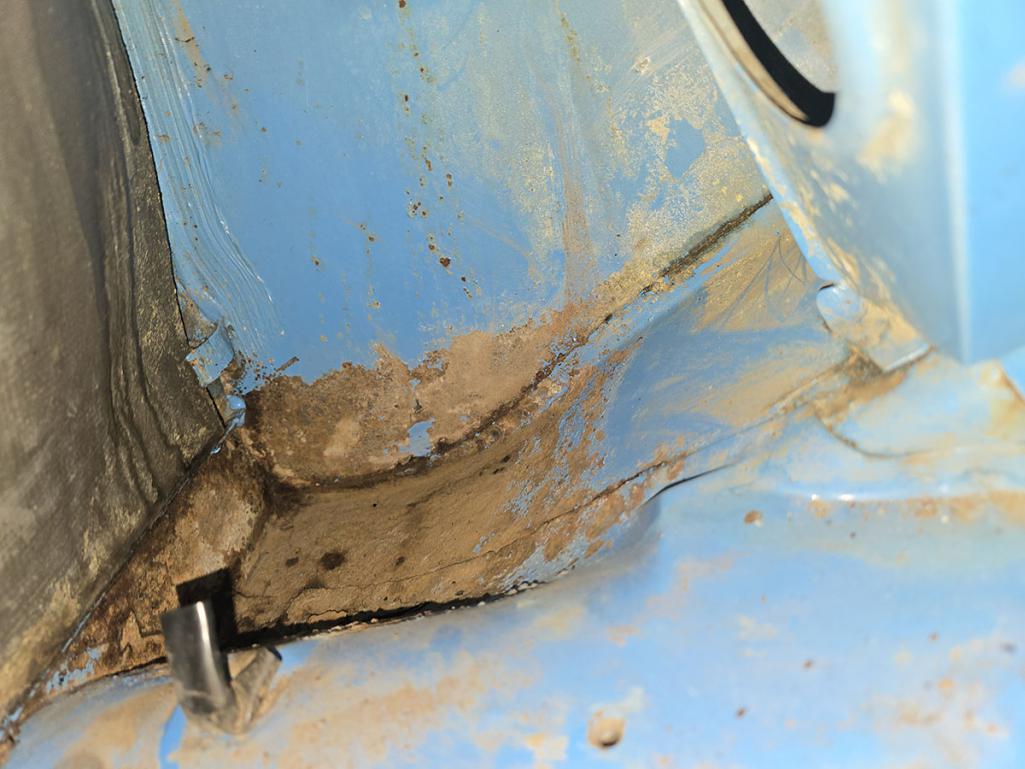 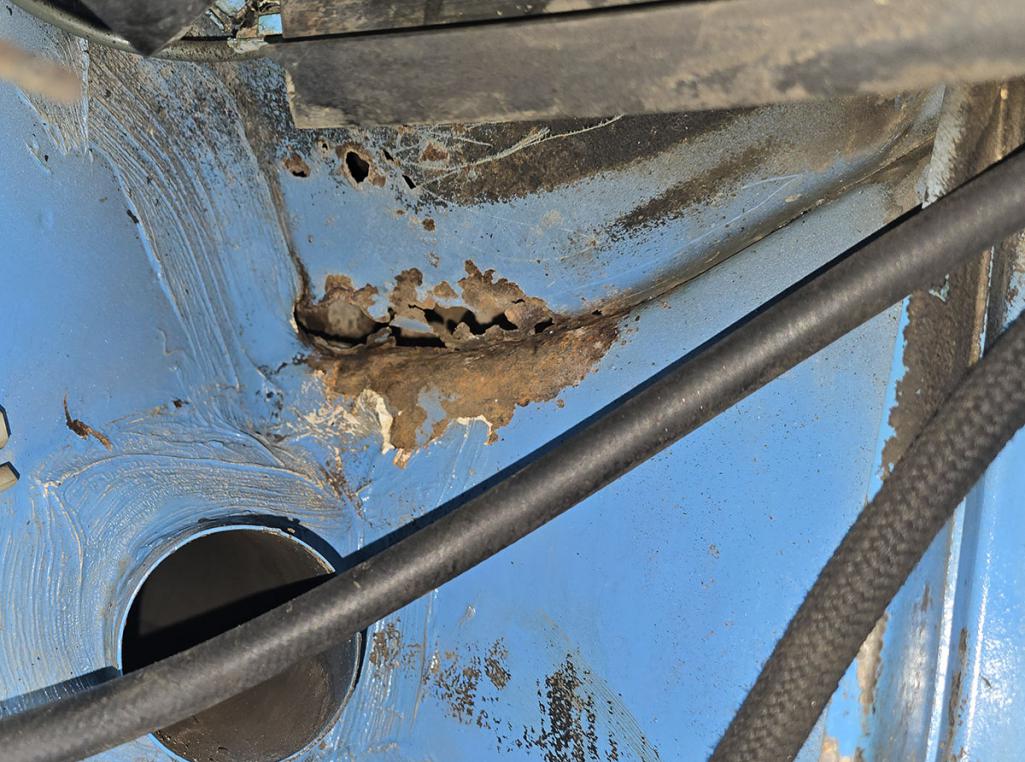 I think I'm going to get a patch panel and fix that area under the battery tray. The other side under the relay board has a few pea sized holes and some thin metal around the drain hole. Not sure what I'm going to do there yet. I hit both of those pockets (battery tray / under the relay board) with some Osphor while I figure out the next steps. All in all, I am okay with what I found, nothing too serious. |
|
|
|
| TRP |
Feb 1 2026, 08:03 PM
Post
#12
|
|
Member Group: Members Posts: 421 Joined: 2-September 23 From: Morgan Hill, CA Member No.: 27,559 Region Association: None |
It's Sunday, so you know I have Updates.
Last weekend I picked up an original Bischoff Sport Series muffler. It had been lightly used and removed from a car back in the 90's. The muffler had most of the original paint and the original chrome tips. I wanted to preserve the metal, so I had it cerakoted. I was feeling adventurous and thought I would try a Titanium color. You can see the protective wrap on the muffler body still. 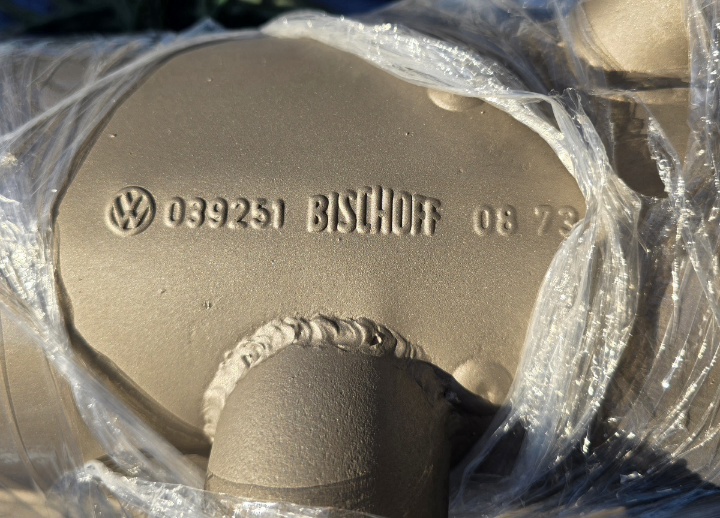 I couldn't help but place it on the car just to see how it would look. The Titanium color doesn'tlook as gold in person or when it's next to the car. 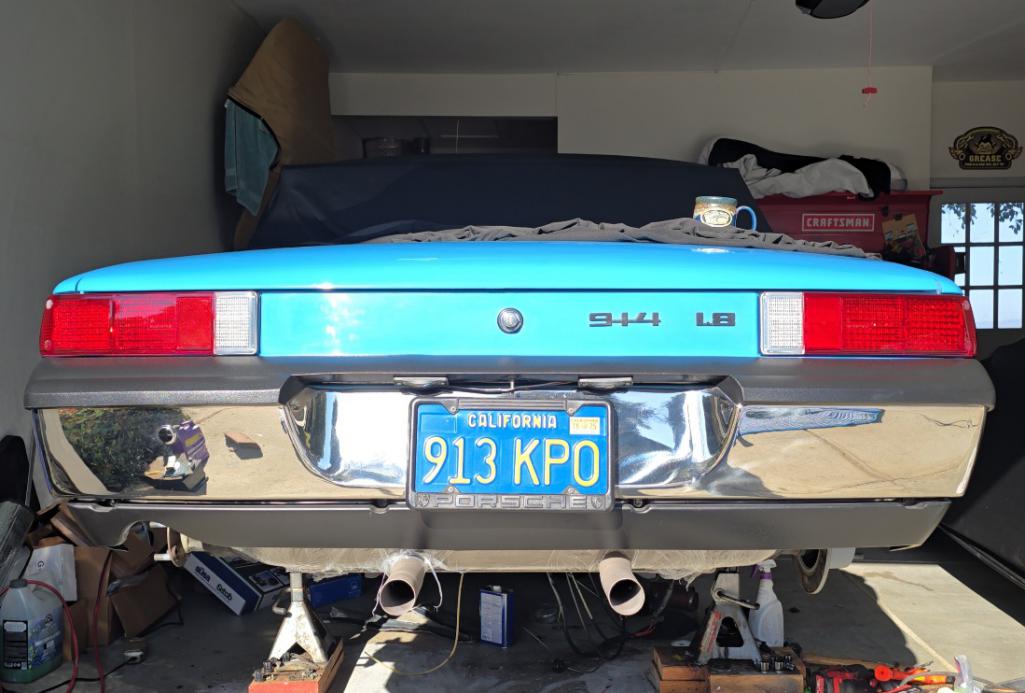 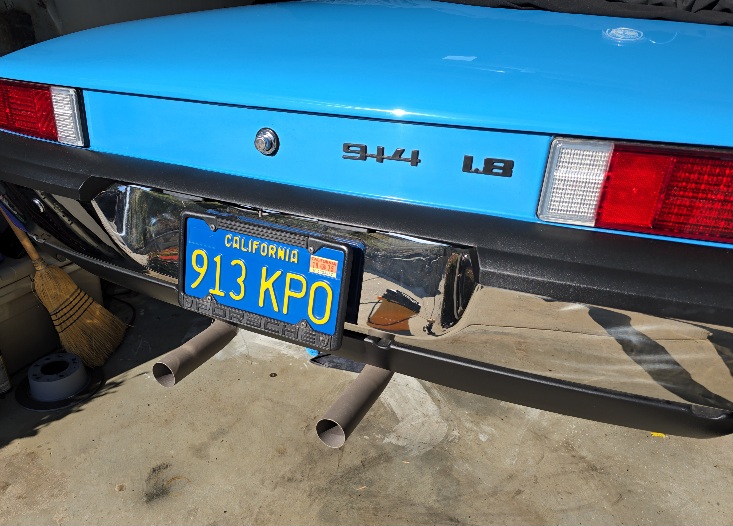 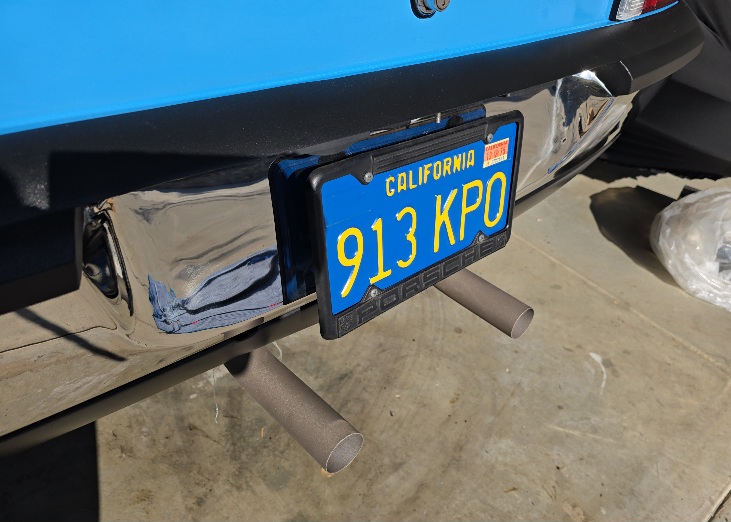 Pretty happy with the way it looks without the chrome tips. 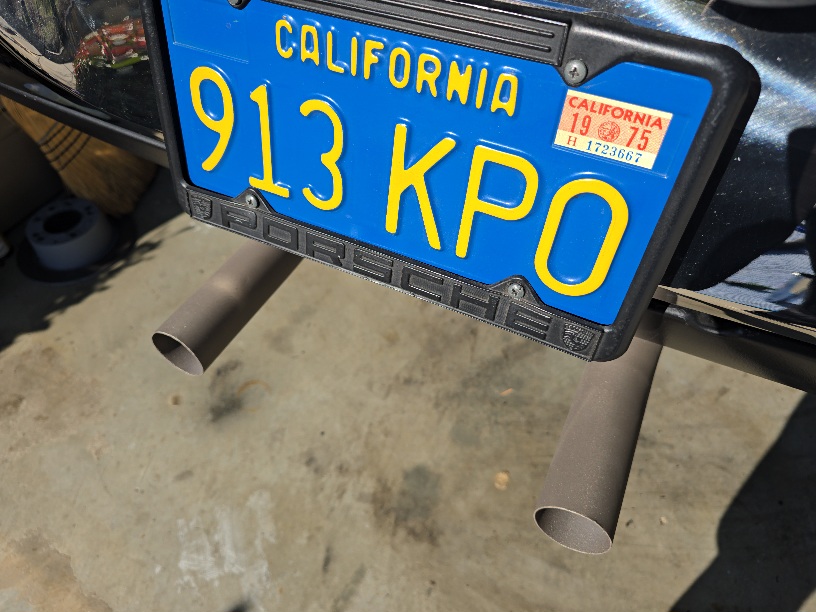 he current shin bash count is zero, I am sure that will go up. 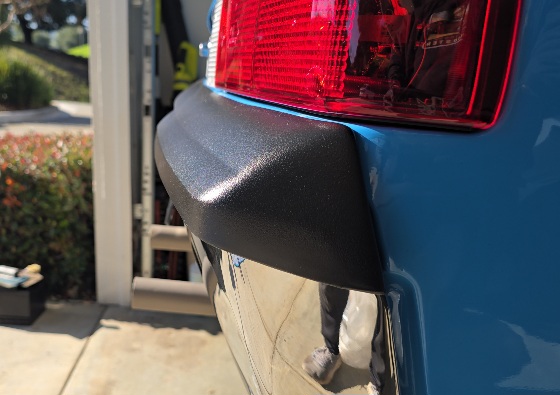 Does anyone make a metal rear valance without the muffler exit cutout? I would like to get one without this notch. 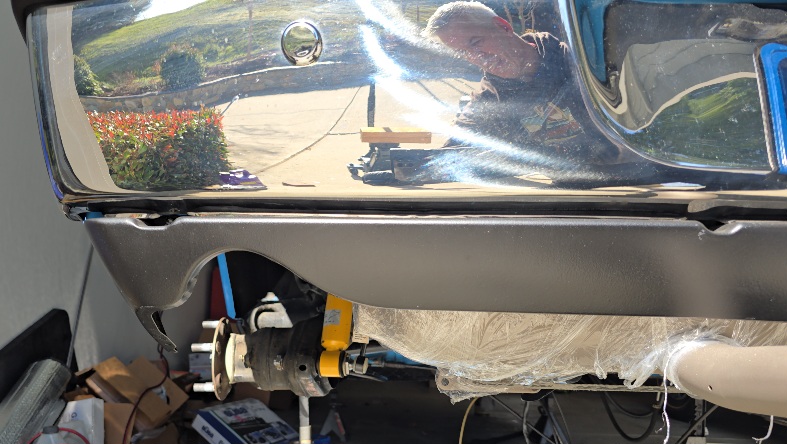 |
|
|
|
| TRP |
Feb 9 2026, 08:49 PM
Post
#13
|
|
Member Group: Members Posts: 421 Joined: 2-September 23 From: Morgan Hill, CA Member No.: 27,559 Region Association: None |
I reached out to Ken today, the rotating assembly is all together and off to get spin balanced. I guess Ken sends that out to have everything indexed and balanced. When it comes back the pressure plate, flywheel, and crank should be all set!
While I have been waiting I am keeping myself busy with other mini projects. I picked up a set of 2.0 intake tubes, had them powder coated, and picked them up today. They are a nice gray with a hint of blueish green tint. I also bit the bullet an ordered a wideband AFR sensor kit, a CHT gauge / kit, and all the hoses/fittings/ and thermostat fan controller for the external oil cooler. All of that should keep me busy while I'm waiting for the motor. |
|
|
|
| Chad911sc |
Feb 11 2026, 10:27 AM
Post
#14
|
|
Member Group: Members Posts: 328 Joined: 24-September 24 From: Florida Member No.: 28,374 Region Association: South East States |
You can just mix up some fiberglass resin and cloth to cover that hole. Pretty easy fix. Make it look like it was never there. Cost you an afternoon and probably 50 bucks in materials. They make a flattening agent that you can add to the clear coat that will make it match the rest of your ground effects.
|
|
|
|
| Superhawk996 |
Feb 11 2026, 01:58 PM
Post
#15
|
|
914 Guru Group: Members Posts: 7,964 Joined: 25-August 18 From: Woods of N. Idaho Member No.: 22,428 Region Association: Galt's Gulch |
QUOTE(Chad911sc @ Feb 11 2026, 12:27 PM) You can just mix up some fiberglass resin and cloth to cover that hole. Pretty easy fix. Make it look like it was never there. Cost you an afternoon and probably 50 bucks in materials. They make a flattening agent that you can add to the clear coat that will make it match the rest of your ground effects. Don’t take this the wrong way but that is some classic DAPO (IMG:style_emoticons/default/stromberg.gif) said in the kindest most loving way I know how (IMG:style_emoticons/default/happy11.gif) Better off to leave the hell hole as-is and let any water and acid continue to easily drain out of that hellhole area. Fiberglass just traps moisture underneath and the rust continues and even accelerates . . . Ask me how I know about DAPOs usng fiberglass to repair rust. (IMG:style_emoticons/default/headbang.gif) 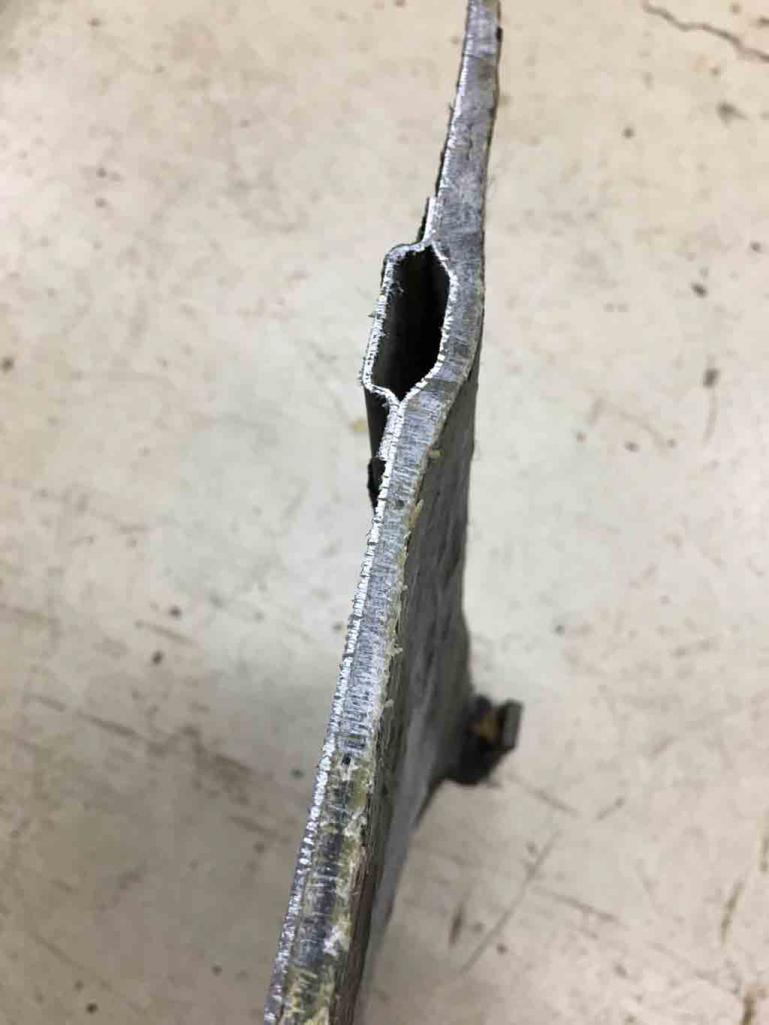 |
|
|
|
| TRP |
Feb 11 2026, 03:57 PM
Post
#16
|
|
Member Group: Members Posts: 421 Joined: 2-September 23 From: Morgan Hill, CA Member No.: 27,559 Region Association: None |
@Superhawk996 - I think @Chad911sc 's fiberglass comment was about filling in the cut out on the lower bumper valance to make it smooth/without the OEM single exhaust pea shooter. I have looked around and nobody offers a metal smooth rear bumper filler. Several fiberglass options exist. I will keep looking for a nice used metal one and just fabricate up a metal patch panel, grind it, smooth it, and paint it up. Keep the original 'nice' one I have now as a back up if I ever want to go with a single tip exhaust. Mixing FG and Metal in an area that gets hot and cools regularly doesn't seem like it would end well longer term. Wouldn't that joint between metal and FG crack eventually?
About the rust holes under each corner of the engine compartment, I'm not sure what I'm going to do there. It's 300.00 for the patch panels and I only need about 5" on each side. If I tackle that job, that's what I would do... but dang... that's a lot of work for something that's just cosmetic at this point. I neutralized all the acid that may have been in that area and hit it with a bunch of osphor. I may just hit it with some epoxy primer to lock out the future rust and revisit it at a later date. I haven't decided yet if I want to go all in on those areas right now. (IMG:style_emoticons/default/dry.gif) |
|
|
|
| Superhawk996 |
Feb 11 2026, 04:59 PM
Post
#17
|
|
914 Guru Group: Members Posts: 7,964 Joined: 25-August 18 From: Woods of N. Idaho Member No.: 22,428 Region Association: Galt's Gulch |
QUOTE(TRP @ Feb 11 2026, 05:57 PM) @Superhawk996 - I think @Chad911sc 's fiberglass comment was about filling in the cut out on the lower bumper valance to make it smooth/without the OEM single exhaust pea shooter. I may just hit it with some epoxy primer to lock out the future rust and revisit it at a later date. I haven't decided yet if I want to go all in on those areas right now. (IMG:style_emoticons/default/dry.gif) (IMG:style_emoticons/default/headbang.gif) Doh. Sorry I thought the fiberglass proposal was for the hell hole. I jumped to that conclusion because that gets done more than you would think. And hopefully you both recognize that although I am serious, it’s a bit tongue in cheek. I think @Chad911sc has some other projects that don’t appear to be done with a DAPO mentality. No offense meant. (IMG:style_emoticons/default/beerchug.gif) As to your proposal for the hell hole: I think that is a good proposal for a holding pattern. This is my personal opinion and is worth what was paid: If I were buying, I’d rather see the rust holes treated with Ospho and primed / painted and in a holding pattern than a poorly done patch job (not saying that is what you would produce). Even more so if the patch is fiberglass - cause there is never anything good hiding under fiberglass. As it sits, it isn’t terrible and you can more or less see and fairly evaluate that rust. With a poorly done metal patch or god forbid fiberglass, I’m going to assume that it is way worse if the patch & rust repair isn’t done to a high standard (ie replace the entire shelf). That’s me and I’m a weirdo so there’s that. (IMG:style_emoticons/default/rolleyes.gif) |
|
|
|
| TRP |
Feb 11 2026, 05:49 PM
Post
#18
|
|
Member Group: Members Posts: 421 Joined: 2-September 23 From: Morgan Hill, CA Member No.: 27,559 Region Association: None |
Oh, no worries! I understand and appreciate anyone who calls out/points out anything that may seem wonky. No offense taken.
I completely agree with your position on the engine shelf bits, I'd rather see the truth of what's there vs some cobbled hack job that causes more concern about 'what else was done wrong'. One thing I hadn't considered is if replacing the whole piece would be easier than trying to section a 6" section in there. (IMG:style_emoticons/default/idea.gif) I doubt that makes it 'easy' for a hack like me. That should be a warning about my experience with this sort of 'repair'. (IMG:style_emoticons/default/biggrin.gif) If it's a bunch of spot welds and seam sealer, that seems like a better solve. I'll epoxy prime the two spots and leave them for now while I consider my options here. Thanks for the feedback! |
|
|
|
| Chad911sc |
Feb 11 2026, 07:05 PM
Post
#19
|
|
Member Group: Members Posts: 328 Joined: 24-September 24 From: Florida Member No.: 28,374 Region Association: South East States |
Yeah…lol.
That would be what the previous owner left me when I bought mine. (IMG:style_emoticons/default/lol-2.gif) I spent a few months cutting all of it out of the hell hole, and replacing with new replacement panels. And I actually thought that rear valance was fiberglass. I didn’t know they came in steel. Mine were fiberglass on mine and I changed it to a center outlet. I wouldn’t use fiberglass on steel ever. I would weld a little well shaped piece into that opening and file it down. I don’t know much about the Porsche 914, that’s why I’m here to learn daily. But I’ve been paint and body man for 30 years. |
|
|
|
| Superhawk996 |
Feb 11 2026, 07:44 PM
Post
#20
|
|
914 Guru Group: Members Posts: 7,964 Joined: 25-August 18 From: Woods of N. Idaho Member No.: 22,428 Region Association: Galt's Gulch |
QUOTE(TRP @ Feb 11 2026, 07:49 PM) One thing I hadn't considered is if replacing the whole piece would be easier than trying to section a 6" section in there. (IMG:style_emoticons/default/idea.gif) I doubt that makes it 'easy' for a hack like me. That should be a warning about my experience with this sort of 'repair'. (IMG:style_emoticons/default/biggrin.gif) If it's a bunch of spot welds and seam sealer, that seems like a better solve. I'll epoxy prime the two spots and leave them for now while I consider my options here. I’ve seen them patched. To me, it seems they usually turn out better replacing the whole shelf. Been there done that. 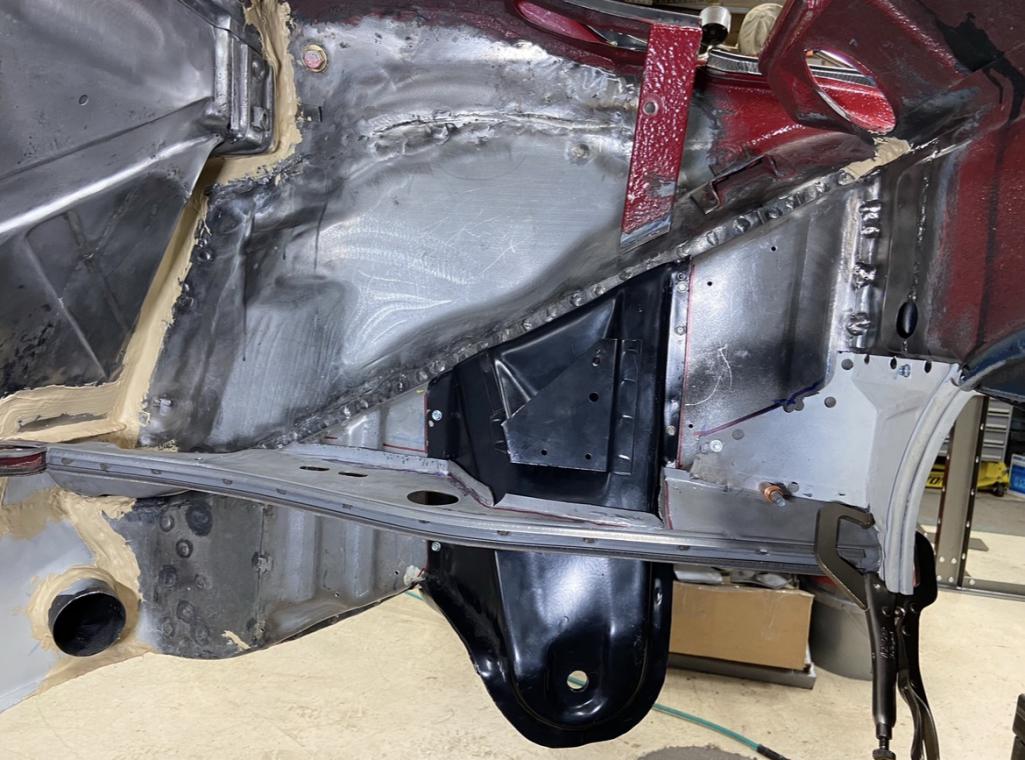 The problem with patching is that you can’t weld to rust and by the time you get to cleaned out solid metal, you’ll end up with a much bigger repair than you think was needed. The channel for the engine seal also compounds things depending on how far back to get to clean metal. It’s pretty straight forward to replace though. All spot welds as you stated. The other problem trying to patch is that hell hole area is all pretty bad access even with the engine out. But you’re doing great - keep moving forward! (IMG:style_emoticons/default/smilie_pokal.gif) |
|
|
|
|
1 User(s) are reading this topic (1 Guests and 0 Anonymous Users)
0 Members:

|
Lo-Fi Version | Time is now: 27th July 2026 - 11:38 AM |
Invision Power Board
v9.1.4 © 2026 IPS, Inc.