|
|
|
Porsche, and the Porsche crest are registered trademarks of Dr. Ing. h.c. F. Porsche AG.
This site is not affiliated with Porsche in any way. Its only purpose is to provide an online forum for car enthusiasts. All other trademarks are property of their respective owners. |
|
|

  |

| TRP |
 Apr 19 2026, 08:29 AM Apr 19 2026, 08:29 AM
Post
#41
|
|
Member  Group: Members Posts: 407 Joined: 2-September 23 From: Morgan Hill, CA Member No.: 27,559 Region Association: None |
Updates, we got Updates!
I picked the motor up from Ken yesterday; it looks great! I was so happy to get the moto and get started on the reassembly that I forgot to take a photo of the longblock in its bare state. I will try to get some pictures today. To do list: Weld on the afr bung Mount setrab oil cooler Get 15x6 Fuchs back from restoration Install fan, fan shroud Get 15" tires & install Adjust right trunk hinge to fix uneven gaps Repaint engine grills on engine cover install new P O R S C H E letters on engine cover Get new battery and install Finish MC install and bleed brakes Break in the cam (will break it in with carbs) Get harnesses back from El Jeffe Install alternator Install all the powder coated tins & gaskets Set thermostat cable/flaps Up next, Reassemble the ljet Fill Transmission with fluid Install circuit board and heater blower Install Motor, exhaust Get it running in the car Figure out how to adapt and install the GoWesty throttle body Figure out how install A123 Distributor Wire up fan controller for oil cooler Wire up the afr sensor Wire up the cht sender & gauge Install new combo gauge |
   |

 
|
| TRP |
Apr 19 2026, 07:40 PM
Post
#42
|
|
Member Group: Members Posts: 407 Joined: 2-September 23 From: Morgan Hill, CA Member No.: 27,559 Region Association: None |
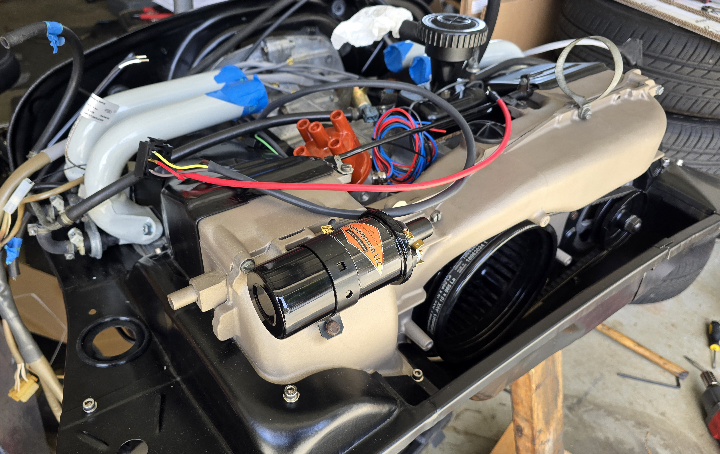
Long day... but I managed to get some stuff done on the motor. A123 and GoWesty are in! New harness are sort of in. A lot of the hoses and wires are just laying on top of the motor until I figure out how I want to route everything. Seems like a shame to treat those new harnesses like that, Jeff did a BEAUTIFUL job on all three harnesses, they are beautiful. I am not really into the band clamps for the intake: they are big and clumsy looking. I am rying to figure out a better solution there, maybe just trimming the ends will make them less obnoxious? What do you all recommend?
    To do list: Weld on the afr bung Mount setrab oil cooler Get 15x6 Fuchs back from restoration Install fan, fan shroud Get 15" tires & install Adjust right trunk hinge to fix uneven gaps Repaint engine grills on engine cover install new P O R S C H E letters on engine cover Get new battery and install Finish MC install and bleed brakes Break in the cam (will break it in with carbs) Get harnesses back from El Jeffe Install alternator Install all the powder coated tins & gaskets Set thermostat cable/flaps Reassemble the ljet Figure out how to adapt and install the GoWesty throttle body Figure out how install A123 Distributor Up next Fill Transmission with fluid Install circuit board and heater blower Install Motor, exhaust Get it running in the car Wire up fan controller for oil cooler Wire up the afr sensor Wire up the cht sender & gauge Install new combo gauge It's coming along. It ain't much... I keep it clean though. |
|
|
|
| TRP |
Apr 21 2026, 01:19 PM
Post
#43
|
|
Member Group: Members Posts: 407 Joined: 2-September 23 From: Morgan Hill, CA Member No.: 27,559 Region Association: None |
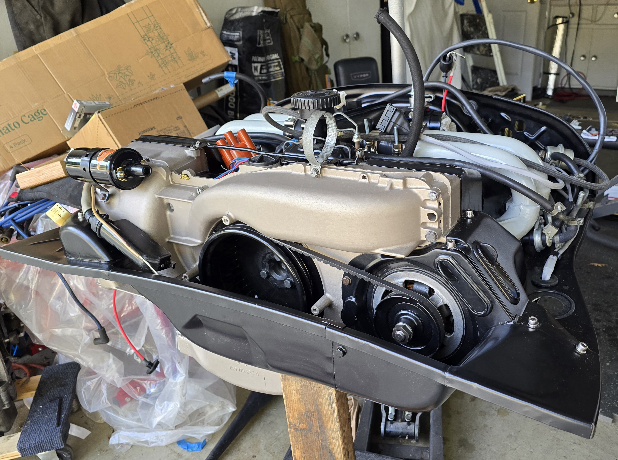
Looking at these photos in again today and I realize how 'off' the camera phone ccd is at capturing the 'color' of the fan shroud. It's NOT tan. It's cerakoted in a magnesium color. It's grey/gold-ish. In fact, the exhaust and the fan shroud are the same color. Totally weird how the color isn't captured properely.
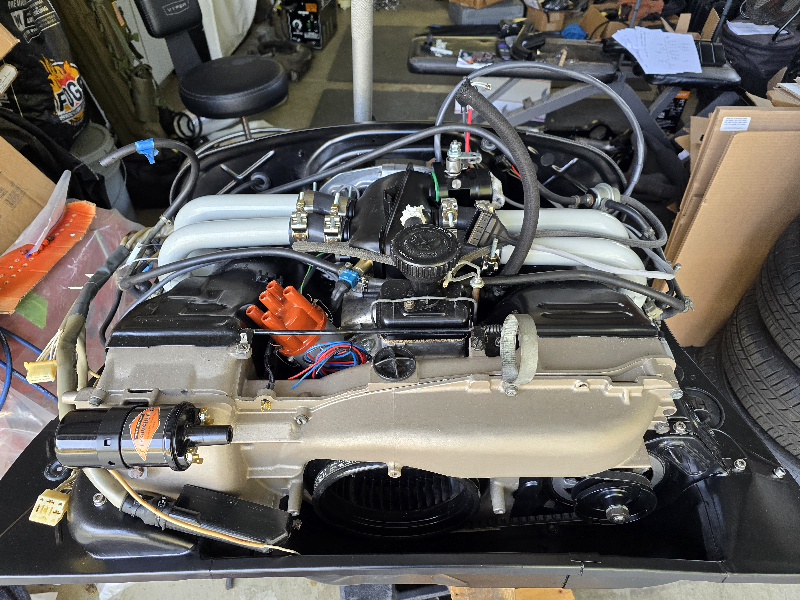
(IMG:http://www.914world.com/bbs2/uploads/post-27559-1776649280.jpg) I wanted to ask the crew here for their suggestion at cleaning up the t-clamps used to hold the silicone hose connectors to the intake runners/intake plenum. They are just kind of sitting on there right now, I can turn them to align them better, but I just think they look clumsy/chunky. I may also go back and swap out the hex head tin fasteners with the OEM Screws. The oem screws seem more fitting than the stainless hex heads. What do you guys think? Please also have a look at my thread about the A123 / GoWesty questions. Thanks! Ted |
|
|
|
| Chad911sc |
Apr 21 2026, 02:51 PM
Post
#44
|
|
Member Group: Members Posts: 324 Joined: 24-September 24 From: Florida Member No.: 28,374 Region Association: South East States |
The engine looks Beautiful!
Clean and tidy! I suppose you could cut off a bit of the shank on the clamps, but those clams apply such nice even force around the entire perimeter, I wouldn’t change them. Keep up the great work, it’s going to be engine starting time soon (IMG:style_emoticons/default/beerchug.gif) |
|
|
|
| FlacaProductions |
Apr 21 2026, 04:02 PM
Post
#45
|
|
Advanced Member Group: Members Posts: 2,235 Joined: 24-November 17 From: LA Member No.: 21,628 Region Association: Southern California |
If those clamps work great, keep 'em.
Form follows function. |
|
|
|
| TRP |
Apr 21 2026, 11:41 PM
Post
#46
|
|
Member Group: Members Posts: 407 Joined: 2-September 23 From: Morgan Hill, CA Member No.: 27,559 Region Association: None |
Thanks for the info on the clamps and the kind words of encouragement.
Im waiting on a few hoses and then I will go over everything once more before I stab the motor back in. Pretty close at this point. Should be interesting to see if I got everything right. The L-Jet is incredibly simple to re-install with all of the great info available here! I just hope it starts! 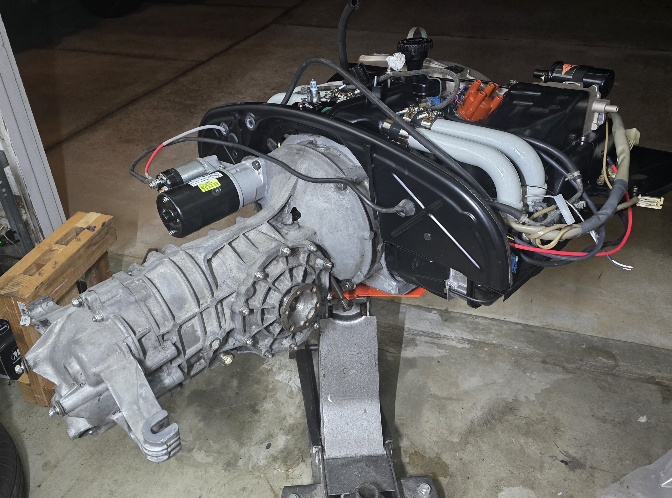 Getting closer! |
|
|
|
| wonkipop |
Apr 22 2026, 01:43 PM
Post
#47
|
|
914 Guru Group: Members Posts: 5,572 Joined: 6-May 20 From: north antarctica Member No.: 24,231 Region Association: NineFourteenerVille |
looks fab. super clean. (IMG:style_emoticons/default/beerchug.gif)
as to the clamps on the intake tube gasket tubes. well if they are new gasket tubes they should seal well without hose clamps. (in fact i still run original gasket tubes which are unclamped and i have smoke tested and no leaks). however i think the clamps you have look fine and as other members comment since they are already on why take them off. if nothing else you got 100% insurance on no air leaks. |
|
|
|
| Cairo94507 |
Apr 22 2026, 02:03 PM
Post
#48
|
|
Michael Group: Members Posts: 10,677 Joined: 1-November 08 From: Auburn, CA Member No.: 9,712 Region Association: Northern California |
Beautiful work. All I can add, and I am sure you thought of this, is try to position the clamps so the bolt is on the bottom so it its less visible on top. I know that makes them harder to access, but if possible, that would look pretty nice. (IMG:style_emoticons/default/beerchug.gif)
|
|
|
|
| TRP |
Apr 22 2026, 02:05 PM
Post
#49
|
|
Member Group: Members Posts: 407 Joined: 2-September 23 From: Morgan Hill, CA Member No.: 27,559 Region Association: None |
QUOTE(wonkipop @ Apr 22 2026, 12:43 PM)  looks fab. super clean. (IMG:style_emoticons/default/beerchug.gif) as to the clamps on the intake tube gasket tubes. well if they are new gasket tubes they should seal well without hose clamps. (in fact i still run original gasket tubes which are unclamped and i have smoke tested and no leaks). however i think the clamps you have look fine and as other members comment since they are already on why take them off. if nothing else you got 100% insurance on no air leaks. Thank you! These aren't the stock gaskets, I'm running 2.0 intake runners on a 1.8 intake body, so I have that odd jog to account for because of the mismatch in parts. I'm using nice silicone tube gaskets which are not as stiff as the originals, so it needs something to hold them from distorting. (IMG:style_emoticons/default/sad.gif) I'm going to leave them for now and just align the clamps in a uniform arrangement and lop off the bolt ends to get rid of some of the clutter. I will just need to learn to love the function vs. the form. I may stab the motor in tonight. (IMG:style_emoticons/default/blink.gif) |
|
|
|
| JeffBowlsby |
Apr 22 2026, 04:48 PM
Post
#50
|
|
914 Wiring Harnesses & Beekeeper Group: Members Posts: 9,286 Joined: 7-January 03 From: San Ramon CA Member No.: 104 Region Association: None |
You might want to fasten the battery+ cable to the rear wall of the tin. Look for two holes in the rear tin, a special zip tie is needed and the zip tie has an integral male plug that stabs into the hole on the tin to secure the cable in place to the tin.
PN should be: 99951300740 But verify it with a vendor before ordering. |
|
|
|
| TRP |
Apr 22 2026, 06:22 PM
Post
#51
|
|
Member Group: Members Posts: 407 Joined: 2-September 23 From: Morgan Hill, CA Member No.: 27,559 Region Association: None |
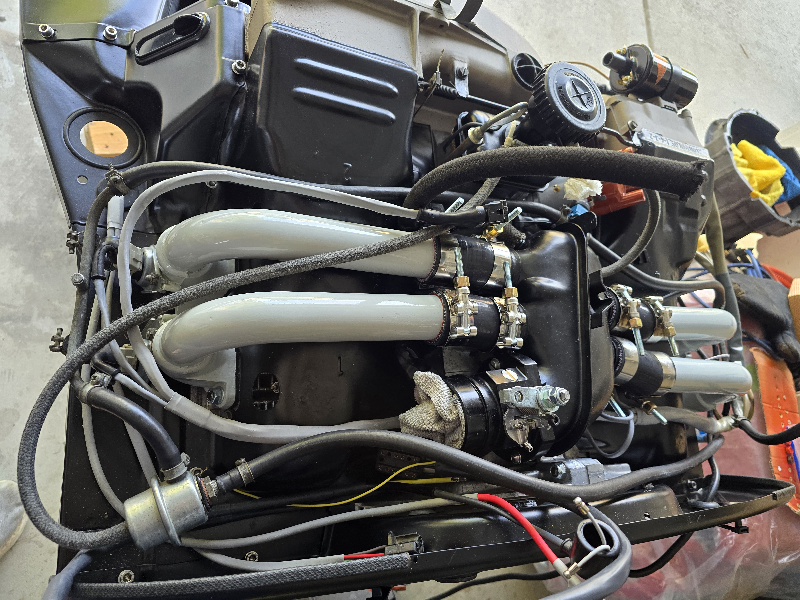
QUOTE(JeffBowlsby @ Apr 22 2026, 03:48 PM) You might want to fasten the battery+ cable to the rear wall of the tin. Look for two holes in the rear tin, a special zip tie is needed and the zip tie has an integral male plug that stabs into the hole on the tin to secure the cable in place to the tin. PN should be: 99951300740 But verify it with a vendor before ordering. Haaa! I knew someone would call that out. I fixed that almost immediately after taking the photo. If you zoom in you can see that the correct zip-ties are there, I just forgot to lash everything down as I was temporarily running the wires. I like that those zip ties are reusable. |
|
|
|
| TRP |
Apr 24 2026, 09:30 PM
Post
#52
|
|
Member Group: Members Posts: 407 Joined: 2-September 23 From: Morgan Hill, CA Member No.: 27,559 Region Association: None |
Updates! We got updates! So today I wrapped up a bunch of little ods and ends and then I figured it was time to put the motor back in.
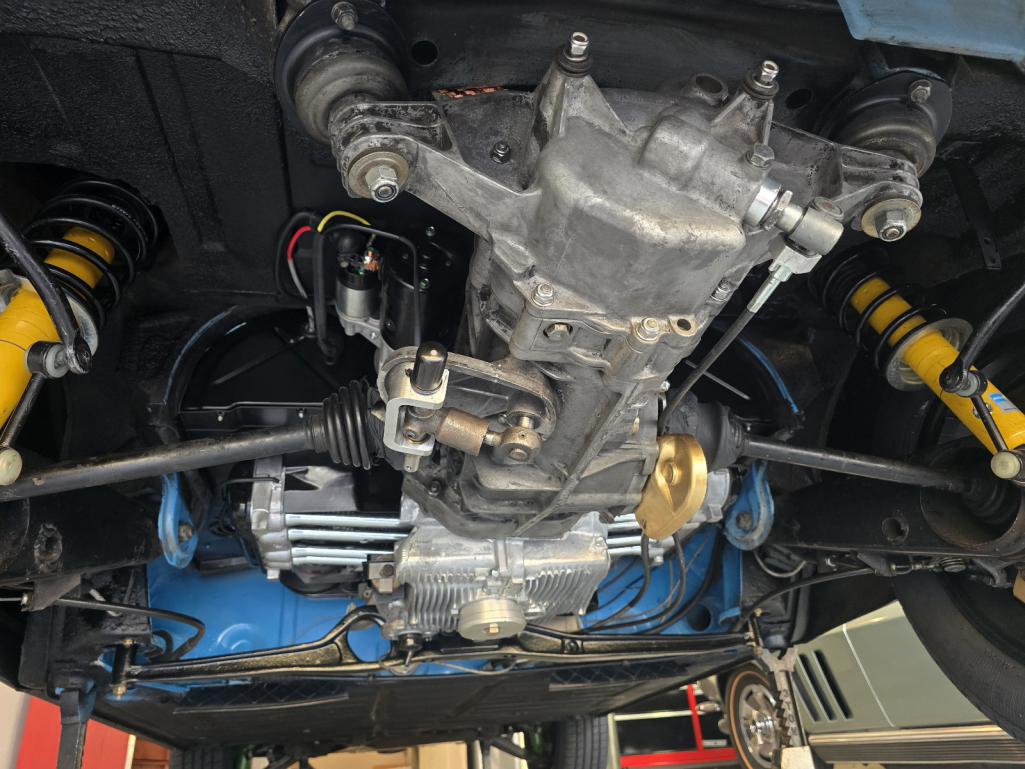 Taking it slowly and double checking everything along the way. To do list: Mount setrab oil cooler Get 15x6 Fuchs back from restoration Install fan, fan shroud Get 15" tires & install Adjust right trunk hinge to fix uneven gaps Repaint engine grills on engine cover install new P O R S C H E letters on engine cover Get new battery and install Finish MC install and bleed brakes Break in the cam (will break it in with carbs) Get harnesses back from El Jeffe Install alternator Install all the powder coated tins & gaskets Set thermostat cable/flaps Reassemble the ljet Figure out how to adapt and install the GoWesty throttle body Figure out how install A123 Distributor Fill Transmission with fluid Install circuit board and heater blower Install Motor Up next Install exhaust & heat parts Get motor running in the car Wire up fan controller for oil cooler Wire up the afr sensor Wire up the cht sender & gauge Install new combo gauge |
|
|
|
| porschetub |
Apr 24 2026, 10:19 PM
Post
#53
|
|
914 Guru Group: Members Posts: 5,124 Joined: 25-July 15 From: New Zealand Member No.: 18,995 Region Association: None |
QUOTE(TRP @ Apr 25 2026, 03:30 PM) Updates! We got updates! So today I wrapped up a bunch of little ods and ends and then I figured it was time to put the motor back in. Taking it slowly and double checking everything along the way. To do list: Mount setrab oil cooler Get 15x6 Fuchs back from restoration Install fan, fan shroud Get 15" tires & install Adjust right trunk hinge to fix uneven gaps Repaint engine grills on engine cover install new P O R S C H E letters on engine cover Get new battery and install Finish MC install and bleed brakes Break in the cam (will break it in with carbs) Get harnesses back from El Jeffe Install alternator Install all the powder coated tins & gaskets Set thermostat cable/flaps Reassemble the ljet Figure out how to adapt and install the GoWesty throttle body Figure out how install A123 Distributor Fill Transmission with fluid Install circuit board and heater blower Install Motor Up next Install exhaust & heat parts Get motor running in the car Wire up fan controller for oil cooler Wire up the afr sensor Wire up the cht sender & gauge Install new combo gauge Nice work and very tidy ,don't forget the large cup washers that go between the gearbox mounting ears and the rubber mounts ok . Keep up the good work and enjoying this build ,cheers Dean. |
|
|
|
| TRP |
Apr 24 2026, 10:33 PM
Post
#54
|
|
Member Group: Members Posts: 407 Joined: 2-September 23 From: Morgan Hill, CA Member No.: 27,559 Region Association: None |
Thank you, I'm trying not to rush it.
I appreciate the extra eyes on the reassembly. Regarding the cup washers, do you mean these guys?: 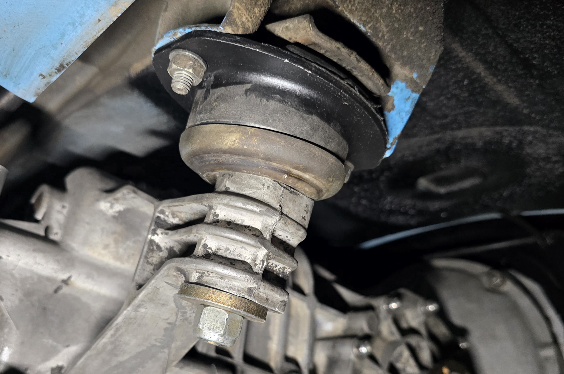 I checked and they are on there, they just arent gold coated anymore. (IMG:style_emoticons/default/sad.gif) |
|
|
|
| porschetub |
Apr 25 2026, 02:11 PM
Post
#55
|
|
914 Guru Group: Members Posts: 5,124 Joined: 25-July 15 From: New Zealand Member No.: 18,995 Region Association: None |
QUOTE(TRP @ Apr 25 2026, 04:33 PM) Thank you, I'm trying not to rush it. I appreciate the extra eyes on the reassembly. Regarding the cup washers, do you mean these guys?: I checked and they are on there, they just arent gold coated anymore. (IMG:style_emoticons/default/sad.gif) Pretty sure they are mounted upside down,cheers. |
|
|
|
| TRP |
Apr 25 2026, 07:52 PM
Post
#56
|
|
Member Group: Members Posts: 407 Joined: 2-September 23 From: Morgan Hill, CA Member No.: 27,559 Region Association: None |
QUOTE(porschetub @ Apr 25 2026, 01:11 PM) Pretty sure they are mounted upside down,cheers. Doh?!? You are 100% correct! Dang it... I will swap em. Thank you for noticing that and for calling it out. I really appreciate it. (IMG:style_emoticons/default/beerchug.gif) Ted |
|
|
|
| TRP |
May 9 2026, 10:40 AM
Post
#57
|
|
Member Group: Members Posts: 407 Joined: 2-September 23 From: Morgan Hill, CA Member No.: 27,559 Region Association: None |
Today could be the day! Down to the ignition and A123 wires at the coil, a few hose clamps, the two hoses for the oil cooler, and the passenger heat exchanger. The motor is at TDC, so setting the 123 should be easy.
I feel like I'm subconsciously avoiding this step for some reason. Maybe Im worried about the Ljet? Not sure. Lets see how today goes. Oh... and one more thing, the Ljet engine bay sure is messy/cluttered! SO. MANY. HOSES. |
|
|
|
| HFC3 |
May 9 2026, 02:18 PM
Post
#58
|
|
Member Group: Members Posts: 84 Joined: 14-December 25 From: Virginia Member No.: 29,151 Region Association: MidAtlantic Region |
Motor almost deserves to just be a show piece. Stunning.
|
|
|
|
| bkrantz |
May 9 2026, 07:03 PM
Post
#59
|
|
914 Guru Group: Members Posts: 8,725 Joined: 3-August 19 From: SW Colorado Member No.: 23,343 Region Association: Rocky Mountains |
QUOTE(Superhawk996 @ Feb 11 2026, 01:58 PM) QUOTE(Chad911sc @ Feb 11 2026, 12:27 PM) You can just mix up some fiberglass resin and cloth to cover that hole. Pretty easy fix. Make it look like it was never there. Cost you an afternoon and probably 50 bucks in materials. They make a flattening agent that you can add to the clear coat that will make it match the rest of your ground effects. Don’t take this the wrong way but that is some classic DAPO (IMG:style_emoticons/default/stromberg.gif) said in the kindest most loving way I know how (IMG:style_emoticons/default/happy11.gif) Better off to leave the hell hole as-is and let any water and acid continue to easily drain out of that hellhole area. Fiberglass just traps moisture underneath and the rust continues and even accelerates . . . Ask me how I know about DAPOs usng fiberglass to repair rust. (IMG:style_emoticons/default/headbang.gif) I agree. Fiberglass, bondo, and undercoat spray should require a license, deposit, and oath to purchase. |
|
|
|
| TRP |
May 9 2026, 07:20 PM
Post
#60
|
|
Member Group: Members Posts: 407 Joined: 2-September 23 From: Morgan Hill, CA Member No.: 27,559 Region Association: None |
@HFC3 Thank you. It came together prettynwell.
Well, everything is hooked up, motor cranks over, no leaks. Also doesn’t start. Seems like its not getting spark. I guess I'll go eat dinner and accept that this is what I was putting off all along. (IMG:style_emoticons/default/dry.gif) |
|
|
|
|
10 User(s) are reading this topic (10 Guests and 0 Anonymous Users)
0 Members:

|
Lo-Fi Version | Time is now: 22nd June 2026 - 04:27 AM |
Invision Power Board
v9.1.4 © 2026 IPS, Inc.