|
|
|
Porsche, and the Porsche crest are registered trademarks of Dr. Ing. h.c. F. Porsche AG.
This site is not affiliated with Porsche in any way. Its only purpose is to provide an online forum for car enthusiasts. All other trademarks are property of their respective owners. |
|
|

  |

| frank_c |
 Feb 27 2026, 12:38 AM Feb 27 2026, 12:38 AM
Post
#1
|
|
Member  Group: Members Posts: 73 Joined: 29-December 24 From: Austin, TX Member No.: 28,542 Region Association: None |
I'm in the process of replacing a leaking Rear Main Seal, and after pulling the old seal I noticed two scratches in the case bore (honestly, it wasn't me - I have the proper tool for this (IMG:style_emoticons/default/smile.gif)).
From what I've been able to find the RMS should be installed dry, but what is the best practice to address the two scratched areas to avoid a leak? Here are some of the suggestions I found when searching: 1. Use an emery cloth to knock-down any raised edges 2. Fill scratch with high-temp JB Weld 3. Use some type of sealant at the scratch Do I use none, one, or some combination of the above (or some other) to address this? Any help would be much appreciated as I'd like to get the new seal in this weekend. 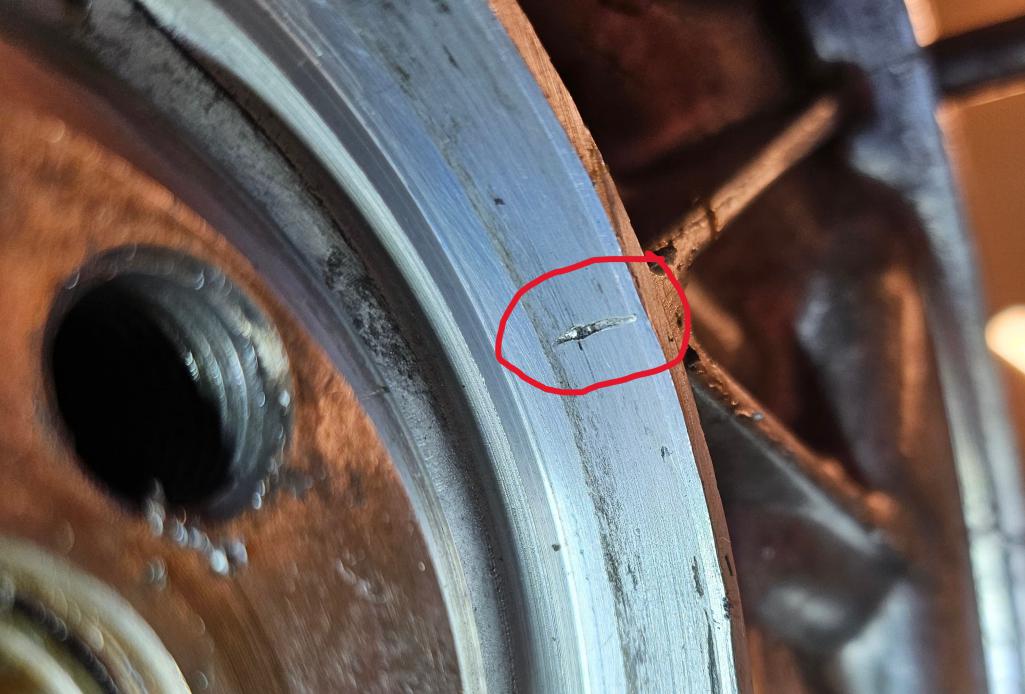 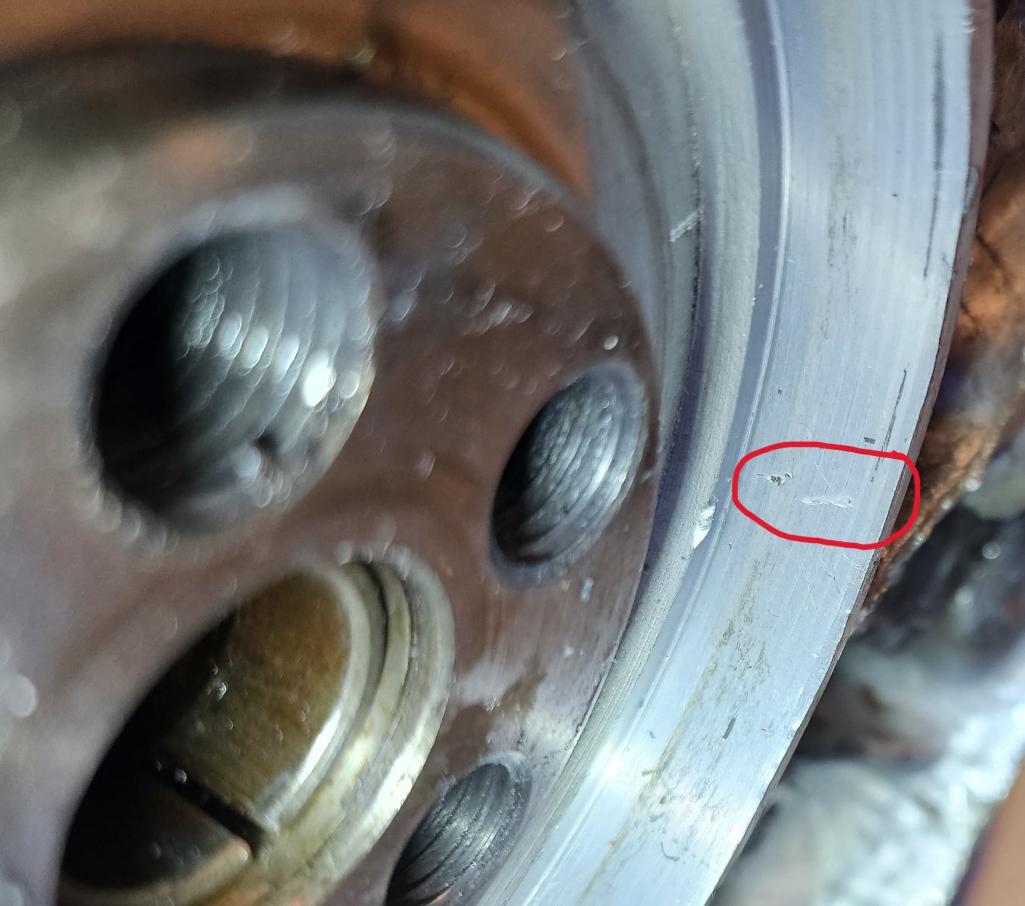 |
   |

 
|
| rfinegan |
Feb 27 2026, 07:01 AM
Post
#2
|
|
Senior Member Group: Members Posts: 1,189 Joined: 8-February 13 From: NC Member No.: 15,499 Region Association: MidAtlantic Region |
1. Use an emery cloth to knock-down any raised edges
2. JB Weld not needed 3. Use favorite sealant at the scratch and around seal |
|
|
|
| Ninja |
Feb 27 2026, 09:31 AM
Post
#3
|
|
Member Group: Members Posts: 170 Joined: 25-September 25 From: Granbury Texas Member No.: 29,004 Region Association: Southwest Region |
(IMG:style_emoticons/default/agree.gif)
Those scratches are completely covered by the OD of the seal. I might put a bit of 3H (case sealant. your choice) in the big one. |
|
|
|
| 930cabman |
Feb 27 2026, 10:16 AM
Post
#4
|
|
Advanced Member Group: Members Posts: 4,507 Joined: 12-November 20 From: Buffalo Member No.: 24,877 Region Association: North East States |
QUOTE(Ninja @ Feb 27 2026, 10:31 AM)  (IMG:style_emoticons/default/agree.gif) Those scratches are completely covered by the OD of the seal. I might put a bit of 3H (case sealant. your choice) in the big one. (IMG:style_emoticons/default/agree.gif) or a shellac based sealant |
|
|
|
| Jack Standz |
Feb 27 2026, 10:59 AM
Post
#5
|
|
Senior Member Group: Members Posts: 719 Joined: 15-November 19 From: Happy Place (& surrounding area) Member No.: 23,644 Region Association: None |
For your consideration is getting a GoWesty RMS installation tool. Seems that after all these years of just using a wood block or something to pound in the seal dry, there is a better way.
The instructions include using a sealant when you install the seal and drilling a drain hole back into the case at the bottom of the seal bore. Also, the tool insures the seal ends up properly positioned (make sure there isn't a Grove on the crankshaft which could cause a leak). https://gowesty.com/blogs/article-library/f...main-seal-story |
 |
|
| frank_c |
Feb 27 2026, 01:18 PM
Post
#6
|
|
Member Group: Members Posts: 73 Joined: 29-December 24 From: Austin, TX Member No.: 28,542 Region Association: None |
QUOTE(Jack Standz @ Feb 27 2026, 10:59 AM) For your consideration is getting a GoWesty RMS installation tool. Seems that after all these years of just using a wood block or something to pound in the seal dry, there is a better way. The instructions include using a sealant when you install the seal and drilling a drain hole back into the case at the bottom of the seal bore. Also, the tool insures the seal ends up properly positioned (make sure there isn't a Grove on the crankshaft which could cause a leak). https://gowesty.com/blogs/article-library/f...main-seal-story Thanks for the suggestion - I've seen that tool before. It looks great, but my plan was to use a bearing/seal tool to tap in the seal. One question I have though is what is the correct depth of the seal? Should it be flush with the top of the bore in the case? Will the seal be "bottomed out" at that point anyway so it can't go any further? As you mentioned, the GoWesty site for the RMS itself recommends the use of 'Vibra-TITE 550 Blue Core Plug Sealant' on the seal. This is a bonding sealant similar to Loctite 540. I have not found any other references recommending the use this type of product on a Rear Main Seal. Anyone have any experience with it? Will this make the seal difficult to remove the next time? And regarding the drilling of a hole to allow for additional oil drainage - I've also read about this modification in the past and it sounds like a good ideal, but a concern I have is aluminum shavings falling into the case during the drilling process on a assembled and sealed case. How do you prevent this from happening? |
|
|
|
| Ninja |
Feb 27 2026, 01:50 PM
Post
#7
|
|
Member Group: Members Posts: 170 Joined: 25-September 25 From: Granbury Texas Member No.: 29,004 Region Association: Southwest Region |
You could mildly pressurize the case (less than 3 PSI).
or Drill 90% of the hole, clean up, pack drill bit with grease on flukes, finish hole slowly cleaning up the bit as you go. or The best way IMO is to do the Raby mod when you have the engine apart later. Look at your crank to see if there is a score line. I always set my seal depth depending on where this line is. I AVOID this line if I can. You can see the original seal was not bottomed out. The important area to have as perfect as you can is where the seal hits the crank. Depth is not important (within reason), being equal depth is (seal straight in bore). |
|
|
|
|

|
Lo-Fi Version | Time is now: 27th February 2026 - 02:03 PM |
Invision Power Board
v9.1.4 © 2026 IPS, Inc.