|
|
|
Porsche, and the Porsche crest are registered trademarks of Dr. Ing. h.c. F. Porsche AG.
This site is not affiliated with Porsche in any way. Its only purpose is to provide an online forum for car enthusiasts. All other trademarks are property of their respective owners. |
|
|

  |

| Tdskip |
 Apr 30 2026, 01:14 PM Apr 30 2026, 01:14 PM
Post
#1
|
|
Advanced Member  Group: Members Posts: 3,781 Joined: 1-December 17 From: soCal Member No.: 21,666 Region Association: None |
So as some of you may remember, I’ve been battling a shifting issue that I diagnosed as an improperly rebuilt transmission so I bought a replacement one from Bruce (that had been rebuilt by our very own Dr Evil) I’m having the same issues getting gears with the engine running. New coupler, bushings good, shifter adjusted properly, clutch linkage not bent etc…
So that means my inability to get gears is most likely the clutch tube flopping around. It appears I need to open up the tunnel and I wanted to ask if where my finger is pointing is the right spot to make a cut? Thanks! 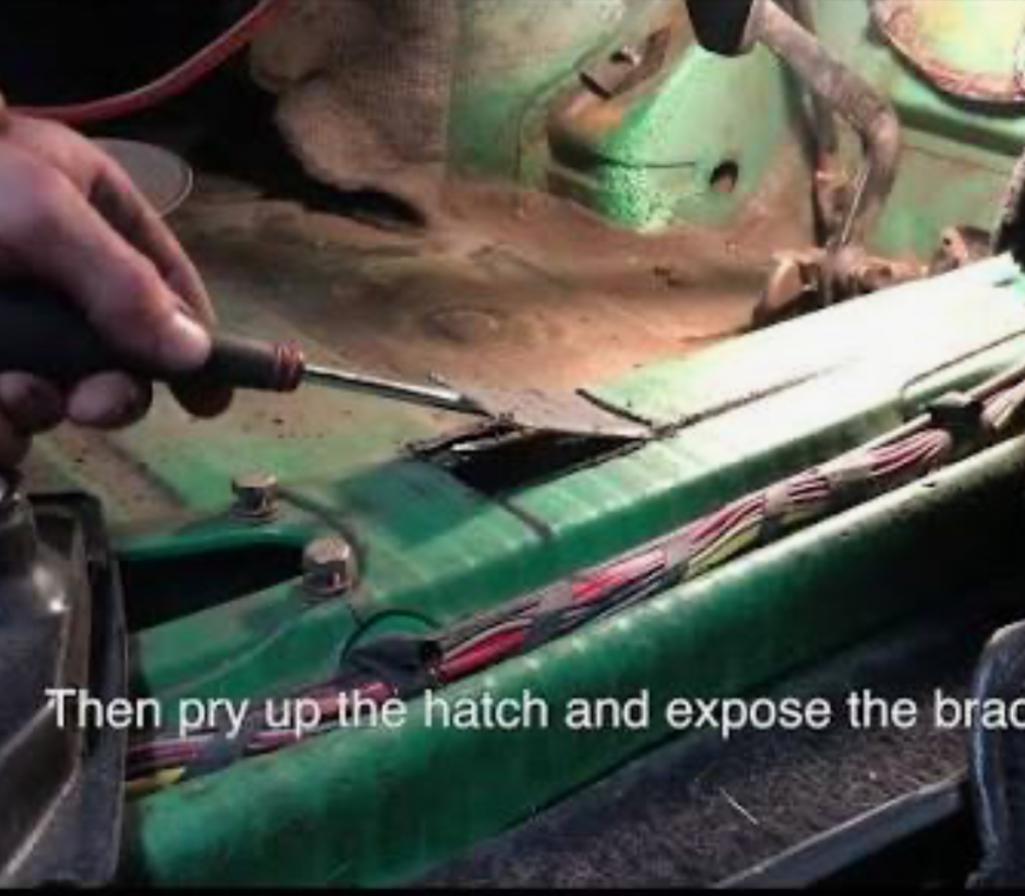 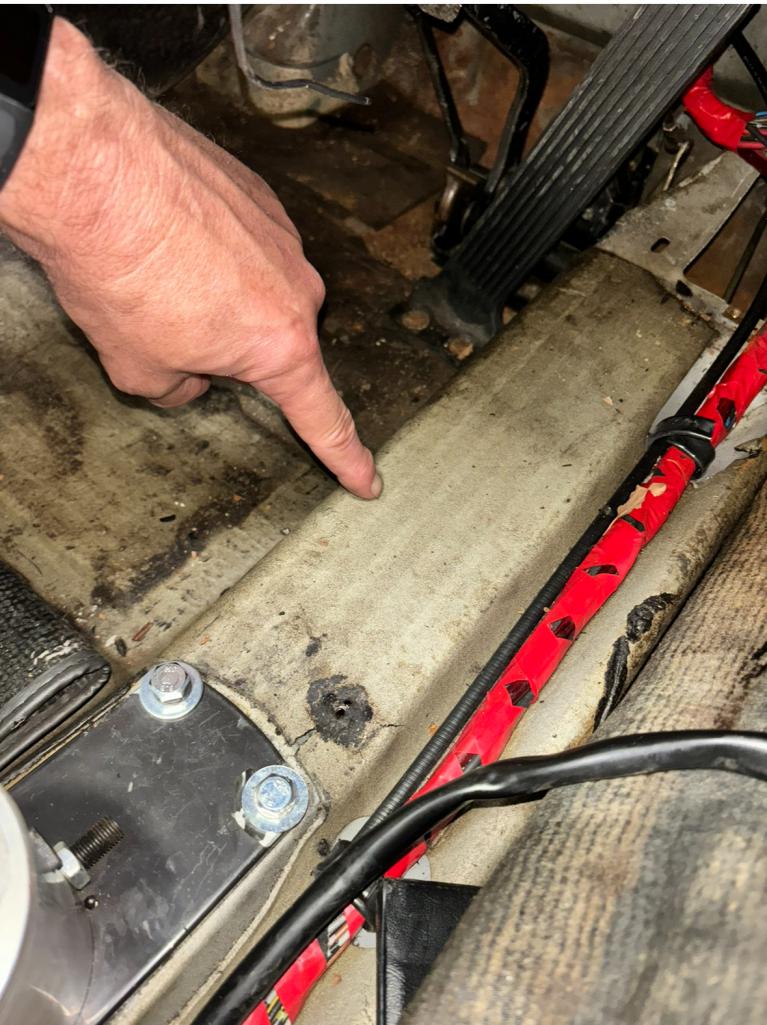 |
   |

 
|
| 930cabman |
Apr 30 2026, 01:18 PM
Post
#2
|
|
Advanced Member Group: Members Posts: 4,659 Joined: 12-November 20 From: Buffalo Member No.: 24,877 Region Association: North East States |
No pics, but I took out a whole section about 3" x 10" for general repairs. When done I will simply tack in back in
|
|
|
|
| JeffBowlsby |
Apr 30 2026, 01:35 PM
Post
#3
|
|
914 Wiring Harnesses & Beekeeper Group: Members Posts: 9,249 Joined: 7-January 03 From: San Ramon CA Member No.: 104 Region Association: None |
STRONGLY recommend that you remove the shifter, and/or open the forward tunnel access panel to inspect actual conditions. Using a mirror and flashlight, or better a borescope, look for the issue. Inspect the front tube and middle tube brackets, and also the rear firewall below the engine bay.
Make a conclusion only after inspection, then deciding on the repair(s) can be discussed. |
|
|
|
| Tdskip |
Apr 30 2026, 01:45 PM
Post
#4
|
|
Advanced Member Group: Members Posts: 3,781 Joined: 1-December 17 From: soCal Member No.: 21,666 Region Association: None |
QUOTE(JeffBowlsby @ Apr 30 2026, 02:35 PM)  STRONGLY recommend that you remove the shifter, and/or open the forward tunnel access panel to inspect actual conditions. Using a mirror and flashlight, or better a borescope, look for the issue. Inspect the front tube and middle tube brackets, and also the rear firewall below the engine bay. Make a conclusion only after inspection, then deciding on the repair(s) can be discussed. Good coaching Jeff, thanks. @930cabman - The area is not structural so opening up a good size working space isn’t the end of the world, that’s a good tip too. |
|
|
|
| dr914@autoatlanta.com |
Apr 30 2026, 02:02 PM
Post
#5
|
|
914 Guru Group: Members Posts: 8,236 Joined: 3-January 07 From: atlanta georgia Member No.: 7,418 Region Association: None |
there is a diagram in the appendix of the tech tips 700
|
|
|
|
| Tdskip |
Apr 30 2026, 02:16 PM
Post
#6
|
|
Advanced Member Group: Members Posts: 3,781 Joined: 1-December 17 From: soCal Member No.: 21,666 Region Association: None |
QUOTE(dr914@autoatlanta.com @ Apr 30 2026, 03:02 PM) there is a diagram in the appendix of the tech tips 700 Sorry but I am not familiar with that resource, where is it located? Thanks for the post. |
|
|
|
| barefoot |
Apr 30 2026, 03:44 PM
Post
#7
|
|
Senior Member Group: Members Posts: 1,512 Joined: 19-March 13 From: Charleston SC Member No.: 15,673 Region Association: South East States |
here's where I cut open to get access to the front bracket,
enlarged the opening between 2 round ports ; BTW I just used a clamp intended for electrical conduit, took a little blacksmithing to get correct curvature (a 3/8 extension was perfect anvil) then 1/4" bolt, no welding Barefoot 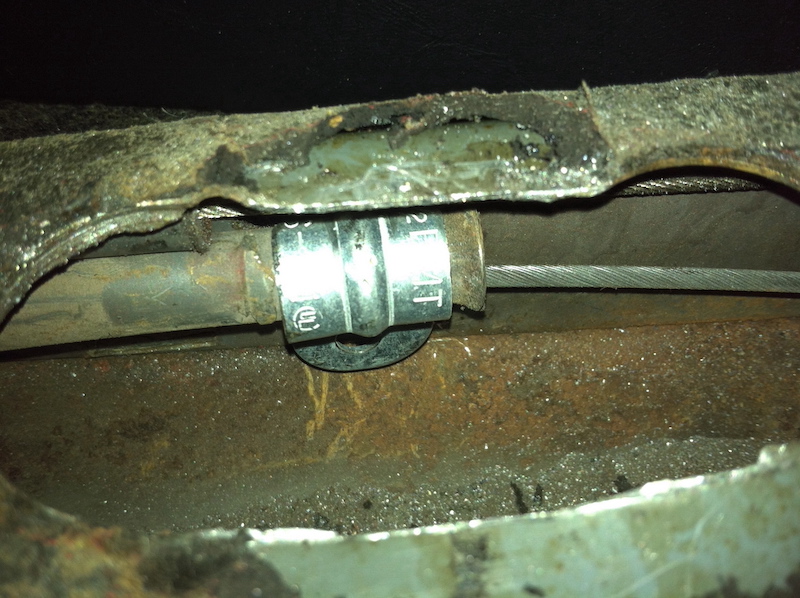 |
|
|
|
| Tdskip |
Apr 30 2026, 09:38 PM
Post
#8
|
|
Advanced Member Group: Members Posts: 3,781 Joined: 1-December 17 From: soCal Member No.: 21,666 Region Association: None |
QUOTE(barefoot @ Apr 30 2026, 04:44 PM) here's where I cut open to get access to the front bracket, enlarged the opening between 2 round ports ; BTW I just used a clamp intended for electrical conduit, took a little blacksmithing to get correct curvature (a 3/8 extension was perfect anvil) then 1/4" bolt, no welding Barefoot Thank you, appreciate the reply. |
|
|
|
| Montreal914 |
Apr 30 2026, 11:18 PM
Post
#9
|
|
Advanced Member Group: Members Posts: 2,102 Joined: 8-August 10 From: Claremont, CA Member No.: 12,023 Region Association: Southern California |
A long time ago I was able to repair mine without cutting the tunnel.
If I recall, I drilled a hole (or two) on the side of the tunnel and did a plug weld. When removing the shifter, you are able to see more of what is going on. Again this was many years ago, but I weld it back without cutting anything. Sorry, its kind of vague but I am sure I saw this somewhere here. |
|
|
|
| Tdskip |
May 1 2026, 04:32 AM
Post
#10
|
|
Advanced Member Group: Members Posts: 3,781 Joined: 1-December 17 From: soCal Member No.: 21,666 Region Association: None |
QUOTE(Montreal914 @ May 1 2026, 12:18 AM) A long time ago I was able to repair mine without cutting the tunnel. If I recall, I drilled a hole (or two) on the side of the tunnel and did a plug weld. When removing the shifter, you are able to see more of what is going on. Again this was many years ago, but I weld it back without cutting anything. Sorry, its kind of vague but I am sure I saw this somewhere here. I have the shifter out, will take a look with a bright light to see what I can see. Seems like a good time to replace the clutch cable itself in case there is some stretching or weirdness going on with that, no? |
|
|
|
| Tdskip |
May 9 2026, 10:24 AM
Post
#11
|
|
Advanced Member Group: Members Posts: 3,781 Joined: 1-December 17 From: soCal Member No.: 21,666 Region Association: None |
Took the shifter out and when I depress the clutch there is slight movement of the torque tube.
Am I correct in assuming there should be ZERO movement of that tube when the clutch is depressed? Thanks! |
|
|
|
| Superhawk996 |
May 9 2026, 07:05 PM
Post
#12
|
|
914 Guru Group: Members Posts: 7,840 Joined: 25-August 18 From: Woods of N. Idaho Member No.: 22,428 Region Association: Galt's Gulch |
QUOTE(Tdskip @ May 9 2026, 12:24 PM) Am I correct in assuming there should be ZERO movement of that tube when the clutch is depressed? Thanks! Correct - maybe the tinyest flex (like 1/32”) but nothing significant |
|
|
|
| Tdskip |
May 10 2026, 03:52 AM
Post
#13
|
|
Advanced Member Group: Members Posts: 3,781 Joined: 1-December 17 From: soCal Member No.: 21,666 Region Association: None |
QUOTE(Superhawk996 @ May 9 2026, 08:05 PM) QUOTE(Tdskip @ May 9 2026, 12:24 PM) Am I correct in assuming there should be ZERO movement of that tube when the clutch is depressed? Thanks! Correct - maybe the tinyest flex (like 1/32”) but nothing significant Thank you for the confirmation. I have more than that so time for a fix. |
|
|
|
| Superhawk996 |
May 10 2026, 09:53 AM
Post
#14
|
|
914 Guru Group: Members Posts: 7,840 Joined: 25-August 18 From: Woods of N. Idaho Member No.: 22,428 Region Association: Galt's Gulch |
Picture for reference of where things are
Donor part shown has broken center bracket and has been previously repaired at front with j-hooks. Attached image(s) 
|
|
|
|
| 914rrr |
May 10 2026, 09:52 PM
Post
#15
|
|
Advanced Member Group: Members Posts: 2,058 Joined: 1-July 03 From: McMinnville, TN Member No.: 874 Region Association: South East States |
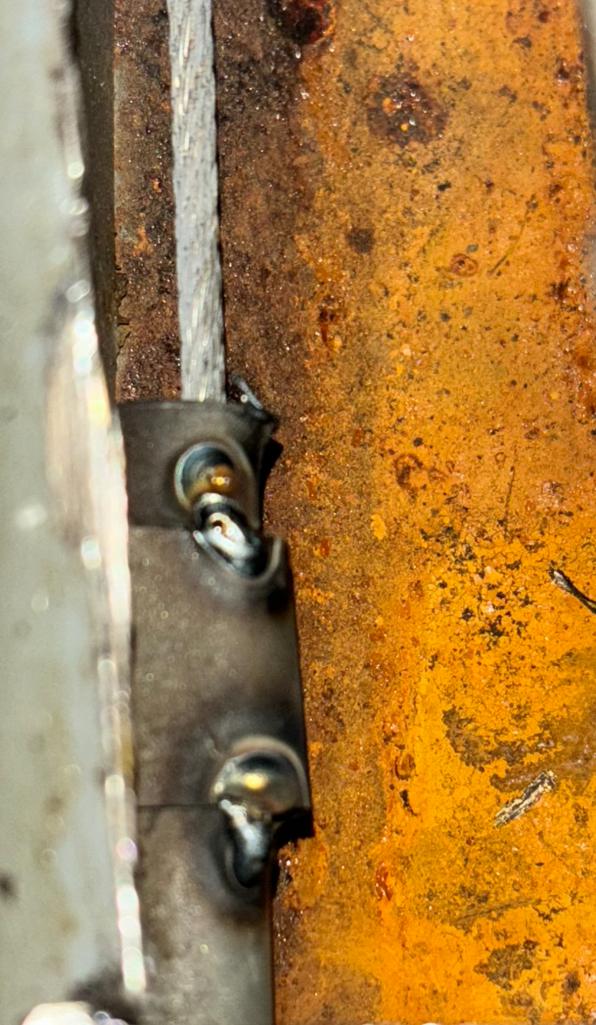
I just did (another) clutch cable conduit repair recently. PM me and I'd be glad to share my experience(s). Last one was substantially more difficult as the conduit had torn completely loose and was flopping around inside the tunnel.
There's a really good chance you're going to have firewall metal repairs where the conduit passes through it. Both of mine did. Here's my 1st one for reference. http://www.914world.com/bbs2/index.php?sho...;hl=clutch+tube |
|
|
|
| Tdskip |
May 11 2026, 09:15 AM
Post
#16
|
|
Advanced Member Group: Members Posts: 3,781 Joined: 1-December 17 From: soCal Member No.: 21,666 Region Association: None |
Thank you for all the replies and information – super helpful and I am expecting that they’ll be other repairs on this required. Really appreciate the photos and links and feedback
|
|
|
|
| Tdskip |
May 12 2026, 12:09 PM
Post
#17
|
|
Advanced Member Group: Members Posts: 3,781 Joined: 1-December 17 From: soCal Member No.: 21,666 Region Association: None |
OK - so I cut open access to the coach tube in front of the shifter and put these two tack welds on and that eliminated the flex. I was feeling on the tube in that area..
 Reassembled everything and it shifted better but still problematic so I got underneath the car and filmed the tube where the clutch cable exits and sure enough, as suggested, I have slight movement there as well. |
|
|
|
| 914rrr |
May 12 2026, 08:41 PM
Post
#18
|
|
Advanced Member Group: Members Posts: 2,058 Joined: 1-July 03 From: McMinnville, TN Member No.: 874 Region Association: South East States |
Welding tip: best if the cable isn't in the conduit even when tacking and for good measure, it helps to insert a copper tube inside the tack area to make sure it doesn't burn through and leave a burr, nugget, etc.
You may also want to check on the under side of the clamp with a mirror to make isn't torn down there. |
|
|
|
| Tdskip |
May 13 2026, 06:27 AM
Post
#19
|
|
Advanced Member Group: Members Posts: 3,781 Joined: 1-December 17 From: soCal Member No.: 21,666 Region Association: None |
QUOTE(914rrr @ May 12 2026, 09:41 PM) Welding tip: best if the cable isn't in the conduit even when tacking and for good measure, it helps to insert a copper tube inside the tack area to make sure it doesn't burn through and leave a burr, nugget, etc. You may also want to check on the under side of the clamp with a mirror to make isn't torn down there. Great tips, thanks. I've since removed the cable to replace it with a new one so will check the welds and use the copper tube idea. Front tube was rock solid after these tacks but will check the underside as well. Thinking I need to wire brush the rear tube opening area and get some additional welds there now? |
|
|
|
| 914rrr |
May 13 2026, 10:21 PM
Post
#20
|
|
Advanced Member Group: Members Posts: 2,058 Joined: 1-July 03 From: McMinnville, TN Member No.: 874 Region Association: South East States |
QUOTE(Tdskip @ May 13 2026, 07:27 AM) QUOTE(914rrr @ May 12 2026, 09:41 PM) Welding tip: best if the cable isn't in the conduit even when tacking and for good measure, it helps to insert a copper tube inside the tack area to make sure it doesn't burn through and leave a burr, nugget, etc. You may also want to check on the under side of the clamp with a mirror to make isn't torn down there. Great tips, thanks. I've since removed the cable to replace it with a new one so will check the welds and use the copper tube idea. Front tube was rock solid after these tacks but will check the underside as well. Thinking I need to wire brush the rear tube opening area and get some additional welds there now? Please be aware that the fuel lines are within an inch or so of the conduit. This is where "mission creep" sneaks its way in, as in, "well, if I have to remove the fuel lines so I don't burn them, I may as well replace them with ss ones..." etc. When replacing the clutch cable, it may be a good idea to have a clutch cable lever arm bushing and clutch clevis pin handy if yours is worn through like mine was. Also see if you can get a nut(s) for the trans end of the cable for lock nut duties, as it's a weird size (7 mm?) that hardly anyone carries. |
|
|
|
|
2 User(s) are reading this topic (1 Guests and 0 Anonymous Users)
1 Members: sixnotfour

|
Lo-Fi Version | Time is now: 14th May 2026 - 01:34 AM |
Invision Power Board
v9.1.4 © 2026 IPS, Inc.