

 Fred's 2374 -> 2258 Engine Build Thread Fred's 2374 -> 2258 Engine Build Thread |
|
|

|
Porsche, and the Porsche crest are registered trademarks of Dr. Ing. h.c. F. Porsche AG.
This site is not affiliated with Porsche in any way. Its only purpose is to provide an online forum for car enthusiasts. All other trademarks are property of their respective owners. |
|
|
  |
| friethmiller |
 Aug 25 2026, 03:50 PM Aug 25 2026, 03:50 PM
Post
#121
|
|
Senior Member  Group: Members Posts: 1,587 Joined: 10-February 19 From: Austin, TX Member No.: 22,863 Region Association: Southwest Region 
 |
Oil Pump Clearancing (8/24/2026):
Well to get the clearance necessary I had to remove the cam bolts one at a time using heat to loosen everything up. Didn't have any troubles but I did take it easy. I certainly didn't want to strip out the allen heads. 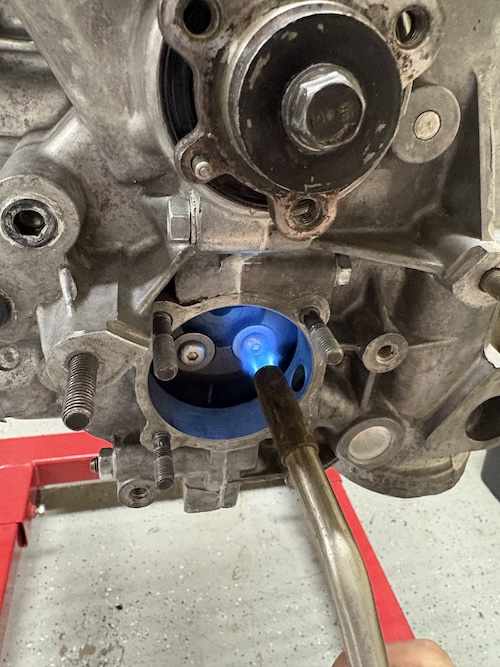 Each bolt was then mounted securely in the vise and filed down/sanded by hand/cleaned. Next, the washers were sanded to smooth out any imperfections. I had to eliminate anything that might prevent the washers from sitting flush in the gear. The next pic shows a bit of work to the pumps drive gear. I used a black marker to help identify any contact/rub points. I also sanded any rough edges on the gear teeth. 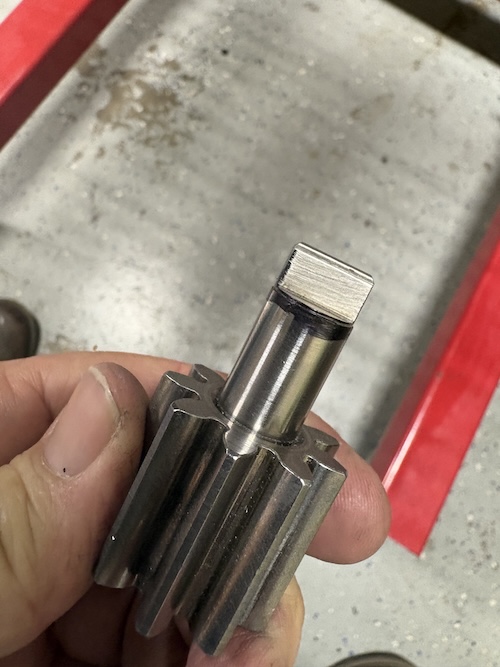 Next two photos show the relief to the back of the pump and the cam bolts. I think ideally the cam gear bolts might need to be counter-sunk into the cam washers. Not sure if this is even possible, though. (IMG:style_emoticons/default/beerchug.gif) 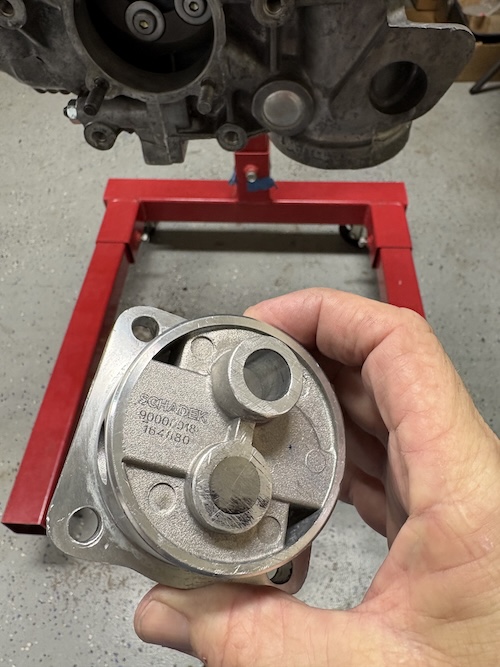 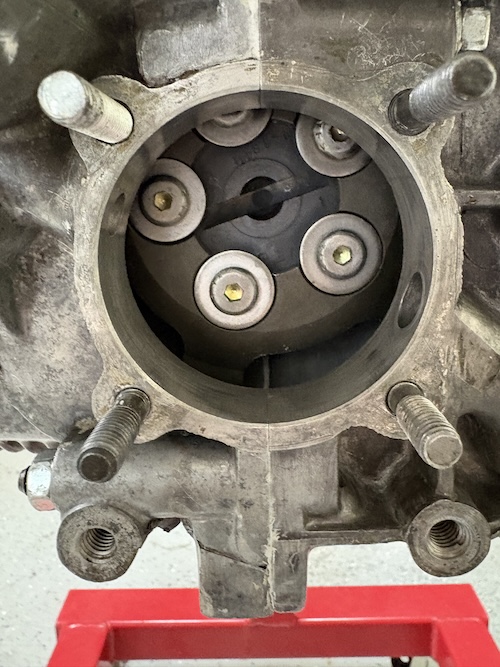 So, after test fitting everything without a gasket and getting everything to clear properly with the pump bolts torqued down, I was finally ready for reassembly. After having to insert/remove this pump about 30 times, I had developed a technique for getting the pump perfectly lined-up to go in with one push. So, I decided to roll the dice and insert the pump with the o-ring. You can see in this pic that I've prep'd the gasket (both sides with Curil-T) and used a little bit of assembly lube on the pump body and gasket. I also applied a little bit of lube to the oil pump bore on the case to help protect the o-ring as it went in. And....... after a few tense moments of making sure of my alignment, I was able to push the pump in place. I'm 99.9% sure that the o-ring is still good and right were it needs to be. (IMG:style_emoticons/default/biggrin.gif) 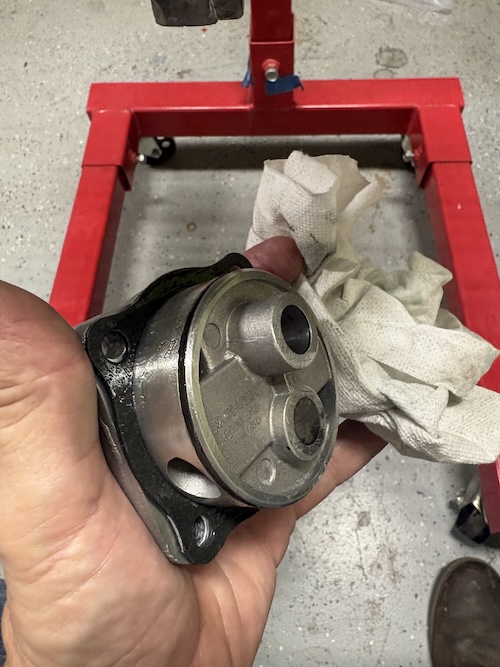 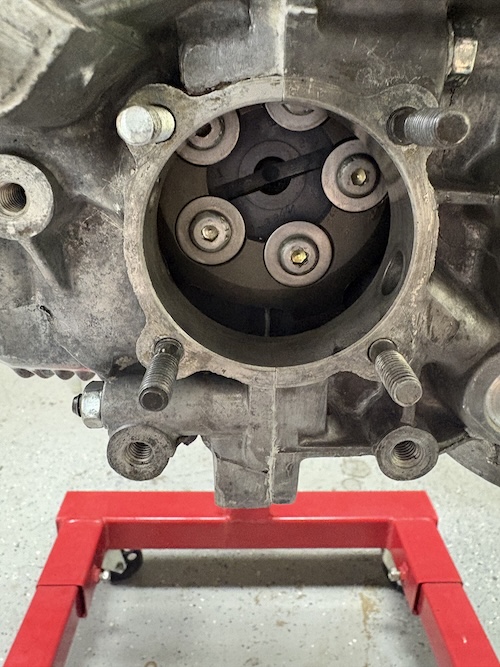 I also took a pic of the thickness of the pump gasket. It's over .060". I wasn't sure what it might crushed down to after torquing but I was glad to have a little more clearance b/w the pump & gear. 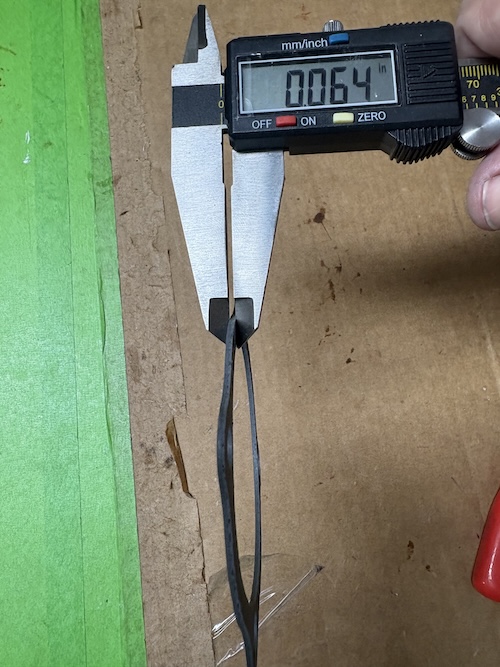 Once the pump was in, I focused on cleaning and preparing the cover. This cover was used before and you can see I had a little interface issue with the previous pump. However, I think I have this pump is a little better prep'd. Again, a very light coat of Curil-T on both sides of the paper gasket. Cover went on, and then finally the nuts/washers with a bunch of thread sealant. I then tested that the engine rotation was good about 3 times during the torque sequence. (IMG:style_emoticons/default/blink.gif) The final test was good to go. I had full unbinding engine rotation using one hand on the crank's snout bolt. (IMG:style_emoticons/default/aktion035.gif) 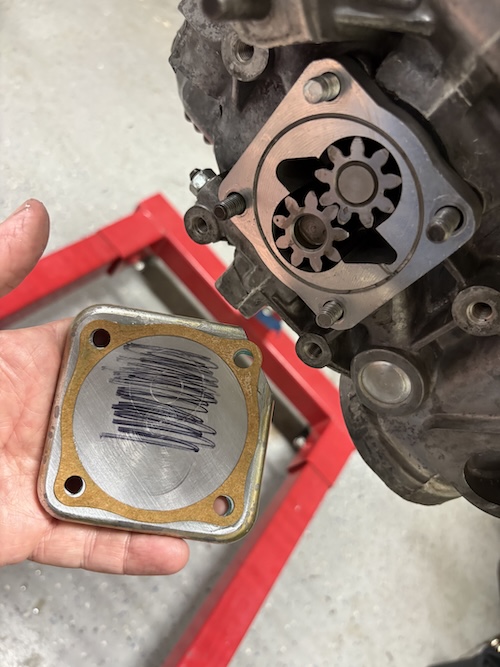 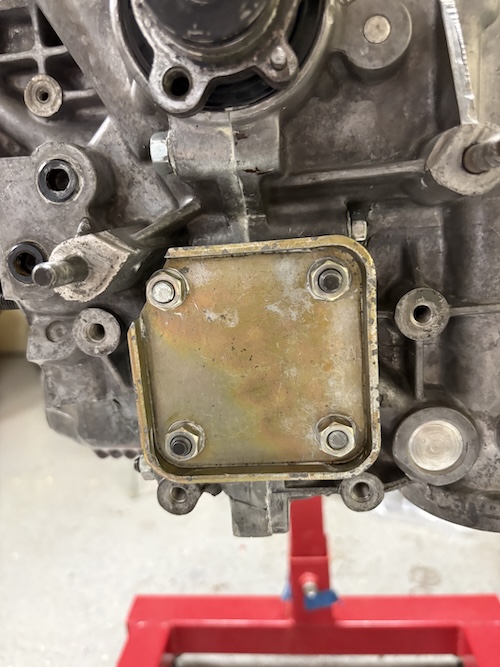 Onward! Cheers! (IMG:style_emoticons/default/beerchug.gif) |
   |

 
|
| friethmiller |
Aug 26 2026, 03:55 PM
Post
#122
|
|
Senior Member Group: Members Posts: 1,587 Joined: 10-February 19 From: Austin, TX Member No.: 22,863 Region Association: Southwest Region
|
Crankshaft End-play (8/25/2026):
I had 7 shims to work with last night. I had to take up most of the .050" that I initially measured without shims - targeting the magical .003 - .005 range. After a few tries I was finally able to get 0.003. It's a consistent .003 - .0035 too. 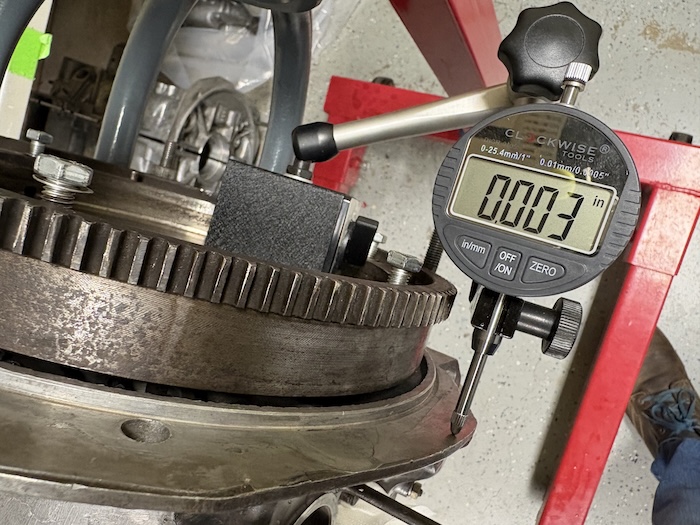 Moving on... Pistons and Cylinders are next!! |
|
|
|
| friethmiller |
Aug 27 2026, 12:53 PM
Post
#123
|
|
Senior Member Group: Members Posts: 1,587 Joined: 10-February 19 From: Austin, TX Member No.: 22,863 Region Association: Southwest Region
|
Preparing Pistons & Cylinders (8/27/2026):
In preparing for pistons and cylinders this weekend, I cleaned up the work tables and pulled out all the parts and tools I'll need for this next phase of the build. I also took the opportunity to add the small items to the engine to help get stuff out of the way. Installed the high and low pressure reliefs, front engine mounts, oil filler tower as well as the oil plug, oil screen, and inspection/taco plate. 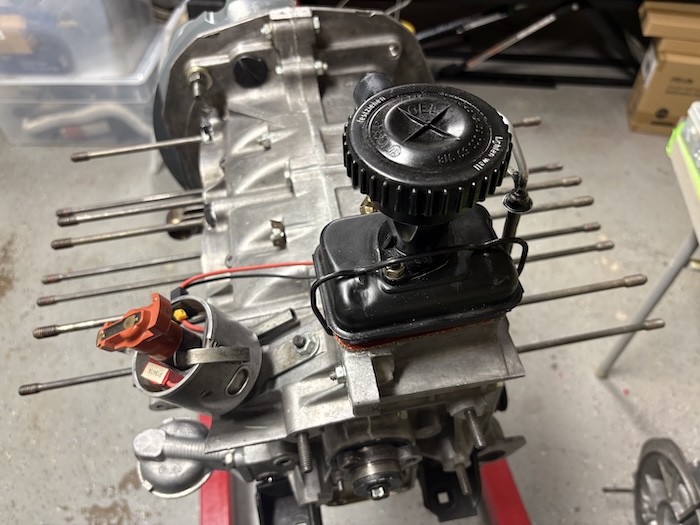 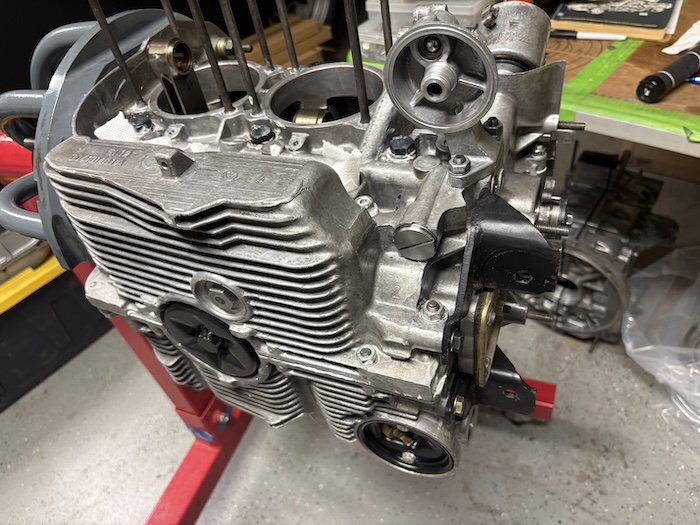 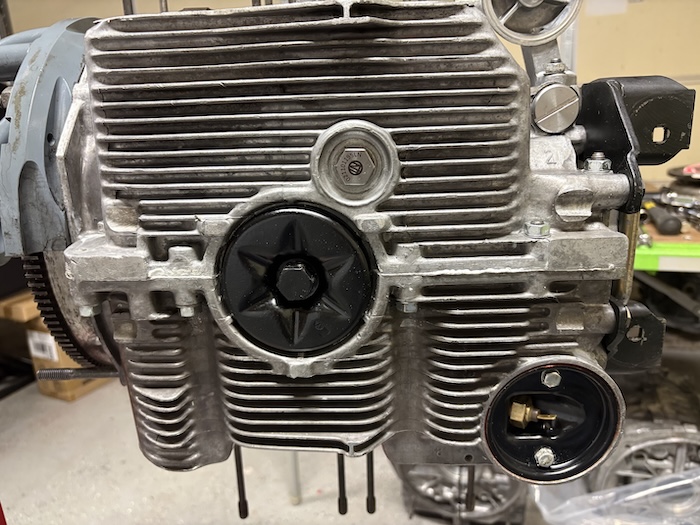 Ring End Gap I've got 96mm cylinders; so that's 3.78". Based on the supplied chart, this would calculate as 3.78" X 0.0045" = 0.017". Can this be right? The difference between the JE and the KB piston gap is pretty substantial, I guess. 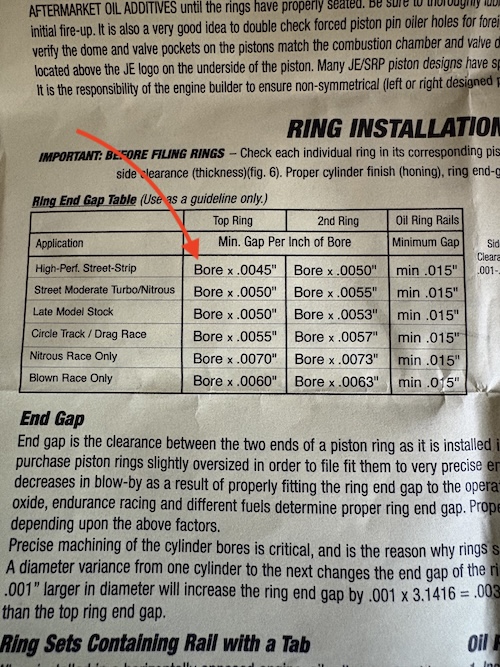 Cylinder Wall Gap I'm also looking at Piston to Cylinder Wall Gap. I got a new battery in the 3-4" micrometer, zero'd it, and then took this initial measurement on one of the pistons. Spec says measure point is 0.5" up from the bottom. More to come on this soon. Weekend goal is to, at a minimum, have the P&Cs 100% ready to install. The cylinder shims that I ordered from AA should arrive tomorrow so I'm hoping to everything in and ready for heads/value train by late Sunday. We'll see. Cheers! (IMG:style_emoticons/default/beer.gif) 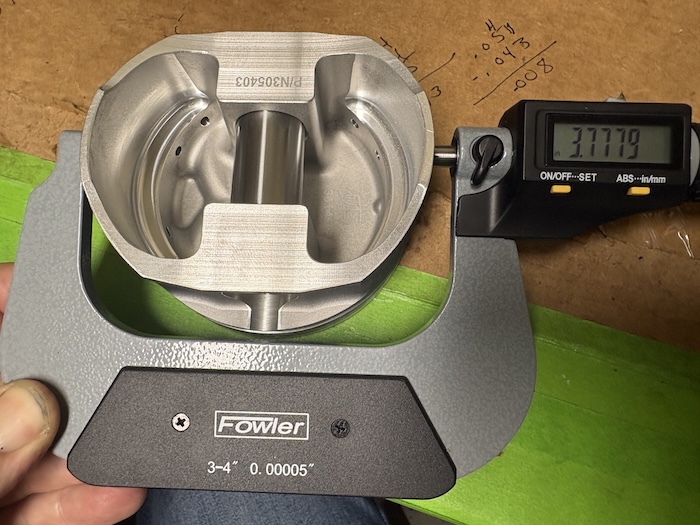 |
|
|
|
| friethmiller |
Aug 27 2026, 03:35 PM
Post
#124
|
|
Senior Member Group: Members Posts: 1,587 Joined: 10-February 19 From: Austin, TX Member No.: 22,863 Region Association: Southwest Region
|
|
|
|
|
| Ninja |
Aug 27 2026, 05:52 PM
Post
#125
|
|
Member Group: Members Posts: 323 Joined: 25-September 25 From: Granbury Texas Member No.: 29,004 Region Association: Southwest Region |
If you're too tight the Grim Reaper will appear and you will be the recipient of further Type 4 education.
If you're too loose, you will have slightly more blow by and MAY see higher oil consumption. In this case I would go loose... Forged pistons would add a little clearance as well in my book. High RPM race type use would add more... (IMG:style_emoticons/default/ninja.gif) |
|
|
|
| friethmiller |
Aug 27 2026, 08:42 PM
Post
#126
|
|
Senior Member Group: Members Posts: 1,587 Joined: 10-February 19 From: Austin, TX Member No.: 22,863 Region Association: Southwest Region
|
QUOTE(Ninja @ Aug 27 2026, 06:52 PM)  If you're too tight the Grim Reaper will appear and you will be the recipient of further Type 4 education. If you're too loose, you will have slightly more blow by and MAY see higher oil consumption. In this case I would go loose... Forged pistons would add a little clearance as well in my book. High RPM race type use would add more... (IMG:style_emoticons/default/ninja.gif) Thanks Rick! I've received enough "Type 4 beat-downs" for two lifetimes. I'll go with the recommended looser gaps, thank you very much. (IMG:style_emoticons/default/slap.gif) |
|
|
|
| porschetub |
Aug 28 2026, 12:16 AM
Post
#127
|
|
914 Guru Group: Members Posts: 5,189 Joined: 25-July 15 From: New Zealand Member No.: 18,995 Region Association: None |
QUOTE(friethmiller @ Aug 28 2026, 02:42 PM) QUOTE(Ninja @ Aug 27 2026, 06:52 PM) If you're too tight the Grim Reaper will appear and you will be the recipient of further Type 4 education. If you're too loose, you will have slightly more blow by and MAY see higher oil consumption. In this case I would go loose... Forged pistons would add a little clearance as well in my book. High RPM race type use would add more... (IMG:style_emoticons/default/ninja.gif) Thanks Rick! I've received enough "Type 4 beat-downs" for two lifetimes. I'll go with the recommended looser gaps, thank you very much. (IMG:style_emoticons/default/slap.gif) Great response (IMG:style_emoticons/default/aktion035.gif) (IMG:style_emoticons/default/lol-2.gif) (IMG:style_emoticons/default/lol-2.gif) perhaps my reply would have been less polite,end of the day you know what you are doing besides . Cheers and keep up the good work . |
|
|
|
| Jack Standz |
Aug 28 2026, 12:39 AM
Post
#128
|
|
Senior Member Group: Members Posts: 966 Joined: 15-November 19 From: Happy Place (& surrounding area) Member No.: 23,644 Region Association: None
|
Maybe take a look at this post:
https://shoptalkforums.com/viewtopic.php?t=1505 However, Raby has said some conflicting things about ring gap over the years (possibly due to his experience with specific ring manufacturers like Deves or Hastings) and that he generally doesn't like too large a ring gap. Lately it seems he doesn't publish his ring gap recommendations, probably to avoid arguments. But, he's built a lot of type iv motors and backs up what he says with test results. Would really like to get some GT3RS rings that he has recommended to run in our JE pistons with nickies cylinders (102mm), but they don't fit our custom pistons! |
|
|
|
| friethmiller |
Aug 28 2026, 03:39 AM
Post
#129
|
|
Senior Member Group: Members Posts: 1,587 Joined: 10-February 19 From: Austin, TX Member No.: 22,863 Region Association: Southwest Region
|
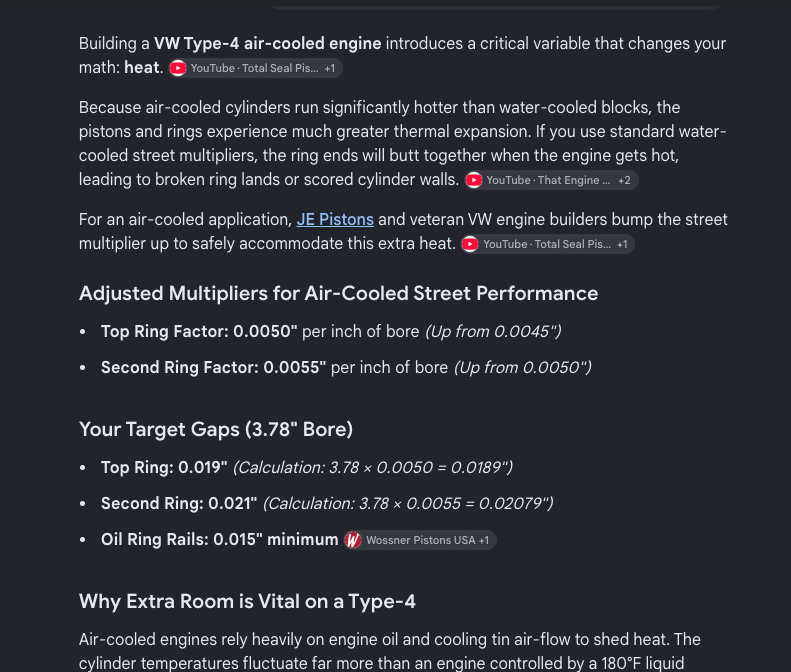
QUOTE(Jack Standz @ Aug 28 2026, 01:39 AM) Maybe take a look at this post: https://shoptalkforums.com/viewtopic.php?t=1505 However, Raby has said some conflicting things about ring gap over the years (possibly due to his experience with specific ring manufacturers like Deves or Hastings) and that he generally doesn't like too large a ring gap. Lately it seems he doesn't publish his ring gap recommendations, probably to avoid arguments. But, he's built a lot of type iv motors and backs up what he says with test results. Would really like to get some GT3RS rings that he has recommended to run in our JE pistons with nickies cylinders (102mm), but they don't fit our custom pistons! Yeah, this is an older thread but it sounds like he was saying .019, which aligns with AI’s recommendation here. Interesting. I’m moving forward though. Having a set of Nickies would be awesome. Can’t imagine what your big 2.6 motor is going to sound like. (IMG:style_emoticons/default/driving-girl.gif) |
|
|
|
| HFC3 |
Aug 28 2026, 06:18 AM
Post
#130
|
|
Member Group: Members Posts: 156 Joined: 14-December 25 From: Virginia Member No.: 29,151 Region Association: MidAtlantic Region |
I don't feel worthy of even reading your posts, but my appreciation and admiration for you and your fellow engine builders is high! Great job.
|
|
|
|
| friethmiller |
Aug 30 2026, 04:01 PM
Post
#131
|
|
Senior Member Group: Members Posts: 1,587 Joined: 10-February 19 From: Austin, TX Member No.: 22,863 Region Association: Southwest Region
|
Piston to Cylinder Wall Clearance (8/29/2026):
Thought I'd verify the clearance for the pistons before moving any further along with the build. The spec for these 2618 forged pistons calls for a large .0035 to .0040" gap. Surely the 93mm pistons that I had the machine shop bore to 96mm would have pull my pistons off the engine cart and verify proper clearance. NOPE! 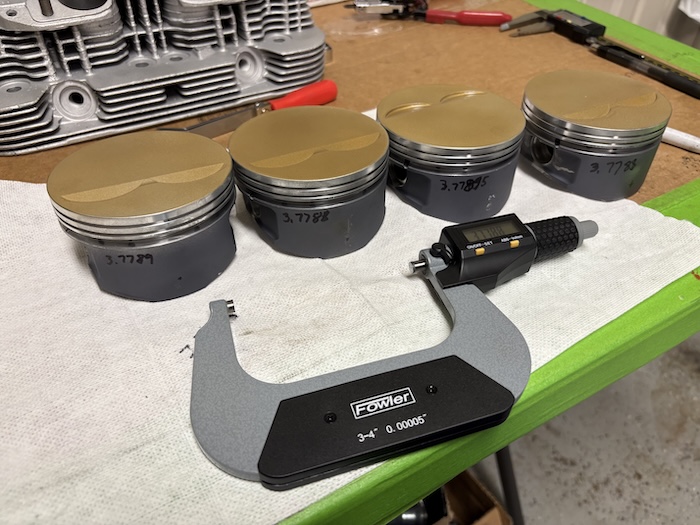 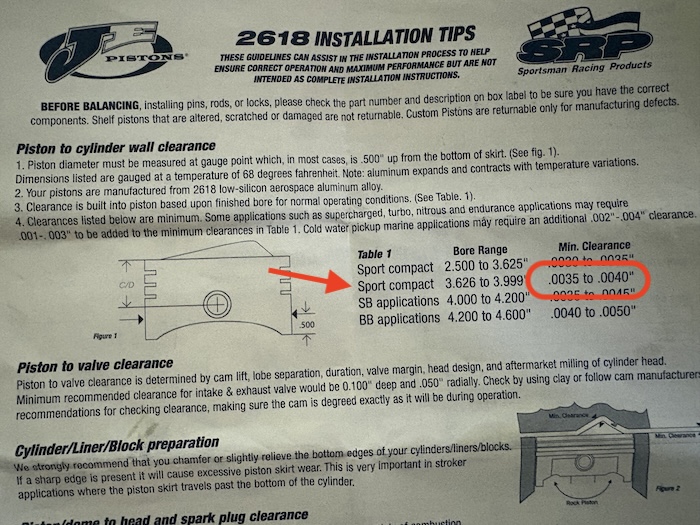 After mic'ing all the pistons and taking an I.D. measurement of each of the cylinders (several spots up/down at two different clock directions) the numbers I was getting were between 0.0005" and 0.0000" of clearance! I verified this by taking one of the pistons without rings, turned it upside down and watched it stick in the bore. NOPE! I then sent a text to the machinist, his reply was that he thought he had seen his assistant taking these measurements. This was not the right answer. He said I could send them back and have them check and recut the cylinders. I thought about this for a minute or two and then realized how extremely slow this shop was at doing anything. Nope! Then it hit me. I've got a perfectly good set of KB stoker pistons sitting on the shelve. So, I pulled them out, cleaned them up, and started taking measurements. These pistons measured smaller than the JE pistons and produced excellent numbers on all my clearance checks. Plus, the KB are hypereutectic and allow for tighter clearances. Below pics show my piston measurements and one of many clearance checks made on each cylinder. 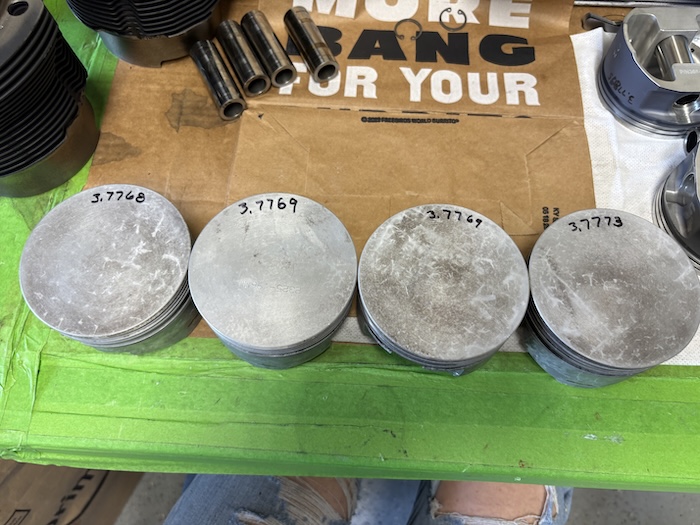 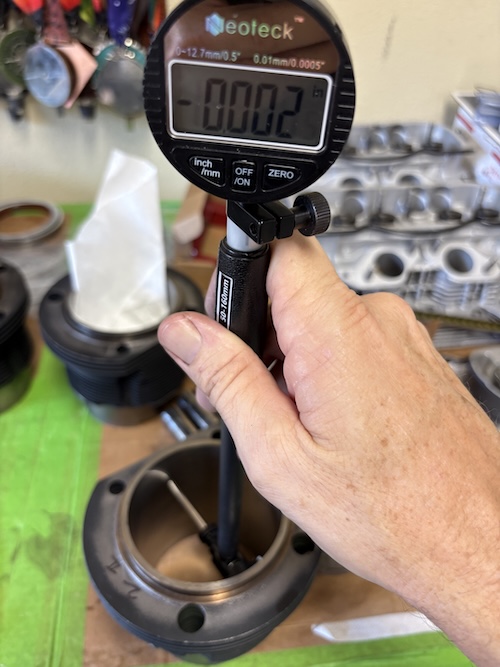 Here's a chart I made of the measurements. These are right in-range for these KB pistons. 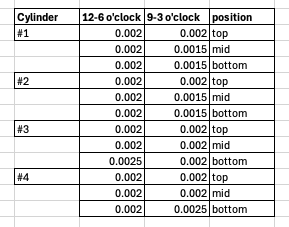 So, my decision was to go with the KBs and use the JEs on a different build I plan to do next year. First pic shows a little clean up on any sharp edges before cleaning the pistons again in the ultra-sonic cleaner. Second and third photos show me taking an initial deck height on piston #1. Roughly figured I needed a .060 or .050 shim to get in the .045 - .050 deck height range. Depending on the final number, the engine compression will be between 9:1 to 9:2. So, the only thing holding me up from moving forward is a new set of KB piston rings. More to come soon on this... standby. 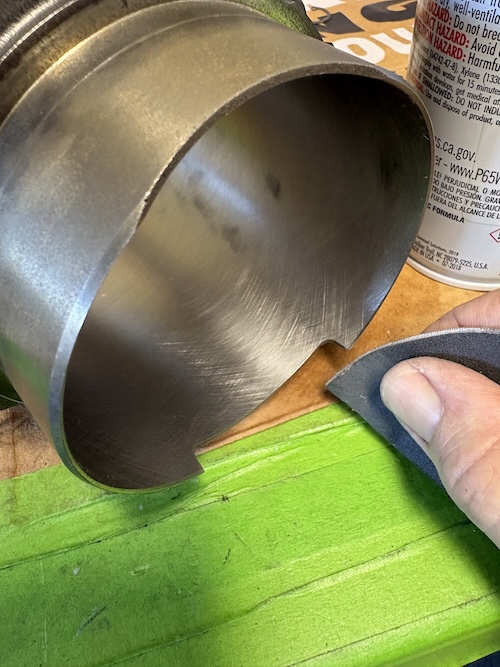 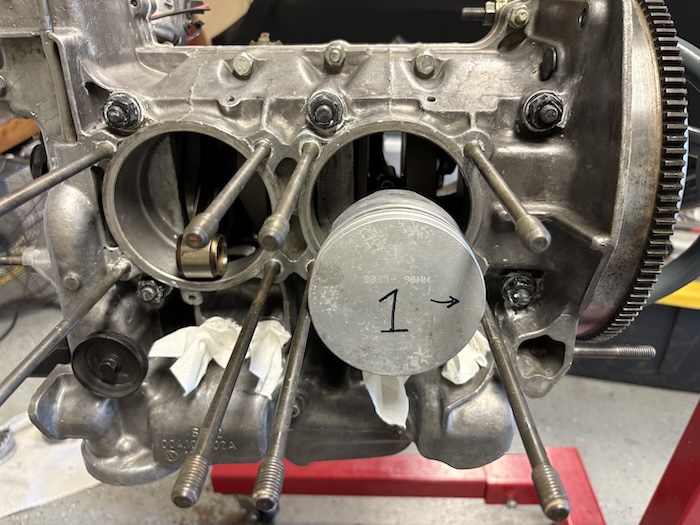 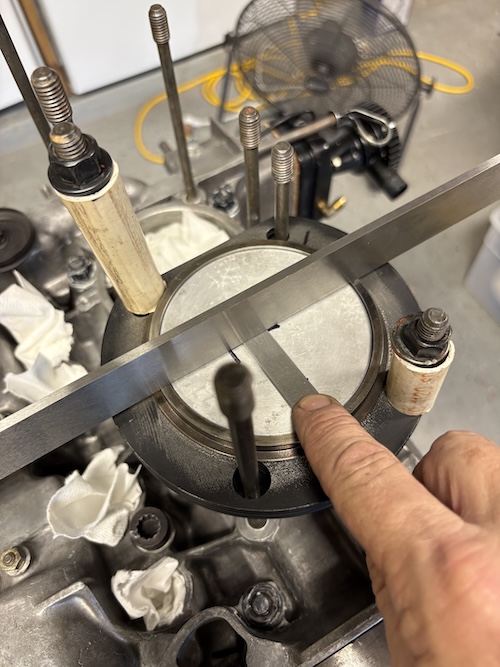 |
|
|
|
| friethmiller |
Aug 30 2026, 04:18 PM
Post
#132
|
|
Senior Member Group: Members Posts: 1,587 Joined: 10-February 19 From: Austin, TX Member No.: 22,863 Region Association: Southwest Region
|
Saturday Evening Bonus - Flywheel, Clutch, and Pressure Plate Assembly (8/29/2026):
Working down the to-do list here. With the crank's end-play figured out, I was ready to pull out the shims, cleaned them up, clean the back end of the crank/case area, and prepare everything for final assembly. With the shims back in place, I then installed the rear main seal and added some oil to prevent any burn-up durning startup (pic 1). The second photo is my silly attempt at switching to a new flywheel but this was quickly ruled out. 1) It wasn't balanced with the rest of the assembly; and 2) I checked the end-play and it was too tight (like .0005). So, I smartly reverted back to my original flywheel and verified a .0035 float [again]. I'll leave that new flywheel for another build. (IMG:style_emoticons/default/happy11.gif) 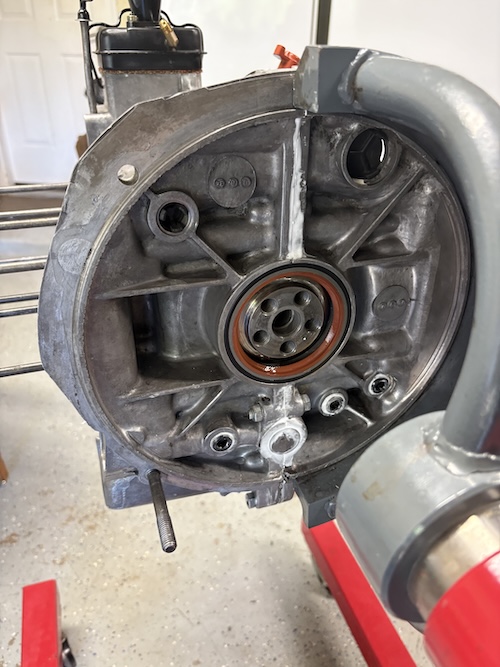 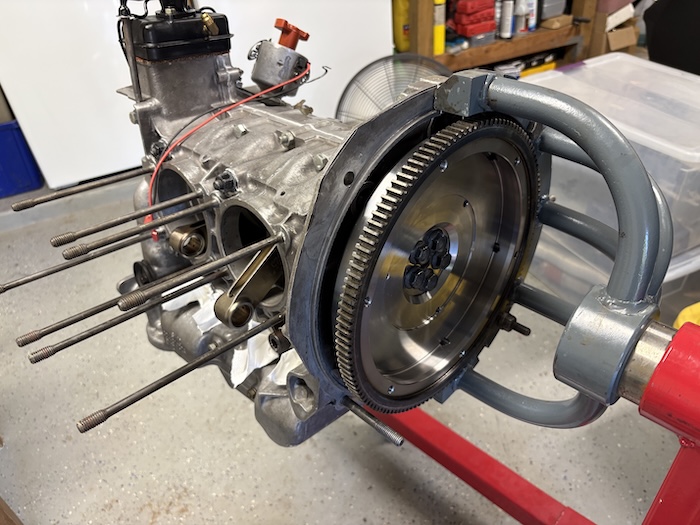 Final photo here shows the flywheel, clutch, and pressure plate all cleaned up and installed. Done! (IMG:style_emoticons/default/beer3.gif) 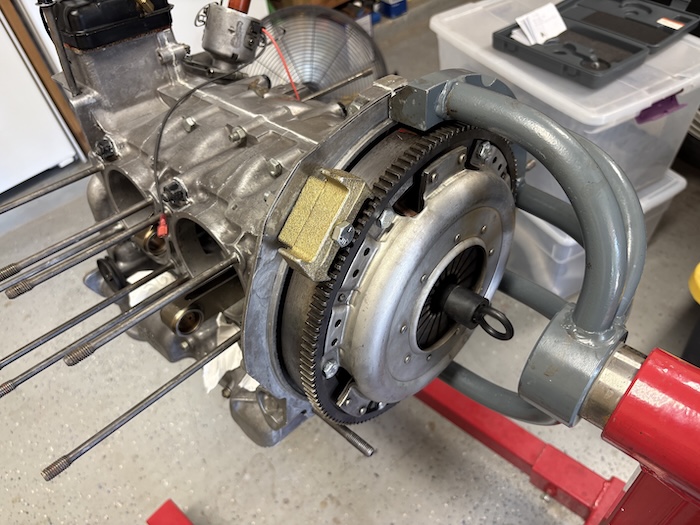 |
|
|
|
| friethmiller |
Aug 30 2026, 04:33 PM
Post
#133
|
|
Senior Member Group: Members Posts: 1,587 Joined: 10-February 19 From: Austin, TX Member No.: 22,863 Region Association: Southwest Region
|
Initial Oil Cooler Work - Part 1 (8/30/2026):
Quick post on my initial work on installing the Tangerine Racking remote oil cooler kit. I thought I'd start my Sunday morning re-reading the instructions. After a second cup was finished, I was finally ready to do this part of the install. The first pic shows the two custom studs that were inserted with thread-locker. These work with the original 3rd stud to secure this mounting plate. Note the orange seals and the use of a (provided) spacer for the original stud. 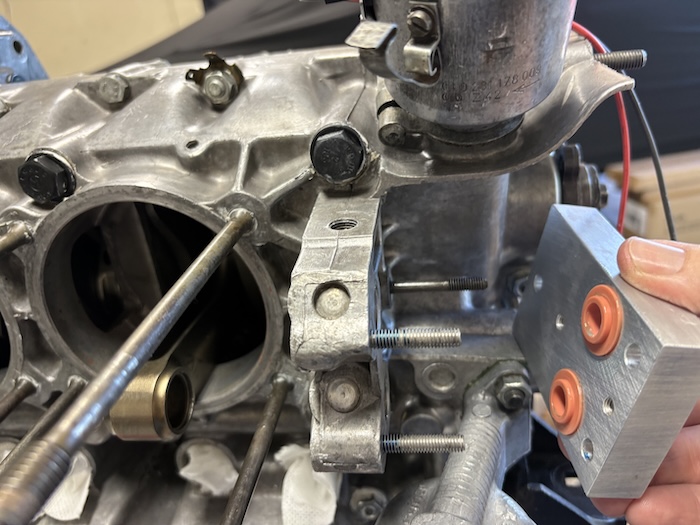 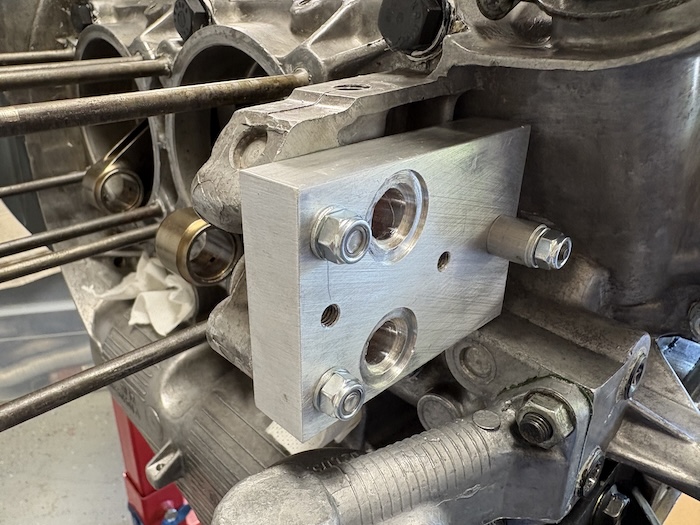 This plate is what holds on the next part. This aluminum block houses an internal thermostat. This mounts to the plate with two long bolts and another set of recessed orange seals. Final photo shows the assembly completed with the large 10AN inlet/outlet. The other parts of this kit will be installed later. 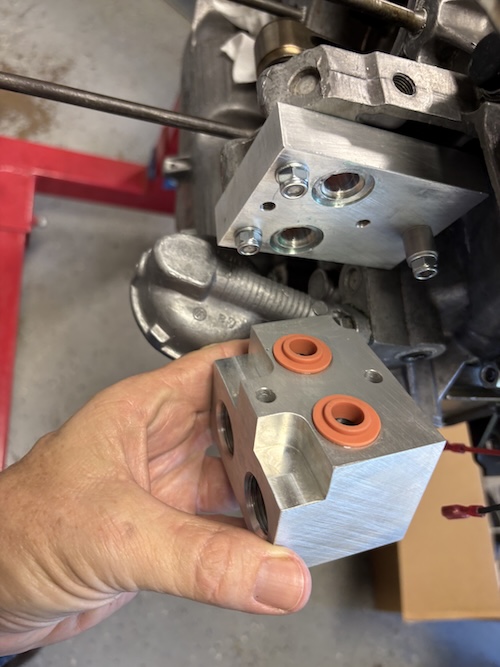 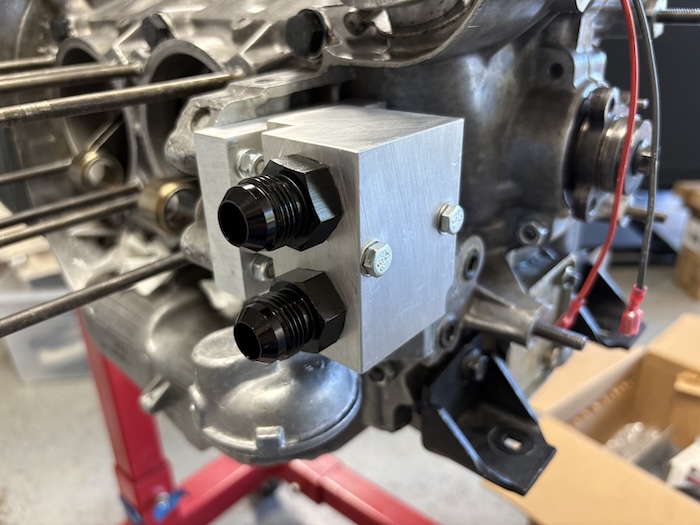 |
|
|
|
| friethmiller |
Aug 30 2026, 04:44 PM
Post
#134
|
|
Senior Member Group: Members Posts: 1,587 Joined: 10-February 19 From: Austin, TX Member No.: 22,863 Region Association: Southwest Region
|
Prep'n Valve Train and Verifying Deck Height (8/30/2026):
While I wait for new piston rings, thought I'd take some time to clean-up the garage a bit and reorganize things for the coming valve-train work. I had that Tobari guy do 2 sets of rockers for me several months ago so I figured it might be a good time to pull everything out and get everything ready for install. One set of rockers are 10mm and go to this engine, the other set are 8mm that I pulled off an old 1.7L engine of mine. This smaller set or rockers will like be used for the LE's 2.0L, which will be rebuilt right after this engine is finished. First pic shows the parts getting ready for a round in the hyper-sonic cleaner. The second photo is everything ready [with other parts] for the upper assembly install. 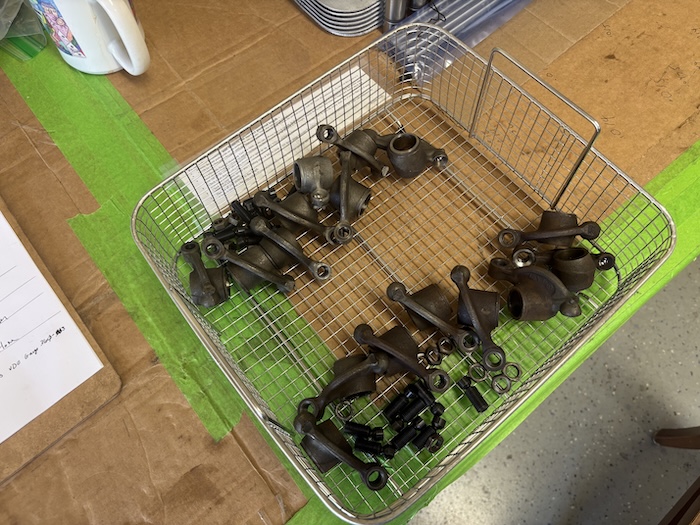 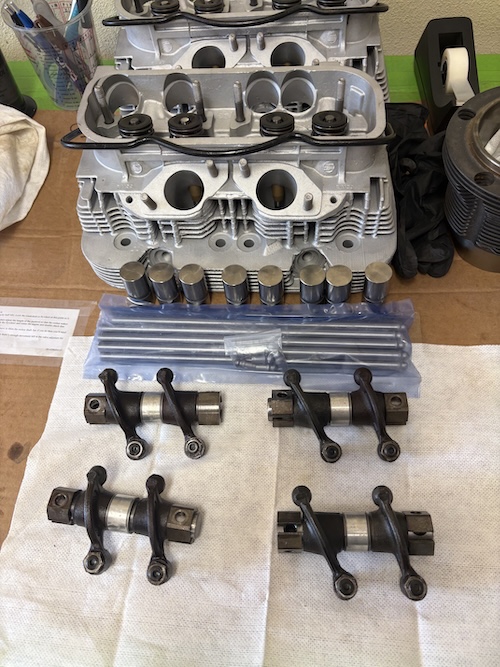 Verifying Deck Height With the extra time I had, I thought it might be worth my while to verify deck height on all my cylinders. Glad I did. Looks like going with the .050" shim. I did note a slightly different deck height b/w the two sides of the engine. The 1 & 2 cylinder side measures at .046 and the 3 & 4 cylinder side is at .048. Not sure if that going to cause any problem. Here are few pics of my engine during this process. The cylinders look good. Everything checks out flat! That's all for today. Hopefully more soon once the rings arrive. Cheers! (IMG:style_emoticons/default/beerchug.gif) 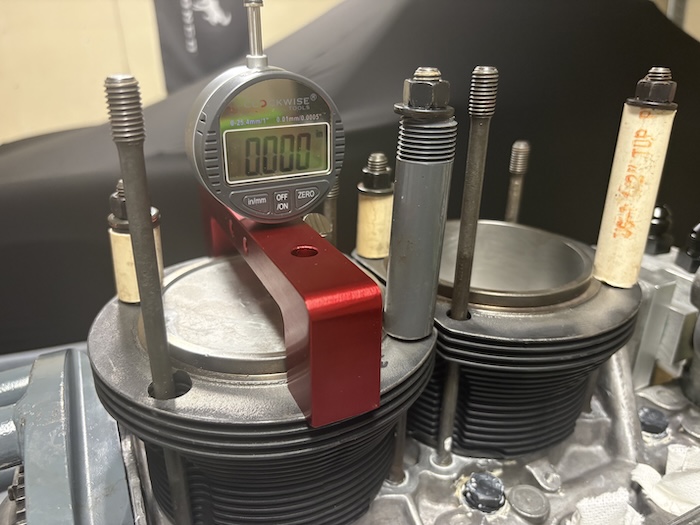 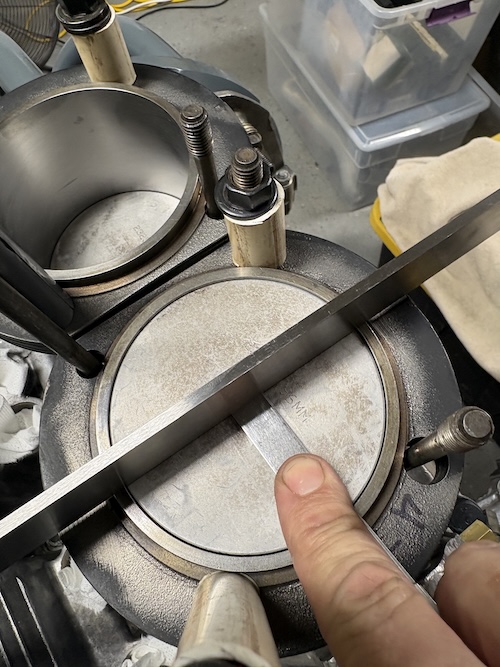 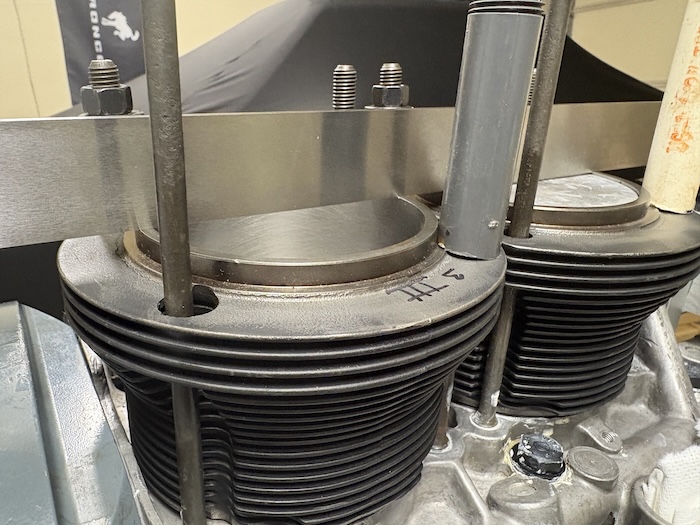 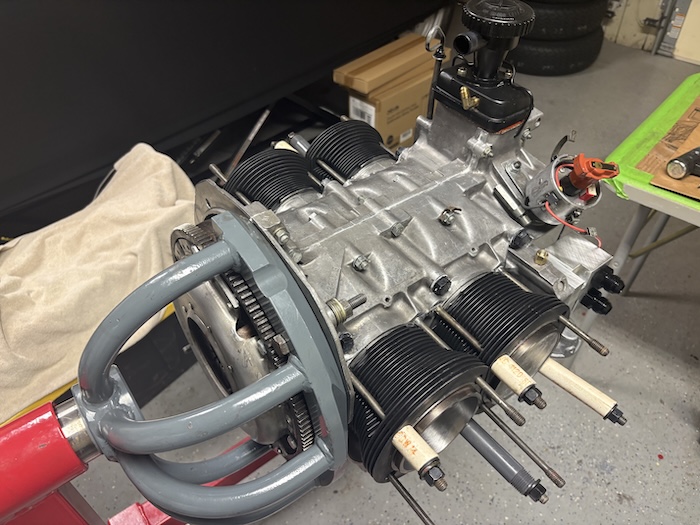 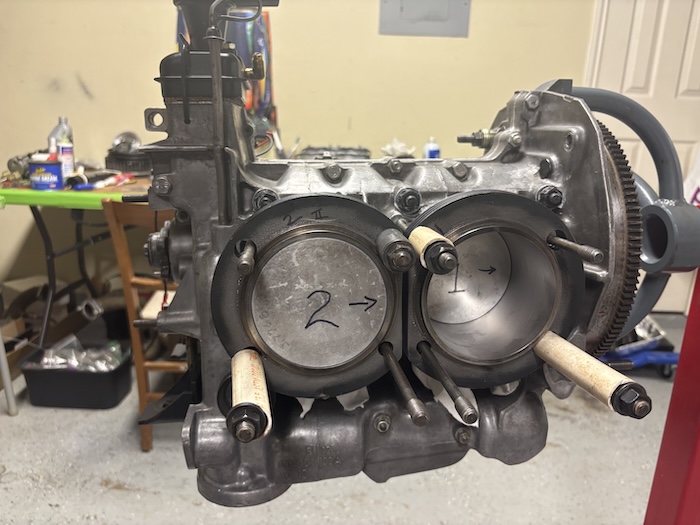 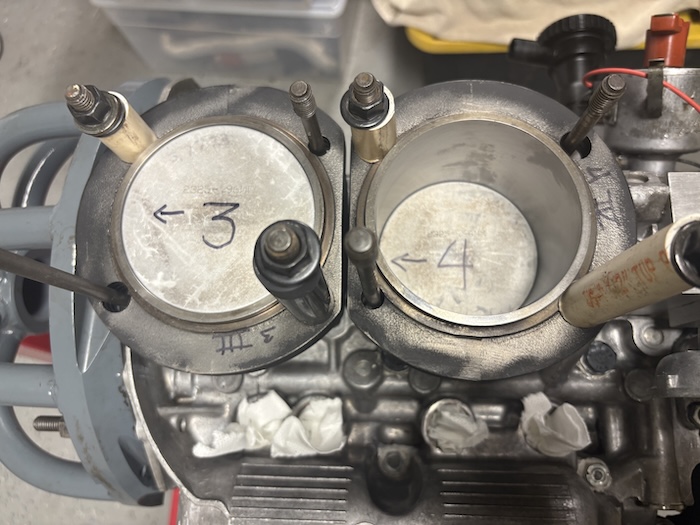 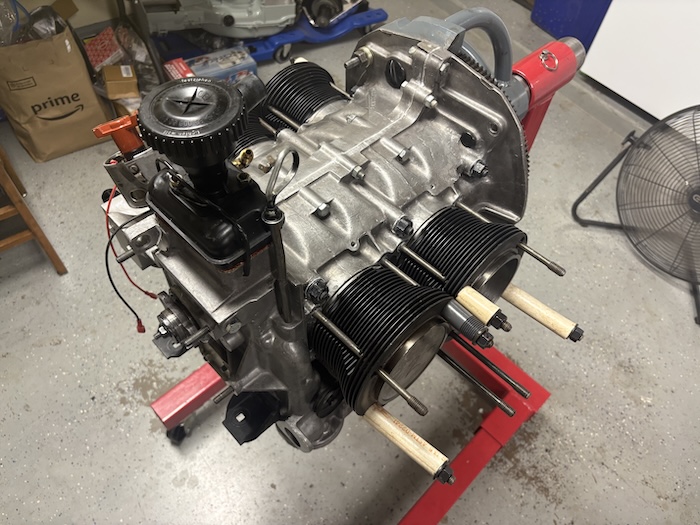 |
|
|
|
| Ninja |
Aug 30 2026, 05:01 PM
Post
#135
|
|
Member Group: Members Posts: 323 Joined: 25-September 25 From: Granbury Texas Member No.: 29,004 Region Association: Southwest Region |
You SHOULD tighten up deck height numbers when using the hyper-eutectic KBs.
I'd be hunting .038 to .044. Will increase compression a tiny bit. Will increase quench action substantially. Both effects increase power with zero downsides as long as you don't kiss a head. Running quench this tight means verifying all 4 cylinders! Your .002+ numbers look great for the KBs. I'd ceramic coat those flat tops. I prefer a true flat-top piston over everything else as long as you can achieve a decent compression ratio and clear the valves. With your cam I'd CAREFULLY check piston to valve clearance as you will be getting close with those. Did the JEs have valve cuts in the crowns? |
|
|
|
| friethmiller |
Aug 30 2026, 05:20 PM
Post
#136
|
|
Senior Member Group: Members Posts: 1,587 Joined: 10-February 19 From: Austin, TX Member No.: 22,863 Region Association: Southwest Region
|
QUOTE(Ninja @ Aug 30 2026, 06:01 PM) Did the JEs have valve cuts in the crowns? Yes. They added 0.9 cc to the combustion chamber, too. With the flat top KBs and a 0.045 - 0.047 deck height, that will put me at 9.2 CR. Getting shims to dial things in seems to be a problem, Rick. If you can @#$! out these off sizes please put them in the mail to me, ASAP (IMG:style_emoticons/default/biggrin.gif) |
|
|
|
| Ninja |
Aug 30 2026, 08:27 PM
Post
#137
|
|
Member Group: Members Posts: 323 Joined: 25-September 25 From: Granbury Texas Member No.: 29,004 Region Association: Southwest Region |
Nope, don't have any shims at all.
I can do the math just fine. You posted your last post while I was making mine, and I didn't see that you had ALREADY checked all 4 (I wouldn't have said anything). What you came up with will work fine. I'd prefer to be a little tighter but it's probably not worth the headache. The SEVERE lack of good/correct/adjustable Type 4 parts is one of the main reasons I won't be walking this path. The lack of decent machine shops is another. The one you used is the one I'd count on and it doesn't look workable anymore. For sure you need to check Piston/valve clearance as that was the limiting factor with a true flat top. Those eyebrows the JEs have are BIGTIME useful. They also make the crown thicker and the overall piston heavier. Those KBs are lightweight pistons. About two years ago I did research shims, pickings were slim then but looked still doable. What is possible if you have too much clearance is to have the tops of the jugs flycut the exact correct amount. Once again, you are at the mercy of the machine shop. This is how I set piston-head clearance on everything else; Deck cut. On normal water cooled (without multiple head gasket thickness available) going too far means another block or fly cutting pistons. Forged/cast can be fly cut but hyper cannot without diamond tipped cutters. If you've got any type of dome/rise in the crown you're screwed on fly cutting pistons. Fly cutting pistons weakens them too. The trick is getting the deck cut right. You are doing it RIGHT! You are making the right choices and trying to buy the right parts. I'm not seeing any corner cutting. You are kicking ass! The really sad thing is that after doing this whole dance spending all this money you will be lucky if you hit 180HP and it lasts 50k. You should already know but in case you forgot little baby ROLL PINS in the lower oil control ring groove are a requirement on the KBs. |
|
|
|
| friethmiller |
Aug 30 2026, 09:25 PM
Post
#138
|
|
Senior Member Group: Members Posts: 1,587 Joined: 10-February 19 From: Austin, TX Member No.: 22,863 Region Association: Southwest Region
|
QUOTE(Ninja @ Aug 30 2026, 09:27 PM) You should already know but in case you forgot little baby ROLL PINS in the lower oil control ring groove are a requirement on the KBs. Yes, you know I know this (IMG:style_emoticons/default/biggrin.gif) . The new rings should be correct but I will verify when they show up. I think these come with a full 360 degree bottom oil ring with a detent that prevents rotation. We'll see. |
|
|
|
| Jack Standz |
Aug 31 2026, 11:06 AM
Post
#139
|
|
Senior Member Group: Members Posts: 966 Joined: 15-November 19 From: Happy Place (& surrounding area) Member No.: 23,644 Region Association: None
|
QUOTE(Ninja @ Aug 31 2026, 09:27 AM) You are doing it RIGHT! You are making the right choices and trying to buy the right parts. I'm not seeing any corner cutting. You are kicking ass! The really sad thing is that after doing this whole dance spending all this money you will be lucky if you hit 180HP and it lasts 50k. (IMG:style_emoticons/default/agree.gif) Although, there was a time when getting 180 HPs from a type iv was a dream. The original 914/6 put out a "whopping" 110 HPs. Our 2 liter 4 cylinder motor meets/exceeds that. No doubt that you will enjoy 150+ aircooled HPs in this 914. As for being 2 thousandths difference between the decks, that's not an issue. A much bigger issue is air getting into the motor in a synchronized/balanced manner (which is why we're considering developing a plenum with a single throttle body/aftermarket FI) even though we already have a new dual throttle body intake system. But, if you've already settled where you're heading with the intake system, you'll be fine. Very much enjoy watching your project(s) and your careful design and build. Go Fred!! BTW The Type IV Store has some blanchard ground spacers in stock for certain thicknesses. They should (used to) sell custom sizes? Not sure what the lead time might be if they still offer them. |
|
|
|
| Ninja |
Aug 31 2026, 11:31 AM
Post
#140
|
|
Member Group: Members Posts: 323 Joined: 25-September 25 From: Granbury Texas Member No.: 29,004 Region Association: Southwest Region |
I remember finding a source for custom ground stuff. Long lead time, a little expensive but it looked like they were "retiring" or ending the business.
This was 2 years back. I did buy a set of extended length head studs as I figured I might need them... LN looks like one of the few good sources left. Just a bit pricey for my taste. The T4 cost per horsepower is higher than almost anything else nowadays. 911 horsepower/dollar is not a good ratio either... |
|
|
|
|
19 User(s) are reading this topic (19 Guests and 0 Anonymous Users)
0 Members:

|
Lo-Fi Version | Time is now: 22nd October 2026 - 11:57 PM |
Invision Power Board
v9.1.4 © 2026 IPS, Inc.