

 Fred's 2374 -> 2258 Engine Build Thread |
|
|

|
Porsche, and the Porsche crest are registered trademarks of Dr. Ing. h.c. F. Porsche AG.
This site is not affiliated with Porsche in any way. Its only purpose is to provide an online forum for car enthusiasts. All other trademarks are property of their respective owners. |
|
|
  |
| friethmiller |
 Aug 31 2026, 01:17 PM
Post
#141
|
|
Senior Member  Group: Members Posts: 1,587 Joined: 10-February 19 From: Austin, TX Member No.: 22,863 Region Association: Southwest Region 
 |
Good input guys. Thanks.
If I run .040" shims + either a .010" or a .08" shim (that I found this morning in my a box of engine components), I can now get a deck height of .046 on both sides of the engine. (IMG:style_emoticons/default/cheer.gif) That puts me at a CR of 9.2. One shim is best, I know, but I'd rather have equal deck height running two shims. I'm set to clay the piston/valve clearance this evening, if I can cut down my adjustable push-rod. The clay is already in the #1 cylinder and torqued down ready to go. It's basically round the clock engine building whenever I'm not working to pay the bills. (IMG:style_emoticons/default/blink.gif) |
   |

 
|
| Ninja |
Aug 31 2026, 01:25 PM
Post
#142
|
|
Member Group: Members Posts: 323 Joined: 25-September 25 From: Granbury Texas Member No.: 29,004 Region Association: Southwest Region |
Make sure the shim packs are exactly the same on adjoining cylinders.
You can have different sizes across the engine but must be the same for both cylinders on one bank. You can have trouble sealing jug to head is they are different on one bank. |
|
|
|
| friethmiller |
Aug 31 2026, 01:29 PM
Post
#143
|
|
Senior Member Group: Members Posts: 1,587 Joined: 10-February 19 From: Austin, TX Member No.: 22,863 Region Association: Southwest Region
|
QUOTE(Ninja @ Aug 31 2026, 02:25 PM)  Make sure the shim packs are exactly the same on adjoining cylinders. You can have different sizes across the engine but must be the same for both cylinders on one bank. You can have trouble sealing jug to head is they are different on one bank. Yes, I've got a total of .050" on the 1&2 bank, and .048" on the other. |
|
|
|
| 930cabman |
Aug 31 2026, 01:31 PM
Post
#144
|
|
Advanced Member Group: Members Posts: 4,865 Joined: 12-November 20 From: Buffalo Member No.: 24,877 Region Association: North East States
|
QUOTE(Ninja @ Aug 31 2026, 01:25 PM) Make sure the shim packs are exactly the same on adjoining cylinders. You can have different sizes across the engine but must be the same for both cylinders on one bank. You can have trouble sealing jug to head is they are different on one bank. A recent 2056 build I used small strips of Plasti Gage at quarter points at the top of the cylinders when I did a trial cylinder head fit to compare how true the sealing surface ( cylinder to head) connection was. It gave me good information, bolted everything up without a gasket and 20k miles later she is still running great. |
|
|
|
| friethmiller |
Aug 31 2026, 05:16 PM
Post
#145
|
|
Senior Member Group: Members Posts: 1,587 Joined: 10-February 19 From: Austin, TX Member No.: 22,863 Region Association: Southwest Region
|
QUOTE(930cabman @ Aug 31 2026, 02:31 PM) QUOTE(Ninja @ Aug 31 2026, 01:25 PM) Make sure the shim packs are exactly the same on adjoining cylinders. You can have different sizes across the engine but must be the same for both cylinders on one bank. You can have trouble sealing jug to head is they are different on one bank. A recent 2056 build I used small strips of Plasti Gage at quarter points at the top of the cylinders when I did a trial cylinder head fit to compare how true the sealing surface ( cylinder to head) connection was. It gave me good information, bolted everything up without a gasket and 20k miles later she is still running great. Nice! That's a good idea (IMG:style_emoticons/default/smile.gif) |
|
|
|
| 930cabman |
Aug 31 2026, 05:41 PM
Post
#146
|
|
Advanced Member Group: Members Posts: 4,865 Joined: 12-November 20 From: Buffalo Member No.: 24,877 Region Association: North East States
|
QUOTE(friethmiller @ Aug 31 2026, 05:16 PM) QUOTE(930cabman @ Aug 31 2026, 02:31 PM) QUOTE(Ninja @ Aug 31 2026, 01:25 PM) Make sure the shim packs are exactly the same on adjoining cylinders. You can have different sizes across the engine but must be the same for both cylinders on one bank. You can have trouble sealing jug to head is they are different on one bank. A recent 2056 build I used small strips of Plasti Gage at quarter points at the top of the cylinders when I did a trial cylinder head fit to compare how true the sealing surface ( cylinder to head) connection was. It gave me good information, bolted everything up without a gasket and 20k miles later she is still running great. Nice! That's a good idea (IMG:style_emoticons/default/smile.gif) Cost is near zero, doesn't take much time and provides information |
|
|
|
| friethmiller |
Sep 1 2026, 05:23 PM
Post
#147
|
|
Senior Member Group: Members Posts: 1,587 Joined: 10-February 19 From: Austin, TX Member No.: 22,863 Region Association: Southwest Region
|
Piston to Valve Clearance (8/31/2026):
Intake Clearance To do this, I figured I needed to make sure my valve was meeting the spec for the max intake of .507". So, I bolted on a head and used an adjustable pushrod and dial gauge to make the necessary adjustments to hit this number. I wasn't concerned with the valve train geometry, just trying to make sure my valve was opening the required amount. Once that was accomplished, I pulled the head back off and placed clay under the intake valve area on the #1 piston. 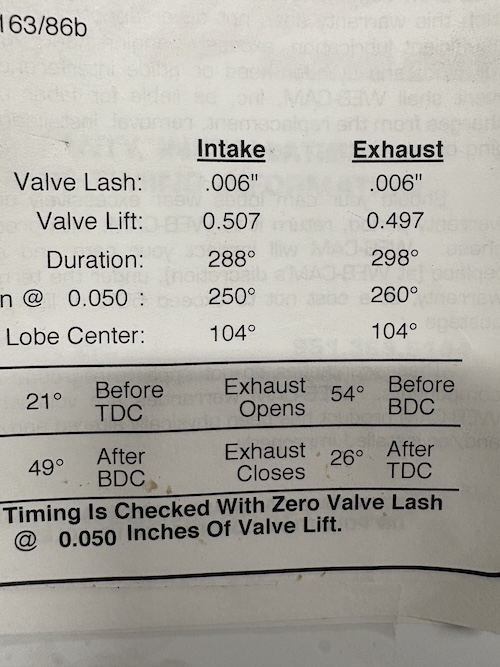 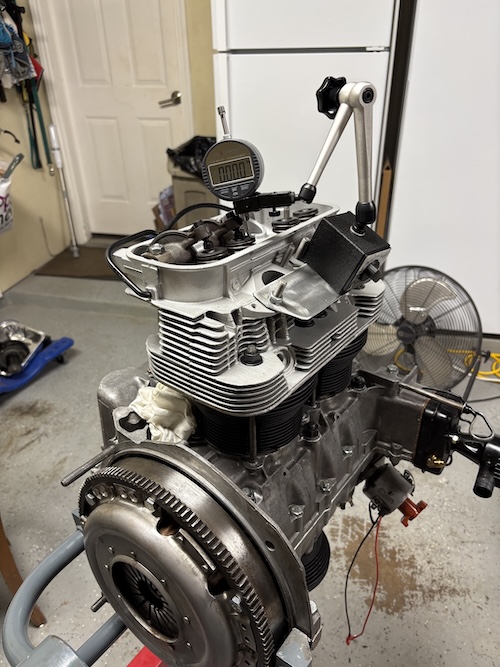 I then reattached the head, valve train, and dial gauge. After several rotations of the crank, I pulled the head, cut the clay with a razor, and exposed the profile. With my vernier caliper, I took a measurement of 0.050". 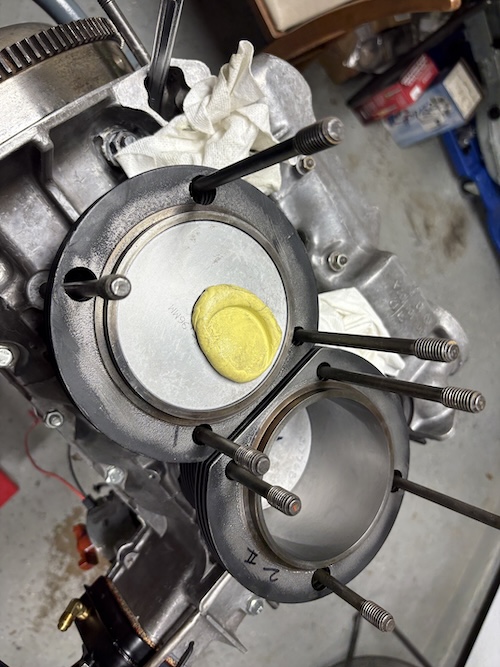 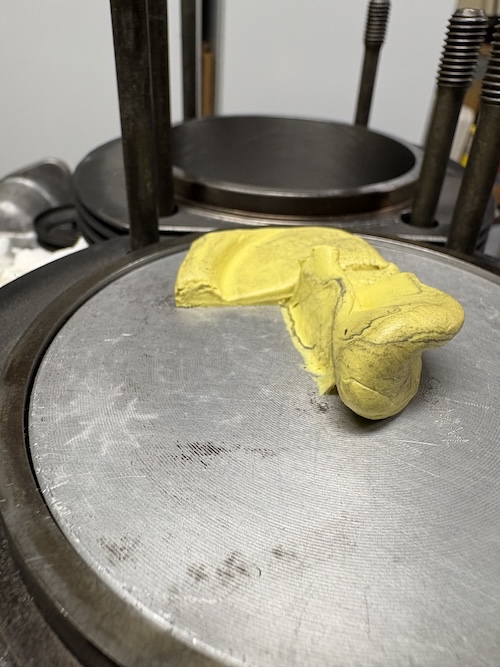 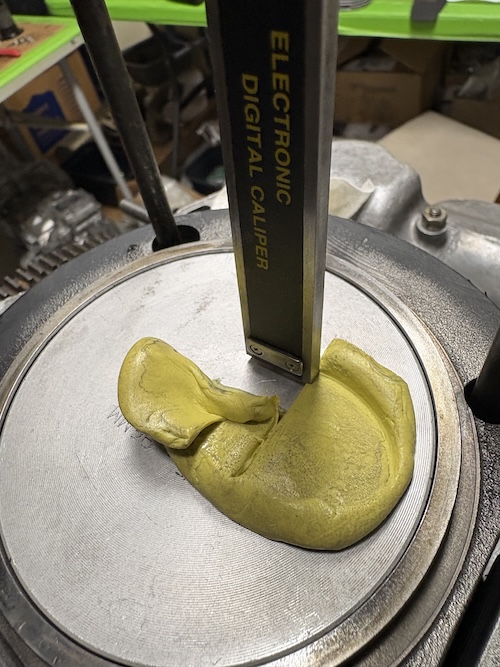 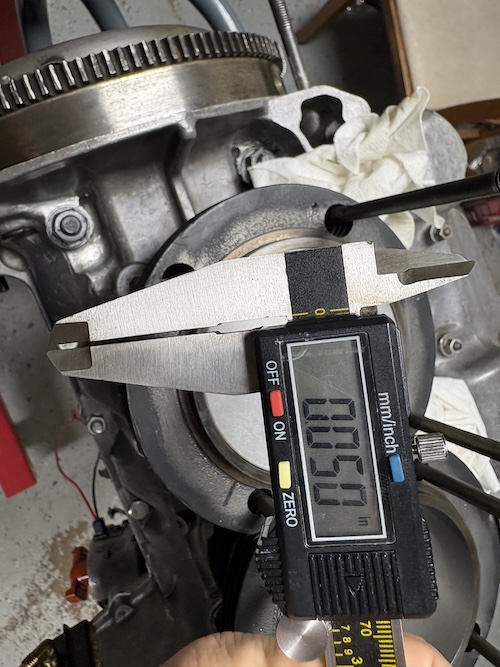 This seems too close for me! (IMG:style_emoticons/default/chair.gif) [ @Ninja mentioned this earlier] I'm thinking this cam and piston combo may not be ideal. I did talk with a rep at AA today. They have liners that are matched with my 2618 JE Pistons with the valve pockets. This might be the better way to go. Hmmmm..... (IMG:style_emoticons/default/idea.gif) |
|
|
|
| Ninja |
Sep 1 2026, 05:49 PM
Post
#148
|
|
Member Group: Members Posts: 323 Joined: 25-September 25 From: Granbury Texas Member No.: 29,004 Region Association: Southwest Region |
"Standard" minimum valve to piston clearance:
Intake .080 Exhaust .100 I'm not certain if Type 4 clearance recommendations are different but there's not a snowballs chance in hell that I'd run what you currently have... Like I mentioned in my pm one of the KBs shortcomings is it cannot accommodate a serious cam. A little tiny eyebrow would help BIGTIME on them. There are "redneck" cutters available for use directly in the head to "cut your own" for many applications (The LS GM engines are one of them). I have no idea if such a critter is available for VW stuff. Doesn't really matter. Hypereutectic material is a BITCH to cut (it's the glass that screws everything up) and I would not want to use a hyper cast piston that I'd cut through the outer "skin" on the crown. Your JEs are beautiful, use them... (IMG:style_emoticons/default/ninja.gif) Edit: on the "matched" liners... As Ronald Regan once said "Trust but verify"! |
|
|
|
| 930cabman |
Sep 1 2026, 06:52 PM
Post
#149
|
|
Advanced Member Group: Members Posts: 4,865 Joined: 12-November 20 From: Buffalo Member No.: 24,877 Region Association: North East States
|
I'd play it safe
|
|
|
|
| friethmiller |
Sep 2 2026, 01:01 PM
Post
#150
|
|
Senior Member Group: Members Posts: 1,587 Joined: 10-February 19 From: Austin, TX Member No.: 22,863 Region Association: Southwest Region
|
QUOTE(930cabman @ Sep 1 2026, 07:52 PM) I'd play it safe Yep! I ordered new liners that should match my JE pistons. They'll be here in a few days. In the meantime, I started moving on the GA block for the LE. I'll post my work on that engine on the other thread. |
|
|
|
| Jack Standz |
Sep 2 2026, 01:32 PM
Post
#151
|
|
Senior Member Group: Members Posts: 966 Joined: 15-November 19 From: Happy Place (& surrounding area) Member No.: 23,644 Region Association: None
|
Here's what Len Hoffman says about valve to piston clearance:
Target Range for Performance Builds: 0.060"–0.080" (1.5–2.0 mm) https://docs.lnengineering.com/article/191-...alve-clearances Also, some say the minimum they use is 50 thousandths. We might be willing to go there or get spacers that get you up to 60 thousandths. Good luck whatever you decide to do. |
|
|
|
| friethmiller |
Sep 2 2026, 03:17 PM
Post
#152
|
|
Senior Member Group: Members Posts: 1,587 Joined: 10-February 19 From: Austin, TX Member No.: 22,863 Region Association: Southwest Region
|
QUOTE(Ninja @ Sep 1 2026, 06:49 PM) ... As Ronald Regan once said "Trust but verify"! Always!! (IMG:style_emoticons/default/shades.gif) |
|
|
|
| friethmiller |
Sep 2 2026, 04:07 PM
Post
#153
|
|
Senior Member Group: Members Posts: 1,587 Joined: 10-February 19 From: Austin, TX Member No.: 22,863 Region Association: Southwest Region
|
QUOTE(Jack Standz @ Sep 2 2026, 02:32 PM) Here's what Len Hoffman says about valve to piston clearance: Target Range for Performance Builds: 0.060"–0.080" (1.5–2.0 mm) https://docs.lnengineering.com/article/191-...alve-clearances Also, some say the minimum they use is 50 thousandths. We might be willing to go there or get spacers that get you up to 60 thousandths. Good luck whatever you decide to do. |
|
|
|
| friethmiller |
Sep 7 2026, 08:44 PM
Post
#154
|
|
Senior Member Group: Members Posts: 1,587 Joined: 10-February 19 From: Austin, TX Member No.: 22,863 Region Association: Southwest Region
|
Quick Update: New cylinders showed up on Saturday morning from AA Performance. These are big bore cylinders that are meant to fit my stroker JE pistons. And, while these provide a little more room than my other cylinders, they are still too narrow. I need a minimum of .0035 of clearance. I will call AA in the morning to follow-up with other possible options. Getting these cylinders honed is probably what needs to be done.
1st pic shows the part number for these Biral liners. The second shows one of JE pistons sitting in one of the cylinders. Note: this piston is rotated about 90 degrees out of its intended position and will slide down the bore but it is no where near .0035 - .004 clearance at the 0.5" mark from the bottom of the piston skirt. 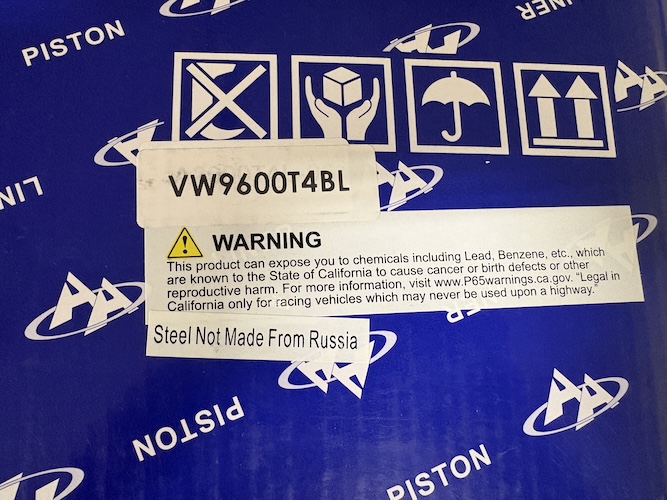 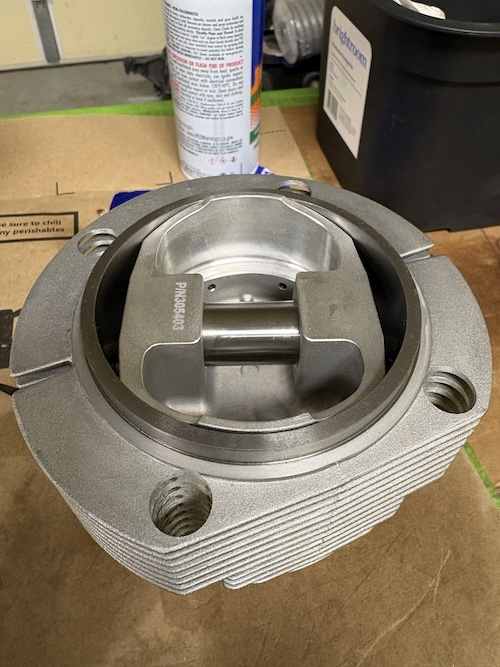 With this delay, I pulled the engine off the stand and started work on the LE's 2056 build. I will post on my other thread for that shortly. |
|
|
|
| Ninja |
Sep 8 2026, 06:48 AM
Post
#155
|
|
Member Group: Members Posts: 323 Joined: 25-September 25 From: Granbury Texas Member No.: 29,004 Region Association: Southwest Region |
There's a tag I've not seen before!
"Steel NOT made from Russia" The one I WANT to see! "Steel NOT made from China" I wonder if this is the new replacement for the "Globally sourced" moniker which is on everything now. What's holding that piston up? Hope it's not friction! (IMG:style_emoticons/default/av-943.gif) Those piston clearance measurements are minimums not maximums... I once did a deep search on what the maximum clearance should be on a forged piston. No consensus... Some of the drag race big blocks (with power adder-NO2/blower) use as much .010! Just flopping in the bore... |
|
|
|
| friethmiller |
Sep 8 2026, 10:03 AM
Post
#156
|
|
Senior Member Group: Members Posts: 1,587 Joined: 10-February 19 From: Austin, TX Member No.: 22,863 Region Association: Southwest Region
|
QUOTE(Ninja @ Sep 8 2026, 07:48 AM) Here's what I measured for each piston. The label on the box says bore of 3.779". The ceramic coating on the skirts is really light - maybe .0005". My ability to take exact measurements might be an issue here. However, getting a piston to "hang" in the bore is not a good indicator of clearance and/or ovality. (IMG:style_emoticons/default/idea.gif) Waiting to hear back from AA on what they recommend to do. 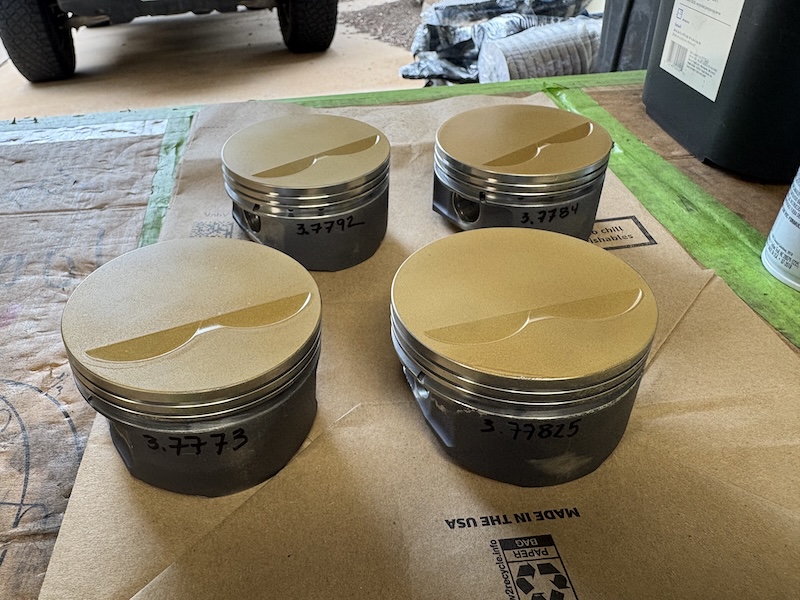 |
|
|
|
| friethmiller |
Sep 30 2026, 09:06 PM
Post
#157
|
|
Senior Member Group: Members Posts: 1,587 Joined: 10-February 19 From: Austin, TX Member No.: 22,863 Region Association: Southwest Region
|
Pistons & Cylinders (9/30/2026):
Well the parts came in today from the machine shop. They ended up honing about .002" out of each cylinder. So, after cleaning the liners, I started verifying the Piston to Cylinder Wall gap. Finally! I'm getting a minimum of .0035" gap in each cylinder as called for by the JE piston guide (IMG:style_emoticons/default/cheer.gif) Note: the Grant rings in the second picture are for my other KB pistons. 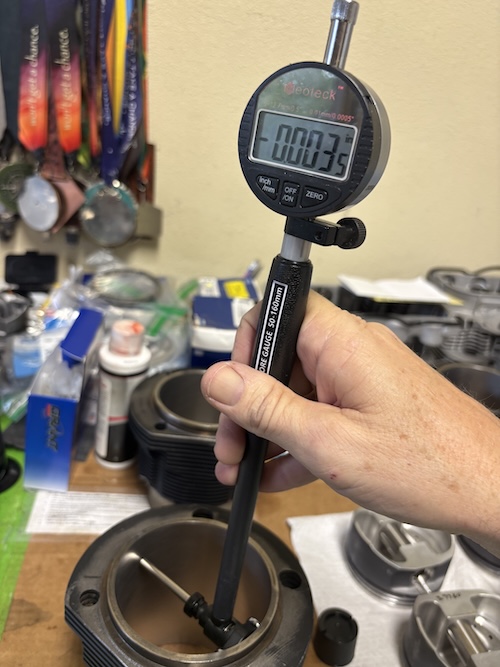 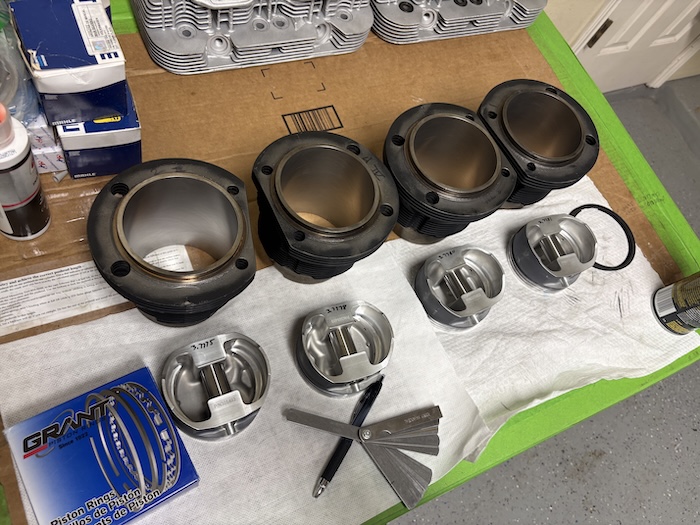 However, I now have another problem. The ring set that goes with the pistons no longer provide a gap that is within range of my clearances. The top ring should be .017" and the 2nd ring .019". I'm measuring .021" and .022" for the rings straight out of the box. Question: do I run these gaps or get on the horn with JE or Hastings in the morning? Next size up would likely be 96.5mm. Unfortunately, the other ring sets I have for the KB pistons require a thicker 2nd ring so they won't work in the JE pistons. Here's a pic of the Hastings rings (96mm with 1/16" x 1/16" x 3/16" ring thickness). Final photo is the gap specs for the JEs. Might be time to start thinking about adding a turbo! (IMG:style_emoticons/default/lol-2.gif) 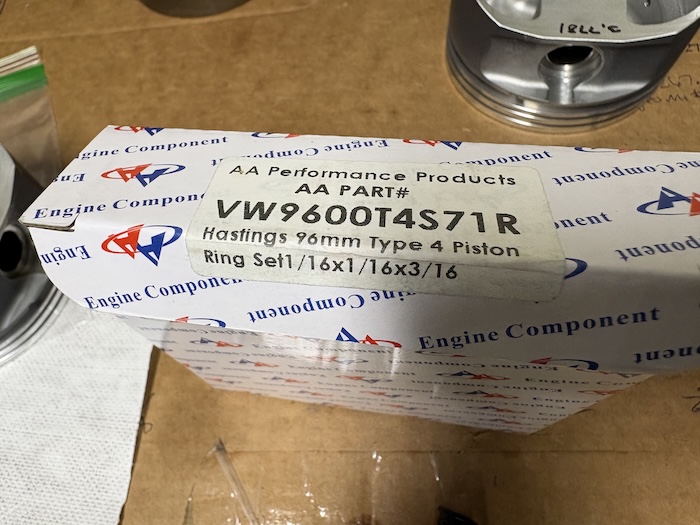 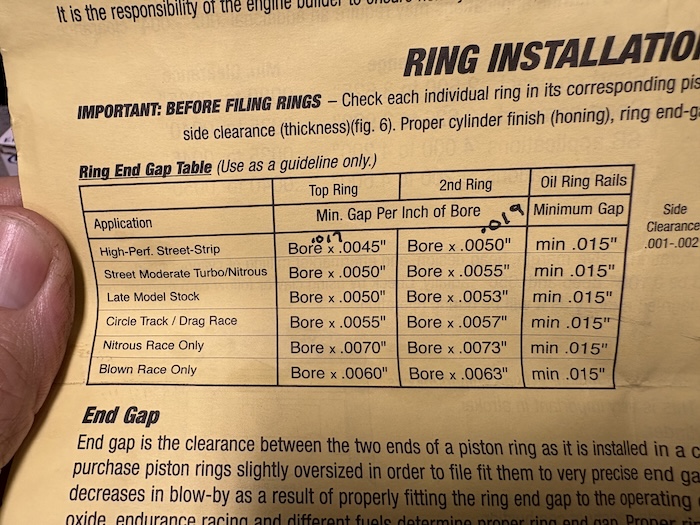 Opinions are welcome here. I am planning to call JE and/or Hastings tomorrow. |
|
|
|
| Ninja |
Oct 1 2026, 08:17 AM
Post
#158
|
|
Member Group: Members Posts: 323 Joined: 25-September 25 From: Granbury Texas Member No.: 29,004 Region Association: Southwest Region |
I don't have a problem with a couple of thousands extra in the ring gap.
I'd probably run what you have... |
|
|
|
| friethmiller |
Oct 1 2026, 08:22 AM
Post
#159
|
|
Senior Member Group: Members Posts: 1,587 Joined: 10-February 19 From: Austin, TX Member No.: 22,863 Region Association: Southwest Region
|
Top Ring Minutiae (10/1/2026):
Early this morning I was out in the garage with the idea that perhaps the top ring from the grant set might work in the JE pistons. I noticed yesterday that they were very similar in size. Here's a side by side comparison. The Grant is on the left/ Hastings on the right. From this view the grant is thicker in its width. 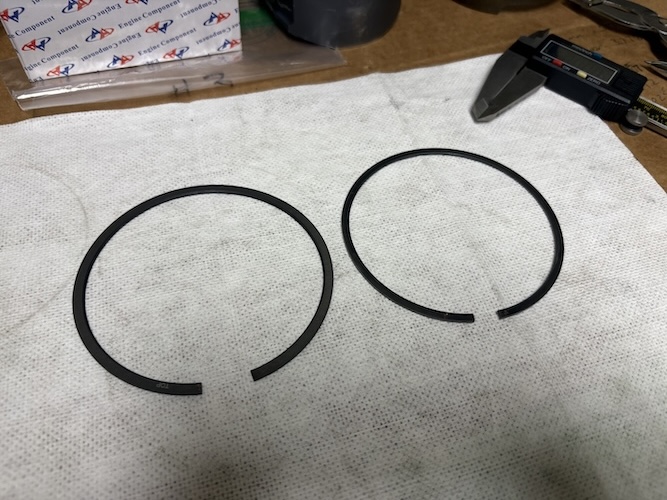 First up is the Grant ring (height and radial thickness): 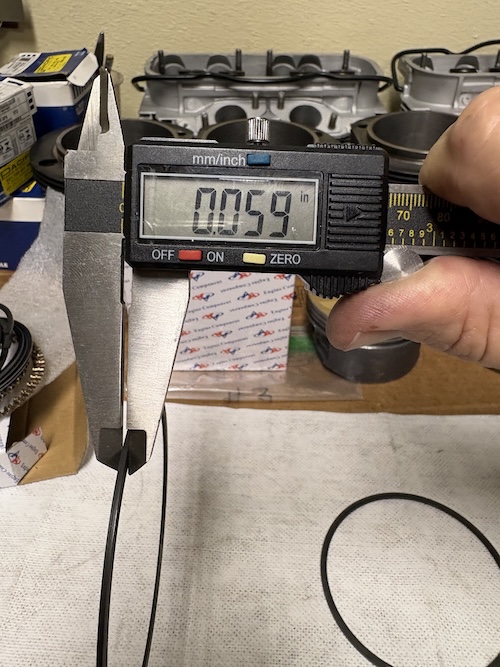 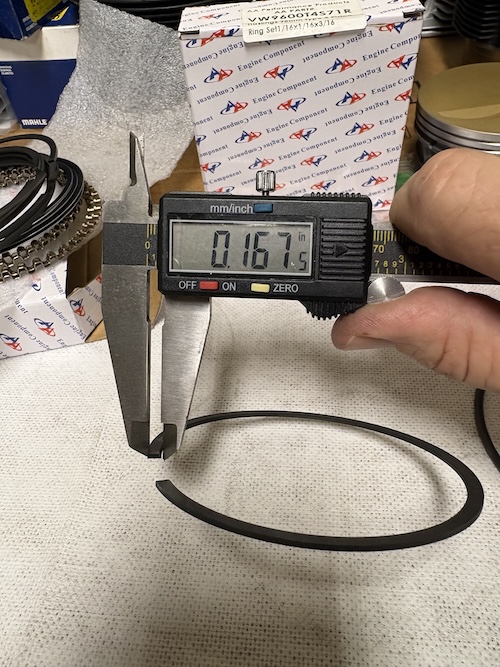 Next the Hastings Ring (height and radial thickness): 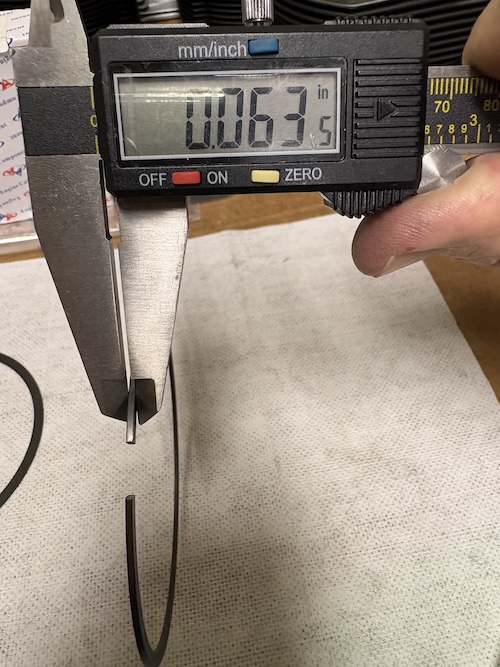 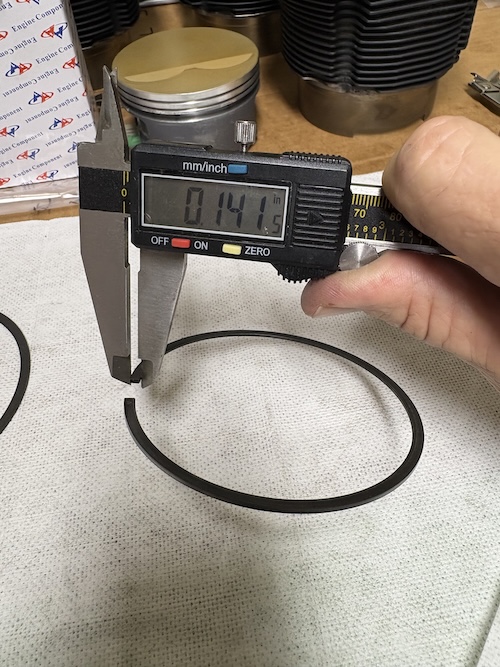 So, while the Grant ring is thicker it isn't as tall as the Hastings ring. In other words, the Grant will fill more of the ring groove and back spacing might be an issue. However, the Grant is shorter than the Hastings ring and might not meet the side clearance specs. Back Spacing This might not be the correct way but I did the measurement with the backend of the calipers. I pressed in against the ring till the body hit the side of the piston and then took the measurement. Again, the Grant ring was first with .005" of back clearance. 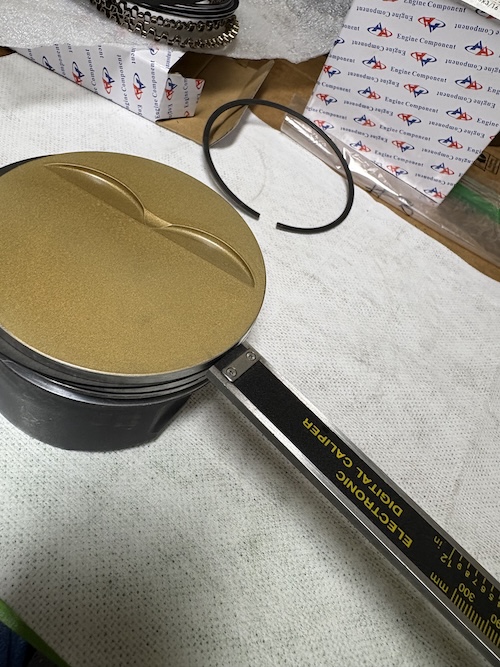 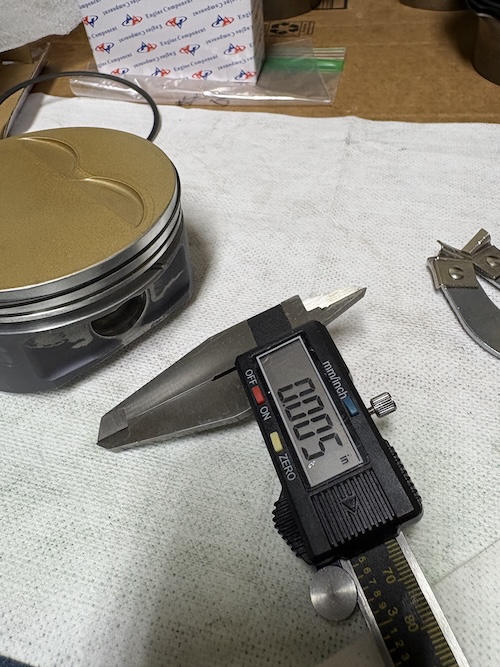 Next, the Hastings ring with .032" of back clearance. Note: first photo is how I started - before pushing in toward the piston. 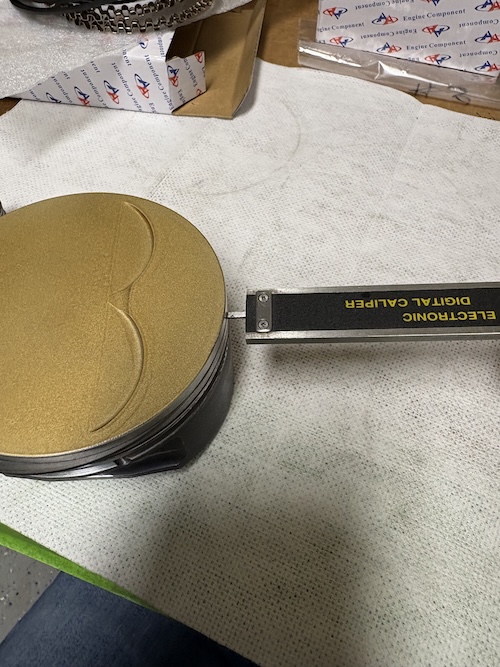 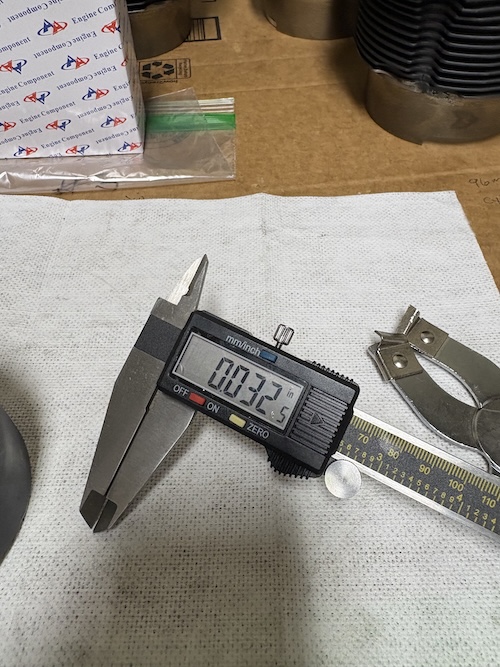 Side Clearance Picture of the side clearance check for the Grant ring coming in at .004" 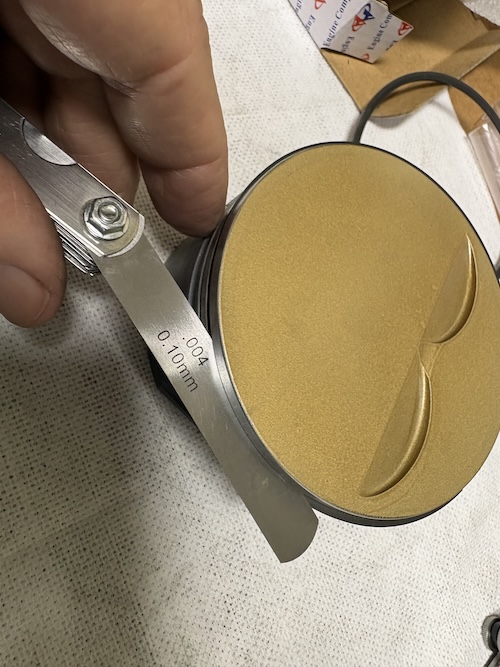 And, finally, the Hastings ring with a side clearance of .0015" 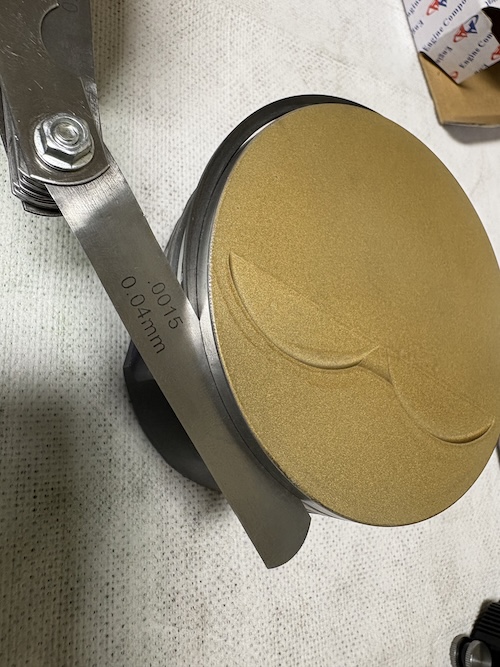 Now, with that done I checked the spec sheet and determined the following: The Grant ring will work based on back clearance however it will NOT work based on side clearance. Cool stuff! 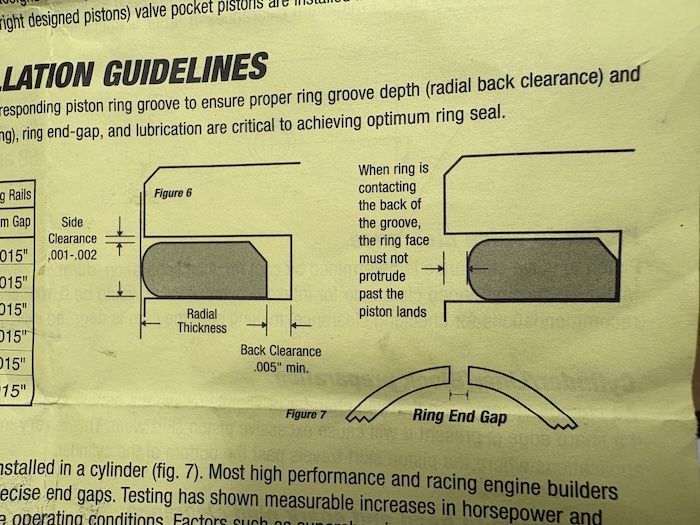 FYI, I ordered another set of oversized rings that should be here Monday. With the delay, I can at least check piston to valve clearance and probably get started on the valve lift / push rod measurement checks this weekend. (IMG:style_emoticons/default/aktion035.gif) |
|
|
|
| Ninja |
Oct 1 2026, 08:33 AM
Post
#160
|
|
Member Group: Members Posts: 323 Joined: 25-September 25 From: Granbury Texas Member No.: 29,004 Region Association: Southwest Region |
Side clearance is CRITICAL!!!
When you measured .0025 difference in the thickness my first thought was, I hope one of those falls between .001-2 to the piston. SO MUCH BS on how this stuff is fitting together for you! Make you wonder if ANY of the critters supplying parts actually "give a shit" if the final engine will live. I feel your pain! (IMG:style_emoticons/default/ninja.gif) |
|
|
|
|
16 User(s) are reading this topic (16 Guests and 0 Anonymous Users)
0 Members:

|
Lo-Fi Version | Time is now: 23rd October 2026 - 12:35 AM |
Invision Power Board
v9.1.4 © 2026 IPS, Inc.