
 Fred's 2374 -> 2258 Engine Build Thread Fred's 2374 -> 2258 Engine Build Thread |
|
|

|
Porsche, and the Porsche crest are registered trademarks of Dr. Ing. h.c. F. Porsche AG.
This site is not affiliated with Porsche in any way. Its only purpose is to provide an online forum for car enthusiasts. All other trademarks are property of their respective owners. |
|
|

| friethmiller |
 Jun 26 2026, 03:07 PM Jun 26 2026, 03:07 PM
Post
#61
|
|
Senior Member  Group: Members Posts: 1,530 Joined: 10-February 19 From: Austin, TX Member No.: 22,863 Region Association: Southwest Region 
 |
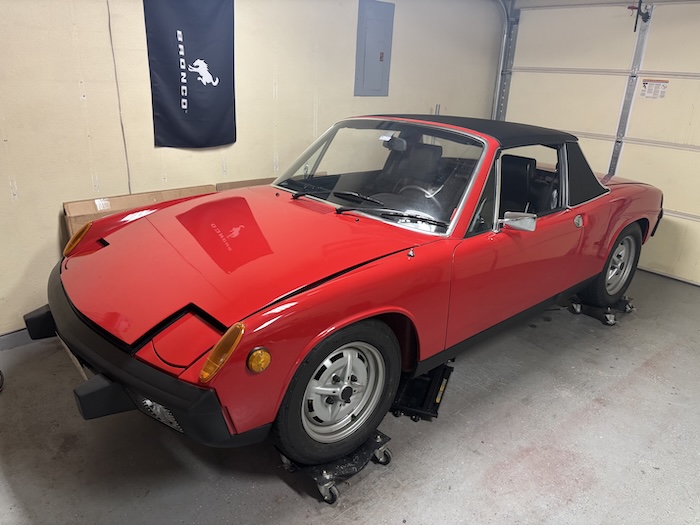
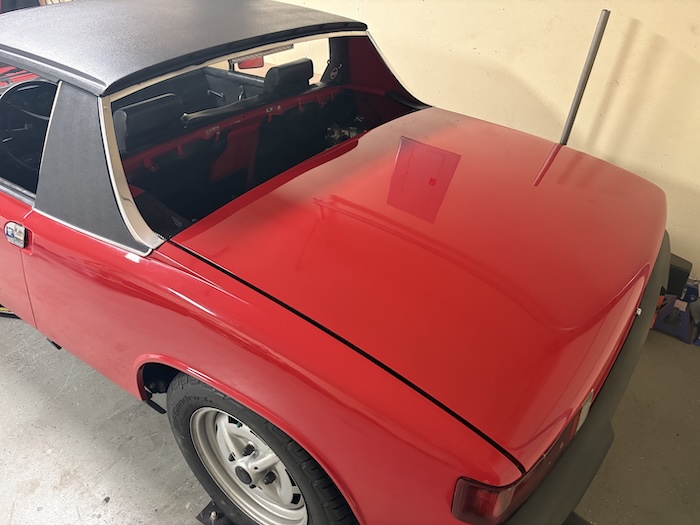
I can't believe it but after 1-1/2 years of waiting for my engine components to be machined, I am finally picking up the parts tomorrow (IMG:style_emoticons/default/blink.gif). I will post more after talking to the owner about the issues he found with my case. This is what was holding everything up. Luckily. I have source another case (from my shed) and will be using this one instead. Here's a few pics of the my "other '74" after uncovering it today and wiping off a bit of dust. She needs to ride again! Hoping for Okteenerfest. Stay tuned!
  |
   |

 
|
Posts in this topic
 friethmiller Fred's 2374 -> 2258 Engine Build Thread Jun 26 2026, 03:07 PM
 Ron914
I can't believe it but after 1-1/2 years of w... Jun 26 2026, 04:59 PM
Ron914
I can't believe it but after 1-1/2 years of w... Jun 26 2026, 04:59 PM
 friethmiller
Car looks great . Did this one start out like the... Jun 26 2026, 07:54 PM 930cabman Been holding out eh Jun 26 2026, 05:35 PM friethmiller Turned out alright, I think. Learned a lot!
Jun 26 2026, 07:58 PM Ninja SHOW OFF!!
An engine thread needs ENGINE ... Jun 26 2026, 08:47 PM friethmiller Hee, hee… yes, it’ll all start tomorrow, Rick. Jun 26 2026, 09:05 PM friethmiller Initial Layout (6/27/2026):
After about 5 hours o... Jun 27 2026, 05:16 PM seanpaulmc I’m so excited and it’s not even my car. :ch... Jun 27 2026, 05:57 PM friethmiller
I’m so excited and it’s not even my car. :c... Jun 27 2026, 06:40 PM Jack Standz Hi Fred,
Me thinks that's a great cam choice... Jun 27 2026, 06:05 PM Montreal914 WOW, super cool!! Where to begin my commen... Jun 27 2026, 06:19 PM friethmiller
Did you install the braces for the inner suspensi... Jun 27 2026, 06:45 PM Montreal914
Did you install the braces for the inner suspens... Jun 27 2026, 07:49 PM friethmiller
All this to say that your LN lifters may be WebCa... Jun 27 2026, 08:59 PM Puebloswatcop
I can't believe it but after 1-1/2 years of w... Jun 27 2026, 06:44 PM friethmiller
Fred, If she needs some TLC, I would be happy to ... Jun 27 2026, 07:19 PM Ninja Ah, meat and potatoes...
Thank you!
So, 2258 ... Jun 27 2026, 06:55 PM friethmiller
Ah, meat and potatoes...
Thank you!
So, 2258... Jun 27 2026, 07:16 PM 914werke Rods checked out fine but were modified for bett... Jun 27 2026, 07:43 PM friethmiller
Curious , why offset as the published description... Jun 27 2026, 08:35 PM friethmiller Trying to verify dimensions here. What is the sta... Jun 28 2026, 04:47 PM 930cabman
Trying to verify dimensions here. What is the st... Jun 28 2026, 05:48 PM cgnj @friethmiller AI is not your friend. That is for ... Jun 28 2026, 06:06 PM friethmiller
[b]@[url=http://www.914world.com/bbs2/index.php?s... Jun 28 2026, 07:15 PM friethmiller Ok, I've confirmed two things.
My EA block i... Jun 29 2026, 06:08 PM Montreal914 Good news! B:)
Nice metrology tools btw.
Di... Jun 29 2026, 07:02 PM Ninja Are bearings MORE available if you need .020 over ... Jun 29 2026, 07:11 PM zig-n-zag Yes, nice tools you have there.
With the main b... Jun 29 2026, 09:34 PM friethmiller
With the main bearing tunnel being tight, ask you... Jun 30 2026, 07:04 AM Jack Standz
Are bearings MORE available if you need .020 over... Jun 29 2026, 10:25 PM friethmiller
Good news! B:)
Did you get a chance to meas... Jun 30 2026, 07:17 AM Ninja I have another question...
How do the main bearin... Jun 30 2026, 08:57 AM friethmiller
I have another question...
How do the main beari... Jun 30 2026, 09:06 AM Nogoodwithusernames Fred,
If mains are tight, I would see if the shop ... Jun 30 2026, 09:21 AM friethmiller Ok, three things to report back on. I talked with... Jun 30 2026, 02:25 PM friethmiller Please help play.... read the micrometer! Thi... Jul 1 2026, 11:41 AM cgnj I'm watching now because you lost me. Jul 1 2026, 12:35 PM Ninja
Please help play.... [b]read the micrometer! ... Jul 1 2026, 01:21 PM friethmiller
Do you have a 2" and 3" standards?
I... Jul 1 2026, 01:37 PM Shivers Nice parts Fred Jul 1 2026, 01:44 PM zig-n-zag A tip I got long ago was to always store engine ca... Jul 2 2026, 02:53 AM friethmiller
A tip I got long ago was to always store engine c... Jul 2 2026, 06:03 AM friethmiller To summarize my current issue, I'm measuring m... Jul 2 2026, 08:29 AM Nogoodwithusernames
To summarize my current issue, I'm measuring ... Jul 2 2026, 02:20 PM friethmiller
Have you checked it with bearings installed? With... Jul 2 2026, 03:43 PM friethmiller Wanted to verify the oil clearance on the mains. ... Jul 2 2026, 04:02 PM 930cabman
Wanted to verify the oil clearance on the mains. ... Jul 2 2026, 04:17 PM friethmiller Not yet. I’m asking if these are the recommende... Jul 2 2026, 05:32 PM friethmiller Update:
I spent a lot of time this weekend in the... Jul 5 2026, 07:45 PM friethmiller W Case Measurements:
Went out to the garage this ... Jul 6 2026, 07:56 AM friethmiller EA Case Measurements:
Ok, I might be alright. He... Jul 6 2026, 03:20 PM friethmiller Initial Mockup
Used a light coating of assembly l... Jul 7 2026, 06:26 AM friethmiller Oil Pump Checks:
Measured my Schadek 30mm pump th... Jul 8 2026, 07:18 AM friethmiller Oil Pump Checks (Part2):
Pulled out the pump gask... Jul 8 2026, 08:13 AM friethmiller More Measurement Data:
I've spent a lot of ti... Jul 10 2026, 09:19 AM 930cabman
More Measurement Data:
I've spent a lot of t... Jul 11 2026, 05:25 AM Jack Standz
[b]Oil Pump Checks (Part2):
Pulled out the pump ... Jul 10 2026, 12:16 PM friethmiller
Fred,
Where did you get these thick gaskets? Th... Jul 10 2026, 12:27 PM friethmiller
Fred,
Where did you get these thick gaskets? T... Jul 11 2026, 02:59 PM friethmiller @930cabman - yeah, you’re probably right. Mayb... Jul 11 2026, 10:36 AM 930cabman I like Plasti Gage, it has worked well for me in t... Jul 11 2026, 01:06 PM friethmiller
I like Plasti Gage...
Me too! I think about... Jul 11 2026, 07:22 PM Robroe Following you with great interest. I am also buil... Jul 11 2026, 03:33 PM friethmiller
Following you with great interest. I am also bui... Jul 11 2026, 07:23 PM friethmiller Moving Forward
While I wait for another case from... Jul 11 2026, 08:08 PM friethmiller Yeah, I forgot about "Cam Degreeing". D... Jul 11 2026, 08:42 PM Jack Standz
[quote name='friethmiller' post='3264688' date='J... Jul 11 2026, 10:31 PM friethmiller
Thanks for checking Fred. Couldn't find it o... Jul 12 2026, 05:13 AM friethmiller
Of course it looks like you might be trying to ju... Jul 12 2026, 07:35 AM friethmiller @930cabman - Plasticgauge on the W-case. Brand n... Jul 12 2026, 09:26 AM 930cabman
[b]@[url=http://www.914world.com/bbs2/index.php?s... Jul 12 2026, 01:16 PM Ninja
Hi Fred,
Me thinks that's a great cam choic... Jul 12 2026, 11:38 AM friethmiller
Can you provide a close-up view of the main beari... Jul 12 2026, 07:51 PM friethmiller Ok, I reassembled the W case again without bearing... Jul 12 2026, 08:13 PM Jack Standz
[quote name='Jack Standz' post='3263078' date='Ju... Jul 12 2026, 11:23 PM friethmiller Fuel Regulator:
I needed to mount the new PMO fue... Jul 13 2026, 07:52 AM Ninja WOW! those machine marks don't look even..... Jul 13 2026, 08:08 AM 930cabman
WOW! those machine marks don't look even.... Jul 14 2026, 01:00 PM friethmiller
perhaps a call to Ollies is in order
Ollies in ... Jul 14 2026, 01:23 PM Ninja Heads up!
Checking line bore without the case... Jul 13 2026, 10:43 AM 930cabman Wish I knew of a reputable VW/Porsche engine machi... Jul 14 2026, 07:25 PM friethmiller I hear ya there. When I torqued the crank in my E... Jul 14 2026, 07:51 PM 930cabman
I hear ya there. When I torqued the crank in my ... Jul 15 2026, 04:55 AM friethmiller
I hear ya there. When I torqued the crank in my... Jul 15 2026, 05:36 AM 930cabman
[quote name='930cabman' post='3265095' date='Jul ... Jul 15 2026, 09:03 AM friethmiller
Given the information available I would give this... Jul 15 2026, 12:36 PM 930cabman
[quote name='930cabman' post='3265146' date='Jul ... Jul 15 2026, 01:01 PM Ninja Ill fitting!
But I'd want to see all of t... Jul 15 2026, 01:26 PM friethmiller Note the backs of these same #2 bearings. Note: t... Jul 15 2026, 01:37 PM 930cabman Once again, I am not a "real" engine bui... Jul 16 2026, 04:50 AM friethmiller
Once again, I am not a "real" engine bu... Jul 16 2026, 06:33 AM friethmiller All this is in the past, though. I'm looking ... Jul 16 2026, 08:33 AM 930cabman
All this is in the past, though. I'm looking... Jul 16 2026, 12:22 PM friethmiller
[quote name='friethmiller' post='3265264' date='J... Jul 16 2026, 01:26 PM 930cabman Whoa, quite the timeline. The learning experience ... Jul 16 2026, 05:58 PM friethmiller @930cabman - so true! Thanks for your input/... Jul 17 2026, 10:56 AM Ninja Awesome!
Chris's exhaust is exemplary... Jul 17 2026, 12:19 PM friethmiller Do I have to run the AFR gauge into the main cabin... Jul 17 2026, 01:24 PM Ninja I'd watch that gauge more than anything else b... Jul 17 2026, 02:23 PM
friethmiller
Car looks great . Did this one start out like the... Jun 26 2026, 07:54 PM 930cabman Been holding out eh Jun 26 2026, 05:35 PM friethmiller Turned out alright, I think. Learned a lot!
Jun 26 2026, 07:58 PM Ninja SHOW OFF!!
An engine thread needs ENGINE ... Jun 26 2026, 08:47 PM friethmiller Hee, hee… yes, it’ll all start tomorrow, Rick. Jun 26 2026, 09:05 PM friethmiller Initial Layout (6/27/2026):
After about 5 hours o... Jun 27 2026, 05:16 PM seanpaulmc I’m so excited and it’s not even my car. :ch... Jun 27 2026, 05:57 PM friethmiller
I’m so excited and it’s not even my car. :c... Jun 27 2026, 06:40 PM Jack Standz Hi Fred,
Me thinks that's a great cam choice... Jun 27 2026, 06:05 PM Montreal914 WOW, super cool!! Where to begin my commen... Jun 27 2026, 06:19 PM friethmiller
Did you install the braces for the inner suspensi... Jun 27 2026, 06:45 PM Montreal914
Did you install the braces for the inner suspens... Jun 27 2026, 07:49 PM friethmiller
All this to say that your LN lifters may be WebCa... Jun 27 2026, 08:59 PM Puebloswatcop
I can't believe it but after 1-1/2 years of w... Jun 27 2026, 06:44 PM friethmiller
Fred, If she needs some TLC, I would be happy to ... Jun 27 2026, 07:19 PM Ninja Ah, meat and potatoes...
Thank you!
So, 2258 ... Jun 27 2026, 06:55 PM friethmiller
Ah, meat and potatoes...
Thank you!
So, 2258... Jun 27 2026, 07:16 PM 914werke Rods checked out fine but were modified for bett... Jun 27 2026, 07:43 PM friethmiller
Curious , why offset as the published description... Jun 27 2026, 08:35 PM friethmiller Trying to verify dimensions here. What is the sta... Jun 28 2026, 04:47 PM 930cabman
Trying to verify dimensions here. What is the st... Jun 28 2026, 05:48 PM cgnj @friethmiller AI is not your friend. That is for ... Jun 28 2026, 06:06 PM friethmiller
[b]@[url=http://www.914world.com/bbs2/index.php?s... Jun 28 2026, 07:15 PM friethmiller Ok, I've confirmed two things.
My EA block i... Jun 29 2026, 06:08 PM Montreal914 Good news! B:)
Nice metrology tools btw.
Di... Jun 29 2026, 07:02 PM Ninja Are bearings MORE available if you need .020 over ... Jun 29 2026, 07:11 PM zig-n-zag Yes, nice tools you have there.
With the main b... Jun 29 2026, 09:34 PM friethmiller
With the main bearing tunnel being tight, ask you... Jun 30 2026, 07:04 AM Jack Standz
Are bearings MORE available if you need .020 over... Jun 29 2026, 10:25 PM friethmiller
Good news! B:)
Did you get a chance to meas... Jun 30 2026, 07:17 AM Ninja I have another question...
How do the main bearin... Jun 30 2026, 08:57 AM friethmiller
I have another question...
How do the main beari... Jun 30 2026, 09:06 AM Nogoodwithusernames Fred,
If mains are tight, I would see if the shop ... Jun 30 2026, 09:21 AM friethmiller Ok, three things to report back on. I talked with... Jun 30 2026, 02:25 PM friethmiller Please help play.... read the micrometer! Thi... Jul 1 2026, 11:41 AM cgnj I'm watching now because you lost me. Jul 1 2026, 12:35 PM Ninja
Please help play.... [b]read the micrometer! ... Jul 1 2026, 01:21 PM friethmiller
Do you have a 2" and 3" standards?
I... Jul 1 2026, 01:37 PM Shivers Nice parts Fred Jul 1 2026, 01:44 PM zig-n-zag A tip I got long ago was to always store engine ca... Jul 2 2026, 02:53 AM friethmiller
A tip I got long ago was to always store engine c... Jul 2 2026, 06:03 AM friethmiller To summarize my current issue, I'm measuring m... Jul 2 2026, 08:29 AM Nogoodwithusernames
To summarize my current issue, I'm measuring ... Jul 2 2026, 02:20 PM friethmiller
Have you checked it with bearings installed? With... Jul 2 2026, 03:43 PM friethmiller Wanted to verify the oil clearance on the mains. ... Jul 2 2026, 04:02 PM 930cabman
Wanted to verify the oil clearance on the mains. ... Jul 2 2026, 04:17 PM friethmiller Not yet. I’m asking if these are the recommende... Jul 2 2026, 05:32 PM friethmiller Update:
I spent a lot of time this weekend in the... Jul 5 2026, 07:45 PM friethmiller W Case Measurements:
Went out to the garage this ... Jul 6 2026, 07:56 AM friethmiller EA Case Measurements:
Ok, I might be alright. He... Jul 6 2026, 03:20 PM friethmiller Initial Mockup
Used a light coating of assembly l... Jul 7 2026, 06:26 AM friethmiller Oil Pump Checks:
Measured my Schadek 30mm pump th... Jul 8 2026, 07:18 AM friethmiller Oil Pump Checks (Part2):
Pulled out the pump gask... Jul 8 2026, 08:13 AM friethmiller More Measurement Data:
I've spent a lot of ti... Jul 10 2026, 09:19 AM 930cabman
More Measurement Data:
I've spent a lot of t... Jul 11 2026, 05:25 AM Jack Standz
[b]Oil Pump Checks (Part2):
Pulled out the pump ... Jul 10 2026, 12:16 PM friethmiller
Fred,
Where did you get these thick gaskets? Th... Jul 10 2026, 12:27 PM friethmiller
Fred,
Where did you get these thick gaskets? T... Jul 11 2026, 02:59 PM friethmiller @930cabman - yeah, you’re probably right. Mayb... Jul 11 2026, 10:36 AM 930cabman I like Plasti Gage, it has worked well for me in t... Jul 11 2026, 01:06 PM friethmiller
I like Plasti Gage...
Me too! I think about... Jul 11 2026, 07:22 PM Robroe Following you with great interest. I am also buil... Jul 11 2026, 03:33 PM friethmiller
Following you with great interest. I am also bui... Jul 11 2026, 07:23 PM friethmiller Moving Forward
While I wait for another case from... Jul 11 2026, 08:08 PM friethmiller Yeah, I forgot about "Cam Degreeing". D... Jul 11 2026, 08:42 PM Jack Standz
[quote name='friethmiller' post='3264688' date='J... Jul 11 2026, 10:31 PM friethmiller
Thanks for checking Fred. Couldn't find it o... Jul 12 2026, 05:13 AM friethmiller
Of course it looks like you might be trying to ju... Jul 12 2026, 07:35 AM friethmiller @930cabman - Plasticgauge on the W-case. Brand n... Jul 12 2026, 09:26 AM 930cabman
[b]@[url=http://www.914world.com/bbs2/index.php?s... Jul 12 2026, 01:16 PM Ninja
Hi Fred,
Me thinks that's a great cam choic... Jul 12 2026, 11:38 AM friethmiller
Can you provide a close-up view of the main beari... Jul 12 2026, 07:51 PM friethmiller Ok, I reassembled the W case again without bearing... Jul 12 2026, 08:13 PM Jack Standz
[quote name='Jack Standz' post='3263078' date='Ju... Jul 12 2026, 11:23 PM friethmiller Fuel Regulator:
I needed to mount the new PMO fue... Jul 13 2026, 07:52 AM Ninja WOW! those machine marks don't look even..... Jul 13 2026, 08:08 AM 930cabman
WOW! those machine marks don't look even.... Jul 14 2026, 01:00 PM friethmiller
perhaps a call to Ollies is in order
Ollies in ... Jul 14 2026, 01:23 PM Ninja Heads up!
Checking line bore without the case... Jul 13 2026, 10:43 AM 930cabman Wish I knew of a reputable VW/Porsche engine machi... Jul 14 2026, 07:25 PM friethmiller I hear ya there. When I torqued the crank in my E... Jul 14 2026, 07:51 PM 930cabman
I hear ya there. When I torqued the crank in my ... Jul 15 2026, 04:55 AM friethmiller
I hear ya there. When I torqued the crank in my... Jul 15 2026, 05:36 AM 930cabman
[quote name='930cabman' post='3265095' date='Jul ... Jul 15 2026, 09:03 AM friethmiller
Given the information available I would give this... Jul 15 2026, 12:36 PM 930cabman
[quote name='930cabman' post='3265146' date='Jul ... Jul 15 2026, 01:01 PM Ninja Ill fitting!
But I'd want to see all of t... Jul 15 2026, 01:26 PM friethmiller Note the backs of these same #2 bearings. Note: t... Jul 15 2026, 01:37 PM 930cabman Once again, I am not a "real" engine bui... Jul 16 2026, 04:50 AM friethmiller
Once again, I am not a "real" engine bu... Jul 16 2026, 06:33 AM friethmiller All this is in the past, though. I'm looking ... Jul 16 2026, 08:33 AM 930cabman
All this is in the past, though. I'm looking... Jul 16 2026, 12:22 PM friethmiller
[quote name='friethmiller' post='3265264' date='J... Jul 16 2026, 01:26 PM 930cabman Whoa, quite the timeline. The learning experience ... Jul 16 2026, 05:58 PM friethmiller @930cabman - so true! Thanks for your input/... Jul 17 2026, 10:56 AM Ninja Awesome!
Chris's exhaust is exemplary... Jul 17 2026, 12:19 PM friethmiller Do I have to run the AFR gauge into the main cabin... Jul 17 2026, 01:24 PM Ninja I'd watch that gauge more than anything else b... Jul 17 2026, 02:23 PM  |
1 User(s) are reading this topic (1 Guests and 0 Anonymous Users)
0 Members:

|
Lo-Fi Version | Time is now: 21st September 2026 - 06:42 AM |
Invision Power Board
v9.1.4 © 2026 IPS, Inc.