

 Diagnose this blip under acceleration please |
|
|

|
Porsche, and the Porsche crest are registered trademarks of Dr. Ing. h.c. F. Porsche AG.
This site is not affiliated with Porsche in any way. Its only purpose is to provide an online forum for car enthusiasts. All other trademarks are property of their respective owners. |
|
|
  |
| s13u74cr4 |
 Oct 18 2026, 03:14 PM
Post
#1
|
|
Member  Group: Members Posts: 61 Joined: 2-September 23 From: PNW Member No.: 27,558 Region Association: Pacific Northwest  |
Sometimes under acceleration I get this slight hiccup. As if for a moment it stalls. Quickly recovers, and only under acceleration. And it seems only when not fully warm. Almost like for a moment it’s fuel starved. I have replaced ALL all the fuel lines, SS lines, so I think the issue is elsewhere just don’t know where.
Link to a video. I don’t think embedding the video in a post works. Video |
   |

 
|
| porschetub |
Oct 18 2026, 10:24 PM
Post
#2
|
|
914 Guru Group: Members Posts: 5,198 Joined: 25-July 15 From: New Zealand Member No.: 18,995 Region Association: None |
QUOTE(s13u74cr4 @ Oct 19 2026, 10:14 AM)  Sometimes under acceleration I get this slight hiccup. As if for a moment it stalls. Quickly recovers, and only under acceleration. And it seems only when not fully warm. Almost like for a moment it’s fuel starved. I have replaced ALL all the fuel lines, SS lines, so I think the issue is elsewhere just don’t know where. Link to a video. I don’t think embedding the video in a post works. Video Check your dizzy isn't gummed up on the top advance plate, after cleaning vacuum check the advance is @ full advance and not leaking ,it should hold vacuum for a reasonable amount of time can't remember off hand but 12 inHg will be enough ,the" suck on the hose trick " isn't enough for a real test, (IMG:style_emoticons/default/beer.gif) . |
|
|
|
| mark04usa |
Oct 18 2026, 11:00 PM
Post
#3
|
|
'70 1.7 Tangerine Group: Members Posts: 370 Joined: 14-September 09 From: Austin TX Member No.: 10,805 Region Association: Southwest Region 
|
The reaction from your tachometer would indicate ignition fault.
|
|
|
|
| emerygt350 |
Oct 19 2026, 06:35 AM
Post
#4
|
|
Advanced Member Group: Members Posts: 3,818 Joined: 20-July 21 From: Upstate, NY Member No.: 25,740 Region Association: North East States |
QUOTE(mark04usa @ Oct 19 2026, 12:00 AM) The reaction from your tachometer would indicate ignition fault. Yep, what Mark said. I would check ALL of your connections to the coil, maybe it has a bad connector that loses it when the motor torques. Definitely electrical though. |
 |
|
| s13u74cr4 |
Oct 24 2026, 11:34 AM
Post
#5
|
|
Member Group: Members Posts: 61 Joined: 2-September 23 From: PNW Member No.: 27,558 Region Association: Pacific Northwest |
QUOTE(porschetub @ Oct 18 2026, 09:24 PM) Check your dizzy isn't gummed up on the top advance plate, after cleaning vacuum check the advance is @ full advance and not leaking ,it should hold vacuum for a reasonable amount of time can't remember off hand but 12 inHg will be enough ,the" suck on the hose trick " isn't enough for a real test, :beer1: . I did the “trick” which I remember from my VW days and that does work. Got a vacuum gauge thing to see what the pressure is, just need to figure out how to measure it correctly. If I use a bulb to produce the suction it will hold. When I replaced the vacuum hoses I found that the place the hoses connect was actually loose on the distributor body. I tightened that up but if does not move smooth or easy really like I think it would. The PO installed a Petronix. I notice the little ground wire is essentially gone. Does it not use one? 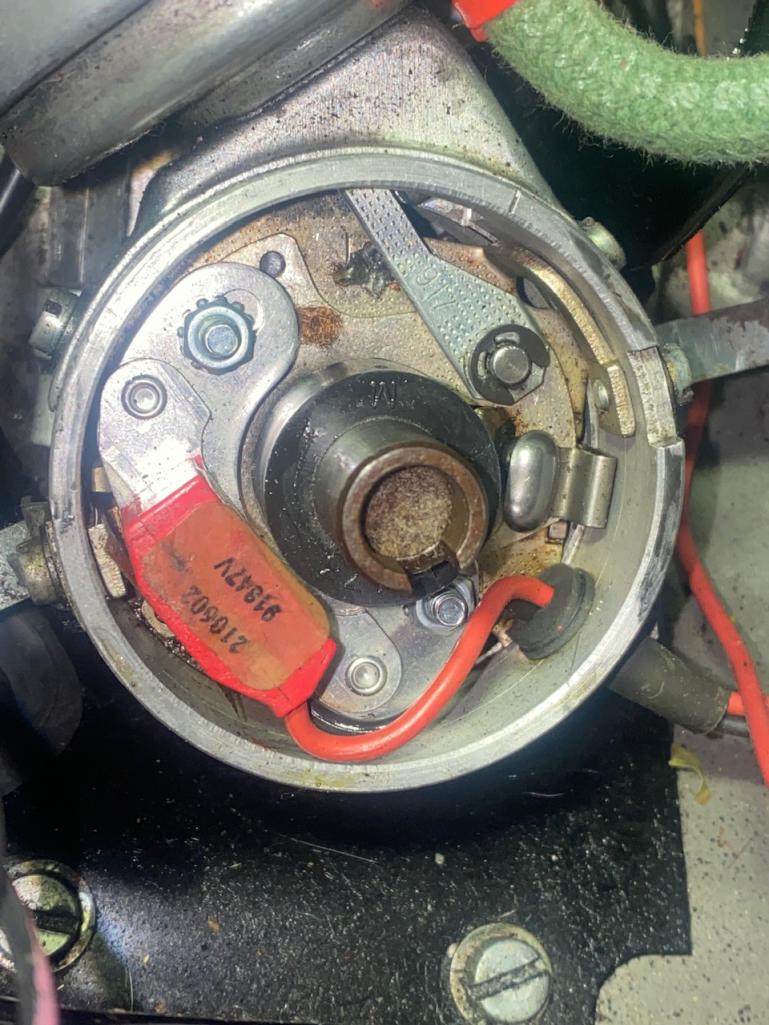 |
|
|
|
| emerygt350 |
Oct 24 2026, 12:15 PM
Post
#6
|
|
Advanced Member Group: Members Posts: 3,818 Joined: 20-July 21 From: Upstate, NY Member No.: 25,740 Region Association: North East States |
It could be the pertronix unit, as that is sending the 'ground' to the coil. However, those symptoms are not what you would get from mechanical issues from the distributor like a gummy advance.
|
|
|
|
| gereed75 |
Oct 25 2026, 10:29 AM
Post
#7
|
|
Senior Member Group: Members Posts: 1,459 Joined: 19-March 13 From: Pittsburgh PA Member No.: 15,674 Region Association: North East States
|
Looks like a Petronius fault to me. They can be glitchy and typically effect the tach signal as you are seeing.
They are great when working but |
|
|
|
| FlacaProductions |
Oct 25 2026, 12:35 PM
Post
#8
|
|
Advanced Member Group: Members Posts: 2,295 Joined: 24-November 17 From: LA Member No.: 21,628 Region Association: Southern California
|
That pertronix looks like it's worth a little double-checking of the set up gap. I'd also peel that sticker off the top of it - don't need that floating around in there.
|
|
|
|
| s13u74cr4 |
Nov 4 2026, 06:51 PM
Post
#9
|
|
Member Group: Members Posts: 61 Joined: 2-September 23 From: PNW Member No.: 27,558 Region Association: Pacific Northwest |
QUOTE(FlacaProductions @ Oct 25 2026, 10:35 AM) That pertronix looks like it's worth a little double-checking of the set up gap. I'd also peel that sticker off the top of it - don't need that floating around in there. Good call on the sticker, didn't even think of that. Looking at the install manual from the Petronix site, it states the air gap: 0.010” to 0.050”. That a pretty big variance. Anyone have a more precise one they used? |
|
|
|
| L-Jet914 |
Nov 4 2026, 07:18 PM
Post
#10
|
|
Member Group: Members Posts: 431 Joined: 24-October 12 From: Davis, CA Member No.: 15,080 Region Association: Northern California |
In the Petronix unit I have in my 74 1.8L, I used the plastic feeler gauge it came with to set the air gap.
|
|
|
|
| FlacaProductions |
Nov 4 2026, 11:04 PM
Post
#11
|
|
Advanced Member Group: Members Posts: 2,295 Joined: 24-November 17 From: LA Member No.: 21,628 Region Association: Southern California
|
Yes - the pertronix came/come with a small plastic feeler used to set the gap - but i'm guessing it's not THAT critical as long as it's in the range you listed. I'd split the diff and just use a 0.020" feeler.
|
|
|
|
| s13u74cr4 |
Nov 5 2026, 10:12 AM
Post
#12
|
|
Member Group: Members Posts: 61 Joined: 2-September 23 From: PNW Member No.: 27,558 Region Association: Pacific Northwest |
No plastic gauge and must not be precise with a range like that. Good call on the median.
QUOTE(FlacaProductions @ Nov 4 2026, 09:04 PM) Yes - the pertronix came/come with a small plastic feeler used to set the gap - but i'm guessing it's not THAT critical as long as it's in the range you listed. I'd split the diff and just use a 0.020" feeler. |
|
|
|
| Superhawk996 |
Nov 5 2026, 11:12 AM
Post
#13
|
|
914 Guru Group: Members Posts: 8,177 Joined: 25-August 18 From: Woods of N. Idaho Member No.: 22,428 Region Association: Galt's Gulch
|
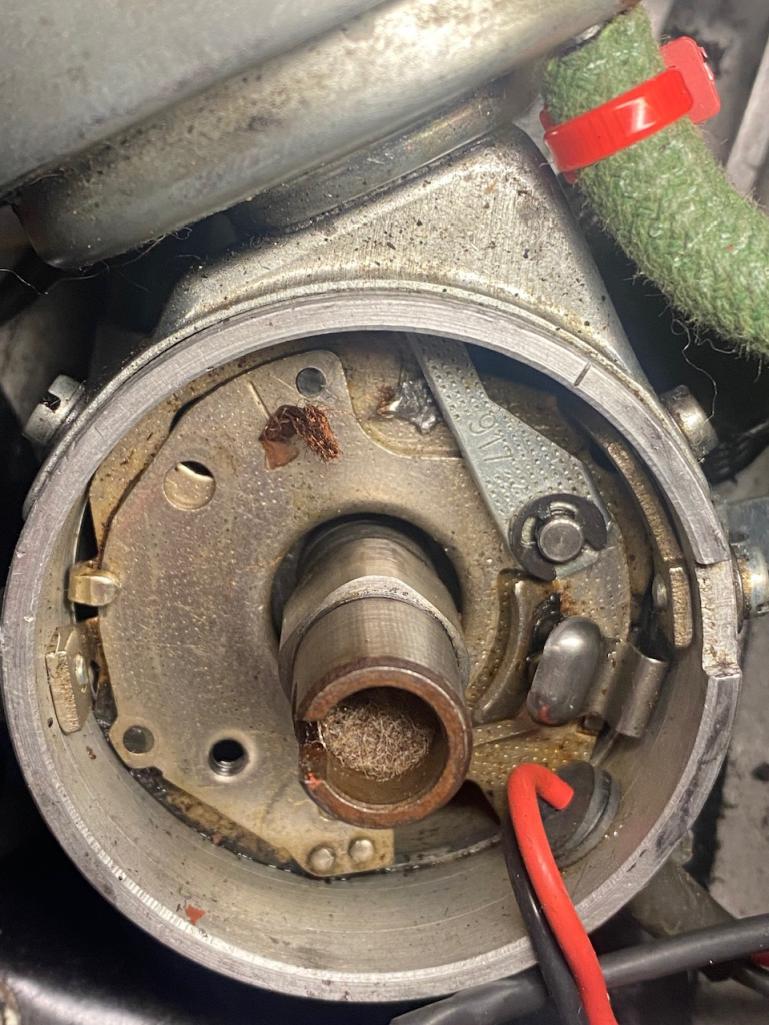
QUOTE(s13u74cr4 @ Oct 24 2026, 01:34 PM) . I notice the little ground wire is essentially gone. Does it not use one? Yes you need the braided ground strap between the sliding points / Pertronix plate and the fixed portion below it that physically connects to the distributor body which then connects to the engine case. Your ground path is now dependent on an intermittent ground between moving plates. |
|
|
|
| s13u74cr4 |
Nov 6 2026, 10:49 AM
Post
#14
|
|
Member Group: Members Posts: 61 Joined: 2-September 23 From: PNW Member No.: 27,558 Region Association: Pacific Northwest |
Took out the Petronix and the ground is gone. I read a few threads where it was said you didn’t need it with the ignition. Their manual says you do.
 |
|
|
|
| Superhawk996 |
Nov 6 2026, 12:03 PM
Post
#15
|
|
914 Guru Group: Members Posts: 8,177 Joined: 25-August 18 From: Woods of N. Idaho Member No.: 22,428 Region Association: Galt's Gulch
|
QUOTE(s13u74cr4 @ Nov 6 2026, 12:49 PM) I read a few threads where it was said you didn’t need it with the ignition. Unless those threads explain where the ground is supposed to come from you can pretty much rest assured they are (IMG:style_emoticons/default/bs.gif) Every wiring diagram I’ve seen for a Pertronix needs a ground. Boggles my mind how many people won’t follow the manufacturer directions. (Not referring to OP - mean bogus information all over the internet) I’ve soldered a few of these in the past. Desoldering braid (without flux embedded in it) works well for the ground strap. The biggest problem is getting enough heat into the plates to flow solder. A high watt soldering gun is what I’ve had luck with. |
|
|
|
| emerygt350 |
Nov 6 2026, 04:09 PM
Post
#16
|
|
Advanced Member Group: Members Posts: 3,818 Joined: 20-July 21 From: Upstate, NY Member No.: 25,740 Region Association: North East States |
Why on earth would you remove it to begin with?
|
|
|
|
| Superhawk996 |
Nov 6 2026, 09:11 PM
Post
#17
|
|
914 Guru Group: Members Posts: 8,177 Joined: 25-August 18 From: Woods of N. Idaho Member No.: 22,428 Region Association: Galt's Gulch
|
QUOTE(emerygt350 @ Nov 6 2026, 06:09 PM) Why on earth would you remove it to begin with? Just extra parts. Every good Murican’ shade tree mechanic knows the Germans just put extra stuff on these cars that isn’t needed. (IMG:style_emoticons/default/av-943.gif) (IMG:style_emoticons/default/happy11.gif) |
|
|
|
| s13u74cr4 |
Nov 8 2026, 11:56 PM
Post
#18
|
|
Member Group: Members Posts: 61 Joined: 2-September 23 From: PNW Member No.: 27,558 Region Association: Pacific Northwest |
QUOTE(Superhawk996 @ Nov 6 2026, 10:03 AM) QUOTE(s13u74cr4 @ Nov 6 2026, 12:49 PM) I read a few threads where it was said you didn’t need it with the ignition. Unless those threads explain where the ground is supposed to come from you can pretty much rest assured they are :bullshit: Every wiring diagram I’ve seen for a Pertronix needs a ground. Boggles my mind how many people won’t follow the manufacturer directions. (Not referring to OP - mean bogus information all over the internet) I’ve soldered a few of these in the past. Desoldering braid (without flux embedded in it) works well for the ground strap. The biggest problem is getting enough heat into the plates to flow solder. A high watt soldering gun is what I’ve had luck with. Couple different threads where I got it wasn’t needed from. In case it confuses others. www.914world.com/bbs2/index.php?showtopic=305819 www.914world.com/bbs2/index.php?showtopic=322066 |
|
|
|
| emerygt350 |
Nov 9 2026, 07:02 AM
Post
#19
|
|
Advanced Member Group: Members Posts: 3,818 Joined: 20-July 21 From: Upstate, NY Member No.: 25,740 Region Association: North East States |
So you are saying this isn't what is causing your hiccup? Have you checked out the connections at the coil and on the way there? Is there some way to test the pertronix unit?
|
|
|
|
| Superhawk996 |
Nov 9 2026, 09:28 AM
Post
#20
|
|
914 Guru Group: Members Posts: 8,177 Joined: 25-August 18 From: Woods of N. Idaho Member No.: 22,428 Region Association: Galt's Gulch
|
QUOTE(s13u74cr4 @ Nov 9 2026, 01:56 AM) QUOTE(Superhawk996 @ Nov 6 2026, 10:03 AM) QUOTE(s13u74cr4 @ Nov 6 2026, 12:49 PM) I read a few threads where it was said you didn’t need it with the ignition. Unless those threads explain where the ground is supposed to come from you can pretty much rest assured they are (IMG:style_emoticons/default/bs.gif) Every wiring diagram I’ve seen for a Pertronix needs a ground. Boggles my mind how many people won’t follow the manufacturer directions. (Not referring to OP - mean bogus information all over the internet) I’ve soldered a few of these in the past. Desoldering braid (without flux embedded in it) works well for the ground strap. The biggest problem is getting enough heat into the plates to flow solder. A high watt soldering gun is what I’ve had luck with. Couple different threads where I got it wasn’t needed from. In case it confuses others. www.914world.com/bbs2/index.php?showtopic=305819 www.914world.com/bbs2/index.php?showtopic=322066 Let’s close this out with the “why” and review how it works. Here’s the overview of the wiring for a Pertronix: 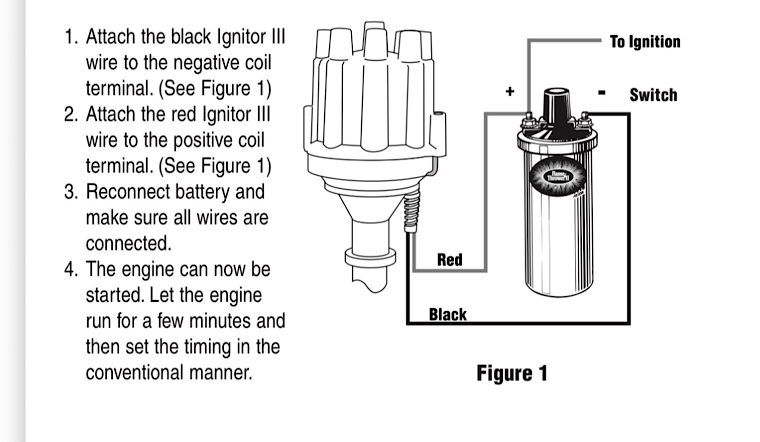 The red wire is +12v power into the Pertronix The black wire coming out of the Pertronix is what controls the coil - it goes to the coil (-) terminal just like the points used to. This black wire is a switched ground that performs the same switching function as the points. This black wire is not a chassis ground. So where does the Pertronix get the chassis ground to switch to control the coil or to power the Pertronix? That chassis ground is coming from the engine case up through the distributor body, then crosses over the braided ground wire between the fixed distributor body and the moving points plate that the Pertronix is mounted to. Without this chassis ground from the engine case, there is no ground for the Pertronix to switch. The reality is that you will get a partial ground without the braided ground strap but it isn’t a solid, reliable ground. It depends on incidental contact between the distributor fixed plate and the moving plate. This isn’t an acceptable ground path for anything electronic. Here are the Pertronix instructions (see #10) that reference the need for the original ground to be retained and that the distributor body is the chassis ground. 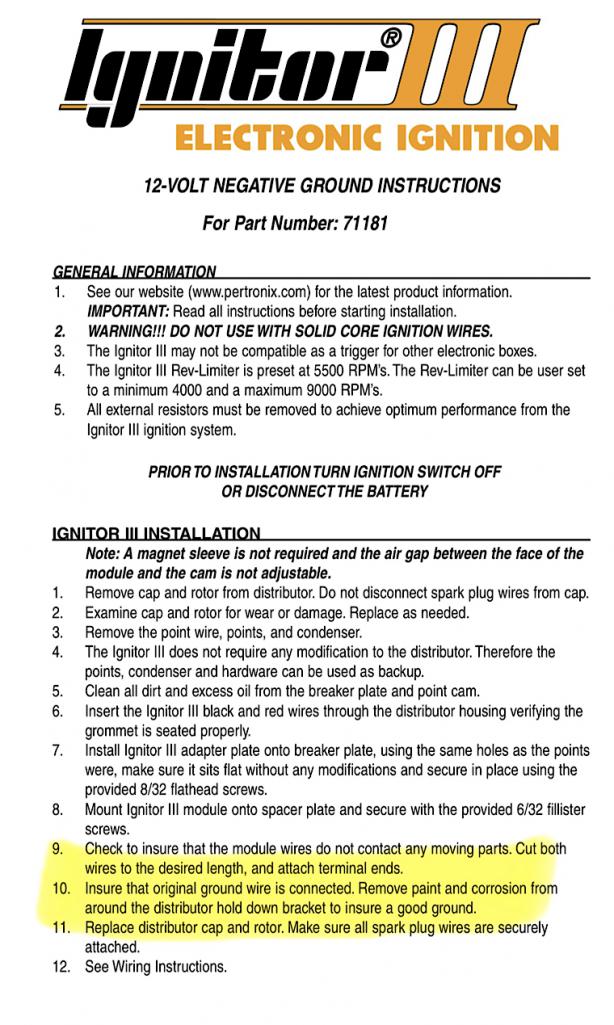 Now let’s modify the original picture to capture the whole circuit including the implied chassis ground that is the distributor body. 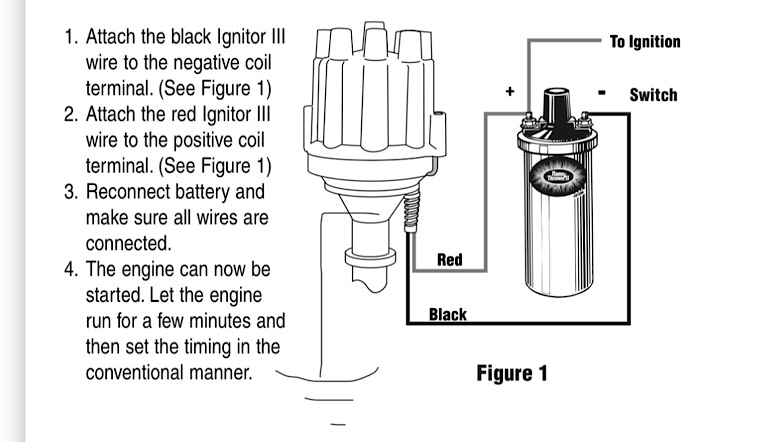 |
|
|
|
|
3 User(s) are reading this topic (3 Guests and 0 Anonymous Users)
0 Members:

|
Lo-Fi Version | Time is now: 10th November 2026 - 07:04 AM |
Invision Power Board
v9.1.4 © 2026 IPS, Inc.