|
|
|
Porsche, and the Porsche crest are registered trademarks of Dr. Ing. h.c. F. Porsche AG.
This site is not affiliated with Porsche in any way. Its only purpose is to provide an online forum for car enthusiasts. All other trademarks are property of their respective owners. |
|
|

  |

| andys |
 Dec 1 2005, 11:03 AM Dec 1 2005, 11:03 AM
Post
#1
|
|
Advanced Member  Group: Members Posts: 2,165 Joined: 21-May 03 From: Valencia, CA Member No.: 721 Region Association: None |
Thought I'd take a few pic's of how I installed my 7" & 9" f'glass flares. I'll start with the results of the past Thanksgiving weekend.
This is where I finished. Flares are mounted with sheet metal screws (Tek-screws), and not bonded in place. Thanks goes to 914 neighbor, Dave, for all his help. Andys Attached thumbnail(s) 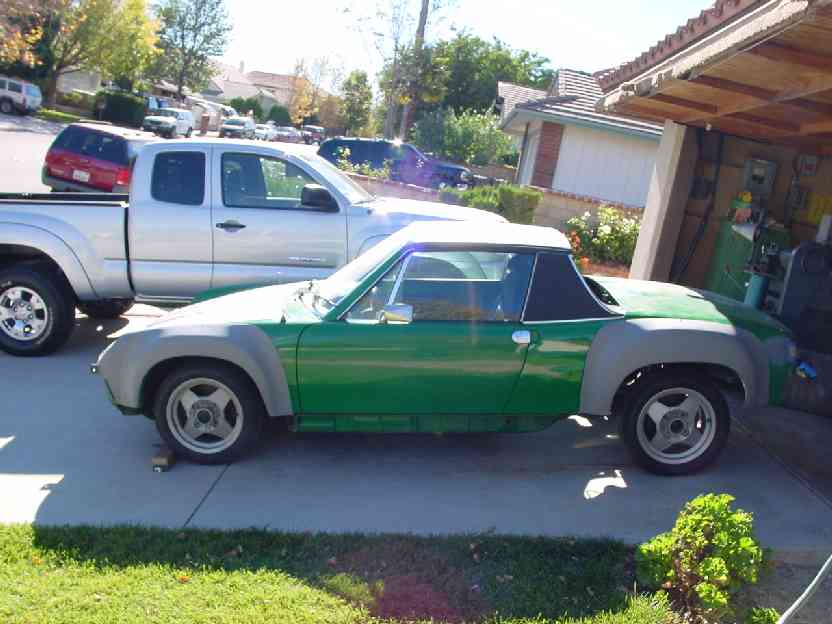
|
   |

 
|
| andys |
Dec 1 2005, 11:08 AM
Post
#2
|
|
Advanced Member Group: Members Posts: 2,165 Joined: 21-May 03 From: Valencia, CA Member No.: 721 Region Association: None |
I first ground the inside of the flares to ensure a uniformwall thickness so that the edges would lay flat against the body. Also, I made sure that the outer perifery was the same, right to left (they were different, so trimming was required).
Attached thumbnail(s) 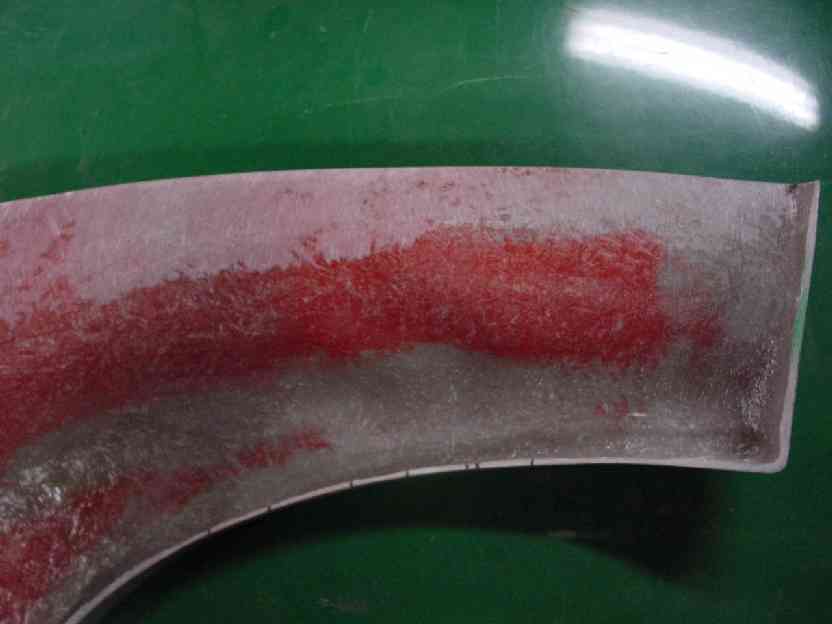
|
|
|
|
| andys |
Dec 1 2005, 11:10 AM
Post
#3
|
|
Advanced Member Group: Members Posts: 2,165 Joined: 21-May 03 From: Valencia, CA Member No.: 721 Region Association: None |
In this pic, the lines are scribed with a felt marker. First, the perifery, then again 1" inside of that.
Attached thumbnail(s) 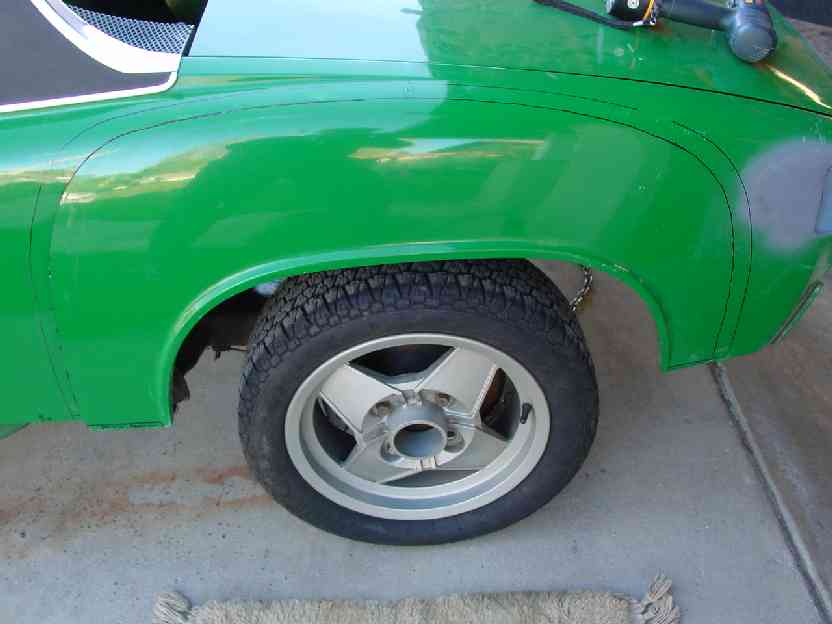
|
|
|
|
| andys |
Dec 1 2005, 11:12 AM
Post
#4
|
|
Advanced Member Group: Members Posts: 2,165 Joined: 21-May 03 From: Valencia, CA Member No.: 721 Region Association: None |
Another scribe pic of the left front.
Attached thumbnail(s) 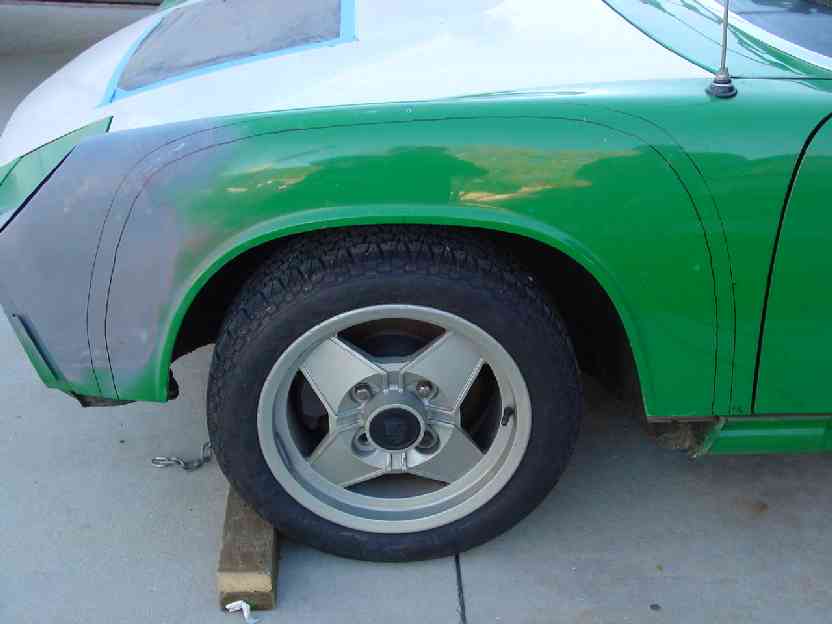
|
|
|
|
| andys |
Dec 1 2005, 11:14 AM
Post
#5
|
|
Advanced Member Group: Members Posts: 2,165 Joined: 21-May 03 From: Valencia, CA Member No.: 721 Region Association: None |
Right front fender cut out.......Somehow didn't save the rear cut out pic's???
|
|
|
|
| andys |
Dec 1 2005, 11:15 AM
Post
#6
|
|
Advanced Member Group: Members Posts: 2,165 Joined: 21-May 03 From: Valencia, CA Member No.: 721 Region Association: None |
Ooops, hit send too soon.............
Attached thumbnail(s) 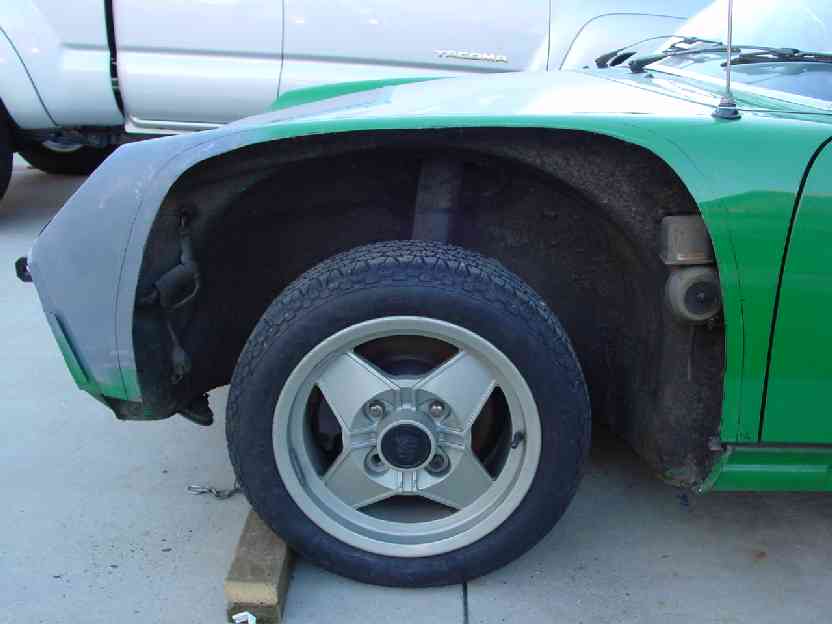
|
|
|
|
| andys |
Dec 1 2005, 11:17 AM
Post
#7
|
|
Advanced Member Group: Members Posts: 2,165 Joined: 21-May 03 From: Valencia, CA Member No.: 721 Region Association: None |
Close of left rear mounted.
Attached thumbnail(s) 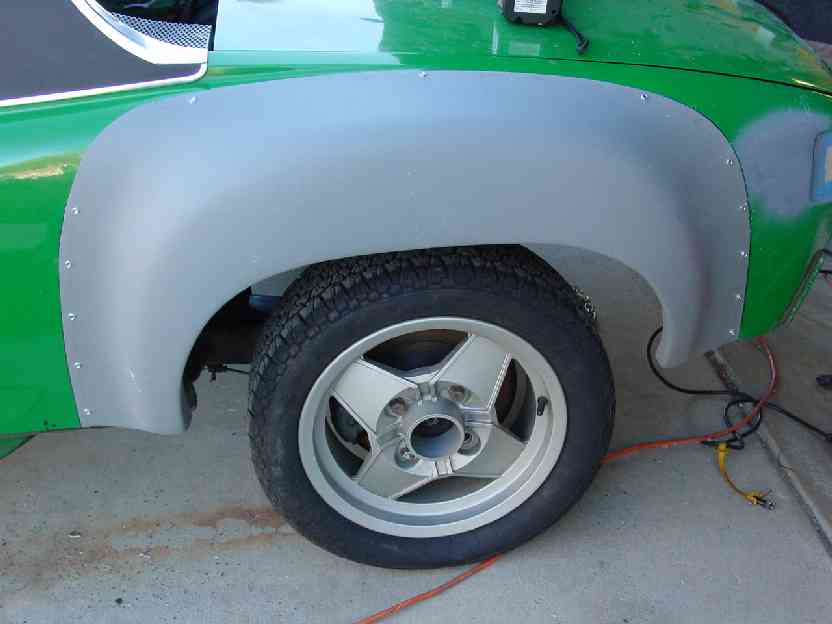
|
|
|
|
| andys |
Dec 1 2005, 11:19 AM
Post
#8
|
|
Advanced Member Group: Members Posts: 2,165 Joined: 21-May 03 From: Valencia, CA Member No.: 721 Region Association: None |
Close of left front mounted.
Attached thumbnail(s) 
|
|
|
|
| andys |
Dec 1 2005, 11:23 AM
Post
#9
|
|
Advanced Member Group: Members Posts: 2,165 Joined: 21-May 03 From: Valencia, CA Member No.: 721 Region Association: None |
Final 3/4 view......I'll post some more pic's as I progress. BTW, the right side is done as well. Sure does change the look of the car!
Andys Attached thumbnail(s) 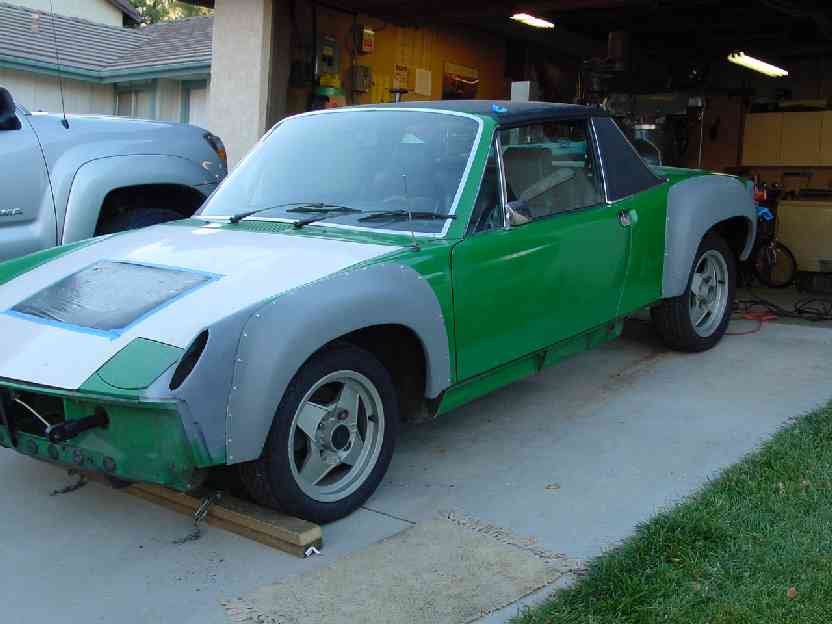
|
|
|
|
| Aaron Cox |
Dec 1 2005, 11:28 AM
Post
#10
|
|
Professional Lawn Dart Group: Retired Admin Posts: 24,541 Joined: 1-February 03 From: OC Member No.: 219 Region Association: Southern California |
nice!!! cant wait to see it done!
what wheels are those BTW? |
|
|
|
| andys |
Dec 1 2005, 11:54 AM
Post
#11
|
||
|
Advanced Member Group: Members Posts: 2,165 Joined: 21-May 03 From: Valencia, CA Member No.: 721 Region Association: None |
Aaron, Wheels are MOMO's, with 195-50's mounted on them. I think they looked pretty nice on the car before I cut it up. I'll be going to wider 993 wheels. Andy |
||
|
|
|
||
| nomore9one4 |
Dec 1 2005, 12:00 PM
Post
#12
|
|
Member of the Eastcoast Thread Killers Club Group: Members Posts: 2,666 Joined: 26-December 02 From: Pittsburgh,Pa.15237 Member No.: 14 Region Association: None |
Looks great!! Now the harder part,to blend it into the fenders. Brings back nightmares for me. (IMG:http://www.914world.com/bbs2/html/emoticons/smash.gif)
|
|
|
|
| Root_Werks |
Dec 1 2005, 12:00 PM
Post
#13
|
|
Village Idiot Group: Members Posts: 8,321 Joined: 25-May 04 From: About 5NM from Canada Member No.: 2,105 Region Association: Pacific Northwest |
Andy, looks great, I did a thread on this a while back. Looks like your following a similar pattern. I opted for screws instead of rivots. Easier to remove.
I can't wait to see the progress! (IMG:http://www.914world.com/bbs2/html/emoticons/boldblue.gif) |
|
|
|
| maf914 |
Dec 1 2005, 12:22 PM
Post
#14
|
|
Not a Guru! Group: Members Posts: 3,049 Joined: 30-April 03 From: Central Florida Member No.: 632 Region Association: None |
What type tool did you use to make the cuts? That step probably requires a few deep breaths! (IMG:http://www.914world.com/bbs2/html/emoticons/laugh.gif)
|
|
|
|
| andys |
Dec 1 2005, 02:46 PM
Post
#15
|
|
Advanced Member Group: Members Posts: 2,165 Joined: 21-May 03 From: Valencia, CA Member No.: 721 Region Association: None |
What I learned, was that there's an issue using Tekscrews (self-drilling), as the pressure required to drill the sheetmetal would push it in (in the flatter areas). The resultant hole in the sheetmetal was not aligned with the hole in the flare, and as you progressed, this would force the flare out of position. On the first attempt, the flare move nearly 1/2" by the time I progressed around to the bottom. I subsequently went to a pilot hole first. That solved the problem. Also, if you, for example, put one screw at the top, then one at each end at the bottm and then add screws in between the flare will buckle.
Hope the screws come out after I bond everything in place with epoxy. (IMG:http://www.914world.com/bbs2/html/emoticons/dry.gif) Yeah, I was apprehensive about cutting perfectly good sheet metal. I used a sabre saw with a fine tooth metal cutting blade. It cut fast and easy. I'm not looking forward to all the finish work either. I've still got to prep the back side of the sheetmetal so that I can glass the inside. Andys |
|
|
|
| john rogers |
Dec 1 2005, 03:19 PM
Post
#16
|
|
Senior Member Group: Members Posts: 1,525 Joined: 4-March 03 From: Chula Vista CA Member No.: 391 |
Looks great. When I went to put mine on I bought a pair of Cleco pliers and a couple of dozen of the clamps and they hold things together amazingly well. Racer Parts Wholesale has them and they will most definately keep the upper fiberglass together with the underlying sheetmetal. I used tape to hold it for the first drill and then just progressed around the outside of the flare.
|
|
|
|
| Andyrew |
Dec 1 2005, 03:32 PM
Post
#17
|
|
Spooling.... Please wait Group: Members Posts: 13,376 Joined: 20-January 03 From: Riverbank, Ca Member No.: 172 Region Association: Northern California |
I see radiator cutout and hood vent...
What engine?? Looks good! |
|
|
|
| nomore9one4 |
Dec 1 2005, 03:38 PM
Post
#18
|
||
|
Member of the Eastcoast Thread Killers Club Group: Members Posts: 2,666 Joined: 26-December 02 From: Pittsburgh,Pa.15237 Member No.: 14 Region Association: None |
Thats so the squirrels can breathe! (IMG:http://www.914world.com/bbs2/html/emoticons/biggrin.gif) |
||
|
|
|
||
| andys |
Dec 1 2005, 05:22 PM
Post
#19
|
||
|
Advanced Member Group: Members Posts: 2,165 Joined: 21-May 03 From: Valencia, CA Member No.: 721 Region Association: None |
Andyrew, Yet to be acquired LS1. Hood venting will look like this: Attached thumbnail(s) 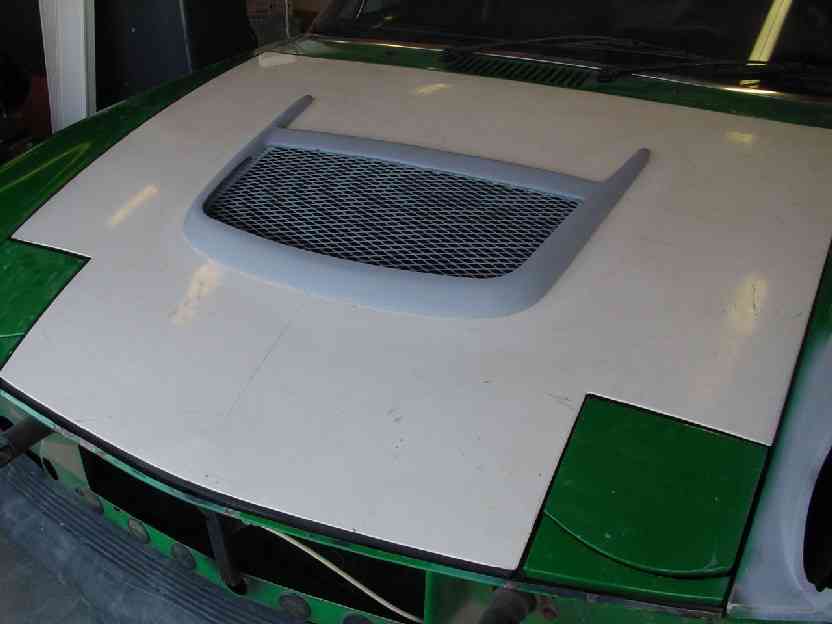
|
||
|
|
|
||
| Andyrew |
Dec 1 2005, 06:36 PM
Post
#20
|
|
Spooling.... Please wait Group: Members Posts: 13,376 Joined: 20-January 03 From: Riverbank, Ca Member No.: 172 Region Association: Northern California |
Interesting...
Where did you get that piece? Will you be running ducting or just open trunk? Looking very cool! I have 2 hoods to fool around with.. Im playing with louvers and ducting in my head.. Still undecided. |
|
|
|
|
1 User(s) are reading this topic (1 Guests and 0 Anonymous Users)
0 Members:

|
Lo-Fi Version | Time is now: 17th May 2024 - 11:52 PM |
Invision Power Board
v9.1.4 © 2024 IPS, Inc.