|
|
|
Porsche, and the Porsche crest are registered trademarks of Dr. Ing. h.c. F. Porsche AG.
This site is not affiliated with Porsche in any way. Its only purpose is to provide an online forum for car enthusiasts. All other trademarks are property of their respective owners. |
|
|

  |

| watsonrx13 |
 Dec 14 2005, 07:34 PM Dec 14 2005, 07:34 PM
Post
#1
|
|
Advanced Member  Group: Members Posts: 2,735 Joined: 18-February 03 From: Plant City, FL Member No.: 312 Region Association: South East States |
Well, I'm in the process of dismantling one of my parts car and I've decided to document the steps used to remove the dash top.
I began removing the top dash pad by removing the instrument cluster. If you haven't removed the steering wheel and knee pad, do that now. Next, remove the 4 screws that hold the cluster to the dash. Now, just pull the cluster forward, without removing the electrical connections. I have removed the cluster completely from the car because I'm stripping it. You don't have to do this to remove the dash top. This post has been edited by watsonrx13: Dec 14 2005, 08:08 PM Attached image(s) 
|
   |

 
|
| watsonrx13 |
Dec 14 2005, 07:34 PM
Post
#2
|
|
Advanced Member Group: Members Posts: 2,735 Joined: 18-February 03 From: Plant City, FL Member No.: 312 Region Association: South East States |
This shows the steering wheel and instrumentation cluster removed. Again, I did this because I'm stipping the car and to be able to better photograph the location of the nuts/bolts.
This post has been edited by watsonrx13: Dec 14 2005, 08:10 PM Attached image(s) 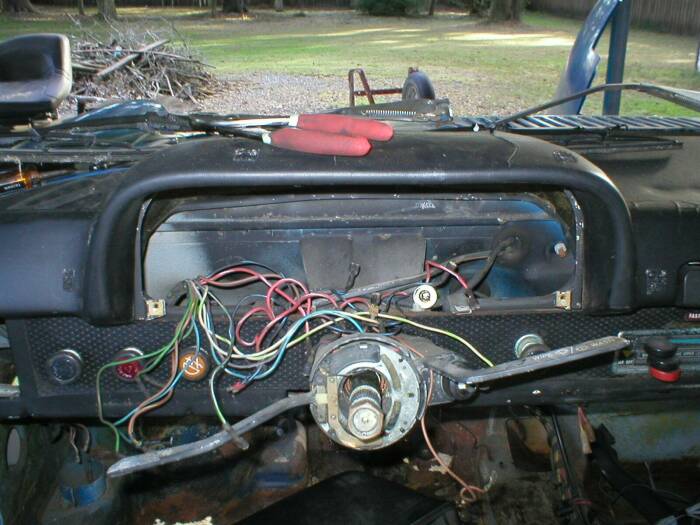
|
|
|
|
| watsonrx13 |
Dec 14 2005, 07:34 PM
Post
#3
|
|
Advanced Member Group: Members Posts: 2,735 Joined: 18-February 03 From: Plant City, FL Member No.: 312 Region Association: South East States |
Once the cluster is out of the way, you can remove the 2 plastic nuts that are directly behind the instruments on the 'hump' section.
Attached image(s) 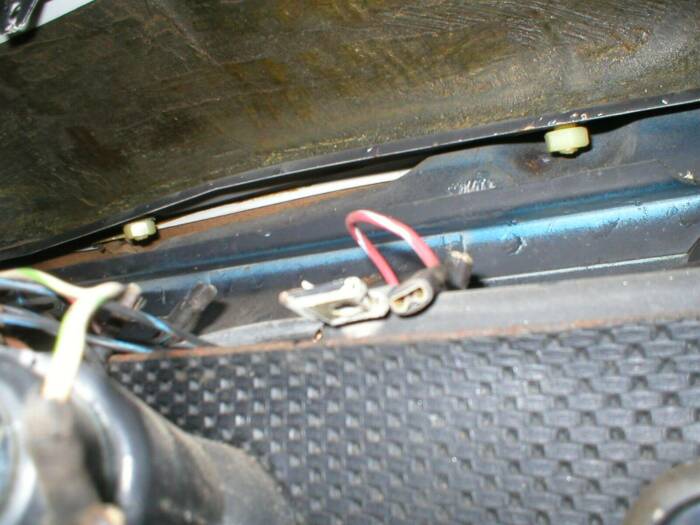
|
|
|
|
| watsonrx13 |
Dec 14 2005, 07:35 PM
Post
#4
|
|
Advanced Member Group: Members Posts: 2,735 Joined: 18-February 03 From: Plant City, FL Member No.: 312 Region Association: South East States |
There are 2 nuts that need to be removed from this area. There is one that is directly above this opening, facing towards the front of the car. The next one is just to the right of the opening, facing down.
Attached image(s) 
|
|
|
|
| watsonrx13 |
Dec 14 2005, 07:35 PM
Post
#5
|
|
Advanced Member Group: Members Posts: 2,735 Joined: 18-February 03 From: Plant City, FL Member No.: 312 Region Association: South East States |
The next one is between the 'hump' and the ashtray. This shows the nut looking in from the cluster opening. This one is pointing down.
Attached image(s) 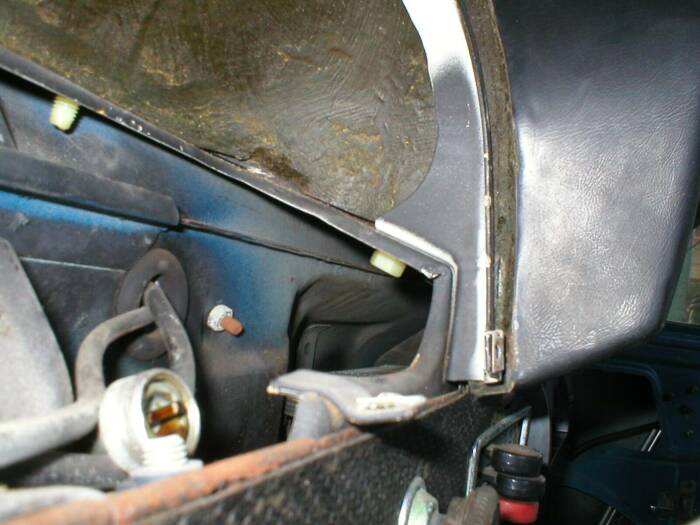
|
|
|
|
| watsonrx13 |
Dec 14 2005, 07:36 PM
Post
#6
|
|
Advanced Member Group: Members Posts: 2,735 Joined: 18-February 03 From: Plant City, FL Member No.: 312 Region Association: South East States |
Next I removed the ashtray. This isn't necessary, but since I'm stripping the car I just wanted it out of the way. I also removed the radio.
Attached image(s) 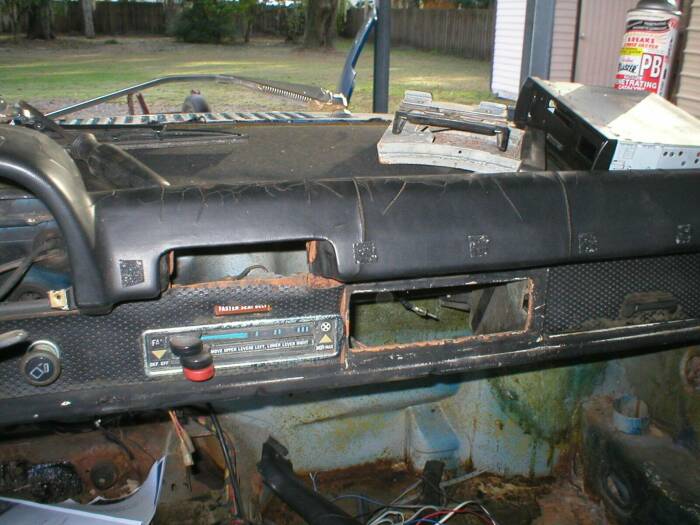
|
|
|
|
| watsonrx13 |
Dec 14 2005, 07:36 PM
Post
#7
|
|
Advanced Member Group: Members Posts: 2,735 Joined: 18-February 03 From: Plant City, FL Member No.: 312 Region Association: South East States |
This shows the next 2 nuts. There is one directly above the radio opening, near the driver's side, pointing forward. The other one is just off center of the radio opening, pointing down. This shot is from underneath the dash. The large dark rectangle is the radio opening.
Attached image(s) 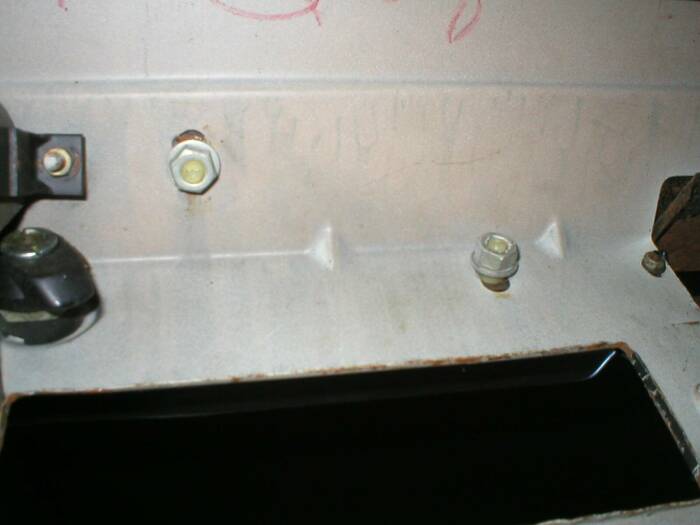
|
|
|
|
| watsonrx13 |
Dec 14 2005, 07:36 PM
Post
#8
|
|
Advanced Member Group: Members Posts: 2,735 Joined: 18-February 03 From: Plant City, FL Member No.: 312 Region Association: South East States |
Next I removed the glove box. Begin by removing the small nut, facing down. This holds the metal strap that wraps around the box.
Attached image(s) 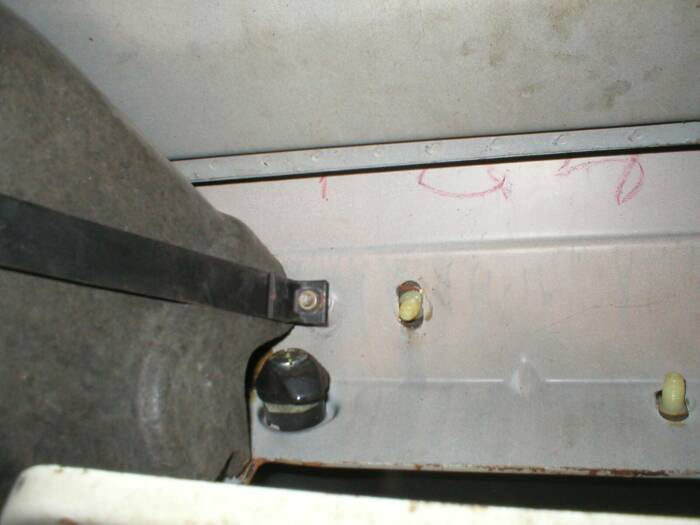
|
|
|
|
| watsonrx13 |
Dec 14 2005, 07:37 PM
Post
#9
|
|
Advanced Member Group: Members Posts: 2,735 Joined: 18-February 03 From: Plant City, FL Member No.: 312 Region Association: South East States |
Before removing the glove box, remove the spring, seen here through the vent opening. Finally, move the metal strap out of the way and carefully push the glove box, with its door, towards the front of the car. The box will be removed from underneath the dash.
Attached image(s) 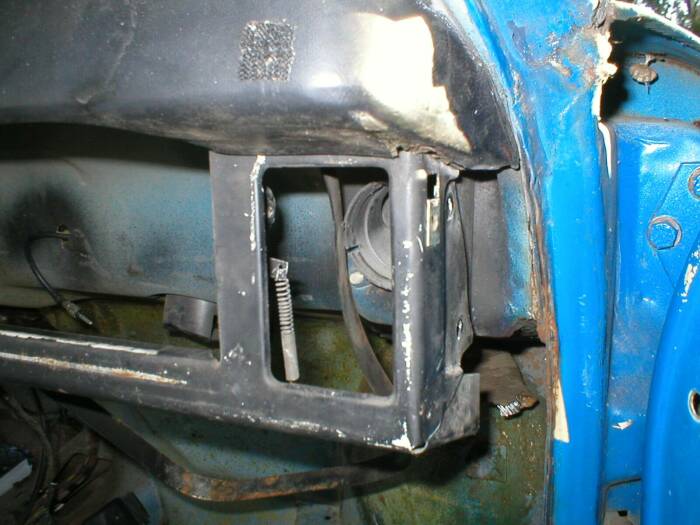
|
|
|
|
| watsonrx13 |
Dec 14 2005, 07:37 PM
Post
#10
|
|
Advanced Member Group: Members Posts: 2,735 Joined: 18-February 03 From: Plant City, FL Member No.: 312 Region Association: South East States |
The last 2 nuts can now be removed. Both are directly above the vent opening. One is facing down, the other is facing forward.
Attached image(s) 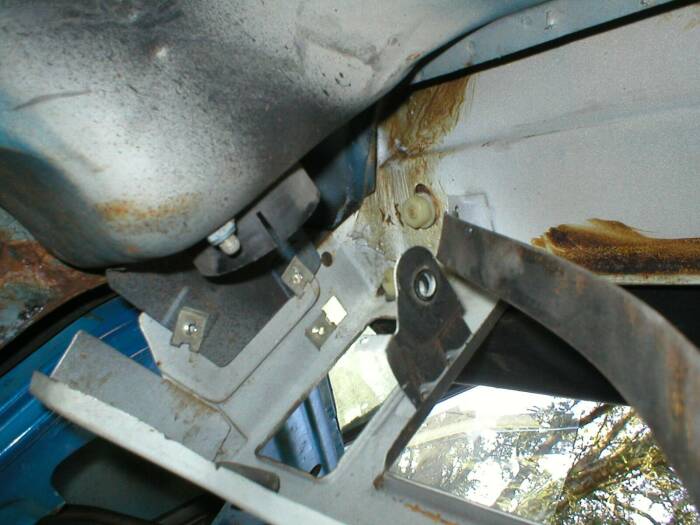
|
|
|
|
| watsonrx13 |
Dec 14 2005, 07:38 PM
Post
#11
|
|
Advanced Member Group: Members Posts: 2,735 Joined: 18-February 03 From: Plant City, FL Member No.: 312 Region Association: South East States |
Now, carefully pull the dash top up. There are 9 nuts that need to be removed. If you don't have 9 and there is some resistance, stop and find the ones that are still attached. Here's the dash top removed.
Attached image(s) 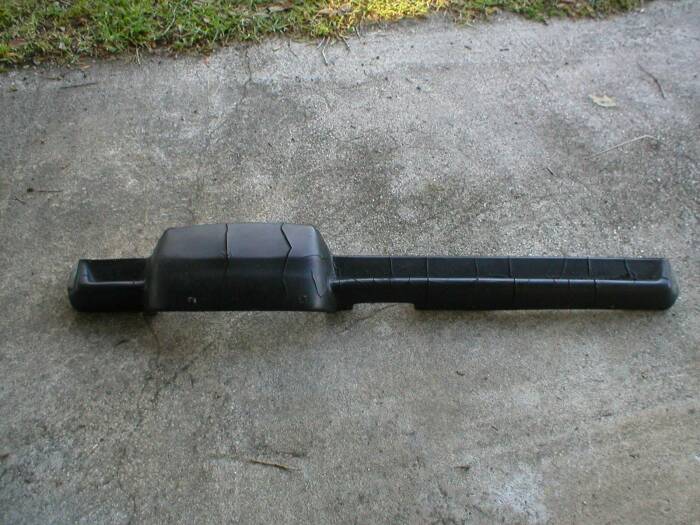
|
|
|
|
| watsonrx13 |
Dec 14 2005, 07:38 PM
Post
#12
|
|
Advanced Member Group: Members Posts: 2,735 Joined: 18-February 03 From: Plant City, FL Member No.: 312 Region Association: South East States |
This shows the plastic bolts on the passenger side.
Attached image(s) 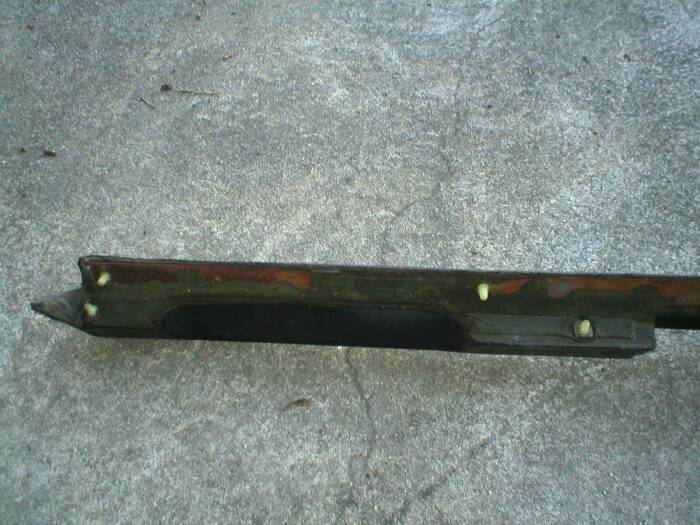
|
|
|
|
| watsonrx13 |
Dec 14 2005, 07:38 PM
Post
#13
|
|
Advanced Member Group: Members Posts: 2,735 Joined: 18-February 03 From: Plant City, FL Member No.: 312 Region Association: South East States |
This shows the bolts around the ash tray.
Attached image(s) 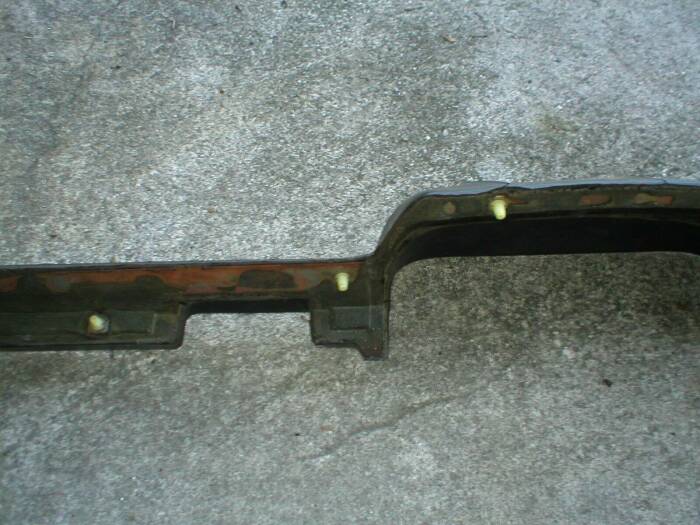
|
|
|
|
| watsonrx13 |
Dec 14 2005, 07:39 PM
Post
#14
|
|
Advanced Member Group: Members Posts: 2,735 Joined: 18-February 03 From: Plant City, FL Member No.: 312 Region Association: South East States |
This shows the bolts on the driver's side.
Attached image(s) 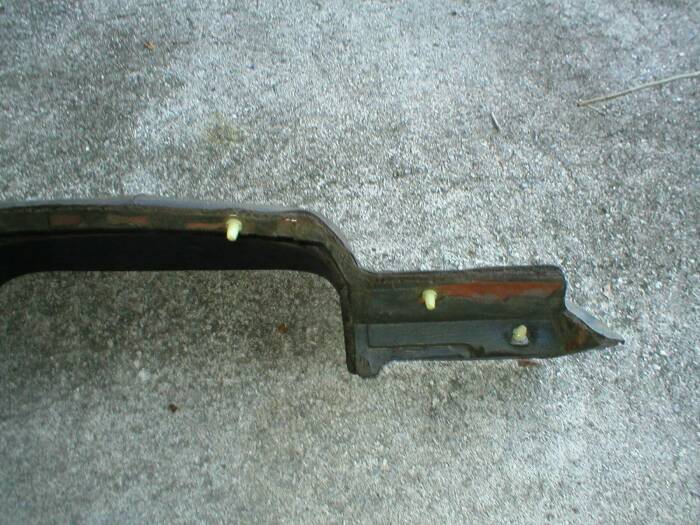
|
|
|
|
| boxstr |
Dec 14 2005, 07:41 PM
Post
#15
|
|
MEMBER:PACIFIC NORTHWEST REGION Group: Members Posts: 7,522 Joined: 25-December 02 From: OREGON Member No.: 12 Region Association: Pacific Northwest |
Looks like a valiant effort to document the procedure of dash pad removal 101. Let me state a couple of things. I have removed many dash tops but never completely removed the gauge cluster. Just pull out far enough to get the two SOB nuts at the top of the hump.
The removal of the two screws on the side is only needed if you are removing the complete dash assembly. It would be very benificial for newbies to know the tools you are using for this operation. Thank you . CCLINDASHINGTHROUGHTHESNOW |
|
|
|
| grasshopper |
Dec 14 2005, 07:44 PM
Post
#16
|
|
Advanced Member Group: Members Posts: 2,613 Joined: 10-December 04 From: Valdosta, GA Member No.: 3,258 Region Association: None |
cool, i needed to know how to take that off! (IMG:http://www.914world.com/bbs2/html/emoticons/smile.gif)
|
|
|
|
| watsonrx13 |
Dec 14 2005, 07:48 PM
Post
#17
|
||
|
Advanced Member Group: Members Posts: 2,735 Joined: 18-February 03 From: Plant City, FL Member No.: 312 Region Association: South East States |
Craig, thanks for pointing several things out. I've modified the post to better reflect a removal only of the dash top. Thanks again for the positive comments. BTW, the plastic nuts are 13mm....Other than a small socket wrench, I used a small crescent wrench on the glove box nut.... |
||
|
|
|
||
| tat2dphreak |
Dec 14 2005, 08:35 PM
Post
#18
|
|
stoya, stoya, stoya Group: Benefactors Posts: 8,797 Joined: 6-June 03 From: Wylie, TX Member No.: 792 Region Association: Southwest Region |
I used a ratchet that can be actuateed by turning the handle... HF has them for under $20... it really saved some coins in the cuss jar...
great procedure, this is a definate classic thread! |
|
|
|
| r_towle |
Dec 14 2005, 08:41 PM
Post
#19
|
|
Custom Member Group: Members Posts: 24,705 Joined: 9-January 03 From: Taxachusetts Member No.: 124 Region Association: North East States |
ok, great, put it in the tech articles at the top under 914 info...
Rich |
|
|
|
| grasshopper |
Dec 14 2005, 09:39 PM
Post
#20
|
||
|
Advanced Member Group: Members Posts: 2,613 Joined: 10-December 04 From: Valdosta, GA Member No.: 3,258 Region Association: None |
(IMG:http://www.914world.com/bbs2/html/emoticons/agree.gif) we need more tech articles... im working on some (IMG:http://www.914world.com/bbs2/html/emoticons/wink.gif) |
||
|
|
|
||
|
1 User(s) are reading this topic (1 Guests and 0 Anonymous Users)
0 Members:

|
Lo-Fi Version | Time is now: 28th July 2026 - 02:09 AM |
Invision Power Board
v9.1.4 © 2026 IPS, Inc.