|
|
|
Porsche, and the Porsche crest are registered trademarks of Dr. Ing. h.c. F. Porsche AG.
This site is not affiliated with Porsche in any way. Its only purpose is to provide an online forum for car enthusiasts. All other trademarks are property of their respective owners. |
|
|


| nick mironov |
 Jan 15 2006, 12:58 PM Jan 15 2006, 12:58 PM
Post
#1
|
|
nickm  Group: Members Posts: 204 Joined: 12-June 05 From: San Francisco, CA Member No.: 4,264 |
My conversion took approximately 5 months of work to get the engine in and get the car on the road. Another 18 months for further work and improvements. Thanks very much to the 914 Club Forum and those who posted their conversion information and to those who responded to my questions, and special thanks to the club members who attended the V8 conversion meeting in Pleasanton in September 05 and shared their valuable knowledge with me.
If anyone is interested in seeing the car, I live in the Richmond District of San Francisco. Project Specs: 1975 1.8L 914 Renegade conversion kit Chevy 283 Vortec heads Compcam 260H New cam bearings 0.060 cylinder overbore New rods and pistons (9.5:1 compression ratio) New main and rod bearings Replaced all gaskets and freeze plugs New high volume oil pump MSD Billet HEI distributor Holley 4 barrel carburetor Treated miscl rust with OSPHO and Por 15 paint Herculiner truck bed liner in front and engine compartments 911 19mm master brake cylinder upgrade BMW 320i front caliper upgrade to start with, M-caliper upgrade using hubs by Mueller Stainless steel flex brake hose upgrade Replaced rear brake proportioning valve with TEE. Rebuilt rear brake calipers Pedal cluster bushings upgrade to brass (from existing plastic) Replaced transmission shifter bushings Replaced transmission seals Weltmeister short-shifter WEVO transmission mounts 9” Kevlar clutch New Bilstein rear shocks and bellows/boots. Electric fuel pump – Carter CRT-P4070 5 psi, 72 gph New / custom throttle cable HP mini-starter 2-gauge wire to starter Ron Davis Radiator with two 13”diameter SPAL fans (Renegade set-up) Renegade bypass thermostat system VDO Water temperature gauge VDO Oil pressure gauge VDO Oil temperature gauge (original) Tachometer upgrade by bigmarkdesign Oil Cooler Center console Rear trunk strut conversion kit – Camp 914 Magnaflow dual-in dual-out muffler Body work and re-paint Power mirrors from Honda del Sol Rear wing from Toyota MR-2 Interior seat and backpad kits by Autos International Carpets by Morph Towbar for flat towing with integral wiring harness 16" 4-lug Superlight wheels from Pack Racing Products BF Goodrich G-Force Sport 205/55/16. The dyno tests were done this 8/24/2008 at the Thunderhill dyno. At max rpm of about 6,250 the dynamometer showed a speed of 153 mph. On the track we got it up to about 125 mph. However, it threw a water pump belt a couple of times. I think that there is too much flex in the Renegade water pump mount, so I need to reinforce it. At rear wheels: 263 ft-lb torque, 241 hp. Engine: Assuming a 15% loss through the transmission, the engine would have about: 302 ft-lb torque, 277 hp. Maybe more if the test was done on a motor dyno stand without water pump, alternator, and muffler. Without air filter: 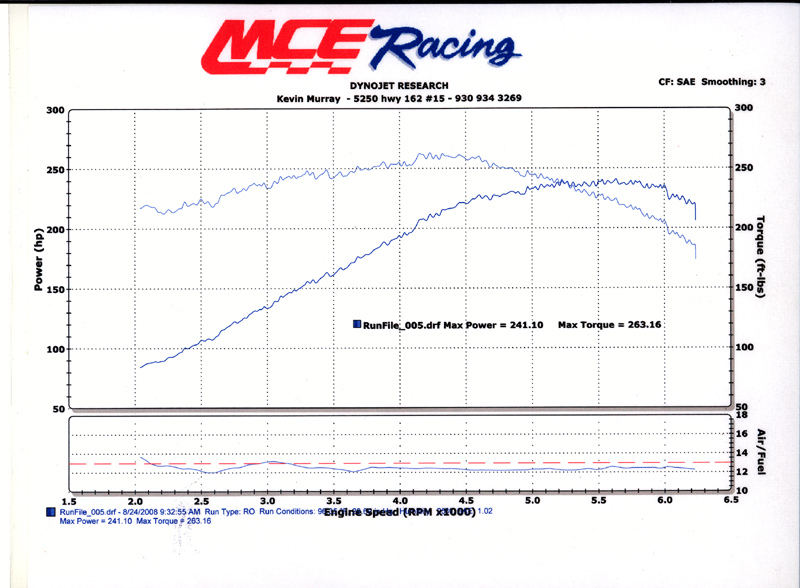 With and without air filter: 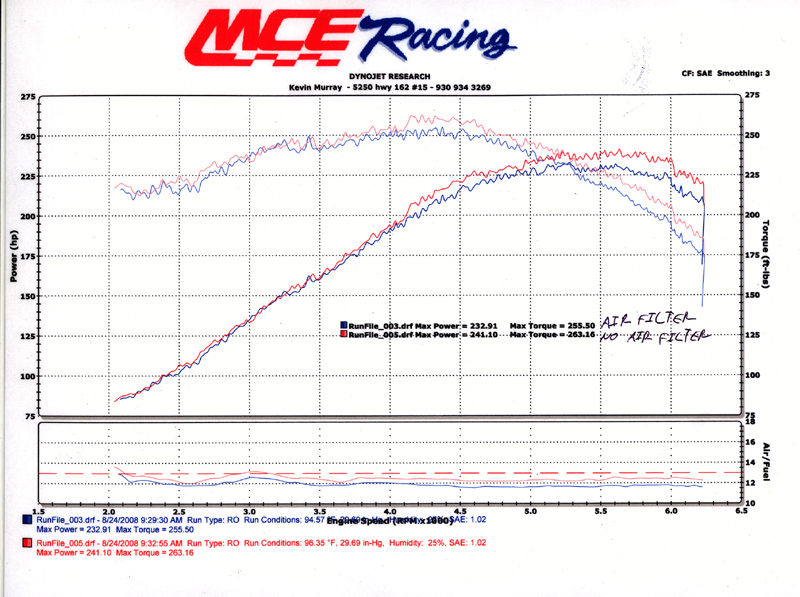 |
   |

 
|
  |
Replies(1 - 19)
| nick mironov |
Jan 15 2006, 12:59 PM
Post
#2
|
|
nickm Group: Members Posts: 204 Joined: 12-June 05 From: San Francisco, CA Member No.: 4,264 |
I bought the car in June 05, ordered and collected enough parts to start, and removed the engine at the end of August.
Attached image(s) 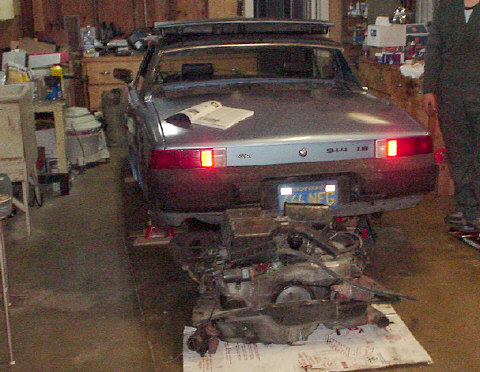
|
|
|
|
| nick mironov |
Jan 15 2006, 01:00 PM
Post
#3
|
|
nickm Group: Members Posts: 204 Joined: 12-June 05 From: San Francisco, CA Member No.: 4,264 |
Started on the radiator first:
Attached image(s) 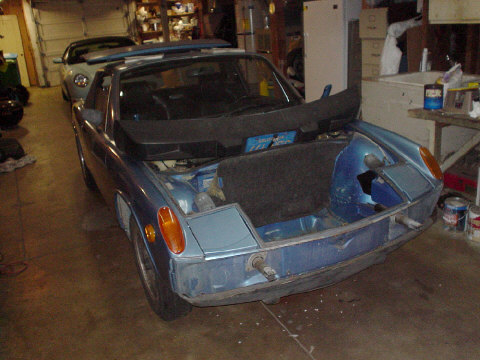
|
|
|
|
| nick mironov |
Jan 15 2006, 01:01 PM
Post
#4
|
|
nickm Group: Members Posts: 204 Joined: 12-June 05 From: San Francisco, CA Member No.: 4,264 |
Cut the front and isntalled the radiator and shroud:
Attached image(s) 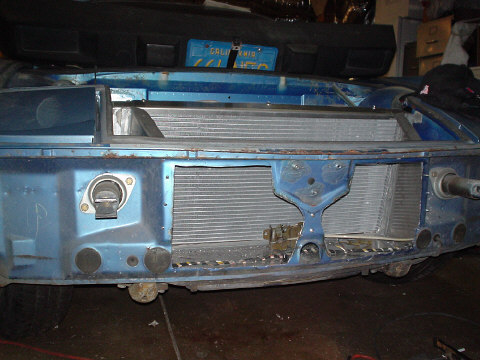
|
|
|
|
| neo914-6 |
Jan 15 2006, 01:02 PM
Post
#5
|
|
neo life Group: Members Posts: 5,086 Joined: 16-January 03 From: Willow Glen (San Jose) Member No.: 159 |
Nick,
Great job, another Bay Area conversion! (IMG:http://www.914world.com/bbs2/html/emoticons/clap.gif) (IMG:http://www.914world.com/bbs2/html/emoticons/smilie_pokal.gif) FYI, We have another "member" who bought Renegades flagship "Peal". A conversion meet this summer will be huge! |
|
|
|
| nick mironov |
Jan 15 2006, 01:03 PM
Post
#6
|
|
nickm Group: Members Posts: 204 Joined: 12-June 05 From: San Francisco, CA Member No.: 4,264 |
Another view of the radiator:
Attached image(s) 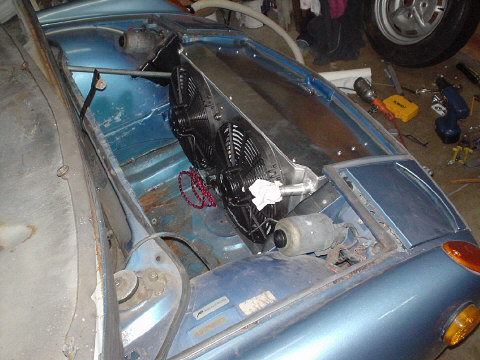
|
|
|
|
| nick mironov |
Jan 15 2006, 01:03 PM
Post
#7
|
|
nickm Group: Members Posts: 204 Joined: 12-June 05 From: San Francisco, CA Member No.: 4,264 |
Cut the bumper:
Attached image(s) 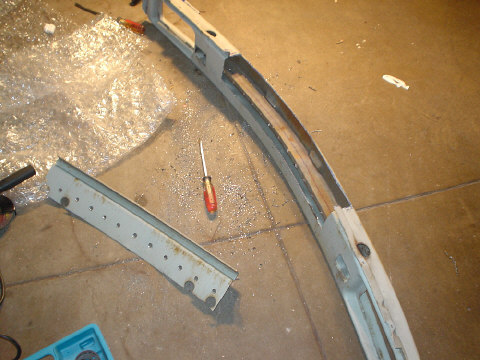
|
|
|
|
| nick mironov |
Jan 15 2006, 01:04 PM
Post
#8
|
|
nickm Group: Members Posts: 204 Joined: 12-June 05 From: San Francisco, CA Member No.: 4,264 |
Finished front:
Attached image(s) 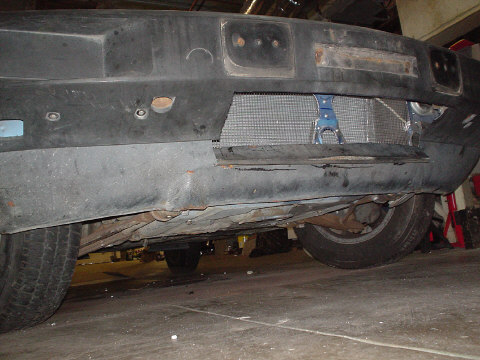
|
|
|
|
| nick mironov |
Jan 15 2006, 01:05 PM
Post
#9
|
|
nickm Group: Members Posts: 204 Joined: 12-June 05 From: San Francisco, CA Member No.: 4,264 |
Removed gas tank and cleaned up the rust within the compartment:
Attached image(s) 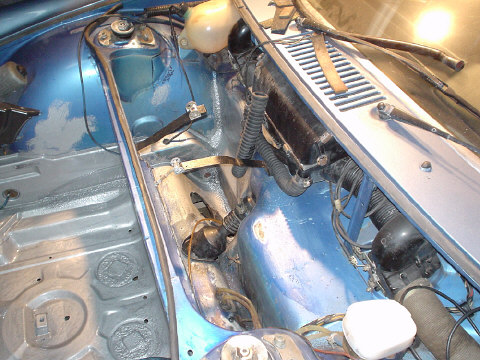
|
|
|
|
| nick mironov |
Jan 15 2006, 01:06 PM
Post
#10
|
|
nickm Group: Members Posts: 204 Joined: 12-June 05 From: San Francisco, CA Member No.: 4,264 |
Cleaned out and painted the gas tank:
Attached image(s) 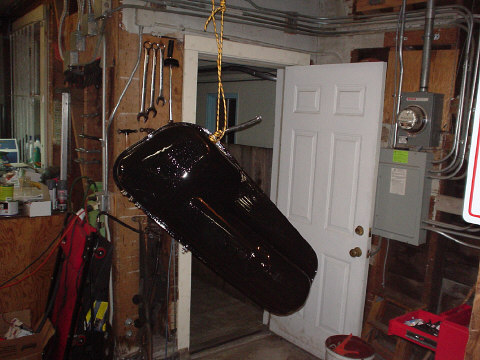
|
|
|
|
| nick mironov |
Jan 15 2006, 01:07 PM
Post
#11
|
|
nickm Group: Members Posts: 204 Joined: 12-June 05 From: San Francisco, CA Member No.: 4,264 |
Cleaned out rust from front compartment, painted with POR15, primered, and final-coated with Heruliner truck bed liner:
Attached image(s) 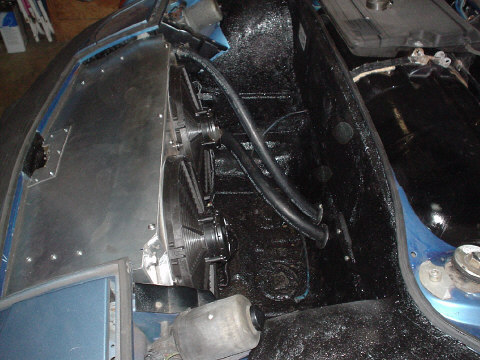
|
|
|
|
| nick mironov |
Jan 15 2006, 01:10 PM
Post
#12
|
|
nickm Group: Members Posts: 204 Joined: 12-June 05 From: San Francisco, CA Member No.: 4,264 |
At this time, I have not committed to cutting the vents in the wheel wells. I am going to experiment with various hood ventings - perforated plates, louvers etc. I have three hoods to work with. If none of that works properly, I will then cut the vents in the wheel wells:
Attached image(s) 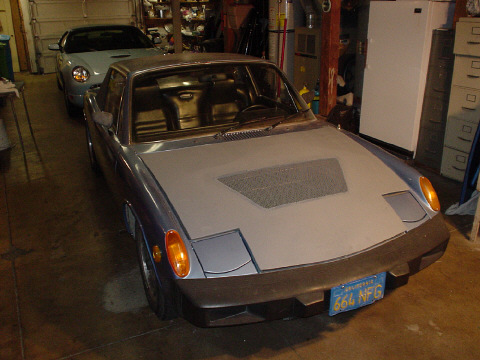
|
|
|
|
| nick mironov |
Jan 15 2006, 01:12 PM
Post
#13
|
|
nickm Group: Members Posts: 204 Joined: 12-June 05 From: San Francisco, CA Member No.: 4,264 |
Engine compartment was also cleaned out of rust, painted with POR 15 paint, primered, and final-coated with Herculiner truck bed liner. This is the compartment after engine removal and initial placement of the coolant components:
Attached image(s) 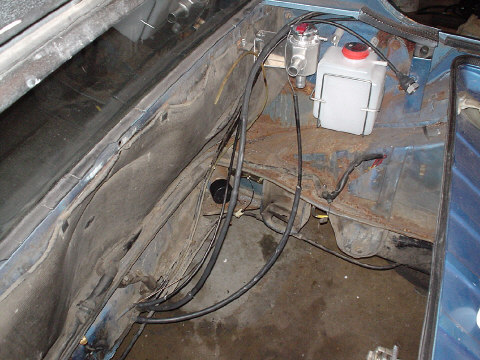
|
|
|
|
| nick mironov |
Jan 15 2006, 01:13 PM
Post
#14
|
|
nickm Group: Members Posts: 204 Joined: 12-June 05 From: San Francisco, CA Member No.: 4,264 |
Primer over POR 15 paint - ready for Heculiner:
Attached image(s) 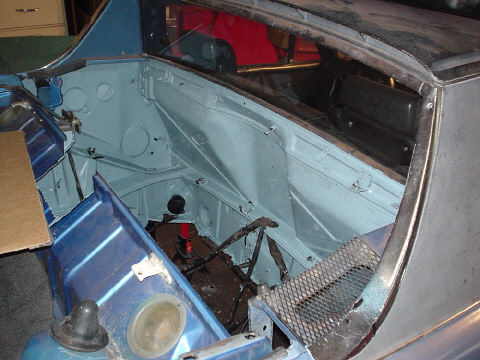
|
|
|
|
| nick mironov |
Jan 15 2006, 01:15 PM
Post
#15
|
|
nickm Group: Members Posts: 204 Joined: 12-June 05 From: San Francisco, CA Member No.: 4,264 |
Trunk was de-rusted and treated with POR 15 paint. You can see the Herculiner in the engine compartment, the distributor cutout, the relocated battery, and the strut-type trunk lid springs:
Attached image(s) 
|
|
|
|
| nick mironov |
Jan 15 2006, 01:16 PM
Post
#16
|
|
nickm Group: Members Posts: 204 Joined: 12-June 05 From: San Francisco, CA Member No.: 4,264 |
Engine rebuild:
Attached image(s) 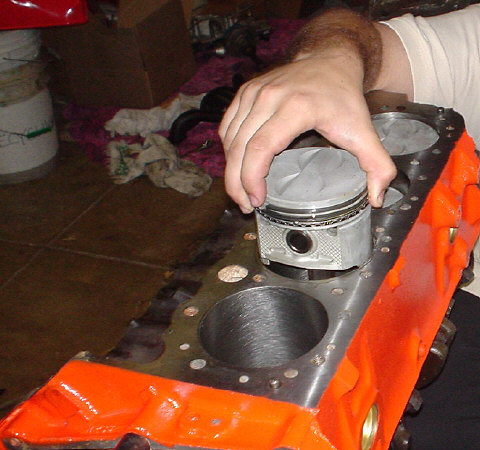
|
|
|
|
| nick mironov |
Jan 15 2006, 01:16 PM
Post
#17
|
|
nickm Group: Members Posts: 204 Joined: 12-June 05 From: San Francisco, CA Member No.: 4,264 |
Engine rebuild:
Attached image(s) 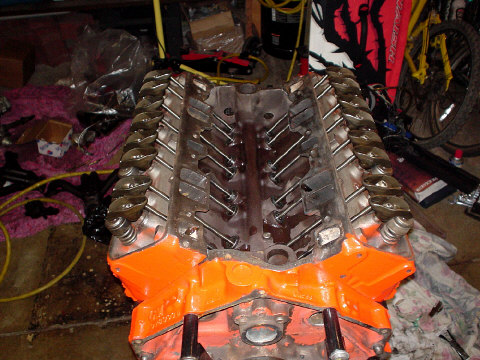
|
|
|
|
| nick mironov |
Jan 15 2006, 01:17 PM
Post
#18
|
|
nickm Group: Members Posts: 204 Joined: 12-June 05 From: San Francisco, CA Member No.: 4,264 |
Mostly compete engine:
Attached image(s) 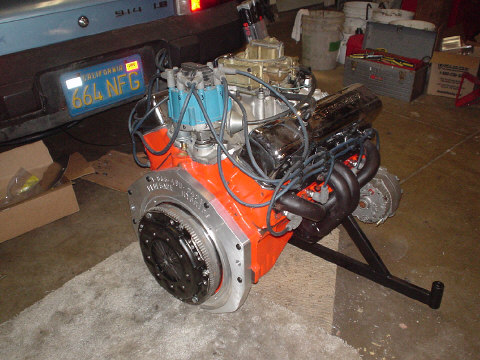
|
|
|
|
| nick mironov |
Jan 15 2006, 01:19 PM
Post
#19
|
|
nickm Group: Members Posts: 204 Joined: 12-June 05 From: San Francisco, CA Member No.: 4,264 |
Transaxle was thoroughly cleaned. All of it was as black as the inside of the bell housing in this picture. All seals were replaced:
Attached image(s) 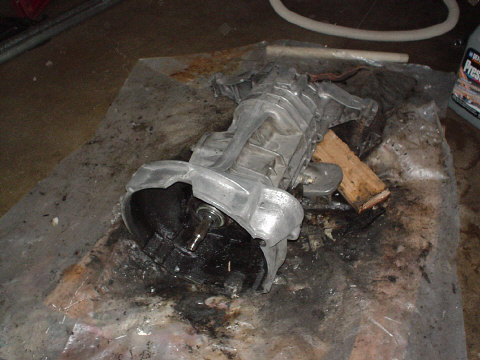
|
|
|
|
| nick mironov |
Jan 15 2006, 01:20 PM
Post
#20
|
|
nickm Group: Members Posts: 204 Joined: 12-June 05 From: San Francisco, CA Member No.: 4,264 |
Engine amd transaxle are mated and ready to be installed:
Attached image(s) 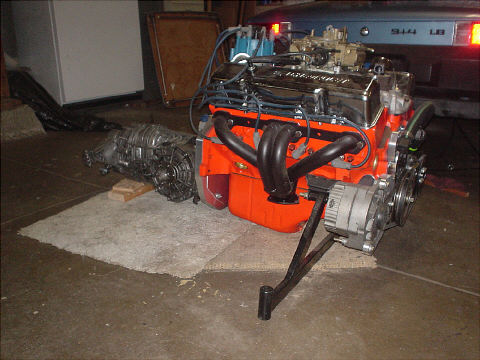
|
|
|
|
|
1 User(s) are reading this topic (1 Guests and 0 Anonymous Users)
0 Members:

|
Lo-Fi Version | Time is now: 28th June 2026 - 07:19 PM |
Invision Power Board
v9.1.4 © 2026 IPS, Inc.