|
|
|
Porsche, and the Porsche crest are registered trademarks of Dr. Ing. h.c. F. Porsche AG.
This site is not affiliated with Porsche in any way. Its only purpose is to provide an online forum for car enthusiasts. All other trademarks are property of their respective owners. |
|
|

  |

| nick mironov |
 Jan 15 2006, 01:21 PM Jan 15 2006, 01:21 PM
Post
#21
|
|
nickm  Group: Members Posts: 204 Joined: 12-June 05 From: San Francisco, CA Member No.: 4,264 |
Going in:
Attached image(s) 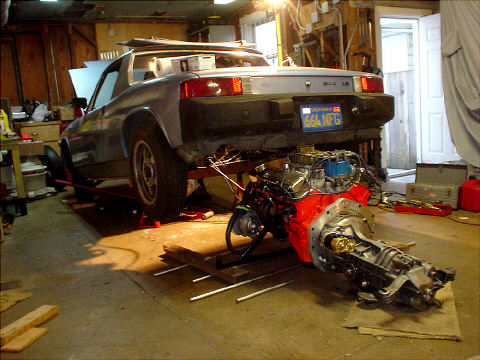
|
   |

 
|
| nick mironov |
Jan 15 2006, 01:23 PM
Post
#22
|
|
nickm Group: Members Posts: 204 Joined: 12-June 05 From: San Francisco, CA Member No.: 4,264 |
Going in...
I actually did the install by myself - since I could not find anyone to help at the moment I decided to do it. Attached image(s) 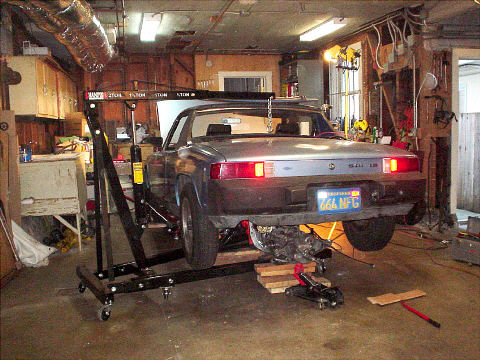
|
|
|
|
| nick mironov |
Jan 15 2006, 01:26 PM
Post
#23
|
|
nickm Group: Members Posts: 204 Joined: 12-June 05 From: San Francisco, CA Member No.: 4,264 |
Installed. Right side before exhaust installation. Note the black cable/tube that loops right in front of the CV joint - that is a new throttle cable made longer than the original to attach to the carburetor from the rear:
Attached image(s) 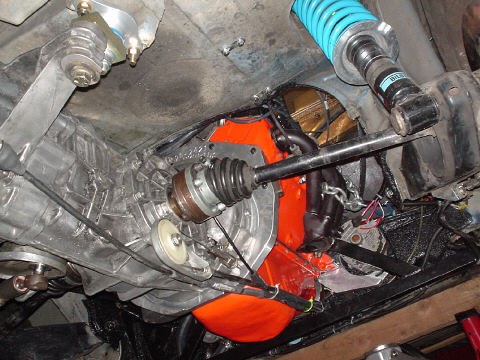
|
|
|
|
| nick mironov |
Jan 15 2006, 01:28 PM
Post
#24
|
|
nickm Group: Members Posts: 204 Joined: 12-June 05 From: San Francisco, CA Member No.: 4,264 |
Installed. Left side after exhaut installation. Note the rubber bellows at the shifter linkage cover - that is a perfect-fit bellows I picked up at Home Depot for a flexible sink drain:
Attached image(s) 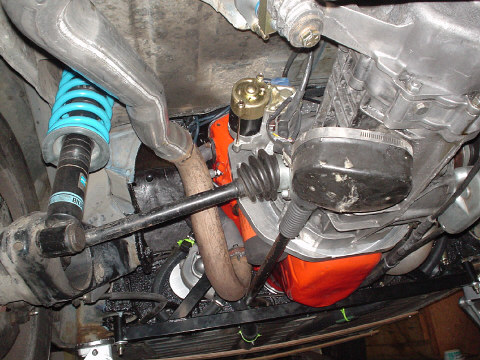
|
|
|
|
| nick mironov |
Jan 15 2006, 01:28 PM
Post
#25
|
|
nickm Group: Members Posts: 204 Joined: 12-June 05 From: San Francisco, CA Member No.: 4,264 |
Rear view:
Attached image(s) 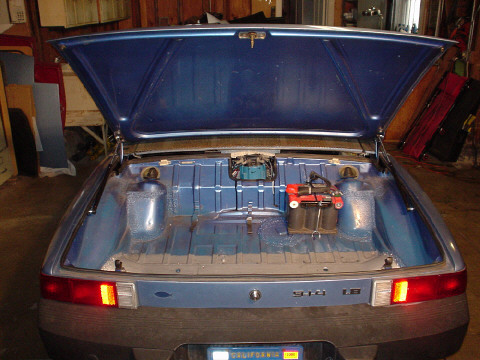
|
|
|
|
| nick mironov |
Jan 15 2006, 01:29 PM
Post
#26
|
|
nickm Group: Members Posts: 204 Joined: 12-June 05 From: San Francisco, CA Member No.: 4,264 |
Coolant accessories:
Attached image(s) 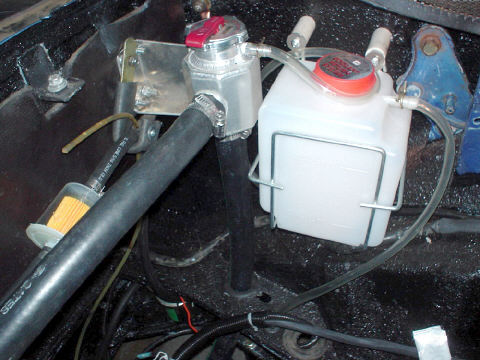
|
|
|
|
| nick mironov |
Jan 15 2006, 01:31 PM
Post
#27
|
|
nickm Group: Members Posts: 204 Joined: 12-June 05 From: San Francisco, CA Member No.: 4,264 |
Carter electric fuel pump (noisy). The heater tubes are capped with 2" ABS pipe caps - perfect fit:
Attached image(s) 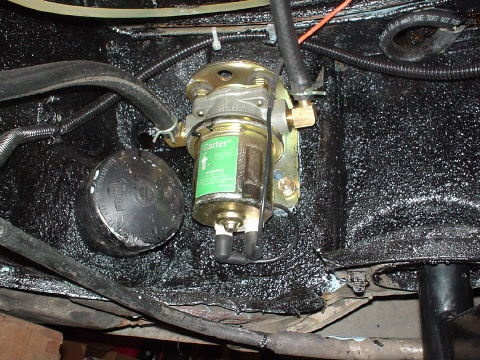
|
|
|
|
| nick mironov |
Jan 15 2006, 01:32 PM
Post
#28
|
|
nickm Group: Members Posts: 204 Joined: 12-June 05 From: San Francisco, CA Member No.: 4,264 |
Rebuilt pedal cluster:
Attached image(s) 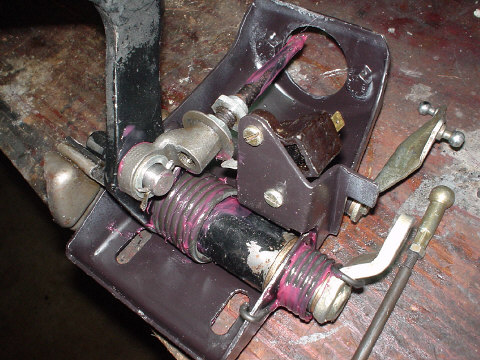
|
|
|
|
| nick mironov |
Jan 15 2006, 01:36 PM
Post
#29
|
|
nickm Group: Members Posts: 204 Joined: 12-June 05 From: San Francisco, CA Member No.: 4,264 |
Custom throttle cable. I drilled and tapped the ball joint and installed 2 set screws. The cable is 1/16". (I tried a 3/32", but it had a little trouble in the motorcycle cable tube that I used in the engine compartment to replace the existing cable tube. I replaced the plastic tube in the tunnel with a new nylon tube - aircraft quality cable guide.
Attached image(s) 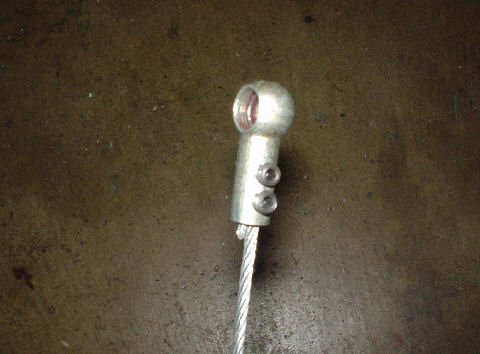
|
|
|
|
| nick mironov |
Jan 15 2006, 01:38 PM
Post
#30
|
|
nickm Group: Members Posts: 204 Joined: 12-June 05 From: San Francisco, CA Member No.: 4,264 |
Throttle cable setup at the carburetor:
Attached image(s) 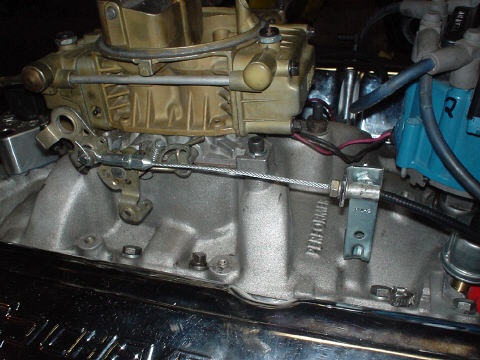
|
|
|
|
| dmenche914 |
Jan 15 2006, 01:38 PM
Post
#31
|
|
Senior Member Group: Members Posts: 1,212 Joined: 27-February 03 From: California Member No.: 366 |
Nice!!! So the radiator air exit is thru the hood? Did you do that to keep the metal solid in the wheel wells for strength, or other reason? i wonder about the common method of cutting the wheel well, if it hurts stiffness much or not.
PS 'Got a photo of the muffler(s) to post? |
|
|
|
| nick mironov |
Jan 15 2006, 01:39 PM
Post
#32
|
|
nickm Group: Members Posts: 204 Joined: 12-June 05 From: San Francisco, CA Member No.: 4,264 |
Muffler - sure is loud without one:
Attached image(s) 
|
|
|
|
| nick mironov |
Jan 15 2006, 01:39 PM
Post
#33
|
|
nickm Group: Members Posts: 204 Joined: 12-June 05 From: San Francisco, CA Member No.: 4,264 |
Magnaflow #12468
Attached image(s) 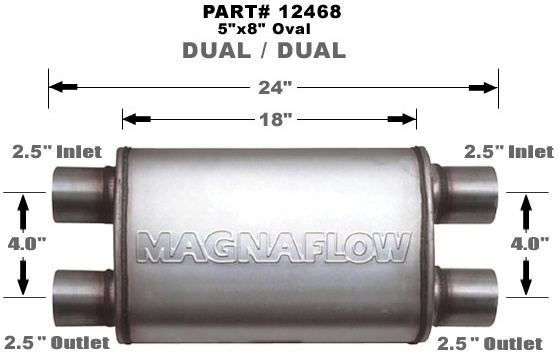
|
|
|
|
| dmenche914 |
Jan 15 2006, 01:43 PM
Post
#34
|
|
Senior Member Group: Members Posts: 1,212 Joined: 27-February 03 From: California Member No.: 366 |
I like that muffler, i have a flowmaster mounted something like that on my Buick V6 914. It however exits out the rear of the muffler (rather than the side like yours) and has four pipes out the rear. It is loud. (i think I need ear plugs sometimes in it!)
|
|
|
|
| Crazyhippy |
Jan 15 2006, 02:22 PM
Post
#35
|
|
Insert witty comment here... Group: Members Posts: 1,659 Joined: 28-July 05 From: Home of the Coyotes, AZ Member No.: 4,493 Region Association: None |
Very nicely done. My only concerns are:
1: The cuts made for the radiator have 90* corners. Keep an eye on them, as the metal will usually begin to tear one direction or the other from there. A smooth corner (holesaw) would have eliminated this concern. 2: Venting through the hood... I have yet to see it work well enough for me to try it, and the car looks stock externally (sleeper!!!) other than that. Once again, very well done!! (IMG:http://www.914world.com/bbs2/html/emoticons/smilie_pokal.gif) BJH |
|
|
|
| r_towle |
Jan 15 2006, 02:35 PM
Post
#36
|
|
Custom Member Group: Members Posts: 24,705 Joined: 9-January 03 From: Taxachusetts Member No.: 124 Region Association: North East States |
Awesome job, really nice work.
Did you modify the tranny....removal of first gear... What are your 0-60 times??? any idea? Rich |
|
|
|
| Dr. Roger |
Jan 15 2006, 02:46 PM
Post
#37
|
|
A bat out of hell. Group: Members Posts: 3,944 Joined: 31-January 05 From: Hercules, California Member No.: 3,533 Region Association: Northern California |
you can reduce the sound made by the fuel pump by isolating it with a rubber mount instead of solid mounted to the body.
i have mine "hung" by the thickest zip ties i could find and mine is absolutely quiet. looks kinda' strange but i had to please myself. great job and yours went faster than mine. even better (IMG:http://www.914world.com/bbs2/html/emoticons/smilie_pokal.gif) (IMG:http://www.914world.com/bbs2/html/emoticons/biggrin.gif) (IMG:http://www.914world.com/bbs2/html/emoticons/laugh.gif) |
|
|
|
| nick mironov |
Jan 15 2006, 03:34 PM
Post
#38
|
|
nickm Group: Members Posts: 204 Joined: 12-June 05 From: San Francisco, CA Member No.: 4,264 |
As I mentioned, I have three hoods that I will be testing for venting options. if none of them work out, I will then vent through the wheel wells. I prefer to avoid cutting the wheel wells for structural integrity reduction concerns. I have some equipment available to test air flows for each configuration - under static conditions. I will am not able to test under dynamic (car moving) conditions. Once I get results, I will post them. I don't know the performance of the car at this time. I have at least 500 miles of break-in ahead of me. Also, I just experienced an ignition system problem, which I have not yet had time to solve, so the car is not running today. The transmission is stock and is in good shape. (I think that the car had only 60,000 original miles on it). Later this year I plan modify the transmission to taller gears. Thanks for the info on hanging the fuel pump. Mine is already on rubber mounts, but obviously it needs better isolation. You can't really hear it as you drive, but it is annoying if you need to simply turn the ingnition to the run position. I am thinking of changing the basic fuel pump single relay to a double-interlock relay so that it engages only after the ignition switch has been in the start position. |
|
|
|
| messix |
Jan 15 2006, 03:49 PM
Post
#39
|
|
AKA "CLUTCH KILLER"! Group: Members Posts: 6,995 Joined: 14-April 05 From: between shit kickers and pinky lifters/ puget sound wa.north of Seattle south of Canada Member No.: 3,931 Region Association: Pacific Northwest |
fuel pump: it looks like the pump to bracket is isolated with rubber washers. you could also use the same type of washers to isolate the braket to body mount.
you have ignition problem? do you have constant 12v to the hei?[with ingintion turned to on] if yes then it might be the module uder the cap below the rotor. its a good idea to have a spare to carry in the car. these can be intermitant good-bad. |
|
|
|
| Andyrew |
Jan 15 2006, 03:56 PM
Post
#40
|
|
Spooling.... Please wait Group: Members Posts: 13,380 Joined: 20-January 03 From: Riverbank, Ca Member No.: 172 Region Association: Northern California |
Hood venting will work fine only if you put a little air block/ lip at the front. Bout 1/2 to 1in tall. It lifts the air over the hole and actually creates a suction from the radiator.
Rest of the car is looking good. Andrew |
|
|
|
|
2 User(s) are reading this topic (2 Guests and 0 Anonymous Users)
0 Members:

|
Lo-Fi Version | Time is now: 28th June 2026 - 09:42 PM |
Invision Power Board
v9.1.4 © 2026 IPS, Inc.