|
|
|
Porsche, and the Porsche crest are registered trademarks of Dr. Ing. h.c. F. Porsche AG.
This site is not affiliated with Porsche in any way. Its only purpose is to provide an online forum for car enthusiasts. All other trademarks are property of their respective owners. |
|
|

  |

| cbenitah |
 Mar 22 2006, 05:33 PM Mar 22 2006, 05:33 PM
Post
#41
|
||
|
Protected by the Swedish Maffia  Group: Members Posts: 848 Joined: 16-August 05 From: San Diego, CA Member No.: 4,597 |
Fenders all cut and ready.. do you see the shape of the 916 front? does it look ok to you guys or is there a gap between hood/lip? maybe just me, have never seen one IRL though just photos. rivets = no cracks right? i think i read it right.. oh 5 lug.... yes! I just had a long talk to Clayton about it. I have been looking for options on doing it but looks like im looking at the wrong places. front struts for 600? front end for 1100? maybe everyone else is getting killer deals and Aaron, by now you probably guessed that i NEVER get any deals (if you consider what i pay for body) ok here is the plan.. GT Silver Rivet Flares 916 front/rear 5-lug 17" wheels, new style porsche or sport. suby engine and the list adds on as I go.. I'm thinking it will be all done by xmas or so.. body is first step, then breaks/susp/wheels... |
||
   |

 
|
||
| Aaron Cox |
Mar 22 2006, 05:38 PM
Post
#42
|
|
Professional Tinkerer Group: Retired Admin Posts: 24,548 Joined: 1-February 03 From: Corona, CA Member No.: 219 Region Association: Southern California |
im pretty sure i can find you a post 72 911 front end for a few C notes...
if you need the lagreger breaks (yada yada $$$$) an SC front end can be had for under 800..... call eric shea for the rear... 400 bones and you got new trailing arms with bearings bushings and 5 lug hubs done (IMG:http://www.914world.com/bbs2/html/emoticons/smile.gif) |
|
|
|
| cbenitah |
Mar 22 2006, 11:05 PM
Post
#43
|
||
|
Protected by the Swedish Maffia Group: Members Posts: 848 Joined: 16-August 05 From: San Diego, CA Member No.: 4,597 |
you can get them for how much? C Notes... I have already talked to eric, but since i didnt find a front i culdnt order the rear... so now i need to wait and see what i can find |
||
|
|
|
||
| turboman808 |
Mar 23 2006, 08:16 AM
Post
#44
|
|
Advanced Member Group: Members Posts: 2,718 Joined: 31-January 06 From: North Jersey Member No.: 5,505 Region Association: North East States |
I'm just thinking...
Couldn't adding something like a spoon mirror, couldn't you then make a full side window and have enough room in the door to roll the window up and down completely. (IMG:http://www.tokyo-express.co.uk/spoon/carbon_racing_mirror.jpg) (IMG:http://www.tokyo-express.co.uk/spoon/mirror01.jpg) |
|
|
|
| cbenitah |
Mar 25 2006, 05:37 PM
Post
#45
|
|
Protected by the Swedish Maffia Group: Members Posts: 848 Joined: 16-August 05 From: San Diego, CA Member No.: 4,597 |
I walked down to Los Panchos today.. Still a little scary I must say.. Anyways. Wanted to see where they were with body work. I got some photos from Joe Buckle yesterday but they were a little fuzzy but great thanks to Joe for taking them (IMG:http://www.914world.com/bbs2/html/emoticons/smilie_pokal.gif) They are done with the flares, rockers and rear bumper as of now. The front bumper needs more fitting, one side was way off alignment. So they are working on that and finishing all the welding. it was way more weldning than i expected but thats a good thing. So left to do is sanding everything smooth, some bondo and then paint. hopefully by next week I can enjoy a full day of assemble my car!
todays photos Attached thumbnail(s) 
|
|
|
|
| cbenitah |
Mar 26 2006, 06:16 PM
Post
#46
|
|
Protected by the Swedish Maffia Group: Members Posts: 848 Joined: 16-August 05 From: San Diego, CA Member No.: 4,597 |
Some say its as easy as changing battery on your flash light. To me this is the same as climbing to the top of mount everest.. As you can see I started with my engine today. I'm only changing out gaskets and seals and fix some minor parts while im in there.
First of all, I had to do this myself, dont know anyone who could help me.. So it took longer than I was expecting. I got some parts off already. Even got the clutch and flywheel, noted lots of oil behind the flywheel, is that normal or could that be the oil leak that I had?? I feel like a blind person looking for a dimond ring in a field of grass.. since I have no clue really what to do and more importantly, what not to do. but here are some pics from today. feel free to add your .02 about what to do etc.. Attached thumbnail(s) 
|
|
|
|
| john rogers |
Mar 27 2006, 11:56 AM
Post
#47
|
|
Senior Member Group: Members Posts: 1,525 Joined: 4-March 03 From: Chula Vista CA Member No.: 391 |
Well Chris, looks like it is coming along. I mentioned a lot of welding I think and it is always a good idea to see what is under the paint so you have an good idea of how much work goes into making one of our rust buckets look so good! Can't wait to see how the silver comes out.
|
|
|
|
| cbenitah |
Mar 27 2006, 07:54 PM
Post
#48
|
||
|
Protected by the Swedish Maffia Group: Members Posts: 848 Joined: 16-August 05 From: San Diego, CA Member No.: 4,597 |
Yea you were right. it was WAY more welding than I expected. However, I got a lil worried when I was down there now. when you were with me we asked them to strip the paint.. if they say its going to be ready by sunday how are they going to have time for that? I will post pictures here when I picked it up. If you aren't busy sunday you are more than welcome to follow me down there.. |
||
|
|
|
||
| john rogers |
Mar 27 2006, 08:10 PM
Post
#49
|
|
Senior Member Group: Members Posts: 1,525 Joined: 4-March 03 From: Chula Vista CA Member No.: 391 |
Let me know on Sat as the Mexicali race I was going to do this weekend has been canceled due to the pavement being too broke up. They might not strip it all but sand that top coat off or if they do strip it it with only two paint jobs it will take about 4 or 5 hours.
|
|
|
|
| cbenitah |
Apr 2 2006, 09:30 PM
Post
#50
|
|
Protected by the Swedish Maffia Group: Members Posts: 848 Joined: 16-August 05 From: San Diego, CA Member No.: 4,597 |
Since I couldn't pick up the car today I worked on the engine for a few hours.
Did some major cleanup on it.. all you see took 3h.. and trust me i scrubbed alot I found some areas where I need your help.. #1 In the first pic you see the main rear seal, it shouldn't be leaking that much right? #2 how do I get the seal off? #3 should I take it apart completly? (just trying to fix my oil leak) #4 Tranny, should I even touch it? heard so many stories about messing it up.. I think putting it back together will be th emost difficult part. I am thinking replacing as much as possible when it comes to hoses and such, am I right? I really need your help on this one. Thanks Attached thumbnail(s) 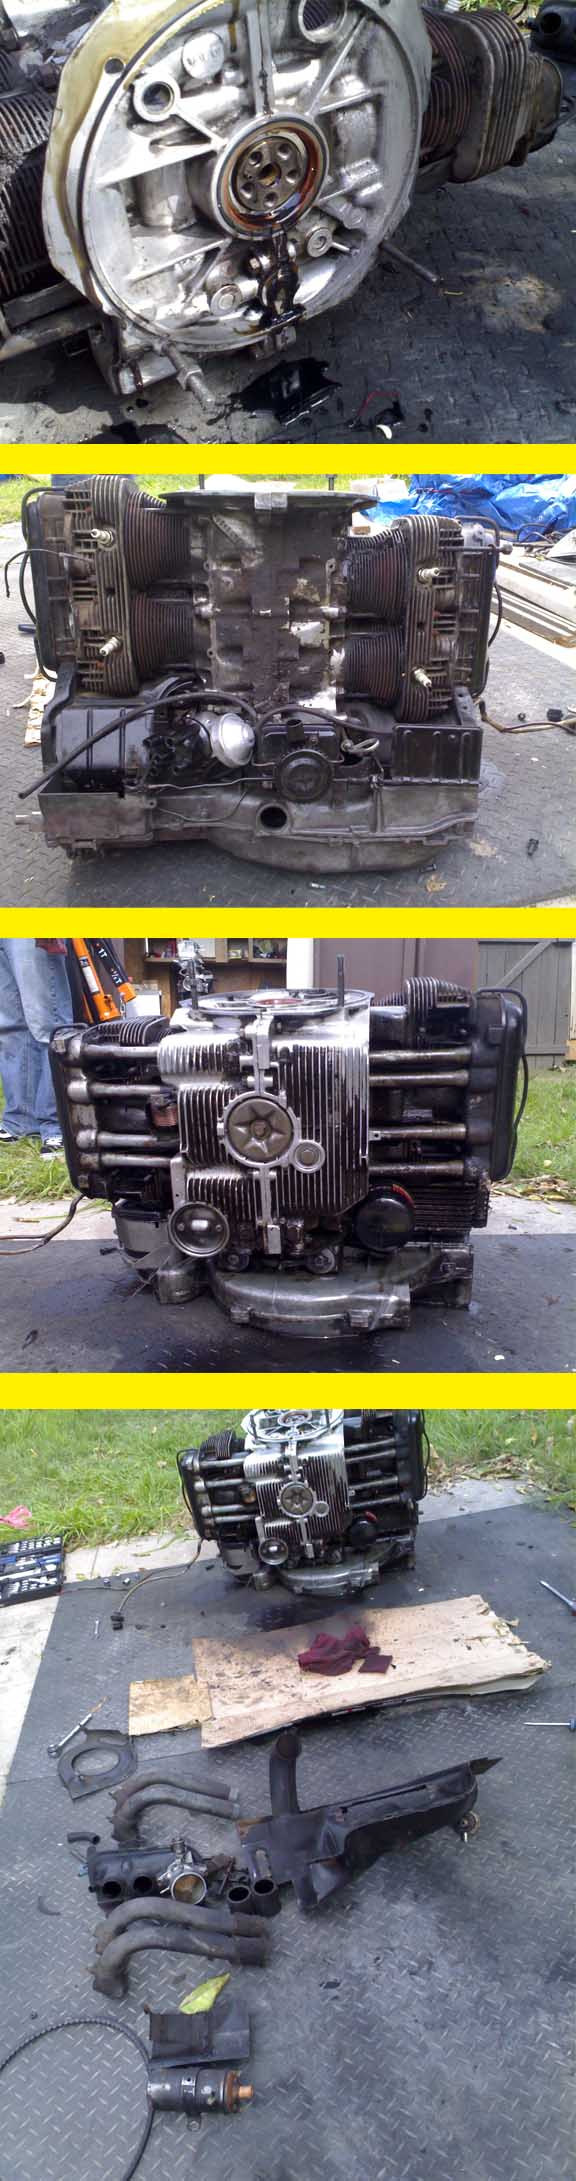
|
|
|
|
| Andyrew |
Apr 3 2006, 02:20 AM
Post
#51
|
|
Spooling.... Please wait Group: Members Posts: 13,380 Joined: 20-January 03 From: Riverbank, Ca Member No.: 172 Region Association: Northern California |
Dude.. you need more cylanders... (IMG:http://www.914world.com/bbs2/html/emoticons/biggrin.gif)
|
|
|
|
| cbenitah |
Apr 3 2006, 03:29 PM
Post
#52
|
||
|
Protected by the Swedish Maffia Group: Members Posts: 848 Joined: 16-August 05 From: San Diego, CA Member No.: 4,597 |
As of now the 4 I got is giving me troubles as is.. wonder what 6 or 8 would do (IMG:http://www.914world.com/bbs2/html/emoticons/screwy.gif) |
||
|
|
|
||
| 914-8 |
Apr 3 2006, 03:34 PM
Post
#53
|
|
Senior Member Group: Members Posts: 802 Joined: 23-January 06 From: Cal Member No.: 5,461 Region Association: None |
no, the rear main seal shouldn't be leaking that much. That think looks like it's totally gushing.
It also looks like the seal isn't sealing right - looks like it sitting in there and mating up to the crank oddly. Like the seal isn't in far enough. It doesn't look like the sealing surface on the seal is mating up to anything! It should ride on the crank surface, but it looks like it's basically just flapping in the wind. |
|
|
|
| jd74914 |
Apr 3 2006, 04:01 PM
Post
#54
|
|
Its alive Group: Members Posts: 4,878 Joined: 16-February 04 From: CT Member No.: 1,659 Region Association: North East States |
(IMG:http://www.914world.com/bbs2/html/emoticons/agree.gif)
I just tore mine apart this weekend and that seal looks like its comming out. How did the flywheel look? (If you're going to pull apart the case I would recomend putting in new bearing. If you do put in new bearings make sure you have a really big puller for the one on the crank. Sorry for the dissertation.) |
|
|
|
| cbenitah |
Apr 3 2006, 05:58 PM
Post
#55
|
||
|
Protected by the Swedish Maffia Group: Members Posts: 848 Joined: 16-August 05 From: San Diego, CA Member No.: 4,597 |
It is just a ring around everything, doesnt really touch anything.. And I dont know what the thin silver ring is (part of the seal?) I was hoping not to break the case open since I can't do so myself.. Can I replace this seal as is right now? you can see in the pictures how far I am in tearing it apart. |
||
|
|
|
||
| Dr Evil |
Apr 3 2006, 06:50 PM
Post
#56
|
|
Send me your transmission! Group: Members Posts: 23,041 Joined: 21-November 03 From: Loveland, OH 45140 Member No.: 1,372 Region Association: MidAtlantic Region |
You can replace that seal as is right now. Also, do not lose the shims on the end of the crank. They are needed to set your flywheel and stuff. (IMG:http://www.914world.com/bbs2/html/emoticons/wink.gif)
|
|
|
|
| cbenitah |
Apr 3 2006, 08:36 PM
Post
#57
|
||
|
Protected by the Swedish Maffia Group: Members Posts: 848 Joined: 16-August 05 From: San Diego, CA Member No.: 4,597 |
could you draw in that in my pic? Me and the terminology is not best friends right now.. |
||
|
|
|
||
| Dr Evil |
Apr 3 2006, 09:09 PM
Post
#58
|
|
Send me your transmission! Group: Members Posts: 23,041 Joined: 21-November 03 From: Loveland, OH 45140 Member No.: 1,372 Region Association: MidAtlantic Region |
There are thin shims that stack into the gap between the crank end and the case. You can see it indicated by the arrows.
HTH Attached image(s) 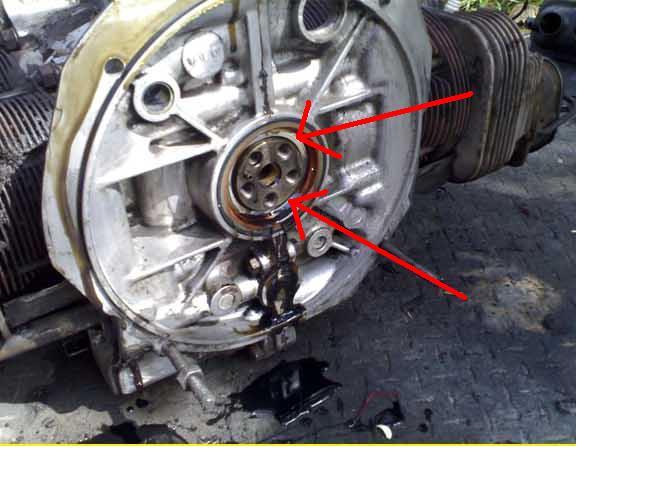
|
|
|
|
| Aaron Cox |
Apr 3 2006, 09:45 PM
Post
#59
|
||
|
Professional Tinkerer Group: Retired Admin Posts: 24,548 Joined: 1-February 03 From: Corona, CA Member No.: 219 Region Association: Southern California |
uh... dont the shims go between the crank and the flywheel? IIRC they had the 5 boltholes in the.... |
||
|
|
|
||
| Dr Evil |
Apr 3 2006, 09:48 PM
Post
#60
|
|
Send me your transmission! Group: Members Posts: 23,041 Joined: 21-November 03 From: Loveland, OH 45140 Member No.: 1,372 Region Association: MidAtlantic Region |
Um, NO! The only thing like that is the shim that goes under the bolt heads when putting the flywheel on.
|
|
|
|
|
1 User(s) are reading this topic (1 Guests and 0 Anonymous Users)
0 Members:

|
Lo-Fi Version | Time is now: 30th May 2026 - 06:03 AM |
Invision Power Board
v9.1.4 © 2026 IPS, Inc.