|
|
|
Porsche, and the Porsche crest are registered trademarks of Dr. Ing. h.c. F. Porsche AG.
This site is not affiliated with Porsche in any way. Its only purpose is to provide an online forum for car enthusiasts. All other trademarks are property of their respective owners. |
|
|

  |

| East coaster |
 Feb 12 2006, 07:38 PM Feb 12 2006, 07:38 PM
Post
#1
|
|
Senior Member  Group: Members Posts: 1,668 Joined: 28-March 03 From: Brigantine, NJ Member No.: 487 Region Association: None |
Finished all my rust repairs and now on to some fabrication work. I'm trying to get everything that would require me F'in up my paint to do later out of the way now.
I started my front oil cooler installation this weekend. It's a big ass cooler from C&R and I've decided to vent it out through the fender wells rather than dump the air underneath. Here's some pics of what I have in mind for the cooler setup. I cut the holes in the fender wells and welded some engine cover steel mesh over them. Then I removed the spare tire mount from the bottom of the trunk and re-welded it to the bulkhead to mount my space saver spare. I'll be fabbing up a plenum to duct the exit air from the cooler. I'm not settled on fiberglass or aluminum yet, but it will be similar to the lousy photoshop work in red........... Attached image(s) 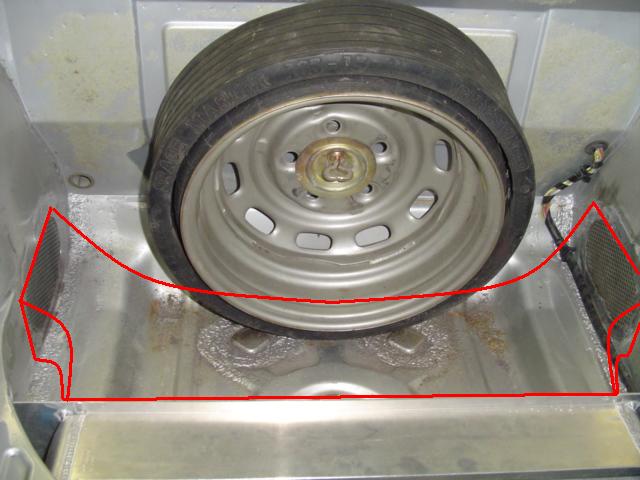
|
   |

 
|
| East coaster |
Feb 12 2006, 07:40 PM
Post
#2
|
|
Senior Member Group: Members Posts: 1,668 Joined: 28-March 03 From: Brigantine, NJ Member No.: 487 Region Association: None |
Here's the outlet areas:
Attached image(s) 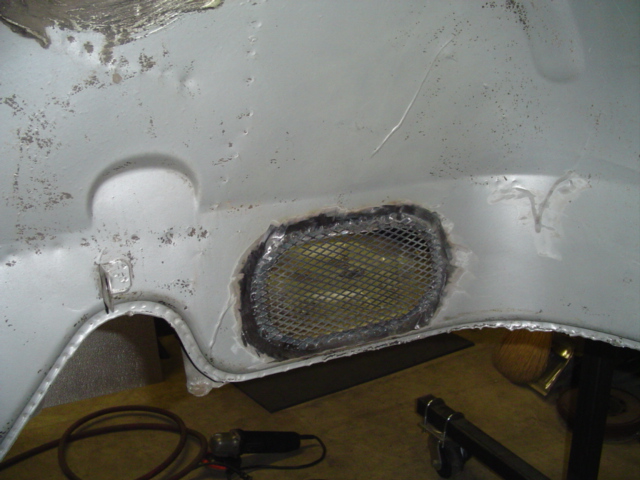
|
|
|
|
| East coaster |
Feb 12 2006, 07:41 PM
Post
#3
|
|
Senior Member Group: Members Posts: 1,668 Joined: 28-March 03 From: Brigantine, NJ Member No.: 487 Region Association: None |
drivers side:
Attached image(s) 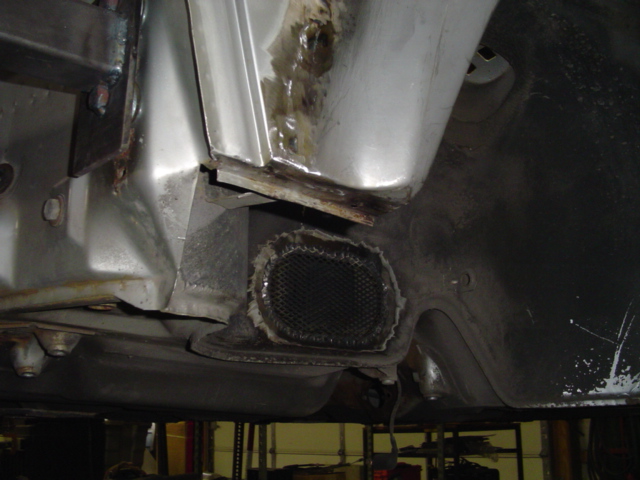
|
|
|
|
| East coaster |
Feb 12 2006, 07:45 PM
Post
#4
|
|
Senior Member Group: Members Posts: 1,668 Joined: 28-March 03 From: Brigantine, NJ Member No.: 487 Region Association: None |
Spare tire mount relocated and studs welded in for my thermostat mounting. It tucks in nicely behind the spare.......
Attached image(s) 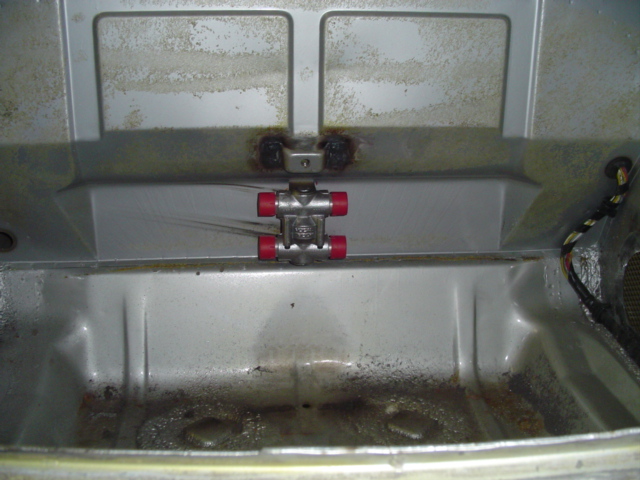
|
|
|
|
| East coaster |
Feb 12 2006, 07:48 PM
Post
#5
|
|
Senior Member Group: Members Posts: 1,668 Joined: 28-March 03 From: Brigantine, NJ Member No.: 487 Region Association: None |
Also cut in the fuel pump mounting hole in the bulkhead. The '92 Carerra fuel pump is almost identical to the '75 pump, so I'm using a '75 mount undertank mount setup.
Attached image(s) 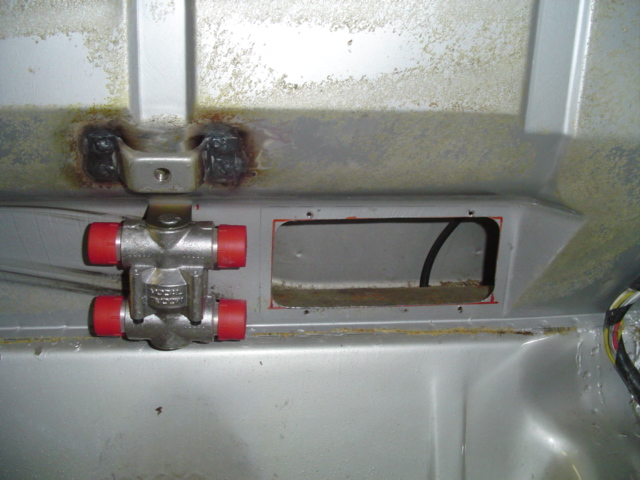
|
|
|
|
| East coaster |
Feb 12 2006, 07:49 PM
Post
#6
|
|
Senior Member Group: Members Posts: 1,668 Joined: 28-March 03 From: Brigantine, NJ Member No.: 487 Region Association: None |
with cover/mount......
Attached image(s) 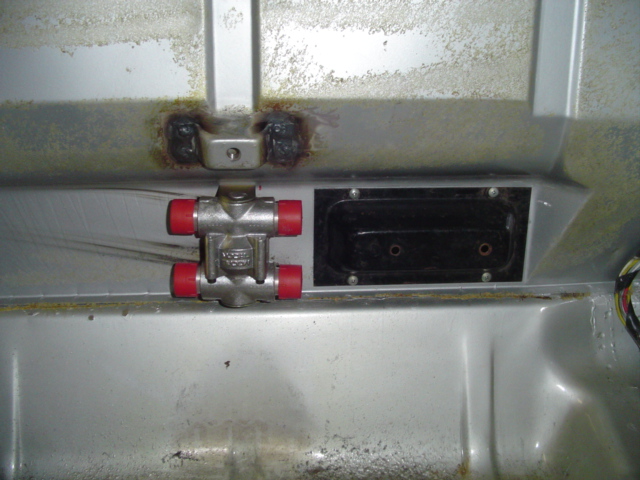
|
|
|
|
| East coaster |
Feb 12 2006, 07:53 PM
Post
#7
|
|
Senior Member Group: Members Posts: 1,668 Joined: 28-March 03 From: Brigantine, NJ Member No.: 487 Region Association: None |
Here's the oil cooler inlet area. I joined the 3 center holes and the 2 holes at each on either side to create oval shaped inlets. The exit area is about 30% larger than the inlet area. 50% larger would be best, but it's better than some I've seen.
Attached image(s) 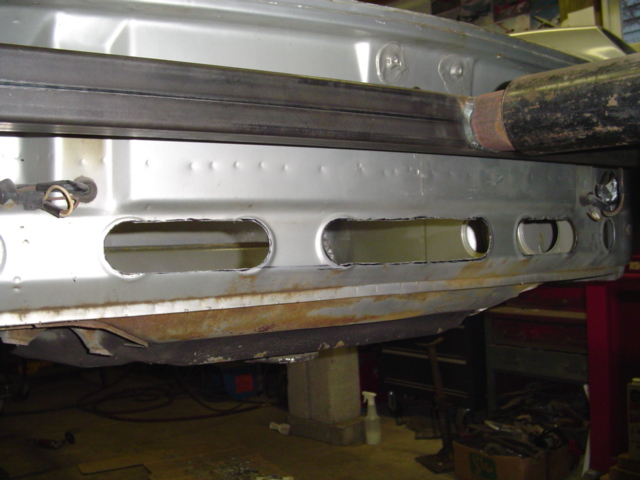
|
|
|
|
| goose2 |
Feb 12 2006, 10:04 PM
Post
#8
|
|
Senior Member Group: Members Posts: 976 Joined: 30-March 05 From: Eugene, Oregon Member No.: 3,847 Region Association: Pacific Northwest |
That's gonna be a nice installation....how will you route the hoses?
|
|
|
|
| McMark |
Feb 12 2006, 11:50 PM
Post
#9
|
|
914 Freak! Group: Retired Admin Posts: 20,179 Joined: 13-March 03 From: Grand Rapids, MI Member No.: 419 Region Association: None |
(IMG:http://www.914world.com/bbs2/html/emoticons/clap56.gif) Nice work!
|
|
|
|
| maf914 |
Feb 13 2006, 08:43 AM
Post
#10
|
|
Not a Guru! Group: Members Posts: 3,049 Joined: 30-April 03 From: Central Florida Member No.: 632 Region Association: None |
Very neat work on the oil cooler.
The mesh on the air outlets is a good idea. It should keep out the mice, squirrels, cats, etc. (IMG:http://www.914world.com/bbs2/html/emoticons/laugh.gif) |
|
|
|
| East coaster |
Feb 13 2006, 08:56 AM
Post
#11
|
|
Senior Member Group: Members Posts: 1,668 Joined: 28-March 03 From: Brigantine, NJ Member No.: 487 Region Association: None |
Still deciding on hose routing, that's driving me nuts. I really want something clean and haven't seen what I want yet, no offense to anyone's setup. I'll probably end up running them down the outside of the longs and through the wheel well somewhere. This is a street car and I don't want to run anything through the interior if I can help it.
I seriously considered deleting the fuel lines in the tunnel and using that space to run the oil lines. They would fit through the oval grommet area under the tank and then could be brought through the cavity where the windsheild washer hose comes out in the trunk......clean! But alas......where to run the fuel lines?? I think I'll end up running one oil line down each side of the car (longs), but time will tell. |
|
|
|
| db9146 |
Feb 13 2006, 01:25 PM
Post
#12
|
|
Senior Member Group: Members Posts: 953 Joined: 21-December 04 From: Atlanta, GA Member No.: 3,315 Region Association: None |
East Coaster,
I like your design for the removal of the air from the front trunk. I saw something similar to this years ago on another -6 that an acquaintance was building. One question though - are you planning on putting a bottom on the "exhaust plenum" so that any water that gets into that area is directed to one of the side vents rather than pooling in the bottom of the trunk? |
|
|
|
| East coaster |
Feb 13 2006, 04:52 PM
Post
#13
|
|
Senior Member Group: Members Posts: 1,668 Joined: 28-March 03 From: Brigantine, NJ Member No.: 487 Region Association: None |
Planning on a fully enclosed plenum (top and bottom), but though I might create a low spot somewhere in the middle of the plenum to purposely collect any moisture and drain it out the bottom. Maybe a small tube to drain through the floor pan? I think it would be foolish to think water will never get it there.
I think a plenum is best for air flow and it seems cleaner, although I'm sure I could get away using the trunk bottom for the bottom of the plenum. A full plenum also allows me to use some of the area below the plenum to route oil lines. My goal is to be able to put the factory carpeted trunk board in place (cutout around spare) with the oil cooler setup in place. |
|
|
|
| db9146 |
Feb 13 2006, 07:57 PM
Post
#14
|
|
Senior Member Group: Members Posts: 953 Joined: 21-December 04 From: Atlanta, GA Member No.: 3,315 Region Association: None |
Sounds like a good plan...I might just have to borrow that idea. (IMG:http://www.914world.com/bbs2/html/emoticons/biggrin.gif)
|
|
|
|
| alpha434 |
Feb 13 2006, 08:33 PM
Post
#15
|
|
My member number is no coincidence. Group: Members Posts: 3,154 Joined: 16-December 05 From: Denver, CO Member No.: 5,280 Region Association: Rocky Mountains |
Wow.
I'm impressed. Way to NOT half @$$ it. Looks incredible. |
|
|
|
| East coaster |
Feb 13 2006, 09:08 PM
Post
#16
|
|
Senior Member Group: Members Posts: 1,668 Joined: 28-March 03 From: Brigantine, NJ Member No.: 487 Region Association: None |
Just a note to others contemplating something similar -
When I cut the oval openings for the exits, the lower fenderwell became kinda flimsy in that area. When I welded in the steel mesh it really brought back the integrity to that area. Far stronger than I would've ever given that mesh the credit for. Thought it might be a useful data point for any where a grill or mesh is used. It was kind of a PIA to weld every little damn piece of the grill work, but it's done and pretty strong. FYI |
|
|
|
| maf914 |
Feb 14 2006, 03:14 PM
Post
#17
|
||
|
Not a Guru! Group: Members Posts: 3,049 Joined: 30-April 03 From: Central Florida Member No.: 632 Region Association: None |
You could reinforce the lower fenderwalls above the air outlets with a little angle iron that could also act as the mounting point for the duct you sketched in your first photo. That might add a little stiffness and also support the carpeted trunk floor board. (IMG:http://www.914world.com/bbs2/html/emoticons/idea.gif) |
||
|
|
|
||
| brokenmoped |
Feb 14 2006, 07:04 PM
Post
#18
|
|
Member Group: Members Posts: 143 Joined: 27-May 05 From: Mission Viejo, CA Member No.: 4,152 |
This is what I made for my oil cooler. And I can still (barely) fit a spare in there...(IMG:http://i48.photobucket.com/albums/f215/brokenmoped/109_0964.jpg)
I used pop rivets to keep the ducting attached... (IMG:http://i48.photobucket.com/albums/f215/brokenmoped/109_0965.jpg) Best part is it cost me $20 and required no welding. (IMG:http://i48.photobucket.com/albums/f215/brokenmoped/109_0963.jpg) |
|
|
|
| East coaster |
Feb 14 2006, 09:48 PM
Post
#19
|
|
Senior Member Group: Members Posts: 1,668 Joined: 28-March 03 From: Brigantine, NJ Member No.: 487 Region Association: None |
Whoa!!!! Homer Depot alert!!! Just kiddin' (IMG:http://www.914world.com/bbs2/html/emoticons/biggrin.gif)
I like your setup and I bet it works great. It's probably lighter than the setup I'll end up with even I used CF for the plenum. Please do NOT do the PVC pipe rollbar though!! Use good common sense and only utilize landscape ties for that! (IMG:http://www.914world.com/bbs2/html/emoticons/smilie_pokal.gif) It's pretty cool you can still get your spare in there. I would assume it's a supplemental cooler? I'm stuck running a huge cooler since my engine does not have a built in cooler. |
|
|
|
| brokenmoped |
Feb 15 2006, 06:34 PM
Post
#20
|
|
Member Group: Members Posts: 143 Joined: 27-May 05 From: Mission Viejo, CA Member No.: 4,152 |
Basically, it's something I could do cheaply and something I could make myself.
Don't worry, already have the autopower rollbar! It doesn't look the greatest (notice the GT Racing sticker! HAHA), but it functions and it was cheap and light...perfect for my AX car. |
|
|
|
|
1 User(s) are reading this topic (1 Guests and 0 Anonymous Users)
0 Members:

|
Lo-Fi Version | Time is now: 13th May 2024 - 07:18 AM |
Invision Power Board
v9.1.4 © 2024 IPS, Inc.