|
|
|
Porsche, and the Porsche crest are registered trademarks of Dr. Ing. h.c. F. Porsche AG.
This site is not affiliated with Porsche in any way. Its only purpose is to provide an online forum for car enthusiasts. All other trademarks are property of their respective owners. |
|
|

  |

| rjames |
 Feb 18 2006, 05:56 PM Feb 18 2006, 05:56 PM
Post
#1
|
|
I'm made of metal  Group: Members Posts: 3,920 Joined: 24-July 05 From: Shoreline, WA Member No.: 4,467 Region Association: Pacific Northwest |
Rust treating, killing, etc, and just want to get some input before I get to crazy with the MIG.
Here are some questions: I have some floor pan issues. Are the holes too big just to try and fill? The following photo is from the driverside, under the seat after the tar has been removed, and I've grinded down to bare metal. Should I advertise for someone who's cutting up a car to cut this pieces out for me, or should I just go buy some sheet metal and make a patch knowing it won't really match, but can at least be made to 'line up'? Attached image(s) 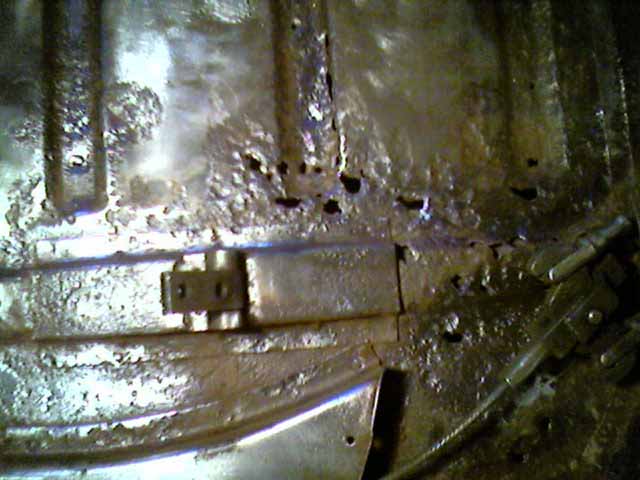
|
   |

 
|
| Hammy |
Feb 18 2006, 06:01 PM
Post
#2
|
|
mr. Wonderful Group: Members Posts: 1,826 Joined: 20-October 04 From: Columbia, California Member No.: 2,978 Region Association: Northern California |
You can buy new replacement floor pans.
Also any car that's in the "parts" car condition probably won't have floor pans any better than yours. (IMG:http://www.914world.com/bbs2/html/emoticons/smile.gif) |
|
|
|
| scotty b |
Feb 18 2006, 06:02 PM
Post
#3
|
|
rust free you say ? Group: Members Posts: 16,375 Joined: 7-January 05 From: richmond, Va. Member No.: 3,419 Region Association: None |
do yourself a favor and get a new pan section. That piece is pretty eaten up and if you try to weld up the holes you'll just burn through the surrounding areas. Gaurantee!
|
|
|
|
| rjames |
Feb 18 2006, 06:05 PM
Post
#4
|
|
I'm made of metal Group: Members Posts: 3,920 Joined: 24-July 05 From: Shoreline, WA Member No.: 4,467 Region Association: Pacific Northwest |
Next set of questions:
Do I just cut the jack plate out? And leave the rocker as is except for using Metal Ready on it? There are a few holes in the inner rocker panel as you can see in the photo, but can I just cut these out and weld a new patch in? Or should I really cut into the whole thing with the idea that there might be rust (might, that's a laugh) on the inside that will need to be treatd as well? How do I cut the plate off? Just use a Sazall and/or snips, or do I use the welder to 'melt' the existing welds so I can pull it off? There is also rust at the top of the inner rocker along the length of the driver side where it meets the door threshold (I think this is the correct name.) The door threshold all but covers it up in the photo- Do I just apply metal ready to this area? Attached image(s) 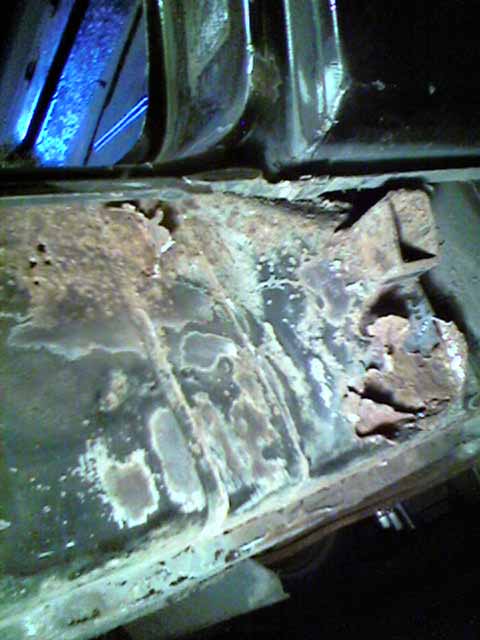
|
|
|
|
| scotty b |
Feb 18 2006, 06:11 PM
Post
#5
|
|
rust free you say ? Group: Members Posts: 16,375 Joined: 7-January 05 From: richmond, Va. Member No.: 3,419 Region Association: None |
Cut it out, treat inside and replace with a new piece of metal. If the inside isn't eaten up, you could simply bend a pice of 18 gauge to the outside shape and weld it on. Jack post doesn't need to be there but the metal under it does.Spend the $25.00 and buy OSPHO for the inside, it is a helluva lot better than the cheaper stuff but it will f-up you senses if you take a good wiff of it so wear a mask!! Give it ample time to dry before enclosing it and make sure the edges of the metal don't have any on them.
|
|
|
|
| scotty b |
Feb 18 2006, 06:16 PM
Post
#6
|
|
rust free you say ? Group: Members Posts: 16,375 Joined: 7-January 05 From: richmond, Va. Member No.: 3,419 Region Association: None |
you need to do something with the upper left portion of that pic as well, looks like you've got some serious issues building up in that rocker (IMG:http://www.914world.com/bbs2/html/emoticons/sad.gif) when you get the section cut out, put a blow chuck up at the front vent hole of the rocker (inside the car by your left foot) and blow towards the rear of the car to clear out any rust or debris that may be in there, and if possible spray some of the OSPHO into the whole rocker.
|
|
|
|
| rjames |
Feb 18 2006, 06:23 PM
Post
#7
|
||
|
I'm made of metal Group: Members Posts: 3,920 Joined: 24-July 05 From: Shoreline, WA Member No.: 4,467 Region Association: Pacific Northwest |
Sounds good, but is the tube that's inside the rocker all metal, or is it some kind of foam hose or something. I don't want to mess it up, and I've seen pictures that seem to show some kind of material other then metal that's used for the heater hose in there. Scotty b, thanks for the info, and more questions if yer up for 'em: The rust at the top runs along the entire rocker towards the front of the car. I wasn't able to punch holes in it with a screw driver, so my hope is that the rust is all on the outside. However, I can't get to it with the grinder either because it's tucked in under the door sill, so I would love to just be able to treat the outside of the majority of the long with something. Is OSPHO like Metal Ready? Or does it work differently/better? |
||
|
|
|
||
| rjames |
Feb 18 2006, 06:35 PM
Post
#8
|
||
|
I'm made of metal Group: Members Posts: 3,920 Joined: 24-July 05 From: Shoreline, WA Member No.: 4,467 Region Association: Pacific Northwest |
So many questions.... 18gauge? Cool. Can someone tell me what guage the inner wheel well metal is? I have to cut a new piece to replace the metal where the battery tray is (was) welded to. Thanks, and I know I'm going to have more questions... This board ROCKS. (IMG:http://www.914world.com/bbs2/html/emoticons/aktion035.gif) I would have never even attempted any of this without reading all of the other posts on here of people who have already done this making it seem doable. |
||
|
|
|
||
| sk8kat1 |
Feb 18 2006, 06:39 PM
Post
#9
|
|
Senior Member Group: Members Posts: 911 Joined: 10-October 05 From: belvidere ,IL Member No.: 4,937 |
OSPHO?
|
|
|
|
| elocke |
Feb 18 2006, 06:57 PM
Post
#10
|
|
Member Group: Members Posts: 178 Joined: 9-February 03 From: Georgetown, MA Member No.: 272 |
I just measured a piece that I trimmed off a Restoration Design upper wheelhouse panel at roughly .04". I've done most of the work that you're facing and you've got some good advice. Welding pitted metal is not fun, especially if you're learning to MIG.
Here's a pic of my right long after I cut out all the crap. Ed Attached image(s) 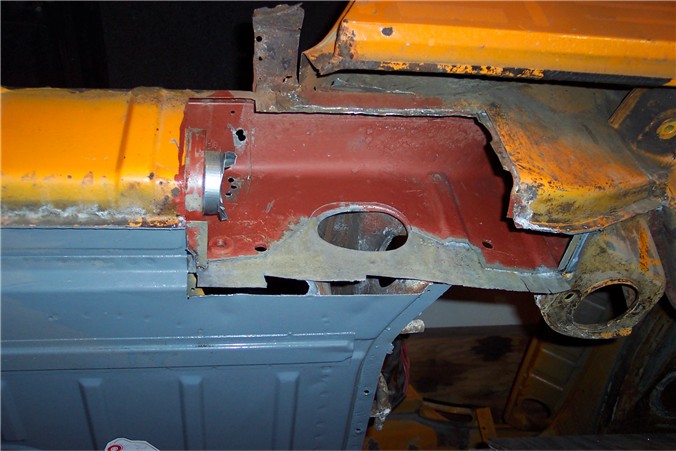
|
|
|
|
| rjames |
Feb 18 2006, 06:58 PM
Post
#11
|
|
I'm made of metal Group: Members Posts: 3,920 Joined: 24-July 05 From: Shoreline, WA Member No.: 4,467 Region Association: Pacific Northwest |
I was looking at the floor plan that restoration design sells, and looks like there isn't a place to weld the part that the seat attaches to, or am I missing something?
Attached image(s) 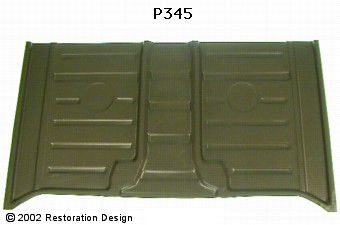
|
|
|
|
| Bartlett 914 |
Feb 18 2006, 07:03 PM
Post
#12
|
|
Advanced Member Group: Members Posts: 2,214 Joined: 30-August 05 From: South Elgin IL Member No.: 4,707 Region Association: Upper MidWest |
The seat mounts are extra. They are not on the site but resto carry them. There is also 2 reinforcment strips mounted underneath. Restro carrys them also. Ask and they wild spot welt them in for you.
|
|
|
|
| rjames |
Feb 18 2006, 07:28 PM
Post
#13
|
||
|
I'm made of metal Group: Members Posts: 3,920 Joined: 24-July 05 From: Shoreline, WA Member No.: 4,467 Region Association: Pacific Northwest |
Ed, that piece that you're going to have to weld in (the part of your longs) is it this part from Restoration Design? Attached image(s) 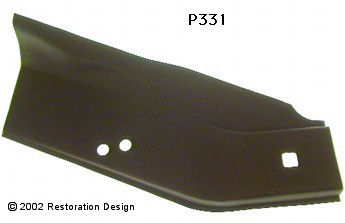
|
||
|
|
|
||
| scotty b |
Feb 19 2006, 07:13 AM
Post
#14
|
|
rust free you say ? Group: Members Posts: 16,375 Joined: 7-January 05 From: richmond, Va. Member No.: 3,419 Region Association: None |
Sorry about the delay, I had a dinner date last night (moms birthday) If you don't want to completely remove and replace the outer rocker (I'm sure you don't) you really should get someone to sandblast that upper edge to get the metal perfectly clean. Then you can very carefully weld up those small holes, but like I said before, be prepard to burn through alot! Take your time and don't let the metal heat up to much. OSPHO ia a phosphoric acid that attacks and neutralizes the rust, it also forms a barrier to prevent it from restarting. Been used in restoration shops for years. About $25.00 per gallon, and is water consitency so it can be sprayed through a cheap paint gun. First and foremost cut out the section around the jack post and look in the tunnel VERY well with a light to make sure the inner rocker isn't rusted through as well. If it is (IMG:http://www.914world.com/bbs2/html/emoticons/sad.gif) car is proably not werth fixing.As for the lines running inside the tunnel it is a cardboard(esque) tube and you need to be careful when cutting through the outer skin not to hit it. Most of the structural metal on these cars is 18 gauge whiile the body metal is 20 gauge (I think)ONe other thing on the OSPHO, if it is in an area you can easily access you would be best off to let it dry for a day, come back with a brush and some water to clean it with, this will neutralize the acid in it, and then paint over it with your etching primer to ensure a good repair.
Ospho link: http://www.ospho.com/directions.htm |
|
|
|
| elocke |
Feb 19 2006, 09:14 AM
Post
#15
|
|
Member Group: Members Posts: 178 Joined: 9-February 03 From: Georgetown, MA Member No.: 272 |
Hey; that was my 100th post (IMG:http://www.914world.com/bbs2/html/emoticons/smilie_pokal.gif)
That's pic is the lower wheelhouse. Here's a pic of the upper being installed. Ed Attached image(s) 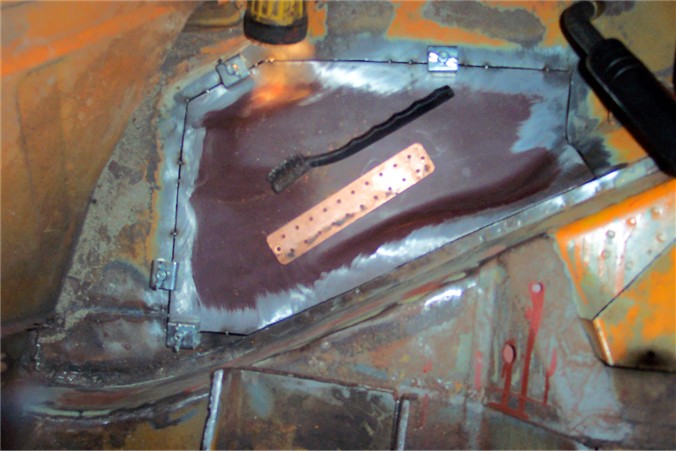
|
|
|
|
| rmital |
Feb 19 2006, 10:08 AM
Post
#16
|
||
|
Northeast optimist Group: Members Posts: 1,946 Joined: 12-December 05 From: Park Ridge, NJ Member No.: 5,268 |
Very timely post for me...I should be doing similar work to the rocker area in the next week or so. Post your progress if you could. Pics would be great. Thanks to all the info..... Ray |
||
|
|
|
||
| vesnyder |
Feb 19 2006, 10:23 AM
Post
#17
|
|
Senior Member Group: Members Posts: 680 Joined: 14-April 05 From: Cleveland, OH Member No.: 3,933 |
I bought my drivers side floor pan from Stoddards's - and it came with the floor latches. I am local to Stoddard's, which made it easier - but it was the cheapest I could find!
|
|
|
|
| abearauto |
Feb 19 2006, 10:59 AM
Post
#18
|
|
Newbie Group: Members Posts: 45 Joined: 10-May 03 From: washougal wa. Member No.: 677 |
(IMG:http://www.914world.com/bbs2/html/emoticons/welder.gif) JUST A LITTLE TIP ON WELDING HOLES WITH A MIG, GET A PIECE OF COPPER PLATE, AND PUT BEHIND THE HOLES WHEN YOU MIG THEM, THE MIG WONT STICK TO THE COPPER AND LESS LIKLY TO MAKE THE HOLES BIGGER, CAN ALSO ADJUST THE WIRE FEED ON THE MIG TO PUT OUT MORE THIS IS BETTER TO FILL WITH, SEE IF YOU CAN FIND A PIECE TO PRACTICE ON TO GET THE MIG ADJUSTED RIGHT, GOOD LUK STEVE
|
|
|
|
| elocke |
Feb 19 2006, 01:08 PM
Post
#19
|
|
Member Group: Members Posts: 178 Joined: 9-February 03 From: Georgetown, MA Member No.: 272 |
Woops...I just reread this and realized I misread the question. I didn't use a RD piece to fix the left (not right as I mis-indicated) long. I formed pieces to resemble the factory "layers". I didn't want to rip into the area under the front of the fender because I think to install the RD piece properly it seems you need to cut some of the fender off. I took lots of pics of this work so here are a few. If you need more let me know.
Ed Attached image(s) 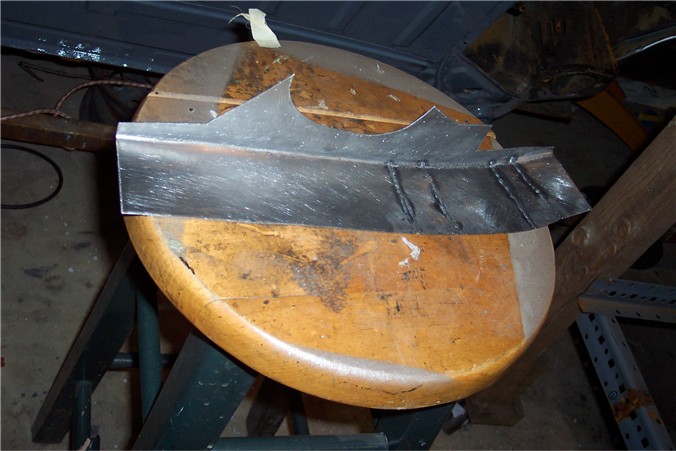
|
|
|
|
| elocke |
Feb 19 2006, 01:10 PM
Post
#20
|
|
Member Group: Members Posts: 178 Joined: 9-February 03 From: Georgetown, MA Member No.: 272 |
Here's that 1st layer installed.
Attached image(s) 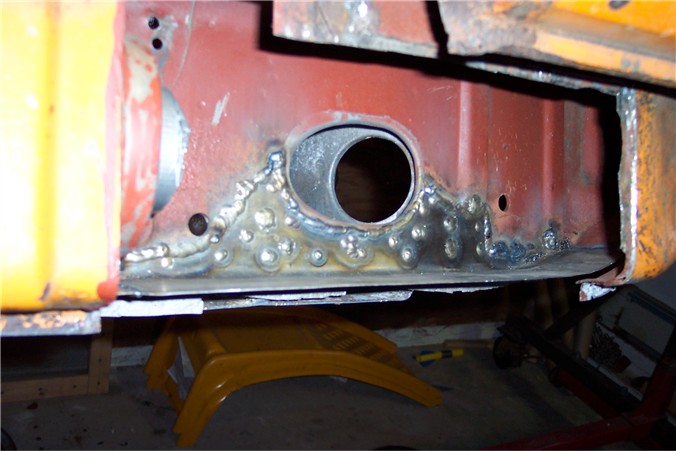
|
|
|
|
|
2 User(s) are reading this topic (2 Guests and 0 Anonymous Users)
0 Members:

|
Lo-Fi Version | Time is now: 3rd May 2024 - 07:10 AM |
Invision Power Board
v9.1.4 © 2024 IPS, Inc.