|
|
|
Porsche, and the Porsche crest are registered trademarks of Dr. Ing. h.c. F. Porsche AG.
This site is not affiliated with Porsche in any way. Its only purpose is to provide an online forum for car enthusiasts. All other trademarks are property of their respective owners. |
|
|

  |

| Aaron Cox |
 Feb 22 2006, 12:04 AM Feb 22 2006, 12:04 AM
Post
#1
|
|
Professional Tinkerer  Group: Retired Admin Posts: 24,548 Joined: 1-February 03 From: Corona, CA Member No.: 219 Region Association: Southern California |
planning to copy dan's RS america handle'd smooth vinyl setup (IMG:http://www.914world.com/bbs2/html/emoticons/smile.gif)
(IMG:http://www.914world.com/bbs2/uploads/post-2-1139878907.jpg) first - you need a set of core early door paels, with the one piece metal top. (IMG:http://www.914world.com/bbs2/uploads/blog-1140414498.jpg) cores... (IMG:http://www.914world.com/bbs2/uploads/blog-1140414506.jpg) then - source some new laser cut piece from evilwerks/burrowerks (IMG:http://www.914world.com/bbs2/uploads/blog-1140414512.jpg) begin taking apart old core door panels. note the solid metal tops.... (IMG:http://www.914world.com/bbs2/uploads/blog-1140414518.jpg) again (IMG:http://www.914world.com/bbs2/uploads/blog-1140414548.jpg) begin prying up old staples..... (IMG:http://www.914world.com/bbs2/uploads/blog-1140414540.jpg) after removing vinyl and foam covering, begin to pry up the tabs holding the metal top to the core board... (IMG:http://www.914world.com/bbs2/uploads/blog-1140414529.jpg) notice the "tuck and roll" (remember how this was done....) (IMG:http://www.914world.com/bbs2/uploads/blog-1140414562.jpg) the old top with the new board.... (IMG:http://www.914world.com/bbs2/uploads/blog-1140573228.jpg) begin pushing holding tabs down on new board. the butt of a screwdriver werks great. (IMG:http://www.914world.com/bbs2/uploads/blog-1140573239.jpg) completed backboard.... (IMG:http://www.914world.com/bbs2/uploads/blog-1140573275.jpg) |
   |

 
|
| Aaron Cox |
Feb 22 2006, 12:06 AM
Post
#2
|
|
Professional Tinkerer Group: Retired Admin Posts: 24,548 Joined: 1-February 03 From: Corona, CA Member No.: 219 Region Association: Southern California |
cut out new 1/4" headliner material to pattern of core board.....
(IMG:http://www.914world.com/bbs2/uploads/blog-1140573284.jpg) attached with 3m super 77 spray adhesive... (IMG:http://www.914world.com/bbs2/uploads/blog-1140573302.jpg) cut out door handle cutouts and window mechanism.... (IMG:http://www.914world.com/bbs2/uploads/blog-1140587456.jpg) prepare to adhere vinyl to headliner foam material (IMG:http://www.914world.com/bbs2/uploads/blog-1140587479.jpg) put new smoooth vinyl down, rubbing it into the adhesive below (IMG:http://www.914world.com/bbs2/uploads/blog-1140587490.jpg) fold back into the tabs to redo the tuck and roll..... (IMG:http://www.914world.com/bbs2/uploads/blog-1140587511.jpg) |
|
|
|
| Aaron Cox |
Feb 22 2006, 12:10 AM
Post
#3
|
|
Professional Tinkerer Group: Retired Admin Posts: 24,548 Joined: 1-February 03 From: Corona, CA Member No.: 219 Region Association: Southern California |
i told you not to forget how this went together....
(IMG:http://www.914world.com/bbs2/uploads/blog-1140587450.jpg) make the carboard tabs to make the line straight and not wavy..... (IMG:http://www.914world.com/bbs2/uploads/blog-1140587520.jpg) cardboard (left) vs no cardboard tabs (right) (IMG:http://www.914world.com/bbs2/uploads/blog-1140587563.jpg) cardboard tabs completed..... (IMG:http://www.914world.com/bbs2/uploads/blog-1140587575.jpg) glue next layer of headliner material over the tabbed portion.... (IMG:http://www.914world.com/bbs2/uploads/blog-1140587586.jpg) trim excess and begin to glue the top tuck and roll portion... a real pita. get the right glue and tons of closepins/clamps.... (IMG:http://www.914world.com/bbs2/uploads/blog-1140587593.jpg) here is what it looks like when pulled over and not glued. (IMG:http://www.914world.com/bbs2/uploads/blog-1140587602.jpg) |
|
|
|
| Aaron Cox |
Feb 22 2006, 12:11 AM
Post
#4
|
|
Professional Tinkerer Group: Retired Admin Posts: 24,548 Joined: 1-February 03 From: Corona, CA Member No.: 219 Region Association: Southern California |
will be updated and for the most part finished tomorrow......
|
|
|
|
| redshift |
Feb 22 2006, 12:17 AM
Post
#5
|
|
Bless the Hell out of you! Group: Members Posts: 10,926 Joined: 29-June 03 Member No.: 869 |
(IMG:http://www.914world.com/bbs2/html/emoticons/ohmy.gif)
That stuff doesn't look used... or free! Are you doing this for someone else? GOOD DEAL! M |
|
|
|
| 736conver |
Feb 22 2006, 12:21 AM
Post
#6
|
|
Advanced Member Group: Members Posts: 2,117 Joined: 25-May 03 From: SE Wisconsin Member No.: 736 Region Association: None |
Looks good.
I have a pneumatic staple gun and 5/32 staples. Works like a charm. Only had to glue the top. If you want to borrow it let me know. Dont forget to clean the top metal piece before you reglue. And dont use to much glue it starts to eat the material. Thats the mistake I made the first time. |
|
|
|
| MattR |
Feb 22 2006, 01:29 AM
Post
#7
|
|
Advanced Member Group: Members Posts: 3,279 Joined: 23-January 04 From: SF Bay Area Member No.: 1,589 Region Association: Northern California |
Clean your fingernails or get a hand model (IMG:http://www.914world.com/bbs2/html/emoticons/ph34r.gif)
(IMG:http://www.914world.com/bbs2/html/emoticons/biggrin.gif) looks good, kid |
|
|
|
| Jeroen |
Feb 22 2006, 04:49 PM
Post
#8
|
|
914 Guru Group: Members Posts: 7,887 Joined: 24-December 02 From: The Netherlands Member No.: 3 Region Association: Europe |
nice work!
smells like a classic thread to me |
|
|
|
| Aaron Cox |
Feb 22 2006, 11:33 PM
Post
#9
|
|
Professional Tinkerer Group: Retired Admin Posts: 24,548 Joined: 1-February 03 From: Corona, CA Member No.: 219 Region Association: Southern California |
ok... the new glue to glue the top....
3m super strength adhesive from home depot. hold it for 5-10 min and then its on its own..... (IMG:http://www.914world.com/bbs2/uploads/blog-1140672532.jpg) now, the stapling. 1/4" were smallest available. although probably fine on their own, i used vinyl scraps as washers.... you cannot feel the staple from the front. PULL and staple. Stretch and staple.... (IMG:http://www.914world.com/bbs2/uploads/blog-1140672550.jpg) trim off the excess later after stapling.... making room for the door panel clips etc..... The 90 percent finished product. need to let it dry before i finish the sides..... RSA handles on order.... (IMG:http://www.914world.com/bbs2/uploads/blog-1140672557.jpg) |
|
|
|
| Brando |
Feb 22 2006, 11:41 PM
Post
#10
|
|
BUY MY SPARE KIDNEY!!! Group: Members Posts: 3,935 Joined: 29-August 04 From: Santa Ana, CA Member No.: 2,648 Region Association: Southern California |
that looks INCREDIBLY slick... no armrest... nada, very clean and crisp.
|
|
|
|
| rhodyguy |
Feb 23 2006, 08:34 AM
Post
#11
|
|
Chimp Sanctuary NW. Check it out. Group: Members Posts: 22,252 Joined: 2-March 03 From: Orion's Bell. The BELL! Member No.: 378 Region Association: Galt's Gulch |
yep. it's a classic. real slick aaron (IMG:http://www.914world.com/bbs2/html/emoticons/smilie_pokal.gif) . combine the new units with "vapor barriers for dummies", and it's a thing of beauty. so where did you get the backing panels?
k |
|
|
|
| Dr Evil |
Feb 23 2006, 08:42 AM
Post
#12
|
|
Send me your transmission! Group: Members Posts: 23,044 Joined: 21-November 03 From: Loveland, OH 45140 Member No.: 1,372 Region Association: MidAtlantic Region |
Nice! (IMG:http://www.914world.com/bbs2/html/emoticons/smilie_pokal.gif) Did you foam between the metal top and the vinyl? I did my set like this, but I have stitched lines on them too. I am thinking of using velcro to mount them as it is easier and may be better in the long run. Another "performance enhancement" is to use some neoprene lining on the back to dampen the noise from the out side.
Attached image(s) 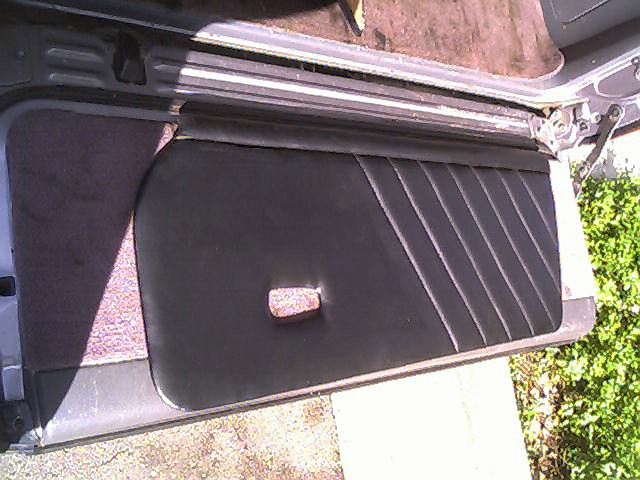
|
|
|
|
| Dr Evil |
Feb 23 2006, 08:45 AM
Post
#13
|
|
Send me your transmission! Group: Members Posts: 23,044 Joined: 21-November 03 From: Loveland, OH 45140 Member No.: 1,372 Region Association: MidAtlantic Region |
Oh ya, since the early metal door tops were always a pain for me to find I am working on having some made from a polymer by a local. If so I will be selling panels again. (IMG:http://www.914world.com/bbs2/html/emoticons/biggrin.gif)
I am glad that you took pics. People always had a hard time understanding that the whole top of the early panels were metal, not just the tabs. |
|
|
|
| Jeroen |
Feb 23 2006, 08:54 AM
Post
#14
|
|
914 Guru Group: Members Posts: 7,887 Joined: 24-December 02 From: The Netherlands Member No.: 3 Region Association: Europe |
what years have the metal top on the panel?
|
|
|
|
| jasons |
Feb 23 2006, 08:55 AM
Post
#15
|
|
Jackstand Extraordinaire Group: Members Posts: 2,011 Joined: 19-August 04 From: Scottsdale, AZ Member No.: 2,573 Region Association: None |
Those look killer. Maybe a classic thread?
BTW Did you consider trying to get the RSA nylon webbing door release to work with the 914? I've wondered how difficult that would be. |
|
|
|
| seanery |
Feb 23 2006, 09:20 AM
Post
#16
|
|
waiting to rebuild whitey! Group: Retired Admin Posts: 15,857 Joined: 7-January 03 From: Indy Member No.: 100 Region Association: None |
(IMG:http://www.914world.com/bbs2/html/emoticons/thumb3d.gif) sweet job AAAAAAaaaaron (IMG:http://www.914world.com/bbs2/html/emoticons/thumb3d.gif)
|
|
|
|
| Aaron Cox |
Feb 23 2006, 11:30 AM
Post
#17
|
||
|
Professional Tinkerer Group: Retired Admin Posts: 24,548 Joined: 1-February 03 From: Corona, CA Member No.: 219 Region Association: Southern California |
rofl mike... i was going to do velcro also.....and a mylar barrier on the back. yep, there is apiece of foam over the metal top.... mike, how did you stitch the line thru the carboard? or you did it thrue the foam? |
||
|
|
|
||
| mike_the_man |
Feb 23 2006, 03:57 PM
Post
#18
|
|
I like stuff! Group: Members Posts: 1,338 Joined: 11-June 03 From: Regina, Saskatchewan, Canada Member No.: 809 |
Aaron, where did you get the RS style door pulls? I've been thinking of doing this exact same thing. Thanks for the how-to! I was also wondering about how to use the red nylon webbing for the inner door handles. Anyone have thoughts on this?
|
|
|
|
| Aaron Cox |
Feb 23 2006, 03:59 PM
Post
#19
|
||
|
Professional Tinkerer Group: Retired Admin Posts: 24,548 Joined: 1-February 03 From: Corona, CA Member No.: 219 Region Association: Southern California |
i thought about the red handle, but i like the ability to lock the car from the inside (IMG:http://www.914world.com/bbs2/html/emoticons/smile.gif) the RSA handles im ordering from pelican, 18 bucks a pop.... these are original 911rs/9146 GT handles... (IMG:http://i6.ebayimg.com/05/i/06/39/2a/b5_1.JPG) (IMG:http://i24.ebayimg.com/01/i/06/3f/da/95_1_b.JPG) RS America (IMG:http://www.pelicanparts.com/catalog/images/interior/911-930RSA_Dr_Pnl.jpg) |
||
|
|
|
||
| TINCAN914 |
Feb 23 2006, 04:21 PM
Post
#20
|
|
Summer's Commin... Group: Members Posts: 2,440 Joined: 18-August 05 From: Colorado Springs, CO. Member No.: 4,611 Region Association: Rocky Mountains |
Nice work Aaron, thanks for sharing... (IMG:http://www.914world.com/bbs2/html/emoticons/smilie_pokal.gif)
|
|
|
|
|
1 User(s) are reading this topic (1 Guests and 0 Anonymous Users)
0 Members:

|
Lo-Fi Version | Time is now: 17th July 2026 - 08:39 AM |
Invision Power Board
v9.1.4 © 2026 IPS, Inc.