|
|

|
Porsche, and the Porsche crest are registered trademarks of Dr. Ing. h.c. F. Porsche AG.
This site is not affiliated with Porsche in any way. Its only purpose is to provide an online forum for car enthusiasts. All other trademarks are property of their respective owners. |
|
|
  |
| gopack |
 Sep 5 2006, 08:34 AM Sep 5 2006, 08:34 AM
Post
#41
|
|
CHEESEHEAD in CA, MARK    Group: Members Posts: 744 Joined: 7-August 04 From: Folsom, CA Member No.: 2,472 Region Association: Northern California |
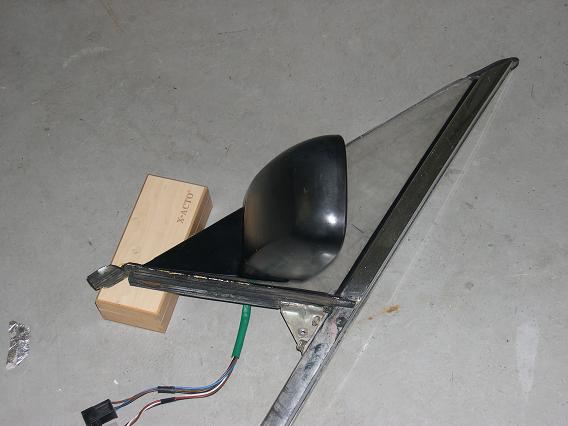
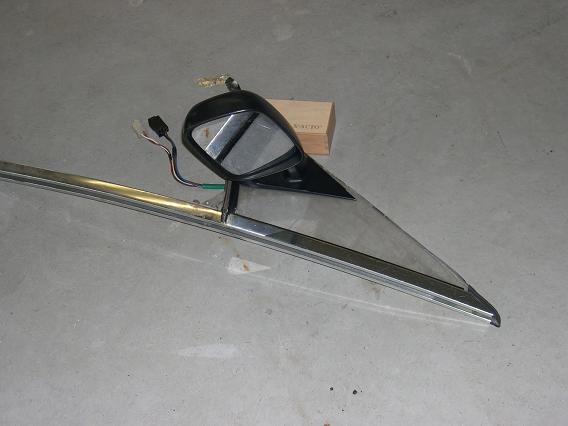
Well some minor progress. I started working on the mock up of the mirror mounting. here are some pics if any one is interested.
It doesnt quite fit, and the angle of the mounting plate will have to be played with, but I think even I can do this! Attached image(s)   
|
| gopack |
 Sep 5 2006, 08:36 AM Sep 5 2006, 08:36 AM
Post
#42
|
|
CHEESEHEAD in CA, MARK    Group: Members Posts: 744 Joined: 7-August 04 From: Folsom, CA Member No.: 2,472 Region Association: Northern California |
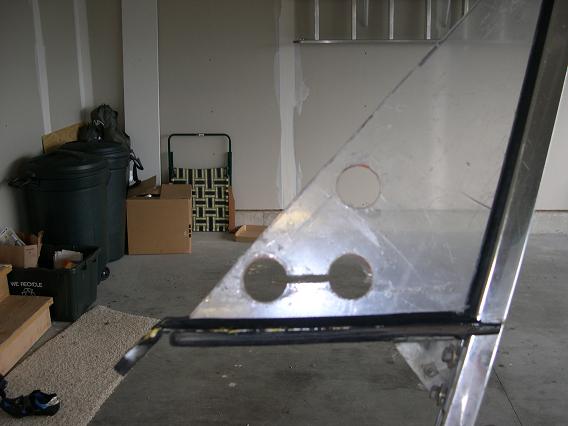
made a vent window out of plexi, and drilled the 3 holes in it. cut the slot to temporarily accomodate a rib in the casting i may cut out in the final product. will need to play with the angles and such for a bit, but i think it will look good. BTW mirror off of a gen 5 VW passat, so I will be keeping it german all the way.
|
| gopack |
 Sep 11 2006, 07:53 AM Sep 11 2006, 07:53 AM
Post
#43
|
|
CHEESEHEAD in CA, MARK    Group: Members Posts: 744 Joined: 7-August 04 From: Folsom, CA Member No.: 2,472 Region Association: Northern California |
Well good news and bad news.
First the good news. The Car is in primer (mostly) and there are very few things to be done before paint. The BAD new is I am SO out of Money that it is getting a little scary. I am afraid to tell the wife where we are so I will tell my freinds on the club site instead. I Owe another $5k for the work to date, which i have in my account for the car. the remaining stuff and paint will be about $4000, which is $4000 over the top number i was quoted of $14k. I am thinking of jsut giving up on the whole dream! Well I went down to visit my baby, and a Chi-Town Teener joined me to help test mount the suspension and wheels. I wanted to make sure the flares were placed properly, see what might be needed for wheel spacers, make sure that the collision damage and repair in the front passenger corner hadn't whacked the front A arm geometry out of wack too badly if at all (before all this I had noticed that with the poly bronze bushings the passenger side was binding a lot more than the drivers side). well both sides were about equal, and Glen asssured me moved more freely than the stock rubbber bushings, so I am satisfied there. here are the pics of what the car looks like now.!!!! rear wheel mounted (IMG:http://i53.photobucket.com/albums/g75/GOPACK42/rearwheel.jpg) side view with 2 helpers simulating engine weight (IMG:http://i53.photobucket.com/albums/g75/GOPACK42/2guysintrunk.jpg) Glen in the car holding on the door and fr bumper clamped in place (IMG:http://i53.photobucket.com/albums/g75/GOPACK42/carside1.jpg) And my favorite custom touch, the high mounted center stop light! (IMG:http://i53.photobucket.com/albums/g75/GOPACK42/stoplight.jpg) Any comments are appreciated.... I am especially proud of the stop light fit and concept! |
| Root_Werks |
 Sep 11 2006, 07:59 AM Sep 11 2006, 07:59 AM
Post
#44
|
|
Village Idiot      Group: Members Posts: 8,315 Joined: 25-May 04 From: About 5NM from Canada Member No.: 2,105 Region Association: Pacific Northwest 
|
(IMG:style_emoticons/default/boldblue.gif) Nice work, looks like actual progress! (IMG:style_emoticons/default/biggrin.gif)
|
| 736conver |
 Sep 11 2006, 08:22 AM Sep 11 2006, 08:22 AM
Post
#45
|
|
Advanced Member     Group: Members Posts: 2,117 Joined: 25-May 03 From: SE Wisconsin Member No.: 736 Region Association: None |
Mark looks good. If you need any local help when you get it back let me know.
|
| gopack |
 Sep 11 2006, 09:06 AM Sep 11 2006, 09:06 AM
Post
#46
|
|
CHEESEHEAD in CA, MARK    Group: Members Posts: 744 Joined: 7-August 04 From: Folsom, CA Member No.: 2,472 Region Association: Northern California |
THanks Brian.
If and when the time comes I will be "SCREAMING" for help! |
| TINCAN914 |
 Sep 11 2006, 09:31 AM Sep 11 2006, 09:31 AM
Post
#47
|
|
Summer's Commin...     Group: Members Posts: 2,440 Joined: 18-August 05 From: Colorado Springs, CO. Member No.: 4,611 Region Association: Rocky Mountains |
Mark,
How did you mount and wire the third light? Did you cut the targa bar, hard for me to tell.. Looking good by the way. |
| gopack |
 Sep 11 2006, 09:46 AM Sep 11 2006, 09:46 AM
Post
#48
|
|
CHEESEHEAD in CA, MARK    Group: Members Posts: 744 Joined: 7-August 04 From: Folsom, CA Member No.: 2,472 Region Association: Northern California |
I will have to get more pictures form the body shop, but here is the short answer:
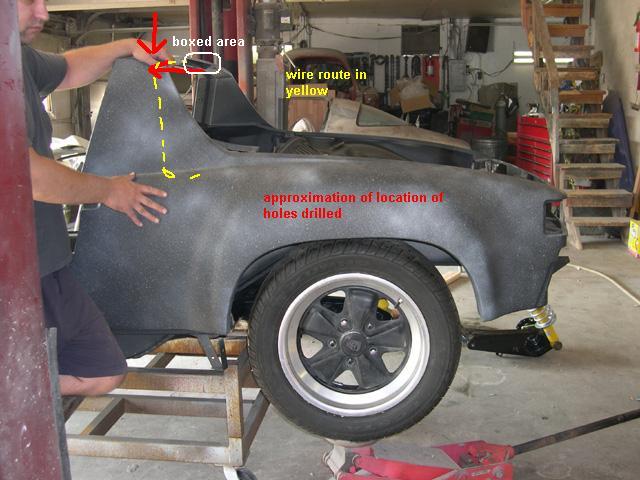
If you followed this thread, I had the entire trailing edge of the targa bar seam welded so I could have the targa bar body colored with no trim attached. After the seam welding, they cut a portion of the lower rear edge out and welded in a box with mounting nuts for the light. they ran a wire through the targa bar from the light box to the relay board area. To do this they had to drill an hole in the side of the targa bar to access the wire and then another in the top at right angles to the first to push it down into the engine compartment, and then weld up the holes. I will likely need to wire it with a relay, a 12 volt from the battery and a resister to get the proper brightness. (BTW, the light is from a Del Sol, and as you can see is a perfect fit.) I would estimate that this was about 10 hours of labor at the shop, but if you have the skills it should be pretty cheap! Attached image(s) 
|
| Brian Mifsud |
 Sep 11 2006, 10:33 AM Sep 11 2006, 10:33 AM
Post
#49
|
|
Mechanical Engineer    Group: Members Posts: 981 Joined: 3-March 03 From: Penngrove, CA Member No.: 384 Region Association: None |
Hey Mark,
Inspiring work.. and I really appreciated the photo of the center tunnel from the bottom without any floorpans. Make the brake and fuel line routing very very clear. Keep your chin up on the financial burden.. remember, you are getting a "new" car after all this work is done. Even with the deep discounts the big three are offering to get sales moving, you couldn't buy a "sporting" car for less than $30K |
| gopack |
 Sep 11 2006, 10:53 AM Sep 11 2006, 10:53 AM
Post
#50
|
|
CHEESEHEAD in CA, MARK    Group: Members Posts: 744 Joined: 7-August 04 From: Folsom, CA Member No.: 2,472 Region Association: Northern California |
Unfortuanately this will be a 30k car by the time I am done with it, nd for all I know it may have a bus motor with 60 HP!? i thought i had 2 liter porsche heads cause i could only feel 3 studs when i bought the car, but it turns out i had 4 stud intake manifolds and heads with one stud removed. I guess that explains the intake leak popping on deceleration!
|
| Brian Mifsud |
 Sep 11 2006, 12:19 PM Sep 11 2006, 12:19 PM
Post
#51
|
|
Mechanical Engineer    Group: Members Posts: 981 Joined: 3-March 03 From: Penngrove, CA Member No.: 384 Region Association: None |
Unfortuanately this will be a 30k car by the time I am done with it, nd for all I know it may have a bus motor with 60 HP!? i thought i had 2 liter porsche heads cause i could only feel 3 studs when i bought the car, but it turns out i had 4 stud intake manifolds and heads with one stud removed. I guess that explains the intake leak popping on deceleration! 60HP?? well, with the big meat tires the flares enable the car will handle like nobody's business so you won't ever need to touch the brake pedal (IMG:style_emoticons/default/biggrin.gif) (IMG:style_emoticons/default/biggrin.gif) just keep your foot in it all the time (IMG:style_emoticons/default/icon_bump.gif) Return On Investment (ROI) - (Fun to Drive, Look at, Own) * (Years added to life Due to copious amount of pleasure) / Total money spent...... (IMG:style_emoticons/default/laugh.gif) |
| gopack |
 Sep 11 2006, 12:21 PM Sep 11 2006, 12:21 PM
Post
#52
|
|
CHEESEHEAD in CA, MARK    Group: Members Posts: 744 Joined: 7-August 04 From: Folsom, CA Member No.: 2,472 Region Association: Northern California |
thanks for the encouragement brian! you are right of course! now to have that talk with my wife.......
|
| gopack |
 Sep 14 2006, 02:01 PM Sep 14 2006, 02:01 PM
Post
#53
|
|
CHEESEHEAD in CA, MARK    Group: Members Posts: 744 Joined: 7-August 04 From: Folsom, CA Member No.: 2,472 Region Association: Northern California |
Well, I talked to the wife, and she says (correctly) that if the money is gone, then the work MUST stop. We are already over budget on this phase of the project. I want a different answer, but I am NOT about to use a redit card and carry the balance with interest!
So, I just called my body shop and said HALT. he is going to go talk to the guy doing the work and see if we can get to an easy (and sensible) stopping point with out spending too much more. I am so bummed (IMG:style_emoticons/default/hanged.gif) about this, but at least I can bring it home and start the mechanical assembly part. |
| gopack |
 Sep 15 2006, 08:18 AM Sep 15 2006, 08:18 AM
Post
#54
|
|
CHEESEHEAD in CA, MARK    Group: Members Posts: 744 Joined: 7-August 04 From: Folsom, CA Member No.: 2,472 Region Association: Northern California |
Well the guy at the body shop called. He kept the guy on it and on the clock all day yesterday, and he will finish the little things liek seat brackets, small pinholes in front of floor pan, and gettign the bottom of the car undercoated today OFF THE CLOCK!!!!!!
Then i can pick it up, and start on the re_assembly at least. I think I will give painting the trunks and passenger compartment a shot as well. gotta do what i can do to get it going, and learnig to lay down a little color can't be that hard can it? Any way i will be pickign it up next weekend (23rd I guess) and starting the long raod back to car-dom (IMG:style_emoticons/default/boldblue.gif) (IMG:style_emoticons/default/beer.gif) (IMG:style_emoticons/default/boldblue.gif) (IMG:style_emoticons/default/beer3.gif) (IMG:style_emoticons/default/boldblue.gif) (IMG:style_emoticons/default/beerchug.gif) (IMG:style_emoticons/default/boldblue.gif) |
| BKLA |
 Sep 15 2006, 09:37 AM Sep 15 2006, 09:37 AM
Post
#55
|
|
Really old member    Group: Members Posts: 1,253 Joined: 14-August 05 From: OR Member No.: 4,590 Region Association: Pacific Northwest 
|
Just read through your entire thread while waiting for a vendor to get here. (IMG:style_emoticons/default/smiley_notworthy.gif)
You are an inspiration. I am in a similar situation with our 2.0. (In storage, awaiting funds to do rust repair/complete repaint.) Please keep the photos and stories coming with your progress. Great job and don't be discouraged! |
| gopack |
 Oct 22 2006, 03:29 PM Oct 22 2006, 03:29 PM
Post
#56
|
|
CHEESEHEAD in CA, MARK    Group: Members Posts: 744 Joined: 7-August 04 From: Folsom, CA Member No.: 2,472 Region Association: Northern California |
Well, here we are.
The car is back in my garage. I have been very happy with te work of the body shop so far. Since I have gotten detail pictures of the high mounted third brake light, and there was some interest, I wnated to show those pics here: first they cut out a section of the targa bar top center rear lip. (IMG:http://i53.photobucket.com/albums/g75/GOPACK42/HPIM3845.jpg) (IMG:http://i53.photobucket.com/albums/g75/GOPACK42/HPIM3846.jpg) (IMG:http://i53.photobucket.com/albums/g75/GOPACK42/HPIM3847.jpg) then they boxed in the top and back of the slot cut out for the ligh. if you look you can see the welded nuts for the mounting screws (IMG:http://s53.photobucket.com/albums/g75/GOPACK42/HPIM3849.jpg) then they completed the box by welding in the end peices (IMG:http://s53.photobucket.com/albums/g75/GOPACK42/HPIM3849.jpg) (IMG:http://s53.photobucket.com/albums/g75/GOPACK42/HPIM3854.jpg) then test fit the light (IMG:http://s53.photobucket.com/albums/g75/GOPACK42/HPIM3857.jpg) (IMG:http://s53.photobucket.com/albums/g75/GOPACK42/HPIM3859.jpg) pic with the top on. unfortunately the top hangs over a little now that I have deleted the targa bar trim (IMG:http://s53.photobucket.com/albums/g75/GOPACK42/HPIM3860.jpg) |
| gopack |
 Oct 22 2006, 03:54 PM Oct 22 2006, 03:54 PM
Post
#57
|
|
CHEESEHEAD in CA, MARK    Group: Members Posts: 744 Joined: 7-August 04 From: Folsom, CA Member No.: 2,472 Region Association: Northern California |
Then we noticed the rear trunk hingehad been repaired poorly by the DAPO, so we did it right
DAPO repair: (IMG:http://s53.photobucket.com/albums/g75/GOPACK42/HPIM3864.jpg) (IMG:http://s53.photobucket.com/albums/g75/GOPACK42/HPIM3865.jpg) (IMG:http://s53.photobucket.com/albums/g75/GOPACK42/HPIM3866.jpg) (IMG:http://s53.photobucket.com/albums/g75/GOPACK42/HPIM3869.jpg) (IMG:http://i53.photobucket.com/albums/g75/GOPACK42/HPIM3868.jpg) and repaired PROPERLY! (IMG:http://i53.photobucket.com/albums/g75/GOPACK42/DSCN1878.jpg) (IMG:http://i53.photobucket.com/albums/g75/GOPACK42/DSCN1879.jpg) (IMG:http://i53.photobucket.com/albums/g75/GOPACK42/DSCN1880.jpg) hard to see in these pics, but if you notice the entire engine compartment has been undercoated. in the first picture you can see the paper coverd coil of wire that was run for the brake light |
| gopack |
 Oct 22 2006, 04:11 PM Oct 22 2006, 04:11 PM
Post
#58
|
|
CHEESEHEAD in CA, MARK    Group: Members Posts: 744 Joined: 7-August 04 From: Folsom, CA Member No.: 2,472 Region Association: Northern California |
then the final work:
cut holes for the Pilot driving lights (IMG:http://s53.photobucket.com/albums/g75/GOPACK42/HPIM3894.jpg) assembled car. pilots , hood, doors and fr bunper mounted (IMG:http://s53.photobucket.com/albums/g75/GOPACK42/HPIM3915.jpg) fuel tank area undercoated (the body guy who worked on the entire project is a Karmen Ghia guy) (IMG:http://s53.photobucket.com/albums/g75/GOPACK42/HPIM3916.jpg) (IMG:http://s53.photobucket.com/albums/g75/GOPACK42/HPIM3918.jpg) Various undercoat shots (IMG:http://s53.photobucket.com/albums/g75/GOPACK42/HPIM3922.jpg) (IMG:http://s53.photobucket.com/albums/g75/GOPACK42/HPIM3923.jpg) (IMG:http://s53.photobucket.com/albums/g75/GOPACK42/HPIM3924.jpg) As always all pics are on my photobucket acount, jsut search for gopack42 if interedted. if you need to see anything in detail, just ask. if I am home, i will take a pic and post it for ya |
| JPB |
 Oct 22 2006, 06:10 PM Oct 22 2006, 06:10 PM
Post
#59
|
|
The Crimson Rocket smiles in your general direction.     Group: Members Posts: 2,927 Joined: 12-November 05 From: Tapmahamock, Va. Member No.: 5,107 |
Nice work Radioactive Man!!! (IMG:style_emoticons/default/smilie_pokal.gif)
(IMG:style_emoticons/default/beer.gif) Hope your child making days are past and your have many 914 driving days ahead. |
| gopack |
 Nov 28 2006, 02:15 PM Nov 28 2006, 02:15 PM
Post
#60
|
|
CHEESEHEAD in CA, MARK    Group: Members Posts: 744 Joined: 7-August 04 From: Folsom, CA Member No.: 2,472 Region Association: Northern California |
Life dictates the end of my 914 dream. car is for sale. Please be kind to a poor dreamer!
for sale ad |
  |
1 User(s) are reading this topic (1 Guests and 0 Anonymous Users)
0 Members:

|
Lo-Fi Version | Time is now: 5th May 2024 - 12:11 AM |
Invision Power Board
v9.1.4 © 2024 IPS, Inc.


