Home  |  Forums  |  914 Info  |  Blogs
 
914World.com - The fastest growing online 914 community!
 
Porsche, and the Porsche crest are registered trademarks of Dr. Ing. h.c. F. Porsche AG. This site is not affiliated with Porsche in any way.
Its only purpose is to provide an online forum for car enthusiasts. All other trademarks are property of their respective owners.
 

Welcome Guest ( Log In | Register )

2 Pages V  1 2 >  
Reply to this topicStart new topic
> A new guy takes the plunge..., Advice welcome!
pib
post Apr 8 2006, 02:52 PM
Post #1


Re Member
**

Group: Members
Posts: 116
Joined: 5-February 06
From: Monterey, CA
Member No.: 5,530


So after a few helpful (IMG:http://www.914world.com/bbs2/html/emoticons/alfred.gif) from members this past week, I've started dealing with the rust on my '75.
I'm sure, as some have said, that this will turn into a complete resto (read: obsession), but I'm starting with the small stuff, and hoping to take what I learn from that into the bigger parts of the project.
I took a bunch of 'before' pictures, which I'll try to post at some point, maybe a blog...
First up, the trunks. Pictures are easier than a full description, so here you go: The red sled...


Attached image(s)
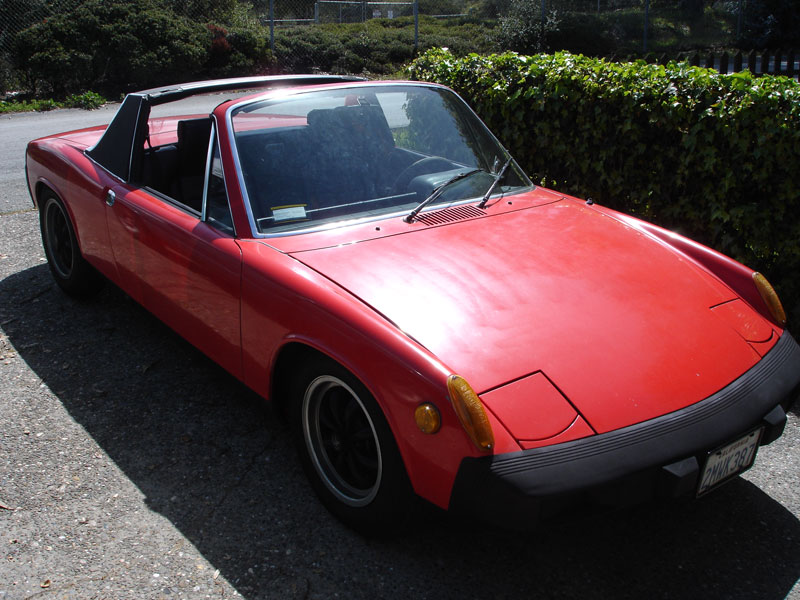
Attached Image
User is offlineProfile CardPM
Go to the top of the page
+Quote Post
pib
post Apr 8 2006, 02:53 PM
Post #2


Re Member
**

Group: Members
Posts: 116
Joined: 5-February 06
From: Monterey, CA
Member No.: 5,530


The back trunk...before


Attached image(s)
Attached Image
User is offlineProfile CardPM
Go to the top of the page
+Quote Post
pib
post Apr 8 2006, 02:54 PM
Post #3


Re Member
**

Group: Members
Posts: 116
Joined: 5-February 06
From: Monterey, CA
Member No.: 5,530


and after a first pass with the wire wheel on the grinder


Attached image(s)
Attached Image
User is offlineProfile CardPM
Go to the top of the page
+Quote Post
porschecb
post Apr 8 2006, 02:58 PM
Post #4


Senior Member
***

Group: Members
Posts: 1,092
Joined: 13-August 04
From: Las Vegas NV
Member No.: 2,529
Region Association: None


Is that a hole I see in the floor?
User is offlineProfile CardPM
Go to the top of the page
+Quote Post
pib
post Apr 8 2006, 02:58 PM
Post #5


Re Member
**

Group: Members
Posts: 116
Joined: 5-February 06
From: Monterey, CA
Member No.: 5,530


That's really the worst spot, most of the rest was surface rust, and came off easily.
So now the questions...
I got my little box of goodies from POR-15 last week, and I could use some advice.
-How much do I need to brush/grind before using the Marine Clean?
- How the heck do you rinse it clean with water...just hose it down and then mop it up?
- Should I have the little hole welded up? Or can I just use the POR-15 filler product?
-I haven't bought a welder, or used one since high school, that's a few weeks down the line I think. Does anyone have a good recommendation for a home MIG setup? Or advice on what to avoid?

Thanks!
-Pete
User is offlineProfile CardPM
Go to the top of the page
+Quote Post
pib
post Apr 8 2006, 03:00 PM
Post #6


Re Member
**

Group: Members
Posts: 116
Joined: 5-February 06
From: Monterey, CA
Member No.: 5,530


QUOTE (porschecb @ Apr 8 2006, 12:58 PM)
Is that a hole I see in the floor?

Yup, a tiny little hole, and the only one in the trunk. The front trunk is much cleaner. The firewall is the worst of it...but I'll get there.
User is offlineProfile CardPM
Go to the top of the page
+Quote Post
jr91472
post Apr 8 2006, 06:25 PM
Post #7


"I'm pacing myself sergeant..."
***

Group: Members
Posts: 1,205
Joined: 2-August 04
From: McKinney, TX
Member No.: 2,437


You only need to brush the loose stuff off. A rough surface actually helps the POR-15 to bond (dis-regard that comment if you have CW intentions).

I think they say 1:1 water and marine clean. As yes, just mop out with a sponge or some such. A heat lamp does wonders to aid in drying. Repeat with the Metal Ready (but no dulution IIRC).

If it were my car, I would just use a filler product for those tiny holes. But welding can be fun.

enjoy the madness (IMG:http://www.914world.com/bbs2/html/emoticons/biggrin.gif)
User is offlineProfile CardPM
Go to the top of the page
+Quote Post
dinomium
post Apr 8 2006, 06:37 PM
Post #8


Git on a chair son, all the good stuff is goin over yer head!
****

Group: Benefactors
Posts: 2,777
Joined: 2-January 03
From: Bremerton, WA
Member No.: 74
Region Association: Pacific Northwest


(IMG:http://www.914world.com/bbs2/html/emoticons/welcome.png)
Nice way to start! I am now in the clean it up and DRIVE IT TILL NEXT WINTER camp!
(IMG:http://www.914world.com/bbs2/html/emoticons/driving.gif) more fun than welding! Less burn marks, too!
User is offlineProfile CardPM
Go to the top of the page
+Quote Post
anthony
post Apr 8 2006, 08:55 PM
Post #9


2270 club
****

Group: Benefactors
Posts: 3,107
Joined: 1-February 03
From: SF Bay Area, CA
Member No.: 218


QUOTE
- How the heck do you rinse it clean with water...just hose it down and then mop it up?


You can use a wet/dry shop vac to vacuum the rinse water out. Take it for a half hour drive and it will be dry as a bone as the muffler is underneath the trunk.
User is offlineProfile CardPM
Go to the top of the page
+Quote Post
SirAndy
post Apr 8 2006, 09:22 PM
Post #10


Resident German
*************************

Group: Admin
Posts: 41,651
Joined: 21-January 03
From: Oakland, Kalifornia
Member No.: 179
Region Association: Northern California


QUOTE (anthony @ Apr 8 2006, 06:55 PM)
Take it for a half hour drive and it will be dry as a bone as the muffler is underneath the trunk.

actually, it won't as the moisture has nowhere to go/vent ...

spray with metal-ready, let it dry, wipe off with wet spunge, let dry, paint with POR-15 ...

if it was me, i'd be replacing that rusted sheetmetal. did you try poking with a screwdriver?
i bet you can easily make that hole much bigger, the metal looks paper-thin there ...
(IMG:http://www.914world.com/bbs2/html/emoticons/smash.gif) (IMG:http://www.914world.com/bbs2/html/emoticons/welder.gif) Andy
User is online!Profile CardPM
Go to the top of the page
+Quote Post
Spoke
post Apr 8 2006, 09:34 PM
Post #11


Jerry
*****

Group: Members
Posts: 6,983
Joined: 29-October 04
From: Allentown, PA
Member No.: 3,031
Region Association: None


QUOTE (SirAndy @ Apr 8 2006, 10:22 PM)
did you try poking with a screwdriver?

Yeah, I tried that too and ran out of screwdrivers. (IMG:http://www.914world.com/bbs2/html/emoticons/biggrin.gif)

Spoke


Attached image(s)
Attached Image
User is offlineProfile CardPM
Go to the top of the page
+Quote Post
pib
post Apr 8 2006, 10:12 PM
Post #12


Re Member
**

Group: Members
Posts: 116
Joined: 5-February 06
From: Monterey, CA
Member No.: 5,530


Thanks guys!

I did try to poke some more, it's really pretty solid, it's just not really pretty. I think I'll grind a bit more on the really rough spot, and then get into mad-scientist mode with the POR products...

The front trunk turned out to be nothing but a really light surface rust. (IMG:http://www.914world.com/bbs2/html/emoticons/smilie_pokal.gif)

And then I pulled the seats and the backpad... (IMG:http://www.914world.com/bbs2/html/emoticons/barf.gif)
The drivers side seat bracket mount was rusted through, and it looks like cracks under the passenger side as well.

One other thing, I rad a few threads about having to scrape a bunch of tar and crap off under the carpets, mine appears to be just painted sheet metal. Was that a difference on early vs late models? (IMG:http://www.914world.com/bbs2/html/emoticons/confused24.gif)
User is offlineProfile CardPM
Go to the top of the page
+Quote Post
SirAndy
post Apr 8 2006, 10:15 PM
Post #13


Resident German
*************************

Group: Admin
Posts: 41,651
Joined: 21-January 03
From: Oakland, Kalifornia
Member No.: 179
Region Association: Northern California


QUOTE (pib @ Apr 8 2006, 08:12 PM)
mine appears to be just painted sheet metal.

if it's the original paint, there's tar underneath that paint ...

the tar mats were glued onto the bare metal, then sprayed over.
that's why you see so many rusted out floorpans. once the tar get's old and brittle, it cracks. water seeps in and works wonders on the bare metal underneath ...

take a closer look ....
(IMG:http://www.914world.com/bbs2/html/emoticons/cool_shades.gif) Andy
User is online!Profile CardPM
Go to the top of the page
+Quote Post
pib
post Apr 8 2006, 10:21 PM
Post #14


Re Member
**

Group: Members
Posts: 116
Joined: 5-February 06
From: Monterey, CA
Member No.: 5,530


Yeah, a closer look is on tomorrow's list of things to do, along with pulling the side trim off and looking/poking at the longs. We'll see just how bad it gets.
My son Kyle, hard at work here... So far, he's the best tool I've found for getting into those hard to reach places!


Attached image(s)
Attached Image
User is offlineProfile CardPM
Go to the top of the page
+Quote Post
anthony
post Apr 8 2006, 11:18 PM
Post #15


2270 club
****

Group: Benefactors
Posts: 3,107
Joined: 1-February 03
From: SF Bay Area, CA
Member No.: 218


QUOTE (SirAndy @ Apr 8 2006, 08:22 PM)
QUOTE (anthony @ Apr 8 2006, 06:55 PM)
Take it for a half hour drive and it will be dry as a bone as the muffler is underneath the trunk.

actually, it won't as the moisture has nowhere to go/vent ...

Worked for me. You make it sound like 914 trunks are air tight or something.
User is offlineProfile CardPM
Go to the top of the page
+Quote Post
SirAndy
post Apr 8 2006, 11:52 PM
Post #16


Resident German
*************************

Group: Admin
Posts: 41,651
Joined: 21-January 03
From: Oakland, Kalifornia
Member No.: 179
Region Association: Northern California


QUOTE (anthony @ Apr 8 2006, 09:18 PM)
Worked for me. You make it sound like 914 trunks are air tight or something.

dunno, mine leaks like hell, every time it rains or i go to the carwash i have about 1" of water in there.

and if i leave it in there, it's still there a week later, no matter how much i drive the car.
and it'll go from pooling at the lower part to a film of moisture everywhere in the trunk.

so yes, i think most of the moisture will stay in the trunk, no matter how hot you get the trunk floor.

and that can't be good ...
(IMG:http://www.914world.com/bbs2/html/emoticons/cool_shades.gif) Andy
User is online!Profile CardPM
Go to the top of the page
+Quote Post
rick 918-S
post Apr 8 2006, 11:55 PM
Post #17


Hey nice rack! -Celette
***************

Group: Members
Posts: 20,464
Joined: 30-December 02
From: Now in Superior WI
Member No.: 43
Region Association: Northstar Region


Looks like you have a good crew! (IMG:http://www.914world.com/bbs2/html/emoticons/welcome.png)
User is offlineProfile CardPM
Go to the top of the page
+Quote Post
rhodyguy
post Apr 9 2006, 12:12 AM
Post #18


Chimp Sanctuary NW. Check it out.
***************

Group: Members
Posts: 22,081
Joined: 2-March 03
From: Orion's Bell. The BELL!
Member No.: 378
Region Association: Galt's Gulch


there's stuff hiding under the seam seal in the trunk. sorry.

k
User is offlineProfile CardPM
Go to the top of the page
+Quote Post
anthony
post Apr 9 2006, 12:43 AM
Post #19


2270 club
****

Group: Benefactors
Posts: 3,107
Joined: 1-February 03
From: SF Bay Area, CA
Member No.: 218


QUOTE (SirAndy @ Apr 8 2006, 10:52 PM)
dunno, mine leaks like hell, every time it rains or i go to the carwash i have about 1" of water in there.

and if i leave it in there, it's still there a week later, no matter how much i drive the car.
and it'll go from pooling at the lower part to a film of moisture everywhere in the trunk.

so yes, i think most of the moisture will stay in the trunk, no matter how hot you get the trunk floor.

and that can't be good ...
(IMG:http://www.914world.com/bbs2/html/emoticons/cool_shades.gif)  Andy

Please note that above I suggested that he vacuum out all of the water in the trunk with a shop vac. You only quoted half of my post. I didn't mean that he should drive around with an inch of water in his trunk and that it would evaporate.

After vacuuming out any water a drive will definitely cause any residual dampness to evaporate away and then he could apply the Metal Ready or the Por15 depending on which step he is on.

User is offlineProfile CardPM
Go to the top of the page
+Quote Post
pib
post Apr 9 2006, 01:21 AM
Post #20


Re Member
**

Group: Members
Posts: 116
Joined: 5-February 06
From: Monterey, CA
Member No.: 5,530


QUOTE (rhodyguy @ Apr 8 2006, 10:12 PM)
there's stuff hiding under the seam seal in the trunk. sorry.

k

(IMG:http://www.914world.com/bbs2/html/emoticons/ohmy.gif) Yikes! So all of that whitish sealer needs to be ground out too? What do you use to replace the sealer after the metal is all cleaned & treated? And do you replace the sealer after the POR-15 and before final paint?
Rick: He's a great helper. Loves to get his little hands dirty and turn those wrenches. Also great for fetching beer and pretzels! (IMG:http://www.914world.com/bbs2/html/emoticons/beerchug.gif) Now if I could just get him to do his homework...

Thanks everyone for the tips! I think she's taken her last drive for a while, so it'll be shop-vac and heat lamp for me tomorrow. Maybe a trip to Home Depot to look at welders...
User is offlineProfile CardPM
Go to the top of the page
+Quote Post

2 Pages V  1 2 >
Reply to this topicStart new topic
1 User(s) are reading this topic (1 Guests and 0 Anonymous Users)
0 Members:


- Lo-Fi Version Time is now: 21st May 2024 - 04:27 PM