|
|
|
Porsche, and the Porsche crest are registered trademarks of Dr. Ing. h.c. F. Porsche AG.
This site is not affiliated with Porsche in any way. Its only purpose is to provide an online forum for car enthusiasts. All other trademarks are property of their respective owners. |
|
|

  |

| BigDBass |
 May 21 2006, 12:30 AM May 21 2006, 12:30 AM
Post
#1
|
|
Dumb Question Champion  Group: Members Posts: 1,438 Joined: 11-January 06 From: Chicago (south 'burbs) Member No.: 5,405 Region Association: Upper MidWest |
I'm planning to install a fiberglass LE airdam replica originally from Performance Products that I got from ebay. This site was offline, so I didn't think to get the one from Morphenspectra which seems to fit better.
My plan is to line up the airdam on the car and mark locations then use a hand drill to drill appropriately sized holes in the 4 mounting tabs. Any tips? |
   |

 
|
| blitZ |
May 21 2006, 01:43 PM
Post
#2
|
|
Beer please... Group: Members Posts: 2,223 Joined: 31-August 05 From: Lawrenceville, GA Member No.: 4,719 Region Association: South East States |
My LE spoiler maybe different from yours. It has to verticle tabs about a foot from the center each side. I didn't use the tabs at all. I already had two holes drilled in the bottom of the front quarter panel where the spoiler wraps around the side of the car. I drilled two more holes through the spoiler into the bottom of the bumper at a convenient reachable spot. This made it easier to snug the spoiler up to the bumper bottom and I don't have to remove the bumper to remove the spoiler.
Hope this helps. |
|
|
|
| BigDBass |
May 22 2006, 10:38 PM
Post
#3
|
|
Dumb Question Champion Group: Members Posts: 1,438 Joined: 11-January 06 From: Chicago (south 'burbs) Member No.: 5,405 Region Association: Upper MidWest |
Thanks Les. I'll keep that stuff in mind.
At risk of dumbly not asking: I assume that the spoiler replaces the stock valence rather than adding on to it... |
|
|
|
| Chris Pincetich |
May 22 2006, 10:51 PM
Post
#4
|
|
B-) Group: Members Posts: 2,082 Joined: 3-October 05 From: Point Reyes Station, CA Member No.: 4,907 Region Association: Northern California |
Mine has some figure 8 holes from the PO's frustrating attempts to mount it. Mine has no tabs anywhere, the top surface is about 0.75" wide and simply mounts flush with the bottom of the bumper (I have the early chrome bumper). I highly reccomend that you enable access to the mounting hardware through the fog light holes in the bumper...you will need a wrench on both sides to get it nice and tight. Have fun! (IMG:style_emoticons/default/beerchug.gif)
|
|
|
|
| rcrgrl |
May 22 2006, 10:55 PM
Post
#5
|
|
Member Group: Members Posts: 202 Joined: 19-April 06 From: San Diego, CA Member No.: 5,893 |
QUOTE(BigDBass @ May 20 2006, 11:30 PM)  I'm planning to install a fiberglass LE airdam replica originally from Performance Products that I got from ebay. This site was offline, so I didn't think to get the one from Morphenspectra which seems to fit better. My plan is to line up the airdam on the car and mark locations then use a hand drill to drill appropriately sized holes in the 4 mounting tabs. Any tips? that's what i did and it worked just dandy - i was able to reach thru the front trunk and down to the back of the mounting tabs... then i added the two holes on the sides to attach to the exisiting holes in the bumper. don't have to remove the bumper and it snugs up nice. yes, it replaces the stock valance |
|
|
|
| Trekkor |
May 22 2006, 11:11 PM
Post
#6
|
|
I do things... Group: Members Posts: 7,809 Joined: 2-December 03 From: Napa, Ca Member No.: 1,413 Region Association: Northern California |
Believe it or not, this was once an LE air dam. (IMG:style_emoticons/default/smash.gif)
Attatched with dzus fasteners. I have a second one that is just black with no Sweeper™ or air holes for the oil cooler or brake ducts. It also fastenes with the dzus's's's KT Attached image(s) 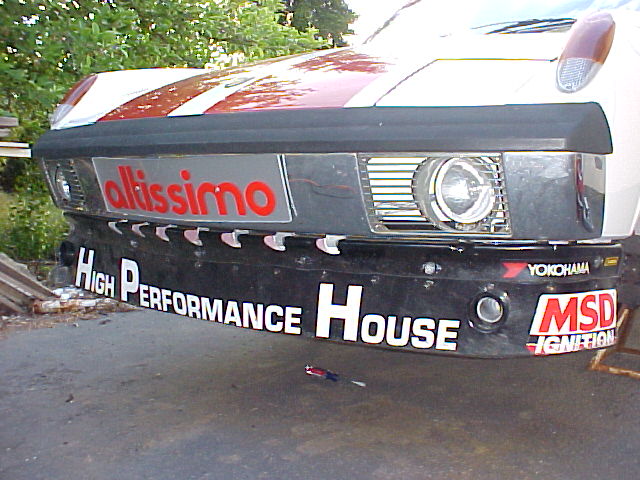
|
|
|
|
| Aaron Cox |
May 22 2006, 11:12 PM
Post
#7
|
|
Professional Lawn Dart Group: Retired Admin Posts: 24,542 Joined: 1-February 03 From: Corona, CA Member No.: 219 Region Association: Southern California |
show us youre DZUS mounts.....
|
|
|
|
| Trekkor |
May 22 2006, 11:29 PM
Post
#8
|
|
I do things... Group: Members Posts: 7,809 Joined: 2-December 03 From: Napa, Ca Member No.: 1,413 Region Association: Northern California |
I dont think I have any pictures of them. They are ugly.
Searching... KT |
|
|
|
| Aaron Cox |
May 22 2006, 11:31 PM
Post
#9
|
|
Professional Lawn Dart Group: Retired Admin Posts: 24,542 Joined: 1-February 03 From: Corona, CA Member No.: 219 Region Association: Southern California |
QUOTE(trekkor @ May 22 2006, 10:29 PM) I dont think I have any pictures of them. They are ugly. Searching... KT pull the valence (IMG:style_emoticons/default/tongue.gif) it dont gotta be purdy.... just has to be functional..... why not go to FG bumpers on your racer trek?? |
|
|
|
| Trekkor |
May 22 2006, 11:41 PM
Post
#10
|
|
I do things... Group: Members Posts: 7,809 Joined: 2-December 03 From: Napa, Ca Member No.: 1,413 Region Association: Northern California |
Here's a better shot. From yesteryear...
I don't want to go outside and take a picture right now. Just think Simson Strong tie 2x2 "L" brackets from Home Depot bent and welded on. Dzus clips riveted onto those. KT Attached image(s) 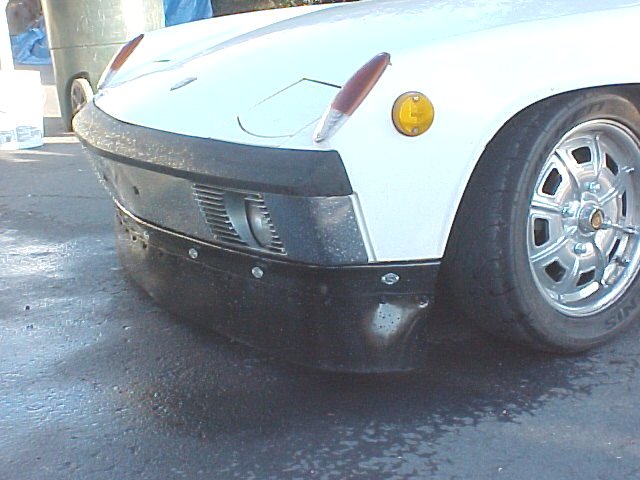
|
|
|
|
| BigDBass |
May 3 2010, 01:06 PM
Post
#11
|
|
Dumb Question Champion Group: Members Posts: 1,438 Joined: 11-January 06 From: Chicago (south 'burbs) Member No.: 5,405 Region Association: Upper MidWest |
Nearly 4 years later and I still have this LE airdam sitting on the shelf...
I think it's "gelcoat"... Do I need to sand/prime/paint this thing or can it just go on as is? |
|
|
|
| PeeGreen 914 |
May 3 2010, 01:11 PM
Post
#12
|
|
Just when you think you're done...wait, there is more..lol Group: Members Posts: 10,219 Joined: 21-September 06 From: Seattle, WA... actually Everett Member No.: 6,884 Region Association: Pacific Northwest |
|
|
|
|
|
1 User(s) are reading this topic (1 Guests and 0 Anonymous Users)
0 Members:

|
Lo-Fi Version | Time is now: 9th July 2025 - 08:26 AM |
Invision Power Board
v9.1.4 © 2025 IPS, Inc.