|
|
|
Porsche, and the Porsche crest are registered trademarks of Dr. Ing. h.c. F. Porsche AG.
This site is not affiliated with Porsche in any way. Its only purpose is to provide an online forum for car enthusiasts. All other trademarks are property of their respective owners. |
|
|

  |

| Mueller |
 Jun 11 2006, 01:54 AM Jun 11 2006, 01:54 AM
Post
#1
|
|
914 Freak!  Group: Members Posts: 17,146 Joined: 4-January 03 From: Antioch, CA Member No.: 87 Region Association: None |
Trying to buy a set of steel GT flares, if still available I hope to pick them up this week. For those that have installed them before, how long did it take per flare??
Anyone have the thread on making your own GT rocker panels from the stock steel units? Besides Dunkles GT flare install, any other "how-to" threads?? Thanks..... |
   |

 
|
| Aaron Cox |
Jun 11 2006, 01:55 AM
Post
#2
|
|
Professional Lawn Dart Group: Retired Admin Posts: 24,541 Joined: 1-February 03 From: OC Member No.: 219 Region Association: Southern California |
joe o (series 9) did a pictorial on both...
buttweld the flares... get the cool harbor freight clamps... east coaster just did the same install... i guess a few hours per.... |
|
|
|
| greg.treadway |
Jun 11 2006, 01:58 AM
Post
#3
|
|
914 Nut Group: Members Posts: 282 Joined: 16-December 04 From: Marietta, GA Member No.: 3,295 |
Make sure you fit the flares and the rockers at the same time. If you're going to flare some rockers then you'll be okay, but fitting the FG rockers after the fact will give you a big headache.
|
|
|
|
| Mueller |
Jun 11 2006, 01:58 AM
Post
#4
|
|
914 Freak! Group: Members Posts: 17,146 Joined: 4-January 03 From: Antioch, CA Member No.: 87 Region Association: None |
QUOTE(Aaron Cox @ Jun 11 2006, 12:55 AM)  joe o (series 9) did a pictorial on both... buttweld the flares... get the cool harbor freight clamps... east coaster just did the same install... i guess a few hours per.... i bought the clamps last week (IMG:style_emoticons/default/smile.gif) (IMG:style_emoticons/default/welder.gif) |
|
|
|
| East coaster |
Jun 11 2006, 06:41 AM
Post
#5
|
|
Senior Member Group: Members Posts: 1,668 Joined: 28-March 03 From: Brigantine, NJ Member No.: 487 Region Association: None |
Having just gone through this, I have a couple recommendations.
1) Fitting - I see folks suggesting to make your flares match the GT rockers. My GT rockers are such pieces of sh*t I would never make the body of my car match these fiberglass chunks of junk. I know I'll take flames for this, but put your flares where they should be.....centered on the wheel opening. My rockers aren't even the same between left and right. It's very easy to deal with moding the rockers to match your flares. The reason peoples rockers don't match their flares is because the rockers are crap, why use this crap as a critical reference for positioning your flares..........think about it! 2) Cutting - I trimmed the mating surface of the flares to get them to fit the body uniformly. Mine were coursely trimmed and didn't fit very well without some tweaking. Once they fit the body contours correctly, I clamped them in place at the bottom and held them against the body and used a sharpie marker to trace the seam onto the body. You can either remove the flare and cut along the line or leave the flare in place it use it as a guide. I tried both methods and didn't see much difference. If you have an air saw that'll work best for cutting the fender. 3) Welding - I tried TIG and MIG, TIG produced the best results. Mount the flare in place using the butt clamps and when satisfied with the placement, tack weld in between each clamp. I found the most important thing is to take your time and not try to weld too much at once. This will help control warping/shrinking. The time you'll save in hammer and dolly work will be well worth the time spent going slowly with the welding. 4) A couple other tips - I left the bottom of the factory fender in place (along with the factory brace) and butt welded the flare to it. It made for a clean looking and strong bottom edge for mounting the above mentioned rockers. This is hard to put into words, so here's a pic: 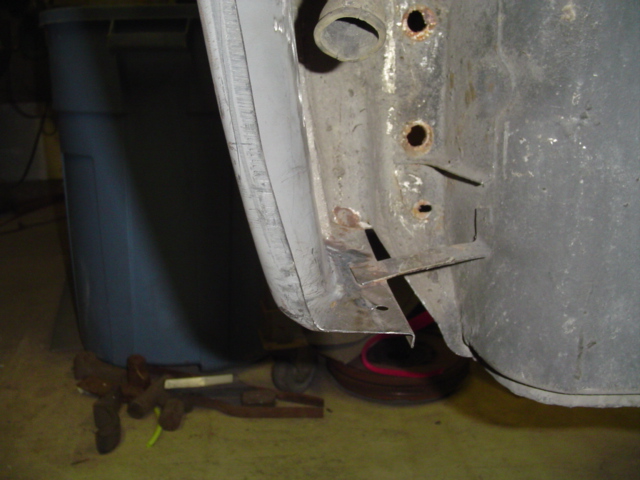 5) I assume your talking about repro GT flares. If so, you'll have to do a little hammer/dolly work to make the bottom of the flare mate to the bottom of the fender. The flare will be flat at the botom and the fender has an angled bottom. I did a gradual morph from flat to angle to mate the bottoms. Again, a pic is worth a thousand words: 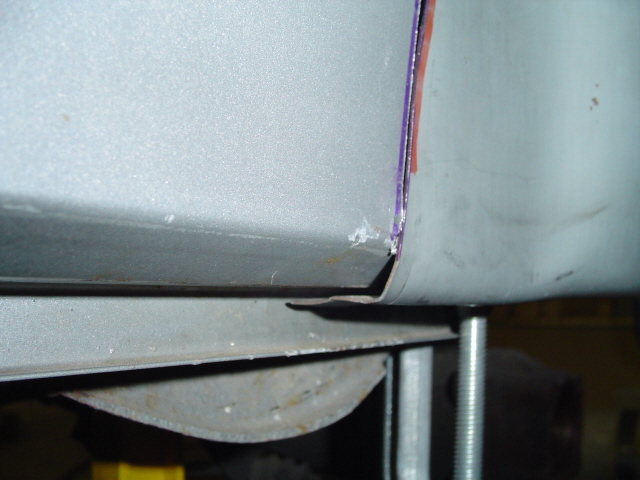 Take your time and have fun! (IMG:style_emoticons/default/sawzall-smiley.gif) (IMG:style_emoticons/default/welder.gif) |
|
|
|
| East coaster |
Jun 11 2006, 06:57 AM
Post
#6
|
|
Senior Member Group: Members Posts: 1,668 Joined: 28-March 03 From: Brigantine, NJ Member No.: 487 Region Association: None |
Oh yeah, this should go without saying, but I managed to miss it on my first flare (dumbass!)
Make sure you clean BOTH sides of the weld seam to bare metal before welding. I missed the backside of the first fender I did and the crap on the backside contaminated the weld and gave me crappy welds until I realized why. I found that the max I could weld without warping was about and inch at a time.... 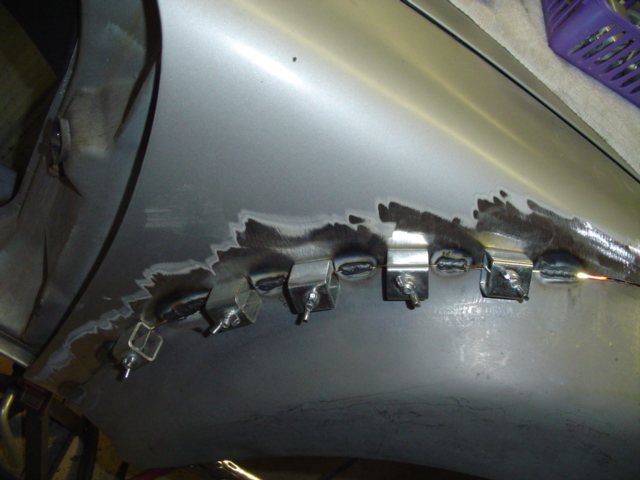 |
|
|
|
| Phoenix-MN |
Jun 11 2006, 07:12 AM
Post
#7
|
|
Senior Member Group: Members Posts: 927 Joined: 23-January 04 From: ST. Bonifacius,MN Member No.: 1,590 |
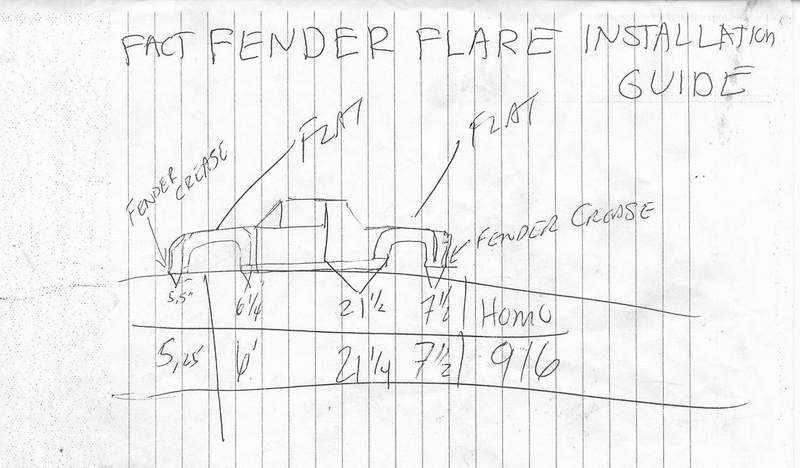 Here is how I did mine, it took me about 7 to 8 hours per flare Here is how I did mine, it took me about 7 to 8 hours per flarehttp://phoenixhobbies.com/html/flares.html and I used these dimensions from a 916 that was measured by someone. |
|
|
|
| plymouth37 |
Jun 11 2006, 08:57 PM
Post
#8
|
|
Senior Member Group: Members Posts: 1,825 Joined: 24-May 05 From: Snoqualmie, WA Member No.: 4,138 Region Association: Pacific Northwest |
I have installed a couple sets of the AA flares, butt welded, tack welded etc... as much as I like to give AA a hard time I have to say their flares fit really well. it took me about 8 hours to fit, weld, and dress 4 flares. looks like everybody is giving you good advice, be sure to butt weld! it takes a little longer but it is really worth it. P.S. those clamps are sweet!
my flare job (IMG:style_emoticons/default/sawzall-smiley.gif) (IMG:http://renegadehybrids.com/pr/ss9_porsche914_yuji_054.jpg) |
|
|
|
| Mueller |
Jun 11 2006, 09:02 PM
Post
#9
|
|
914 Freak! Group: Members Posts: 17,146 Joined: 4-January 03 From: Antioch, CA Member No.: 87 Region Association: None |
Just got home with the flares !!!
Took my wife and the twins (IMG:style_emoticons/default/wub.gif) (IMG:style_emoticons/default/wub.gif) on the 200+ mile round trip to pick them up. Talked to Paul for about 45 minutes while Sherryl fed the girls and relaxed in the shade.... The flares do look nice and so far after laying them up against the car I see nothing wrong with them that stands out..... A "little" bit more money than 'glass flares but I think it's worth it.... |
|
|
|
| John Kelly |
Jun 12 2006, 06:45 AM
Post
#10
|
|
Senior Member Group: Members Posts: 692 Joined: 1-May 03 From: Moclips WA. Member No.: 640 |
Hi Mike,
As long as you keep in mind that you cannot stop the weld from shrinking and warping the metal, and that you will have to deal with it one way or another, you'll be fine. You will have to either stretch the weld and the area that turns blue on either side of it, or fill, or both, depending on how much time you want to spend. I would clamp the flare in place (lots of clamps) and scribe a line. It helps to mark it first with a magic marker so the scribe line shows up. Make witness marks perpendicular to the scribe line so that you get the flare in the right spot after cutting. The better the fit, the better weld. I've never had a use for those panel clamps. They leave an unnecessary gap between panels. Long reach vice grips work for me, but probably too steep of an investment for one time use. Don't get caught up worrying about how much time it takes to install a flare. Take your time. If it takes you 20 hours per flare, so be it. If you are using a mig welder, you will have to grind the weld on both sides in order to hammer and dolly it. I would do very short, and hot tack welds. For gas or tig welds, weld an inch or more before hammering. On those flares, some areas may be easier to hammer from the inside with a dolly on the outside. John www.ghiaspecialties.com |
|
|
|
| jonwatts |
Jun 12 2006, 08:24 AM
Post
#11
|
|
no rules, just wrong Group: Benefactors Posts: 2,321 Joined: 13-January 03 From: San Jose, CA Member No.: 141 |
Hi John, long time no read. New digs keeping you busy?
What about backing the weld gap with copper? Would that minimize the amount of grinding needed on the back of the panel? Hope life is treating you well, Jon |
|
|
|
| WRX914 |
Jun 12 2006, 09:41 AM
Post
#12
|
|
2.5 WRX STI hybrid powered beast Group: Members Posts: 782 Joined: 16-September 04 From: Las Vegas, NV Member No.: 2,771 Region Association: Southwest Region |
Here are my flares. Dana did the install. I had mine blended at the body shop to get that nice radius.
Attached image(s) 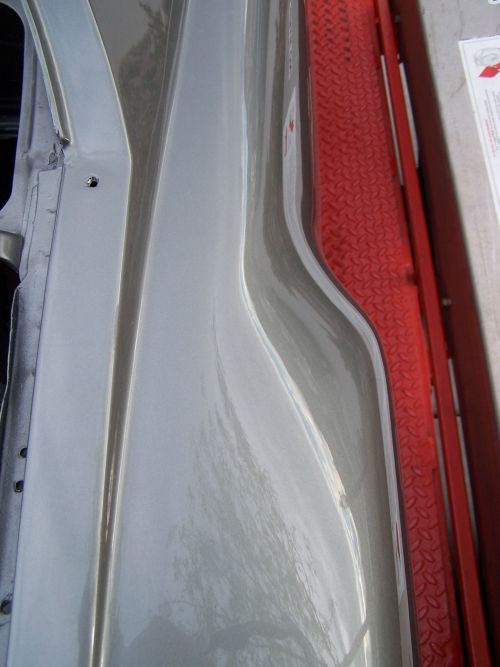
|
|
|
|
| Mueller |
Jun 12 2006, 12:48 PM
Post
#13
|
|
914 Freak! Group: Members Posts: 17,146 Joined: 4-January 03 From: Antioch, CA Member No.: 87 Region Association: None |
QUOTE(WRX914 @ Jun 12 2006, 08:41 AM) Here are my flares. Dana did the install. I had mine blended at the body shop to get that nice radius. that is nice......thanks for the info peoples (IMG:style_emoticons/default/smile.gif) |
|
|
|
| John Kelly |
Jun 13 2006, 06:22 AM
Post
#14
|
|
Senior Member Group: Members Posts: 692 Joined: 1-May 03 From: Moclips WA. Member No.: 640 |
QUOTE(jonwatts @ Jun 12 2006, 06:24 AM) Hi John, long time no read. New digs keeping you busy? What about backing the weld gap with copper? Would that minimize the amount of grinding needed on the back of the panel? Hope life is treating you well, Jon Hi Jon, Staying pretty busy. Vacation rental season is upon us at the end of the month...July and August will be hopping. I've done a few metalshapers retreats...need a bigger shop though. Here is our web site for anyone interested: www.gullwinginn.com The beach is great! I love living here. Still working on my second flare video. I've never backed up a weld with copper but I bet it works for mig really well. John www.ghiaspecialties.com |
|
|
|
|
1 User(s) are reading this topic (1 Guests and 0 Anonymous Users)
0 Members:

|
Lo-Fi Version | Time is now: 11th May 2024 - 10:14 PM |
Invision Power Board
v9.1.4 © 2024 IPS, Inc.