|
|
|
Porsche, and the Porsche crest are registered trademarks of Dr. Ing. h.c. F. Porsche AG.
This site is not affiliated with Porsche in any way. Its only purpose is to provide an online forum for car enthusiasts. All other trademarks are property of their respective owners. |
|
|


| neo914-6 |
 Jul 20 2006, 03:15 AM Jul 20 2006, 03:15 AM
Post
#1
|
|
neo life  Group: Members Posts: 5,086 Joined: 16-January 03 From: Willow Glen (San Jose) Member No.: 159 |
can't see what's holding it in...
Attached image(s) 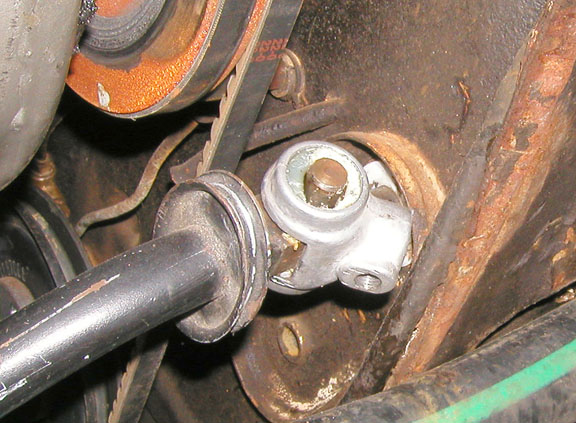
|
   |

 
|
  |
Replies(1 - 19)
| jr91472 |
Jul 20 2006, 06:45 AM
Post
#2
|
|
"I'm pacing myself sergeant..." Group: Members Posts: 1,205 Joined: 2-August 04 From: McKinney, TX Member No.: 2,437 |
This first thing is to remove the shift rod from the car. Once out of the car and on your bench, then attack the shift bushing.
It looks like you have already removed the cone screw...correct? Now remove the cone screw at the rear of the car (by the tranny). Once both are out, the rod should pull away from the tranny and the firewall. You should then have the shift rod out with the coupler attached. Now that that is out, you will need a vice and/or press and an assortment of wrench sockets (deep sockets work best). Place the coupler (still attached to the rod) in the vice. Use a small socket and place against the "large horizontal pin". Use a second larger socket and place on the oppisite side of the coupler. This second socket should be big enough that the "pin" will push through it once you start turning the vice. But it must also be small enough so that it fits inside the coupler. I.E. its diameter should roughly match the plastic bushing - bigger than the pin, but smaller that the coupler body. The idea is that the vice will push the pin through the bushing. BUT, BE CAREFUL. The actual coupler is not that strong. That is why the size of the sockets that you use is so important. The coupler should "float" in the vice because all the stress will be on the "pin" on one side and the bushing on the other. If done wrong, the coupler will break. Sorry I don't have any pics. Once you figure it out, it is actually quite easy. good luck. |
|
|
|
| JoeSharp |
Jul 20 2006, 07:01 AM
Post
#3
|
|
In Irvine, Ca. May 15-18 Group: Members Posts: 3,947 Joined: 9-July 03 From: DeLand, Florida Member No.: 898 Region Association: South East States |
Felix: I take a piece of something like 1/8 plate and put it in the vice and put the square part of the shaft on it to keep from putting pressure on the cast parts. I have read of people breaking them. The pin is pressed in and can be driven out with a punch. There are sirations on the shaft that help to keep it in place. When I replace the bushings, I use a cold chisel the refreshen them.
:PERMAGRIN: Joe |
|
|
|
| maf914 |
Jul 20 2006, 07:03 AM
Post
#4
|
|
Not a Guru! Group: Members Posts: 3,049 Joined: 30-April 03 From: Central Florida Member No.: 632 Region Association: None |
If you have a bench vise that's the way to go. My method was a little more basic.
I removed the shift rod with coupler attached and sprayed it with penetrating oil. I took a block of wood (actually a piece of landscaping timber) and drilled a hole a little larger in diameter than the pin in the coupler and deeper tham the length of the pin. I placed the coupler on this block with the pin centered on the hole and gently tapped the pin into the hole using a hammer and punch. Gently, because as stated above the coupler is somewhat fragile. It looks like cast aluminum or pot metal and is probably brittle. In my case the pin came out with relative little force from the hammer. (IMG:style_emoticons/default/smash.gif) Remove the old bushings and replace with new from the inside of the coupler. Reposition on the shift rod and tap the pin back in. (IMG:style_emoticons/default/smash.gif) Be patient and don't force it. Replacement couplers aren't cheap! (IMG:style_emoticons/default/thumb3d.gif) |
|
|
|
| solex |
Jul 20 2006, 07:28 AM
Post
#5
|
|
Senior Member Group: Members Posts: 789 Joined: 12-January 05 From: Long Island, NY Member No.: 3,439 Region Association: North East States |
I just did this and had a hell of a time trying to get the pin out.
I used a vise and two sockets, one to support the rod (size it so it fits inside the cage and supports the rod (it must not support the cage) and the other socket should fit on top of the pin. I soaked mine in penetrating oil for a few days but that did not really help. I had to apply a bit of heat to the rod where it surrounds the pin and only after I was able to get the pin out. Dan |
|
|
|
| Aaron Cox |
Jul 20 2006, 07:41 AM
Post
#6
|
|
Professional Tinkerer Group: Retired Admin Posts: 24,548 Joined: 1-February 03 From: Corona, CA Member No.: 219 Region Association: Southern California |
i did a quickee write up on this...
PITA.... |
|
|
|
| URY914 |
Jul 20 2006, 08:02 AM
Post
#7
|
|
I built the lightest 914 in the history of mankind. Group: Members Posts: 132,067 Joined: 3-February 03 From: Jacksonville, FL Member No.: 222 Region Association: None |
A few tips:
A little heat should help things along. Go slow when your pressing it out. Be careful not to screw up the pin. |
|
|
|
| neo914-6 |
Jul 21 2006, 01:53 AM
Post
#8
|
|
neo life Group: Members Posts: 5,086 Joined: 16-January 03 From: Willow Glen (San Jose) Member No.: 159 |
All Good advice, I used my small vise and the pin came out surprisingly easy (with a pipe on the vise handle).
1. As recommended I used a smaller than pin size socket with hardened washers on the opposite side to hold the bushing to the housing. 2. Once the pin was protruding I used a socket larger than the pin to get it 3/4 out. Attached image(s) 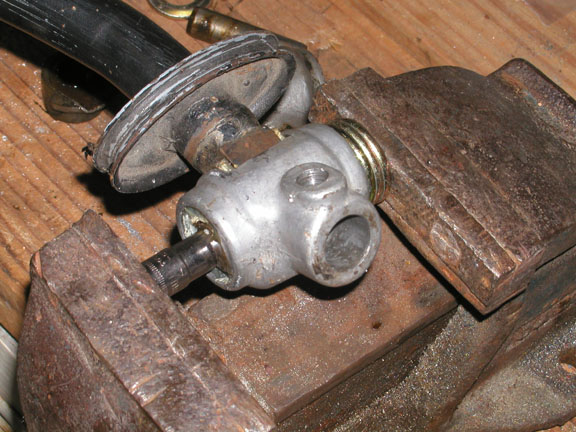 
|
|
|
|
| neo914-6 |
Jul 21 2006, 01:55 AM
Post
#9
|
|
neo life Group: Members Posts: 5,086 Joined: 16-January 03 From: Willow Glen (San Jose) Member No.: 159 |
3. I then pulled the pin out with pliers and a rag to protect it. The pin has 3 or 4 serrations. This must enough to secure it in the square rod's hole.
4. To install the bushings I used a long socket with washer on opposite side and drove the first one in with the vise. The half flanged bushings install from the inside of the coupler. The flange keeps them in. I had to work and guide the edges of the bushing in the coupler housing. Attached image(s) 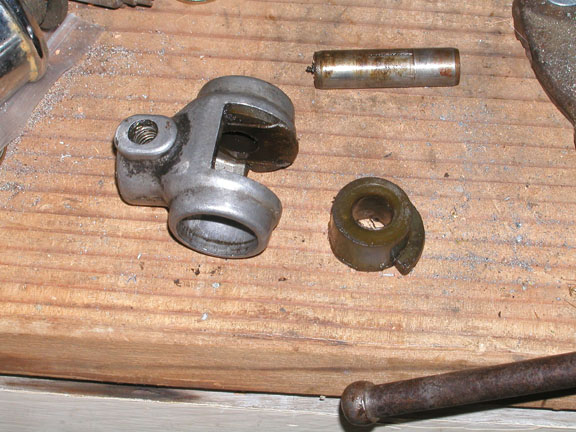 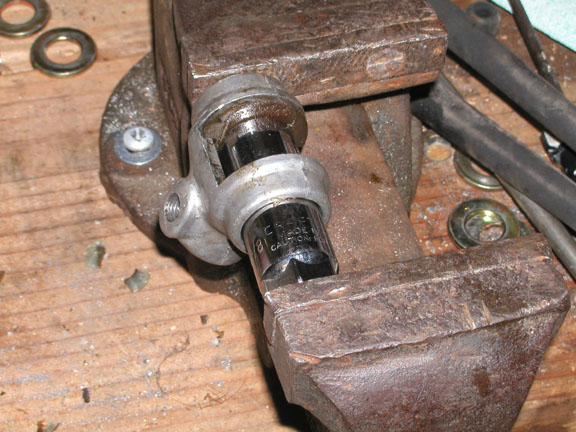
|
|
|
|
| neo914-6 |
Jul 21 2006, 01:56 AM
Post
#10
|
|
neo life Group: Members Posts: 5,086 Joined: 16-January 03 From: Willow Glen (San Jose) Member No.: 159 |
5. To get the second bushing in I used the pin and a flat piece of aluminum in the vise of course.
6. Once they were in I removed the pin and inserted the square part of the shift rod. Be carefull not to install it upside down as the set screws should be in the same down orientation. 7. I then drove the pin in with a washer on the opposite side. The bushing where the pin was driving wants to recess into the gap between the coupler and square rod. Get it flush with the bushings and you're ready to install the shifter. Attached image(s) 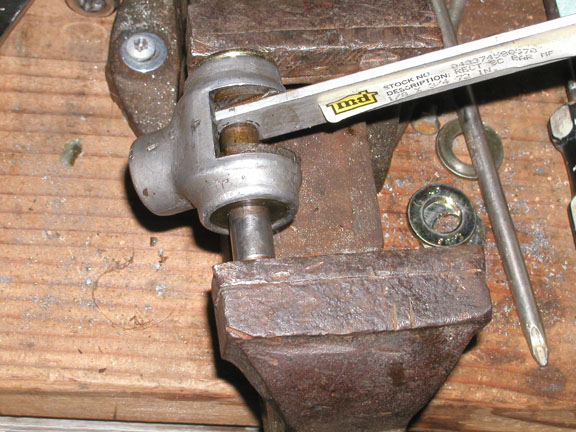 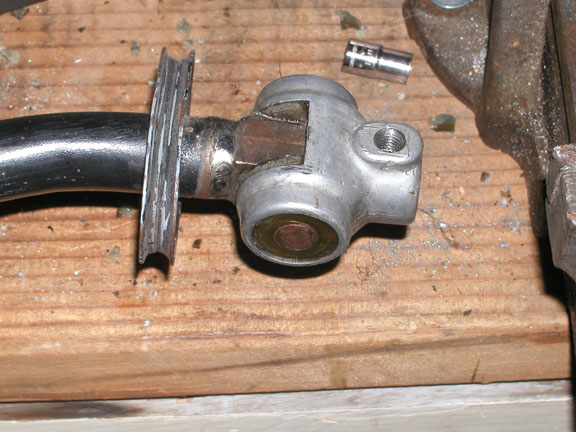
|
|
|
|
| McMark |
Jul 21 2006, 02:17 AM
Post
#11
|
|
914 Freak! Group: Retired Admin Posts: 20,180 Joined: 13-March 03 From: Grand Rapids, MI Member No.: 419 Region Association: None |
Nice writeup Felix. (IMG:style_emoticons/default/biggrin.gif) (IMG:style_emoticons/default/thumb3d.gif)
|
|
|
|
| jr91472 |
Jul 21 2006, 07:46 AM
Post
#12
|
|
"I'm pacing myself sergeant..." Group: Members Posts: 1,205 Joined: 2-August 04 From: McKinney, TX Member No.: 2,437 |
YO Admins!!
Can this go in the Classics? It is way too complicated to explain and Neo914-6's pics say it all. Good job man (IMG:style_emoticons/default/beerchug.gif) |
|
|
|
| elwood-914 |
Jul 21 2006, 07:55 AM
Post
#13
|
|
elwood-914 Group: Members Posts: 387 Joined: 29-December 02 From: Plymouth CA Member No.: 38 |
I was just looking at my bushing kit and wondering where those went. Very timely. Thanks Felix for the good write up. (IMG:style_emoticons/default/smiley_notworthy.gif)
|
|
|
|
| jonwatts |
Jul 21 2006, 08:40 AM
Post
#14
|
|
no rules, just wrong Group: Benefactors Posts: 2,321 Joined: 13-January 03 From: San Jose, CA Member No.: 141 |
I rarely think to take the time to document when I do stuff, and I know you are burning the midnight oil to get this done. Nice writeup and nice way to give back to the community.
(IMG:style_emoticons/default/aktion035.gif) |
|
|
|
| neo914-6 |
Jul 21 2006, 09:21 AM
Post
#15
|
|
neo life Group: Members Posts: 5,086 Joined: 16-January 03 From: Willow Glen (San Jose) Member No.: 159 |
QUOTE(jonwatts @ Jul 21 2006, 07:40 AM)  I rarely think to take the time to document when I do stuff, and I know you are burning the midnight oil to get this done. Nice writeup and nice way to give back to the community. (IMG:style_emoticons/default/aktion035.gif) Thanks, I thought I'd document it since I may have to do this in another 20 years (IMG:style_emoticons/default/laugh.gif) One more thing, while reconnecting the shifter in the car I found rotating the base made it easier to join the rods and tighten the bolt: Attached image(s) 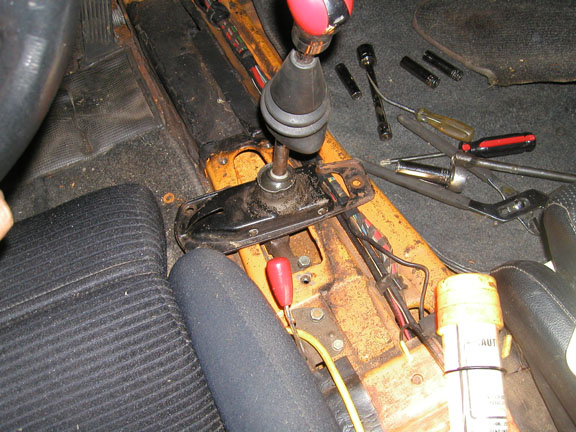
|
|
|
|
| KaptKaos |
Jul 21 2006, 09:28 AM
Post
#16
|
|
Family Group: Members Posts: 4,009 Joined: 23-April 03 From: Near Wausau Member No.: 607 Region Association: Upper MidWest |
Make sure that you connect the coupling so that the set screw faces down.
Ask me how I know this (IMG:style_emoticons/default/headbang.gif) |
|
|
|
| Aaron Cox |
Jul 21 2006, 09:34 AM
Post
#17
|
|
Professional Tinkerer Group: Retired Admin Posts: 24,548 Joined: 1-February 03 From: Corona, CA Member No.: 219 Region Association: Southern California |
ROFL.. i did it too Joe!
|
|
|
|
| neo914-6 |
Jul 21 2006, 11:34 AM
Post
#18
|
|
neo life Group: Members Posts: 5,086 Joined: 16-January 03 From: Willow Glen (San Jose) Member No.: 159 |
QUOTE(KaptKaos @ Jul 21 2006, 08:28 AM) Make sure that you connect the coupling so that the set screw faces down. Ask me how I know this (IMG:style_emoticons/default/headbang.gif) (IMG:style_emoticons/default/thumb3d.gif) QUOTE 6. Once they were in I removed the pin and inserted the square part of the shift rod. Be carefull not to install it upside down as the set screws should be in the same down orientation. |
|
|
|
| racerx9146 |
Jul 21 2006, 03:29 PM
Post
#19
|
|
good design never goes out of date.. Group: Members Posts: 174 Joined: 1-January 04 From: Sacramento, CA Member No.: 1,483 Region Association: Northern California |
Gonna throw my 2 cents in here only because the this is far from a stock 914. I assume this is in the Neo 914 concept.
When i put my 6 in with a side shifter i made a straight shift rod with the factory coupler mentioned in this thread. I guess i had something off kilter because my shifting was very stiff. Put a slight bend in the bar and it was a littler better but not great. Anyhow i got tired of messing with it replaced the coupler with a Wevo coupler to give me a full 360 degree pivot and all is better now. I know most folks dont seem to have my problem but with all the stuff going in this 914 not sure he will wind up with things in the original location. John |
|
|
|
| mightyohm |
Jul 21 2006, 03:35 PM
Post
#20
|
|
Advanced Member Group: Benefactors Posts: 2,279 Joined: 16-January 03 From: Seattle, WA Member No.: 162 Region Association: Pacific Northwest |
With a good socket set a bench vise becomes a very versatile press!
|
|
|
|
|
1 User(s) are reading this topic (1 Guests and 0 Anonymous Users)
0 Members:

|
Lo-Fi Version | Time is now: 2nd April 2026 - 09:24 AM |
Invision Power Board
v9.1.4 © 2026 IPS, Inc.