|
|
|
Porsche, and the Porsche crest are registered trademarks of Dr. Ing. h.c. F. Porsche AG.
This site is not affiliated with Porsche in any way. Its only purpose is to provide an online forum for car enthusiasts. All other trademarks are property of their respective owners. |
|
|


| ChrisFoley |
 Jul 24 2006, 07:42 PM Jul 24 2006, 07:42 PM
Post
#21
|
|
I am Tangerine Racing  Group: Members Posts: 8,030 Joined: 29-January 03 From: Bolton, CT Member No.: 209 Region Association: None |
The owner of this car was recently at Watkins Glen. Then he noticed something wrong with the handling and with the toe of the left rear tire at his last autocross. By the time the car was unloaded at my shop this is what he was driving with.
Attached image(s) 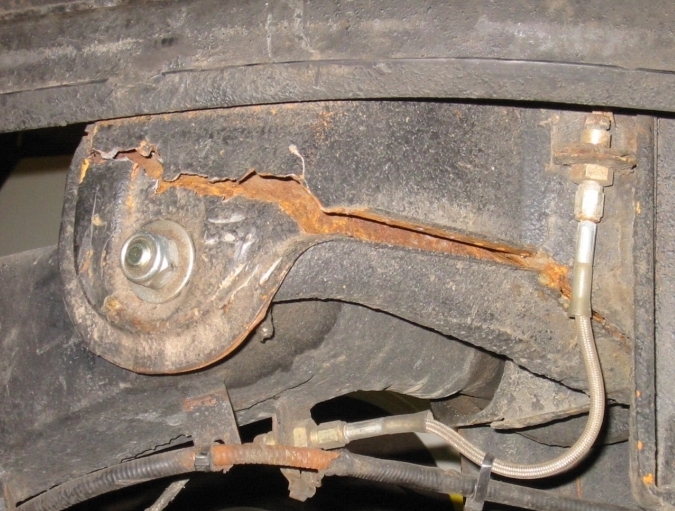
|
   |

 
|
Posts in this topic
 Racer Chris Torn Rear Suspension Ear Jul 24 2006, 07:42 PM
 root what kind of bushings are behind there?
new nylon ... Jul 24 2006, 07:49 PM
root what kind of bushings are behind there?
new nylon ... Jul 24 2006, 07:49 PM
 Racer Chris
 QUOTE
brant I tore 2 of these (both right hand sides) in appro... Jul 24 2006, 11:00 PM brant and from below: Jul 24 2006, 11:01 PM trekkor This is on top of my list this winter. :welder:
... Jul 24 2006, 11:27 PM Randal QUOTE
Racer Chris I took a look across the engine compartment and he... Jul 26 2006, 06:58 AM Racer Chris bottom side detail Jul 26 2006, 06:59 AM Racer Chris Repairs to the driver's side are underway.
I c... Jul 26 2006, 07:01 AM Racer Chris This piece had some perf but it is a lot easier to... Jul 26 2006, 07:07 AM Racer Chris Back on the car...
I pushed the lower portion back... Jul 26 2006, 07:10 AM Racer Chris After the repair is complete I will be welding on ... Jul 26 2006, 07:14 AM ynotdd Chris looks like you are doing a great job!... Jul 27 2006, 07:00 AM thesey914 When the inside is coated with por15 can it be wel... Jul 27 2006, 11:42 AM Racer Chris   |
1 User(s) are reading this topic (1 Guests and 0 Anonymous Users)
0 Members:

|
Lo-Fi Version | Time is now: 9th June 2026 - 11:52 AM |
Invision Power Board
v9.1.4 © 2026 IPS, Inc.
| All rights reserved 914World.com © since 2002 |
|
914World.com is the fastest growing online 914 community! We have it all, classifieds, events, forums, vendors, parts, autocross, racing, technical articles, events calendar, newsletter, restoration, gallery, archives, history and more for your Porsche 914 ... |