|
|
|
Porsche, and the Porsche crest are registered trademarks of Dr. Ing. h.c. F. Porsche AG.
This site is not affiliated with Porsche in any way. Its only purpose is to provide an online forum for car enthusiasts. All other trademarks are property of their respective owners. |
|
|

  |

| mepstein |
 May 11 2018, 05:12 AM May 11 2018, 05:12 AM
Post
#641
|
|
914-6 GT in waiting  Group: Members Posts: 19,272 Joined: 19-September 09 From: Landenberg, PA/Wilmington, DE Member No.: 10,825 Region Association: MidAtlantic Region |
QUOTE(Mueller @ May 10 2018, 11:58 PM)  That is a nice beefy intercooler. I'm afraid to look up that -AN fitting to see how much those puppies cost! $25-35. doesn't seem bad. |
   |

 
|
| Amenson |
May 11 2018, 06:17 AM
Post
#642
|
|
That's opposite lock!! Group: Members Posts: 645 Joined: 27-May 05 From: Dublin, OH Member No.: 4,154 Region Association: None |
QUOTE(mepstein @ May 11 2018, 07:12 AM) QUOTE(Mueller @ May 10 2018, 11:58 PM) That is a nice beefy intercooler. I'm afraid to look up that -AN fitting to see how much those puppies cost! $25-35. doesn't seem bad. I am using Vibrant fittings with the locking ferrule, still under $50. Well worth it to avoid wrestling with squished and baked on hoses any time I want to work on anything. That intercooler will be on the chopping block this winter. Water/air like I did on Grey is the way to go. |
|
|
|
| Andyrew |
May 11 2018, 07:18 AM
Post
#643
|
|
Spooling.... Please wait Group: Members Posts: 13,376 Joined: 20-January 03 From: Riverbank, Ca Member No.: 172 Region Association: Northern California |
QUOTE(mepstein @ May 11 2018, 04:12 AM) QUOTE(Mueller @ May 10 2018, 11:58 PM) That is a nice beefy intercooler. I'm afraid to look up that -AN fitting to see how much those puppies cost! $25-35. doesn't seem bad. Till you have to buy 8 of them to make them work... My fuel lines are AN10 and AN6. You would have thought that E85 compatible nylon braided fuel lines in black would have been the expensive part, no way.. fittings themselves F'in killed me. I am confident my next project involving hoses and lines is going to have a LOT more solid line connections. I think its cleaner and more stout. |
|
|
|
| 914forme |
May 11 2018, 07:35 AM
Post
#644
|
|
Times a wastin', get wrenchin'! Group: Members Posts: 3,896 Joined: 24-July 04 From: Dayton, Ohio Member No.: 2,388 Region Association: None |
I like it, looking good.
Andrew if you can pull it off, solid lines are the only way to go. You will still have expenses, flare tooling for the proper flare on the tube. Or tubing beaders to make the proper end on the tube. Don't forget all the audial clamps you will ned to properly support the tube. Sheet metal tabs bent over the a tube isolated in rubber is how the factory solved the issue. I prefer Andial clamps, each their own. You still have fitting costs in transitions from moving to solid parts. Weld on bungs are nice, but still $$ in fitting costs, and TIG time. Just depends on the level of what your building and willing to accept. Vibrant Performance Fittings (IMG:style_emoticons/default/w00t.gif) (IMG:style_emoticons/default/wub.gif) Scott you just moved that build to the big leagues. |
|
|
|
| Amenson |
May 11 2018, 07:52 AM
Post
#645
|
|
That's opposite lock!! Group: Members Posts: 645 Joined: 27-May 05 From: Dublin, OH Member No.: 4,154 Region Association: None |
QUOTE(914forme @ May 11 2018, 09:35 AM) I like it, looking good. Andrew if you can pull it off, solid lines are the only way to go. You will still have expenses, flare tooling for the proper flare on the tube. Or tubing beaders to make the proper end on the tube. Don't forget all the audial clamps you will ned to properly support the tube. Sheet metal tabs bent over the a tube isolated in rubber is how the factory solved the issue. I prefer Andial clamps, each their own. You still have fitting costs in transitions from moving to solid parts. Weld on bungs are nice, but still $$ in fitting costs, and TIG time. Just depends on the level of what your building and willing to accept. Vibrant Performance Fittings (IMG:style_emoticons/default/w00t.gif) (IMG:style_emoticons/default/wub.gif) Scott you just moved that build to the big leagues. I use Vibrant AN stuff because it is generally cheaper than Earls, etc. $20-$30 cheaper in AN20! I will be transitioning to hard line through the tunnel. You can see the weld bung in the fitting picture above. Plus you have to add the AN bungs on the engine and radiator side. Loads of TIG time in my near future. |
|
|
|
| mepstein |
May 11 2018, 09:12 AM
Post
#646
|
|
914-6 GT in waiting Group: Members Posts: 19,272 Joined: 19-September 09 From: Landenberg, PA/Wilmington, DE Member No.: 10,825 Region Association: MidAtlantic Region |
QUOTE(Amenson @ May 11 2018, 09:52 AM) QUOTE(914forme @ May 11 2018, 09:35 AM) I like it, looking good. Andrew if you can pull it off, solid lines are the only way to go. You will still have expenses, flare tooling for the proper flare on the tube. Or tubing beaders to make the proper end on the tube. Don't forget all the audial clamps you will ned to properly support the tube. Sheet metal tabs bent over the a tube isolated in rubber is how the factory solved the issue. I prefer Andial clamps, each their own. You still have fitting costs in transitions from moving to solid parts. Weld on bungs are nice, but still $$ in fitting costs, and TIG time. Just depends on the level of what your building and willing to accept. Vibrant Performance Fittings (IMG:style_emoticons/default/w00t.gif) (IMG:style_emoticons/default/wub.gif) Scott you just moved that build to the big leagues. I use Vibrant AN stuff because it is generally cheaper than Earls, etc. $20-$30 cheaper in AN20! I will be transitioning to hard line through the tunnel. You can see the weld bung in the fitting picture above. Plus you have to add the AN bungs on the engine and radiator side. Loads of TIG time in my near future. where do you purchase your vibrant fittings? |
|
|
|
| Amenson |
May 11 2018, 07:30 PM
Post
#647
|
|
That's opposite lock!! Group: Members Posts: 645 Joined: 27-May 05 From: Dublin, OH Member No.: 4,154 Region Association: None |
QUOTE(mepstein @ May 11 2018, 11:12 AM) where do you purchase your vibrant fittings? Lately Summit, but Jegs has them too. |
|
|
|
| Amenson |
May 14 2018, 09:10 PM
Post
#648
|
|
That's opposite lock!! Group: Members Posts: 645 Joined: 27-May 05 From: Dublin, OH Member No.: 4,154 Region Association: None |
Tom (the owner of Grey) and his son stopped by the garage this weekend to check up on the project and install some parts that will make test driving it less troublesome. It was great to have them in the shop and I took advantage of the extra hands to install the rear bumper. I wanted to make sure that it fit with the fiberglass fenders...looks like it does.
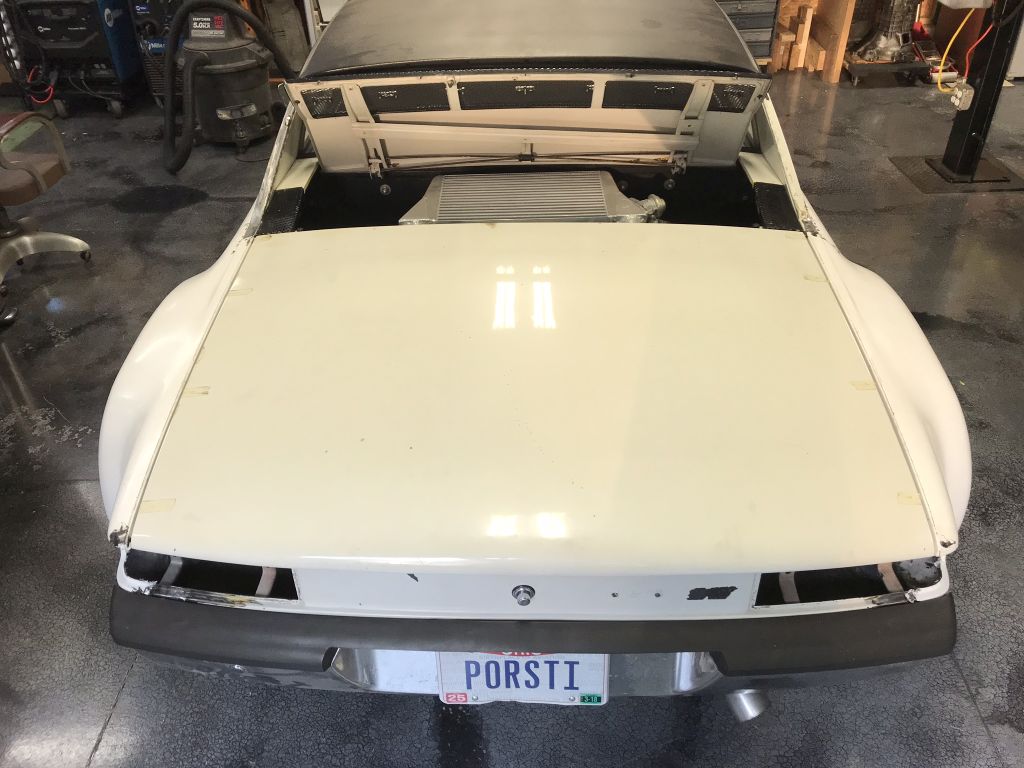 Now I can make the fiberglass bumper fit to match. The flares were installed purely to allow wider tires but damn do they look good too!  On with real work. I got out the plasma cutter to help me slice through the various layers of the a-pillar chunk. In the end it came down to the spot welds along the flange and the two mig welds colored in black. 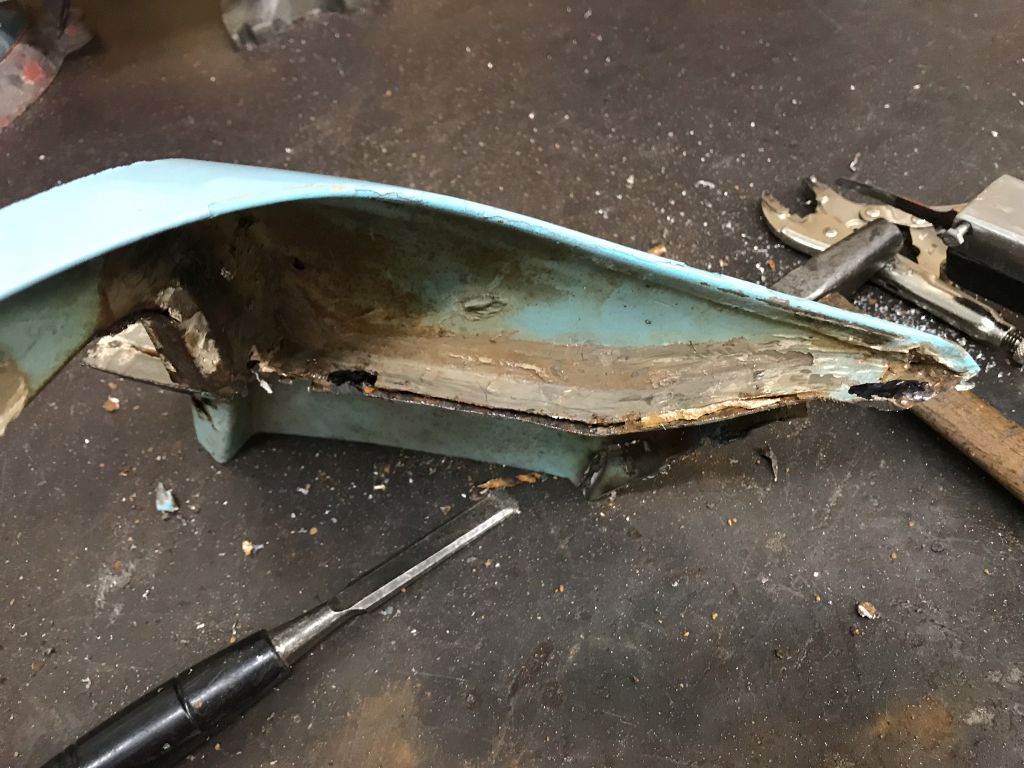 Nice piece to put back on the car. 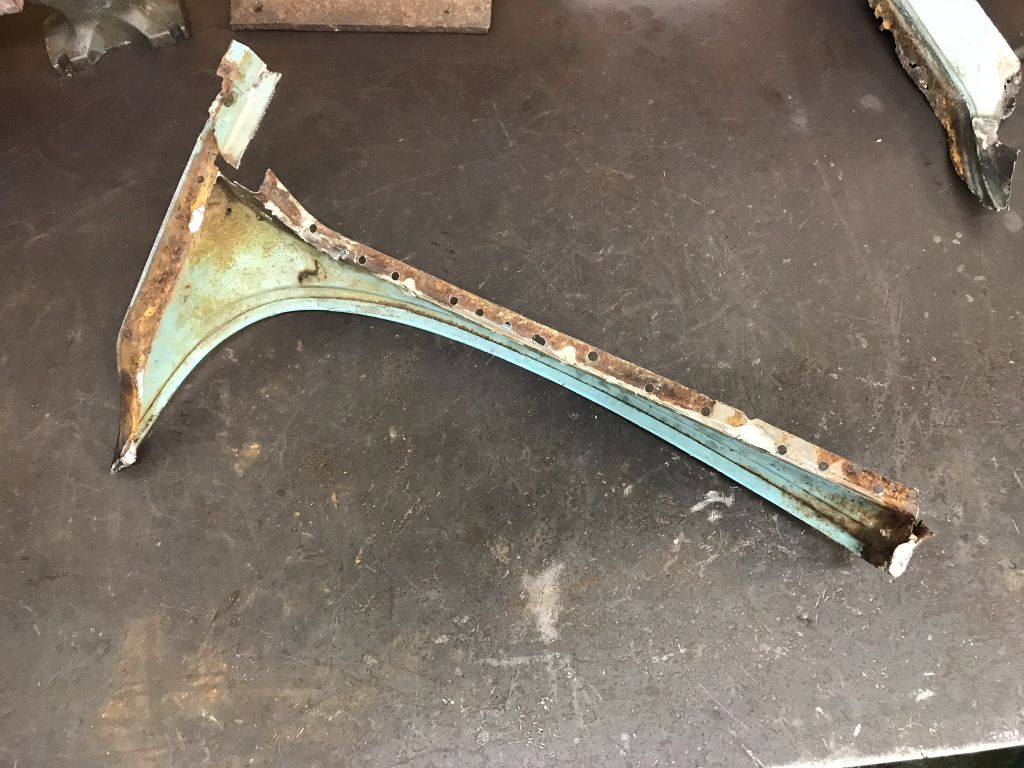 Just a small area at the bottom to fix. 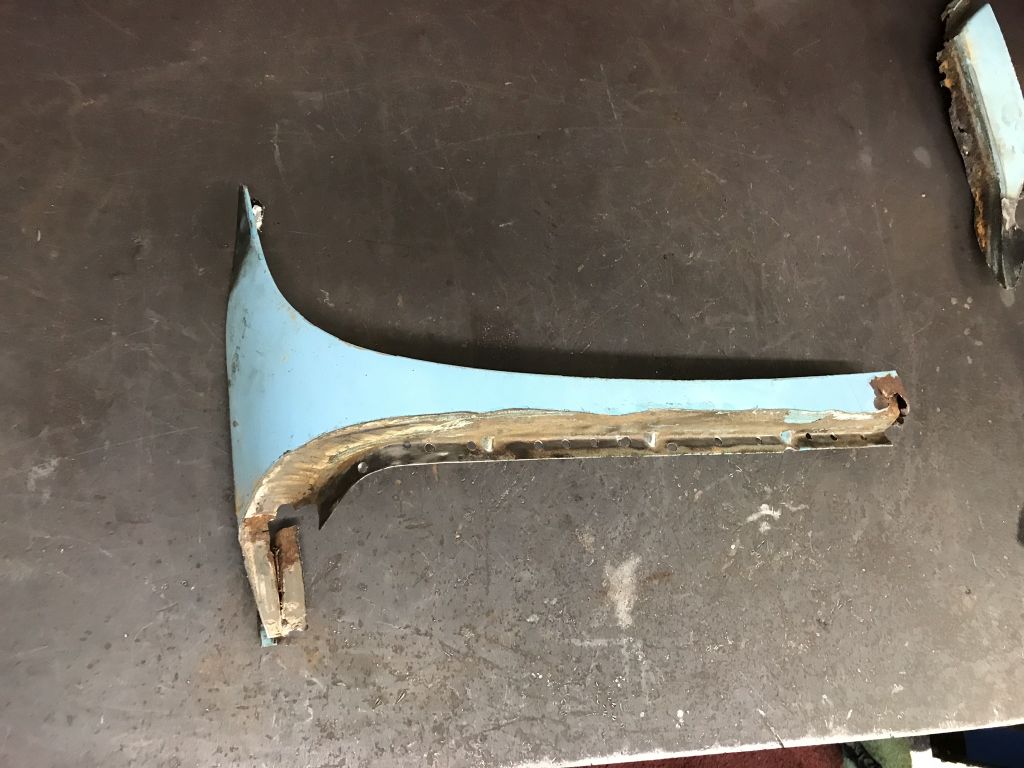 Hack off the rusty crap 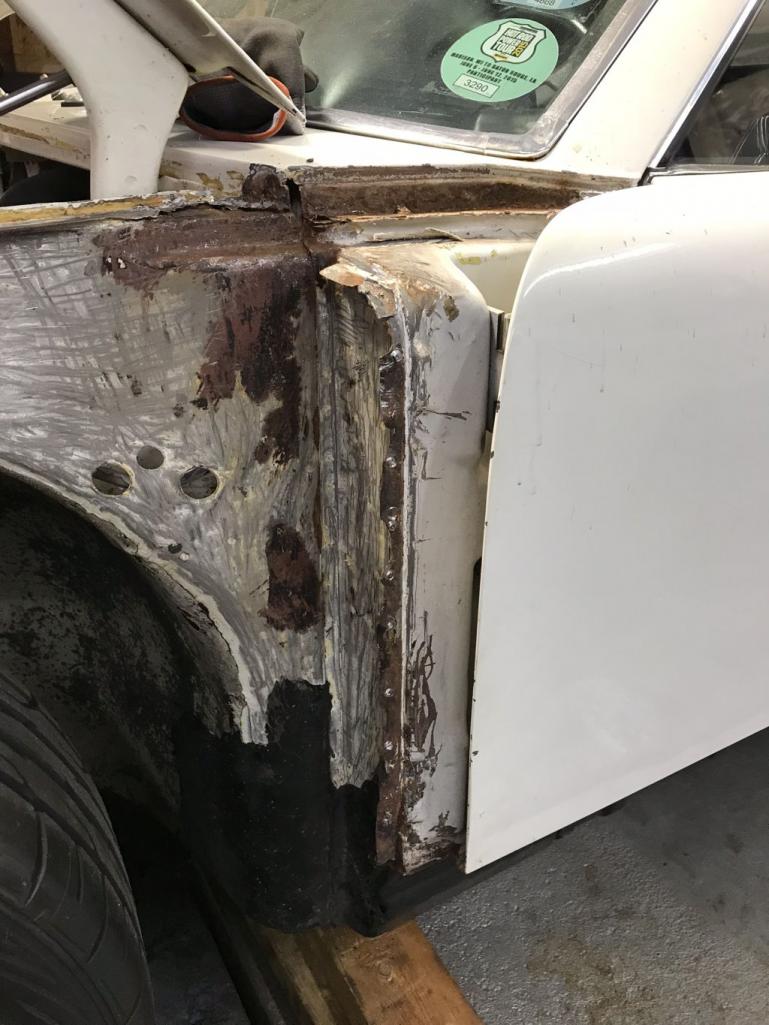 |
|
|
|
| effutuo101 |
May 14 2018, 10:49 PM
Post
#649
|
|
Advanced Member Group: Members Posts: 2,734 Joined: 10-April 05 From: Lemon Grove Member No.: 3,914 Region Association: Southern California |
(IMG:style_emoticons/default/popcorn[1].gif)
Keep it up! Looking good! |
|
|
|
| Amenson |
May 15 2018, 08:19 PM
Post
#650
|
|
That's opposite lock!! Group: Members Posts: 645 Joined: 27-May 05 From: Dublin, OH Member No.: 4,154 Region Association: None |
I called my backup plan for front passenger fender parts today and he agreed to let me hack up one of his yard cars. If that fails I am sure he will have a nice $$ fender in the building. That good news combined with confirmation from the power team (my parents) that they will come down again for Memorial weekend to help grind through some more tasks gave me the confidence to kick off the performance upgrades.
First step was to disconnect the cooling lines from the engine and make a terrible mess. I rewarded myself by yanking my least favorite part on the car. My cobbled together intake with all of the recirc connections behind the MAF. We don't need no MAF where we are going (will actually keep it in the intake temporarily to help with the speed density tuning). Yes, that is a copper plumbing elbow (IMG:style_emoticons/default/barf.gif) 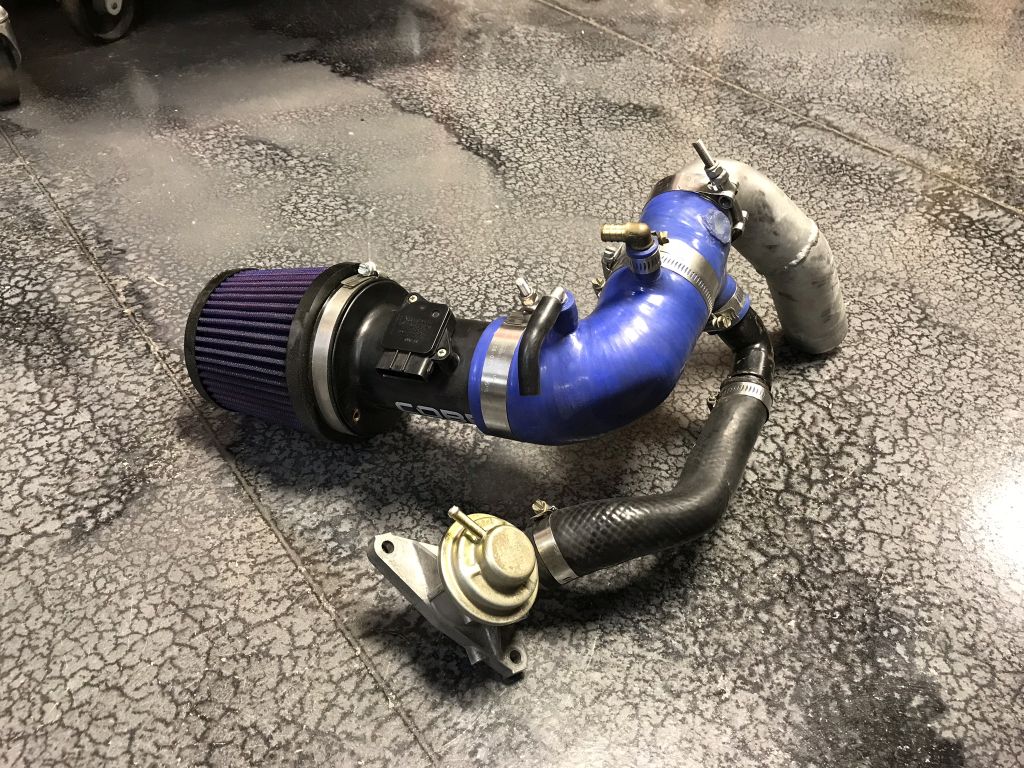 I also enjoyed cutting the never to be used again hose clamped fuel lines. 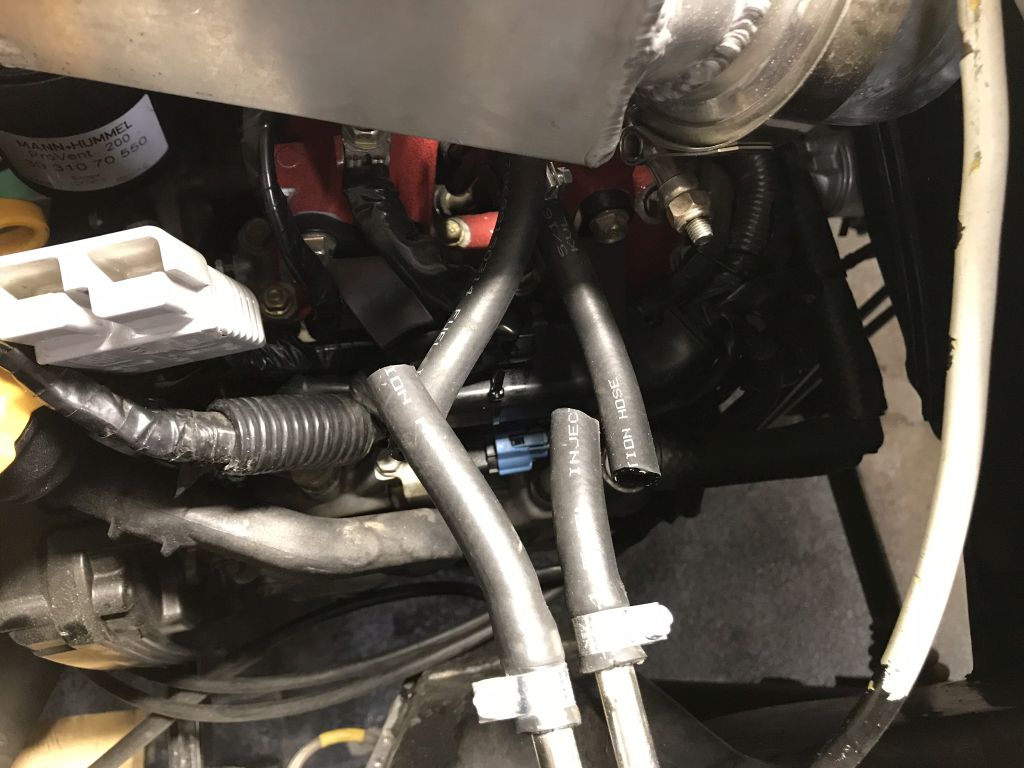 |
|
|
|
| charliew |
May 16 2018, 10:09 AM
Post
#651
|
|
Advanced Member Group: Members Posts: 2,363 Joined: 31-July 07 From: Crawford, TX. Member No.: 7,958 |
great progress, suby plumbing is complicated and hard to keep clean. I want to emphasize the importance of a updated breather system on a hot-rodded suby. If you have time try to study up on the big turbo applications. The simply way is a catchcan but it really means a lot closer check of the oil level in the pan on every filup. the hot oil breaks down and goes out the exhaust and also into the catchcan. a lot of suby motors went bad from low thin oil. the thing with a turbo is the lower pressure or vaccum below boost and then the pressure in the intake at boost. one sign of too much crankcase pressure is the dipstick rising in the tube after a hard run. you have gone to a lot of nice high tech parts so don't leave the breather stuff out. also the longer the breather lines the better to keep the oil in the sump.
|
|
|
|
| Amenson |
May 18 2018, 09:13 PM
Post
#652
|
|
That's opposite lock!! Group: Members Posts: 645 Joined: 27-May 05 From: Dublin, OH Member No.: 4,154 Region Association: None |
Engine is out and upgrades are in progress. It is amazing how much can be accomplished when not fitting body sections.
Took 360 pictures of the starting point just for fun. 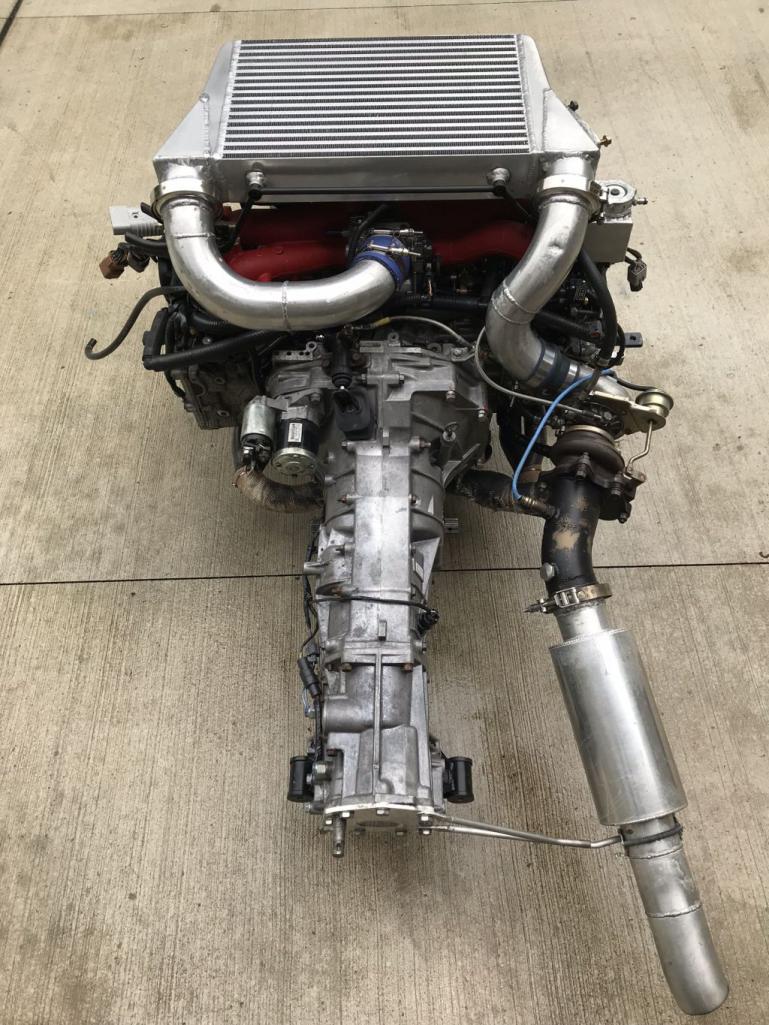 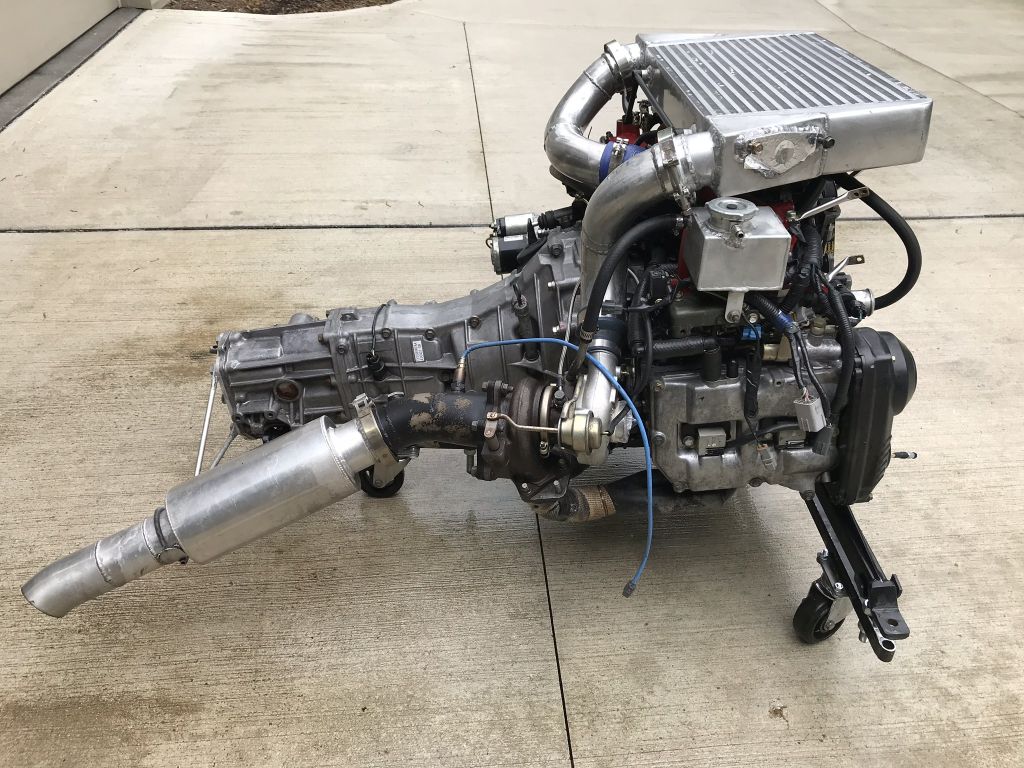  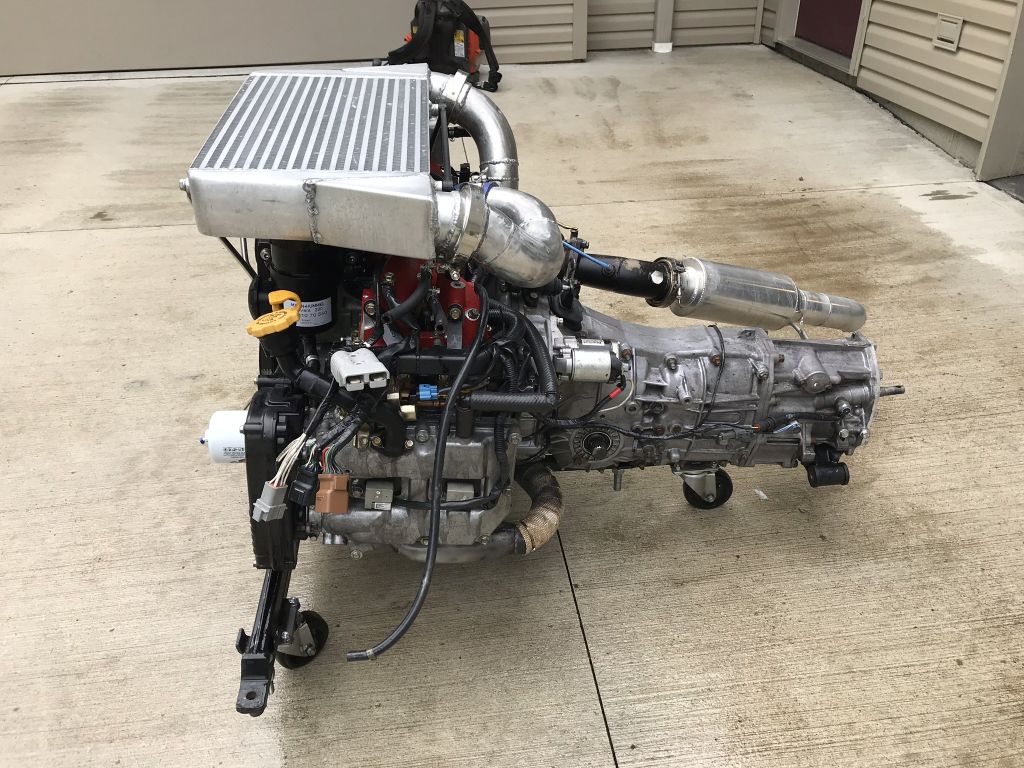 I picked up a earlier cooling cross over because it has fewer connections to deal with. The heater core outlet has been plugged but decided that I would hook it back up using an AN setup that is on Grey. The hole is perfect size for 3/8 NPT! 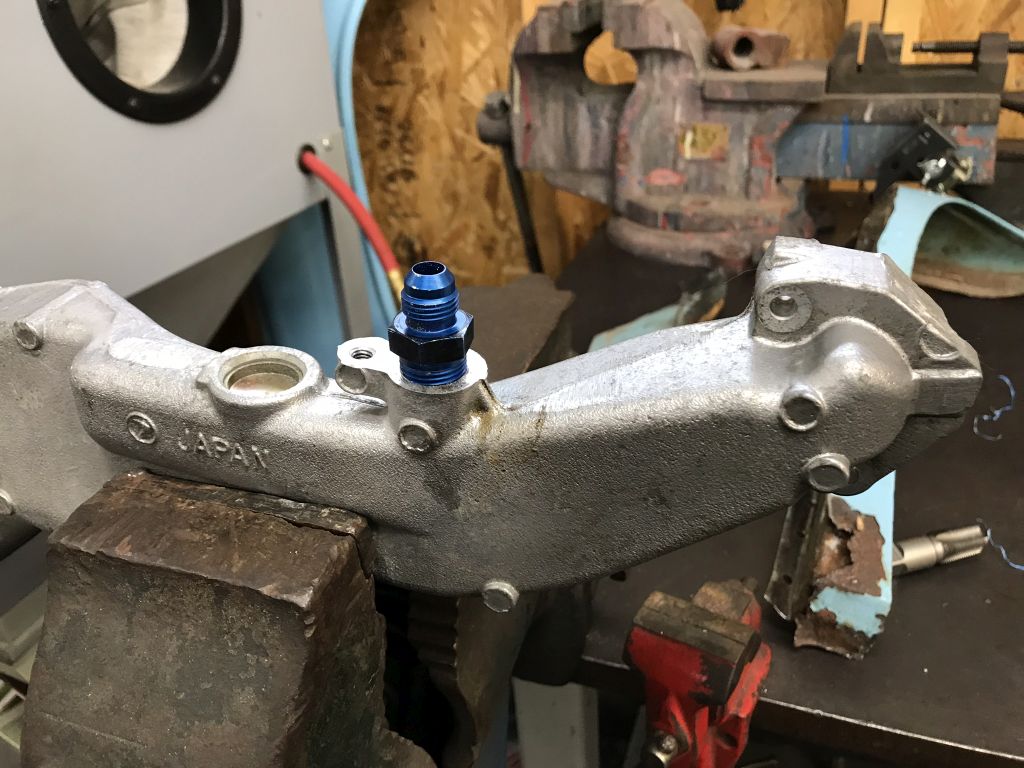 First AN cooling fitting. AN all the things.  TGV Deletes installed. So much cleaner than the EOM setup. I will tuck the wires under fuel railes to clean it up a bit more. 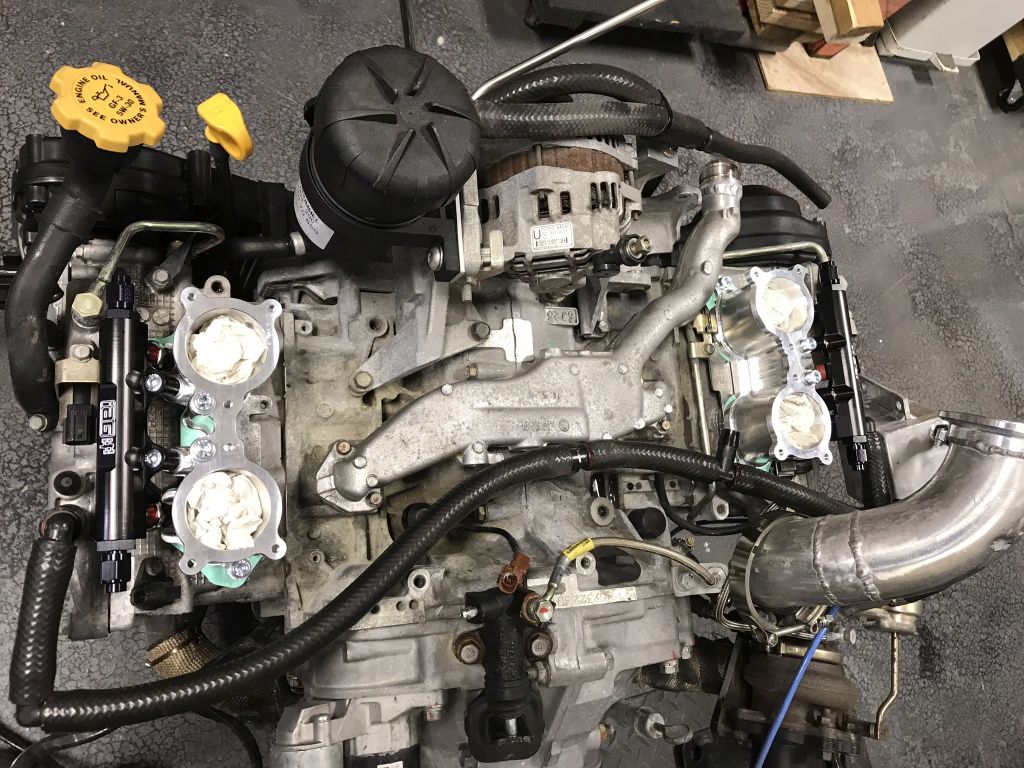 |
|
|
|
| Amenson |
May 18 2018, 09:43 PM
Post
#653
|
|
That's opposite lock!! Group: Members Posts: 645 Joined: 27-May 05 From: Dublin, OH Member No.: 4,154 Region Association: None |
Two of Subaru's crappiest ideas all in one...TGV's and side feed injectors.
 Threw on the top of the intake to start fitting/routing. 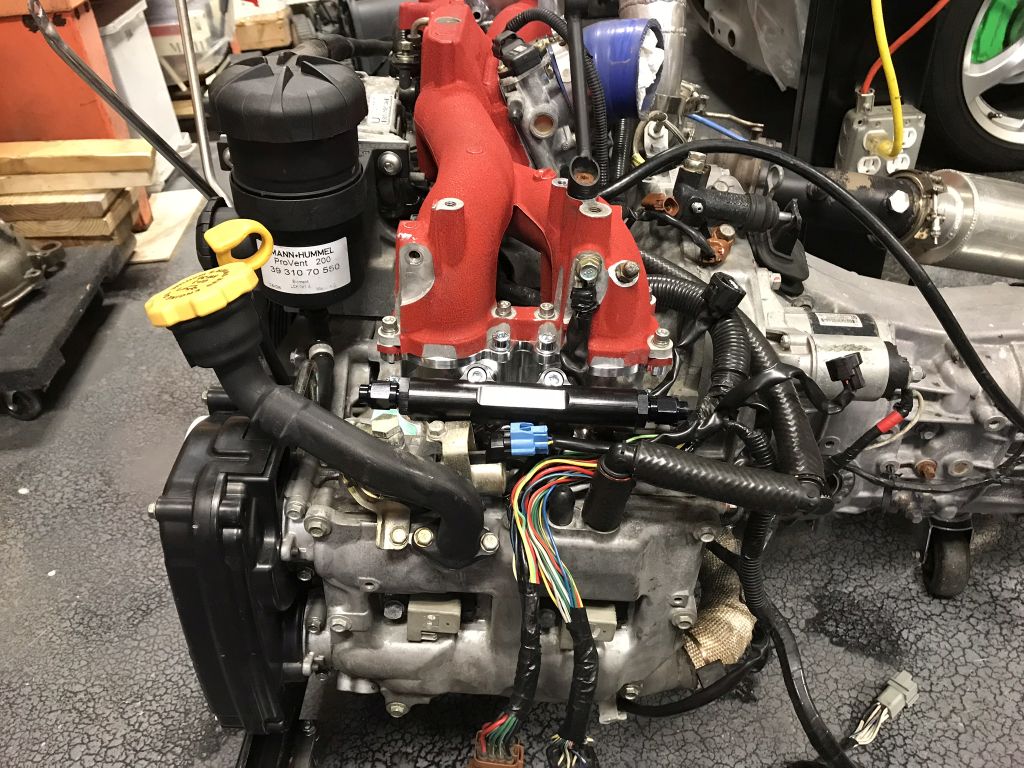 The fuel pressure regulator is huge but I think that I found a good place to mount it. Just have to make sure the ethanol sensor will also fit. |
|
|
|
| Amenson |
Jun 24 2018, 08:55 PM
Post
#654
|
|
That's opposite lock!! Group: Members Posts: 645 Joined: 27-May 05 From: Dublin, OH Member No.: 4,154 Region Association: None |
I'll spoil the ending right at the start...PorSTI did not get finished in time for Power Tour. Even taking an entire week off plus several other days to create long weekends...I cut it too close starting the work, added to many while I am in there projects, had some equipment failures and one huge mental failure.
Going back through he pictures reminded me just how much I did and how much I did that I did not take progress pictures of. It will be easier to make the post by systems instead of chronologically. I'll only show the highlights, if anyone wants detailed pictures of a certain thing let me know and I can post them. Cooling System: This was a colossal amount of work but so nice now that it is in. In retrospect I probably would not use tube down the center. Or, if I did, not use the double gasket. They area awesome and will seal nicely but spaced the tubes further apart than necessary and they just barely fit down the tunnel. In a car with a stock pedal assembly with added clutch MC, it would not fit. Also, the cost of the additional fittings almost offsets the price of the AN20 hose. Also, welding on the fittings, while fun, also added an incredible amount of time. 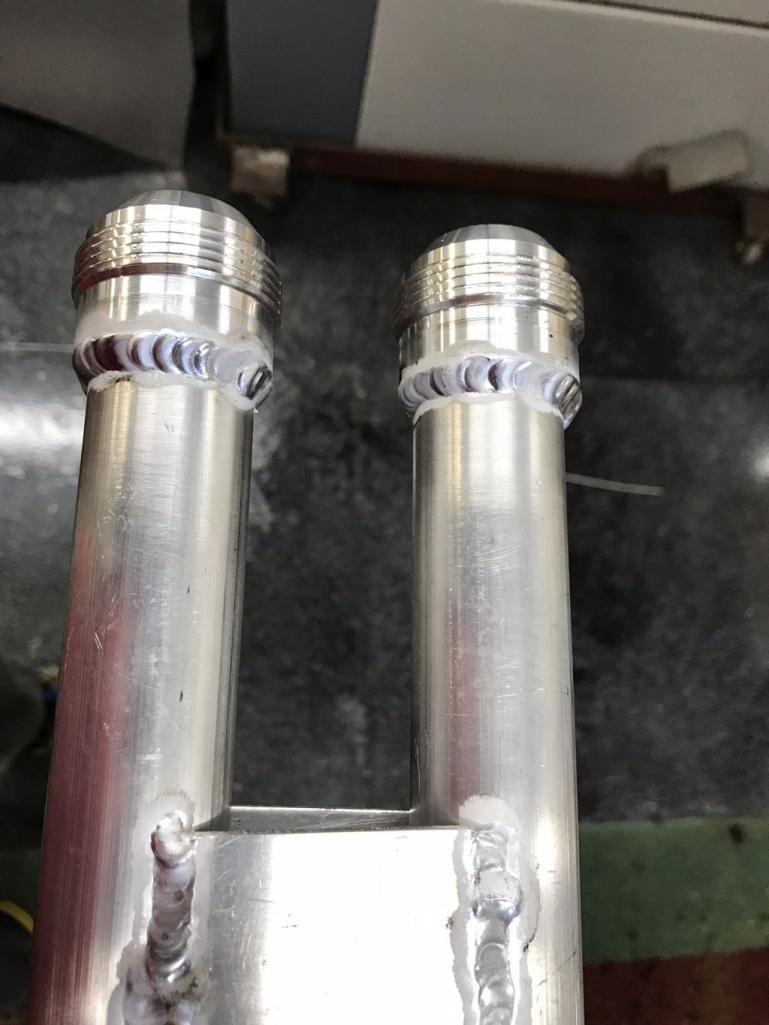 As did machining each fitting to match what it is interfacing to...stock on the right. 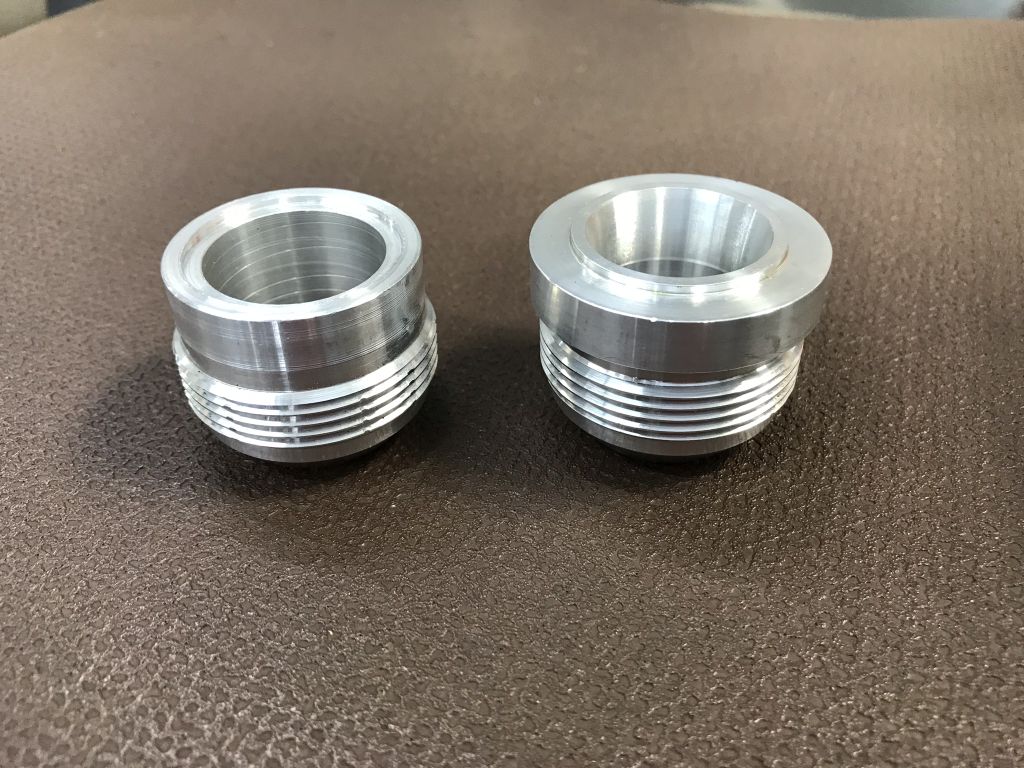 I also cut out and replaced (again) the firewall so that I could start fresh. 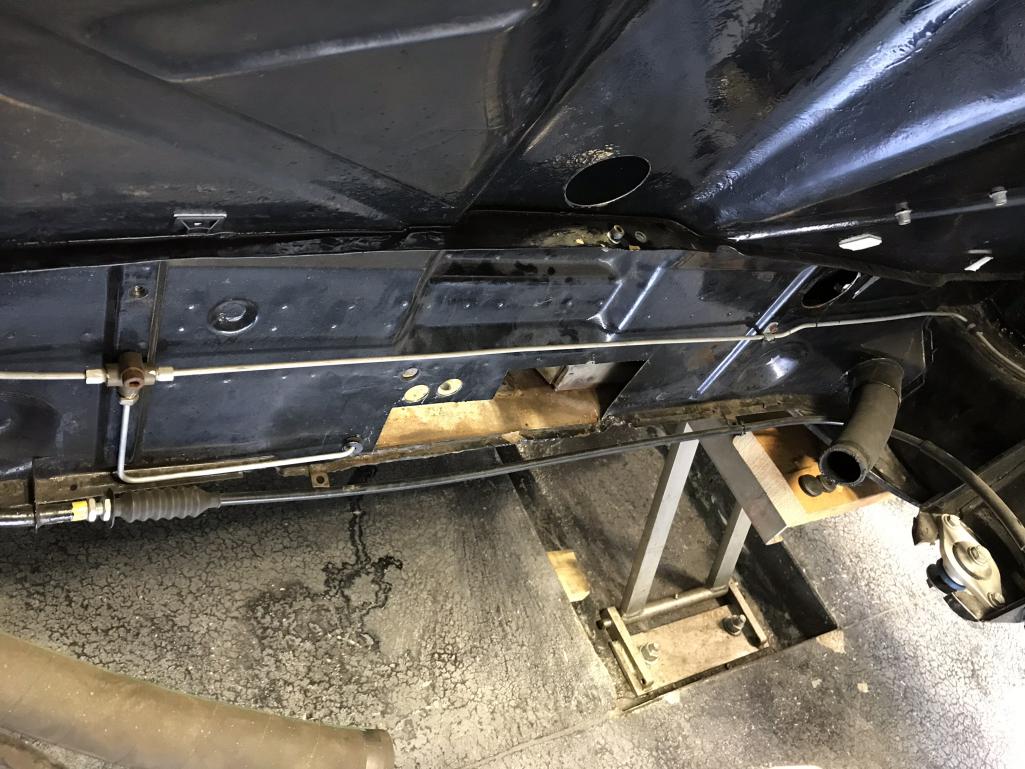 Full. 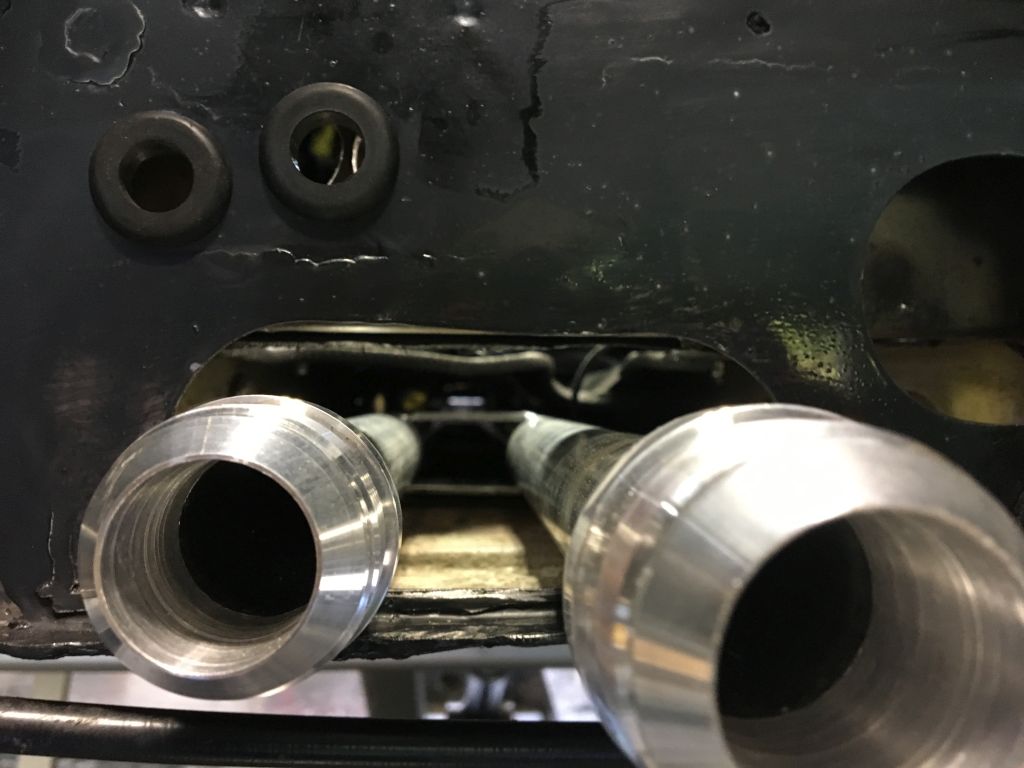 Can see the new fuel line routing here too! 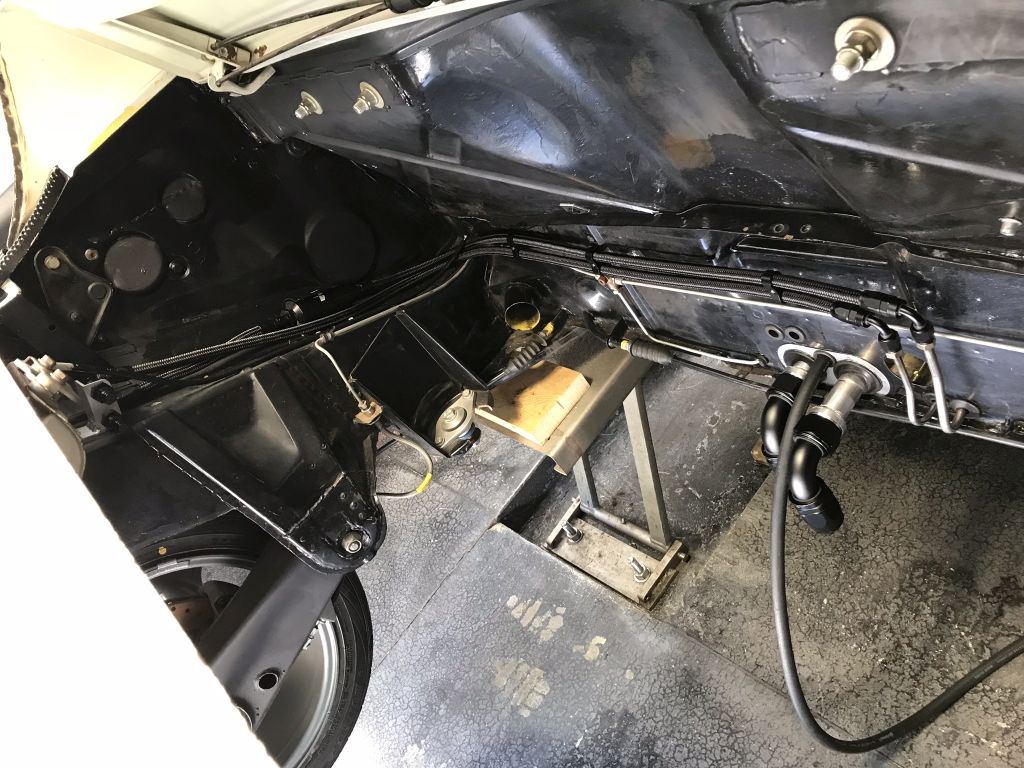 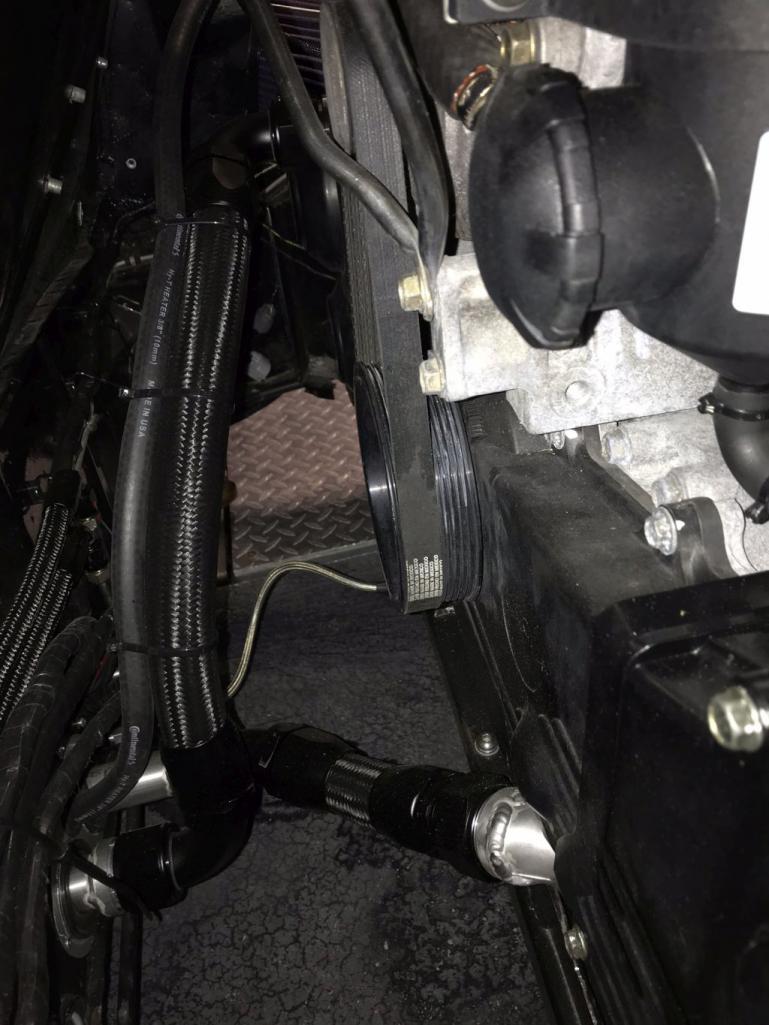 Path through front. You can see the new mount for the pedal->tunnel soft lines for brake/clutch. I always hated the routing of the hard lines. to the pedals. All of the lines in the tunnel are new as well. 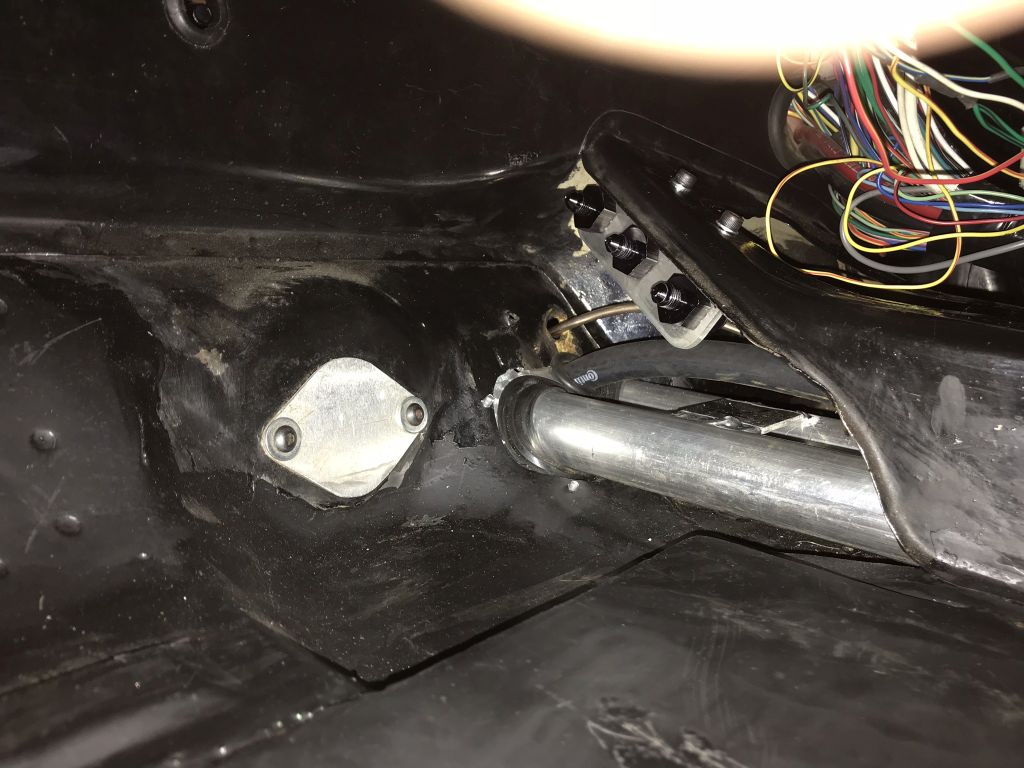 This is so incredibly tight but there is clearance. Had to order 30 deg. fittings, 45's just would not work. 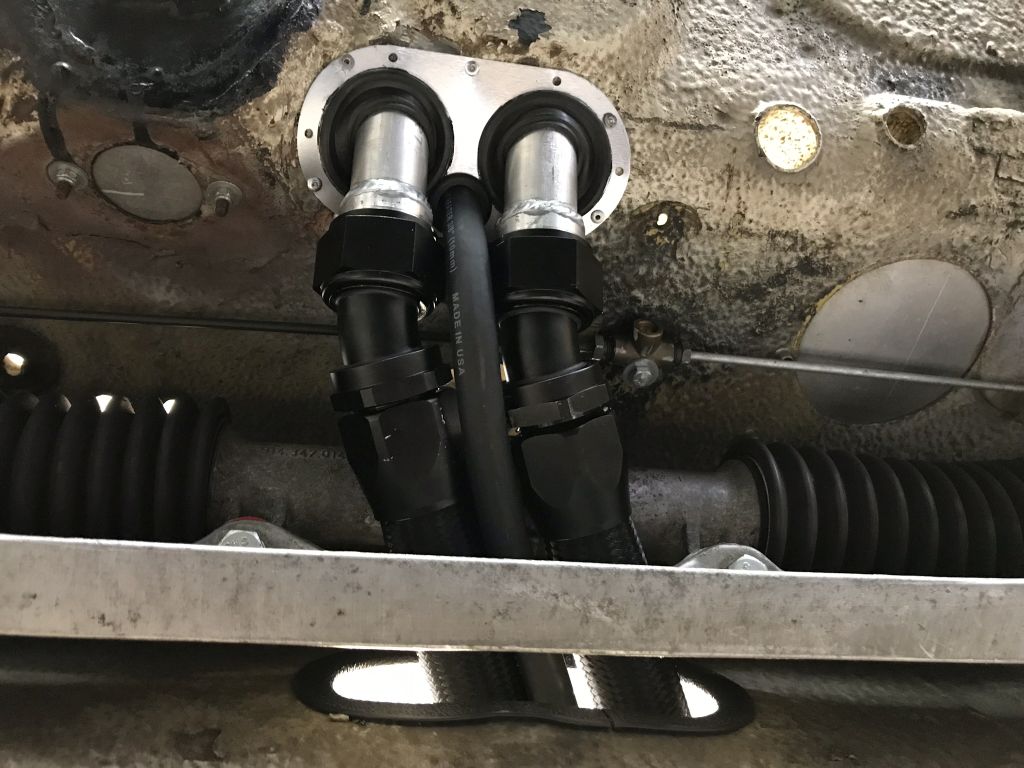 I spaced the fuel tank up 10mm to give the lines a bit more space to avoid kinking. 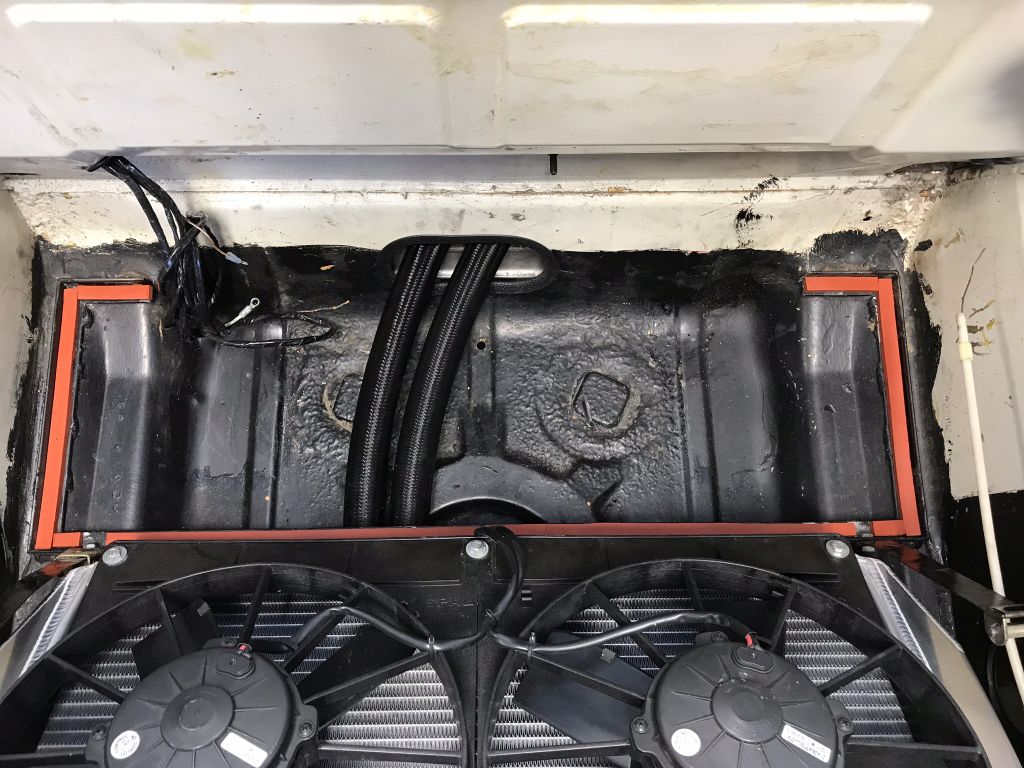 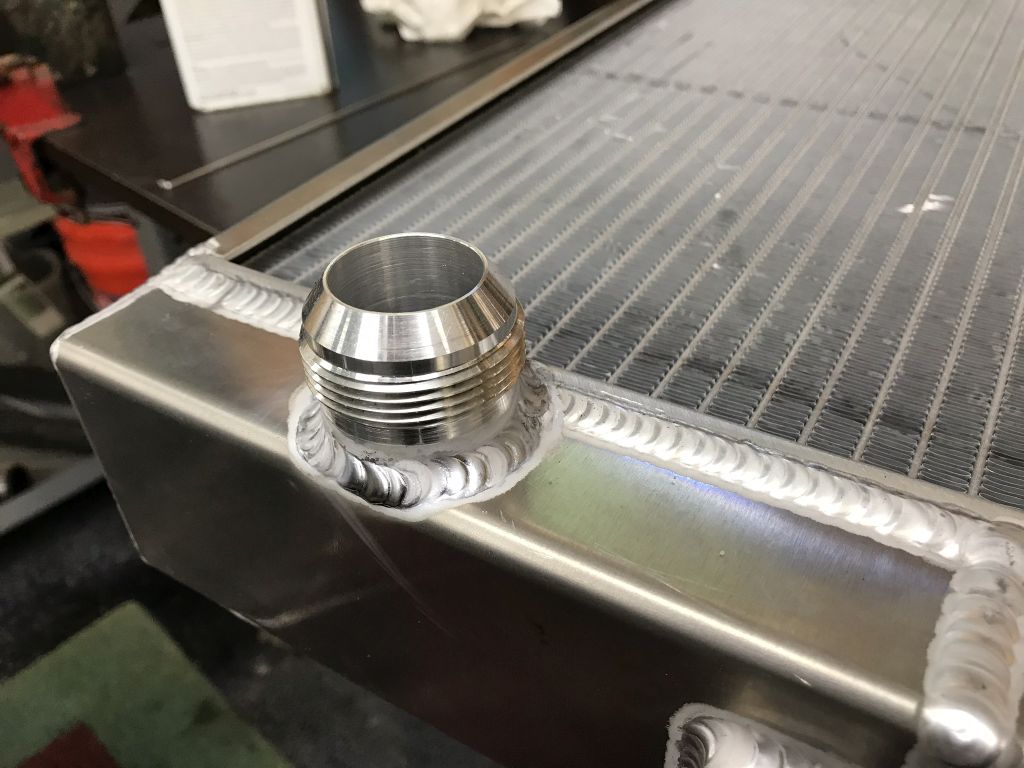 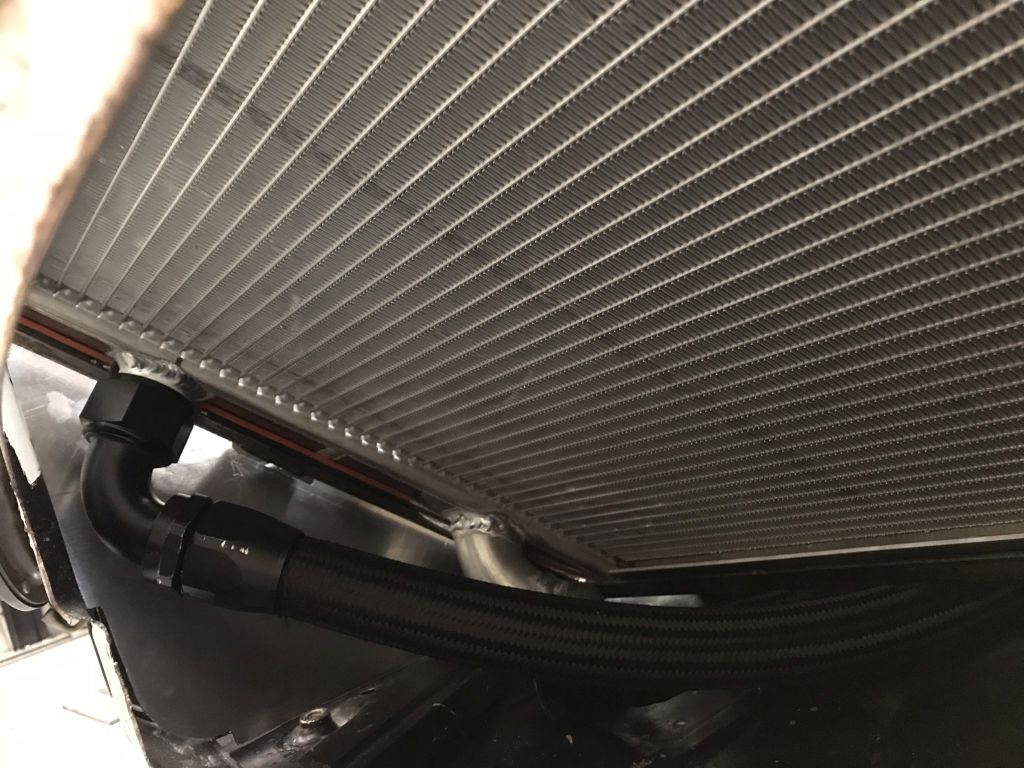 That is enough for tonight will post more tomorrow. |
|
|
|
| CptTripps |
Jun 25 2018, 07:45 AM
Post
#655
|
|
:: Punch and Pie :: Group: Members Posts: 3,584 Joined: 26-December 04 From: Mentor, OH Member No.: 3,342 Region Association: Upper MidWest |
Looks amazing. You're an artist with a welder, and have an amazing engineering mind.
|
|
|
|
| charliew |
Jun 25 2018, 06:48 PM
Post
#656
|
|
Advanced Member Group: Members Posts: 2,363 Joined: 31-July 07 From: Crawford, TX. Member No.: 7,958 |
great pictures, nice Heli arcing too, I bet getting the wrench on those fittings was tricky. Is the aluminum tubing apt to bend when you tighten the fittings? My idea is to get my ac guy to form a 11 ga u channel and cut the bottom of the tunnel out to form the channel in the bottom of the car for the tubes, that way the air can help cool the coolant and maybe get the lines for the wtaic in there also. course talk is cheap. now that they have fuel feed setups that don't require return fuel lines to the tank it might help some. I wonder now if you ever thought about putting a clip board on the wall and record your time? I know it's fun but we each only have so much of it. Oh yeah somehow I missed the part about the mann provent install.
|
|
|
|
| 914forme |
Jun 26 2018, 04:00 PM
Post
#657
|
|
Times a wastin', get wrenchin'! Group: Members Posts: 3,896 Joined: 24-July 04 From: Dayton, Ohio Member No.: 2,388 Region Association: None |
"I'll spoil the ending right at the start...PorSTI did not get finished in time for Power Tour. Even taking an entire week off plus several other days to create long weekends...I cut it too close starting the work, added to many while I am in there projects, had some equipment failures and one huge mental failure."
(IMG:style_emoticons/default/sad.gif) |
|
|
|
| Amenson |
Jul 5 2018, 09:16 PM
Post
#658
|
|
That's opposite lock!! Group: Members Posts: 645 Joined: 27-May 05 From: Dublin, OH Member No.: 4,154 Region Association: None |
QUOTE(CptTripps @ Jun 25 2018, 09:45 AM) Looks amazing. You're an artist with a welder, and have an amazing engineering mind. Thanks...lots of practice! (IMG:style_emoticons/default/beer.gif) QUOTE(charliew @ Jun 25 2018, 08:48 PM) great pictures, nice Heli arcing too, I bet getting the wrench on those fittings was tricky. Is the aluminum tubing apt to bend when you tighten the fittings? My idea is to get my ac guy to form a 11 ga u channel and cut the bottom of the tunnel out to form the channel in the bottom of the car for the tubes, that way the air can help cool the coolant and maybe get the lines for the wtaic in there also. course talk is cheap. now that they have fuel feed setups that don't require return fuel lines to the tank it might help some. I wonder now if you ever thought about putting a clip board on the wall and record your time? I know it's fun but we each only have so much of it. Oh yeah somehow I missed the part about the mann provent install. There is pretty good clearance to get to the fittings. I did have to buy a few new wrenches for the big guys. I think that Tygaboy is going to make a removable bottom center tunnel. Could be a good idea if executed properly, I am sure he will. Recording my time would take the fun out of it. QUOTE(914forme @ Jun 26 2018, 06:00 PM) "I'll spoil the ending right at the start...PorSTI did not get finished in time for Power Tour. Even taking an entire week off plus several other days to create long weekends...I cut it too close starting the work, added to many while I am in there projects, had some equipment failures and one huge mental failure." (IMG:style_emoticons/default/sad.gif) Ya, so about that. During the next to last week before PT I was cranking through the stuff that needed to be completed before the car went on the dyno the last Monday before departure. On Saturday I was wrapping up the last few things and planned first start. I had just spent over three hours modifying the thermostat housing/lower radiator hose to firewall. The part welded like crap even though it was perfectly cleaned, figured that the housing had some crud from casting. While it was cooling I drained the oil. Next up was relocating the BOV. Welded up the old location and got the new V-band flange fit for the new one. Put a really nice tack, flipped it over and the made the crappiest charred looking tack I could ever imagine. Started inspecting the torch and noticed that it was spitting out coolant! The flex part of the torch failed allowing coolant to get into the shield gas connection. It is Saturday so there is no option to find another torch so I jump onto the next tasks prior to startup....check for fuel leaks and test the new sensors. I got the wife to help with leak checks and in the few seconds of the fuel pump running during the priming cycle I pumped fuel all over. Turns out that I did not tighten the plugs on the bottom of the fuel rails for the optional dampers. Another two wasted hours of cleanup and disassembly/reassembly later and I am ready to test again. No leaks but the fuel pump will not run long enough during the short priming cycle for the Accessport to startup and show the flex fuel and pressure sensor data. The pump will only run again when it sees the crank signal. The intercooler is uninstalled so I figured that I could bump the starter without worrying about the engine starting. Give the starter a quick bump and not only the fuel pump start but so did the engine. While I was enjoying the sound of a running engine and wondering how it was actually running I had forgotten that I had drained the oil and in the chaotic previous hours sopping up welder coolant and fuel...never put fresh oil in. After about a minute I realized this terrible fact and shut off the engine. (IMG:style_emoticons/default/headbang.gif) (IMG:style_emoticons/default/headbang.gif) (IMG:style_emoticons/default/headbang.gif) After I regained a bit of composure, I put oil it it and started it. Sounds fine, compression check looks fine but after a few beers I decide not to take any chances and consider it in need of a rebuild. Plan is to pull it apart and confirm that machine work is not necessary and then put new bearings, forged rods and forged (slightly higher compression) pistons. Not something I wanted to do in the short term but was necessary to get to my reliable 500 whp target with a new turbo down the road. |
|
|
|
| Amenson |
Jul 5 2018, 09:32 PM
Post
#659
|
|
That's opposite lock!! Group: Members Posts: 645 Joined: 27-May 05 From: Dublin, OH Member No.: 4,154 Region Association: None |
There is a ton more stuff that I successfully accomplished.
Engine: I now realize why I had not installed AN fittings previously. Box full of gold... 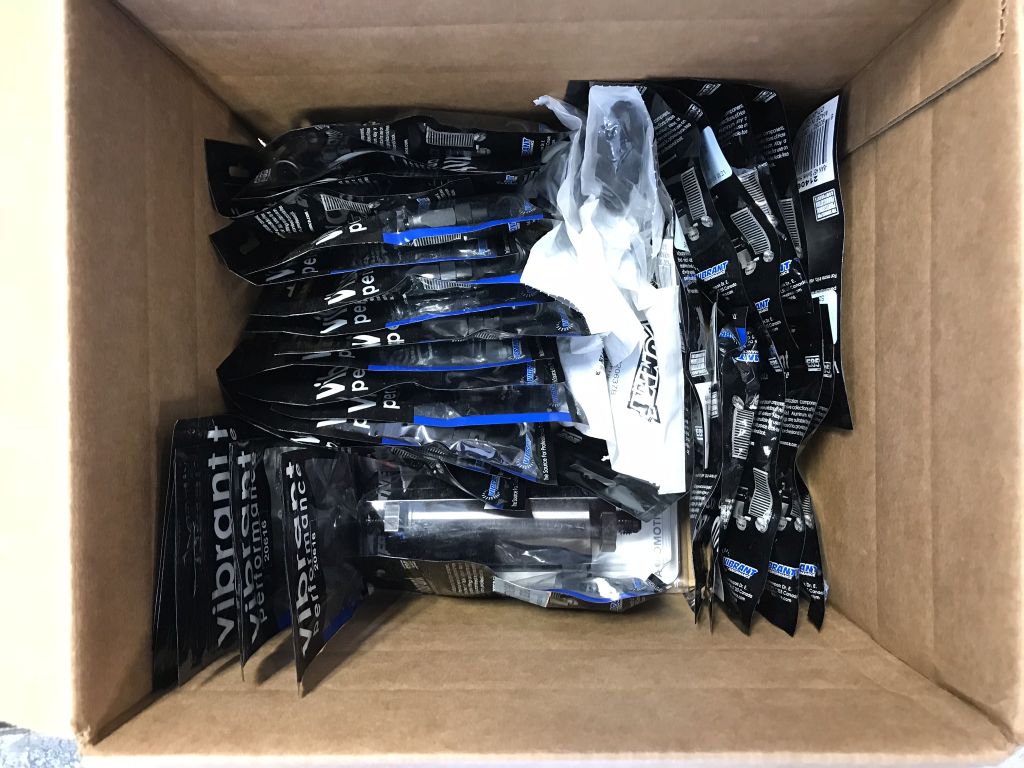 I added the flex fuel setup and "while I was in there" reorganized and rewrapped the engine engine harness. 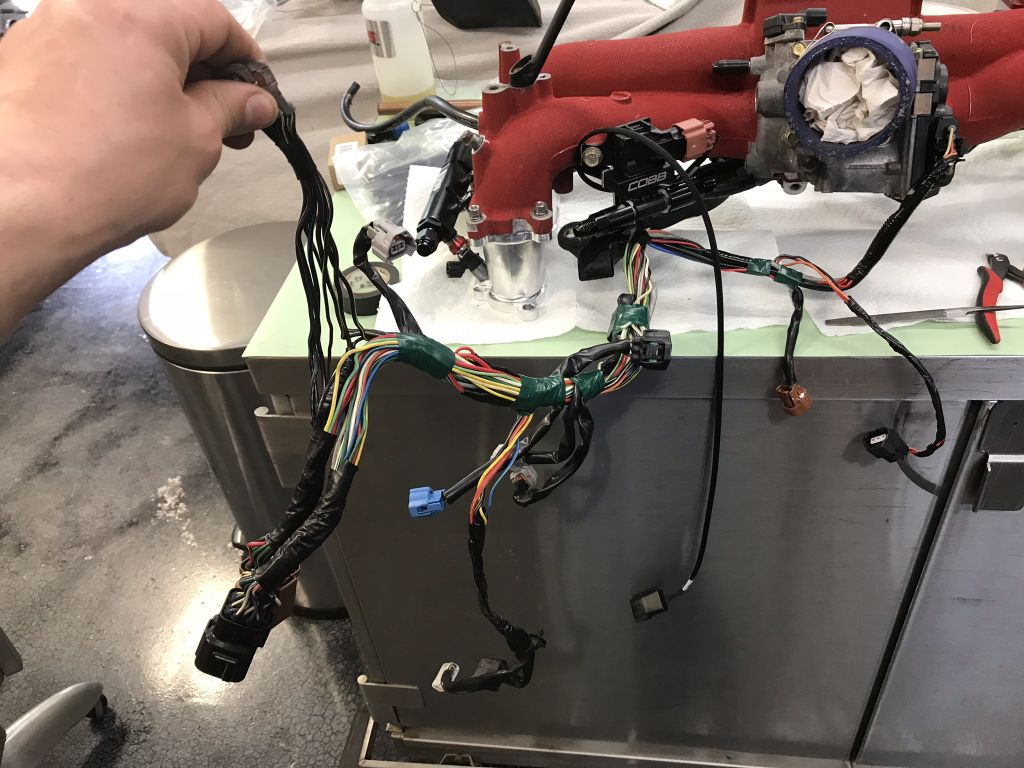 Wiring sorted and sensors mounted...just before running the new AN lines/fitting. Didn't get a picture due to time constraints. 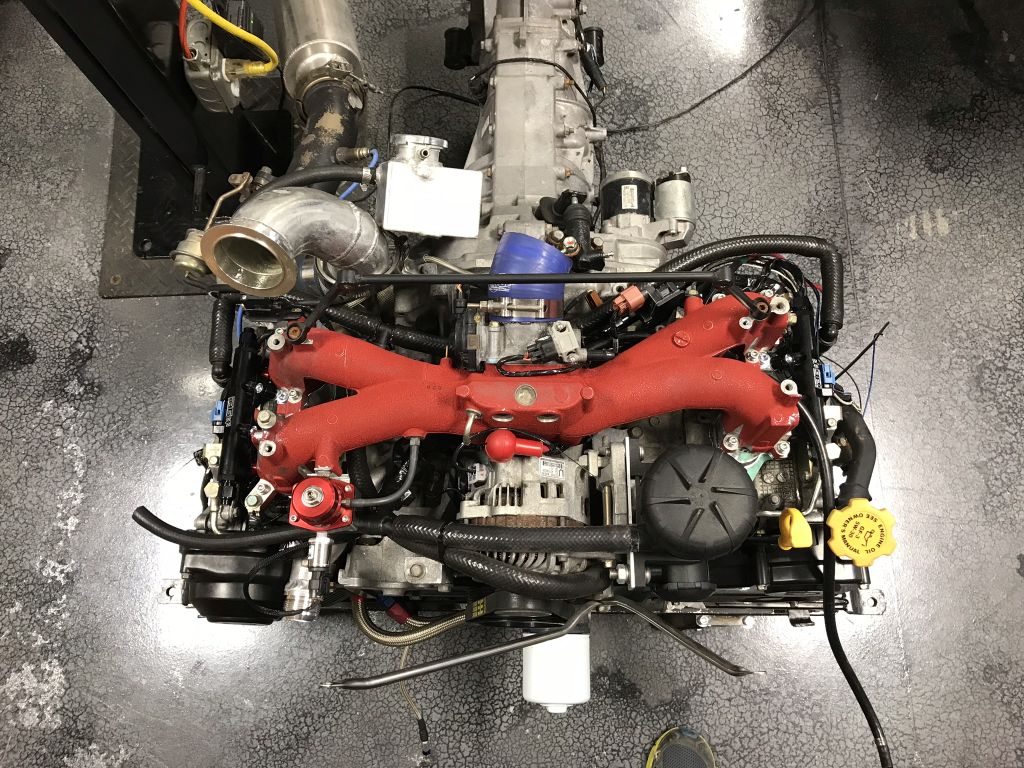 AN all the things...including the return lines from the header tank and heater core bypass. 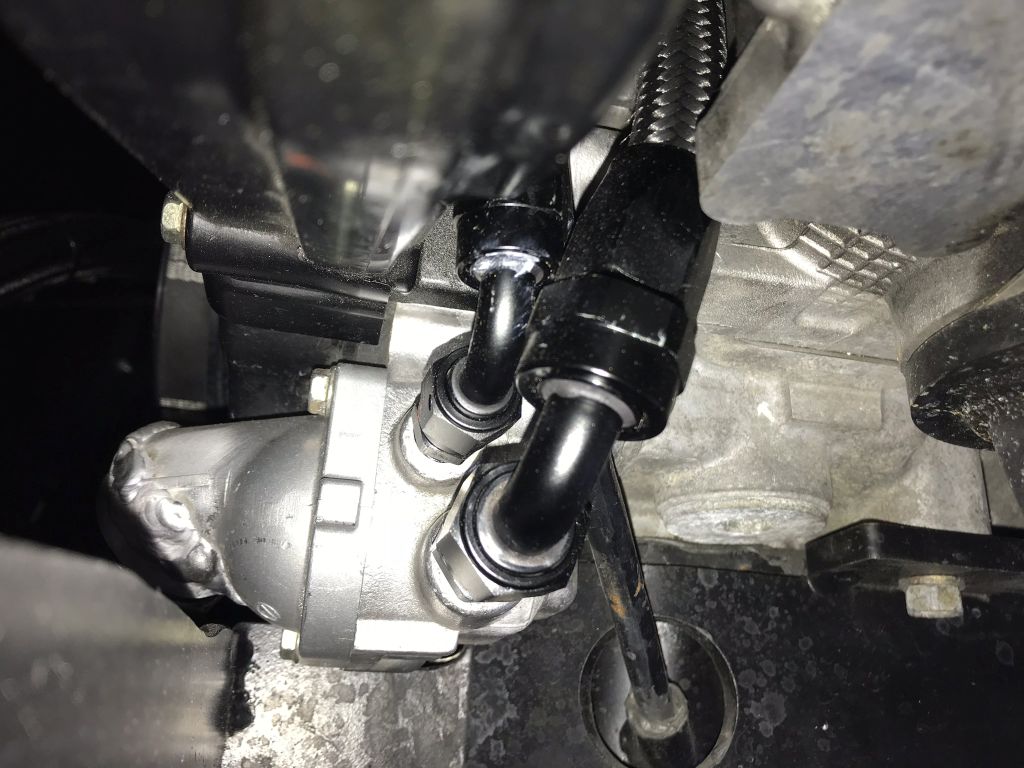 IAT Installed just before the throttle body. 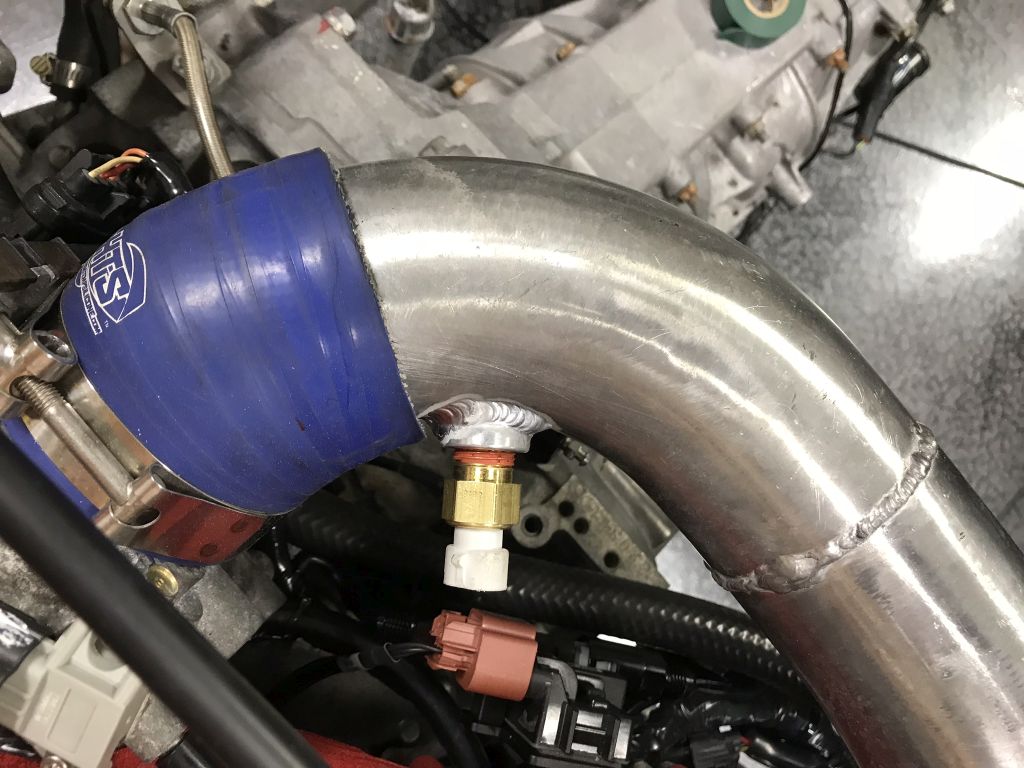 Old BOV location, so much cleaner on this side of the engine. Air filter much lower now with only the suction side of the Provent plumbed pre-turbo. 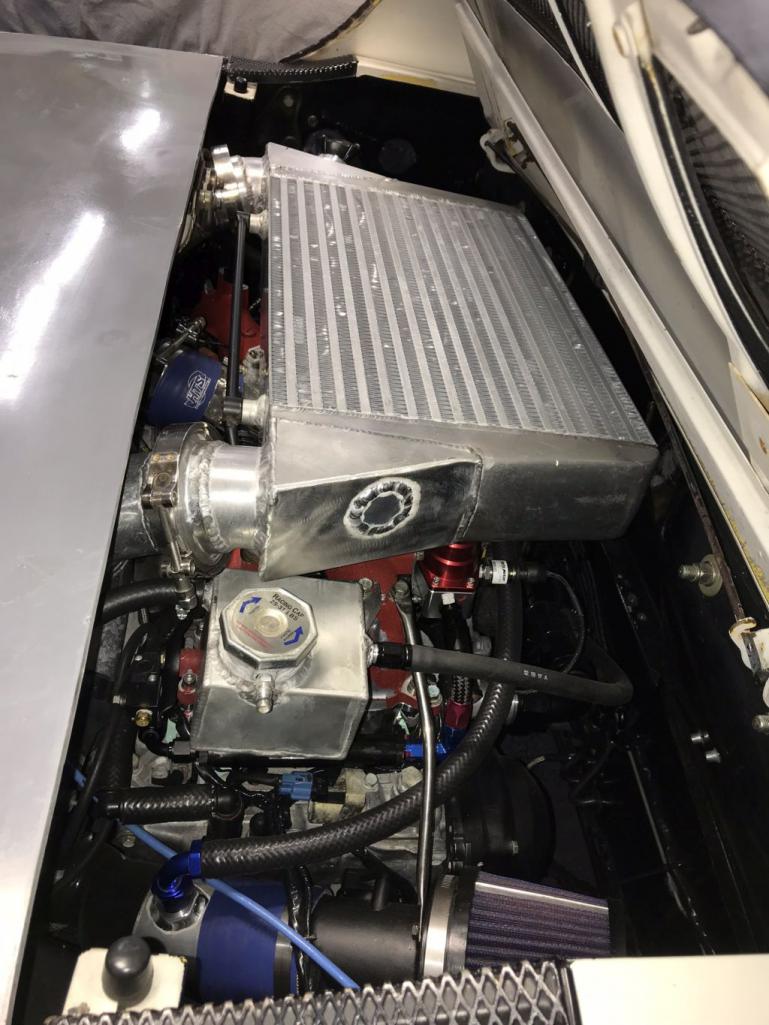 New BOV. Should sound great! 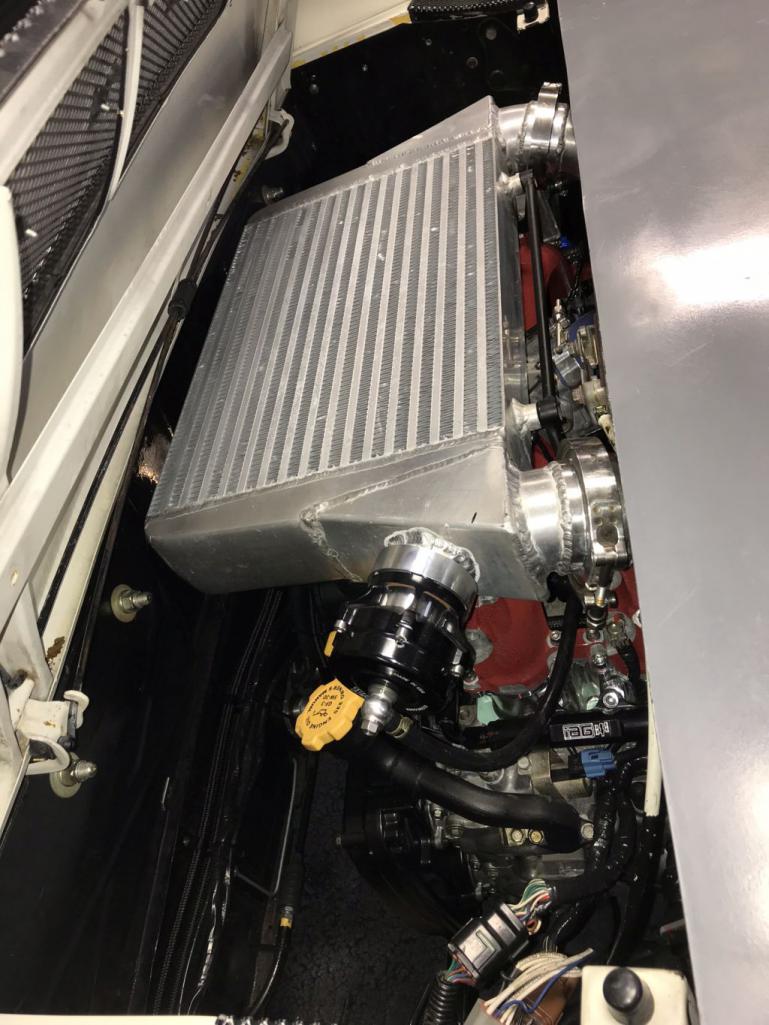 New fuel pump. 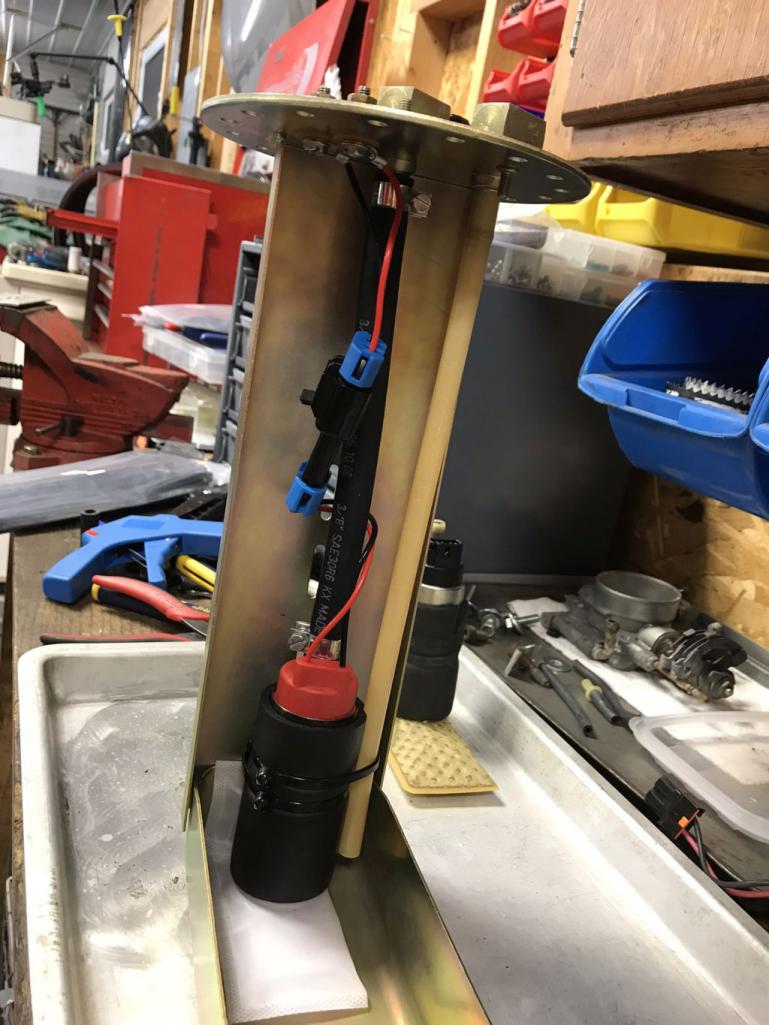 Front trunk is much cleaner now. 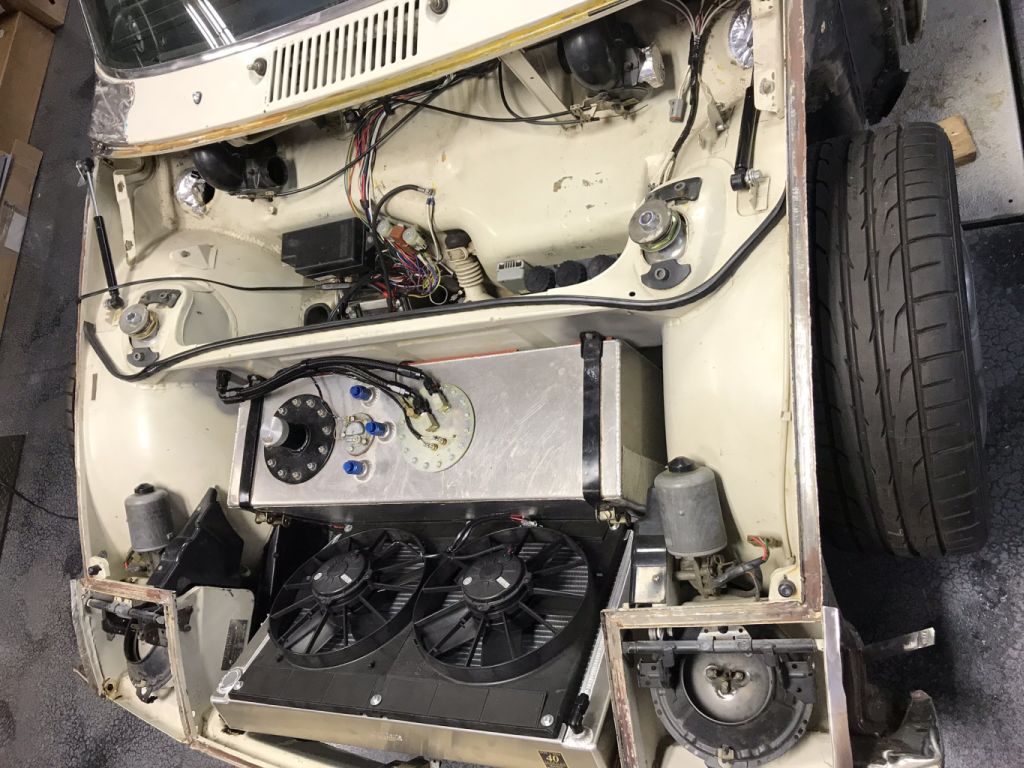 |
|
|
|
| Amenson |
Jul 5 2018, 09:41 PM
Post
#660
|
|
That's opposite lock!! Group: Members Posts: 645 Joined: 27-May 05 From: Dublin, OH Member No.: 4,154 Region Association: None |
Pedals:
The clevis for the clutch pedal was wearing through the pedal and had a really bad feeling. I cut it apart so that I could install a proper heim join. Also replaced the ball joint on the bottom of the throttle linkage with a quick disconnect joint to make it easier to adjust. Also added a threaded adjuster to the end of the linkage so that I can adjust the stop position. No good pictures of any of these mods. This is what it looks like finished. 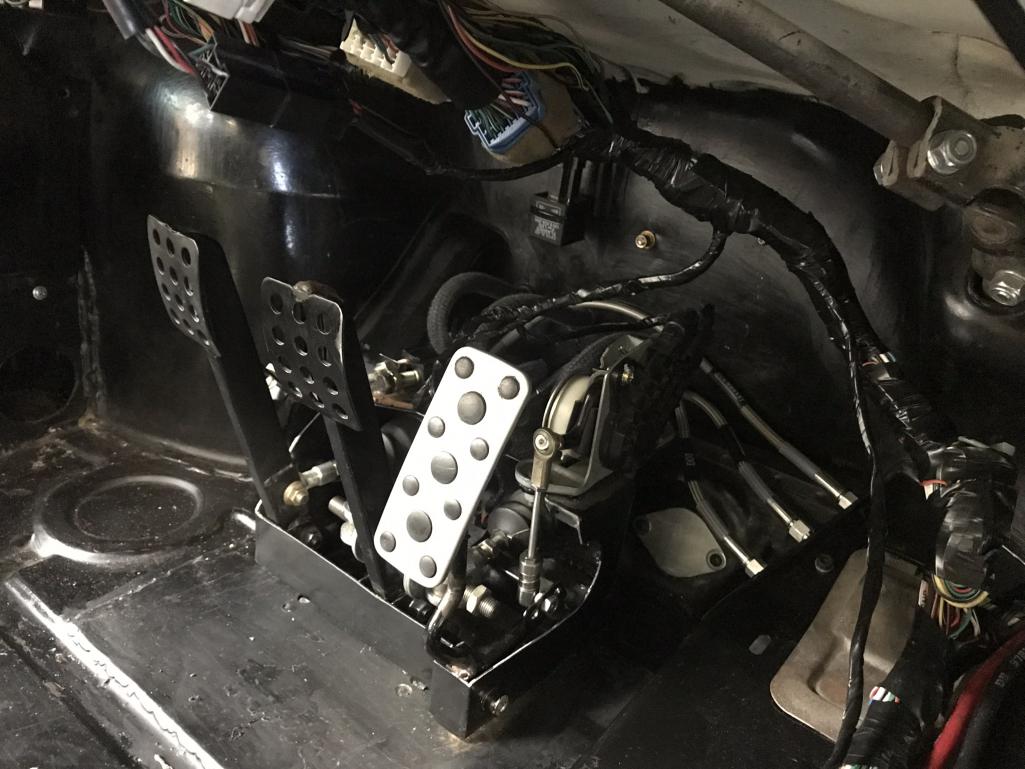 I also reorganized and rewrapped much of the cabin harness while I had access.  Will get a post picture, you can see some of it in the first pedal picture. Still have the body to post but don't have the motivation to go through the pictures of carnage tonight. Cheers, Scott |
|
|
|
|
2 User(s) are reading this topic (2 Guests and 0 Anonymous Users)
0 Members:

|
Lo-Fi Version | Time is now: 17th May 2024 - 04:52 PM |
Invision Power Board
v9.1.4 © 2024 IPS, Inc.