|
|
|
Porsche, and the Porsche crest are registered trademarks of Dr. Ing. h.c. F. Porsche AG.
This site is not affiliated with Porsche in any way. Its only purpose is to provide an online forum for car enthusiasts. All other trademarks are property of their respective owners. |
|
|

  |

| Eric_Shea |
 Nov 1 2003, 05:50 PM Nov 1 2003, 05:50 PM
Post
#1
|
|
PMB Performance  Group: Admin Posts: 19,304 Joined: 3-September 03 From: Salt Lake City, UT Member No.: 1,110 Region Association: Rocky Mountains |
Damn this site is good...
I started the morning by searching the archives for "GT Lid". I found a great how to that took me to Dave's post on the PP BBS. Great job Dave. I was inspired. Off to the garage. In building my GT replica I wanted my lid to match as closely as possible. I wanted the two screens to mate together down the middle. This is how my project differs from what I saw on other sites. I left the extra metal (not covered by an additional, original grill) at the back of the lid. I actually only spent about 2.5 hours on this to get it to what you'll see below. The only thing left to do is to bend the final lip(s) down on the backside of the lid and prep for finishing. Here's what you need if you care to brave the wilds of creating a GT lid. * An extra 914 grill. * Cut-off wheel. * Tin Snips. * Sabre saw with a metal blade. * Die Grinder * Vise * Drill * Body hammer * Dollie * Flanging pliers (or something... haven't gotten to that step yet. I'll keep ya posted) Step 1: I think this is a fairly easy way to get a GT lid started. I simply used an extra 914 grill but used it in the opposite direction. No "major" bending of metal (at this point). All you'll need to do is cut the mounting tabs off the long side where the two grills will meet. These tabs would get in the way of the tabs on the original grill. By cutting them off and using a "V" notch, the original tabs will be able to mount in their original holes (novel concept). I've also left as many of the (other) original mounting tabs as possible on the grill. More about that later. I used a small cut-off wheel to do the job. Attached image(s) 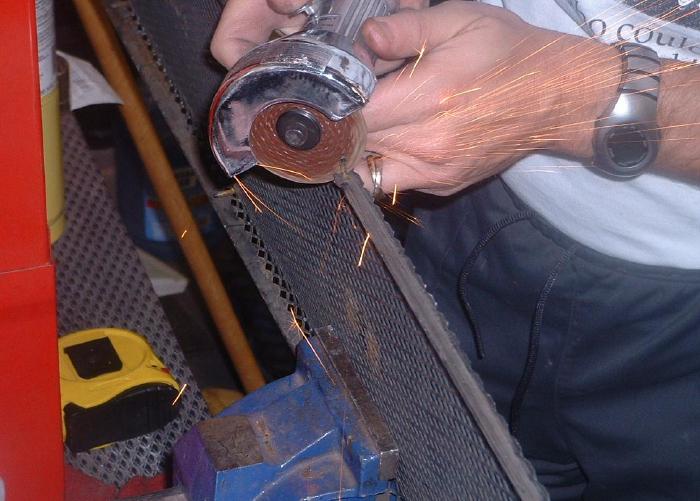
|
   |

 
|
| Eric_Shea |
Nov 1 2003, 05:57 PM
Post
#2
|
|
PMB Performance Group: Admin Posts: 19,304 Joined: 3-September 03 From: Salt Lake City, UT Member No.: 1,110 Region Association: Rocky Mountains |
Step 2:
The tabs are cut out. The picture below shows the notch made by the cut-off wheel. This is where some bending comes in. The grill mates to the front edge of the lid on the "ends" and stands off by about 1/4 inch in the middle. This is because the ends of the grill are bent in a rather precarious manner. The picture shows the bend on the grill. Notice how you can see more of the "diamonds" on the right side and less on the left. The trick is to flatten the grill out on the ends and "re-bend" in a straight line. The "thick" part of the grill (at the bottom) is molded in that straight line. You need to secure it in a vise along the "thick" edge and bend it back in a straight line using a body hammer. Attached image(s) 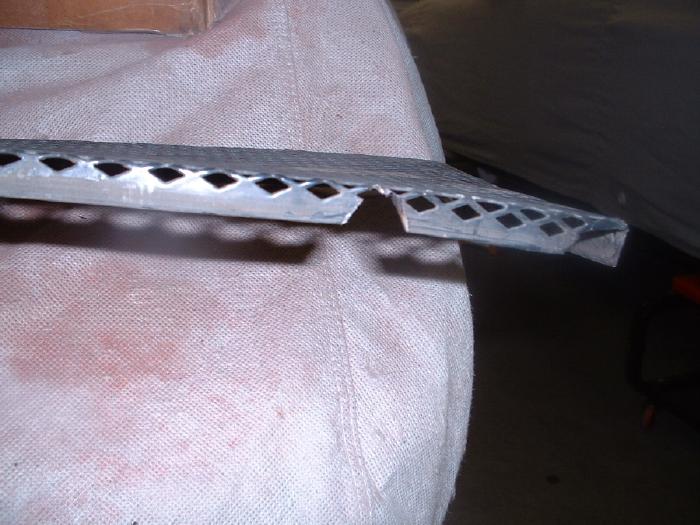
|
|
|
|
| Eric_Shea |
Nov 1 2003, 05:59 PM
Post
#3
|
|
PMB Performance Group: Admin Posts: 19,304 Joined: 3-September 03 From: Salt Lake City, UT Member No.: 1,110 Region Association: Rocky Mountains |
Step 3:
Next I laid the screen on the lid for a test fit. I used a scribe to mark the locations of the remaining stock mounting tabs. I marked the lid and drilled the holes... pretty simple so far. |
|
|
|
| Eric_Shea |
Nov 1 2003, 06:00 PM
Post
#4
|
|
PMB Performance Group: Admin Posts: 19,304 Joined: 3-September 03 From: Salt Lake City, UT Member No.: 1,110 Region Association: Rocky Mountains |
(ooops... photo would be nice) (IMG:style_emoticons/default/blink.gif)
Attached image(s) 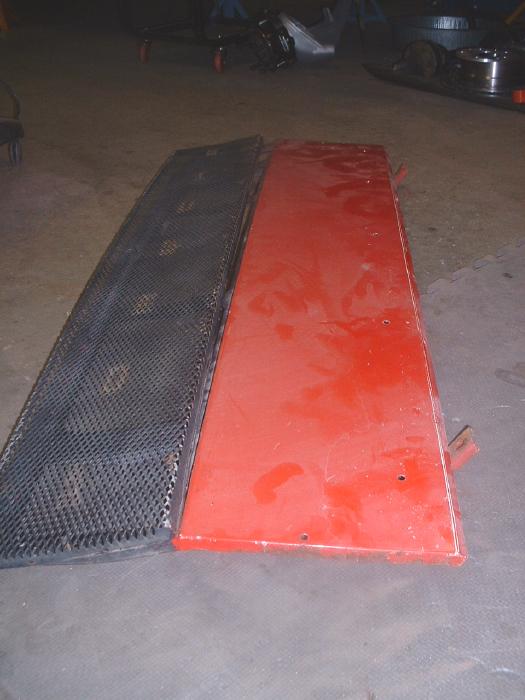
|
|
|
|
| Eric_Shea |
Nov 1 2003, 06:06 PM
Post
#5
|
|
PMB Performance Group: Admin Posts: 19,304 Joined: 3-September 03 From: Salt Lake City, UT Member No.: 1,110 Region Association: Rocky Mountains |
Step 4:
I used a drill and drilled out the spot welds on the cross brace. I also used a cut-off wheel and cut the center spring mount down about 1/2" past the mount itself. I didn't use a special "spot weld bit", instead I drill completely through saving an extra .000012542nd of a pound in weight! (lighter = faster). Actually I've seen actualy GT lids and they're nothing to write home about so I wasn't too picky here... this took a whoppin 5 minutes. Attached image(s) 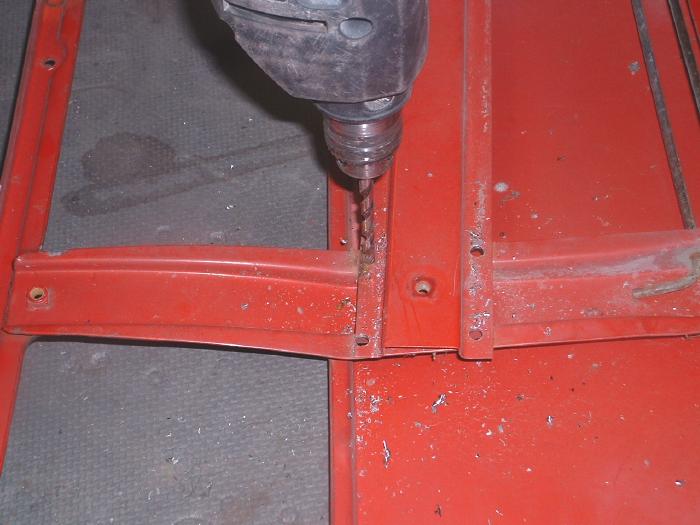
|
|
|
|
| Eric_Shea |
Nov 1 2003, 06:10 PM
Post
#6
|
|
PMB Performance Group: Admin Posts: 19,304 Joined: 3-September 03 From: Salt Lake City, UT Member No.: 1,110 Region Association: Rocky Mountains |
Step 5:
Building the Template. I used the front section of the lid with the existing mounting surface as my original template. Seeing as how my grill would simply be turned around, this was a logical place to get a "factory look" type template from. I laid a piece of masking tape over the front surface and used the side of a pencil to trace the outline. I then lifted the tape and using my center hole as a guide, I laid the tape down on the back section of the lid. Attached image(s) 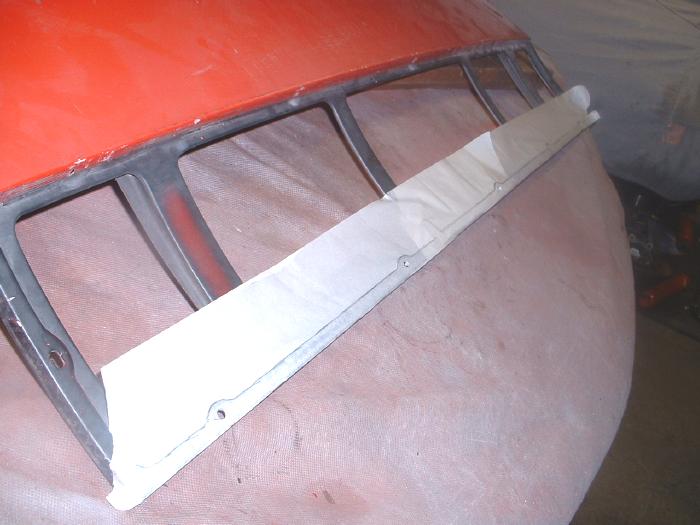
|
|
|
|
| Eric_Shea |
Nov 1 2003, 06:13 PM
Post
#7
|
|
PMB Performance Group: Admin Posts: 19,304 Joined: 3-September 03 From: Salt Lake City, UT Member No.: 1,110 Region Association: Rocky Mountains |
Step 6:
Completing the template. I used masking tape and completed taping off the lid. Using measurements similar to the front half of the lid I drafted the new opening on the back half. All over except the "commitment" part (snip, snip). Attached image(s) 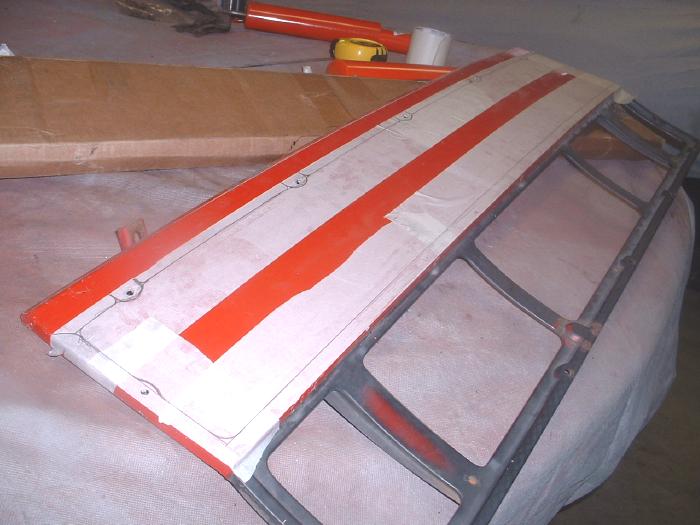
|
|
|
|
| Eric_Shea |
Nov 1 2003, 06:23 PM
Post
#8
|
|
PMB Performance Group: Admin Posts: 19,304 Joined: 3-September 03 From: Salt Lake City, UT Member No.: 1,110 Region Association: Rocky Mountains |
Step 7:
You can see by the template above that I plan to simply fold down the back. The 45 deg. lines in the corners will give you an idea. Also, the lines around the tab mounting holes in the rear show the direction. Step 7 is "Get cutting." I drilled a couple of holes to get my sabre saw blade started and away I went. The areas to be careful around when cutting are the mounting braces. I once again used the cut-off wheel to get at these areas. Be "very" careful with the cut-off wheel up toward the front of the lid. Here the sheetmetal virtually rests on the brace. You'll need to have a steady hand to just cut through the sheetmetal and not the brace. In the middle of the lid the brace slopes down so as not to be a mjor issue. Here's the new breather hole! Attached image(s) 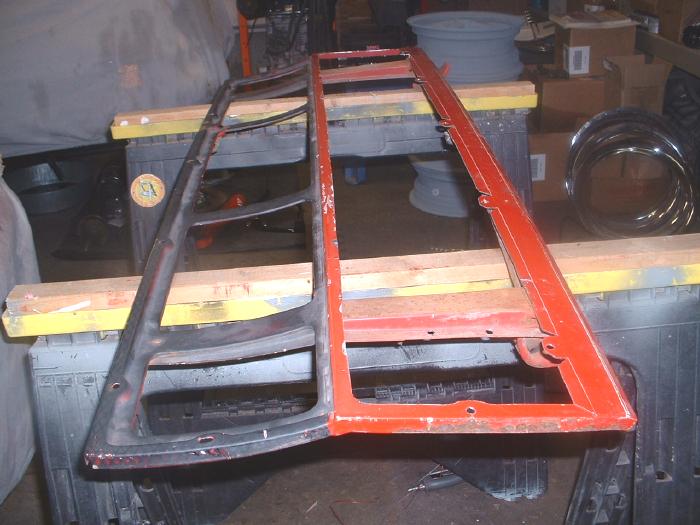
|
|
|
|
| Eric_Shea |
Nov 1 2003, 06:29 PM
Post
#9
|
|
PMB Performance Group: Admin Posts: 19,304 Joined: 3-September 03 From: Salt Lake City, UT Member No.: 1,110 Region Association: Rocky Mountains |
Next I'll need to find either some flanging pliers or... something that one of our fine 914club members would recommend for bending down the back lip. Once that is done the grill will need some slight cutting and modifying around those areas for final fit. I also kept the rubber beading that came on this grill and I plan to use it to "clean up" that back edge. Here's the lid with the grill trial fit, before the lip has been bent...
Film at 11:00! (IMG:style_emoticons/default/smile.gif) Attached image(s) 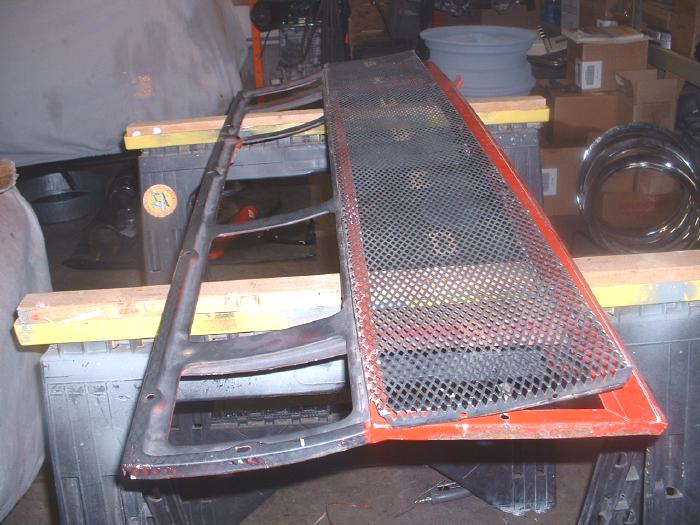
|
|
|
|
| McMark |
Nov 1 2003, 06:55 PM
Post
#10
|
|
914 Freak! Group: Retired Admin Posts: 20,180 Joined: 13-March 03 From: Grand Rapids, MI Member No.: 419 Region Association: None |
Very nice! I'm looking forward to the finished product.
|
|
|
|
| Aaron Cox |
Nov 1 2003, 07:10 PM
Post
#11
|
|
Professional Tinkerer Group: Retired Admin Posts: 24,548 Joined: 1-February 03 From: Corona, CA Member No.: 219 Region Association: Southern California |
schweet! (IMG:style_emoticons/default/smilie_pokal.gif)
|
|
|
|
| Eric_Shea |
Nov 1 2003, 07:11 PM
Post
#12
|
|
PMB Performance Group: Admin Posts: 19,304 Joined: 3-September 03 From: Salt Lake City, UT Member No.: 1,110 Region Association: Rocky Mountains |
Thanks Mark... say, is that a venison burger? How's the car?
|
|
|
|
| Joe Bob |
Nov 1 2003, 07:46 PM
Post
#13
|
|
Retired admin, banned a few times Group: Members Posts: 17,427 Joined: 24-December 02 From: Boulder CO Member No.: 5 Region Association: None |
That's how I did mine......I used barbeque paint to finish it off....
|
|
|
|
| Rusty |
Nov 2 2003, 09:05 AM
Post
#14
|
|
914 Guru Group: Retired Admin Posts: 7,993 Joined: 24-December 02 From: North Alabama Member No.: 6 Region Association: South East States |
Fantastic job!
When this thread is finished, I'll move it to the Classics. |
|
|
|
| djm914-6 |
Nov 2 2003, 10:24 AM
Post
#15
|
|
Happiness is: Getting on the road Group: Members Posts: 1,864 Joined: 6-February 03 From: Burlington MA Member No.: 248 Region Association: None |
I'm glad to have inspired someone to do their own project. I never did finish mine, but someone at Hershey got a great deal.
Good luck on yours! Here's the PP thread/ article... GT Engine Lid |
|
|
|
| Eric_Shea |
Nov 2 2003, 03:28 PM
Post
#16
|
|
PMB Performance Group: Admin Posts: 19,304 Joined: 3-September 03 From: Salt Lake City, UT Member No.: 1,110 Region Association: Rocky Mountains |
Did a few little things today. Dug out the original grill and test fit both together on the lid.
Also, used the MAP torch (why don't you have one yet?) and toned down the springs a bit. I held each sping in the vise and bent the end in about 1/2 way from where it was. I'm hoping this will duplicate the lighter 914-6 spring without going to the effort of finding a pair. Attached image(s) 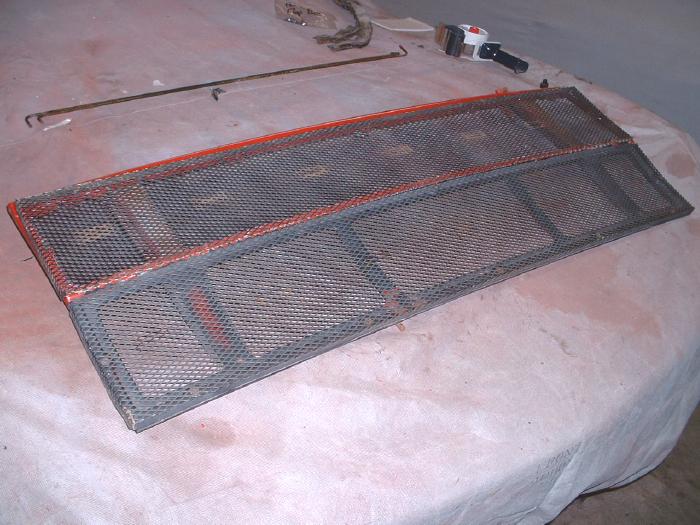
|
|
|
|
| Eric_Shea |
Nov 5 2003, 10:23 PM
Post
#17
|
|
PMB Performance Group: Admin Posts: 19,304 Joined: 3-September 03 From: Salt Lake City, UT Member No.: 1,110 Region Association: Rocky Mountains |
Guess who?
OK... The answer to the missing tool from the first post is; A pair of Vise-Grip sheetmetal bending pliers. With those and a dollie and body hammer the final bend was completed. Attached image(s) 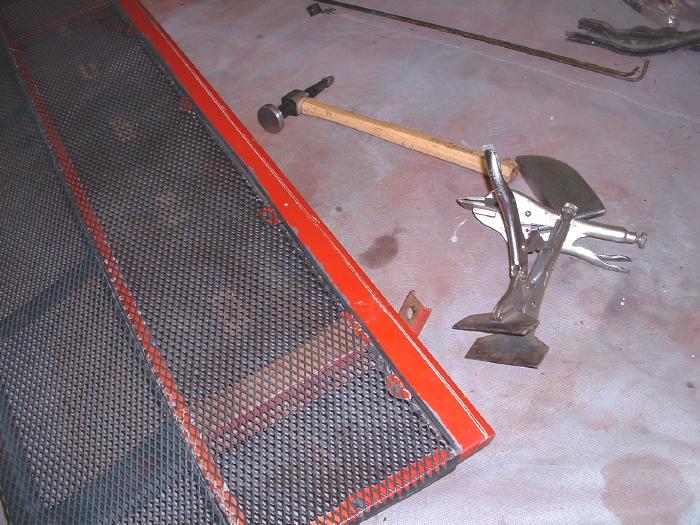
|
|
|
|
| Eric_Shea |
Nov 5 2003, 10:27 PM
Post
#18
|
|
PMB Performance Group: Admin Posts: 19,304 Joined: 3-September 03 From: Salt Lake City, UT Member No.: 1,110 Region Association: Rocky Mountains |
I also took the time to trim the extra piece of rubber trim so it would fit along that back edge. Next, the entire lid and grill assembly gets taken off to the sand blaster to have it all cleaned up. Then it gets primed and painted with semi-gloss black and re-assembled.
Attached image(s) 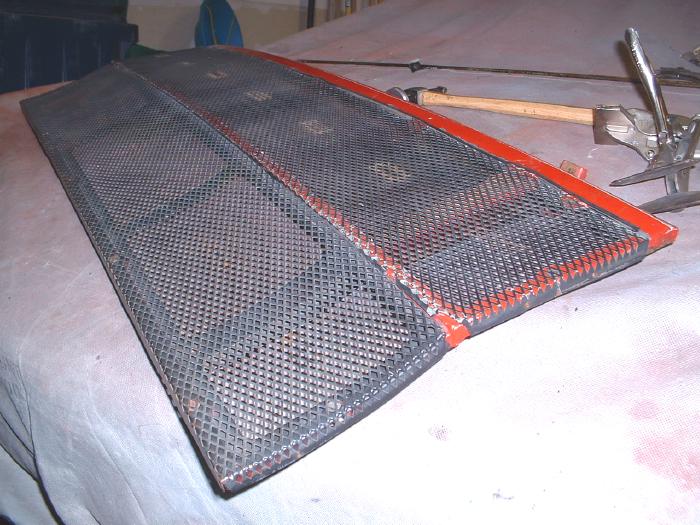
|
|
|
|
| redshift |
Nov 5 2003, 10:39 PM
Post
#19
|
|
Bless the Hell out of you! Group: Members Posts: 10,926 Joined: 29-June 03 Member No.: 869 |
That came out really nice.
Does Mike eat venison with barbeque paint? M |
|
|
|
| Eric_Shea |
Nov 7 2003, 11:09 PM
Post
#20
|
|
PMB Performance Group: Admin Posts: 19,304 Joined: 3-September 03 From: Salt Lake City, UT Member No.: 1,110 Region Association: Rocky Mountains |
Back from the sandblaster today. I finished up the bend at the rear of the lid and, once again, test fit the grills. I also test fit the springs again.
Attached image(s) 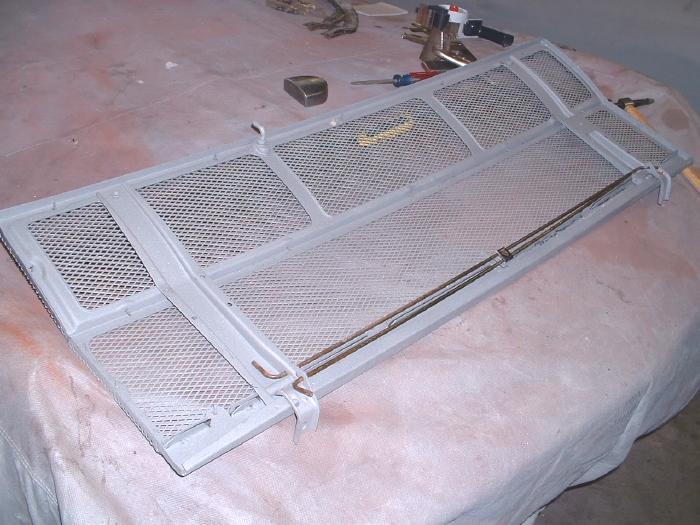
|
|
|
|
|
1 User(s) are reading this topic (1 Guests and 0 Anonymous Users)
0 Members:

|
Lo-Fi Version | Time is now: 19th June 2026 - 05:35 PM |
Invision Power Board
v9.1.4 © 2026 IPS, Inc.