|
|
|
Porsche, and the Porsche crest are registered trademarks of Dr. Ing. h.c. F. Porsche AG.
This site is not affiliated with Porsche in any way. Its only purpose is to provide an online forum for car enthusiasts. All other trademarks are property of their respective owners. |
|
|

  |

| Allan |
 Nov 19 2006, 04:37 PM Nov 19 2006, 04:37 PM
Post
#1
|
|
Teenerless Weenie  Group: Members Posts: 8,373 Joined: 5-July 04 From: Western Mesopotamia Member No.: 2,304 Region Association: Southern California |
Can it be done without turning it into junk? (IMG:style_emoticons/default/unsure.gif)
If so, any tricks... |
   |

 
|
| SirAndy |
Nov 19 2006, 04:41 PM
Post
#2
|
|
Resident German Group: Admin Posts: 42,483 Joined: 21-January 03 From: Oakland, Kalifornia Member No.: 179 Region Association: Northern California |
QUOTE(Headrage @ Nov 19 2006, 02:37 PM)  Can it be done without turning it into junk? (IMG:style_emoticons/default/unsure.gif) If so, any tricks... i'll be the first to ask as we had that exact same confusion a week ago or so ... do you mean the TARGA seal that goes between the windshield frame and the top or are you refering to another seal? (IMG:style_emoticons/default/idea.gif) Andy |
 |
|
| Allan |
Nov 19 2006, 04:43 PM
Post
#3
|
|
Teenerless Weenie Group: Members Posts: 8,373 Joined: 5-July 04 From: Western Mesopotamia Member No.: 2,304 Region Association: Southern California |
I'm talking about the wrap around seal that goes across the top of the windshield frame and down both sides of the pillars. (IMG:style_emoticons/default/thumb3d.gif)
The unobtainium one... |
|
|
|
| SirAndy |
Nov 19 2006, 04:46 PM
Post
#4
|
|
Resident German Group: Admin Posts: 42,483 Joined: 21-January 03 From: Oakland, Kalifornia Member No.: 179 Region Association: Northern California |
QUOTE(Headrage @ Nov 19 2006, 02:43 PM) I'm talking about the wrap around seal that goes across the top of the windshield frame and down both sides of the pillars. (IMG:style_emoticons/default/thumb3d.gif) The unobtainium one... ok, good. (IMG:style_emoticons/default/biggrin.gif) easy to remove, just don't miss the *tiny* setscrews on each side in the top corners that hold it to the top of the a-pillar trim! if it's in decent shape it can be easily removed in one piece. just be careful. done it many times ... (IMG:style_emoticons/default/smash.gif) Andy |
|
|
|
| Allan |
Nov 19 2006, 06:09 PM
Post
#5
|
|
Teenerless Weenie Group: Members Posts: 8,373 Joined: 5-July 04 From: Western Mesopotamia Member No.: 2,304 Region Association: Southern California |
QUOTE(SirAndy @ Nov 19 2006, 02:46 PM) if it's in decent shape it can be easily removed in one piece. just be careful. done it many times ... (IMG:style_emoticons/default/smash.gif) Andy What exactly do you consider decent shape? It's a 32 year old seal and has cracks at the corners. Other than that it's all there. |
|
|
|
| Richard Casto |
Nov 19 2006, 06:57 PM
Post
#6
|
|
Blue Sky Motorsports, LLC Group: Members Posts: 1,465 Joined: 2-August 05 From: Durham, NC Member No.: 4,523 Region Association: South East States |
I removed mine about a month ago and took a bunch of photos. I was intending to do a write up. I wouldn't consider it "easy", but it is doable. The unexpected problem I ran into was that the aluminum channels that the seal slide in on the side of the windshield had been "staked". It looks like it was done to prevent the seal from sliding up and out of the channel. I don't know if this was done at the factory or by a previous owner. I wouldn't be suprised if this was the original seal.
When I say "staked", I mean that they had take a punch (or screwdriver) and a hammer and punched in part of the groove in the channel to deform it. It was on the inside (you have to remove the inside windshield trim to get at it. Once I did that, I could bend back the channel, apply some soapy water to get it moving and then it came out. There is much more that it than just that, but that was the tricky part IMHO. Hopefully in the next month or so I will do a writeup (with photos) on my website. |
|
|
|
| SirAndy |
Nov 19 2006, 07:13 PM
Post
#7
|
|
Resident German Group: Admin Posts: 42,483 Joined: 21-January 03 From: Oakland, Kalifornia Member No.: 179 Region Association: Northern California |
QUOTE(Richard Casto @ Nov 19 2006, 04:57 PM) When I say "staked", I mean that they had take a punch (or screwdriver) and a hammer and punched in part of the groove in the channel to deform it. factory. they all were done like that ... (IMG:style_emoticons/default/smile.gif) Andy |
|
|
|
| Allan |
Nov 19 2006, 07:44 PM
Post
#8
|
|
Teenerless Weenie Group: Members Posts: 8,373 Joined: 5-July 04 From: Western Mesopotamia Member No.: 2,304 Region Association: Southern California |
Andy,
Please share the techniques you use to R&R the seal... I just don't want to end up with the car sitting in the garage for the next 6 years looking for a replacement. |
|
|
|
| Joe Bob |
Nov 19 2006, 07:47 PM
Post
#9
|
|
Retired admin, banned a few times Group: Members Posts: 17,427 Joined: 24-December 02 From: Boulder CO Member No.: 5 Region Association: None |
QUOTE(Headrage @ Nov 19 2006, 05:44 PM) Andy, Please share the techniques you use to R&R the seal... I just don't want to end up with the car sitting in the garage for the next 6 years looking for a replacement. I used glycerin to help soften and lubricate the sliding out of the channels. I've had some over the years that tear where channel sits. Why are you removing one? Paint? |
|
|
|
| firstknight13 |
Nov 19 2006, 11:09 PM
Post
#10
|
|
Senior Member Group: Members Posts: 652 Joined: 25-March 05 From: manchester,ct. Member No.: 3,817 |
(IMG:style_emoticons/default/smile.gif) be very carefull grasshopper pull from the bottom and work your way up to the top. this is the hard part there is a metal piece that the seal sits in and that is the weak spot. hold the top and side and pull out towards the back to release the seal . then go to the other side and repeat. after its out of that metal your set. replacement is much easyier. oh i did rip mine when i replaced the channel with a powder coated one. it was brand new!!! then 275 now the sky is the limit.... good luck (IMG:style_emoticons/default/clap56.gif)
|
|
|
|
| Richard Casto |
Nov 20 2006, 06:46 AM
Post
#11
|
|
Blue Sky Motorsports, LLC Group: Members Posts: 1,465 Joined: 2-August 05 From: Durham, NC Member No.: 4,523 Region Association: South East States |
QUOTE(firstknight13 @ Nov 20 2006, 12:09 AM) (IMG:style_emoticons/default/smile.gif) be very carefull grasshopper pull from the bottom and work your way up to the top. Its a bit like pushing a chain, but pulling from the bottom is the key. You need to snake it up a bit at a time and do not pull AT ALL at the joint between the horizontal and vertical parts. Its one of those things that is scary the first time, but once you do it and see how it's done, I think the second time would be relatively straight forward. |
|
|
|
| Allan |
Nov 20 2006, 08:18 AM
Post
#12
|
|
Teenerless Weenie Group: Members Posts: 8,373 Joined: 5-July 04 From: Western Mesopotamia Member No.: 2,304 Region Association: Southern California |
Good info so far.
What holds it on across the top? |
|
|
|
| Allan |
Nov 20 2006, 08:18 AM
Post
#13
|
|
Teenerless Weenie Group: Members Posts: 8,373 Joined: 5-July 04 From: Western Mesopotamia Member No.: 2,304 Region Association: Southern California |
QUOTE(mikez @ Nov 19 2006, 05:47 PM) Why are you removing one? Paint? Yep... |
|
|
|
| Richard Casto |
Nov 20 2006, 12:38 PM
Post
#14
|
|
Blue Sky Motorsports, LLC Group: Members Posts: 1,465 Joined: 2-August 05 From: Durham, NC Member No.: 4,523 Region Association: South East States |
QUOTE(Headrage @ Nov 20 2006, 09:18 AM) Good info so far. What holds it on across the top? All along the top there is an embedded metal clip. On the windshield frame there is a knife edge that the seal covers and the clip slides over and grips. I used both a small screw driver (putty knife might work better) on the top (between the frame and the seal) and sliping a finger behind the bottom of the seal. Alternate between the top and bottom to seperate the seal from the frame. Wiggle, go slow and don't force anything. Once you get a small section loose, you should see the clip and how it works. And once you get a section loose, the rest should be easy. I found the top easy and the sides hard. I did the top first and then the sides. If you have the sides loose and sliding in the channel already, it might make the top easier. But I think it is easier to get the top loose so that way you can slide the sides out. Either way, the sides will not slide all the way out unless you have already broken the top free. I think Aaron mentioned that there are some screws through the seal near the corners (edges of the horizontal part). A PO had tried to cure a leak by adding some rubber sealant in that area and had covered up the screws. If I hadn't dug out the added sealant, I wouldn't have seen the screws. Can't promise I will get it done, but I am going to try to do a write up with photos tonight. I just need to download the photos from my camera. I have the write up about 80% done already. |
|
|
|
| Allan |
Nov 20 2006, 01:29 PM
Post
#15
|
|
Teenerless Weenie Group: Members Posts: 8,373 Joined: 5-July 04 From: Western Mesopotamia Member No.: 2,304 Region Association: Southern California |
QUOTE(Richard Casto @ Nov 20 2006, 10:38 AM) QUOTE(Headrage @ Nov 20 2006, 09:18 AM) Good info so far. What holds it on across the top? All along the top there is an embedded metal clip. On the windshield frame there is a knife edge that the seal covers and the clip slides over and grips. I used both a small screw driver (putty knife might work better) on the top (between the frame and the seal) and sliping a finger behind the bottom of the seal. Alternate between the top and bottom to seperate the seal from the frame. Wiggle, go slow and don't force anything. Once you get a small section loose, you should see the clip and how it works. And once you get a section loose, the rest should be easy. I found the top easy and the sides hard. I did the top first and then the sides. If you have the sides loose and sliding in the channel already, it might make the top easier. But I think it is easier to get the top loose so that way you can slide the sides out. Either way, the sides will not slide all the way out unless you have already broken the top free. I think Aaron mentioned that there are some screws through the seal near the corners (edges of the horizontal part). A PO had tried to cure a leak by adding some rubber sealant in that area and had covered up the screws. If I hadn't dug out the added sealant, I wouldn't have seen the screws. Can't promise I will get it done, but I am going to try to do a write up with photos tonight. I just need to download the photos from my camera. I have the write up about 80% done already. EXCELLENT!!!!! (IMG:style_emoticons/default/smilie_pokal.gif) |
|
|
|
| Richard Casto |
Nov 20 2006, 09:51 PM
Post
#16
|
|
Blue Sky Motorsports, LLC Group: Members Posts: 1,465 Joined: 2-August 05 From: Durham, NC Member No.: 4,523 Region Association: South East States |
QUOTE(Richard Casto @ Nov 20 2006, 01:38 PM) Can't promise I will get it done, but I am going to try to do a write up with photos tonight. I just need to download the photos from my camera. I have the write up about 80% done already. Ok, I put it together. It's my own little "how to" with photos. Someone else who has done this, let me know if I have an factual errors and I can fix the page... http://motorsport.zyyz.com/project_914_13.htm I hope this helps someone. (IMG:style_emoticons/default/smile.gif) Oh, by the way, the busted up thumb in the photos has healed up nicely thank you! (IMG:style_emoticons/default/rocking nana.gif) |
|
|
|
| Allan |
Nov 20 2006, 10:07 PM
Post
#17
|
|
Teenerless Weenie Group: Members Posts: 8,373 Joined: 5-July 04 From: Western Mesopotamia Member No.: 2,304 Region Association: Southern California |
Outstanding!!!
This has got to be added to the classic threads.... |
|
|
|
| Richard Casto |
Nov 20 2006, 10:21 PM
Post
#18
|
|
Blue Sky Motorsports, LLC Group: Members Posts: 1,465 Joined: 2-August 05 From: Durham, NC Member No.: 4,523 Region Association: South East States |
QUOTE(Headrage @ Nov 20 2006, 11:07 PM) Outstanding!!! This has got to be added to the classic threads.... If the admins think this is worthy of classic status, one of them can PM me and I can create a post with attached photos just like on my blog. I can't always guarantee my web server will be up as hosting that page as much as I would like. (IMG:style_emoticons/default/unsure.gif) |
|
|
|
| swood |
Nov 23 2006, 01:26 PM
Post
#19
|
|
Senior Member Group: Members Posts: 1,845 Joined: 6-February 03 From: Strong Beach Member No.: 251 Region Association: None |
Since I'm not hosting T-day this year, I spent some time on the car. I thought I'd add a few pics pertaining to the windshield seal removal, and how it's attached.
First pic shows the contour of the seal and of the channel that holds it. My channel only had two "stakes" (really just punched with a chisel or something) to hold the seal at the bottom. My seal was relatively plyable so I could just pull it out away from the channel rather than sliding it through. The latter is probably still the best way to go FWIW. Oh yeah, it seems the channel has a factory bead of butyl to seal it all the way up to the top corner. Gotta remember to use it when putting it back. Attached thumbnail(s) 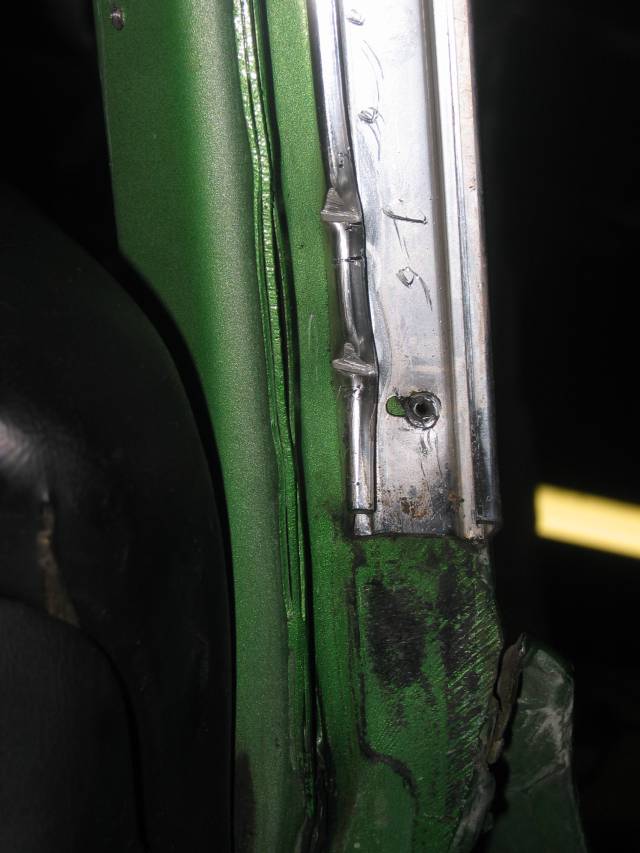 Attached image(s)  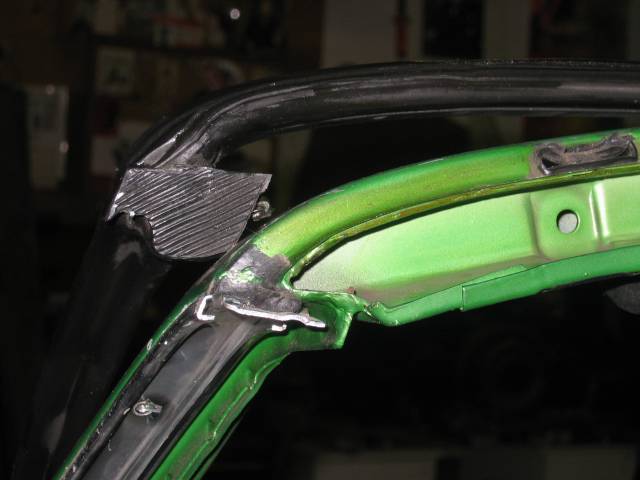
|
|
|
|
| swood |
Nov 23 2006, 01:32 PM
Post
#20
|
|
Senior Member Group: Members Posts: 1,845 Joined: 6-February 03 From: Strong Beach Member No.: 251 Region Association: None |
And just as an aside, if you ever have an opportunity to pick up an architectural flat file, do so. I've got 3 and I have almost a whole car stored in it.
You can see the winshield seal now coated in glycerine safely stored next to the outer trim and rear glass, safe and sound. (IMG:style_emoticons/default/smile.gif) Attached image(s) 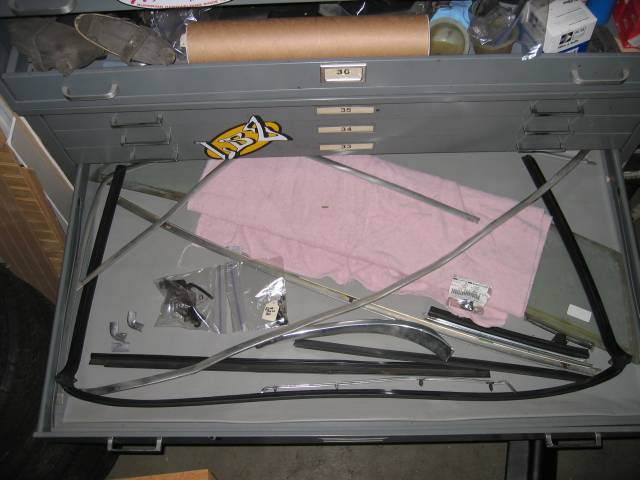
|
|
|
|
|
1 User(s) are reading this topic (1 Guests and 0 Anonymous Users)
0 Members:

|
Lo-Fi Version | Time is now: 8th June 2026 - 10:32 PM |
Invision Power Board
v9.1.4 © 2026 IPS, Inc.