|
|
|
Porsche, and the Porsche crest are registered trademarks of Dr. Ing. h.c. F. Porsche AG.
This site is not affiliated with Porsche in any way. Its only purpose is to provide an online forum for car enthusiasts. All other trademarks are property of their respective owners. |
|
|


| JeffBowlsby |
 Nov 25 2006, 09:25 AM Nov 25 2006, 09:25 AM
Post
#1
|
|
914 Wiring Harnesses  Group: Members Posts: 8,524 Joined: 7-January 03 From: San Ramon CA Member No.: 104 Region Association: None |
Attached image(s) 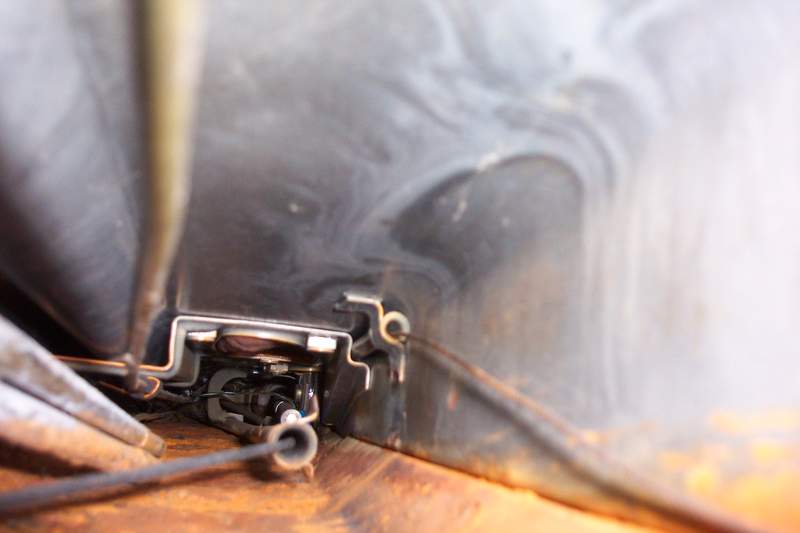
|
   |

 
|
  |
Replies(20 - 33)
| Dave_Darling |
Nov 26 2006, 07:04 PM
Post
#21
|
|
914 Idiot Group: Members Posts: 14,991 Joined: 9-January 03 From: Silicon Valley / Kailua-Kona Member No.: 121 Region Association: Northern California |
QUOTE(Rand @ Nov 25 2006, 11:32 PM)  So, the tricky part is: Drilling without damaging the tube. And putting something inside the tube before welding to make sure the weld doesn't penetrate the tube. Right? Not that I've noticed... Remember, you're not trying to weld the tube itself! You're just trying to get that bracket back onto the side of the tunnel. You don't have to drill the bracket, either--just drill into the side of the tunnel in the right places. If you're just welding the bracket, near the edges away from the tube, you're not going to heat up the tube or the cable. --DD |
|
|
|
| Rand |
Nov 26 2006, 09:04 PM
Post
#22
|
|
Cross Member Group: Members Posts: 7,409 Joined: 8-February 05 From: OR Member No.: 3,573 Region Association: None |
Thanks Dave!
But my concern then shifts..... Is the bracket really more stable than the tube? I'm thinking I could weld the bracket and later find the tube breaks away from the bracket.... I'm thinking I want to secure the tube to the wall. So, Brad's screwdriver tip.... Earlier I was thinking that would only work if cable was out.... But now I'm realizing how simple..... Cable in or out... Shank in the hole, plug weld... git-r-done. Simple. Bottom line, protect the tube from the penetrating weld.... Whether with a screwdriver tip (If the handle allows clearance) or with my slotted tubing idea.... Just do what works.... The point being, protect the interior of the tube from weld penetration.... |
|
|
|
| Trekkor |
Nov 27 2006, 07:57 PM
Post
#23
|
|
I do things... Group: Members Posts: 7,809 Joined: 2-December 03 From: Napa, Ca Member No.: 1,413 Region Association: Northern California |
I drilled the holes today any with vice-grip c-clamp it is right in place to accept the new weld.
my first hole was very close to perfect. the spot welds were impossible for me to detect. (IMG:style_emoticons/default/confused24.gif) After I drilled the first "exploritory" hole, I drilled two more in the *right* places. So I have three 1/4" holes...Oh no!!! (IMG:style_emoticons/default/ohmy.gif) I will take some pictures with a measuring tape in the shot to show *exactly* where to drill. ( tomorrow or later ) Time to weld it up (IMG:style_emoticons/default/welder.gif) KT |
|
|
|
| Trekkor |
Nov 27 2006, 08:01 PM
Post
#24
|
|
I do things... Group: Members Posts: 7,809 Joined: 2-December 03 From: Napa, Ca Member No.: 1,413 Region Association: Northern California |
From the look of things through the drilled holes it will be very easy to hit the weld on the existing bracket and then plug weld it on the way out.
It should be stronger than the original. KT |
|
|
|
| Katmanken |
Nov 27 2006, 08:34 PM
Post
#25
|
|
You haven't seen me if anybody asks... Group: Members Posts: 4,738 Joined: 14-June 03 From: USA Member No.: 819 Region Association: Upper MidWest |
How to find and drill a spotweld 101.
1. Spotwelds are dimples in the metal so simply block sand the paint off around the area of interest. The block sanding removes the paint from the flat surface and the remaining spots of paint should be your spotwelds. 2. Drill out the spots of paint. |
|
|
|
| Trekkor |
Nov 27 2006, 08:42 PM
Post
#26
|
|
I do things... Group: Members Posts: 7,809 Joined: 2-December 03 From: Napa, Ca Member No.: 1,413 Region Association: Northern California |
I know how to find them...
these ones wouldn't come out of hiding (IMG:style_emoticons/default/laugh.gif) I used a flat razor and scraped all the paint away. No could see... I could sort of feel a dimple so I drilled there. KT |
|
|
|
| Katmanken |
Nov 27 2006, 08:47 PM
Post
#27
|
|
You haven't seen me if anybody asks... Group: Members Posts: 4,738 Joined: 14-June 03 From: USA Member No.: 819 Region Association: Upper MidWest |
Sometimes when you spotweld and don't clamp tightly, you don't get the penetration, the dimple, and the weld fails.....
Hey, sound familar? Ken |
|
|
|
| Trekkor |
Dec 1 2006, 07:43 PM
Post
#28
|
|
I do things... Group: Members Posts: 7,809 Joined: 2-December 03 From: Napa, Ca Member No.: 1,413 Region Association: Northern California |
OK, I finished my clutch tube repair.
In the tunnel and at the firewall. (IMG:style_emoticons/default/welder.gif) I tried the drill and tack method, but I didn't feel comfortable with the strength of it, so I did it "my way". 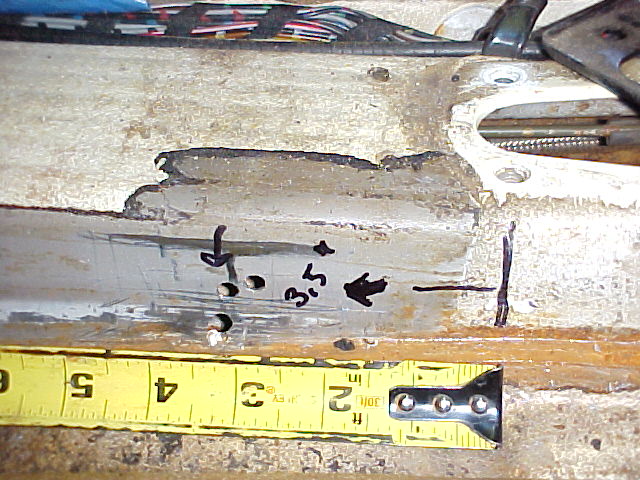 Here you can see the location of the area to be drilled/opened. It's 3.5" from the front shifter bolt hole. 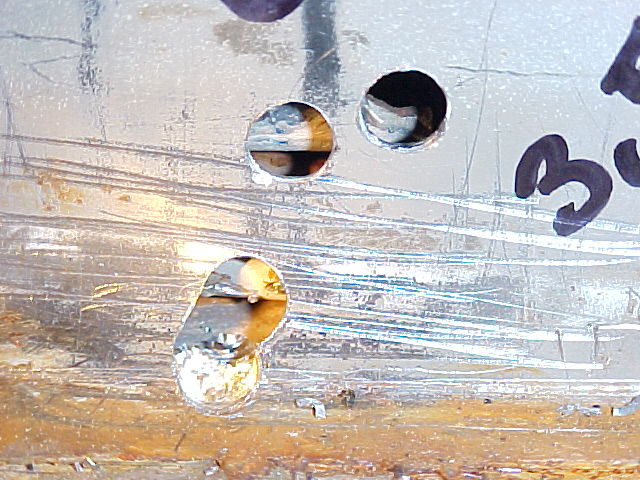 Can you see the tube mounting tabs through the holes? KT |
|
|
|
| Trekkor |
Dec 1 2006, 07:52 PM
Post
#29
|
|
I do things... Group: Members Posts: 7,809 Joined: 2-December 03 From: Napa, Ca Member No.: 1,413 Region Association: Northern California |
I decided to open the side of the tunnel so I could weld the entire length of the lower tab to the tunnel.
Then I folded the upper tab up, over and down toward the floor. I built up weld from the lower until it reached the upper tab and then welded directly to it. 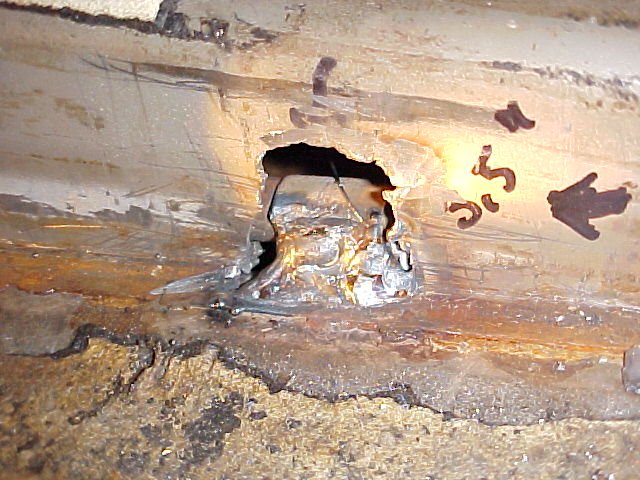 Then I made a simple sheet metal patch and closed it up. 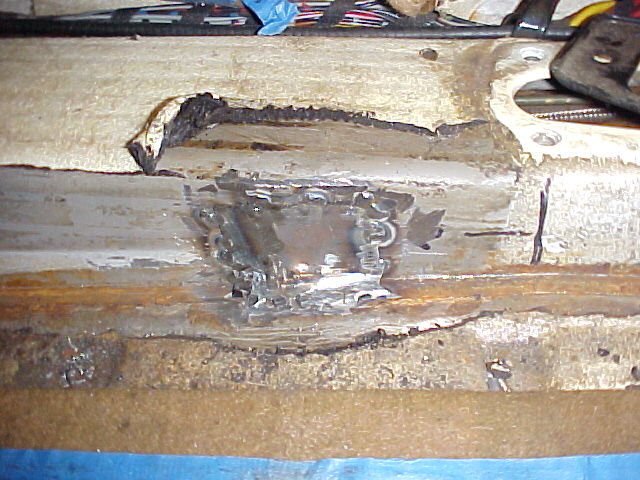 KT |
|
|
|
| Trekkor |
Dec 1 2006, 07:59 PM
Post
#30
|
|
I do things... Group: Members Posts: 7,809 Joined: 2-December 03 From: Napa, Ca Member No.: 1,413 Region Association: Northern California |
Here's the rear firewall repair.
I cut a fender washer into a "D" shape. I put a piece of 3/8" copper tube into the tube to protect it from burn through. 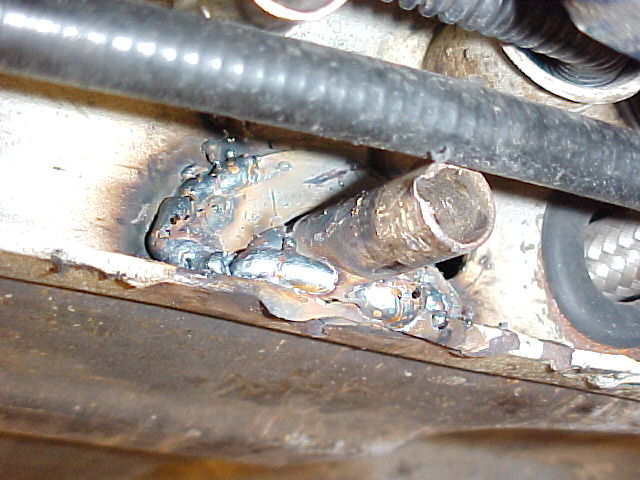 Clutch cable is back in and readjusted. 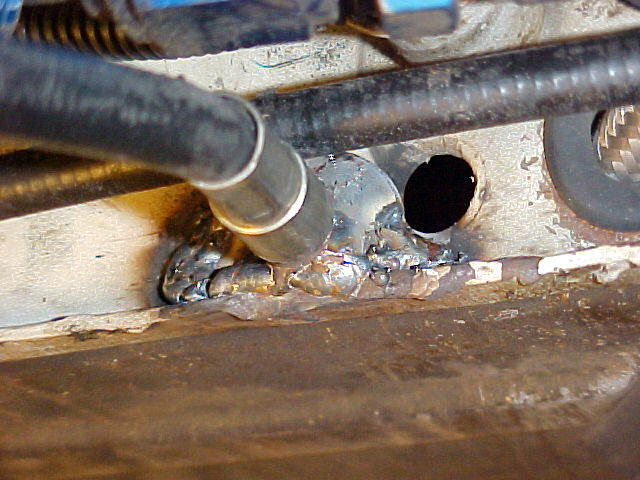 I hope it holds for at least 15 years... KT |
|
|
|
| ppickerell |
Dec 1 2006, 09:09 PM
Post
#31
|
|
914 addicted Group: Members Posts: 1,679 Joined: 14-October 03 From: Pleasanton, CA. Member No.: 1,246 |
[quote name='trekkor' date='Nov 27 2006, 05:57 PM' post='823900']
I drilled the holes today any with vice-grip c-clamp it is right in place to accept the new weld. my first hole was very close to perfect. the spot welds were impossible for me to detect. (IMG:style_emoticons/default/confused24.gif) After I drilled the first "exploritory" hole, I drilled two more in the *right* places. So I have three 1/4" holes...Oh no!!! (IMG:style_emoticons/default/ohmy.gif) Haha, Ury does that on purpose. |
|
|
|
| euro911 |
Dec 3 2006, 07:27 PM
Post
#32
|
|
Retired & living the dream. God help me if I wake up! Group: Members Posts: 8,851 Joined: 2-December 06 From: So.Cal. & No.AZ (USA) Member No.: 7,300 Region Association: Southern California |
Good info guys ...
I'm basically new to 914s, although I did have a '71 with a 1.8 liter for a couple of weeks way back in '73. I needed something bigger to haul motorcycles around, so the car had to go ... (IMG:style_emoticons/default/dry.gif) Just picked up a '75 2.0 project car this w/e and have been reading a lot of threads for the past two days. My hats off to you guys who are doing rust repairs ... not a fun job by any means. One of my friends always says: "Rust is no bargain, at any price" Yesterday, I noticed that my clutch was engaging too close to the floorboard so I decided to adjust it. When I got under the car, I found a 1" long aluminum spacer behind the release arm lever, then two 11mm nuts with another inch or more of thread exposed. I guess this was someone's fix because they didn't know about the tube problem? Noticing several things didn't appear right, I stopped in to see Adrian at Edelweiss Porsche. He told me that clutch tubes breaking loose was a common problem. We also found an 'L' bracket securing the front of the tube bolted inside the tunnel (IMG:style_emoticons/default/dry.gif) He'll MIG-weld the tube back in place and use a 2" hole-saw to gain access the middle bracket if needed. It will all get repaired properly ... some day (IMG:style_emoticons/default/shades.gif)  |
|
|
|
| Dave_Darling |
Dec 3 2006, 09:44 PM
Post
#33
|
|
914 Idiot Group: Members Posts: 14,991 Joined: 9-January 03 From: Silicon Valley / Kailua-Kona Member No.: 121 Region Association: Northern California |
QUOTE(euro911 @ Dec 3 2006, 05:27 PM) When I got under the car, I found a 1" long aluminum spacer behind the release arm lever, then two 11mm nuts with another inch or more of thread exposed. I guess this was someone's fix because they didn't know about the tube problem? The spacer is normal when someone uses the 911 clevis--the metal part the cable goes through where it hooks up to the throwout arm. The plastic 914 part is longer than the 911 part, so a spacer is required. And double-nutting is just a way to make sure it doesn't "self-adjust" while you're driving. However, a 1" spacer and 1" worth of threads sounds like a little much. BTW, this thread has just showed you pictures of why you don't need to take a hole-saw to the center tunnel. --DD |
|
|
|
| Trekkor |
Dec 4 2006, 10:49 AM
Post
#34
|
|
I do things... Group: Members Posts: 7,809 Joined: 2-December 03 From: Napa, Ca Member No.: 1,413 Region Association: Northern California |
Are "Terry" clutch cables a bit longer than stock?
I have a lot of adjustment on both ends. ( extra thread length ) KT |
|
|
|
|
1 User(s) are reading this topic (1 Guests and 0 Anonymous Users)
0 Members:

|
Lo-Fi Version | Time is now: 31st May 2024 - 09:32 PM |
Invision Power Board
v9.1.4 © 2024 IPS, Inc.