|
|
|
Porsche, and the Porsche crest are registered trademarks of Dr. Ing. h.c. F. Porsche AG.
This site is not affiliated with Porsche in any way. Its only purpose is to provide an online forum for car enthusiasts. All other trademarks are property of their respective owners. |
|
|

  |

| FB914 |
 Dec 5 2006, 03:03 PM Dec 5 2006, 03:03 PM
Post
#1
|
|
74 alaska blue 2.0  Group: Members Posts: 63 Joined: 1-March 05 From: Philly Member No.: 3,689 |
I'm into the 3rd week (part time of course) of a rear bearing replacement project that has been a problem. I've been following the Pelican Parts recomended process from there tech article and that has been helpful. The problem is that the bearing broke apart as I tried to drive it out of the trailing arm. Only the outer ring or outer race of the old bearing is left and it does not want to budge out of the trailing arm. The pelican article says to use brute force and knock it out but I'm afraid of damaging the trailing arm. Anybody ever had this issue and if so, how did you get the bearing out? Thanks as always for your helpul replies.
Frank B |
   |

 
|
| Allan |
Dec 5 2006, 03:16 PM
Post
#2
|
|
Teenerless Weenie Group: Members Posts: 8,373 Joined: 5-July 04 From: Western Mesopotamia Member No.: 2,304 Region Association: Southern California |
I used a brass punch and beat the holy crap out of one I had.
Came out eventually with no real visible damage... |
|
|
|
| Eric_Shea |
Dec 5 2006, 03:18 PM
Post
#3
|
|
PMB Performance Group: Admin Posts: 19,304 Joined: 3-September 03 From: Salt Lake City, UT Member No.: 1,110 Region Association: Rocky Mountains |
Frank,
Do you have compressed air and an air hammer? - If so you may want to take a blunt bit and position it (from the inside) on the small ledge left over on the existing race. Short bursts from 3:00 to 9:00/12:00 to 6:00 etc. Is the trailing arm off the car? At this point, it might be a good idea. If you have air and you can get in there without taking it off, all the better. Did it move at all before the inner portion came out? - Is that inner lip of the outer race exposed even more? Again, all the better. You may be able to take a punch and work the clockwise movement described above and slowly wiggle the race out that way. Sorry I'm not closer... if you have the time and money (probably around $50 in shipping both ways) I can do it for you. Send the control arms and your new bearings and I'll hook you up. |
|
|
|
| Brad Roberts |
Dec 5 2006, 03:20 PM
Post
#4
|
|
914 Freak! Group: Members Posts: 19,148 Joined: 23-December 02 Member No.: 8 Region Association: None |
I dont try to get them out "softly" I use an air chisel and knock them out "right now" No need to be soft with something I'm throwing away (IMG:style_emoticons/default/biggrin.gif)
3lb sledge and a brass punch If you do nick the control arm..big deal.. be prepared to do some filing so the next one goes in smooth. I always use Scotchbrite to clean the bearing surface up prior to install and I use a thin layer of anti-seize when going in. Freeze the bearing and heat the control arm if at all possible. B |
|
|
|
| ChicagoChris |
Dec 5 2006, 03:27 PM
Post
#5
|
|
It was jack-stand-tastic! Group: Members Posts: 168 Joined: 3-November 05 From: Chicago (burbs), IL Member No.: 5,062 |
Is it on the car or off?
Off brute force usually does it. On - I made a 'tool' (if you can call it that) from a thick threaded rod and some nuts. What ever you can find with suficiant strength or heft goes on the interior of the race. The rod goes through what is left and start turning. As long as your end pieces are strong enough you will be able to pull the race out. Basicly acting as a press. This is also a good way to get the bearings back in, as well as pulling the hubs back in. The process is slow and less shocking then pounding the stuff in. I also keeps thing from trying to go in sideways. I used a large socket (cheap from your FLAPS) for the bearing race and some thick steel for the oppsite end. (no steel- how about an old break drum or rotor. Thick with a hole in it.) You will to keep the nut on one side from moving. So if you have two wrenches great, double nut, or just bugger up some threads. Good luck Attached image(s) 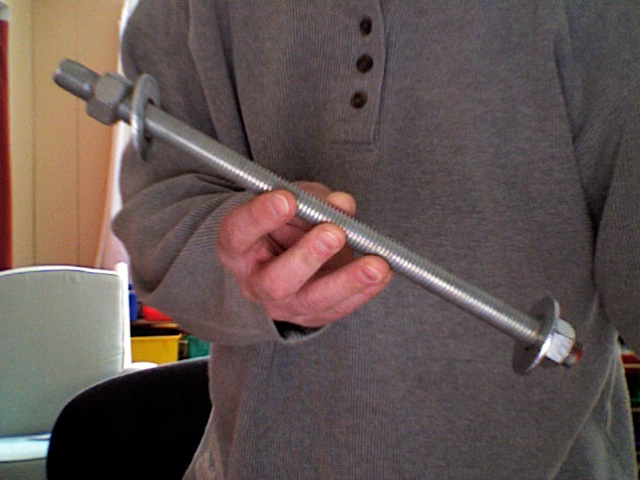
|
|
|
|
| Heeltoe914 |
Dec 5 2006, 03:27 PM
Post
#6
|
|
Senior Member Group: Members Posts: 1,135 Joined: 31-January 06 From: Tujunga Calif, Member No.: 5,506 |
You do have to use brute force sometimes. Try finding something made of brass or any softer metal about 6-9" long. Work your hits around the bearing it will move. Last year I did have to use a air chassis with a large flat point on one came right out.
If it really is extremely hard to get out make sure you do it with the arm out of the car. |
|
|
|
| FB914 |
Dec 5 2006, 03:45 PM
Post
#7
|
|
74 alaska blue 2.0 Group: Members Posts: 63 Joined: 1-March 05 From: Philly Member No.: 3,689 |
All:
Thanks for the posts. The arm is still on the car at this point, I was hoping to avoid removing it as I've never done this before. I do have a compressor and haven't tried that yet but I think I will. The reassurance that it's OK to be using a sledge hammer to pound something out of the trailing arm is helpful. Thanks again, I'll keep you posted |
|
|
|
| FB914 |
Dec 5 2006, 03:49 PM
Post
#8
|
|
74 alaska blue 2.0 Group: Members Posts: 63 Joined: 1-March 05 From: Philly Member No.: 3,689 |
Thanks Eric:
If I need to take the trailing arms off, I may take you up on the offer to ship them out. By the way, I'm the guy that inquired a while back about a 5 lug conversion so I could put a set of Fuchs off an 86 911 in my car. For now I'm holding off on ths because I don't want to add flares - at least not yet. Maybe next winter Thanks again Frank QUOTE(Eric_Shea @ Dec 5 2006, 01:18 PM)  Frank, Do you have compressed air and an air hammer? - If so you may want to take a blunt bit and position it (from the inside) on the small ledge left over on the existing race. Short bursts from 3:00 to 9:00/12:00 to 6:00 etc. Is the trailing arm off the car? At this point, it might be a good idea. If you have air and you can get in there without taking it off, all the better. Did it move at all before the inner portion came out? - Is that inner lip of the outer race exposed even more? Again, all the better. You may be able to take a punch and work the clockwise movement described above and slowly wiggle the race out that way. Sorry I'm not closer... if you have the time and money (probably around $50 in shipping both ways) I can do it for you. Send the control arms and your new bearings and I'll hook you up. |
|
|
|
| Brad Roberts |
Dec 5 2006, 03:55 PM
Post
#9
|
|
914 Freak! Group: Members Posts: 19,148 Joined: 23-December 02 Member No.: 8 Region Association: None |
Frank,
Find a common spot on the tranny and at the back of the control arm.. take a measurement... this is TOE. Your arm is probably in 30+yo rubber.. you dont have to take the arm off if you are hitting it with an air chisel. The air chisel concentrates its force in a very small area. If you are concerned.. then measure the arm like I suggested and write the number down. Check it before and after the "hammer" I havent removed an arm in 17+ years of bearing replacement (and I have to do them almost once a year on competition cars with sticky tires) Even if you do remove it.. the only thing you would have to set is TOE (which you would have the measurement for if you followed along above) Good luck. You have our guidance and support. You can do it!! B |
|
|
|
| ChicagoChris |
Dec 5 2006, 07:37 PM
Post
#10
|
|
It was jack-stand-tastic! Group: Members Posts: 168 Joined: 3-November 05 From: Chicago (burbs), IL Member No.: 5,062 |
At the risk of (IMG:style_emoticons/default/dead horse.gif)
my way leaves the arms on the car. (IMG:style_emoticons/default/thumb3d.gif) No (IMG:style_emoticons/default/smash.gif) No (IMG:style_emoticons/default/sawzall-smiley.gif) No (IMG:style_emoticons/default/headbang.gif) |
|
|
|
| Eric_Shea |
Dec 5 2006, 09:42 PM
Post
#11
|
|
PMB Performance Group: Admin Posts: 19,304 Joined: 3-September 03 From: Salt Lake City, UT Member No.: 1,110 Region Association: Rocky Mountains |
I agree Chris but I think there's a problem here... Frank's missing most of his bearing. Not much to grab on to.
(Go Bears) |
|
|
|
| Allan |
Dec 5 2006, 10:09 PM
Post
#12
|
|
Teenerless Weenie Group: Members Posts: 8,373 Joined: 5-July 04 From: Western Mesopotamia Member No.: 2,304 Region Association: Southern California |
QUOTE(Eric_Shea @ Dec 5 2006, 07:42 PM) I agree Chris but I think there's a problem here... Frank's missing most of his bearing. Not much to grab on to. (Go Bears) (IMG:style_emoticons/default/agree.gif) (IMG:style_emoticons/default/WTF.gif) Ban me!!!!!! |
|
|
|
| Jeffs9146 |
Dec 5 2006, 11:14 PM
Post
#13
|
|
Ski Bum Group: Members Posts: 4,062 Joined: 10-January 03 From: Discovery Bay, Ca Member No.: 128 |
QUOTE I agree Chris but I think there's a problem here... Frank's missing most of his bearing. Not much to grab on to. I went down to Grand Auto and purchased a bearing press kit for $24.99 and used the proper sized adaptor to pound it out. I still needed to adapt an extension using a galvanized pipe and a 5lb sledge hammer but it worked fine! Good Luck and (IMG:style_emoticons/default/smash.gif) hit it hard! Jeff |
|
|
|
| andys |
Dec 5 2006, 11:24 PM
Post
#14
|
|
Advanced Member Group: Members Posts: 2,165 Joined: 21-May 03 From: Valencia, CA Member No.: 721 Region Association: None |
QUOTE(Eric_Shea @ Dec 5 2006, 07:42 PM) I agree Chris but I think there's a problem here... Frank's missing most of his bearing. Not much to grab on to. (Go Bears) I'm curious about that too. It might help to re-assemble the pieces on at least one side (the inboard side) of the bearing; the balls and inner race. Now you should have a nice large area to place a large round piece of short round bar or a large diameter socket. It's a duplex angular contact bearing, so the balls will not escape the beaing with axial force. Personally, I use a short large diameter piece of aluminum bar stock with a pilot and the traditional BFH. I do prefer however to remove the trailing arm when encountering a stuborn bearing. Andys |
|
|
|
| Dr Evil |
Dec 5 2006, 11:33 PM
Post
#15
|
|
Send me your transmission! Group: Members Posts: 23,041 Joined: 21-November 03 From: Loveland, OH 45140 Member No.: 1,372 Region Association: MidAtlantic Region |
Frank, if you are still having a problem with this after the 16th I would be glad to come over and help you out. Let me know.
|
|
|
|
| CHAFF |
Dec 6 2006, 12:32 AM
Post
#16
|
|
Member Group: Members Posts: 167 Joined: 13-September 04 From: Regina, SK Member No.: 2,749 |
Hi Frank, I went through this whole hassle last weekend and I managed to take a few pics of the process as I went along. I'll post them tomorrow...might give you some ideas.
I basically used a modified bearing puller to get them out. I actually had problems getting one axle out by banging on it. (like the manual says) When you put in the new bearings....I highly recommend that you freeze them overnight. When you go to install them...warm up the housing with a torch and put your frozen bearings in...they'll slip in by hand. This way you avoid having to hit the new bearing into the housing. -L Attached thumbnail(s) 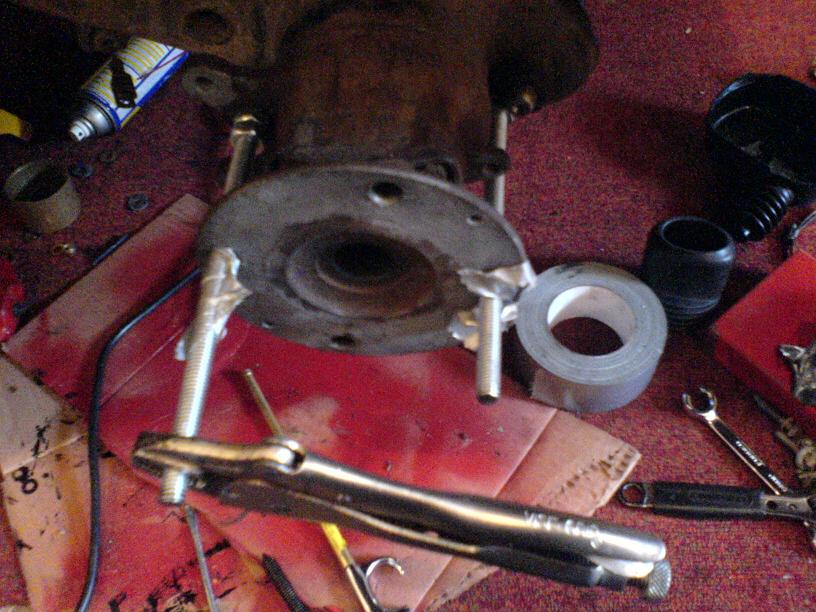 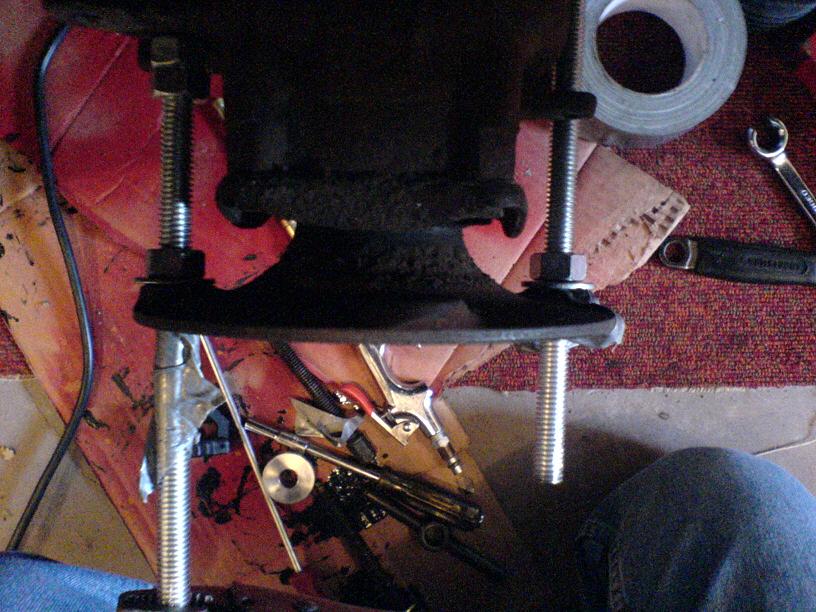 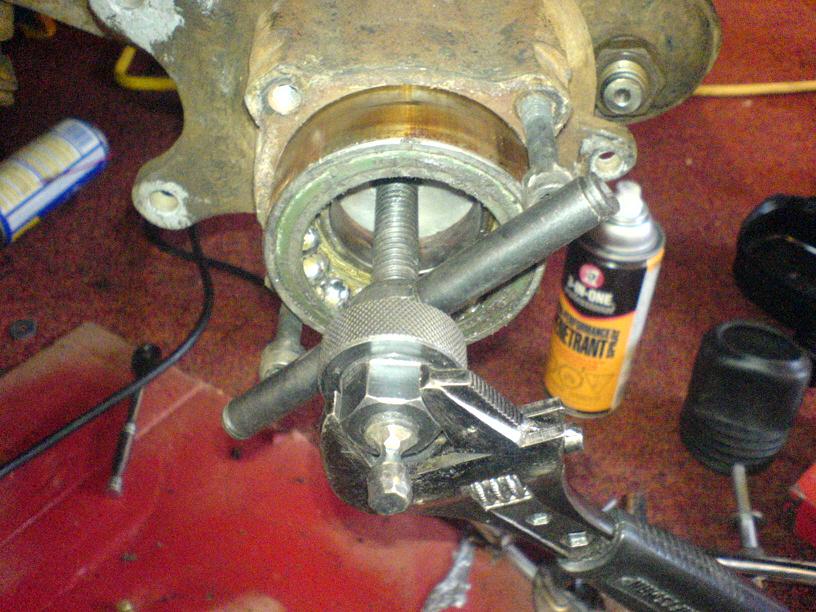
|
|
|
|
| Brad Roberts |
Dec 6 2006, 01:34 AM
Post
#17
|
|
914 Freak! Group: Members Posts: 19,148 Joined: 23-December 02 Member No.: 8 Region Association: None |
QUOTE my way leaves the arms on the car. Correct! and PERFECT for home users with minimal tools. He said he had an air compressor. Most of my experience is "shop" related. I didnt have time to run nuts down all thread for an hour (IMG:style_emoticons/default/biggrin.gif) The bearing pullers work great.. but to buy the one he needs with no mods runs quite a bit. After you have had to replace them at the track.. you become VERY creative with minimal tools. B |
|
|
|
| murt |
Dec 6 2006, 11:56 AM
Post
#18
|
|
Newbie Group: Members Posts: 37 Joined: 24-December 05 From: Erial, NJ 08081 Member No.: 5,310 |
I had the same problem about 10 years ago. Instead of brute force, I took a dremmel tool cutting disk and carefully cut a perpendicular notch into what was left of the bearing housing. it relieved the tension and it came out with just a few taps.
Another note: make sure you buy the genuine OEM German replacement bearings - there are inferior ones out there that don't fit properly. Put them in the freezer for a few hours before installation. -Murt |
|
|
|
| FB914 |
Dec 7 2006, 07:10 PM
Post
#19
|
|
74 alaska blue 2.0 Group: Members Posts: 63 Joined: 1-March 05 From: Philly Member No.: 3,689 |
QUOTE(murt @ Dec 6 2006, 09:56 AM) I had the same problem about 10 years ago. Instead of brute force, I took a dremmel tool cutting disk and carefully cut a perpendicular notch into what was left of the bearing housing. it relieved the tension and it came out with just a few taps. Another note: make sure you buy the genuine OEM German replacement bearings - there are inferior ones out there that don't fit properly. Put them in the freezer for a few hours before installation. -Murt I'm gona try the dremel, no luck with the air hammer yet. This baby is stuck - more later Thanks again for all the posts |
|
|
|
| FB914 |
Dec 7 2006, 07:12 PM
Post
#20
|
|
74 alaska blue 2.0 Group: Members Posts: 63 Joined: 1-March 05 From: Philly Member No.: 3,689 |
QUOTE(Dr Evil @ Dec 5 2006, 09:33 PM) Frank, if you are still having a problem with this after the 16th I would be glad to come over and help you out. Let me know. I may take you up on the offer if I haven't set the car on fire before then. If it's after the 16th, there's no telling what I'll have done (IMG:style_emoticons/default/WTF.gif) |
|
|
|
|
1 User(s) are reading this topic (1 Guests and 0 Anonymous Users)
0 Members:

|
Lo-Fi Version | Time is now: 14th April 2026 - 04:26 PM |
Invision Power Board
v9.1.4 © 2026 IPS, Inc.