|
|
|
Porsche, and the Porsche crest are registered trademarks of Dr. Ing. h.c. F. Porsche AG.
This site is not affiliated with Porsche in any way. Its only purpose is to provide an online forum for car enthusiasts. All other trademarks are property of their respective owners. |
|
|

  |

| thomasotten |
 Nov 16 2003, 11:58 PM Nov 16 2003, 11:58 PM
Post
#1
|
|
Senior Member  Group: Members Posts: 1,544 Joined: 16-November 03 From: San Antonio, Texas Member No.: 1,349 |
I spent the weekend gnawing off the right rear suspension console which had a big crack in it. I also removed some of the upper longitudinal that was pitted. As I can now see into the logitudinal with a light, I need some advice as to how I should aproach the rust behind the jack post. This area is double walled, and I didn't know if the "inner wheelhouse, lower portion" was double walled as well. Would cutting this piece out and patching cause the frame to flex while on jack stands? My door gaps are fine, but I would like to get in their and try to fix any longitudinal rust. Also, the "clambshells" would be another option, which I presume covers the rusted areas. Has anyone done this repair before? Any advice would be great.
Thomas Attached image(s) 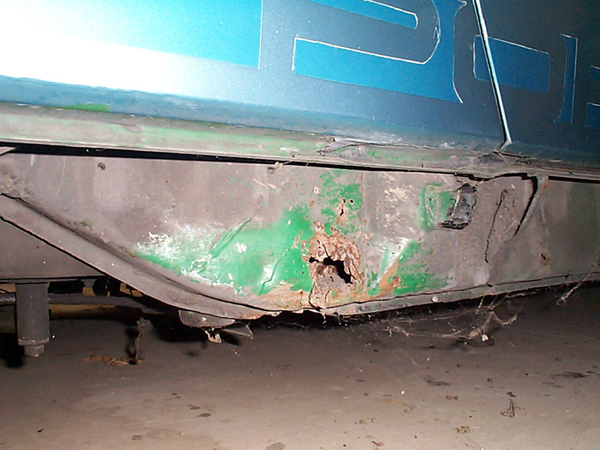
|
   |

 
|
| Brad Roberts |
Nov 17 2003, 12:00 AM
Post
#2
|
|
914 Freak! Group: Members Posts: 19,148 Joined: 23-December 02 Member No.: 8 Region Association: None |
Welcome Thomas.. great first post.
B |
|
|
|
| thomasotten |
Nov 17 2003, 12:14 AM
Post
#3
|
|
Senior Member Group: Members Posts: 1,544 Joined: 16-November 03 From: San Antonio, Texas Member No.: 1,349 |
Thanks,
How I spent my weekend can be best shown in a single picture. Hunters, when they kill deer, like to pose with their game. I had noone to shoot the picture of me with this, but the feeling is the same. Attached image(s) 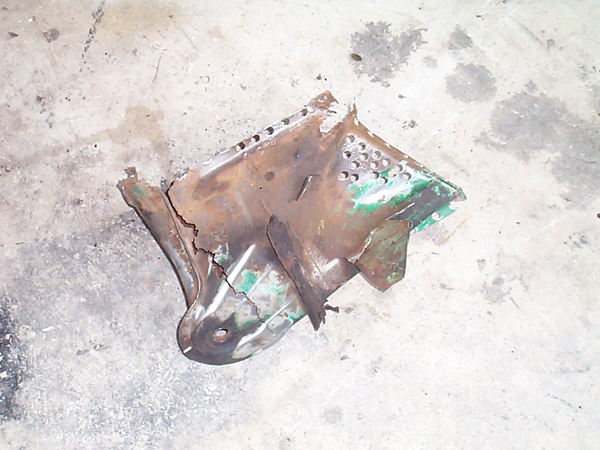
|
|
|
|
| Brad Roberts |
Nov 17 2003, 12:22 AM
Post
#4
|
|
914 Freak! Group: Members Posts: 19,148 Joined: 23-December 02 Member No.: 8 Region Association: None |
Yep. I did one of those earlier this year and showed the install/removal process.
Same side.. same problem. People dont clean out the drain in the bottom. Good job. We have learned to live with spot weld removal tools. B |
|
|
|
| thomasotten |
Nov 17 2003, 07:03 AM
Post
#5
|
|
Senior Member Group: Members Posts: 1,544 Joined: 16-November 03 From: San Antonio, Texas Member No.: 1,349 |
If you have any photos of the install that would be great. By the way, did you drill holes into the new console and weld it to replicate spot welds? I am refering to the area at the top that bonds to the side of the longitudinal, behind the little bracket.
-Thomas |
|
|
|
| indydad |
Nov 17 2003, 11:10 AM
Post
#6
|
|
Member Group: Members Posts: 76 Joined: 16-April 03 From: indy Member No.: 578 |
Boy, this looks familiar. I have the suspension consol, engine tray and battery support off and ready to look into this area. I have the front to back longitudnial structure to put on over the repair. Can this area be patched? I plan to Ospho and Por15 the area too.
Don't mean to jump on your post Thomas, but it looks like we have the same situation. Suggestions? Jerry Indy |
|
|
|
| Brad Roberts |
Nov 17 2003, 01:30 PM
Post
#7
|
|
914 Freak! Group: Members Posts: 19,148 Joined: 23-December 02 Member No.: 8 Region Association: None |
I closely replicated the factory spot welds and added about 20 more. I also welded all the way around it.
I cant find my post about the install. I know its buried around here somewhere (with pics). The hardest part was making the new scab plates so they closely resembled the factory ones (two plates that tie the new ear to the frame rail at the bottom) B |
|
|
|
| seanery |
Nov 17 2003, 04:01 PM
Post
#8
|
|
waiting to rebuild whitey! Group: Retired Admin Posts: 15,852 Joined: 7-January 03 From: Indy Member No.: 100 Region Association: None |
|
|
|
|
| Aaron Cox |
Nov 17 2003, 04:03 PM
Post
#9
|
|
Professional Lawn Dart Group: Retired Admin Posts: 24,541 Joined: 1-February 03 From: OC Member No.: 219 Region Association: Southern California |
ah, another l64k car painted over like mine (IMG:style_emoticons/default/rolleyes.gif)
|
|
|
|
| thomasotten |
Nov 17 2003, 10:00 PM
Post
#10
|
|
Senior Member Group: Members Posts: 1,544 Joined: 16-November 03 From: San Antonio, Texas Member No.: 1,349 |
Brad:
How did you go about replicating the spot welds? I was thinking of drilling holes in the metal and then mig welding around the hole. The only problem is, as I was practicing this on scrap, I found that I could only make a decent weld if the hole I drilled was at least 3/8". This just seems kind of big, but then again, ikt all gets filled in. |
|
|
|
| Brad Roberts |
Nov 18 2003, 02:54 AM
Post
#11
|
|
914 Freak! Group: Members Posts: 19,148 Joined: 23-December 02 Member No.: 8 Region Association: None |
I used a 3/8 drill bit. And you are correct.. it all gets filled in.
B |
|
|
|
|
1 User(s) are reading this topic (1 Guests and 0 Anonymous Users)
0 Members:

|
Lo-Fi Version | Time is now: 8th May 2024 - 08:27 PM |
Invision Power Board
v9.1.4 © 2024 IPS, Inc.