|
|
|
Porsche, and the Porsche crest are registered trademarks of Dr. Ing. h.c. F. Porsche AG.
This site is not affiliated with Porsche in any way. Its only purpose is to provide an online forum for car enthusiasts. All other trademarks are property of their respective owners. |
|
|

  |

| rfuerst911sc |
 Jan 6 2007, 03:27 PM Jan 6 2007, 03:27 PM
Post
#1
|
|
Advanced Member  Group: Members Posts: 2,158 Joined: 4-May 06 From: Dahlonega , Georgia Member No.: 5,980 Region Association: South East States |
Well I signed up for the group buy of GT metal flares so now I want to know how to install these. I have a mig welder and am a fair welder so my intention is to install these myself. Once you cut the fenders ( hopefully correctly ) you line the flares up and tack them in place right? Once tacked do you run a continous bead or do you do spaced welds? Once tacked/welded then you grind the welds flush? And then do your skim coats of bondo to finish? Any online forum how to's on this? I know that the least amount of heat is good to keep warping to a minimum but any tips are appreciated. Thanks (IMG:style_emoticons/default/beerchug.gif)
|
   |

 
|
| dr914@autoatlanta.com |
Jan 6 2007, 03:45 PM
Post
#2
|
|
914 Guru Group: Members Posts: 7,814 Joined: 3-January 07 From: atlanta georgia Member No.: 7,418 Region Association: None |
QUOTE(rfuerst911sc @ Jan 6 2007, 01:27 PM)  Well I signed up for the group buy of GT metal flares so now I want to know how to install these. I have a mig welder and am a fair welder so my intention is to install these myself. Once you cut the fenders ( hopefully correctly ) you line the flares up and tack them in place right? Once tacked do you run a continous bead or do you do spaced welds? Once tacked/welded then you grind the welds flush? And then do your skim coats of bondo to finish? Any online forum how to's on this? I know that the least amount of heat is good to keep warping to a minimum but any tips are appreciated. Thanks (IMG:style_emoticons/default/beerchug.gif) I am not a welder and therefore no one to depend on for the blow by blow installation, but have seen it done by our men often enough to say the following: The flares are thick enough that warping is more minimal than with thinner sheet metal panels. When installing though no one here has run a continuous bead as that will guarantee a warp! The flares are easy to line up by matching the wheel well keeping the exact same front to rear opening as well as the same lip height. After welding they are ground flat and metal worked with a minimum of filler. Since the factory did it and designed the original flares, they are made to easily fit the 914. The plus is that we when producing our replicas, borrowed an orginal old set from Jim Bailey at Brumos and had them scanned in Detroit with the guys there remarking that the flares were not mirror images of one another! Therefore we combined the two front scans and then spit out perfect mirrors, so left and right are now more identical than the originals ever were. We did the same with the rear as well. There is also plenty of material in the flare for the crunched fender set! |
|
|
|
| IronHillRestorations |
Jan 6 2007, 06:04 PM
Post
#3
|
|
I. I. R. C. Group: Members Posts: 6,714 Joined: 18-March 03 From: West TN Member No.: 439 Region Association: None |
What i do is carefully positon the flair in the correct locaton, and fasten it with Clecos.
Attached thumbnail(s) 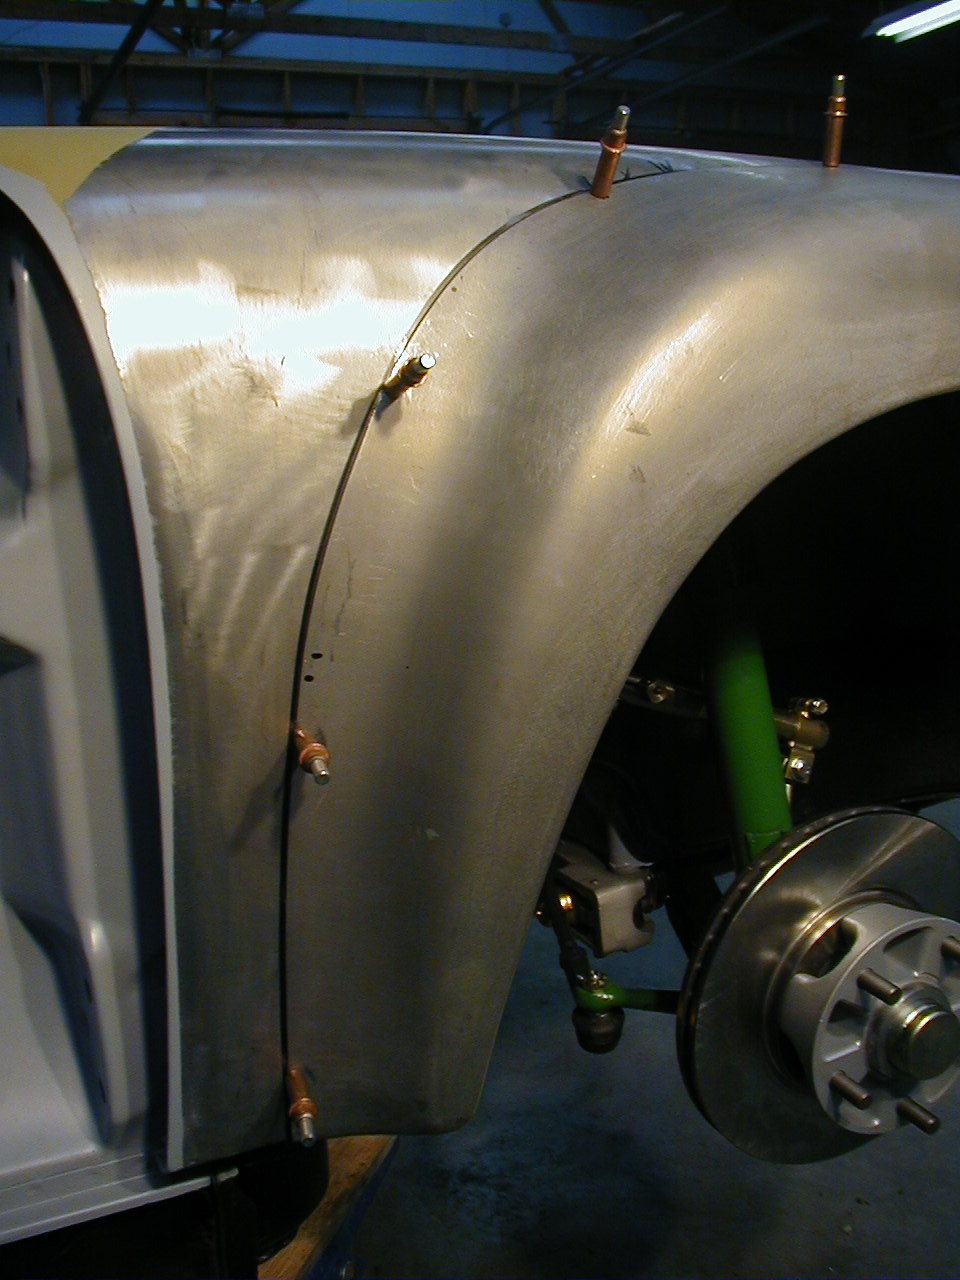
|
|
|
|
| IronHillRestorations |
Jan 6 2007, 06:06 PM
Post
#4
|
|
I. I. R. C. Group: Members Posts: 6,714 Joined: 18-March 03 From: West TN Member No.: 439 Region Association: None |
And like this
Attached thumbnail(s) 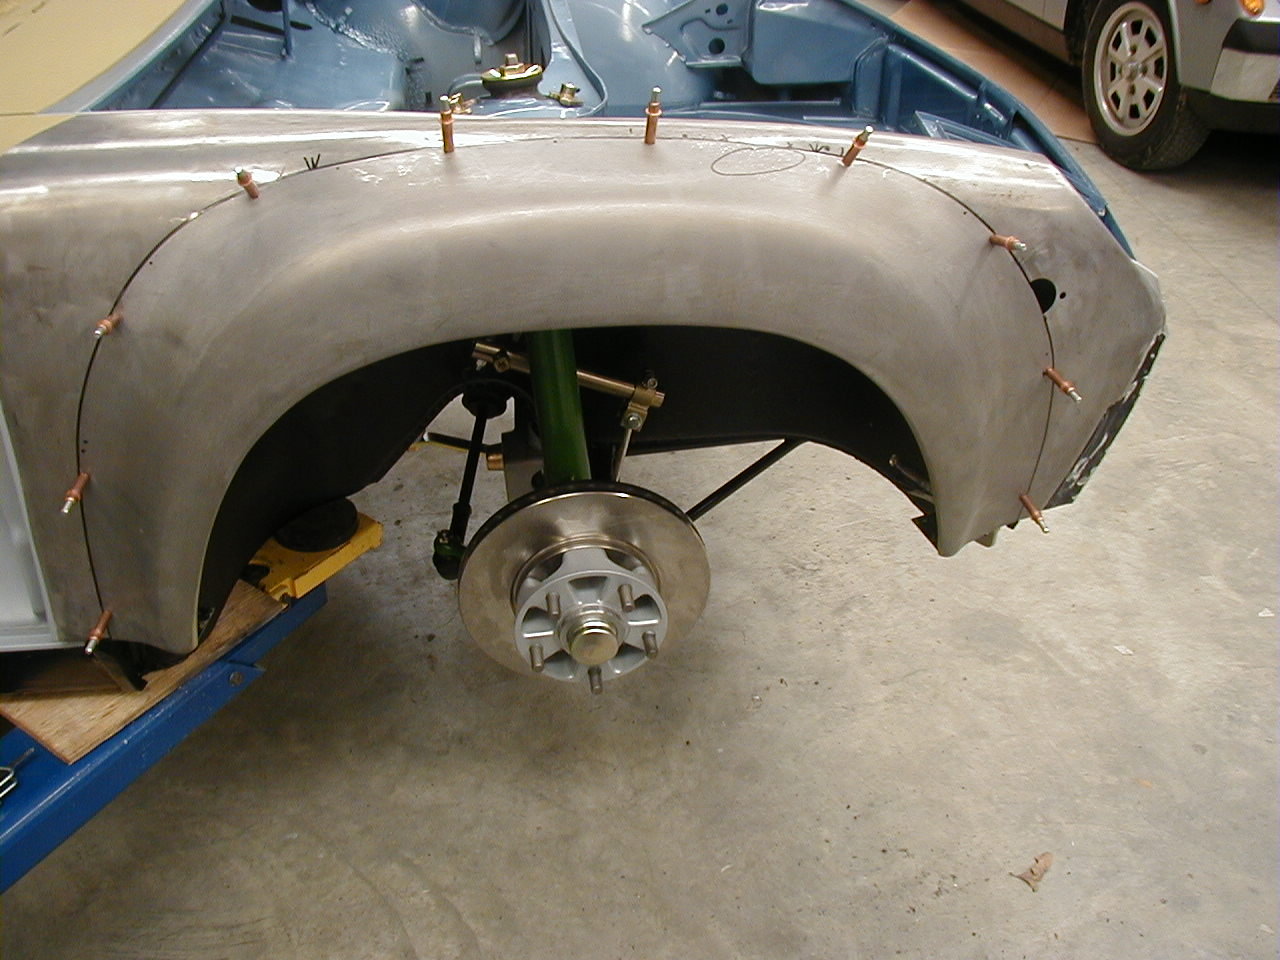
|
|
|
|
| IronHillRestorations |
Jan 6 2007, 06:15 PM
Post
#5
|
|
I. I. R. C. Group: Members Posts: 6,714 Joined: 18-March 03 From: West TN Member No.: 439 Region Association: None |
I don't have a pic of the actual cutting, but I use an air powered body saw, that's like a jigsaw. I barely cut the edge of the flair and the underlying fender at the same time, so you have a perfect seam. Then I clamp the two pieces, as I cut, with some panel clamps for butt welding panels together, and tack weld the flair on to the fender following the cut line.
Attached thumbnail(s) 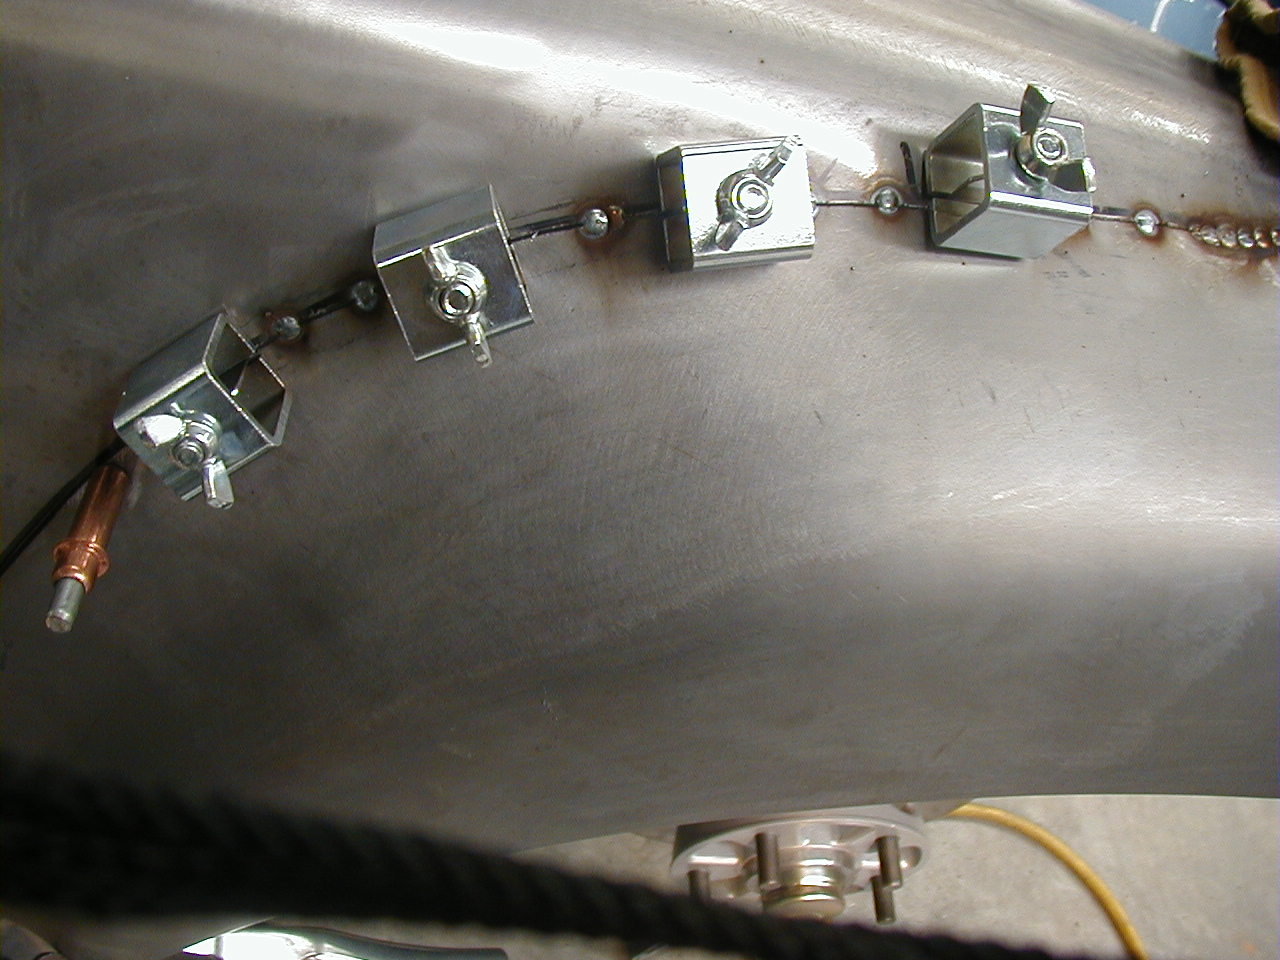
|
|
|
|
| IronHillRestorations |
Jan 6 2007, 06:18 PM
Post
#6
|
|
I. I. R. C. Group: Members Posts: 6,714 Joined: 18-March 03 From: West TN Member No.: 439 Region Association: None |
Here's what it looks like after it's cut and tacked all the way around. The small tack beads are as large as I weld. I just make small beads all the way around, using a copper spoon on the back of the weld seam to defer heat and keep from blowing through.
Attached thumbnail(s) 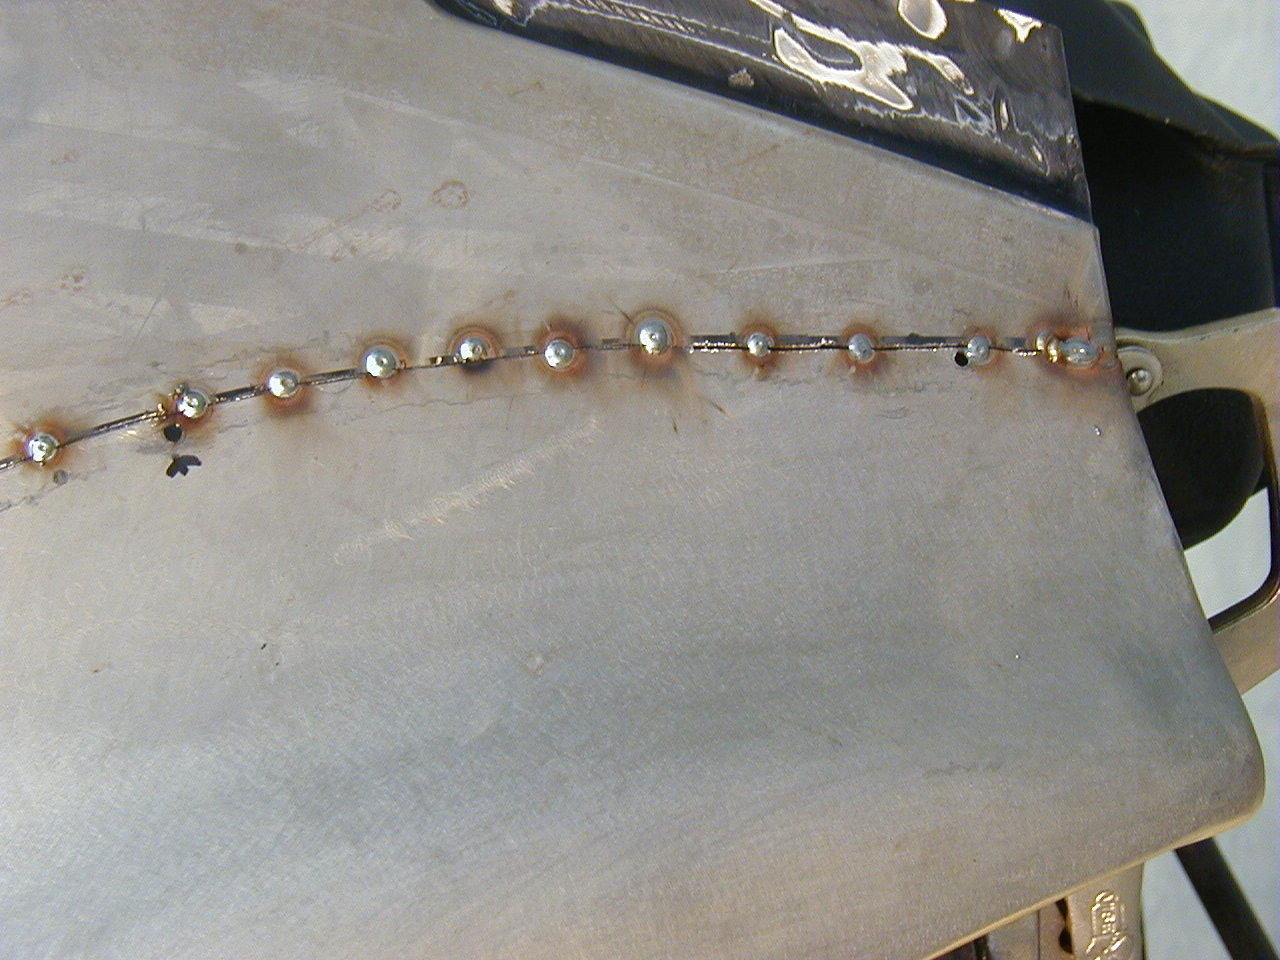
|
|
|
|
| IronHillRestorations |
Jan 6 2007, 06:28 PM
Post
#7
|
|
I. I. R. C. Group: Members Posts: 6,714 Joined: 18-March 03 From: West TN Member No.: 439 Region Association: None |
I didn't take a pic of the top side of the flair with all the small tack welds, but here is what it looks like from the underside, after it's been tacked solid all the way around.
Attached thumbnail(s) 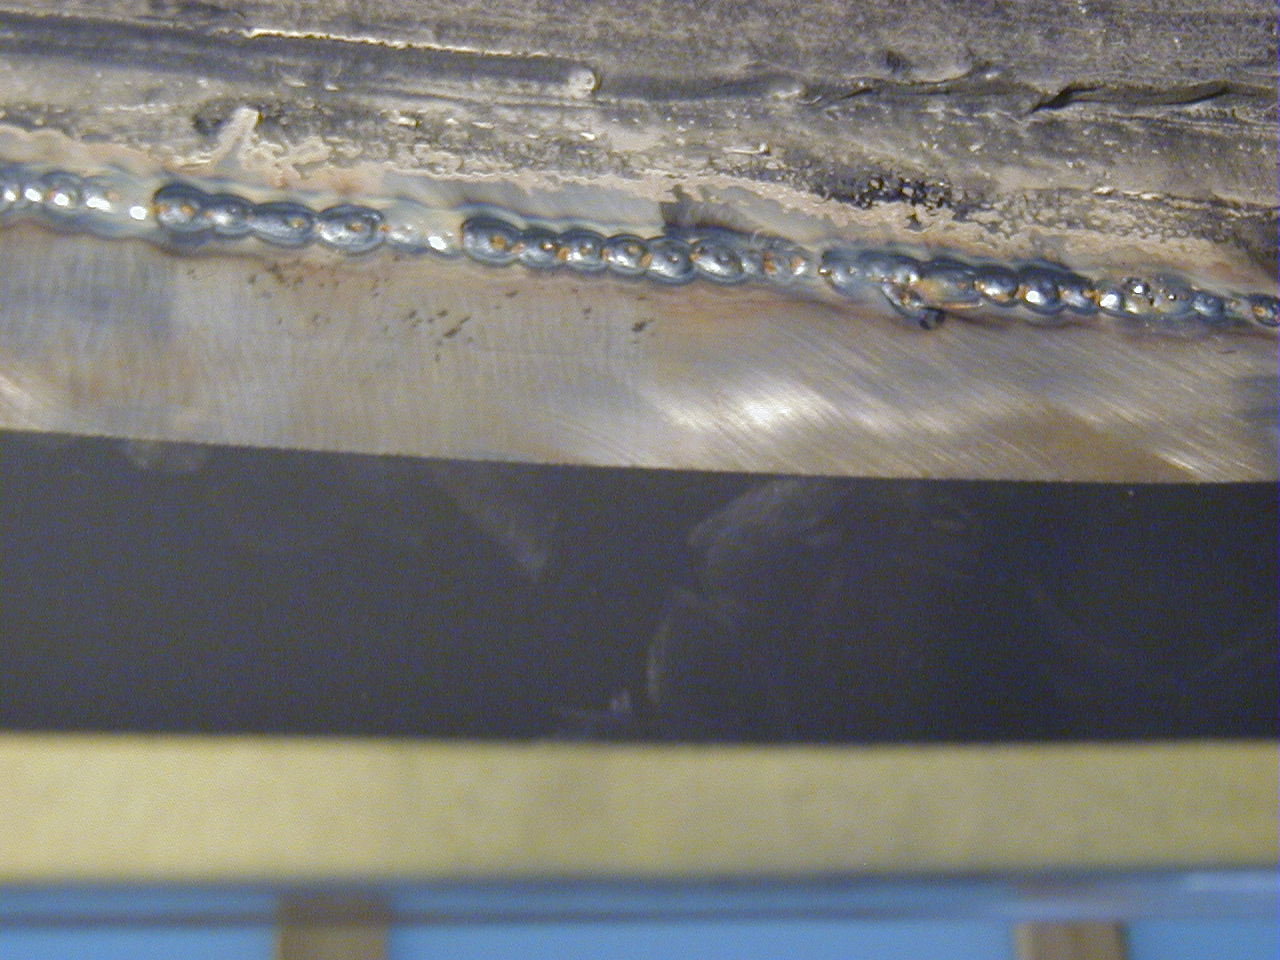
|
|
|
|
| IronHillRestorations |
Jan 6 2007, 06:37 PM
Post
#8
|
|
I. I. R. C. Group: Members Posts: 6,714 Joined: 18-March 03 From: West TN Member No.: 439 Region Association: None |
After it's all welded up nice and solid I carefully grind the welds with a flap wheel type grinder. If you use a hard wheel grinder you'll make too much heat and end up with warpage. Grind a little and move on to another area. I also use a spot light under the fender to find any pin holes. When you get done it should look something like this.
Attached thumbnail(s) 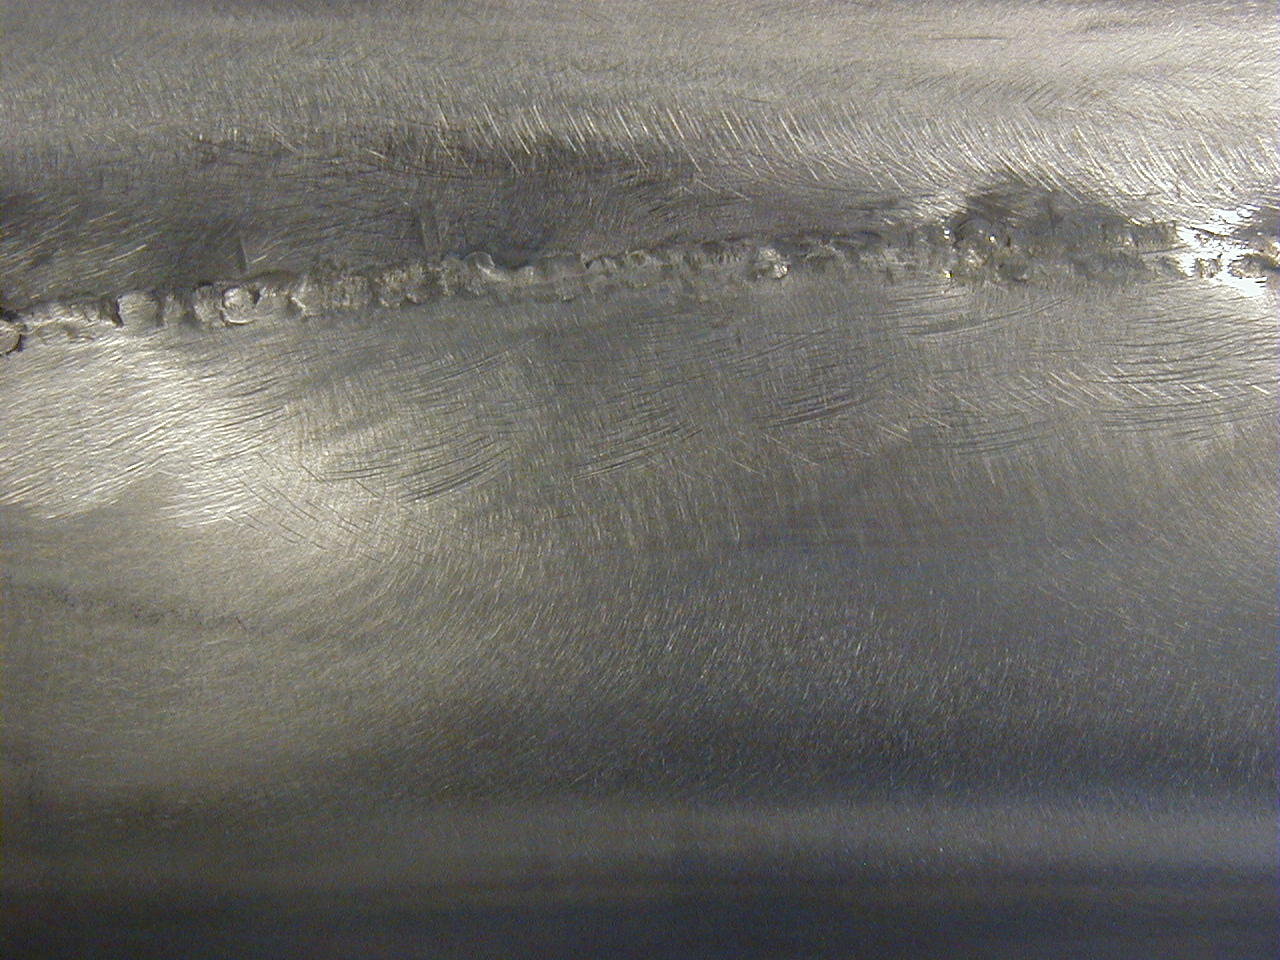
|
|
|
|
| IronHillRestorations |
Jan 6 2007, 06:43 PM
Post
#9
|
|
I. I. R. C. Group: Members Posts: 6,714 Joined: 18-March 03 From: West TN Member No.: 439 Region Association: None |
I've never installed an AA set, but the factory flairs don't fit right at the bottom, and require some work to fit good. The factory flairs aren't a great fit in general.
Here's the bottom of the factory flair before any work was done. The bottom edge of 914 panels have a 45 degree bevel, that the factory flairs do not have. I don't know if AA flairs have a bevel or not. Attached thumbnail(s) 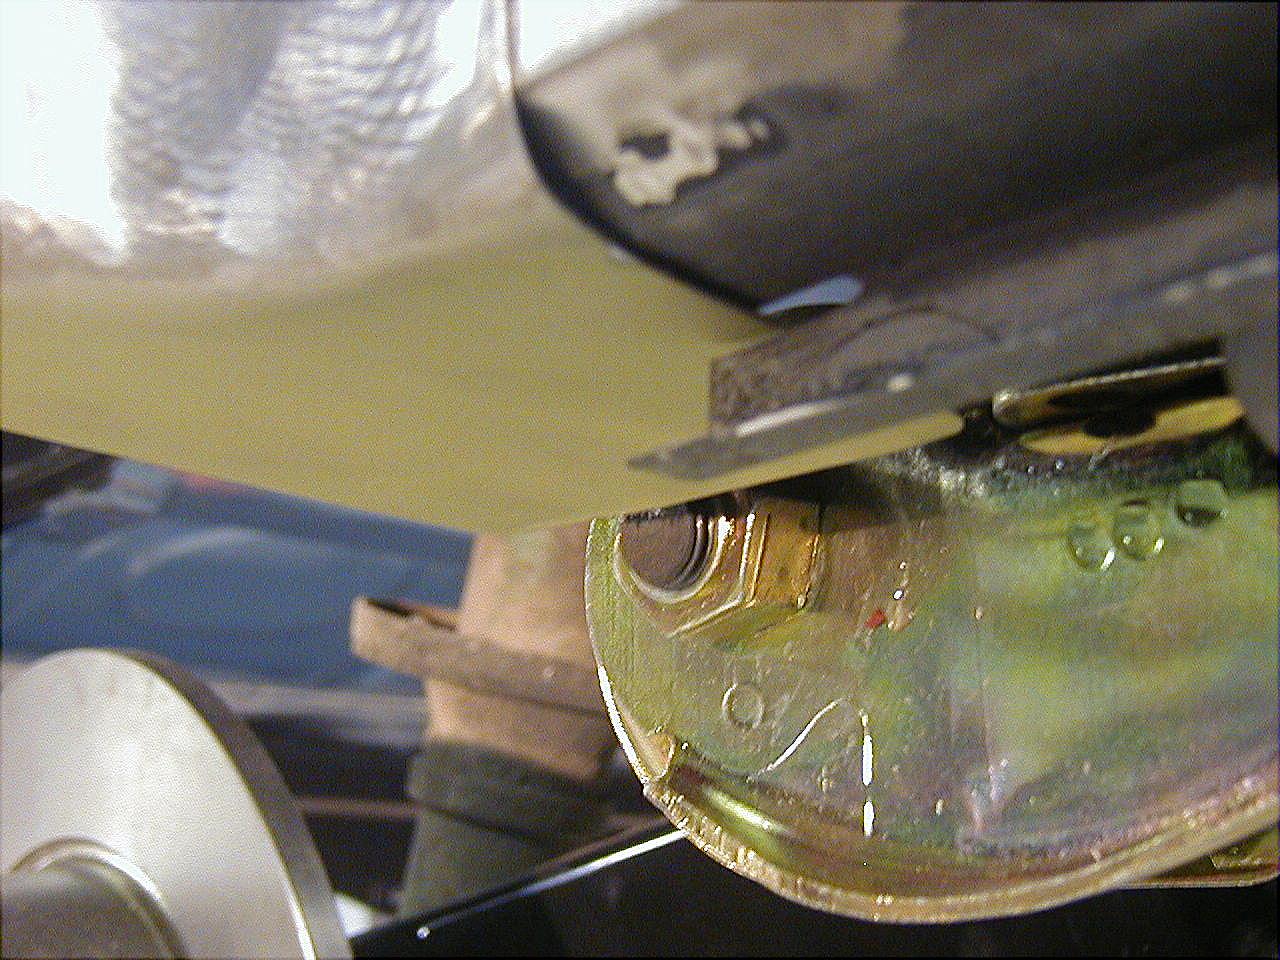
|
|
|
|
| IronHillRestorations |
Jan 6 2007, 06:45 PM
Post
#10
|
|
I. I. R. C. Group: Members Posts: 6,714 Joined: 18-March 03 From: West TN Member No.: 439 Region Association: None |
Here's the bottom of the flair after some work.
Attached thumbnail(s) 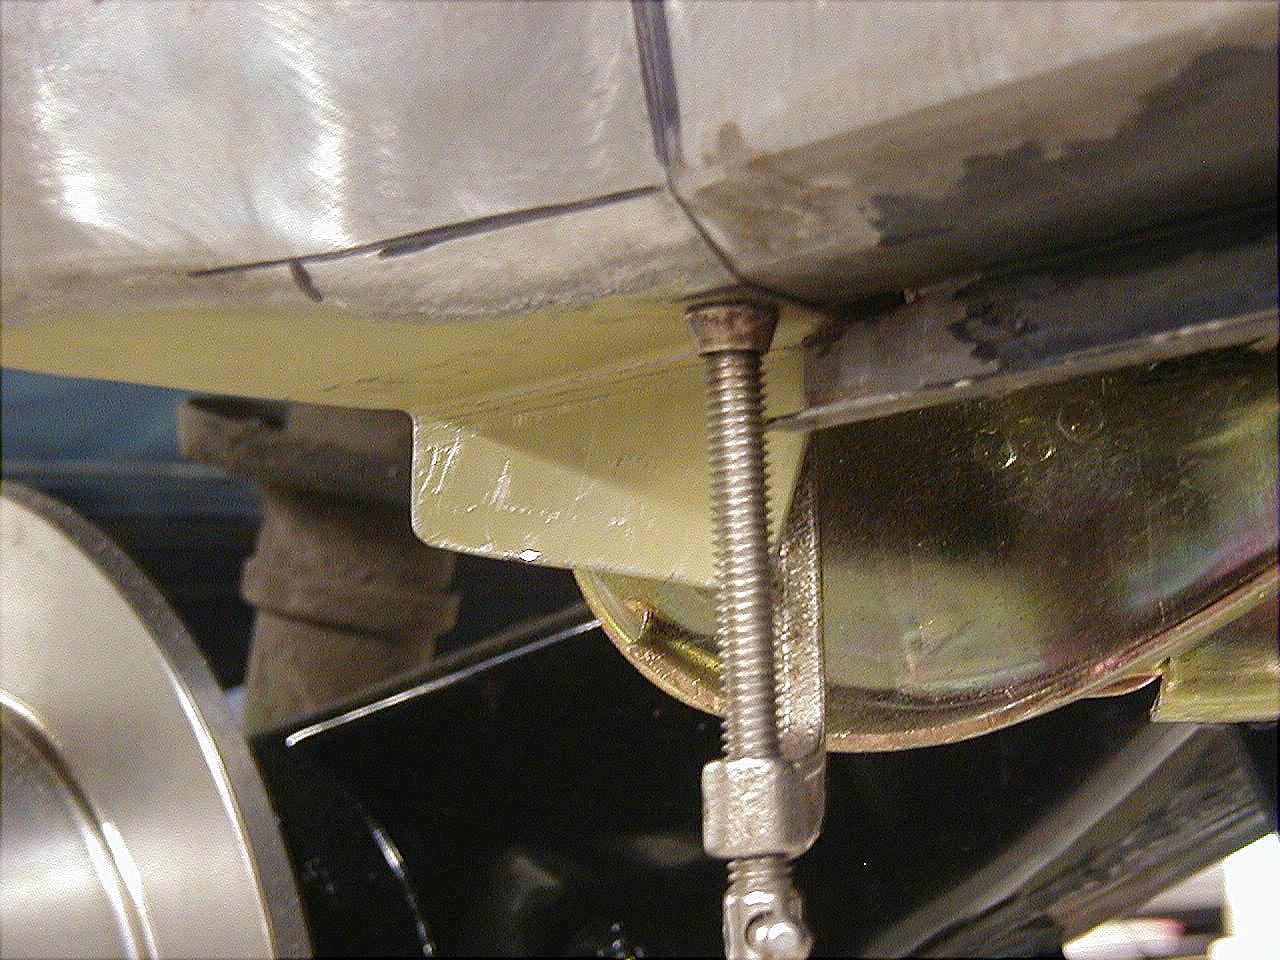
|
|
|
|
| IronHillRestorations |
Jan 6 2007, 06:49 PM
Post
#11
|
|
I. I. R. C. Group: Members Posts: 6,714 Joined: 18-March 03 From: West TN Member No.: 439 Region Association: None |
And when it's all done it will look just like this! The owner was happy!
Attached thumbnail(s) 
|
|
|
|
| rfuerst911sc |
Jan 6 2007, 07:54 PM
Post
#12
|
|
Advanced Member Group: Members Posts: 2,158 Joined: 4-May 06 From: Dahlonega , Georgia Member No.: 5,980 Region Association: South East States |
The pics are great. For some reason I thought the flares were welded "on" the fender skin not butt welded. Do you dress the tack welds on the underside or leave them as is? Do you prime and paint the underside only or do you add undercoating? So you do end up welding the entire seam but it is done by spot tacks and you move around the flare to keep the heat down. Is the copper spoon something that can be purchased at welding shops? Thanks
|
|
|
|
| ptravnic |
Jan 6 2007, 08:05 PM
Post
#13
|
|
Senior Member Group: Members Posts: 1,231 Joined: 27-May 03 From: Chicago, IL Member No.: 747 Region Association: None |
Perry - If you don't mind me asking, what (ballpark) do you charge to install a set? I picked up a set in Dec and am looking to get them put on in the next month or so. I might be willing to drop off my car @ your shop & let you have your way w/it. Maybe PM me if you are uncomfortable listing rates on the general board?
-pt |
|
|
|
| TravisNeff |
Jan 6 2007, 08:50 PM
Post
#14
|
|
914 Guru Group: Members Posts: 5,082 Joined: 20-March 03 From: Mesa, AZ Member No.: 447 Region Association: Southwest Region |
This thread should be in the classics
|
|
|
|
| IronHillRestorations |
Jan 7 2007, 12:22 AM
Post
#15
|
|
I. I. R. C. Group: Members Posts: 6,714 Joined: 18-March 03 From: West TN Member No.: 439 Region Association: None |
QUOTE(rfuerst911sc @ Jan 6 2007, 05:54 PM) The pics are great. For some reason I thought the flares were welded "on" the fender skin not butt welded. Do you dress the tack welds on the underside or leave them as is? Do you prime and paint the underside only or do you add undercoating? So you do end up welding the entire seam but it is done by spot tacks and you move around the flare to keep the heat down. Is the copper spoon something that can be purchased at welding shops? Thanks Yes, I do go over the welds on the underside with a grinder and/or carbide burr, and then it gets self etching primer, primer, and then paint. Yes, the entire weld seam is made of small tack welds, and yes it's to keep warpage to a minimum. I got my copper spoon from Eastwood, but they may be available elsewhere. |
|
|
|
| Hoss |
Jan 7 2007, 12:54 AM
Post
#16
|
|
Member Group: Members Posts: 113 Joined: 24-January 06 From: Del Mar, CA Member No.: 5,465 |
QUOTE(Travis Neff @ Jan 6 2007, 06:50 PM) This thread should be in the classics I completely agree. I would not add flairs to my present 914, but if I found the right additional car, this is a serious upgrade path. Thanks for the excellent pictures and sharing your process, Perry. If you do another set and can fill in the details it would be greatly appreciated. Sure wish you were closer to San Diego. Cheers, Jeff |
|
|
|
| seanery |
Jan 7 2007, 09:25 AM
Post
#17
|
|
waiting to rebuild whitey! Group: Retired Admin Posts: 15,841 Joined: 7-January 03 From: Indy Member No.: 100 Region Association: None |
|
|
|
|
| IronHillRestorations |
Jan 7 2007, 09:52 AM
Post
#18
|
|
I. I. R. C. Group: Members Posts: 6,714 Joined: 18-March 03 From: West TN Member No.: 439 Region Association: None |
Thanks guys! I had planned to take step by step photos, but that in itself is a little time consuming. I'll try and do a better detailed step by step when I get to that point on the current project car.
|
|
|
|
| cooltimes |
Jan 7 2007, 10:47 AM
Post
#19
|
|
Advanced Member Group: Members Posts: 2,508 Joined: 18-May 04 Member No.: 2,081 Region Association: None |
I hope this post relates to the subject. If not, I apologize to all.
Someone may also like to see and save this link along with PK's excellent tutor on how to do flairs right. It is a 356 being restored page. Very detailed and well suited for the challenge of doing excellent craftsmanship skills shown in this thread. http://www.brown-house.net/356project/archives/2004_07.html Mike Cooley |
|
|
|
| Hoss |
Jan 7 2007, 11:39 AM
Post
#20
|
|
Member Group: Members Posts: 113 Joined: 24-January 06 From: Del Mar, CA Member No.: 5,465 |
QUOTE(9146986 @ Jan 7 2007, 07:52 AM) Thanks guys! I had planned to take step by step photos, but that in itself is a little time consuming. I'll try and do a better detailed step by step when I get to that point on the current project car. Thank you, Perry. I know it is a pain in the ass to photo and document a process while you are in the heat of the battle. On the flip side, the real value of having someone make the time and effort to get it done is difficult to overstate. Content, including your contribution to the Lapuwali classics, is really where the gold nuggets reside. The recent intensity to restore technical content on these board(s) is an indication of how much this community appreciates it. Looking forward to your further updates when you get to them, and thanks again! |
|
|
|
|
1 User(s) are reading this topic (1 Guests and 0 Anonymous Users)
0 Members:

|
Lo-Fi Version | Time is now: 23rd April 2024 - 08:39 PM |
Invision Power Board
v9.1.4 © 2024 IPS, Inc.