|
|
|
Porsche, and the Porsche crest are registered trademarks of Dr. Ing. h.c. F. Porsche AG.
This site is not affiliated with Porsche in any way. Its only purpose is to provide an online forum for car enthusiasts. All other trademarks are property of their respective owners. |
|
|


| markb |
 Jan 10 2007, 05:50 PM Jan 10 2007, 05:50 PM
Post
#21
|
|
914less :(  Group: Members Posts: 5,450 Joined: 22-January 03 From: Nipomo, CA Member No.: 180 Region Association: Central California |
I was re-keying a lock for someone today, and thought it might be a good time to take some pictures & explain how you can do this yourself. It’s not rocket science, if I can do it, anyone can do it. Please correct me if I’m wrong, or use the wrong terminology.
I’ll start with a door handle, because that seems to be what needs to be re-keyed the most. 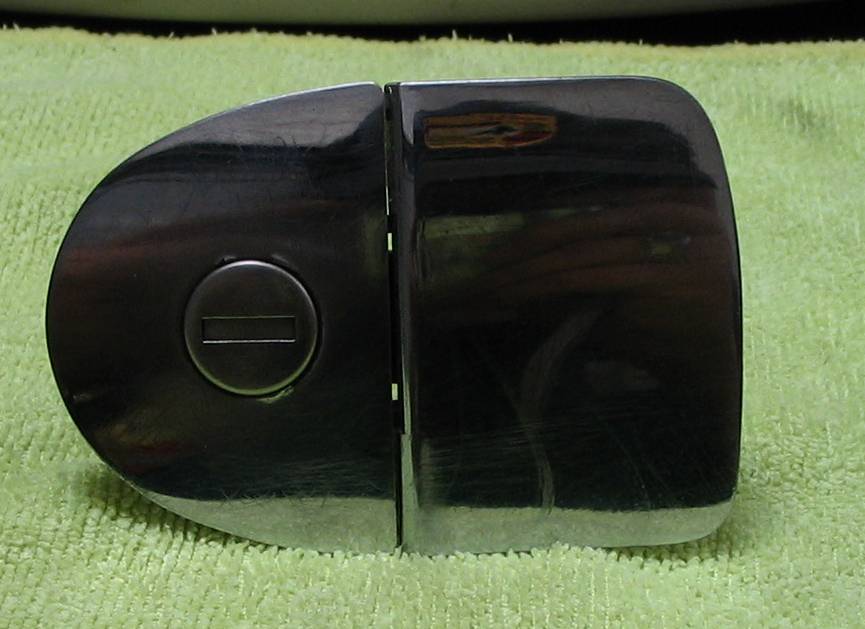 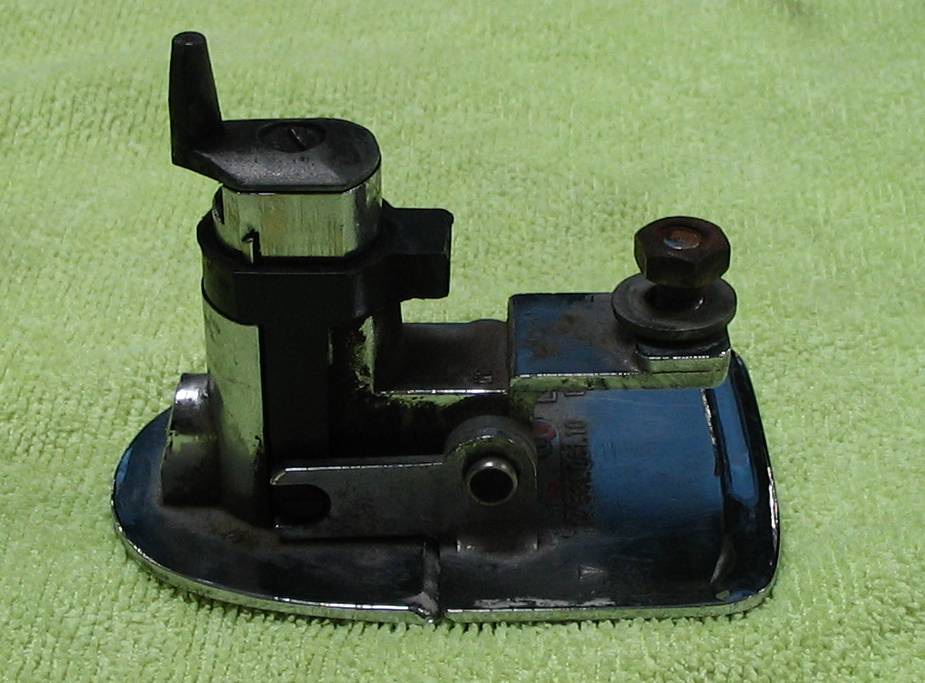 Your standard 914 door handle. |
   |

 
|
Posts in this topic
markb Re-keying your locks Jan 10 2007, 05:50 PM markb Remove the screw that holds the tumbler in place.
... Jan 10 2007, 05:55 PM markb
Once the tumbler is removed, you can see how the... Jan 10 2007, 05:58 PM markb This might be a good time to discuss the wafers
Th... Jan 10 2007, 06:03 PM markb Before you start replacing wafers, wipe the accumu... Jan 10 2007, 06:11 PM markb Since you have the door handle out, you should che... Jan 10 2007, 06:22 PM mikez Good write up.... Jan 10 2007, 06:47 PM markb Thanks. My brain hurts now, so I have to wait awhi... Jan 10 2007, 06:49 PM cooltimes Mark, nice lesson. Couple of questions.
Are you s... Jan 10 2007, 07:00 PM markb I'm keying a whole set to one key at the momen... Jan 10 2007, 07:04 PM Brian_Boss One additional thought to a great write up. If, af... Jan 10 2007, 08:39 PM markb I just re-read the how-to over on Pelican. You mig... Jan 10 2007, 08:41 PM 914Sixer One thing I have noticed over the years, the pins ... Jan 10 2007, 10:25 PM
markb Remove the screw that holds the tumbler in place.
... Jan 10 2007, 05:55 PM markb
Once the tumbler is removed, you can see how the... Jan 10 2007, 05:58 PM markb This might be a good time to discuss the wafers
Th... Jan 10 2007, 06:03 PM markb Before you start replacing wafers, wipe the accumu... Jan 10 2007, 06:11 PM markb Since you have the door handle out, you should che... Jan 10 2007, 06:22 PM mikez Good write up.... Jan 10 2007, 06:47 PM markb Thanks. My brain hurts now, so I have to wait awhi... Jan 10 2007, 06:49 PM cooltimes Mark, nice lesson. Couple of questions.
Are you s... Jan 10 2007, 07:00 PM markb I'm keying a whole set to one key at the momen... Jan 10 2007, 07:04 PM Brian_Boss One additional thought to a great write up. If, af... Jan 10 2007, 08:39 PM markb I just re-read the how-to over on Pelican. You mig... Jan 10 2007, 08:41 PM 914Sixer One thing I have noticed over the years, the pins ... Jan 10 2007, 10:25 PM
 markb
One thing I have noticed over the years, the pins... Jan 10 2007, 10:30 PM hwgunner Mark, you are the man. I'm still going to pay... Jan 10 2007, 10:57 PM markb Ok, moving on to the ignition switch. tumbler Ther... Jan 11 2007, 07:35 PM markb At the tip of the punch, you’ll see a pin. There... Jan 11 2007, 07:40 PM markb Now you re-key the tumbler by replacing the wafers... Jan 11 2007, 07:46 PM porsche913b_sp Great Write Up, thanks. I need to get off my but a... Jan 12 2007, 09:39 AM Bartlett 914 If you have a glove box or a front trunk lock but ... Jan 12 2007, 12:48 PM markb
If you have a glove box or a front trunk lock but... Jan 13 2007, 01:35 AM evan Ok, so now after reading all this, I feel confiden... Jan 13 2007, 02:11 PM markb Re-keying the rear trunk lock is pretty easy, so y... Jan 13 2007, 03:38 PM craig downs Excellent thread. I would like to see this make it... Jan 13 2007, 03:49 PM dflesburg 911 ignition switch? Jan 13 2007, 10:20 PM markb I've done an SC switch. Maybe after all the 91... Jan 13 2007, 10:24 PM So.Cal.914 Thanks, informative thread. Jan 14 2007, 12:30 AM DEC I love this place.... :wub:
Thanks for sharing, v... Jan 14 2007, 07:41 AM r_towle get off your ass and do the rest of the locks...co... Jan 16 2007, 01:54 PM markb Geez, pushy! :D
I'm waiting for an ear... Jan 16 2007, 02:32 PM Instru-Mental Thanks Mark!
This was an awesome thread. I ex... Jan 16 2007, 03:25 PM r_towle I did one better...
This thread inspired me.
I we... Jan 16 2007, 03:31 PM John I've been following along this thread and ther... Jan 16 2007, 04:19 PM markb I'm really glad this is making sense, I'm ... Jan 16 2007, 09:28 PM markb The Early Switch
Since these are quite a bit diff... Jan 23 2007, 05:18 PM markb Now you can get to the housing. This housing has t... Jan 23 2007, 05:24 PM markb The Later (75-76) Switch
On this one, it seems th... Jan 23 2007, 05:30 PM markb Here is the pin that needs to be pushed through.
... Jan 23 2007, 05:36 PM markb Now you have the tumbler apart.
Notice the 2 pins... Jan 23 2007, 05:41 PM markb Once the front part is on, put the spring and rear... Jan 23 2007, 05:46 PM markb The Front Trunk Lock
I did not have a key for thi... Jan 23 2007, 05:49 PM markb Note the locking pin, it needs go back in the same... Jan 23 2007, 05:53 PM dflesburg okay all my locks are set, except my 911 ignition ... Jan 23 2007, 07:22 PM markb
okay all my locks are set, except my 911 ignition... Jan 23 2007, 07:37 PM rezron Great job on the "How to " thread! ... Jan 26 2007, 10:13 PM markb Glad to hear it! This really isn't that ha... Jan 26 2007, 10:31 PM jim_hoyland I finally got my truck and glve box locks done. On... Feb 17 2007, 05:52 PM markb Since the lock cyls are curved, I would think the ... Feb 17 2007, 07:03 PM jim_hoyland Sorry, I wasn't clear. I'm asking whether ... Feb 17 2007, 09:28 PM markb Correct, the doors & ignition switch get all s... Feb 17 2007, 10:20 PM PRS914-6 Great thread......I took all my locks down to a lo... Feb 18 2007, 06:34 PM jim_hoyland My guess, having just done this is that if both ke... Feb 18 2007, 09:44 PM markb Moving on to the rear trunk lock.
You will need a ... Feb 21 2007, 01:43 PM markb Clean and re-key in the normal fashion.
Fit the me... Feb 21 2007, 01:45 PM mrhurtalot i used my cyl. from the trunk lock (got a pull cab... Feb 21 2007, 02:05 PM markb And now for the dreaded glovebox lock.
It’s a pa... Feb 21 2007, 04:22 PM markb You will need a pair of snap-ring pliers to remove... Feb 21 2007, 04:24 PM jim_hoyland Mark,
Got the hood lock in but having trouble wit... Feb 21 2007, 08:50 PM markb I'm sure the cable can be replaced. I've e... Feb 21 2007, 09:39 PM jim_hoyland That the trick I missed-leaving the sheath in plac... Feb 21 2007, 09:55 PM markb Uh-oh. :( IIRC, it will be easiest to have 2 peo... Feb 21 2007, 10:10 PM dyw914 Mark, great thread. I was disassembling my trunk ... Feb 22 2007, 12:51 PM markb
Mark, great thread. I was disassembling my trunk... Feb 22 2007, 02:21 PM 7T Porsha My handles are good...are the lock cylinders avail... Feb 22 2007, 01:19 PM markb
My handles are good...are the lock cylinders avai... Feb 22 2007, 02:23 PM 914Sixer The 75-76 steering column requires you to mark and... Feb 23 2007, 08:54 AM jim_hoyland Yup; just learned about this today.Why didthey mak... Feb 23 2007, 09:36 PM markb Jim, were you able to take any pics you could post... Feb 24 2007, 12:46 AM bd1308 A dremel makes any key suddenly work.
I took the ... Feb 23 2007, 02:11 PM markb I guess it's time for a little update. I final... Jun 14 2007, 11:22 PM orange914 not trying to hijack the thread but have a door lo... Jun 14 2007, 11:43 PM markb It sounds like you need to clean & lube everyt... Jun 14 2007, 11:47 PM orange914
It sounds like you need to clean & lube every... Jun 15 2007, 12:23 AM markb I bet the edges of the tumbler have rounded off. T... Jun 15 2007, 12:27 AM markb OK, hopefully I can now finish this thread.
This i... Jun 19 2007, 01:15 PM dflesburg sweet. Jun 19 2007, 04:14 PM dflesburg oh, and Thank you Jul 6 2007, 12:16 PM markb You're welcome. :) Jul 6 2007, 04:20 PM JPB Cool thread! For the record, you can stick yo... Jul 6 2007, 06:48 PM 96740 Great thread. Someone over at 914.club gave me a l... May 12 2008, 09:05 AM PRS914-6 If you go to a locksmith and order 1 master kit yo... May 12 2008, 09:26 AM 96740
If you go to a locksmith and order 1 master kit y... May 12 2008, 01:25 PM Lavanaut The keys I bought have a 3-digit code on the tag, ... Dec 5 2008, 02:08 PM markb The tag I have here has 4 numbers. Interesting tha... Dec 5 2008, 02:13 PM nicabr Great information! :trophy: Helped me a lot w... Mar 24 2011, 07:11 AM jim_hoyland Glad this thread is available ! I just had to ... Sep 3 2016, 06:55 AM FlacaProductions I had a new key cut and it seems that it's juu... Jun 1 2019, 08:43 AM fiacra Thank you for this tutorial! All seems clearl... Jun 1 2019, 11:40 AM bbrock
Thank you for this tutorial! All seems clear... Jun 1 2019, 12:03 PM fiacra Thanks Brent! Appreciate the info. I just ca... Jun 1 2019, 01:00 PM
markb
One thing I have noticed over the years, the pins... Jan 10 2007, 10:30 PM hwgunner Mark, you are the man. I'm still going to pay... Jan 10 2007, 10:57 PM markb Ok, moving on to the ignition switch. tumbler Ther... Jan 11 2007, 07:35 PM markb At the tip of the punch, you’ll see a pin. There... Jan 11 2007, 07:40 PM markb Now you re-key the tumbler by replacing the wafers... Jan 11 2007, 07:46 PM porsche913b_sp Great Write Up, thanks. I need to get off my but a... Jan 12 2007, 09:39 AM Bartlett 914 If you have a glove box or a front trunk lock but ... Jan 12 2007, 12:48 PM markb
If you have a glove box or a front trunk lock but... Jan 13 2007, 01:35 AM evan Ok, so now after reading all this, I feel confiden... Jan 13 2007, 02:11 PM markb Re-keying the rear trunk lock is pretty easy, so y... Jan 13 2007, 03:38 PM craig downs Excellent thread. I would like to see this make it... Jan 13 2007, 03:49 PM dflesburg 911 ignition switch? Jan 13 2007, 10:20 PM markb I've done an SC switch. Maybe after all the 91... Jan 13 2007, 10:24 PM So.Cal.914 Thanks, informative thread. Jan 14 2007, 12:30 AM DEC I love this place.... :wub:
Thanks for sharing, v... Jan 14 2007, 07:41 AM r_towle get off your ass and do the rest of the locks...co... Jan 16 2007, 01:54 PM markb Geez, pushy! :D
I'm waiting for an ear... Jan 16 2007, 02:32 PM Instru-Mental Thanks Mark!
This was an awesome thread. I ex... Jan 16 2007, 03:25 PM r_towle I did one better...
This thread inspired me.
I we... Jan 16 2007, 03:31 PM John I've been following along this thread and ther... Jan 16 2007, 04:19 PM markb I'm really glad this is making sense, I'm ... Jan 16 2007, 09:28 PM markb The Early Switch
Since these are quite a bit diff... Jan 23 2007, 05:18 PM markb Now you can get to the housing. This housing has t... Jan 23 2007, 05:24 PM markb The Later (75-76) Switch
On this one, it seems th... Jan 23 2007, 05:30 PM markb Here is the pin that needs to be pushed through.
... Jan 23 2007, 05:36 PM markb Now you have the tumbler apart.
Notice the 2 pins... Jan 23 2007, 05:41 PM markb Once the front part is on, put the spring and rear... Jan 23 2007, 05:46 PM markb The Front Trunk Lock
I did not have a key for thi... Jan 23 2007, 05:49 PM markb Note the locking pin, it needs go back in the same... Jan 23 2007, 05:53 PM dflesburg okay all my locks are set, except my 911 ignition ... Jan 23 2007, 07:22 PM markb
okay all my locks are set, except my 911 ignition... Jan 23 2007, 07:37 PM rezron Great job on the "How to " thread! ... Jan 26 2007, 10:13 PM markb Glad to hear it! This really isn't that ha... Jan 26 2007, 10:31 PM jim_hoyland I finally got my truck and glve box locks done. On... Feb 17 2007, 05:52 PM markb Since the lock cyls are curved, I would think the ... Feb 17 2007, 07:03 PM jim_hoyland Sorry, I wasn't clear. I'm asking whether ... Feb 17 2007, 09:28 PM markb Correct, the doors & ignition switch get all s... Feb 17 2007, 10:20 PM PRS914-6 Great thread......I took all my locks down to a lo... Feb 18 2007, 06:34 PM jim_hoyland My guess, having just done this is that if both ke... Feb 18 2007, 09:44 PM markb Moving on to the rear trunk lock.
You will need a ... Feb 21 2007, 01:43 PM markb Clean and re-key in the normal fashion.
Fit the me... Feb 21 2007, 01:45 PM mrhurtalot i used my cyl. from the trunk lock (got a pull cab... Feb 21 2007, 02:05 PM markb And now for the dreaded glovebox lock.
It’s a pa... Feb 21 2007, 04:22 PM markb You will need a pair of snap-ring pliers to remove... Feb 21 2007, 04:24 PM jim_hoyland Mark,
Got the hood lock in but having trouble wit... Feb 21 2007, 08:50 PM markb I'm sure the cable can be replaced. I've e... Feb 21 2007, 09:39 PM jim_hoyland That the trick I missed-leaving the sheath in plac... Feb 21 2007, 09:55 PM markb Uh-oh. :( IIRC, it will be easiest to have 2 peo... Feb 21 2007, 10:10 PM dyw914 Mark, great thread. I was disassembling my trunk ... Feb 22 2007, 12:51 PM markb
Mark, great thread. I was disassembling my trunk... Feb 22 2007, 02:21 PM 7T Porsha My handles are good...are the lock cylinders avail... Feb 22 2007, 01:19 PM markb
My handles are good...are the lock cylinders avai... Feb 22 2007, 02:23 PM 914Sixer The 75-76 steering column requires you to mark and... Feb 23 2007, 08:54 AM jim_hoyland Yup; just learned about this today.Why didthey mak... Feb 23 2007, 09:36 PM markb Jim, were you able to take any pics you could post... Feb 24 2007, 12:46 AM bd1308 A dremel makes any key suddenly work.
I took the ... Feb 23 2007, 02:11 PM markb I guess it's time for a little update. I final... Jun 14 2007, 11:22 PM orange914 not trying to hijack the thread but have a door lo... Jun 14 2007, 11:43 PM markb It sounds like you need to clean & lube everyt... Jun 14 2007, 11:47 PM orange914
It sounds like you need to clean & lube every... Jun 15 2007, 12:23 AM markb I bet the edges of the tumbler have rounded off. T... Jun 15 2007, 12:27 AM markb OK, hopefully I can now finish this thread.
This i... Jun 19 2007, 01:15 PM dflesburg sweet. Jun 19 2007, 04:14 PM dflesburg oh, and Thank you Jul 6 2007, 12:16 PM markb You're welcome. :) Jul 6 2007, 04:20 PM JPB Cool thread! For the record, you can stick yo... Jul 6 2007, 06:48 PM 96740 Great thread. Someone over at 914.club gave me a l... May 12 2008, 09:05 AM PRS914-6 If you go to a locksmith and order 1 master kit yo... May 12 2008, 09:26 AM 96740
If you go to a locksmith and order 1 master kit y... May 12 2008, 01:25 PM Lavanaut The keys I bought have a 3-digit code on the tag, ... Dec 5 2008, 02:08 PM markb The tag I have here has 4 numbers. Interesting tha... Dec 5 2008, 02:13 PM nicabr Great information! :trophy: Helped me a lot w... Mar 24 2011, 07:11 AM jim_hoyland Glad this thread is available ! I just had to ... Sep 3 2016, 06:55 AM FlacaProductions I had a new key cut and it seems that it's juu... Jun 1 2019, 08:43 AM fiacra Thank you for this tutorial! All seems clearl... Jun 1 2019, 11:40 AM bbrock
Thank you for this tutorial! All seems clear... Jun 1 2019, 12:03 PM fiacra Thanks Brent! Appreciate the info. I just ca... Jun 1 2019, 01:00 PM  |
4 User(s) are reading this topic (4 Guests and 0 Anonymous Users)
0 Members:

|
Lo-Fi Version | Time is now: 9th June 2026 - 12:33 AM |
Invision Power Board
v9.1.4 © 2026 IPS, Inc.