|
|
|
Porsche, and the Porsche crest are registered trademarks of Dr. Ing. h.c. F. Porsche AG.
This site is not affiliated with Porsche in any way. Its only purpose is to provide an online forum for car enthusiasts. All other trademarks are property of their respective owners. |
|
|


| Greenguy |
 Feb 5 2007, 10:20 PM Feb 5 2007, 10:20 PM
Post
#1
|
|
Member  Group: Members Posts: 51 Joined: 29-December 06 From: Clovis, CA Member No.: 7,402 |
Decided to use aircraft safety wire instead of welding…pictures detail the repair. The repair itself took about 30 min.
Attached image(s) 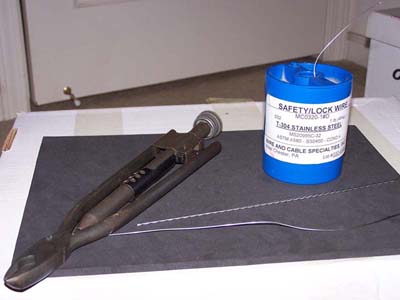 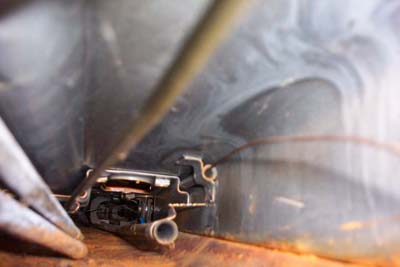 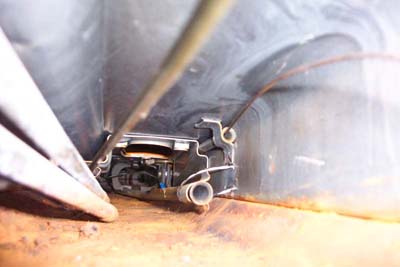 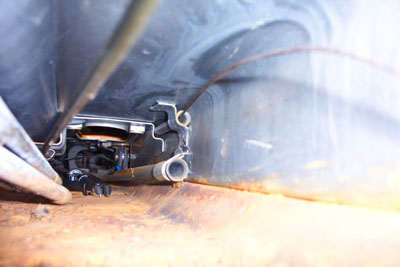 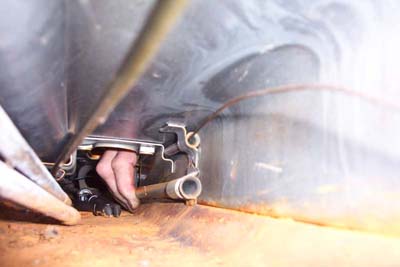 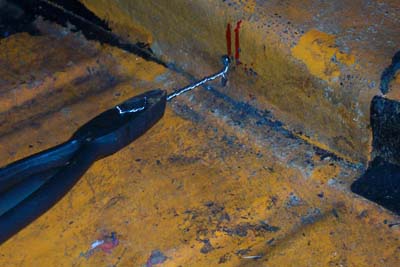 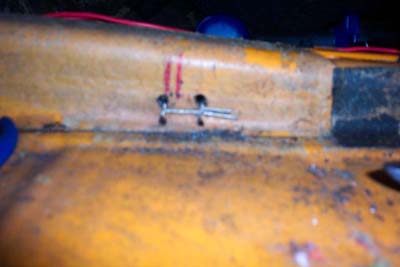 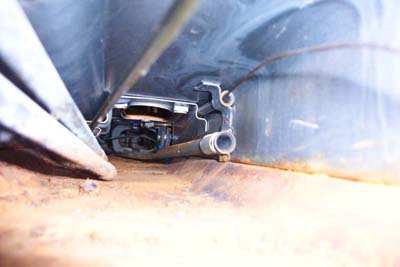
|
   |

 
|
  |
Replies(1 - 19)
| So.Cal.914 |
Feb 5 2007, 10:24 PM
Post
#2
|
|
"...And it has a front trunk too." Group: Members Posts: 6,588 Joined: 15-February 04 From: Low Desert, CA./ Hills of N.J. Member No.: 1,658 Region Association: None |
I love the pics, wire will work for a while as a temp fix. Good idea.
|
|
|
|
| ws91420 |
Feb 5 2007, 10:25 PM
Post
#3
|
|
Yes I have one a Lensley 914 Group: Members Posts: 2,063 Joined: 10-September 03 From: Ruther Glen,VA (halfway between sticks and civilization) Member No.: 1,137 Region Association: MidAtlantic Region |
Good outside the box thinking. (IMG:style_emoticons/default/clap56.gif)
|
|
|
|
| Brian_Boss |
Feb 5 2007, 10:26 PM
Post
#4
|
|
Member Group: Members Posts: 324 Joined: 3-June 03 From: Dallas, TX Member No.: 781 |
How did you take those pics?
Let us know how your repair holds up. |
|
|
|
| Greenguy |
Feb 5 2007, 10:32 PM
Post
#5
|
|
Member Group: Members Posts: 51 Joined: 29-December 06 From: Clovis, CA Member No.: 7,402 |
QUOTE(So.Cal.914 @ Feb 5 2007, 08:24 PM)  I love the pics, wire will work for a while as a temp fix. Good idea. My bet is the the braided stainless steel safety wire will last longer than the original weld did, I hope anyway. |
|
|
|
| Greenguy |
Feb 5 2007, 10:34 PM
Post
#6
|
|
Member Group: Members Posts: 51 Joined: 29-December 06 From: Clovis, CA Member No.: 7,402 |
QUOTE(Brian_Boss @ Feb 5 2007, 08:26 PM) How did you take those pics? Let us know how your repair holds up. Once you get the pedal cluster out there is enough room to get a small camera inside the tunnel |
|
|
|
| So.Cal.914 |
Feb 5 2007, 10:35 PM
Post
#7
|
|
"...And it has a front trunk too." Group: Members Posts: 6,588 Joined: 15-February 04 From: Low Desert, CA./ Hills of N.J. Member No.: 1,658 Region Association: None |
|
|
|
|
| ClayPerrine |
Feb 5 2007, 10:38 PM
Post
#8
|
|
Life's been good to me so far..... Group: Admin Posts: 15,469 Joined: 11-September 03 From: Hurst, TX. Member No.: 1,143 Region Association: NineFourteenerVille |
QUOTE(Greenguy @ Feb 5 2007, 10:34 PM) QUOTE(Brian_Boss @ Feb 5 2007, 08:26 PM) How did you take those pics? Let us know how your repair holds up. Once you get the pedal cluster out there is enough room to get a small camera inside the tunnel I was going to bet on a borescope (I so want one.. (IMG:style_emoticons/default/drooley.gif) ) |
|
|
|
| Greenguy |
Feb 5 2007, 10:43 PM
Post
#9
|
|
Member Group: Members Posts: 51 Joined: 29-December 06 From: Clovis, CA Member No.: 7,402 |
QUOTE(So.Cal.914 @ Feb 5 2007, 08:35 PM) Thanks for the welcome...awesome care, awesome board |
|
|
|
| SirAndy |
Feb 5 2007, 10:51 PM
Post
#10
|
|
Resident German Group: Admin Posts: 41,643 Joined: 21-January 03 From: Oakland, Kalifornia Member No.: 179 Region Association: Northern California |
(IMG:style_emoticons/default/smilie_pokal.gif)
now, get a gallon of metal ready and spray the heck out of that tunnel before that surface rust spreads any further .. (IMG:style_emoticons/default/cool_shades.gif) Andy PS: (IMG:style_emoticons/default/welcome.png) |
|
|
|
| Cap'n Krusty |
Feb 5 2007, 11:52 PM
Post
#11
|
|
Cap'n Krusty Group: Members Posts: 10,794 Joined: 24-June 04 From: Santa Maria, CA Member No.: 2,246 Region Association: Central California |
Perhaps you can tell me how that will stop the longitudinal movement? You know, the movement that causes the rear weld to break? Excuse my Krusty welcome, but that's just me, the guy with an attitude. My experience (34 years of teeners) tells me your efforts, clever as they may be, aren't gonna prevent further damage. Nice pix, though. The Cap'n
|
|
|
|
| DerekKim |
Feb 5 2007, 11:55 PM
Post
#12
|
|
Member Group: Members Posts: 387 Joined: 27-August 04 From: Gulfport, MS Member No.: 2,635 |
Lol or you can do what I did which is what the guy before me did... Take a hose clamp to it... same idea different thing used. Hopefully it will hold up. How the heck would you spray all of the tunnel with a coat? Mine is hecka rusty too!
|
|
|
|
| Greenguy |
Feb 6 2007, 12:05 AM
Post
#13
|
|
Member Group: Members Posts: 51 Joined: 29-December 06 From: Clovis, CA Member No.: 7,402 |
QUOTE(Cap'n Krusty @ Feb 5 2007, 09:52 PM) Perhaps you can tell me how that will stop the longitudinal movement? You know, the movement that causes the rear weld to break? Excuse my Krusty welcome, but that's just me, the guy with an attitude. My experience (34 years of teeners) tells me your efforts, clever as they may be, aren't gonna prevent further damage. Nice pix, though. The Cap'n I worried about that as well. The middle weld and the firewall weld on my clutch tube seem to be good as there was no longitudinal movement with the tube. When I installed the safety wire I secured one strand in front of the forward bracket and one strand aft of the bracket thinking that this would also prevent longitudinal movement. About 1000 miles so far and the clutch performs wonderfully, but you may be right, I'll keep you posted |
|
|
|
| Hammy |
Feb 6 2007, 02:23 AM
Post
#14
|
|
mr. Wonderful Group: Members Posts: 1,826 Joined: 20-October 04 From: Columbia, California Member No.: 2,978 Region Association: Northern California |
QUOTE(DerekKim @ Feb 5 2007, 09:55 PM) Lol or you can do what I did which is what the guy before me did... Take a hose clamp to it... same idea different thing used. Hopefully it will hold up. How the heck would you spray all of the tunnel with a coat? Mine is hecka rusty too! Metal ready or Ospho... watery like stuff. I guess you'd just spray as much as you can or leave a nice puddle of it up front and jack the car up (IMG:style_emoticons/default/biggrin.gif) |
|
|
|
| Demick |
Feb 6 2007, 09:47 AM
Post
#15
|
|
Ernie made me do it! Group: Benefactors Posts: 2,312 Joined: 6-February 03 From: Pleasanton, CA Member No.: 257 |
Good temporary fix, but I agree with the Capt'n - you will have failure of the other welds unless this one is fixed properly. What happens is that once one of the welds is broken, the longitudinal stress has to be supported by the remaining welds - so their stress level goes up, and those welds will fail. Might be 5 months, might be 5 years, but it will happen.
Great photos though!! (IMG:style_emoticons/default/clap56.gif) |
|
|
|
| pbanders |
Feb 6 2007, 10:00 AM
Post
#16
|
|
Senior Member Group: Members Posts: 939 Joined: 11-June 03 From: Phoenix, AZ Member No.: 805 |
I had mine done years ago by my mechanic in CA (Bob Grigsby). He took the shotgun approach - he welded it AND he used clamps along the length. It's never going to move again.
|
|
|
|
| John |
Feb 6 2007, 11:50 AM
Post
#17
|
|
member? what's a member? Group: Members Posts: 3,393 Joined: 30-January 04 From: Evansville, IN (SIRPCA) Member No.: 1,615 Region Association: None |
Now that the tube is pulled up tight and the bracket is located, it's a real easy job to drill 2 holes and plug weld with a MIG.
Probably won't take 1/2 hour from start to finish. You did the hard parts (location and getting the tube pulled tight against the tunnel). |
|
|
|
| Rand |
Feb 6 2007, 02:23 PM
Post
#18
|
|
Cross Member Group: Members Posts: 7,409 Joined: 8-February 05 From: OR Member No.: 3,573 Region Association: None |
It's been said clearly. What I was thinking. You did a fantastic job of securing the tube the the tunnel. But the real problem is... The actual-use tension is not sideways, it's backwards. Your fix just might hold it... But it's still a *might*. It needs some strength to handle the forward/back motion.
|
|
|
|
| Andyrew |
Feb 6 2007, 10:26 PM
Post
#19
|
|
Spooling.... Please wait Group: Members Posts: 13,376 Joined: 20-January 03 From: Riverbank, Ca Member No.: 172 Region Association: Northern California |
What John said, Although 30 mins is a little long.. I'd say 5 mins...
Do it once, Do it right, DONT blow through. I used clamps till I bought my welder, Worked just fine. |
|
|
|
| John |
Feb 6 2007, 10:31 PM
Post
#20
|
|
member? what's a member? Group: Members Posts: 3,393 Joined: 30-January 04 From: Evansville, IN (SIRPCA) Member No.: 1,615 Region Association: None |
I was giving him time to park the car, pull the carpet back, find a drill, find an extension cord, drill holes, find a vacuum, vacuum the metal shavings, find a grinder, scrape some tar off, grind a little paint, vacuum the dirt, get the welder, unroll the leads, plug in the welder, find the hood, find the gloves, turn on the gas, weld two spot welds, touch up the paint, and put everything away.
I'd say 1/2 hour. |
|
|
|
|
1 User(s) are reading this topic (1 Guests and 0 Anonymous Users)
0 Members:

|
Lo-Fi Version | Time is now: 18th May 2024 - 03:39 PM |
Invision Power Board
v9.1.4 © 2024 IPS, Inc.