|
|
|
Porsche, and the Porsche crest are registered trademarks of Dr. Ing. h.c. F. Porsche AG.
This site is not affiliated with Porsche in any way. Its only purpose is to provide an online forum for car enthusiasts. All other trademarks are property of their respective owners. |
|
|

  |

| computers4kids |
 Apr 19 2007, 05:57 PM Apr 19 2007, 05:57 PM
Post
#1
|
|
Love these little cars!  Group: Members Posts: 2,443 Joined: 11-June 05 From: Port Townsend, WA Member No.: 4,253 Region Association: None |
I can buy OEM Bosch trigger points from my porsche repair shop for $150 (ouch) or $25 from my local bug shop (aftermarket). They look the same. Has anyone had any experience with aftermarket ones?
Are they worth the effort to try ($25 ones)? |
   |

 
|
| r_towle |
Apr 19 2007, 06:03 PM
Post
#2
|
|
Custom Member Group: Members Posts: 24,574 Joined: 9-January 03 From: Taxachusetts Member No.: 124 Region Association: North East States |
are your trigger points broken?
Please take them out, test open/close with an ohm meter or test light... They are very very low voltage, so the contact (at least the ten or so that I have seen) never wear out... I have seen them set off square,,meaning the contacts dont touch square. A set of needle nose pliers can fix that. Rich |
|
|
|
| jasons |
Apr 19 2007, 06:10 PM
Post
#3
|
|
Jackstand Extraordinaire Group: Members Posts: 2,002 Joined: 19-August 04 From: Scottsdale, AZ Member No.: 2,573 Region Association: None |
I don't think the contacts are the only place they go bad.
The original set I had in my car when I bought it wouldn't open/close correctly. The contacts looked fine and tested fine out of the dizzy. But the plastic things that ride on the dizzy shaft and made the open/close action were worn out. I replaced them with the factory piece. |
|
|
|
| computers4kids |
Apr 19 2007, 06:12 PM
Post
#4
|
|
Love these little cars! Group: Members Posts: 2,443 Joined: 11-June 05 From: Port Townsend, WA Member No.: 4,253 Region Association: None |
QUOTE(r_towle @ Apr 19 2007, 05:03 PM)  are your trigger points broken? Please take them out, test open/close with an ohm meter or test light... They are very very low voltage, so the contact (at least the ten or so that I have seen) never wear out... I have seen them set off square,,meaning the contacts dont touch square. A set of needle nose pliers can fix that. Rich I have a little bit of bucking at low speeds, which from what I've read could be trigger points. I'm going to try the pot on the TS2 trick first to see if a bit richer mix solves the prob...the answer is no, I haven't even looked at them yet. Saving this for last. (Already checked out & cleaned throttle switch, grounds etc.) |
|
|
|
| r_towle |
Apr 19 2007, 06:30 PM
Post
#5
|
|
Custom Member Group: Members Posts: 24,574 Joined: 9-January 03 From: Taxachusetts Member No.: 124 Region Association: North East States |
Take them out and have a look.
I agree that the cam followers (plastic) can wear out, and actually need a bit of grease. Here is my suggestion. Trust me, it costs less than five cents. Please pay close attention as you do this so you dont drop anything. Remove the dist cap Look at were the vacuum pot is pointing and memorize the location of the distributor. Now, we are going to remove it. Take the one or two vacuum lines off the distributor, mark them if there are two, its easy to forget. Now unplug the FI trigger point, and unplug the lead that goes to the coil. Loosen the 10 adjuster that allows you to rotate the distributor, and turn the distributor clockwise till you can see the 13mm nut that clamps the distributor down. Now, go get a good light, some rags, screw driver, popsicle stick..whatever you need. Clean the whole area around that nut, and around the base of the distibutor so you can eat off of it. Make sure there is no dirt present. Loosen the nut, and remove it from the engine bay (trust me, just do it) Look for the washer that was under the nut and remove it from the engine bay..(again trust me) Now pull out the distributor, try to remember the current position, or you can twist it back to its permanent location so you only need to remember one visual...then pull it out. Now its out. Take it to a clean bench and clean all the rest of the crud off. Two screws take out the FI trigger points, do that and set them aside. Take out the screw that holds the condensor, set them aside. Remove the set of points. Now if its like mine it has two clamps still screwed in, though I have seen them use one clamp to hold the condensor also..whatever. Take out the two screws that hold the cap clamps, and notice that they are threaded into the advance plates inside the distributor, take a pic if needed so you orient that plate correctly on the way back in. There set the screws and clamps aside. Now there are two plates, hooked to the vacuum advance pot, and they are also joined together, with a very small ball bearing in between. You want to take these two plates out, clean the shit out of them, clean the ball bearing, and re-grease in between the plates. There is a some funky old grease in there that actually makes the plates hard to move when it gets hot. This resistance causes some really odd behaviour, and is a simple fix. Now, put it all back together, blow all the crap out of the lower areas, and in the FI trigger point area... Inspect and test the trigger points, but for not, do not replace them. Put it together, with new grease, not so much that it will splatter when the plates spin, but enough to let them now move freely. Put it back in the car after you are done. Word of caution. Put the distributor back in , it should be the only thing in your hands, and the only thing you focus on for that few seconds, after its in, then and only then reach for the washer and nut that hold it down. That hole is not easy to fish things out of. Rich |
|
|
|
| computers4kids |
Apr 19 2007, 08:31 PM
Post
#6
|
|
Love these little cars! Group: Members Posts: 2,443 Joined: 11-June 05 From: Port Townsend, WA Member No.: 4,253 Region Association: None |
QUOTE(r_towle @ Apr 19 2007, 05:30 PM) Take them out and have a look. I agree that the cam followers (plastic) can wear out, and actually need a bit of grease. Here is my suggestion. Trust me, it costs less than five cents. Please pay close attention as you do this so you dont drop anything. Remove the dist cap Look at were the vacuum pot is pointing and memorize the location of the distributor. Now, we are going to remove it. Take the one or two vacuum lines off the distributor, mark them if there are two, its easy to forget. Now unplug the FI trigger point, and unplug the lead that goes to the coil. Loosen the 10 adjuster that allows you to rotate the distributor, and turn the distributor clockwise till you can see the 13mm nut that clamps the distributor down. Now, go get a good light, some rags, screw driver, popsicle stick..whatever you need. Clean the whole area around that nut, and around the base of the distibutor so you can eat off of it. Make sure there is no dirt present. Loosen the nut, and remove it from the engine bay (trust me, just do it) Look for the washer that was under the nut and remove it from the engine bay..(again trust me) Now pull out the distributor, try to remember the current position, or you can twist it back to its permanent location so you only need to remember one visual...then pull it out. Now its out. Take it to a clean bench and clean all the rest of the crud off. Two screws take out the FI trigger points, do that and set them aside. Take out the screw that holds the condensor, set them aside. Remove the set of points. Now if its like mine it has two clamps still screwed in, though I have seen them use one clamp to hold the condensor also..whatever. Take out the two screws that hold the cap clamps, and notice that they are threaded into the advance plates inside the distributor, take a pic if needed so you orient that plate correctly on the way back in. There set the screws and clamps aside. Now there are two plates, hooked to the vacuum advance pot, and they are also joined together, with a very small ball bearing in between. You want to take these two plates out, clean the shit out of them, clean the ball bearing, and re-grease in between the plates. There is a some funky old grease in there that actually makes the plates hard to move when it gets hot. This resistance causes some really odd behaviour, and is a simple fix. Now, put it all back together, blow all the crap out of the lower areas, and in the FI trigger point area... Inspect and test the trigger points, but for not, do not replace them. Put it together, with new grease, not so much that it will splatter when the plates spin, but enough to let them now move freely. Put it back in the car after you are done. Word of caution. Put the distributor back in , it should be the only thing in your hands, and the only thing you focus on for that few seconds, after its in, then and only then reach for the washer and nut that hold it down. That hole is not easy to fish things out of. Rich Rich...thank your excellent directions...I loved the part where you are preparing yourself so that NOTHING can fall down the "black hole."...that would be too much fun. I had a spare bosch distributor on my spare motor so I went ahead and did everything noted above...except one small problem. You know that black ball bearing...it took off like a rocket when I turned the plates to remove them (IMG:style_emoticons/default/headbang.gif) I'll have to see if I can find one from someones junk distributor...that thing was history...even after carefully searching for 30 minutes. Should the plates just lift out at this point...I can't see anything holding them in? The trigger points also only come out the side of the distributor partway as well. I'm assuming once the plates come out, the trigger points will be free to come out as well. |
|
|
|
| orthobiz |
Apr 19 2007, 08:48 PM
Post
#7
|
|
Senior Member Group: Members Posts: 1,754 Joined: 8-January 07 From: Cadillac, Michigan Member No.: 7,438 Region Association: Upper MidWest |
Is this a classic thread?
Paul |
|
|
|
| SLITS |
Apr 19 2007, 11:17 PM
Post
#8
|
|
"This Utah shit is HARSH!" Group: Benefactors Posts: 13,602 Joined: 22-February 04 From: SoCal Mountains ... Member No.: 1,696 Region Association: None |
The trigger points also only come out the side of the distributor partway as well. I'm assuming once the plates come out, the trigger points will be free to come out as well.
You should be able to pull the trigger points out now. The shaft is another cam that opens and closes the trigger points. Rotate the shaft and pull them out, |
|
|
|
| r_towle |
Apr 19 2007, 11:22 PM
Post
#9
|
|
Custom Member Group: Members Posts: 24,574 Joined: 9-January 03 From: Taxachusetts Member No.: 124 Region Association: North East States |
That was all from memory...
So, the plates should come out if the screws that hold them in are removed, and the vacuum advance is removed, along with the rod from the vacuum advance. They are just resting in there now..I think... If you get stuck I have a few old ones, I will go look.. If you need that ball, let me know..it has happened to me also..I have a few extras I got at the local hardware store that sells individual balls...pretty cool place.. I forgot to add this thought. I take my distributor out to install new points cause I find it so so so much easier to set the point gap with it in my hands.. So at least for this project, put the points in before you re-install it, its really simple to get them almost perfect... Do check the timing. Do check the dwell (first) Rich |
|
|
|
| URY914 |
Apr 20 2007, 08:25 AM
Post
#10
|
|
I built the lightest 914 in the history of mankind. Group: Members Posts: 120,693 Joined: 3-February 03 From: Jacksonville, FL Member No.: 222 Region Association: None |
I FINALLY get to post this picture. I found it months ago and been waiting to use it...
Attached image(s) 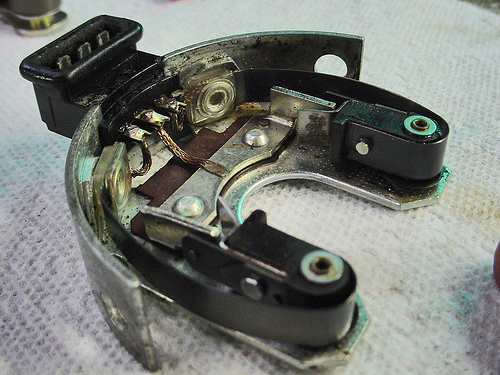
|
 |
|
| computers4kids |
Apr 20 2007, 09:36 AM
Post
#11
|
|
Love these little cars! Group: Members Posts: 2,443 Joined: 11-June 05 From: Port Townsend, WA Member No.: 4,253 Region Association: None |
QUOTE(URY914 @ Apr 20 2007, 07:25 AM) I FINALLY get to post this picture. I found it months ago and been waiting to use it... Attached image(s) 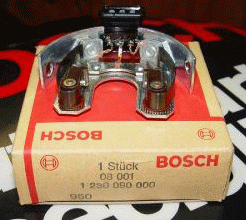
|
|
|
|
|
1 User(s) are reading this topic (1 Guests and 0 Anonymous Users)
0 Members:

|
Lo-Fi Version | Time is now: 19th May 2024 - 05:46 AM |
Invision Power Board
v9.1.4 © 2024 IPS, Inc.