Home  |  Forums  |  914 Info  |  Blogs
 
914World.com - The fastest growing online 914 community!
 
Porsche, and the Porsche crest are registered trademarks of Dr. Ing. h.c. F. Porsche AG. This site is not affiliated with Porsche in any way.
Its only purpose is to provide an online forum for car enthusiasts. All other trademarks are property of their respective owners.
 

Welcome Guest ( Log In | Register )

 
Reply to this topicStart new topic
> AAR Repair, how I did it.
blitZ
post Apr 20 2007, 08:24 PM
Post #1


Beer please...
****

Group: Members
Posts: 2,223
Joined: 31-August 05
From: Lawrenceville, GA
Member No.: 4,719
Region Association: South East States


I've been attempting to find a good used AAR, as others have, and have had no luck. So, I decided to fix the darn thing. It's actually a simple device. I believe typically two things go wrong.

1) The insulation between the housing breaks causing a short. This causes the fuse it shares with the fuel pump to blow, which causes the car to come to a discouraging halt.

2) The tube with the slot port gets stuck and won't close.

If your insulation is still good, but the port won't close, you may be able to free it by removing the pipe, squirting in your favorite solvent: PB Blaster, WD-40, vodka, etc. Work the tube back and forth to free it up. I was unable to do this and needed to repair the wire, so I opened it up by grinding off the lip of the bottom housing with my Dremel.


Attached image(s)
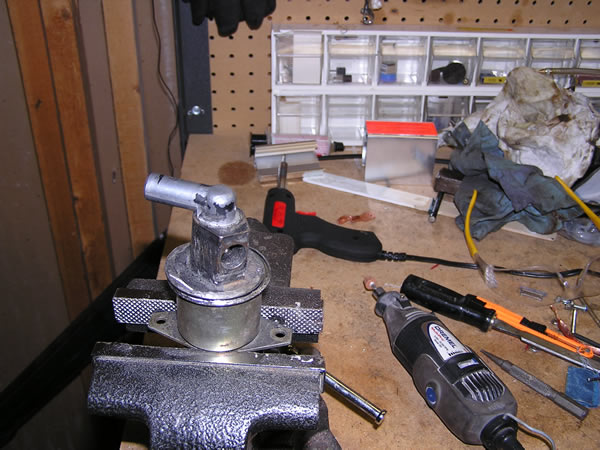
Attached Image
User is offlineProfile CardPM
Go to the top of the page
+Quote Post
blitZ
post Apr 20 2007, 08:26 PM
Post #2


Beer please...
****

Group: Members
Posts: 2,223
Joined: 31-August 05
From: Lawrenceville, GA
Member No.: 4,719
Region Association: South East States


Once, the top is off you can see the inards. Basically a ceramic base with a simple heating coil on the bottom.


Attached image(s)
Attached Image
User is offlineProfile CardPM
Go to the top of the page
+Quote Post
blitZ
post Apr 20 2007, 08:28 PM
Post #3


Beer please...
****

Group: Members
Posts: 2,223
Joined: 31-August 05
From: Lawrenceville, GA
Member No.: 4,719
Region Association: South East States


The top has a spring like piece attached to the tube which expands when heated and gradually closes the port.


Attached image(s)
Attached Image
User is offlineProfile CardPM
Go to the top of the page
+Quote Post
blitZ
post Apr 20 2007, 08:30 PM
Post #4


Beer please...
****

Group: Members
Posts: 2,223
Joined: 31-August 05
From: Lawrenceville, GA
Member No.: 4,719
Region Association: South East States


Next, drill out the rivets on the bottom. The center one holds the ceramic base to the housing, the other is the ground. The wire piece can be clipped off with wire cutters.


Attached image(s)
Attached Image
User is offlineProfile CardPM
Go to the top of the page
+Quote Post
blitZ
post Apr 20 2007, 08:31 PM
Post #5


Beer please...
****

Group: Members
Posts: 2,223
Joined: 31-August 05
From: Lawrenceville, GA
Member No.: 4,719
Region Association: South East States


Under the ceramic base is a heat shield and a nub of the remaining hot lead.


Attached image(s)
Attached Image
User is offlineProfile CardPM
Go to the top of the page
+Quote Post
blitZ
post Apr 20 2007, 08:34 PM
Post #6


Beer please...
****

Group: Members
Posts: 2,223
Joined: 31-August 05
From: Lawrenceville, GA
Member No.: 4,719
Region Association: South East States


The wire repair involved tinning the wires back together and covering with some shrink tubing. I added a little sillycon around the shrink tubing and the ceramic base to prevent any possible short.


Attached image(s)
Attached Image Attached Image
User is offlineProfile CardPM
Go to the top of the page
+Quote Post
Pat Garvey
post Apr 20 2007, 08:35 PM
Post #7


Do I or don't I...........?
*****

Group: Members
Posts: 5,899
Joined: 24-March 06
From: SE PA, near Philly
Member No.: 5,765
Region Association: North East States


Looks cool so far. More to follow?
User is offlineProfile CardPM
Go to the top of the page
+Quote Post
blitZ
post Apr 20 2007, 08:37 PM
Post #8


Beer please...
****

Group: Members
Posts: 2,223
Joined: 31-August 05
From: Lawrenceville, GA
Member No.: 4,719
Region Association: South East States


Place the ceramic base back into the bottom, lining the holes up. I used a pop rivet to secure it. Some solder was melted into the ground hole to secure the ground pole to the casing.


Attached image(s)
Attached Image
User is offlineProfile CardPM
Go to the top of the page
+Quote Post
blitZ
post Apr 20 2007, 08:39 PM
Post #9


Beer please...
****

Group: Members
Posts: 2,223
Joined: 31-August 05
From: Lawrenceville, GA
Member No.: 4,719
Region Association: South East States


I have a portable compressor with a 12v supply I used to test. You should be able to feel the base heat up and watch the port gradually close. I secured the top back on with a little wire. It will be easier to get back into if another repair is required. It's working fine so far. I think it's possible the heating coil could break, however it could be easily replace with a little solder work.

Hope this helps someone.


Attached image(s)
Attached Image
User is offlineProfile CardPM
Go to the top of the page
+Quote Post
smooth_eddy
post Apr 20 2007, 10:02 PM
Post #10


Senior Member
***

Group: Members
Posts: 535
Joined: 13-November 04
From: Seattle
Member No.: 3,102


Nice work (IMG:style_emoticons/default/clap56.gif)

I have wondered about my AAR valve. I pulled mine off and bench tested it with a 12V battery charger. I noticed that the valve only closed about 3/4 of the way. I blasted it several times with PB Blaster lubricant but no change. I even let is soak overnight with still no change. Is a 2.0 liter AAR supposed to close 100% when warm? (IMG:style_emoticons/default/confused24.gif)

Eddy
User is offlineProfile CardPM
Go to the top of the page
+Quote Post
computers4kids
post Apr 20 2007, 10:27 PM
Post #11


Love these little cars!
****

Group: Members
Posts: 2,443
Joined: 11-June 05
From: Port Townsend, WA
Member No.: 4,253
Region Association: None


QUOTE(blitZ @ Apr 20 2007, 07:24 PM) *

I've been attempting to find a good used AAR, as others have, and have had no luck. So, I decided to fix the darn thing. It's actually a simple device. I believe typically two things go wrong.


Thanks for the tutorial...I vote for "classic thread status!" Actually, looks pretty staight forward...let us know how it holds up.
Mark
User is offlineProfile CardPM
Go to the top of the page
+Quote Post
McMark
post Apr 20 2007, 10:45 PM
Post #12


914 Freak!
***************

Group: Retired Admin
Posts: 20,179
Joined: 13-March 03
From: Grand Rapids, MI
Member No.: 419
Region Association: None


Not just a classic, a new tech article. (IMG:style_emoticons/default/wink.gif)
User is offlineProfile CardPM
Go to the top of the page
+Quote Post
Air_Cooled_Nut
post Apr 20 2007, 11:21 PM
Post #13


914 Ronin - 914 owner who lost his 914club.com
***

Group: Members
Posts: 1,748
Joined: 19-April 03
From: Beaverton, Oregon
Member No.: 584
Region Association: None


Good info. Goes good with what has already been seen:
http://www.914world.com/bbs2/index.php?act...f=2&t=39113
User is offlineProfile CardPM
Go to the top of the page
+Quote Post
smooth_eddy
post Apr 21 2007, 04:53 PM
Post #14


Senior Member
***

Group: Members
Posts: 535
Joined: 13-November 04
From: Seattle
Member No.: 3,102


(IMG:style_emoticons/default/icon_bump.gif)
User is offlineProfile CardPM
Go to the top of the page
+Quote Post
pbanders
post Apr 21 2007, 05:38 PM
Post #15


Senior Member
***

Group: Members
Posts: 939
Joined: 11-June 03
From: Phoenix, AZ
Member No.: 805


Since you already pulled off the side port, I suggest removing the top port, too. This lets you remove the rotating cylinder, enabling you to clean the bore completely. Make sure when you're removing the bimetallic coil that you mark the position - this determines the "calibration" of the AAR.
User is offlineProfile CardPM
Go to the top of the page
+Quote Post
blitZ
post Apr 21 2007, 08:20 PM
Post #16


Beer please...
****

Group: Members
Posts: 2,223
Joined: 31-August 05
From: Lawrenceville, GA
Member No.: 4,719
Region Association: South East States


I actually played around with the calibration as to how long I wanted the high idle to last. Things change after 30 years. The heat coil doesn't heat up as fast as it used to and the bi-metal coil has been through umpteen heat cycles. YMMV

I was just glad to get a working unit, again.
User is offlineProfile CardPM
Go to the top of the page
+Quote Post
Brian_Boss
post Apr 21 2007, 08:39 PM
Post #17


Member
**

Group: Members
Posts: 324
Joined: 3-June 03
From: Dallas, TX
Member No.: 781


QUOTE(blitZ @ Apr 20 2007, 09:30 PM) *

Next, drill out the rivets on the bottom. The center one holds the ceramic base to the housing, the other is the ground. The wire piece can be clipped off with wire cutters.


Be ready to catch the innards, including the fragile ceramic insulator, when you drill this rivet. Otherwise, the insulator will fall to the concrete shop floor and shatter into countless tiny pieces, or so I hear.
User is offlineProfile CardPM
Go to the top of the page
+Quote Post
TravisNeff
post May 17 2007, 06:31 PM
Post #18


914 Guru
*****

Group: Members
Posts: 5,082
Joined: 20-March 03
From: Mesa, AZ
Member No.: 447
Region Association: Southwest Region


Bump for Shaggy. (IMG:style_emoticons/default/smile.gif)
User is offlineProfile CardPM
Go to the top of the page
+Quote Post
shaggy
post May 17 2007, 06:37 PM
Post #19


mechanic/welder/fabricator
***

Group: Members
Posts: 702
Joined: 26-September 05
From: Gilbert, AZ
Member No.: 4,869
Region Association: None


thanks

ill be atempting this later with both of mine.
User is offlineProfile CardPM
Go to the top of the page
+Quote Post
tdgray
post May 17 2007, 06:53 PM
Post #20


Thank God Nemo is not here to see this
*****

Group: Members
Posts: 9,705
Joined: 5-August 03
From: Akron, OH
Member No.: 984
Region Association: None


Missed this one.... excellent tech tip. Bravo my man.
User is offlineProfile CardPM
Go to the top of the page
+Quote Post

Reply to this topicStart new topic
1 User(s) are reading this topic (1 Guests and 0 Anonymous Users)
0 Members:


- Lo-Fi Version Time is now: 21st May 2024 - 07:04 PM