|
|
|
Porsche, and the Porsche crest are registered trademarks of Dr. Ing. h.c. F. Porsche AG.
This site is not affiliated with Porsche in any way. Its only purpose is to provide an online forum for car enthusiasts. All other trademarks are property of their respective owners. |
|
|

  |

| tracks914 |
 May 12 2007, 11:24 AM May 12 2007, 11:24 AM
Post
#1
|
|
Canadian Member  Group: Benefactors Posts: 2,083 Joined: 15-January 03 From: Timmins, Ontario, Canada Member No.: 153 Region Association: None |
Last year when I was adjusting my clutch I got to a point where the clutch pedal was engaging at the right spot but if I pushed it any further it would get REALLY easy as if I went past the center point of the clutch springs. When I let it out it engages OK but I always have this feeling that I am going to run out of disk soon.
I got a new disk and was getting ready to put it in. I pulled the tranny this AM and took the clutch apart. I took the old one out and found it was almost as thick as the new one. New one .380" - 9.60mm old one .375" - 9.45mm. Now I measured the depth of my flywheel from the plain where the clutch assemby bolts on (shoulder) to the running surface of the flywheel. The one on the car .940". The spare I have .890" - .050" difference. Then I measured the clutch assemblies pressure plate thickness. .380" - .388" and .390". Then I measured the clutch assemblies from the bolt mating surface to the pressure surface. .670" - .650" and .665". All the clutch parts look in good shape. The only wear is on the one I took off the car, the springs are slightly worn where the pilot bearing rides on it. Now I am going over to my shop to measure the flywheel on my torn apart project car. Anyone have any numbers on the topic that can help? I want to add, I did both clutch tube repairs 2 years ago so I am not getting cable stretch in the tunnel. Thanks |
   |

 
|
| tracks914 |
May 13 2007, 09:40 AM
Post
#2
|
|
Canadian Member Group: Benefactors Posts: 2,083 Joined: 15-January 03 From: Timmins, Ontario, Canada Member No.: 153 Region Association: None |
I've got some more numbers for the clutch guru's.
I put my Fly Wheel (spare) in the drill press and placed each of the 3 spring plates in the pressure plate. I Used the arbor of the drill press starting from the point it touched the spring and measured the travel of each plate before it got past the spring center point. Old Clutch off DD car - 3/8" Old spare from storage - 3/8" Clutch off project car - 1/2" It would be nice to know what a new one is but I think for now I will put the 1/2" one back in the car. |
|
|
|
| r_towle |
May 13 2007, 10:13 AM
Post
#3
|
|
Custom Member Group: Members Posts: 24,574 Joined: 9-January 03 From: Taxachusetts Member No.: 124 Region Association: North East States |
sounds like the original one you had in the car was a re-machined flywheel.
Please use the same terms, you are confusing me. We have a few parts. Flywheel Pressure Plate Clutch Disk Throw Out Bearing Now, for the flywheel you have in the car, you need to shim the clutch fork pivot bolt out the same amount as the difference that was machined on the flywheel. The flywheel bolts to the motor at the crankshaft. The pressure plate is bolted to the stepped surface of the flywheel. The measurement is the total difference between the step and the surface that the clutch disk contacts. So, if I can decipher your original measurements correctly, you have to shim the clutch fork pivot 0.50 by putting a washer under it that is that size. The clutch disk is floating. The pressure plates should all be exactly the same, unless there is wear and/or differing part numbers. The clutch disk should be the same thickness. The only difference really should be the measurements of the flywheel. The key measurement can be taken from a flywheel either on or off the car. The number you are looking for is from stock and then from your flywheel. This system is unique, so once again. Where the pressure plate bolts to the flywheel , we will call that the shoulder. Where the clutch disk makes contact with the flywheel, we will call that the flywheel face. Measure from the flywheel shoulder to the flywheel face. provided you have all the correct parts, you need to shim the fork pivot to bring it back to stock. Rich |
|
|
|
| tracks914 |
May 13 2007, 11:01 AM
Post
#4
|
|
Canadian Member Group: Benefactors Posts: 2,083 Joined: 15-January 03 From: Timmins, Ontario, Canada Member No.: 153 Region Association: None |
Rich Thanks, you deciphered pretty close. The thing I wasn't clear about was this.
I have 2 (now 3) flywheels. One measures .940" from the shoulder to the flywheel face. The old spare one I have measures .890" from the shoulder to the flywheel face. The one I went to measure yesterday (on the engine out of my project car) measures .900" from the shoulder to the flywheel face. I can't see where shimming the fork would make up for a remachined flywheel unless both the shoulder and the face were machined the same amount. It appears to me I have a .050" to .060" descepancy in the 3 flywheels I have. What should it ( the distance from shoulder to face) be stock? thanks |
|
|
|
| davep |
May 13 2007, 02:45 PM
Post
#5
|
|
914 Historian Group: Benefactors Posts: 5,141 Joined: 13-October 03 From: Burford, ON, N0E 1A0 Member No.: 1,244 Region Association: Canada |
According to this .886 is correct, so the old spare is closest. The .940 is far too great.
Attached image(s) 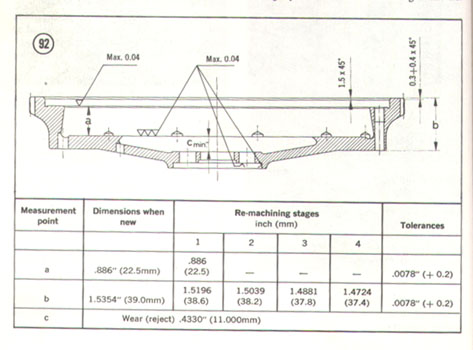
|
|
|
|
| Dr Evil |
May 13 2007, 03:20 PM
Post
#6
|
|
Send me your transmission! Group: Members Posts: 22,995 Joined: 21-November 03 From: Loveland, OH 45140 Member No.: 1,372 Region Association: MidAtlantic Region |
It looks as if on the .940 wheel the shoulder was not machined. This is a big no no and will cause unrealiable clutch engaugment and slippage. The dowel pins need to be removed and the shoulder brought into specs for it to be useable, then you need to shim the ball bolt. Shimming the bolt moves the shift fork into the same relationship as it was when the flywheel surface was farther aft with more meat when new.
|
|
|
|
| tracks914 |
May 13 2007, 03:32 PM
Post
#7
|
|
Canadian Member Group: Benefactors Posts: 2,083 Joined: 15-January 03 From: Timmins, Ontario, Canada Member No.: 153 Region Association: None |
That diagram is just what I needed. I think I will put my spare in the car and mark the old one as needing machining. (A winter project for me)
Thanks all. |
|
|
|
| Dr Evil |
May 13 2007, 03:57 PM
Post
#8
|
|
Send me your transmission! Group: Members Posts: 22,995 Joined: 21-November 03 From: Loveland, OH 45140 Member No.: 1,372 Region Association: MidAtlantic Region |
Right on.
Just FYI, and for those that may search this topic, the shimming of the ball bolt is done in regards to the change in the dimension on the far left (Max 0.04). Any increase in this dimension requires a shim of about the same size under the bolt to compensate |
|
|
|
|
1 User(s) are reading this topic (1 Guests and 0 Anonymous Users)
0 Members:

|
Lo-Fi Version | Time is now: 12th May 2024 - 11:04 PM |
Invision Power Board
v9.1.4 © 2024 IPS, Inc.