|
|
|
Porsche, and the Porsche crest are registered trademarks of Dr. Ing. h.c. F. Porsche AG.
This site is not affiliated with Porsche in any way. Its only purpose is to provide an online forum for car enthusiasts. All other trademarks are property of their respective owners. |
|
|

  |

| ConeDodger |
 Jul 4 2007, 09:11 PM Jul 4 2007, 09:11 PM
Post
#1
|
|
Apex killer!  Group: Members Posts: 23,587 Joined: 31-December 04 From: Tahoe Area Member No.: 3,380 Region Association: Northern California |
I notice that everyone seems to be doing the gas tank dance lately...
I did too. I used the POR15 kit which is a three stage treatment that cleans and eliminates rust and then coats the interior of the tank with a tough paint coating that will prevent rust from forming and seal any that had already formed. I copied an pasted all of these pictures as I didn't want my camera anywhere near me during this battle. Thanks to those who provided these... First step is to remove the tank. Hopefully, you have little if any fuel left in it. I had nearly ten gallons and it was quite an adventure getting it all out and not well... out on the floor. I have two of those 5 gallon gas containers I used to use for Jet Ski's so they did the trick... The tank is held in by a strap across the top which holds it down. It is nestled on some odd looking pillow devices meant to hold it in a position. Don't lose these. Many people attach an extra length of fuel line to the tank so the tank can be lowered in without trying to connect fuel lines through tiny holes. This is recommended. Under the tank you will find an inlet for fuel to return which will go to a line heading into the tunnel. You will also find an outlet which goes to the pump before going to the other line going through the tunnel. Just cut the hoses. You should replace them as long as you are in there. Once the tank is out you will need to remove the fittings on the bottom as well as the filler and the fuel level assy. The bolts on the top are 8mm with a washer and can be reused. Now the fun begins... Wear gloves, eye protection, and preferably a lab apron. The first step in the POR15 kit is the Marine Clean. They provide two bottles of the stuff. The instructions say to mix it in about a quart of warm water. I duct taped the fitting fixtures on the bottom and across the openings on the top. You will know if your water is too hot because it will melt the adhesive on your duct tape. Once you pour the evil stuff in, tape the opening, and slosh it around for 20 minutes or so... Two bottles at 20 minutes each and 40 minutes later you are ready for the next step... The next step is the Metal Ready. Metal Ready is an acid that dissolves rust. I poured it in full strength and taped the hole shut again. 20 minutes of sloshing and you are ready for the rinse... I spent about a 15 minutes rinsing with a hose and sloshing the water around to get all the nooks and cranies. Finally I placed the tank in a position to dry over night. In my case, actually two nights. Flash rust can occur but I am in the Central Valley of California so this was not a problem for me. It dried quite nicely with a clean metal surface. Now for the last step. Retape your fittings and cover your holes except one. Mix your US Tank Sealer Paint well and pour it in to the last opening. Tape the hole shut and carefully slosh it around until you have covered all the interior surfaces. Then, untape your holes and fittings and pour out the excess into the can and throw it away. Place your tank in a position to dry and wait 24 hours. I suggest placing it so the inlet and outlet are up somewhat to prevent the paint from clogging the openings. 24 hours or so later, you are ready to reassemble. A couple things to watch for: POR15 drys very hard. So I bought 8mm sacrificial bolts to put in the bolt holes to prevent them becoming buggered up by the paint. Once dry I just spun them out and had clean threads. A second thing to watch for is that Marine clean if left for any length of time on paint will take it off. So if you don't want to repaint the exterior of the tank tape well. Likewise, the POR15 is silver and if it gets on the exterior it will dry thick and hard and be extremely hard to get off. All that said, if I had it to do over again I would just go to a radiator shop and have them boil it out. The kit costs @ $65.00 The radiator shop is probably less. You don't have to risk chemical burns or kill your flowers, and you can still buy the POR15 paint at the paint store to do up the interior if you wish... One last comment. I found that when I click on Pelican's parts diagram feature it brings me to the exploded diagram and parts numbers. You can buy the sock, the gaskets and even some of the fittings. When on the main Porsche parts site, I didn't see the sock available. We shall see as the sock and gaskets will be delivered next week... Attached image(s) 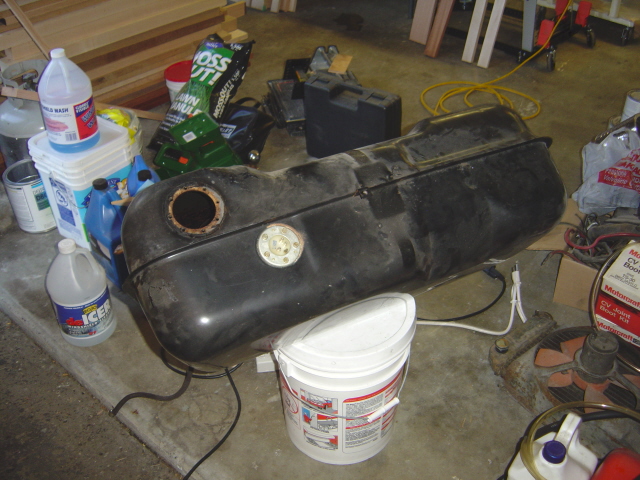
|
   |

 
|
| ConeDodger |
Jul 4 2007, 09:42 PM
Post
#2
|
|
Apex killer! Group: Members Posts: 23,587 Joined: 31-December 04 From: Tahoe Area Member No.: 3,380 Region Association: Northern California |
The top picture is of a tank that has been treated with the POR15 paint.... Notice in the cup structure which prevents fuel starvation in hard cornering that a new sock has been installed. Next to the sock is the return inlet hole...
The picture below is the same tank before the treatment. Lots of surface rust! Actually, this tank is not in bad shape! Attached image(s) 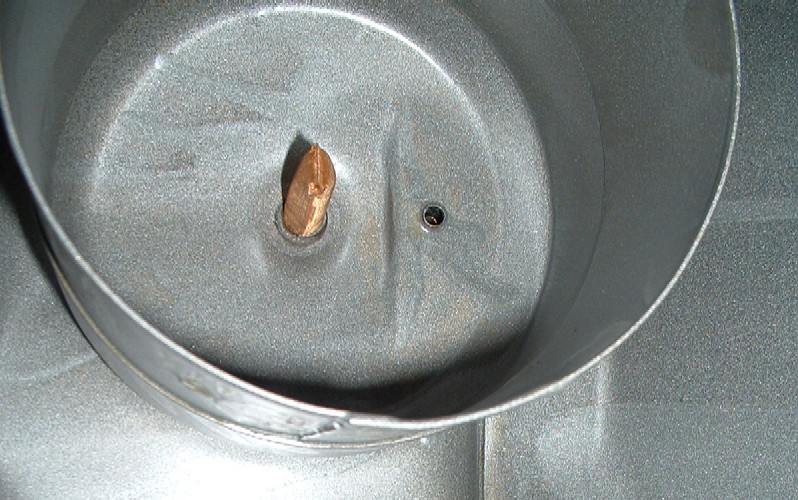 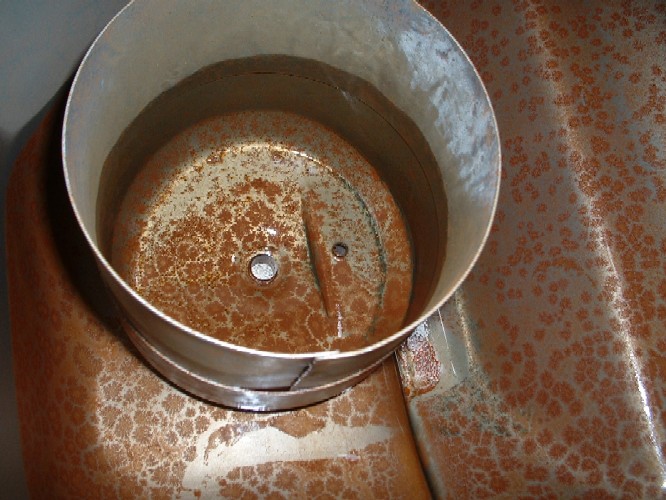
|
|
|
|
| ConeDodger |
Jul 4 2007, 09:46 PM
Post
#3
|
|
Apex killer! Group: Members Posts: 23,587 Joined: 31-December 04 From: Tahoe Area Member No.: 3,380 Region Association: Northern California |
The tank on the left is in a little worse shape then the one above with the surface rust but even this is not a terminal case.
On the right you see what happens to gas when it sits for years. Oil can be made into a number of products and some even occur naturally when the right conditions exist. In this case, we have a good start on varnish which is occuring throughout the entire fuel system from the tank, through the lines, to the injectors or carbs!!! Attached image(s) 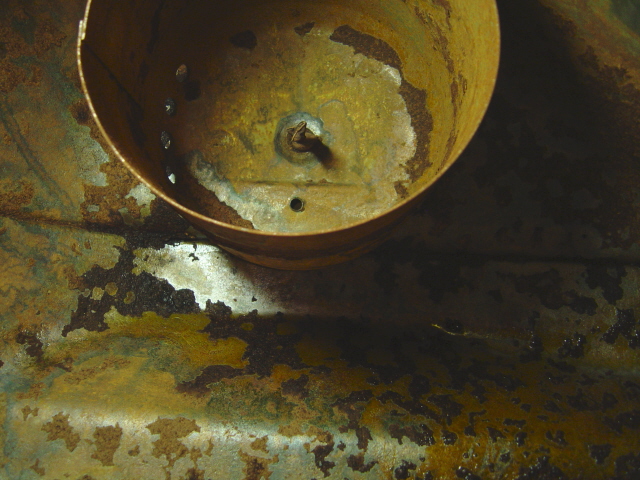 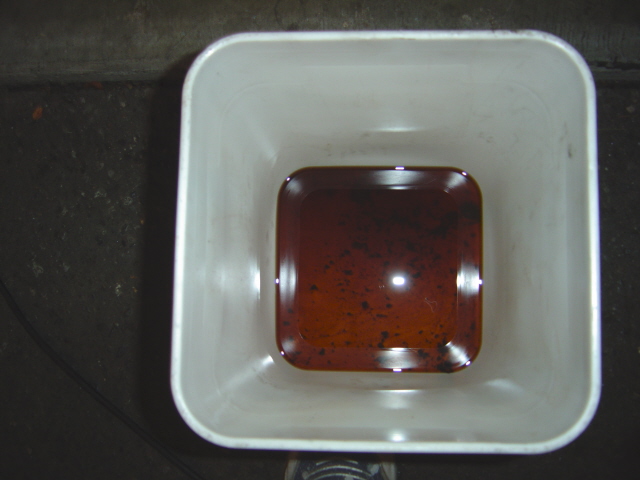
|
|
|
|
| ConeDodger |
Jul 4 2007, 09:50 PM
Post
#4
|
|
Apex killer! Group: Members Posts: 23,587 Joined: 31-December 04 From: Tahoe Area Member No.: 3,380 Region Association: Northern California |
This tank has thicker rust. But even this can be fixed.
The worst tanks will have holes that must be repaired. At that point, you need to decide if finding another tank in better shape is possible. Attached image(s) 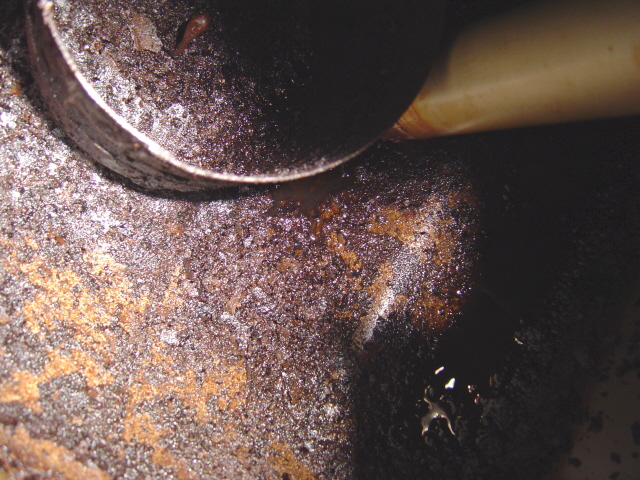
|
|
|
|
| ConeDodger |
Jul 4 2007, 09:52 PM
Post
#5
|
|
Apex killer! Group: Members Posts: 23,587 Joined: 31-December 04 From: Tahoe Area Member No.: 3,380 Region Association: Northern California |
Hopefully, this is helpful to someone. Thanks to the photographers who dared get their camera near this project!
|
|
|
|
| BahnBrenner914 |
Jul 10 2007, 02:08 AM
Post
#6
|
|
The girl is gone and all I have now is a beat-up teener Group: Members Posts: 301 Joined: 22-May 04 From: Gig Harbor and University Place, WA :: School in Angola, IN :: girlfriend in Sarasota, FL Member No.: 2,094 Region Association: None |
Keep me updated on that fuel filter sock, I need a new one too.
And I think we should have a girlfriend/wife contest (IMG:style_emoticons/default/wub.gif) (cause we'd be front runners) (IMG:style_emoticons/default/thumb3d.gif) |
|
|
|
| Krieger |
Jul 10 2007, 08:51 AM
Post
#7
|
|
Advanced Member Group: Members Posts: 4,711 Joined: 24-May 04 From: Santa Rosa CA Member No.: 2,104 Region Association: None |
I used the Eastwood kit around 1994 and have never had a clog/leak/problem. To nuetralize the acid and prevent flash rusting them recommended a Whisk detergent mixed with water. This did the trick. I used plain water at first and I DID have a problem with flash rust in sunny warm LA in the summer overnight.
|
 |
|
| ConeDodger |
Jul 10 2007, 10:34 AM
Post
#8
|
|
Apex killer! Group: Members Posts: 23,587 Joined: 31-December 04 From: Tahoe Area Member No.: 3,380 Region Association: Northern California |
QUOTE(BahnBrenner914 @ Jul 10 2007, 01:08 AM)  Keep me updated on that fuel filter sock, I need a new one too. And I think we should have a girlfriend/wife contest (IMG:style_emoticons/default/wub.gif) (cause we'd be front runners) (IMG:style_emoticons/default/thumb3d.gif) Pelican still hasn't come up with one and I didn't want to wait so I went to a local bug shop and got one. The VW part is the same at the important end, meaning the crush washer base. It is longer though which is not a bad thing. In other notes on availability, I ordered both the gaskets that go at the base of the inlet and outlet, the screen, and both gaskets for the top. So far, only the gasket that goes at the base of the fuel level sender has arrived. I have gotten email saying the two gaskets at the bottom of the tank are NLA so DON'T DESTROY YOURS!!! I will keep you updated if the filter sock arrives but like I said, the VW part works and it is about $10... Yopu is not hard to look at... That is for sure. She spends a week away for the first time since she moved in next week... It is gonna be quiet and lonely around here... (IMG:style_emoticons/default/sad.gif) |
|
|
|
| ConeDodger |
Jul 10 2007, 10:37 AM
Post
#9
|
|
Apex killer! Group: Members Posts: 23,587 Joined: 31-December 04 From: Tahoe Area Member No.: 3,380 Region Association: Northern California |
QUOTE(Krieger914 @ Jul 10 2007, 07:51 AM) I used the Eastwood kit around 1994 and have never had a clog/leak/problem. To nuetralize the acid and prevent flash rusting them recommended a Whisk detergent mixed with water. This did the trick. I used plain water at first and I DID have a problem with flash rust in sunny warm LA in the summer overnight. If I had done this project in Minnesota where I am from, I am sure that I would have had the flash rust problem. Here in California it is quite dry in the summer and I found it clean and dry with no rust after two days of sitting. Does Eastwood still sell a kit? Mine was actually a POR15 product. |
|
|
|
| dr914@autoatlanta.com |
Jul 10 2007, 06:21 PM
Post
#10
|
|
914 Guru Group: Members Posts: 7,857 Joined: 3-January 07 From: atlanta georgia Member No.: 7,418 Region Association: None |
QUOTE(ConeDodger @ Jul 10 2007, 09:34 AM) QUOTE(BahnBrenner914 @ Jul 10 2007, 01:08 AM) Keep me updated on that fuel filter sock, I need a new one too. And I think we should have a girlfriend/wife contest (IMG:style_emoticons/default/wub.gif) (cause we'd be front runners) (IMG:style_emoticons/default/thumb3d.gif) Pelican still hasn't come up with one and I didn't want to wait so I went to a local bug shop and got one. The VW part is the same at the important end, meaning the crush washer base. It is longer though which is not a bad thing. In other notes on availability, I ordered both the gaskets that go at the base of the inlet and outlet, the screen, and both gaskets for the top. So far, only the gasket that goes at the base of the fuel level sender has arrived. I have gotten email saying the two gaskets at the bottom of the tank are NLA so DON'T DESTROY YOURS!!! I will keep you updated if the filter sock arrives but like I said, the VW part works and it is about $10... Yopu is not hard to look at... That is for sure. She spends a week away for the first time since she moved in next week... It is gonna be quiet and lonely around here... (IMG:style_emoticons/default/sad.gif) both washers and the socks are readily available from 914 suppliers. |
|
|
|
| ConeDodger |
Jul 10 2007, 06:42 PM
Post
#11
|
|
Apex killer! Group: Members Posts: 23,587 Joined: 31-December 04 From: Tahoe Area Member No.: 3,380 Region Association: Northern California |
QUOTE(dr914@autoatlanta.com @ Jul 10 2007, 05:21 PM) QUOTE(ConeDodger @ Jul 10 2007, 09:34 AM) QUOTE(BahnBrenner914 @ Jul 10 2007, 01:08 AM) Keep me updated on that fuel filter sock, I need a new one too. And I think we should have a girlfriend/wife contest (IMG:style_emoticons/default/wub.gif) (cause we'd be front runners) (IMG:style_emoticons/default/thumb3d.gif) Pelican still hasn't come up with one and I didn't want to wait so I went to a local bug shop and got one. The VW part is the same at the important end, meaning the crush washer base. It is longer though which is not a bad thing. In other notes on availability, I ordered both the gaskets that go at the base of the inlet and outlet, the screen, and both gaskets for the top. So far, only the gasket that goes at the base of the fuel level sender has arrived. I have gotten email saying the two gaskets at the bottom of the tank are NLA so DON'T DESTROY YOURS!!! I will keep you updated if the filter sock arrives but like I said, the VW part works and it is about $10... Yopu is not hard to look at... That is for sure. She spends a week away for the first time since she moved in next week... It is gonna be quiet and lonely around here... (IMG:style_emoticons/default/sad.gif) both washers and the socks are readily available from 914 suppliers. George, Your answer implies that Pelican is not a 914 supplier??? So far, all that they have come up with from my order is the base gasket for the sender... You have these I take it? |
|
|
|
| Allan |
Jul 10 2007, 06:45 PM
Post
#12
|
|
Teenerless Weenie Group: Members Posts: 8,373 Joined: 5-July 04 From: Western Mesopotamia Member No.: 2,304 Region Association: Southern California |
Any bug shop can supply the sock and washer.
It's the return fitting washer that's the problem. |
|
|
|
|
1 User(s) are reading this topic (1 Guests and 0 Anonymous Users)
0 Members:

|
Lo-Fi Version | Time is now: 16th May 2024 - 09:18 AM |
Invision Power Board
v9.1.4 © 2024 IPS, Inc.